
WallPerfect W 985 E - Paint gun WAGNER - Free user manual and instructions
Find the device manual for free WallPerfect W 985 E WAGNER in PDF.

| Product type | Electric paint sprayer |
| Brand | Wagner |
| Model | WallPerfect W 985 E |
| Supply voltage | 230 V ~ |
| Power consumption | 600 W |
| Maximum product viscosity | 3500 mPas |
| Maximum flow rate | 525 ml/min |
| Sound pressure level | < 70 dB(A) |
| Vibration level | < 2.5 m/s² |
| Air hose length | 3.5 m |
| Appliance weight | 5.2 kg |
| Spray pattern type | Adjustable (wide/narrow) |
| Product flow adjustment | Yes, continuous |
| Multifunction switch | On/Off/Clean |
| Protection | Double insulation, thermal fuse |
| Maintenance | Replaceable air filter, cleaning with warm water |
| Spare parts available | Yes, list provided |
| Application area | Interior wall paints (water-based) |
| Maximum product temperature | 40 °C |
| Recommended spraying distance | 10 - 30 cm |
| Warranty | 2 years |
Frequently Asked Questions - WallPerfect W 985 E WAGNER
User questions about WallPerfect W 985 E WAGNER
0 question about this device. Answer the ones you know or ask your own.
Ask a new question about this device
Download the instructions for your Paint gun in PDF format for free! Find your manual WallPerfect W 985 E - WAGNER and take your electronic device back in hand. On this page are published all the documents necessary for the use of your device. WallPerfect W 985 E by WAGNER.
USER MANUAL WallPerfect W 985 E WAGNER


natural_image
Technical diagram showing two mechanical components with directional arrows, no text or symbols present
natural_image
Technical line drawing of a mechanical assembly with an inset close-up showing internal components (no text or symbols)D 1 - 14
GB 15 - 28
F 29 - 42
NL 43 - 56

Translation of the original operating instructions
Congratulations on your purchase of a WAGNER colour application device.
You have purchased a proprietary device that requires careful cleaning and care to ensure trouble-free functioning. Read the operating instructions carefully before using the tool and observe the safety instructions. Keep the operating instructions in a safe place.
Explanation of symbols used
 | This symbol indicates a potential danger for you or for the device. Under this symbol you can find important information on how to avoid injuries and damage to the device. |
 | Danger of electrical shock |
 | Indicates tips for use and other particularly useful information. |
 | Wide spray jet setting |
 | Narrow spray jet setting |
 | Devices and accessories marked with this symbol are suitable for processing interior wall paints (dispersions and latex paints). |
General Safety Instructions
Caution!

Read all the instructions. Non-observance of the instructions below can cause electric shock, fire and or serious personal injuries. The term "power tool" used below covers both mains-operated power tools (with mains lead) and accumulator-operated power tools (without mains lead).
1. Workplace
Keep your workplace clean and tidy. a) Untidiness and unlit working areas can lead to accidents.
Never use the tool in hazardous areas that contain flammable liquids, gases b) or dusts. Power tools generate sparks that can ignite the dust or vapors.
Keep children and other persons away when using the power tool. c) You can lose control of the tool if you are distracted.
2. Electrical Safety
The tool plug must fit into the socket. The plug may not be modified in any a) form. Do not use adaptor plugs together with protective-earthed tools.
Unmodified plugs and suitable sockets reduce the risk of an electric shock.
Avoid physical contact with earthed surfaces such as pipes, heating b) elements, stoves and refrigerators. The risk through electric shock increases if your body is earthed.
Keep the equipment away from rain and moisture. c) The risk of an electric shock increases if water penetrates electrical equipment.
Do not misuse the mains lead by carrying the tool by the lead, hanging it d) from the lead or by pulling on the lead to remove the plug. Keep the lead away from heat, oil, sharp edges or moving tool parts. Damaged or twisted leads increase the risk of an electric shock.
If you work outdoors, use only extension leads that are approved for e) outdoor use. The use of an extension lead that is suitable for outdoors reduces the risk of an electric shock.
3. Safety of Persons
Be attentive. Pay attention to what you are doing and work sensibly with a) a power tool. Do not use the tool if you are tired or under the influence of drugs, alcohol or medication. Just a moment of inattentiveness while using the tool can lead to serious injuries.
Wear personal safety equipment and always wear safety goggles. b) Wearing personal protective equipment, such as dust mask, non-slip safety shoes, safety helm or ear protection, depending on the type of power tools, reduces the risk of injury.
c) Avoid accidental starting-up. Ensure that the switch is in the "OFF" position before inserting the plug into the socket. Accidents can occur if you carry the power tool while your finger is on the switch or if you connect the power tool to the power supply which it is on.
d) Remove setting tools or wrenches before switching on the power tool. A tool or wrench that is in a rotating tool part can lead to injuries.
Do not overestimate your abilities. Ensure that you are standing securely e) and have your balance at all times. This ensures that you can control the tool better in unexpected situations.
Wear suitable clothing. Do not wear wide clothing or jewelry. Keep your hair, f) clothes and gloves away from moving parts. Loose clothing, jewelry or long hair can be caught in moving parts.
This appliance is not intended for use by persons (including children) with g) reduced physical, sensory or mental capabilities, or lack of experience and knowledge, unless they have been given supervision or instruction concerning use of the appliance by a person responsible for their safety. Children should be supervised to ensure that they do not play with the appliance.
4. Careful Handling and Use of Power Tools
Do not overload the tool. Use the power tool designed for the work that you are doing. You work better and safer in the specified performance range if you use the suitable power tool.
Do not use power tools whose switch is defective. b) A power tool that cannot be switched on or off is dangerous and has to be repaired.
Remove the plug from the socket before carrying out tool settings, changing c) accessories or putting the tool away. This precautionary measure prevents unintentional starting of the tool.
Store unused power tools so that they are inaccessible to children. Do not d) let persons use the tool who are not familiar with it or who have not read these instructions. Power tools are dangerous when they are used by inexperienced persons.
Take proper care of your tools. Check whether the moving parts function e) trouble-free and do not jam, whether parts are broken or damaged so that the tool function is impaired. Have damaged parts repaired before using the tool. Many accidents have their origin in power tools that have been maintained badly.
Use the power tool, accessories, insert tools, etc. in accordance with these f) instructions and in a fashion specified for this special tool type. Take the working conditions and the activity to be carried out into consideration. The use of power tools for purposes other than the intended ones can lead to dangerous situations.
5. Service
Have your tool repaired only by qualified specialist personnel and only with a) original spare parts. This ensures that the tool safety is maintained.
If the supply cord is damaged, it must be replaced by the manufacturer or it's b) service agent or a similarly qualified person in order to avoid a safety hazard.
Safety instructions for colour application devices
- Caution! Wear breathing equipment: Paint mist and solvent vapors are damaging to health. Always wear breathing equipment and only work in well ventilated rooms or using supplementary ventilating equipment. It is advisable to wear working clothing, safety glasses, ear protection and gloves.

CAUTION: DANGER OF INJURY!
Never point the spray lance at people or animals.

Sockets and plugs must be masked. Risk of an electric shock as a consequence of sprayed material entering the socket!
- Only materials with a flash point of 21 °C (32° in UK) or higher may be used with this device (See information on the material tin. Hazard class A II and A III permitted).
- Flammable agents may not be used for spraying with this device.
- The device may not be cleaned using flammable solvents with a flash point below 21^ .
- Caution against dangers that can arise from the sprayed substance and observe the text and information on the containers or the specifications given by the substance manufacturer.
- Do not spray any liquid of unknown hazard potential.
- The device may not be used in establishments that are subject to explosion prevention regulations.
- In order to avoid risk of an explosion during spray operations, excellent natural or artificial ventilation must be provided.
- While spraying there may be no ignition source in the surrounding area, for example, open fire, cigarette smoke, sparks, red-hot wires and hot surfaces.
- Ensure that no solvent vapors are sucked in by the unit. Do not spray onto the unit!
- The device is not a toy. For this reason do not allow children to handle or play with the device.
- Before working on the device, remove the power plug from the socket.
- Mask all areas that are not going to be sprayed. When working keep in mind that wind, for example, may transport paint mist over great distances and cause damage.
- Always switch off the device before placing the spray lance in the holder.
- The turbine is fitted with a thermal fuse, which switches off the turbine in the event of overheating. In this case, turn off the device, remove the plug and let the device cool down for at least 1/2 hour. Eliminate the cause of heating, e.g. bent hose, soiled air filter, slots for air intake covered.
With original WAGNER accessories and spare parts, you have the guarantee that all safety regulations are fulfilled.
Technical Data
| Max. viscosity: 3500 mPas | |
| Power source: 230 V ~ | |
| Power consumption: 600 W | |
| Atomizing output: 140 W | |
| Max. delivery rate 525 ml/min | |
| Double insulation: | |
| Sound pressure level: < 70 dB (A) | |
| Oscillation level: < 2.5 m/s ^2 | |
| Air hose length: 3.5 m | |
| Weight: 5.2 kg | |
Description (Fig. 1)
| 1 Air cap 2 Nozzle | |
| 3 Union nut 4 Spray jet adjustment ring | |
| 5 Spray head cover 6 Air pipe | |
| 7 Grab handle | 8 Trigger |
| 9 Trigger stop | 10 Air hose |
| 11 Material hose | 12 Control hose |
| 13 Carry handle | 14 Multifunction switch: ON/OFF/Cleaning |
| 15 Spray lance holder | 16 Material flow limiter |
| 17 Drip tray | 18 Air filter cover |
| 19 Suction hose connection | 20 Mains lead |
| 21 Material hose connection | 22 Control hose connection |
| 23 Air hose connection | 24 Suction hose |
| 25 Attachment clip suction hose | 26 Inlet filter |
Field of application
WallPerfect W 985 E has been specially developed for the application of interior wall paints.
Coating Materials Suitable for Use
Water-soluble interior wall paint (dispersions and latex paint)
Coating Materials Not Suitable for Use
Materials that contain highly abrasive components, facade paint, caustic solutions and acidic coating substances.
Solvent-based wall paints, water- and solvent-based paints, finishes, primers,
2-component paints, clear finishes, automotive finishes, staining sealers and wood sealer-preservatives.
Materials with a flash point below 21^ C.
Preparation of the workplace

Sockets and plugs must be masked. Risk of an electric shock as a consequence of sprayed material entering the socket! Mask all the areas and objects that are not to be spray painted, or remove them from the work area.

Silicate paint corrodes glass and ceramic surfaces upon contact! All such surfaces must therefore be completely covered.
Preparation of the Coating Material

Spray material that is at least at room temperature (e.g. diluted with warm water) provides a better spray result.
Attention! Do not heat spray material above 40^ C.

Make sure the material container is positioned stably to avoid knocking it over by accident.
Using WallPerfect W 985 E interior wall paints can be applied by spraying without diluting them, or by diluting them slightly. Detailed information is available in the technical data sheet of the manufacturer ( Internet Download).
- Stir the material thoroughly and dilute it in the container as per the recommended dilution (an agitator is recommended for stirring).
| Thinning recommendation | |
| Sprayed material | |
| Interior wall paint (dispersions and latex paint) dilute by 0-10 | % |
If the feed rate is too low even at maximum flow setting, dilute in steps of 5 - 10 % until 2. the feed rate meets your requirements.
Assembling the spray lance (fig. 4)
- Put air pipe (2) in grab handle (1).

After assembly, the air pipe and grab handle can no longer be separated. Do not try to disassemble them by force!
- Put together the spray head (3) and air pipe (2).
- Unwind up the pull wire (4) and guide it along the guide rail (5), over the guide hook (6) to the spray head.
- Push back the trigger (7) and connect the pull wire. Set the pull wire at a tension using the adjustment screw (8). (Fig. 4A)

Attention! Do not tighten the adjustment screw (8) too much. The nozzle opening has to remain closed at this point (see fig. 5 A), as otherwise material might leak out.
- Push the end of the material hose (fig. 4 B, 9), without the clip, into the slot (fig. 4 B, 10) on the spray head.
- Guide the material hose close along the spray head along to the grab handle and push it into the guide rail (5).
- Clip the cover (11) on to the spray head.
Connecting the hoses (fig. 6)
- Insert the control hose (1) into the grab handle
- Insert the thin end of the black air hose (3) into the grab handle (2) (watch out for marking) and fix it into position by turning it to the right.
- Insert the thick end of the air hose (3) into the air-hose connection (4) on the basic device (watch out for marking) and fix it into position by turning it to the right.
- Connect the material hose (5) to the material hose connection socket (6) and secure with securing clip.
- Connect the control hose (1) to the control hose connection socket (7).
- Connect the suction hose (8) to the suction hose connection socket (9) and secure with securing clip.
- Plug the attachment clip on the suction hose (10) to the edge of the paint container.
- Push the suction hose down to the base of the paint container.

Do not push the hose too far into the paint container, as it might otherwise bend upwards and suck in air.
Brief explanation of functionality of the W985 E
In the W985 E the coating material is sucked directly out of the material container by a pump. At the nozzle, the coating material is atomised with the help of the turbine and at the same time wrapped with a coat of air.
Multifunction switch settings (fig. 2, A)
CLEAN → The pump is ready for operation and is switched on by pulling the trigger. The turbine is switched off. Settings for cleaning and pre-filling the system
OFF → Pump and turbine are switched off = system is off
ON → Pump and turbine are ready for operation. The coating material is moved and sprayed by pulling the trigger. Operating setting
Adjusting the Material Volume
The material quantity is set depending on the characteristics of the material (viscosity) and the working speed of the operator.
This setting can be made variably with the material flow limiter (fig. 2, B):
lower material → turn to the left higher material → turn to the right

We recommend starting with a low material flow setting and then gradually adjusting this to suit needs.
Setting the width of the spray jet (fig. 3)

A = wide spray jet (green)
→ For coating larger surfaces
→ Working with a large flow rate (green area on quantity scale)
→ For coating smaller areas, corners and edges
→ Set material flow limiter to red area on quantity scale

B = narrow spray jet (red)

In order to reduce overspray and to improve the sprayed result, the colour on the quantity scale (red or green) should match the colour of the width of the spray jet (red or green).
Start-up/ Filling the system
- Put the machine down only on a level, clean surface.
- Before connecting to the mains supply, be sure that the supply voltage is identical with the value given on the rating plate.

Attention! Before switching on the device, check that the trigger is not pulled/held. A held trigger can result in paint being sprayed by accident. Only put the trigger on hold when cleaning.
- Plug in the power cable.
- Set the multifunction switch (fig. 2, 1) to "Clean".
- Hold the spray lance over the paint container.
- Keep the trigger kept pressed down until paint starts to come out of the nozzle. Now the system is filled with paint and ready to be operated.
- Set the multifunction switch (fig. 2, 1) to "ON".
Spray Technique
- Mask all areas that are not going to be sprayed.
- It can be valuable to do a test spray on a piece of cardboard or similar surface to work out what the most suitable settings are.
Important: Start at the edge of the spray area. Start the spray movement first of all, and then press the trigger. Avoid interrupting the spraying process inside the spray area.
• Work at a distance of between 10-30 cm.
Fig. 7 a: CORRECT Even distance to the object.
Fig. 7 b: INCORRECT An uneven distance will result in uneven paint application.
- Move the spray lance up and down evenly.
- To work in a horizontal direction, turn the spray lance by 90^ .
- Even guidance of the splash lance will produce a consistent surface quality.
- If nozzle and air cap are soiled, clean both parts with water.

If the work being performed is of a sophisticated nature (e.g. the borders around plugs) do not pull the trigger through completely. This prevents the feed pump from being switched on and the only material that is sprayed is the material that is already in the system. If this starts to run out, briefly pull the trigger completely in order to refill the system.

"Cross spray" when using paint with a poor covering capacity or if the surface is highly absorbent (Fig. 8).

Interior wall paint in strong colour shades should be applied at least twice (allow first paint coat to dry first). This will ensure good coverage.
Interruption of Work
- Turn the machine off. (Set the multifunction switch to "OFF")
- Put the spray lance in the holder.
- Wet paint surface in paint container with a little water to prevent a skin from forming.
- Clean nozzle openings after an interruption in operation.
Taking Out of Operation and Cleaning
Proper cleaning is the prerequisite for problem-free operation of the paint application device. No warranty claims are accepted in case of improper or no cleaning.

We recommend using hot water for cleaning purposes.
Turn the machine off. (Set the multifunction switch to "OFF")1)
Remove the suction hose from the paint container. 2)
Set the multifunction switch to "CLEAN".3)
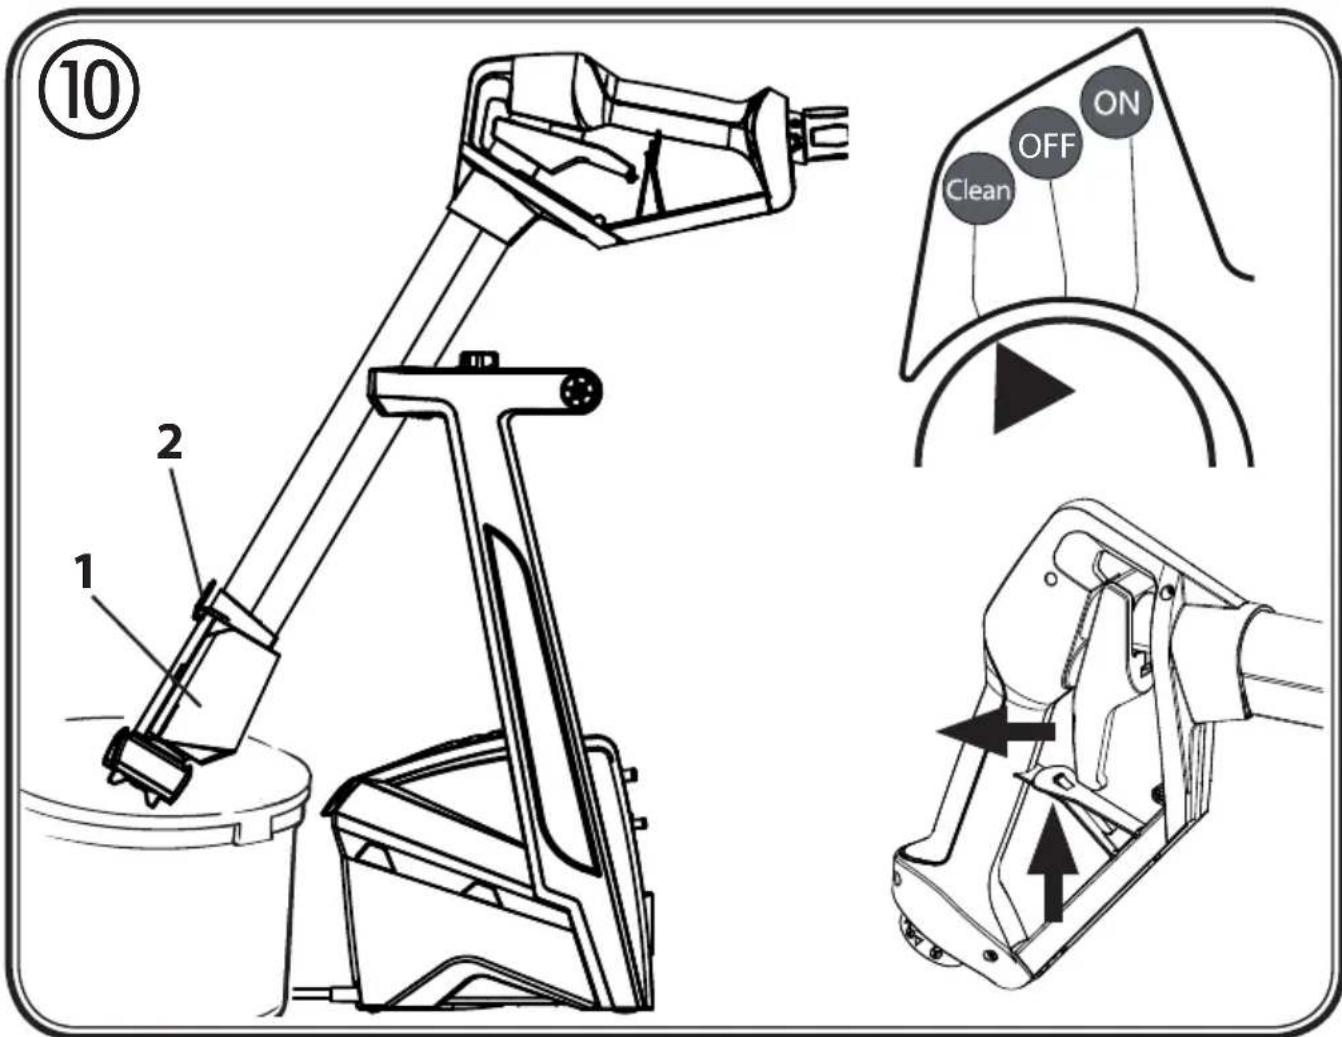
4) Hold the spray lance over the material container and pull the trigger to pump the remaining paint out of the system into the material container.
Turn the machine off. (Set the multifunction switch to "OFF")5)
Place a container with water in front of the device and attach the suction hose. 6)
Click the spray lance into the holder and slew it over the container with water. (Fig. 7) 10)

Attention! During automatic cleaning of the pump do not leave the device unattended. The hoses could disconnect during the cleaning operation leading to water damage.
Set the multifunction switch to "CLEAN".8)
Pull the trigger and push the stop upwards to secure the trigger. Allow water to 9) circulate through the machine for about 10 minutes in order to clean the pump and hoses. If necessary renew the water.
Release the stop by pulling the trigger. 10)
Turn the machine off. (Set the multifunction switch to "OFF") 11)
Take the spray lance out of the holder and remove the cover from the spray head. 12)
Detach the material hose from the slot on the spray head. 13)
Loosen the pull wire by the adjustment screw. Pull the trigger disengage the pull 14) wire.
Remove the spray head (fig. 10, 1) by pressing the lever (fig. 10, 2). 15)
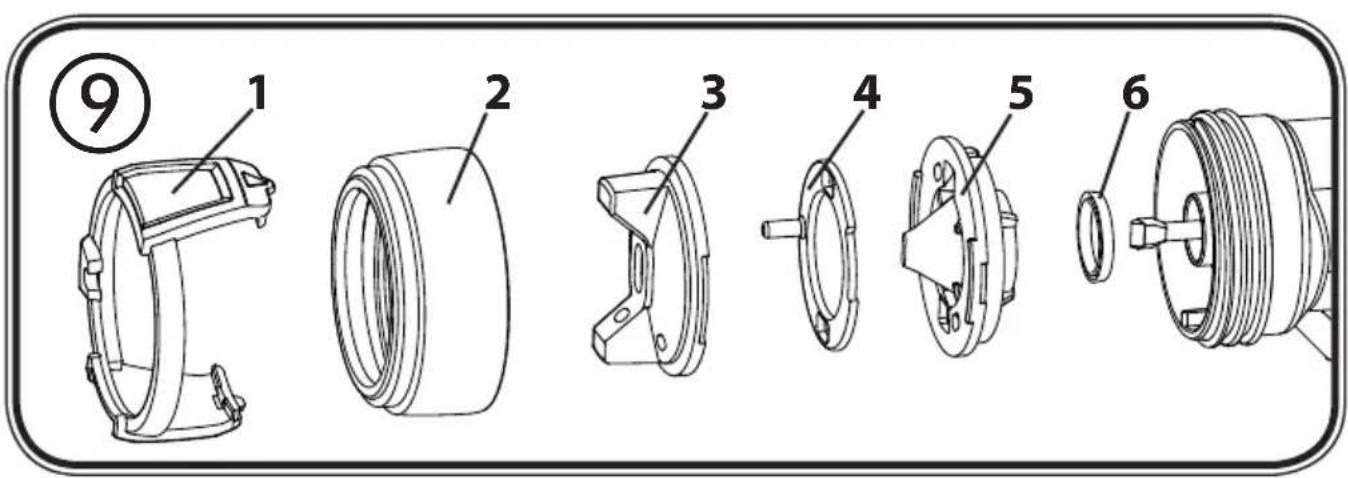
16) Remove the adjustment ring (fig. 9,1) carefully from the connecting nut (fig. 9, 2).
Loosen the connecting nut. Remove the air cap (3), air screen (4), nozzle (5) and nozzle seal (6) from the spray head. (Fig 9)
Clean the air cap; air screen, nozzle and nozzle seal thoroughly. 17)
Attention! Never clean the seals, nozzle- or air-holes with pointy metal objects.
Remove the suction hose and thoroughly rinse the suction filter in flowing water. 18) If necessary wipe the exterior of the spray lance. 19)
Reconstruction
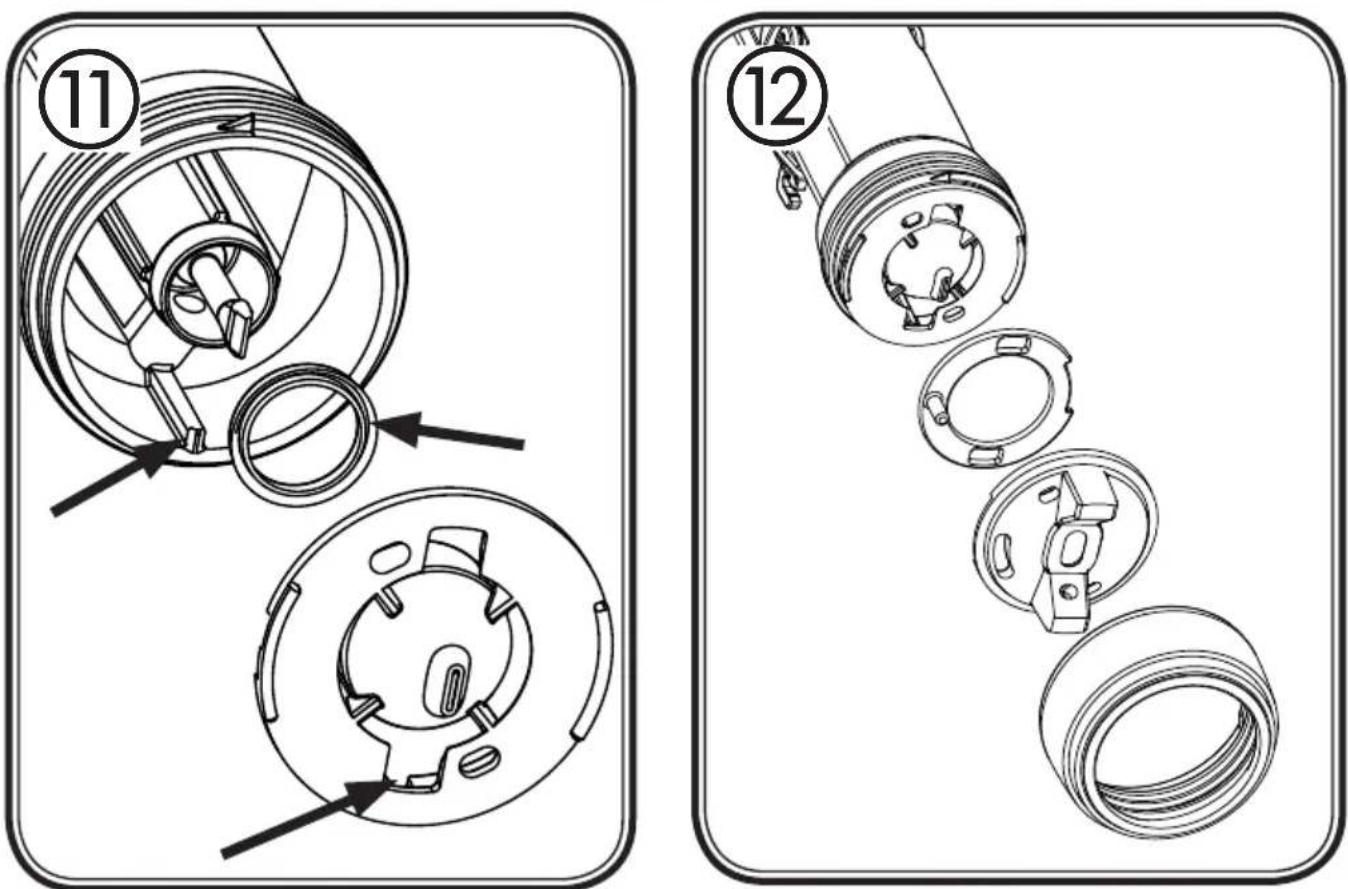
Slide the nozzle seal with the groove (slot) facing forwards into the nozzle. 1)
Insert the nozzle, keeping an eye on the grooves (Fig. 11)
Put the air screen in the air cap. Put both on the nozzle and secure with the 2)
connecting nut. (Fig. 12)
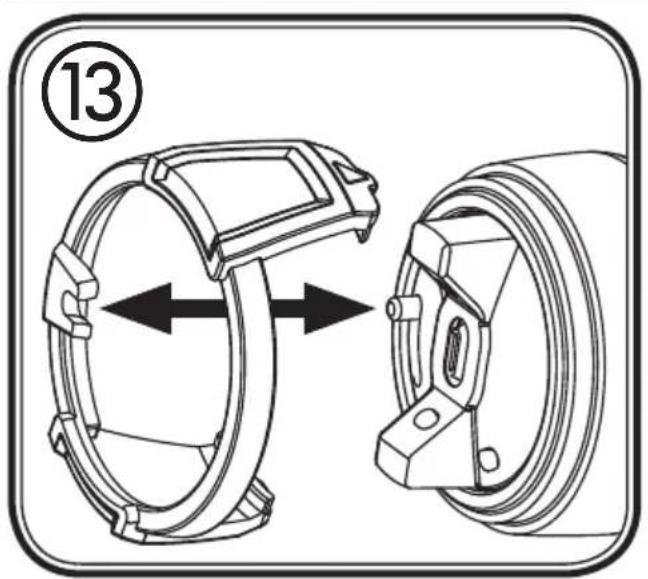
Snap the adjustment ring into the connecting nut enabling the loop on the peg to 3)
be positioned in the air cap. (Fig. 13)
Maintenance (Fig. 14)
Check the air filter (1) after use and replace depending on how soiled it is. Insert a new air filter (order no. 2310 812) and replace the lid (2).

WARNING! Never operate the machine without the air filter; dirt could be sucked in and interfere with the function of the machine.
Storage

After assembly, the air pipe and grab handle can no longer be separated.
Do not try to disassemble them by force!
- Store the device only when cleaned properly.
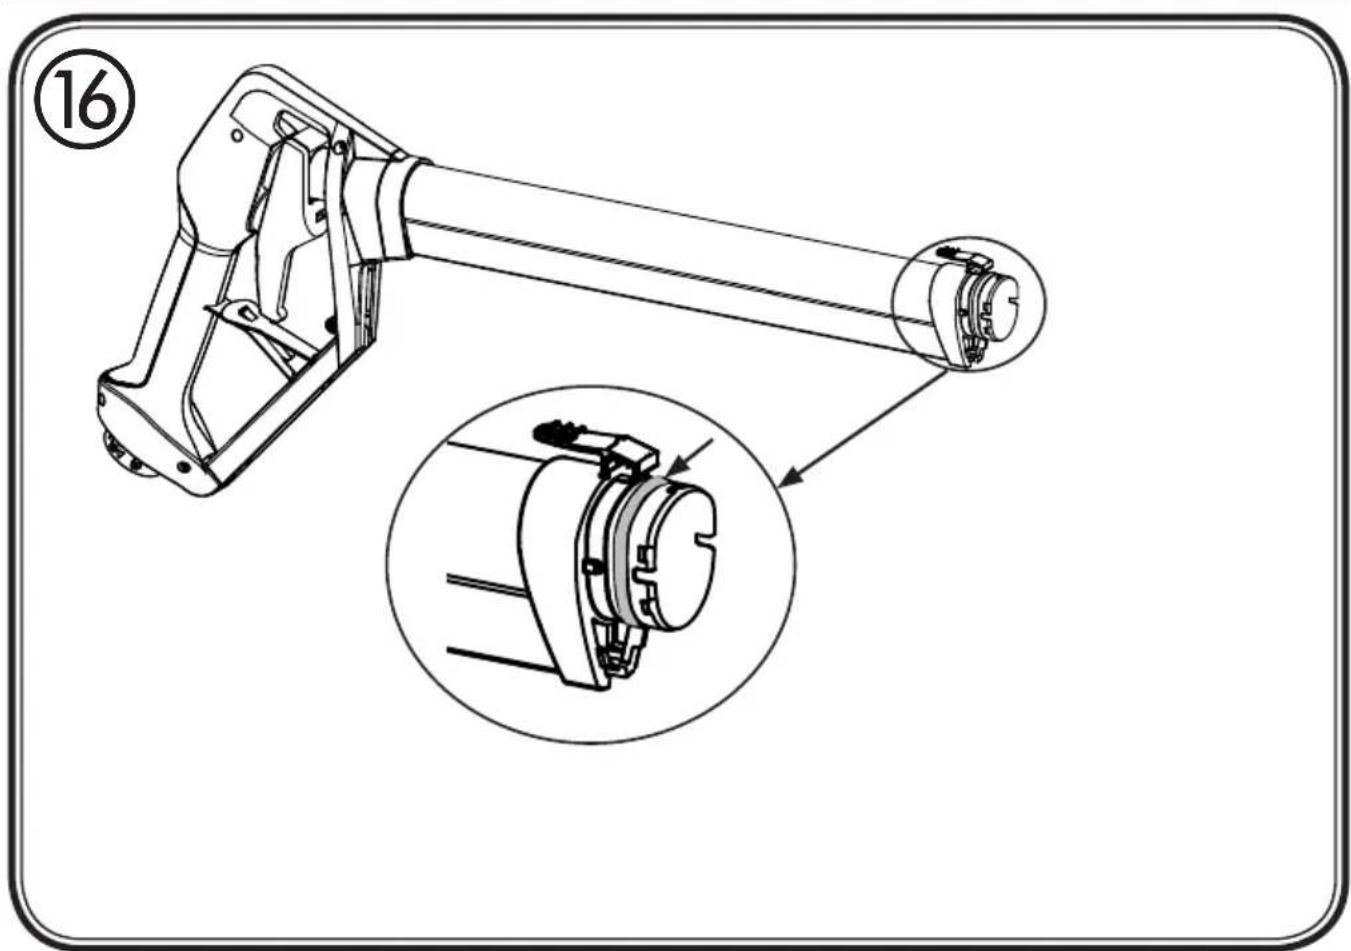
- Apply a thin coat of sliding grease at the marked points for preservation. (Fig. 16)
- Release the pull wire.
- Release the trigger stop.
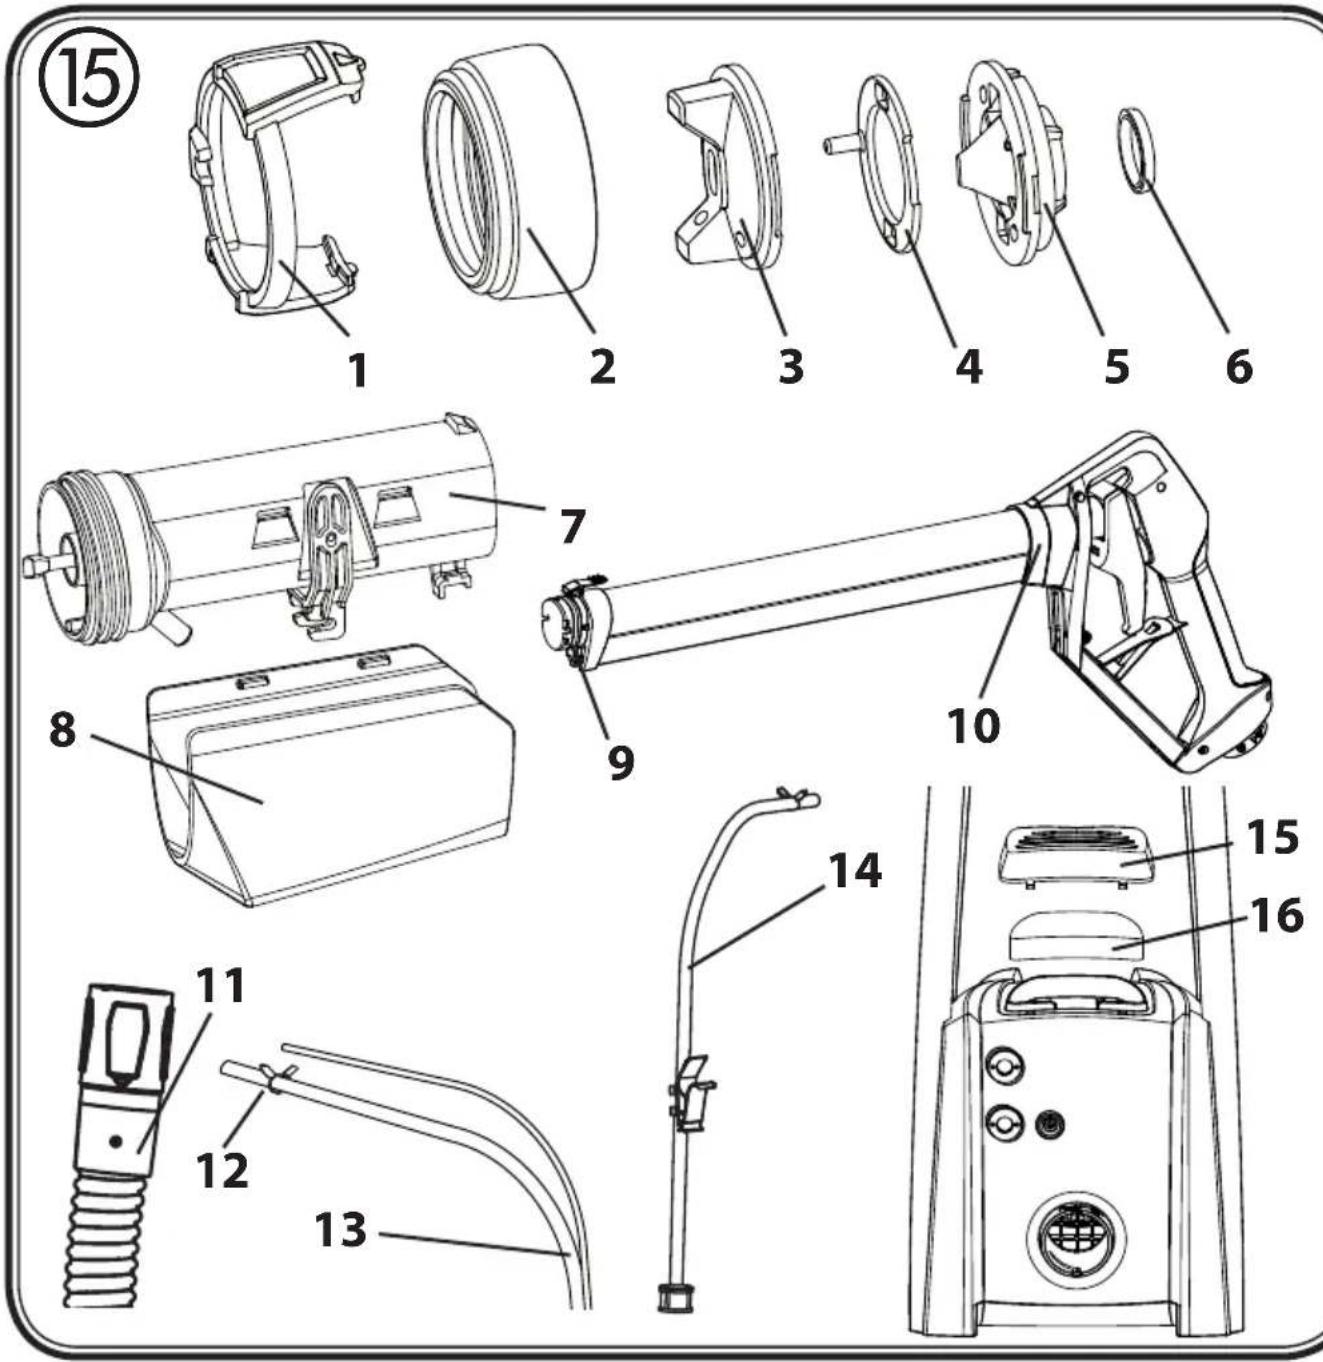
| Spare Parts List (Fig. 15) | ||
| Pos. Name Order No. | ||
| 1,2 | Spray jet adjustment ring, union nut * | 2310 811 |
| 3,4,5,6 | Nozzle set * | 2310 810 |
| 6 | Nozzle seal (2x) | 2304 433 |
| 1-7 | Complete spray head * | 2308 113 |
| 8 | Spray head cover | 2308 176 |
| 9 | O-ring | 2308 158 |
| 9,10 | Spray lance * | 2310 816 |
| 11 Air hose 2308 127 | ||
| 12 Securing clip 2308 123 | ||
| 13 Material hose and control hose * 2314 168 | ||
| 14 Complete suction hose 2308 116 | ||
| 15 Air filter cover 2308 132 | ||
| 16 Air filter (2x) 2310 812 | ||
| Lubricating grease 9892 550 | ||
* Denotes parts that can only be purchased together and not individually.
Further information about the WAGNER range of products for renovating is available under www.wagner-group.com
Correction of Malfunctions
| Problem Cause Remedy | ||
| No coating material emerges from the nozzle | ·When trigger is not completely pushed through, the feed pump is not switched on·Control hose blocked or damaged·Nozzle clogged·Material volume setting turned too far to the left·Container empty·Suction hose is blocked·The suction hose is disconnected from the basic device·The suction hose is not in the paint·Pull wire is disconnected or not tight enough·The material hose is disconnected from the spray head or basic device·Pump is defect | →Push trigger through completely→Clean or replace→Clean→Turn to the right→New paint container→Clean suction hose→Reattach the suction hose→Immerse the suction hose→Connect and tighten the pull wire→Reattach the material hose→Please contact Wagner Service |
| Coating material drips from the nozzle | ·Coating material assembly at air cap, nozzle or needle·Nozzle loose·Nozzle seal worn·Nozzle worn·Pull wire is too tight | →Clean→Union nut tighten→Change→Change→Reduce tension |
| Atomisation too coarse | Material volume too largeMaterial volume setting turned too far to the rightNozzle contaminatedViscosity of coating material too highAir filter heavily soiledAt high quantity of material, narrow spray jet selected (red) | Turn the material volume → setting to the leftClean→Dilute further →Change→Switch to wide spray jet → (green) |
| Spray jet pulsates Coating material in container running outFilter clogged at suction hoseNozzle seal wornAir filter heavily soiled | Refill →Clean filter →Replace →Change → | |
| Coating material causes "paint tears" | Too much coating material appliedViscosity of coating material too low | Turn the material volume → setting to the left Spray excess material on the wall using the inking roller Reduce the quantity of → material and apply in several layers |
| Too much fog of coating material (Overspray) | Distance to the object too largeToo much material quantityAt a low quantity of material, wide spray jet selected (green) | Reduce distance →Turn the material volume → setting to the left Switch to narrow jet spray (red) |
| Width of paint spray cannot be adjusted | Adjustment ring is not connected to the peg on the air capAir screen is clogged up | Connect adjustment ring and pegDisassemble and clean the spray head |
| Poor covering capacity on the wall | Spray material is too coldHighly absorbent surface or paint with poor covering capacityDistance too largeThe material quantity and spray jet do not correspond with each other | → Heat spray material (to maximum 40°C)Cross spray (Fig. 8)Closer to the object Optimise the settings |
| Problem Cause Remedy | ||
| Coating material cannot be atomised | •Multifunction switch is set to "Clean" •Turbine is overheated •Turbine is defect | Set the multifunction switch to "ON" Unplug the power plug, → let the device cool down approx. 30 minutes, do not bend the hose, check the air filter, do not cover the intake slots Please contact Wagner → Service |
Environmental protection

The appliance and accessories should be recycled in an environmentally friendly way. Do not dispose of the appliance with household waste. Support environmental protection by taking the appliance to a local collection point or obtain information from a specialist retailer.
Important Note regarding Product Liability!
Due to an EC ordinance in effect since 01.01.1990, the manufacturer is liable for his product only if all parts originate from or were approved by the manufacturer and the devices are assembled and operated correctly. The use of other accessories and spare parts can partially or completely invalidate the liability.
Warning
If the supply cord of this appliance is damaged, it must only be replaced by a repair shop appointed by the manufacturer, because special purpose tools are required.
Warning: Do not connect the blue or brown wire to the earth terminal of the plug! The wires in this mains lead are coloured in accordance with the following code:
blue = neutral brown = live
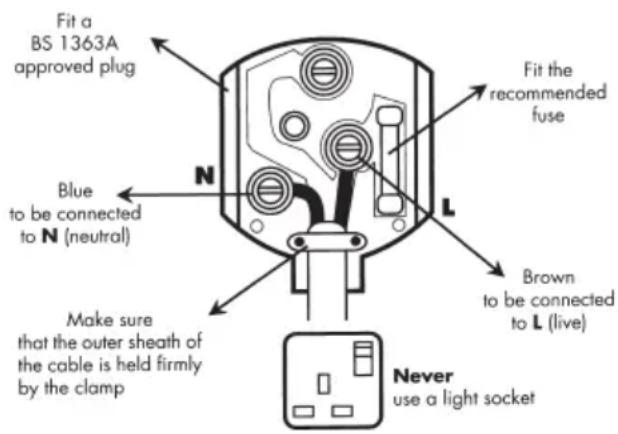
As the colours of the wires in the mains lead of this appliance may not correspond with the coloured markings identifying the terminals in your plug, proceed as follows:
- Should the moulded plug have to be replaced, never re-use the defective plug or attempt to plug it into a different 13 A socket. This could result in an electric shock.
- Should it be necessary to exchange the fuse in the plug only use fuses approved by ASTA in accordance with BS 1362. 5 Amp fuses may be used.
-
To ensure that the fuse and fuse carrier are correctly mounted please observe the provided markings or colour coding in the plug.
-
After changing the fuse, always make sure that the fuse carrier is correctly inserted. With out the fuse carrier, it is not permissible to use the plug.
- The correct fuses and fuse carriers are available from your local electrical supplies stockist.
2 years guarantee
The guarantee runs for two years, counting from the date of sale (sales slip). It covers and is restricted to free-of-charge rectification of faults which are demonstrably attributable to the use of faulty materials in manufacture, or assembly errors; or free-of-charge replacement of the defective parts. The guarantee does not cover incorrect use or commissioning or fitting or repair work which is not stated in our operating instructions. Wearing parts are also excluded from the guarantee. The guarantee excludes commercial use. We expressly reserve the right to fulfil the guarantee. The guarantee expires if the tool is opened up by persons other than WAGNER service personnel. Transport damage, maintenance work and loss and damage due to faulty maintenance work are not covered by the guarantee. Under any guarantee claim, there must be proof of purchase of the tool through submission of the original receipt. Wherever legally possible, we exclude all liability for injury, damage or consequential loss, especially if the tool has been used for a purpose other than that stated in the operating instructions, commissioned or repaired other than in accordance with our operating instructions or if repairs are performed by someone who is unqualified. We reserve the right to perform any repairs in excess of those stated in our operating instructions. In case of guarantee or repair, please refer to your point of sale.
CE Declaration of Conformity
We declare under sole responsibility that this product conforms
to the following relevant stipulations:
2006/42/EG; 2004/108 EG; 2002/95/EG; 2002/96/EG
Applied harmonised norms:
EN 55014-1: 2006, EN 55014-2: 2001, EN 61000-3-2: 2006,
EN 61000-3-3: 2005, EN 60335-1: up to A13:2009, EN 50366: 2006; EN 50144-2-7: 2000

Vice President Development Manager
Product Strategy & Planning
Responsible person for documents
Responsable de la documentation
© Copyright by J.Wagner GmbH
| CZ | E-Coreco s.r.o. |
| Na Roudné 102 | |
| 301 00 Plzen | |
| +420 739 359 518 +420 227 077 364 |
| E | J. Wagner Spraytech Ibérica S.A.Ctra. N-340, Km 1245,408750 Molins de Rei (Barcelona) |
| +34/93/6 80 00 28 +34/93/6 68 01 56 |
| SLO | Adresa servisa:GMA Elektromehanika d.o.o.Cesta Andreja Bitenca 115,Ljubljana 1000/Slowenien+386(1)/583 83 04 +386(1)/518 38 03 |


- Translation of the original operating instructions
- Congratulations on your purchase of a WAGNER colour application device.
- General Safety Instructions
- Caution!
- Workplace
- Electrical Safety
- Safety of Persons
- Careful Handling and Use of Power Tools
- Service
- Safety instructions for colour application devices
- CAUTION: DANGER OF INJURY!
- Never point the spray lance at people or animals.
- Sockets and plugs must be masked. Risk of an electric shock as a consequence of sprayed material entering the socket!
- Field of application
- Coating Materials Suitable for Use
- Coating Materials Not Suitable for Use
- Preparation of the workplace
- Preparation of the Coating Material
- Assembling the spray lance (fig. 4)
- Connecting the hoses (fig. 6)
- Brief explanation of functionality of the W985 E
- Multifunction switch settings (fig. 2, A)
- Adjusting the Material Volume
- Setting the width of the spray jet (fig. 3)
- Start-up/ Filling the system
- Spray Technique
- Interruption of Work
- Taking Out of Operation and Cleaning
- Attention! During automatic cleaning of the pump do not leave the device unattended. The hoses could disconnect during the cleaning operation leading to water damage.
- Reconstruction
- Maintenance (Fig. 14)
- Storage
- Environmental protection
- Important Note regarding Product Liability!
- Warning
- years guarantee
- CE Declaration of Conformity
Brand : WAGNER
Model : WallPerfect W 985 E
Category : Paint gun