Land Cruiser (2013) - Car TOYOTA - Free user manual and instructions
Find the device manual for free Land Cruiser (2013) TOYOTA in PDF.

User questions about Land Cruiser (2013) TOYOTA
0 question about this device. Answer the ones you know or ask your own.
Ask a new question about this device
Download the instructions for your Car in PDF format for free! Find your manual Land Cruiser (2013) - TOYOTA and take your electronic device back in hand. On this page are published all the documents necessary for the use of your device. Land Cruiser (2013) by TOYOTA.
USER MANUAL Land Cruiser (2013) TOYOTA
natural_image
Toyota logo on red background (no text or symbols)LAND CRUISER
2 0 1 3

natural_image
Traffic light with green and red lights against a blue sky with clouds (no text or symbols visible)QUICK REFERENCE GUIDE
2013
Land Cruiser
This Quick Reference Guide is a summary of basic vehicle operations. It contains brief descriptions of fundamental operations so you can locate and use the vehicle's main equipment quickly and easily.
The Quick Reference Guide is not intended as a substitute for the Owner's Manual located in your vehicle's glove box. We strongly encourage you to review the Owner's Manual and supplementary manuals so you will have a better understanding of your vehicle's capabilities and limitations.
Your dealership and the entire staff of Toyota Motor Sales, U.S.A., Inc. wish you many years of satisfied driving in your new Land Cruiser.
A word about safe vehicle operations
This Quick Reference Guide is not a full description of Land Cruiser operations. Every Land Cruiser owner should review the Owner's Manual that accompanies this vehicle.
Pay special attention to the boxed information highlighted in color throughout the Owner's Manual. Each box contains safe operating instructions to help you avoid injury or equipment malfunction.
All information in this Quick Reference Guide is current at the time of printing. Toyota reserves the right to make changes at any time without notice.
INDEX
OVERVIEW
Engine maintenance 9
Fuel tank door release and cap 8
Hood release 8
Indicator symbols 4-5
Instrument cluster 4
Instrument panel 2-3
Keyless entry ^1 6
Light control-Instrument panel 9
Smart Key system ^1,2 7
FEATURES/OPERATIONS
Air Conditioning/Heating 18-19
Audio 20-21
Auto lock/unlock ^1 10
Automatic Transmission 10
Back door 17
Cooler box 26
Crawl control 21
Cup holders 26
Door locks 25
Dynamic radar cruise control 22-23
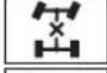
Four-wheel drive 11
Garage door opener (HomeLink ^® ) ^3 23
Lights ^1 & turn signals 15
Mirrors-Side 17
Moonroof 17
Multi-Information Display ^2 24
Parking brake 27
Power outlets-12V DC 27
Power outlet-120V AC 27
Rear seat entertainment system 26
Seat adjustments-Front 12
Seat adjustments-Rear 12
Seat heaters and ventilators 19
Seats-Head restraints 12
Seats-Tumbling second row seats 13
Seats-Tumbling third row seats 14
Steering lock release 11
Tilt and telescopic steering wheel 24
Telephone controls (Bluetooth®) 25
Windows-Power 16
Window wipers & washers 16
SAFETY AND
Doors-Child safety locks 29
Floor mat installation 31
Seat belts 28
Seat belts-Shoulder belt anchor 28
Spare tire & tools 29
Star Safety System™ 30
Tire Pressure Monitoring (warning) System 28
Visit your Toyota dealer for information on customizing this feature.
^2 Programmable by customer. Refer to the Owner's Manual for instructions and more information.
^3 HomeLink ^® is a registered trademark of Johnson Controls, Inc.
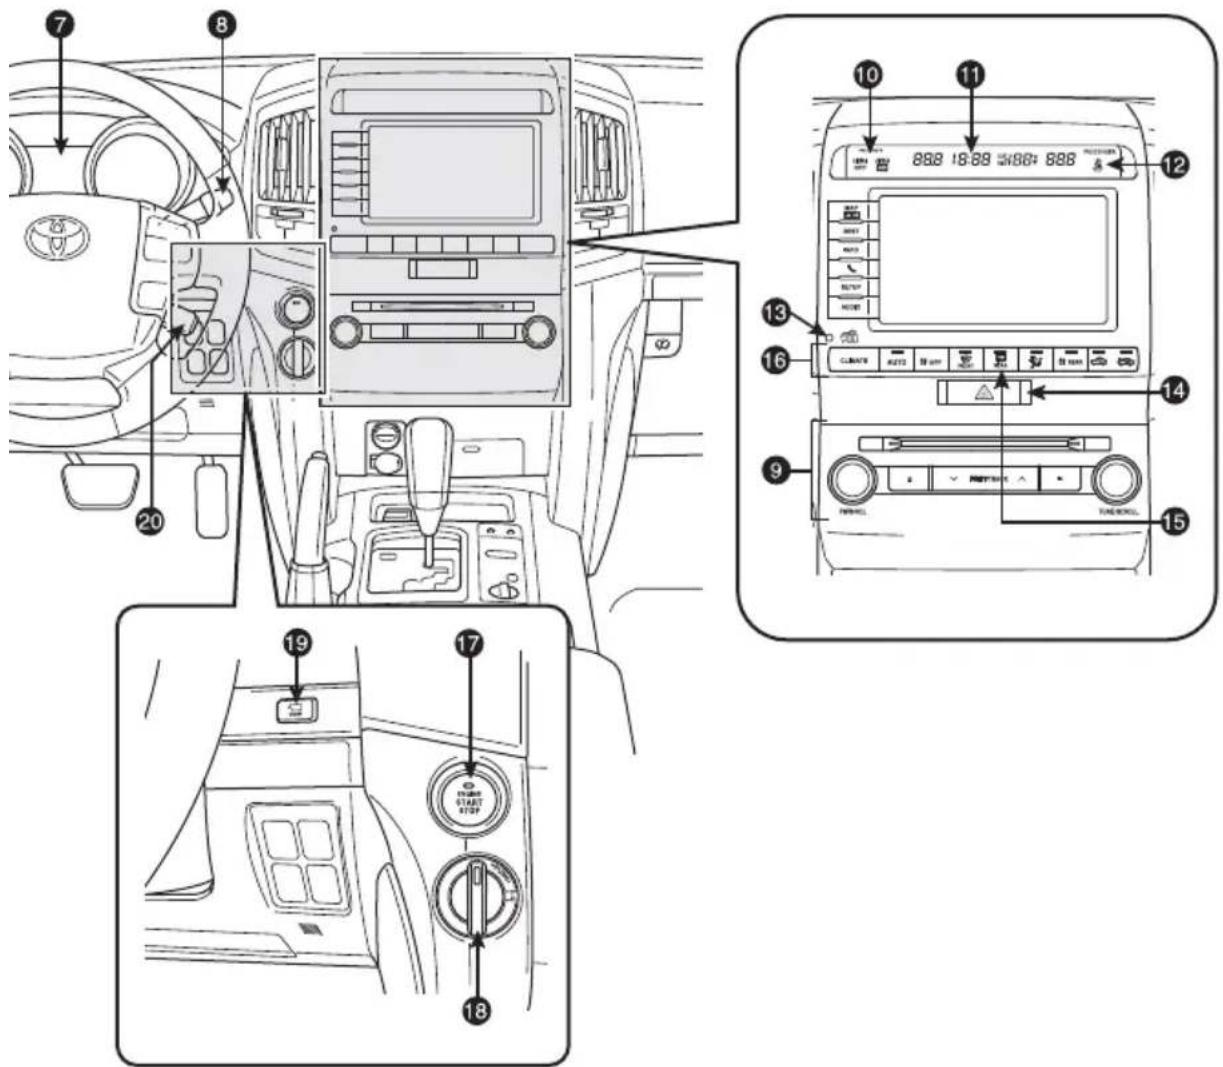
OVERVIEW
Instrument panel
Steering wheel controls

text_image
SRS AIRBAD 1 NODE 2 Stop 3 4 5
text_image
Technical diagram of a car interior with labeled components and directional arrows indicating movement or flow.
text_image
Diagram of car interior control panel with numbered labels pointing to various buttons and indicators1 Steering wheel audio controls*
② Telephone controls*
③ Voice command button*
4 Multi-Information Display button
5 Distance switch*
6 Headlight, turn signal and front fog light controls
⑦ Multi-Information Display
8 Wiper and washer controls
9 Audio system*
10 "AIR BAG ON" and "AIR BAG OFF" indicator
11 Clock*
12 Front passenger seat belt reminder light
13 Theft deterrent system/Engine immobilizer indicator
14 Emergency flasher button
15 Outside rearview mirrors/Rear window defogger button
16 Air Conditioning controls*
text_image
Diagram of car interior and dashboard layout with numbered labels pointing to controls and indicators17 "ENGINE START STOP" switch
18 Four-wheel drive control switch
19 VIEW switch (multi-terrain monitor)*
20 Dynamic radar cruise control
21 Tire Pressure Monitoring (warning) System reset
22 Headlight leveling dial
23 Power outside rearview mirror controls
24 Instrument panel light control
25 Tilt and telescopic steering control
26 Intuitive parking assist switch
27 Center differential lock/unlock switch
28 Roll Sensing of Curtain shield Airbag OFF switch
29 Heated steering wheel switch
30 VSC/TRAC OFF switch
31 Headlight cleaner
* Refer to the "Navigation System Owner's Manual" for details.
Instrument cluster
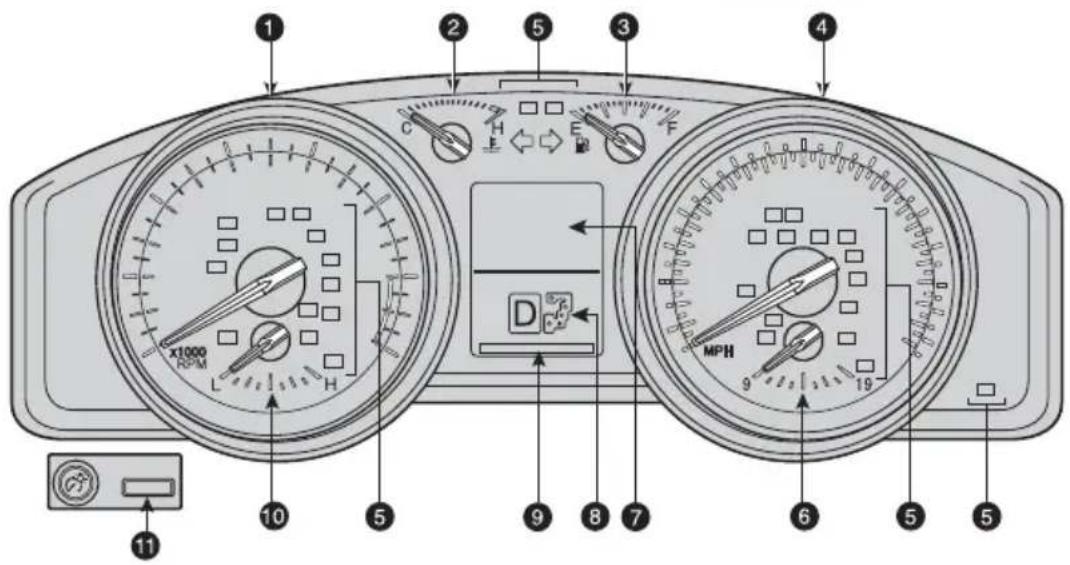
text_image
Diagram of a car dashboard with labeled gauges and control buttons, showing front, side, and interior views with numbered labels.① Tachometer
② Engine coolant temperature
③ Fuel gauge
4 Speedometer
⑤ Service indicator and reminder
6 Voltmeter
⑦ Multi-information display
8 Automatic Transmission shift range display
9 Odometer and two trip meters
10 Engine oil pressure gauge
11 Odometer/Trip meter and trip meter reset button
Indicator symbols
For details, refer to “Indicators and warning lights,” Section 2-2, 2013 Owner’s Manual.

text_image
BRAKE PASSenger PASSenger AIR BAG AIR BAG OFF ON PCS CHECKBrake system warning ^1
Driver seat belt reminder (alarm will sound if speed is over 12 mph)
Front passenger seat belt reminder (alarm will sound if speed is over 12 mph)
Charging system warning ^1
AIR BAG ON and AIR BAG OFF indicator
Pre-Collision System warning light ^1
Malfunction/Check Engine indicator ^1
 | Unengaged Park warning light |
 | Low fuel level warning |
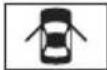 | Open door warning |
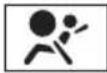 | Airbag SRS warning^1 |
| [XYZ7] | Master warning^1 |
 | Crawl control indicator^1 |
 | Low Tire Pressure Warning^1 |
 | Roll Sensing of Curtain shield Airbag OFF indicator^1 |
 | Power mode indicator |
 | Automatic Transmission second start indicator |
 | Headlight low/high beam indicator |
 | Turn signal indicator |
 | Fog light indicator |
 | Slip indicator^1,2 |
 | Low speed four-wheel drive indicator |
 | Center differential lock indicator |
 | SET Cruise control indicator/Cruise control SET indicator |
 | Radar cruise control indicator |
 | Anti-lock Brake System warning^1 |
 | Vehicle Stability Control OFF indicator^1 |
 | Multi-terrain select indicator |
 | ECO driving indicator^1 |
 | Turn assist function indicator |
^1 If indicator does not turn off within a few seconds of starting engine, there may be a malfunction. Have vehicle inspected by your Toyota dealer.
^2 The indicator flashes to indicate that the system is operating.
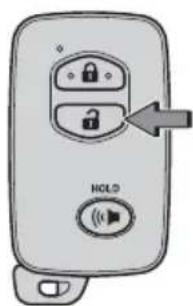
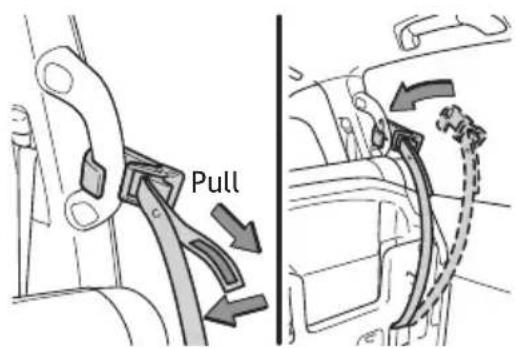
Keyless entry
Locking operation
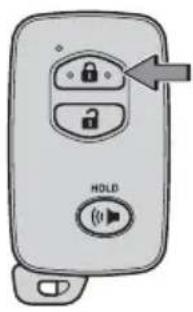
text_image
HOLDPush
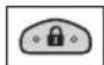
Unlocking operation
text_image
HOLDPush ONCE: Driver door TWICE: All doors

NOTE: If a door is not opened within 60 seconds of unlocking, all doors will relock for safety.
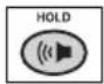
Panic button
text_image
HOLDPush and hold
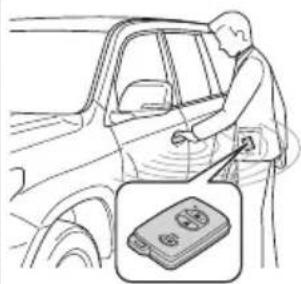
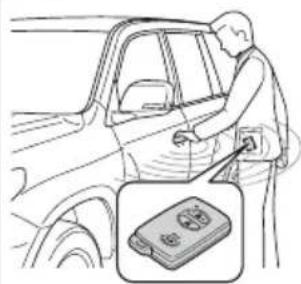
Smart Key system
Start function

text_image
Green indicator ON Depress brake pedal + Push CarryingNOTE: Gear shift lever must be in Park and brake pedal depressed.
Power (without starting engine)
Without depressing the brake pedal, pressing the “ENGINE START STOP” switch will change the operation mode in succession from:
ACCESSORY
Accessories such as the radio will operate.
ON
Power ON; the engine not running.
OFF
All systems OFF.
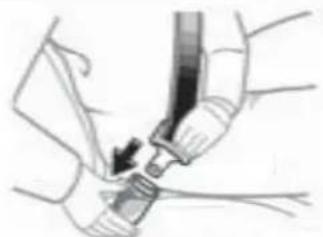
Locking operation
natural_image
Illustration of a person cleaning a car window with a device inset (no text or symbols)Front door lock
natural_image
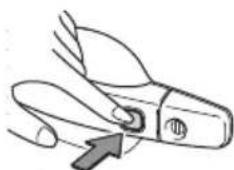
Illustration of a pair of scissors with a handle and arrow indicating direction (no text or symbols)Push
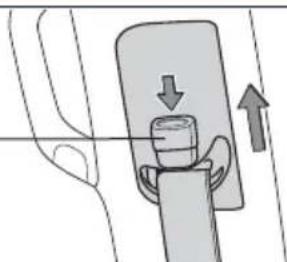
Carry remote to lock Carry remote to unlock
Unlocking operation
natural_image
Illustration of a person cleaning a car window with a close-up inset showing a battery pack (no text or symbols)Front door unlock*

Back door lock/unlock
Carry remote to lock/unlock

text_image
Lock Push Unlock Push* Driver door unlocking function can be programmed to unlock driver door only, or all doors.
NOTE: Doors may also be locked/unlocked using remote.
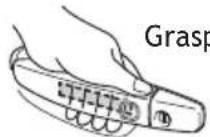
Fuel tank door release and cap

text_image
PullTurn to open
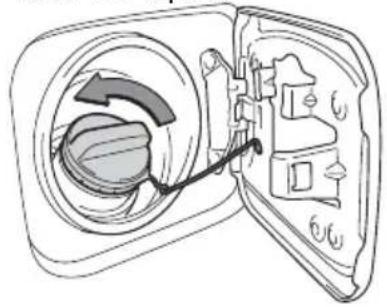
natural_image
Diagram of a door with an open door showing internal components and a curved arrow indicating rotation (no text or symbols)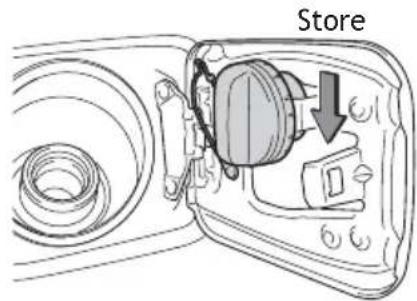
text_image
StoreNOTE: Tighten until one click is heard. If the cap is not tightened enough, Check Engine "CHECK" indicator may illuminate.
Hood release
text_image
PullPull up latch and raise hood

natural_image
Line drawing of a car exterior with a magnified inset showing a person on the road (no text or symbols)Engine maintenance
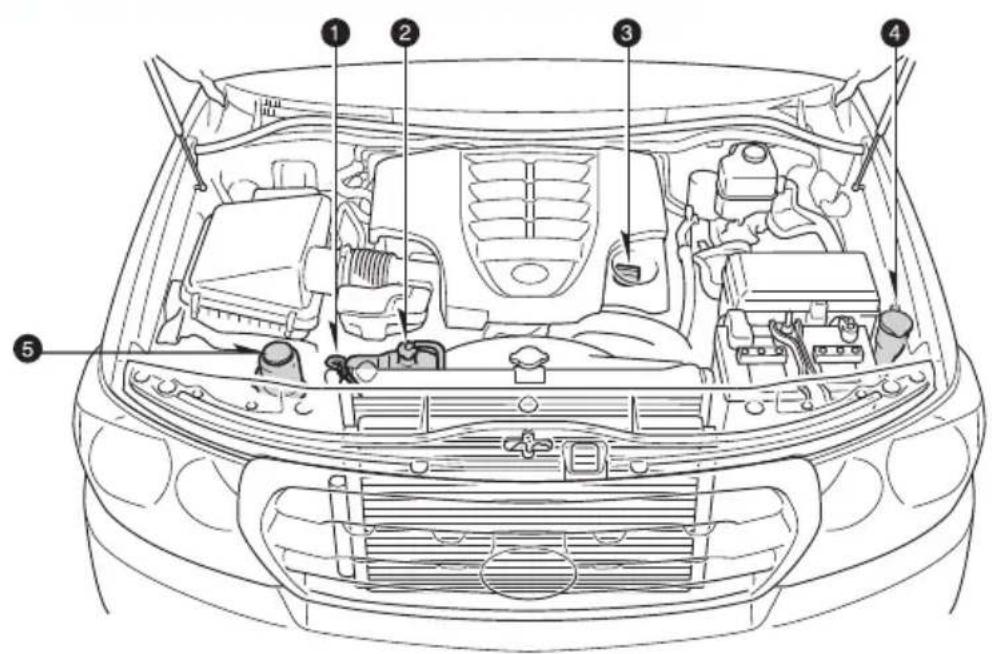
text_image
Technical diagram of a car engine bay with numbered components for identification① Engine oil level dipstick
② Engine coolant reservoir
③ Engine oil filler cap
4 Windshield washer fluid tank
5 Power steering fluid reservoir
NOTE: Regularly scheduled maintenance, including oil changes, will help extend the life of your vehicle and maintain performance. Please refer to the "Warranty Maintenance Guide."
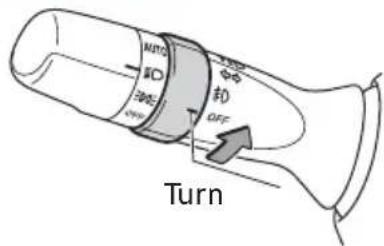
Light control-Instrument panel
Brightness control
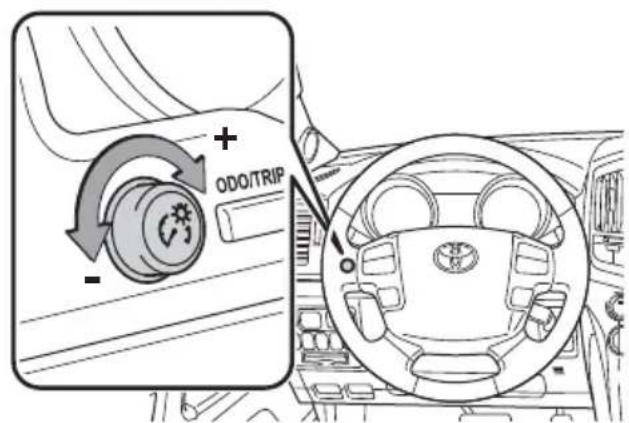
text_image
ODO/TRIPFEATURES/OPERATIONS
Auto lock/unlock
Automatic door locks can be programmed to operate in two different modes, or turned OFF.
-Doors lock when shifting from Park.
-Doors lock when the vehicle speed is approximately 12 mph or higher.
-Doors unlock when shifting into Park.
-Doors unlock when the driver's door is opened within 45 seconds after turning the "ENGINE START STOP" switch OFF.
Refer to the Owner's Manual for more details.
Automatic Transmission

Park*

Reverse

Neutral

Drive

"S" mode
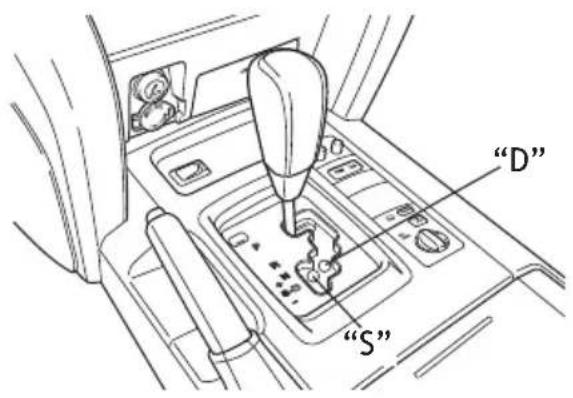
text_image
"D" "S"* The “ENGINE START STOP” switch must be in “IGNITION ON” mode and the brake pedal depressed to shift from Park.
“S” (Sequential) mode
Shift the shift lever to "S" position from "D" position.
Downshifting increases power going uphill, or provides engine braking downhill. For best fuel economy during normal driving conditions, always drive with the shift lever in the “D” position.
Power mode
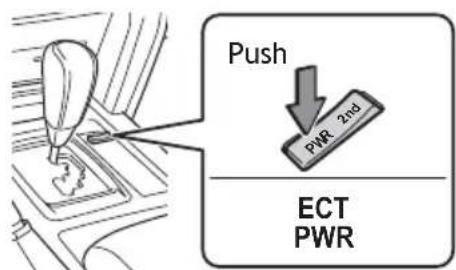
text_image
Push PWR 2nd ECT PWRFor powerful acceleration and driving in mountainous regions.
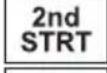
Second start mode
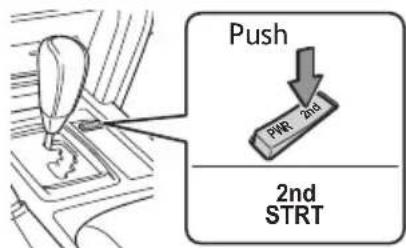
text_image
Push PWR 2nd 2nd STRTFor starting on slippery surfaces, such as snowy roads. Press "2nd" to return to normal mode.
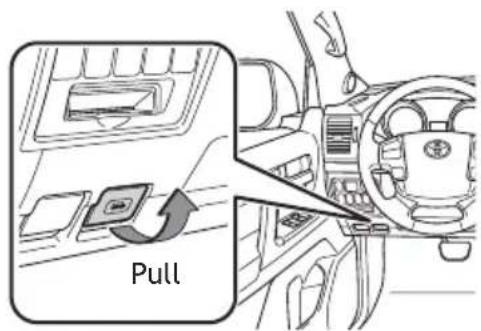
Steering lock release

text_image
Turn ENGINE START STOP PushFour-wheel drive
Four-wheel drive control switch
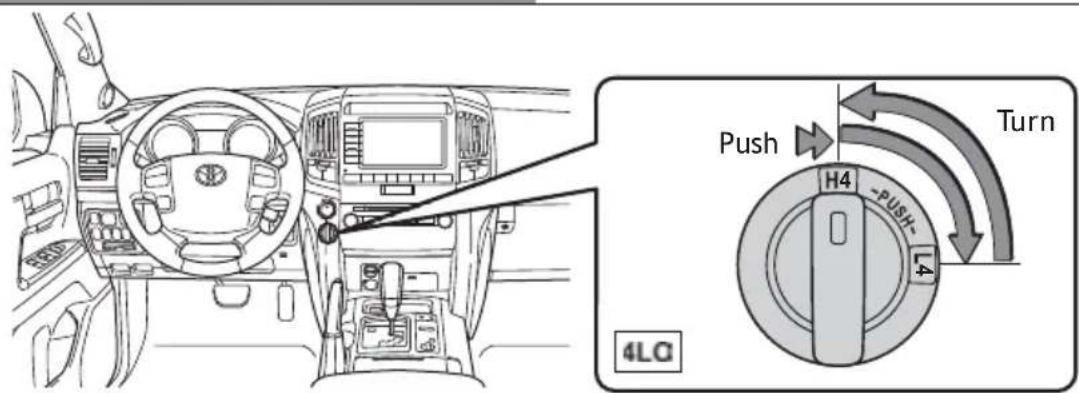
text_image
Push H4 -PUSH- 4 4LQ Turn
High speed

Low speed
Shift to "N" position when stopped, then push and turn to "L4."
Center differential lock/unlock switch
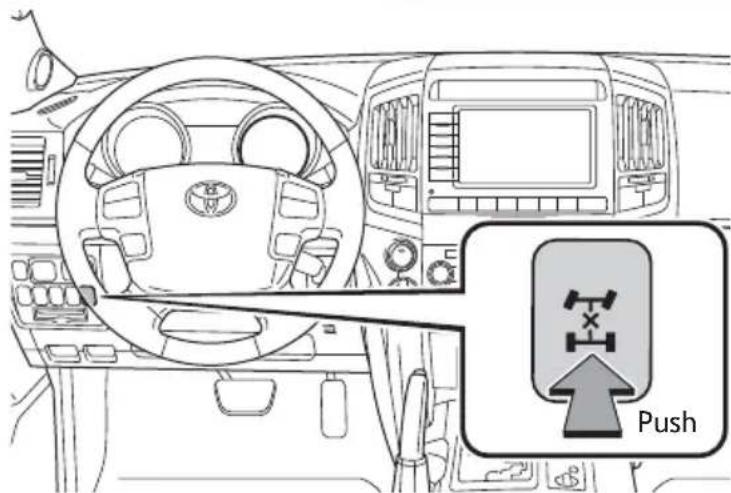
text_image
Push
Lock the center differential when your vehicle's wheels get stuck in a ditch or when driving on a slippery or bumpy surface.
Seat adjustments-Front

text_image
Diagram of a car seat with labeled parts and directional arrows indicating motion or movement.① Seat position, cushion angle and height
② Seatback angle
③ Lumbar support (driver side only)
Seat adjustments-Rear
Second row Third row

natural_image
Line drawing of a car seat assembly with seatbars and belt switches (no text or symbols)
natural_image
Line drawing of a car backseat with seat covers and rear seats, showing seatbelting arrows (no text or symbols)1 Seatback angle
② Seat position
Refer to the Owner's Manual for more details.
Seats-Head restraints
Front Second row
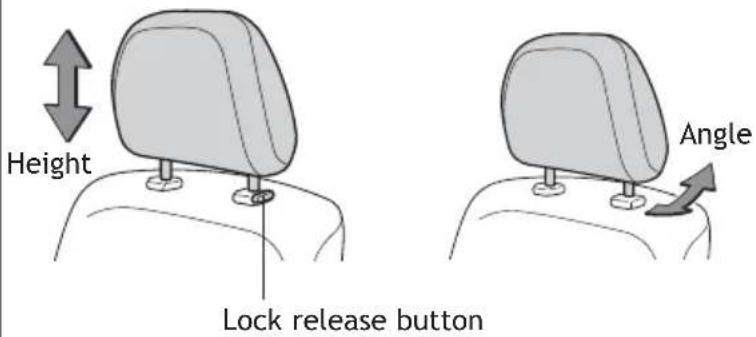
text_image
Height Lock release button Angle
text_image
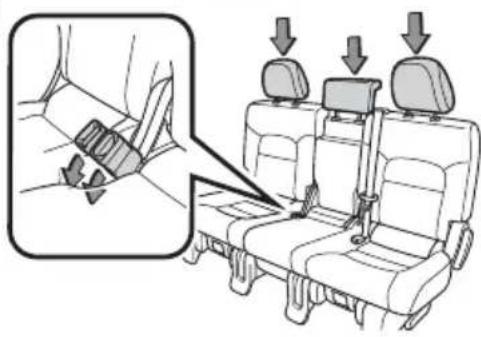
Height Lock release buttonSeats-Tumbling second row seats
(1)
text_image
Diagram showing seatbelt buckle adjustment with arrows indicating movement, including a magnified inset of the seatbelt.(3)
(2)
natural_image
Diagram of a car seatbelt switch mechanism showing the grip and lock (no text or symbols present)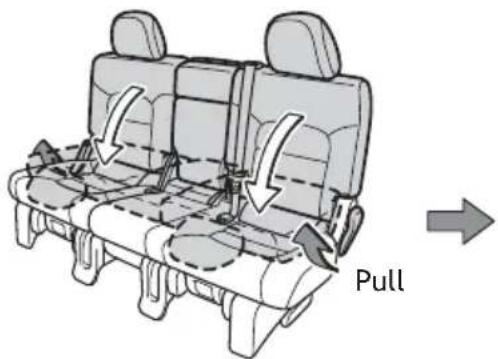
text_image
Pull(4)
natural_image
Technical line drawing of a mechanical component with internal cavities and a curved arrow indicating motion (no text or symbols)(5)
text_image
Pull
text_image
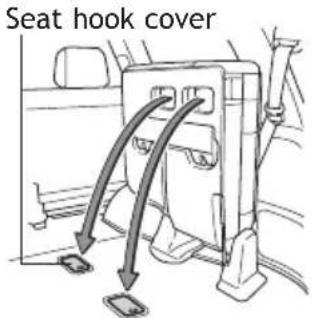
Seat hook cover(1) Stow the seat belt buckles and lower the head restraints.
(2) Hook the seat belt to the seat belt hangers.
(3) Fold down the seatback and swing the whole seat up and forward.
(4) Hook the holding strap to the assist grip and secure the seat.
(5) Install the seat hook covers on the seat hooks.
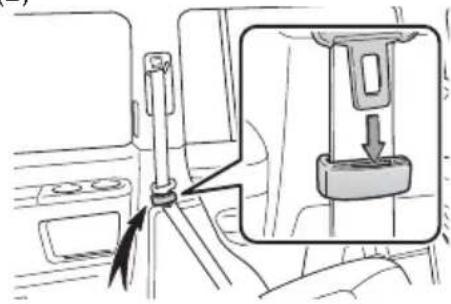
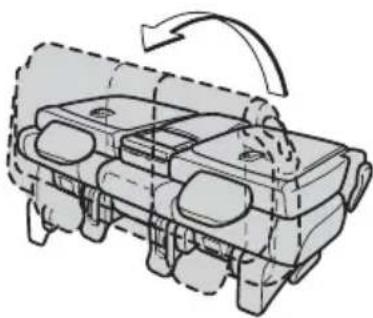
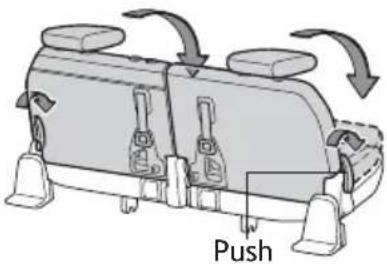
Seats-Tumbling third row seats
(1)

text_image
Diagram showing seatbelting instruction with magnified view of seatbelting mechanism(3)
text_image
Diagram showing a car seatbelt switch mechanism with an inset close-up of the component being inserted into a socket.(5)
text_image
Push(7)

natural_image
Diagram of a vehicle interior showing seatbelt and door panel, with an inset view of the seatbelt detail (no text or symbols present)(1)
Returning seats

natural_image
Line drawing of a car fuel pump assembly with hoses and connectors (no text or symbols)(2)

natural_image
Line drawing of a car interior showing seats, front panel, and dashboard with a door (no text or symbols)(4)

text_image
Pull(6)

text_image
Pull(8)
text_image
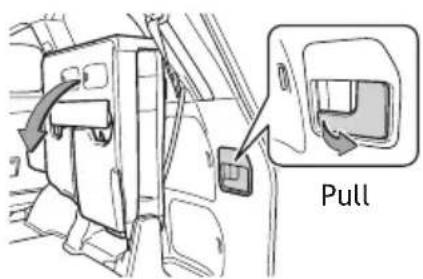
Seat hook cover(2)
text_image
Pull(1) Stow the seat belt buckles.
(2) Stow the center head restraint.
(3) Hook the seat belt to the seat belt hangers.
(4) Fold down the outer head restraints.
(5) Fold the seats.
(6) Lift the seats sideward.
(7) Lock the seats.
(8) Install the seat hook covers on the seat hooks.
Returning seats
(1) Install the seat hook covers into the back of the seat cushions.
(2) Lower the seats to their original position.
Lights & turn signals
Headlights
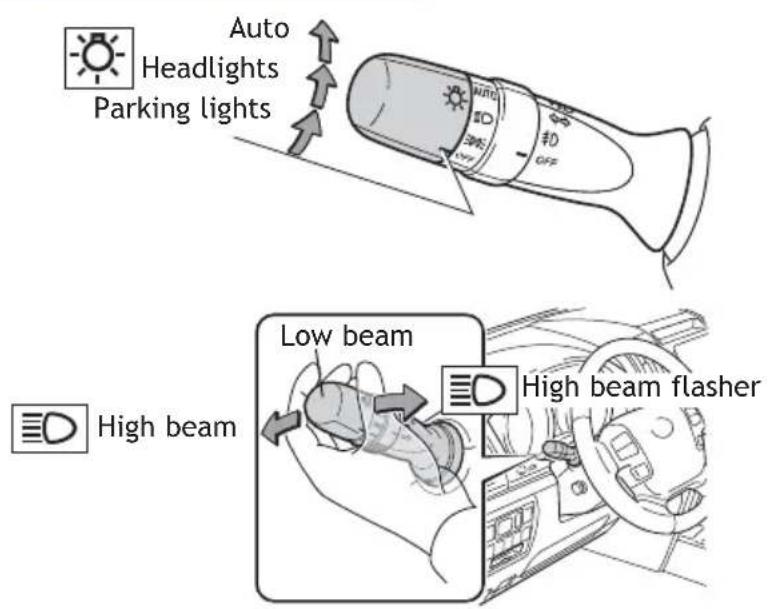
text_image
Auto Headlights Parking lights Low beam High beam flasher-Daytime Running Light system (DRL) Automatically turns on the headlights at a reduced intensity.
-Automatic light cut off system Automatically turns lights off after a delay of 30 seconds.
Front fog lights
text_image
MITO ID 300Ω OFF Turn≠0
Front fog lights come on only when the headlights are on low beam.
Turn signals

text_image
Right turn Lane change Lane change Left turn
Window wipers & washers
Front
Adjust sensor sensitivity*
Single wipe

text_image
nsor sensitivity* Sin MST OFF MDS L0 L0 ON INT OFF REARRain-sensing
Slow
Fast
* Rain-sensing windshield wiper Rotate to increase/decrease sensor sensitivity.
Pull to wash and wipe
Rear

text_image
MST OFF INT LD IN INT ON INT OFF 2025 W ↑ ↓Wash and wipe
Wipe
Interval wipe
Wash and wipe
Windows-Power
Driver side

text_image
Up Down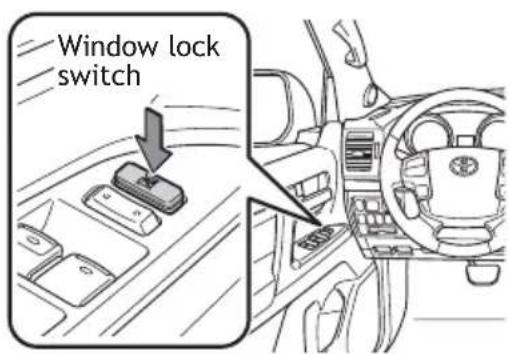
text_image
Window lock switchAutomatic operation Push the switch completely down or pull it completely up and release to fully open or close. To stop window midway, lightly push the switch in the opposite direction.
Window lock switch Deactivates all passenger windows. Driver's window remains operable.
Mirrors-Side
text_image
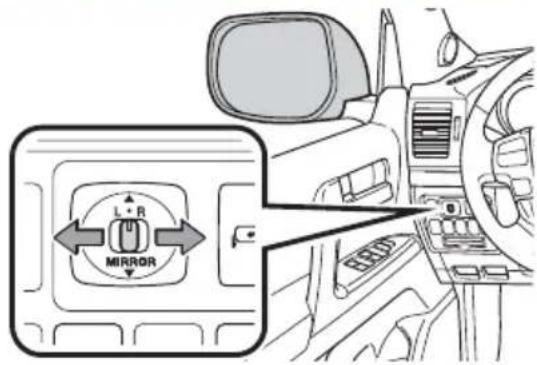
L + R MIRRORUse switch to adjust mirror angle while in ACCESSORY or IGNITION ON mode.
Linked mirror function when reversing The outside rearview mirrors automatically angle downwards when vehicle is in reverse. Will only operate when switch is in "L" or "R" position.
Back door
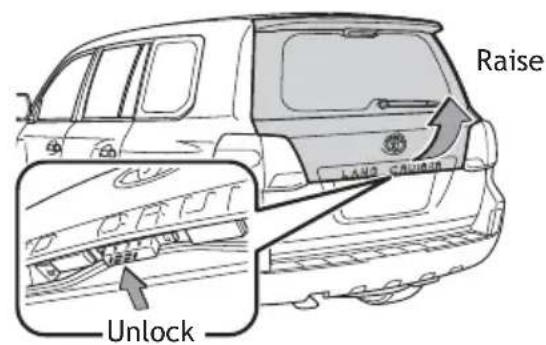
text_image
Raise LAND CIVIUM Unlock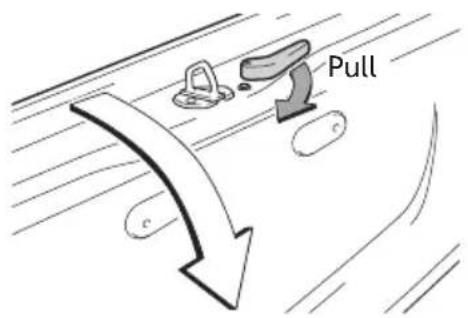
text_image
Pull c cThe back door can be locked and unlocked using the entry function, wireless remote control or door lock switch.
Moonroof
Sliding operation Tilting operation
Push once to open partway; again to open completely.

text_image
Open CloseRecommended open position to minimize wind noise.
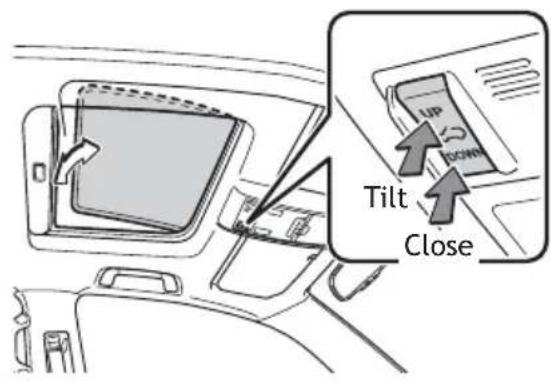
text_image
Tilt CloseAir Conditioning/Heating
NOTE: For more information, refer to the "Navigation System Owner's Manual."
Front Air Conditioning
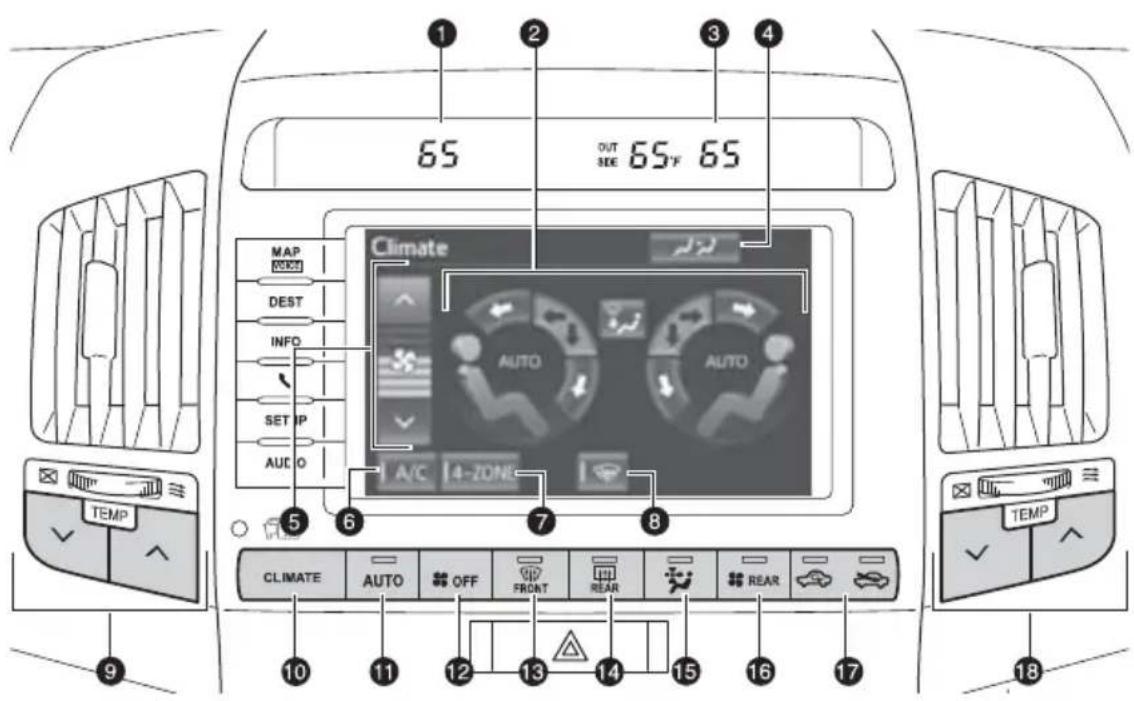
text_image
65 OUT SEE 65°F 65 Climate AUTO AUTO A/C 4-ZONE TEMP AUSTO OFF FRONT REAR REAR 10 11 12 13 14 15 16 17 TEMP 18① Driver side temperature display
2 Airflow controls (touch to change air outlets)
③ Passenger side temperature display
4 Rear AC control button (touch to display rear AC control screen)
5 Fan speed
6 Air Conditioning ON/OFF
7 “4-ZONE” button (touch to set the temperatures independently for driver, front passenger and rear seats)
8 Windshield wiper de-icer (if equipped)
9 Temperature controls (driver side)
10 CLIMATE (push to display AC control screen)
11 Automatic climate control ON
Adjusting the temperature setting will cause the airflow vents, air intake and fan to adjust automatically.
12 Climate control OFF
13 Windshield airflow/defogger (fresh air only)
14 Outside rearview mirror/Rear window defogger
15 Micro dust and pollen removal mode ON/OFF
16 Rear Air Conditioning operation mode ON/OFF
17 Air intake control (switch between outside air and recirculated air mode)
18 Temperature controls (passenger side)
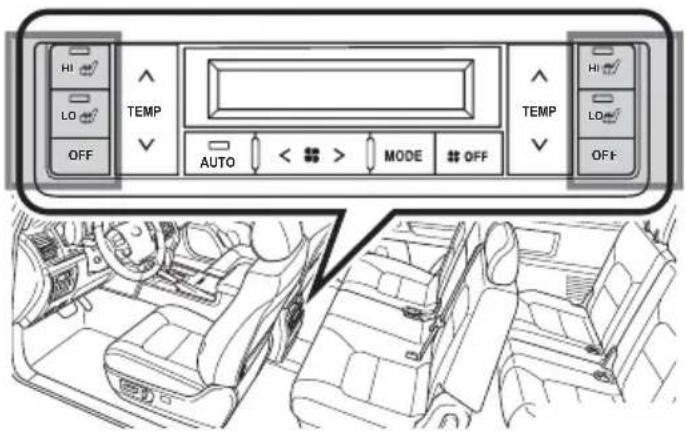
Rear Air Conditioning
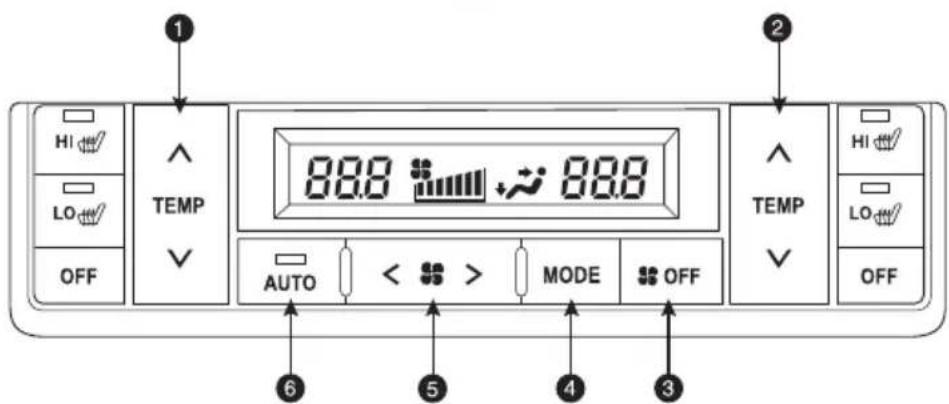
text_image
HI LO OFF TEMP 88.8 88.8 AUTO < > MODE OFF 2 TEMP HI LO OFF ① ② ③ ④ ⑤ ⑥① Temperature selector (left side)
② Temperature selector (right side)
③ Climate control OFF
4 Airflow vent
5 Fan speed
6 Automatic climate control ON
Seat heaters and ventilators
Front seats

text_image
Push OFFPush knob to pop the controller out. Turn clockwise for heater; counterclockwise for airflow.
① Blows air from the seat
② Turns the seat heater on
Second seats
Left second seat
text_image
HI LO OFF TEMP AUTO < > MODE # OFF TEMP HI LO OFFRight second seat
Audio
NOTE: For more information, refer to the "Navigation System Owner's Manual."

text_image
Function tabs: Select media mode Display audio setup screen Display audio control screen MAP VOCU DEST INFO SETUP AUDIO AM FM SAT Apps 1 101.1 2 100.6 3 Ch113 Set 4 94.1 1/6 5 Ch111 > SCAN Multicast Options 6 Ch110 HDRadio Tag Sound HD ONLY TRAP SCAN 91.70 MHz Rock WRIF HD2 of 2 Artist Name Song Title Push to turn ON/OFF PWR-VOL PRST-TRACK H1 TUNE-SCROLL Seek station/ track/presets Eject disc Mute/Pause/FF. Disc slot Turn to search selected media (radio, CD, DVD, iPod®, etc.)USB port

natural_image
Interior view of a car dashboard and steering wheel with a close-up of the steering wheel (no text or symbols visible)Connecting a USB-compatible portable audio device or USB memory to the USB port will enable you to listen to these devices through the vehicle's speaker system.
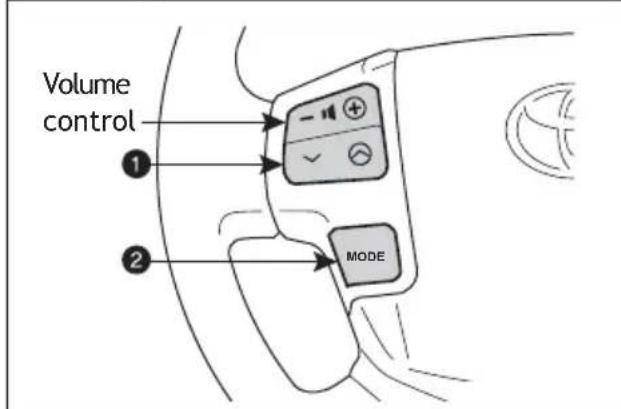
Steering wheel switches
text_image
Volume control ① ② MODE① “V ∧”
Use to search within the selected audio medium (radio, CD, iPod ^® , etc.).
② "MODE"
Push to turn audio ON and to select an audio mode. Push and hold to turn audio system OFF.
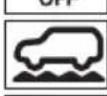
Crawl control

text_image
CRAWL IS ACTIVATED Speed Push ON/OFF CRAWL MTS Speed selection switchSpeed modes
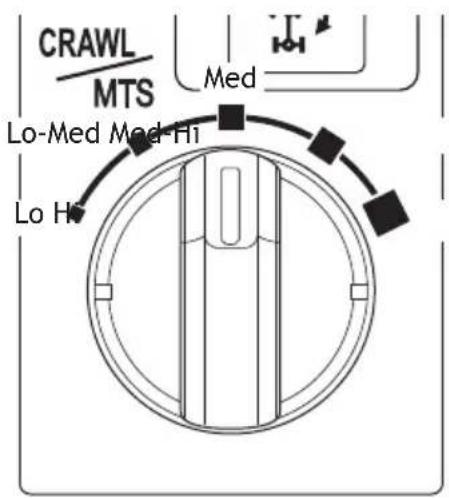
text_image
CRAWL MTS Med Lo-Med Med-Hi Lo HCrawl control allows travel on extremely rough off-road surfaces at a fixed low speed without pressing the accelerator or brake pedal.
Refer to the Owner's Manual for more details.
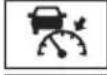
Dynamic radar cruise control
Use to drive at a constant speed above 25 mph, or to follow the vehicle in front of you at a fixed distance without pressing on the gas or brake pedal.
Refer to the Owner's Manual for more details and complete safety precautions before attempting to use dynamic radar cruise control.
Turn system ON


text_image
Diagram showing car interior and rearview side view with a close-up of the rearview device labeled 'REF' and 'SET'.System ON/OFF
Set, cancel or resume

text_image
Resume 2 Cancel1 Set SET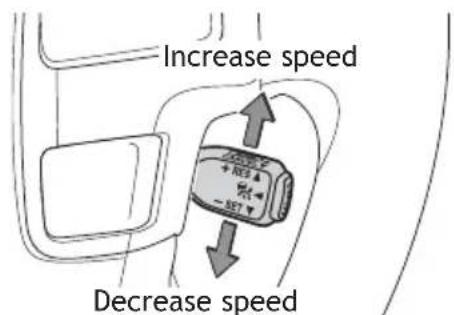
text_image
Increase speed Decrease speed^1 The set speed may also be cancelled by depressing the brake pedal.
^2 The set speed may be resumed once vehicle speed exceeds 25 mph.
Distance control mode

text_image
RADAR READY + REG - SETThe distance control mode will cruise at a set speed, decelerate to maintain a selected distance from a slower vehicle traveling in front of you, and accelerate back up to the selected speed if the vehicle in front changes lanes or speeds up.
To select distance control mode Push ON-OFF button. "RADAR READY" or the "Indicator will appear."
To set, cancel or resume a speed Refer to "Set, cancel or resume" details at beginning of section.
LONG MIDDLE SHORT

flowchart
graph TD
    A["Top Parking"] --> B["Top Parking"]
    B --> C["Top Parking"]
    C --> D["Downward Arrow"]

text_image
Diagram showing a device with an arrow pointing to it, indicating a process or operation.To change vehicle-to-vehicle distance Push the distance button to cycle through the settings, which will change progressively from LONG to MIDDLE to SHORT.
Once a dynamic radar cruise control speed has been set, it is not possible to switch to fixed speed mode without turning the system OFF and then back ON.
Fixed speed mode

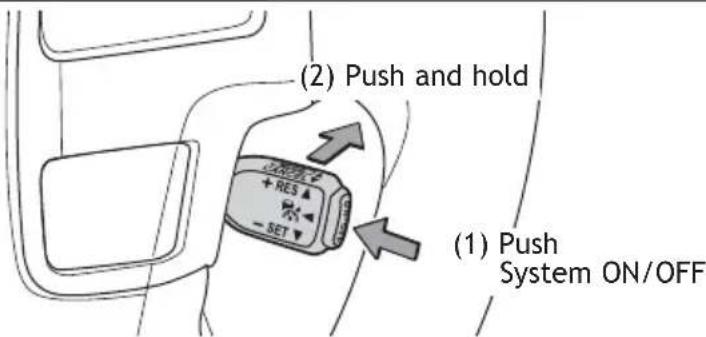
text_image
(2) Push and hold (1) Push System ON/OFFTo select fixed speed mode Push ON-OFF button. Push lever forward and hold until the “ indicator appears.
To set, cancel or resume a speed Refer to "Set, cancel or resume" details at beginning of section.
Garage door opener (HomeLink®)\*

natural_image
Diagram showing a car interior with a door clip and a close-up of the dashboard (no text or symbols)Garage door openers manufactured under license from HomeLink®* can be programmed to operate garage doors, estate gates, security lighting, etc.
Refer to “Garage door opener,” Section 3-7 in the Owner’s Manual for more details.
For programming assistance, contact HomeLink® at 1-800-355-3515, or visit http://www.homelink.com.
* HomeLink® is a registered trademark of Johnson Controls, Inc.
Multi-Information Display

text_image
AVERAGE SPEED 25 MPH D ODO 123456 MILESPush "DISP" to scroll through the following information screens:
(1) Front tire angle
(2) Miles left on remaining fuel
(3) Average gas mileage after refueling
(4) Current gas mileage
(5) Average gas mileage and Eco Driving Indicator Zone Display
(6) Average vehicle speed
(7) Speedometer
(8) Turn-by-turn navigation setting screen (vehicles with navigation system)
(9) Tire inflation pressure
(10) Display OFF
Tilt and telescopic steering wheel

flowchart
graph TD
    A["Up"] --> B["Toward driver"]
    C["Down"] --> B
    D["Away from driver"] --> B
    style A fill:#f9f,stroke:#333
    style B fill:#ccf,stroke:#333
    style C fill:#cfc,stroke:#333
    style D fill:#fcc,stroke:#333
NOTE: Do not attempt to adjust while the vehicle is in motion.
Telephone controls (Bluetooth®)
Display
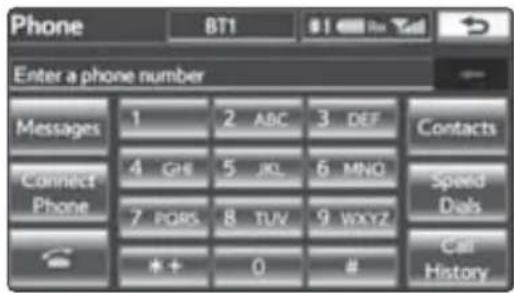
text_image
Phone BT1 $1 For You Enter a phone number Messages 1 2 ABC 3 DEF Contacts Connect Phone 4 GHE 5 JK 6 MNO Speed Dals 7 PORS 8 TUV 9 WXYZ Call History * + 0 #Microphone
text_image
Diagram showing car air intake system with directional arrows and labeled ports P and NNSteering wheel telephone switches

text_image
Start call End call Voice command button DSPBluetooth® technology allows dialing or receipt of calls without taking hands from the steering wheel or using a cable to connect the telephone and the system.
Refer to “Hands-free system (for cellular phone),” Section 4 in the Navigation System Owner’s Manual, for more information about phone connections and compatibility.
Door locks

text_image
Unlock LockRear seat entertainment system

text_image
Diagram of car interior with numbered UI components including remote control, display, and door panel① Front audio system (DVD player)
② DVD screen
③ Remote control
4 Headphone volume control and headphone jacks
⑤ A/V input adapter
6 120V AC Power outlet
For details, refer to the "Navigation System Owner's Manual."
Cup holders
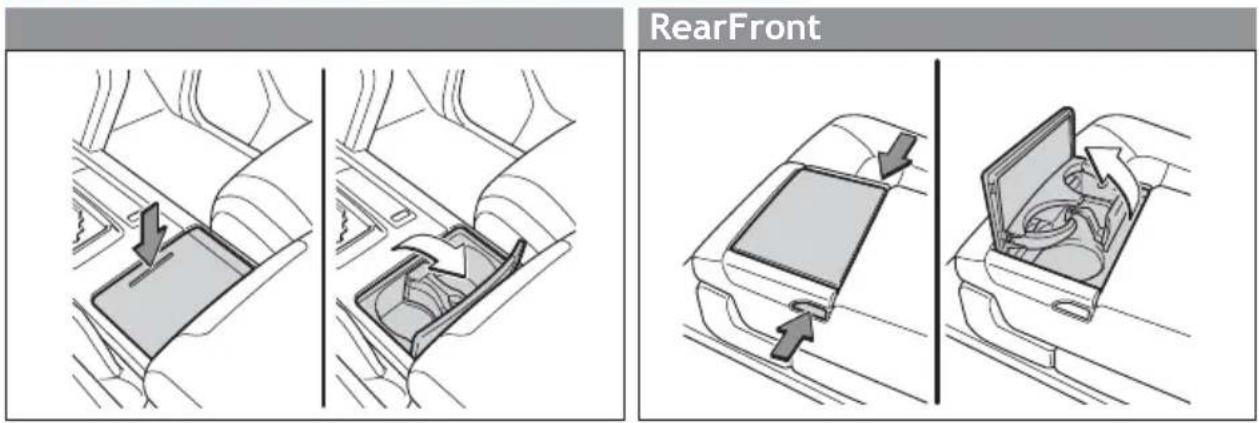
text_image
RearFrontCooler box

text_image
Indicator COOL BOX PWRPush "PWR" button to turn cooler box ON; indicator will illuminate.
Parking brake
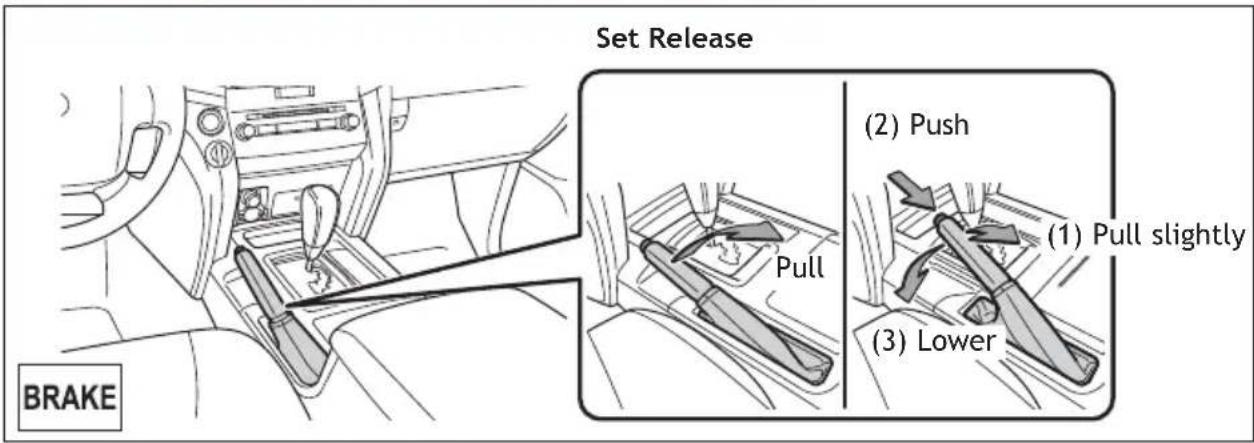
text_image
Set Release (BRAKE) (2) Push Pull (1) Pull slightly (3) LowerPower outlets-12V DC
Front Rear
text_image
Diagram showing car interior with dashboard, steering wheel, and directional arrow indicating left-hand rule
text_image
Diagram showing car interior with a highlighted 'TAX1500' button and directional arrow, likely illustrating vehicle safety or steering system.The “ENGINE START STOP” switch must be in “ACCESSORY” or “IGNITION ON” mode to be used.
Power outlet-120V AC

text_image
Diagram showing a vehicle interior with a door panel and directional arrow indicating movement or change, alongside a close-up of the backrest.The "ENGINE START STOP" switch must be in "IGNITION ON" mode to be used.
SAFETY AND EMERGENCY FEATURES
Seat belts
natural_image
Illustration of a medical procedure showing hands using a tool to adjust or install a device (no text or symbols visible)Keep as low on hips as possible

text_image
Take Too high is low on possibleTake up slack
Too high
If belt is fully extended, then retracted even slightly, it cannot be re-extended beyond that point, unless fully retracted again. This feature is used to help hold child restraint systems securely.
To find more information about seat belts, and how to install a child restraint system, refer to the Owner's Manual.
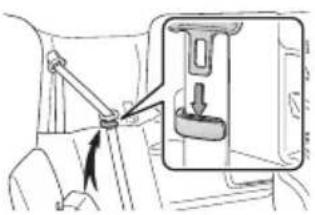
Seat belts-Shoulder belt anchor
Push up, or squeeze - lock release to lower
natural_image
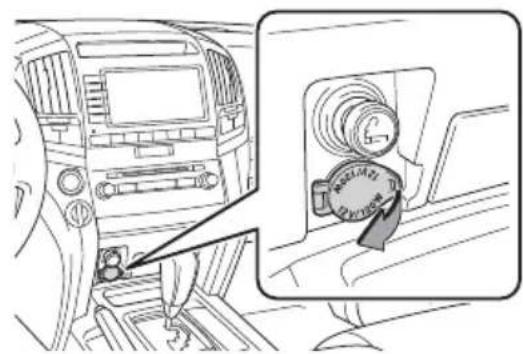
Diagram of a mechanical device with directional arrows indicating movement or force (no text or symbols)Tire Pressure Monitoring (warning) System

text_image
SETSystem reset initialization
-
Push and hold "SET" button until the indicator blinks three times.
-
Wait a few minutes to allow initialization to complete.
After adjusting tire pressures, or after tires have been rotated or replaced, turn the "ENGINE START STOP" switch to ON and press and hold the "SET" button until indicator blinks three times. Let the vehicle sit for a few minutes to allow initialization to complete.
Refer to the load label on the door jamb or the Owner's Manual for tire inflation specifications.
If the tire pressure indicator flashes for more than 60 seconds and then remains on, take the vehicle to your local Toyota dealer.
NOTE: The warning light may come on due to temperature changes or changes in tire pressure from natural air leakage. If the system has not been initialized recently, setting the tire pressures to factory specifications should turn off the light.
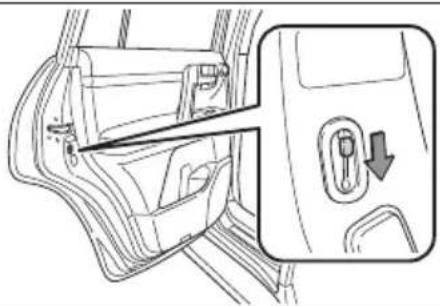
Doors-Child safety locks
Rear door
natural_image
Line drawing of a car door panel with a close-up inset showing the door handle and lock (no text or symbols)Moving the lever to "LOCK" will allow the door to be opened only from the outside.
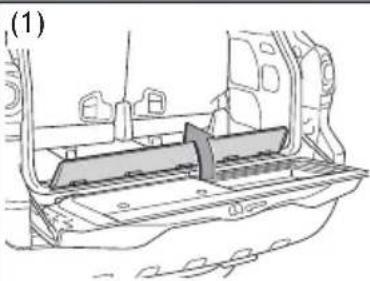
Spare tire & tools
Tool location

text_image
Jack Spare tire Tool boxRemoving the spare tire
natural_image
Technical line drawing of a vehicle interior showing structural components and frame (no text or symbols)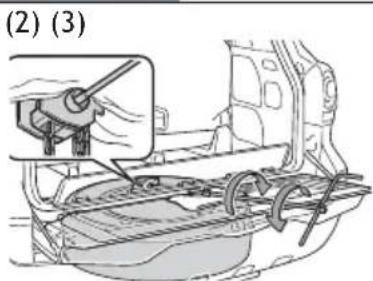
text_image
(2) (3)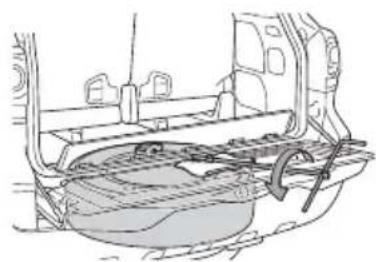
natural_image
Technical line drawing of a car's front bumper assembly (no text or symbols)(1) Remove the cover.
(2) Insert the jack handle extension into the lowering screw.
(3) Lower the spare tire completely to the ground.
Refer to the Owner's Manual for tire changing and jack positioning procedures.
Star Safety System™
All new Toyota vehicles come standard with the Star Safety System ^™ , which combines Vehicle Stability Control (VSC), Traction Control (TRAC), Anti-lock Braking System (ABS), Electronic Brake-force Distribution (EBD), Brake Assist (BA) and Smart Stop Technology (SST).
Vehicle Stability Control (VSC)
VSC helps prevent loss of traction during cornering by reducing engine power and applying brake force to selected wheels.
Toyota's VSC monitors steering angle and the direction your vehicle is traveling. When it senses that the front or rear wheels begin to lose traction, VSC reduces engine power and applies braking to selected wheels. This helps restore traction and vehicle control.
Active Traction Control (A-TRAC)
Helps to maintain drive power and prevent the 4 wheels from spinning when starting the vehicle or accelerating on slippery roads.
Multi Terrain Anti-lock Brake System (ABS)
Helps to prevent wheel lock when the brakes are applied suddenly, or if the brakes are applied while driving on a slippery road surface, or in off-road conditions (such as rough roads, sand and mud).
Electronic Brake Force Distribution (EBD)
Toyota's ABS technology has Electronic Brake-force Distribution (EBD) to help maintain stability and balance when braking. Abrupt stops cause the vehicle to tilt forward, reducing the braking power of the rear wheels. EBD responds to sudden stops by redistributing brake force to maximize the braking effectiveness of all four wheels.
Brake Assist (BA)
Brake Assist is designed to detect sudden or “panic” braking, and then add braking pressure to decrease the vehicle’s stopping distance. When there’s only a split second to react, Brake Assist can add additional brake pressure more quickly than just the driver alone can.
Smart Stop Technology (SST)
Smart Stop Technology automatically reduces engine power when the accelerator and brake pedals are pressed simultaneously under certain conditions.
SST engages when the accelerator is depressed first and the brakes are applied firmly for longer than one-half second at speeds greater than five miles per hour.
SST doesn't engage if the brake pedal is depressed before the accelerator pedal, allowing vehicles to start on a steep hill and safely accelerate without rolling backward.
Floor mat installation
There are two types of Toyota floor mats: carpeted and all-weather. Each vehicle has model-specific floor mats. Installation is easy.
For safety, follow these steps:
- Only use floor mats designed for your specific model.
- Use only one floor mat at a time, using the retaining hooks to keep the mat in place.
• Install floor mats right side up.

text_image
Technical diagram showing a car interior with labeled parts and a magnified inset of a mechanical component.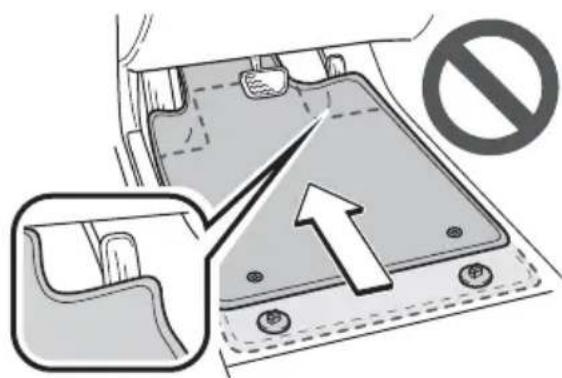
text_image
Diagram showing a vehicle seatbelt mechanism with a prohibition symbol and an arrow indicating upward movement.NOTES
OVERVIEW
FEATURES/OPERATIONS
SAFETY AND EMERGENCY FEATURES

TOYOTA Owners
toyota.com/owners
CUSTOMER EXPERIENCE CENTER
1-800 -331-4331