
RG-CT 18 Li - String Trimmer EINHELL - Free user manual and instructions
Find the device manual for free RG-CT 18 Li EINHELL in PDF.


| Product type | Cordless grass trimmer |
| Brand | Einhell |
| Model | RG-CT 18 Li |
| Cutting circle | 24 cm diameter |
| No-load speed | 8,500 rpm |
| Battery | Li-Ion 18 V, 1.4 Ah |
| Charger | 21 V DC, 500 mA |
| Charging time | Approximately 3 to 5 hours |
| Maximum runtime | Approximately 35 minutes |
| Weight | 2.8 kg |
| Sound pressure level (LpA) | 77 dB(A) |
| Sound power level (LWA) | 94 dB(A) |
| Vibration front handle | < 2.5 m/s² |
| Vibration rear handle | < 2.5 m/s² |
| Safety class | III |
| Line type | Spool line (automatic feed) |
| Replacement blade | Ref. 34.057.26 |
| Functions | Edging, adjustable height and angle, 180° rotating handle |
| Maintenance | Regular cleaning with damp cloth, no internal maintenance required |
| Warranty | 2 years (conditions in manual) |
Frequently Asked Questions - RG-CT 18 Li EINHELL
User questions about RG-CT 18 Li EINHELL
0 question about this device. Answer the ones you know or ask your own.
Ask a new question about this device
Download the instructions for your String Trimmer in PDF format for free! Find your manual RG-CT 18 Li - EINHELL and take your electronic device back in hand. On this page are published all the documents necessary for the use of your device. RG-CT 18 Li by EINHELL.
USER MANUAL RG-CT 18 Li EINHELL








Attention!
When using equipment, a few safety precautions must be observed to avoid injuries and damage. Please read the complete operating manual with due care. Keep this manual in a safe place, so that the information is available at all times. If you give the equipment to any other person, give them these operating instructions as well.
We accept no liability for damage or accidents which arise due to non-observance of these instructions and the safety information.
1. Safety information
Please refer to the booklet included in delivery for the safety instructions.
CAUTION!
Read all safety regulations and instructions.
Any errors made in following the safety regulations and instructions may result in an electric shock, fire and/or serious injury.
Keep all safety regulations and instructions in a safe place for future use.
Explanation of the warning signs on the machine (Figure 3)
1: Caution! 2: Wear safety goggles! 3: Protect from the damp! 4: Read the directions for use before putting into operation for the first time! 5: Keep third parties away from the danger zone! 6: The tool runs on after being switched off!
2. Layout (Fig. 1/2)
1 Safety lock-off 2 ON/OFF switch 3 Setting knob to turn the handle 4 Additional handle 5 Height adjustment bar 6 Edge guide 7 Thread spool 8 Safety hood 9 Pedal for angle adjustment 10 Battery charger 11 Battery 12 4 Securing screws for safety hood 13 2 Securing screws for edge guide 14 Blade
3. Proper use
The equipment is designed for cutting the edges of lawns and small areas of grass in private and hobby gardens.
Tools for private and hobby gardens are not suitable for use in public facilities, parks and sport centers, along roadways, on farms or in the forestry sector.
For the tool to be used properly it is imperative to follow the instructions set out in the manufacturer's directions for use.
Important! It is prohibited to use the tool to chop material for composting because of the potential danger to persons and property.
The machine is to be used only for its prescribed purpose. Any other use is deemed to be a case of misuse. The user / operator and not the manufacturer will be liable for any damage or injuries of any kind caused as a result of this.
Please note that our equipment has not been designed for use in commercial, trade or industrial applications. Our warranty will be voided if the machine is used in commercial, trade or industrial businesses or for equivalent purposes.
4. Technical data
Type of protection: III
Sound power level LWA : 94 dB(A)
Sound pressure level LpA : 77 dB(A)
Replaceable NC battery: 18 V d.c./1400 mAh
Front handle vibration ahv : ≤2,5 m/s
Rear handle vibration ahv: ≤ 2,5 m / s
Weight 2.8 kg
Power supply unit:
Mains voltage: 230 V ~ 50 Hz
Output:
Rated voltage: 21 V d.c.
Rated current: 500 mA
The noise level of this machine may exceed 85 dB(A). In this case, noise protection is necessary for the user. The machine's noise was measured in accordance with prEN ISO 10518. The level of vibrations at the handle is <2.5 m/s². Measurements were taken in accordance with prEN ISO 10518.
5. Before starting
5.1 Installing the safety hood (Fig. 4-7)
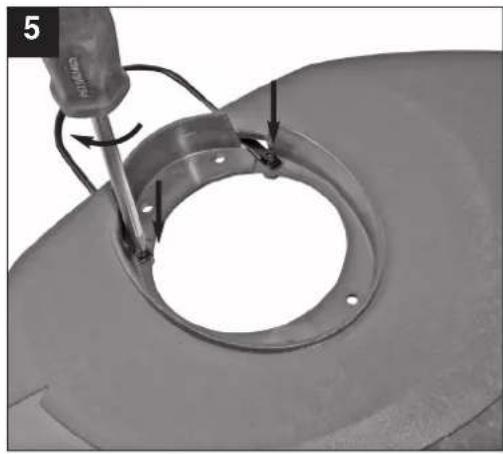
- Secure the edge guide to the safety hood (Fig. 4-5) using the two securing screws (Fig. 2/Item 13).
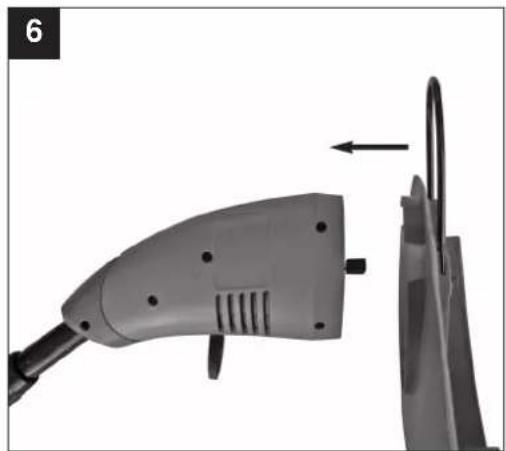
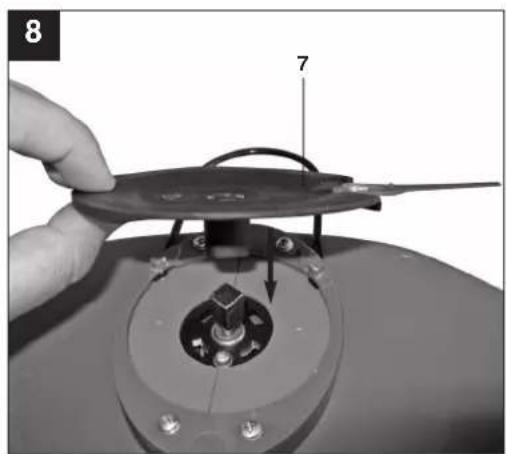
- Place the safety hood on the trimmer (Fig. 6) and secure it to the trimmer (Fig. 7) using the four securing screws (Fig. 2 / Item 12).
5.2 Installing the additional handle (Fig. 9-10)
Undo the securing screw from the handle and then place the handle on the main handle (Fig. 9) and secure it with the screw (Fig. 1).
5.3 Fitting the blade (Fig. 11-12)
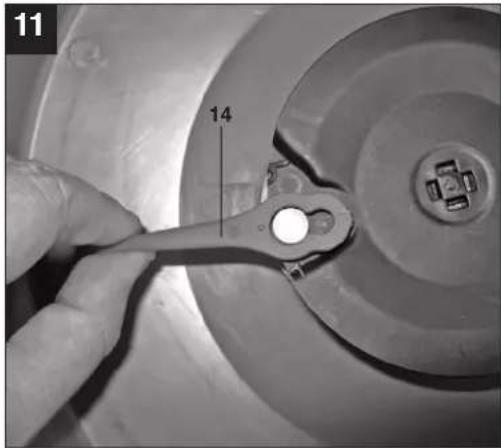
Place the blade (Fig. 11/Item 14) with the larger opening over the mount (Fig. 11) and then pull tight in the direction of the arrow. Make sure the blade locks into place correctly as shown in Figure 12.
5.4 Height adjustment (Fig. 13)
Undo the union nut (Fig. 13/Item 5) until the grass trimmer handle can be moved in and out freely. Now set the required working height and secure the handle in this position by tightening the union nut again.
5.5 Adjusting the additional handle (Fig. 10)
Undo the securing screw on the additional handle until it can be moved forwards and backwards without any great resistance. Set the required position and tighten the securing screw again.
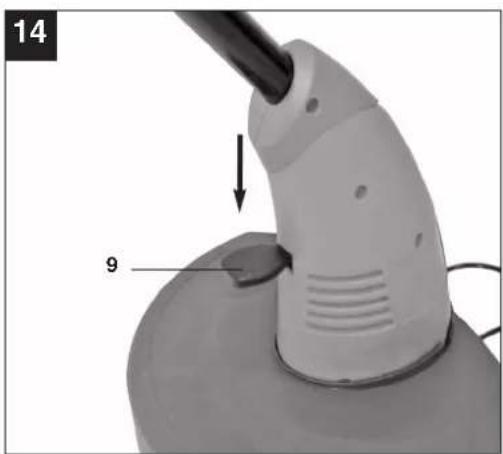
5.6 Adjusting the angle of the guide handle (Fig. 14)
Place the grass trimmer on a firm surface. Press the pedal for adjusting the angle from above using your foot (Fig. 14/Item 9). You can now set the handle to the required angle. Release the pedal and allow the handle to lock into position to fix the angle. Three different locking angles are possible.
5.7 Charging the battery (Fig. 15 - 17)
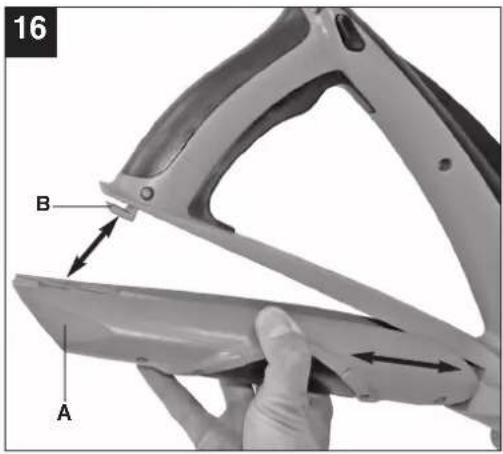
- Take the battery pack out of the equipment. Press the locking buttons on the side to release the battery pack (Fig. 15-16).
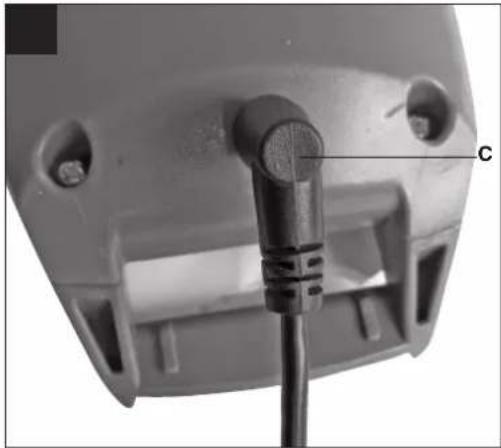
- Check that your mains voltage is the same as that marked on the rating plate of the battery charger. Connect the charger's power cable to a socket outlet and insert the plug (Fig. 17/Item C) into the charging jack of the battery pack. The red LED indicates the charging process.
- The charger will end the charging process automatically when the battery is fully charged (after approx. 3-5 h). The green LED will come on.
The rechargeable battery can become a little warm during the charging process. This is normal.
When you insert the battery again ensure that it locks securely in the mounting (Fig. 16/Item B) with the opening at the rear (Fig. 16/Item A).
If the battery pack fails to charge, please check
● whether there is voltage at the socket-outlet
● whether there is good contact at the charging contacts
If the battery pack still fails to charge, send
● the battery charger with charging adapter
● and the battery pack
to our customer services department.
To ensure that the NC battery pack provides long service you should take care to recharge it promptly. Recharging is always necessary when you notice a drop in the performance of your cordless grass trimmer.
Never fully discharge the battery pack. This will cause it to develop a defect.
6. Operation
Your grass trimmer will work at its best if you observe the following instructions:
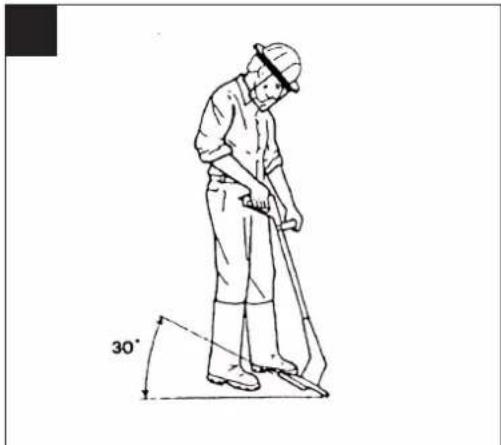
● Never use the grass trimmer without its safety devices. - Do not cut grass when it is wet. The best results are had on dry grass. ● To switch on your grass trimmer, press the safety lock-off and the ON/OFF switch (Fig.1/Pos. 2). ● To switch off your grass trimmer, let go of the ON/OFF switch (Fig. 1/Pos. 2). - Do not move the grass trimmer against the grass until the switch is pressed, i.e. wait until the trimmer is running. - For the correct cutting action, swing the grass trimmer to the side as you walk forward, holding it at an angle of approx. 30° as you do so (see Figure 19-20). ● Make several passes to cut long grass shorter step by step from the top (see Figure 21). - Use the guard hood to prevent unnecessary wear. ● To avoid unnecessary wear, keep the grass trimmer away from hard objects.
Using the grass trimmer as an edge trimmer
The grass trimmer can be adjusted as follows to trim the edge of lawns and beds.
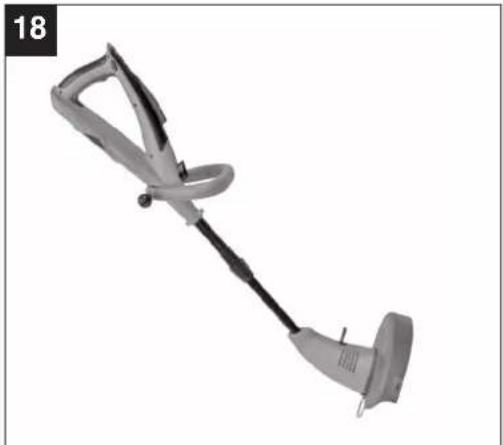
- Remove the battery (Fig. 15 + 16) ● Press the setting knob (Fig. 1 / Item 3)
- Press and hold the setting knob and turn the top handle through 180° until it locks. ● The grass trimmer can thus be adjusted for use as an edge trimmer for making vertical cuts on the grass (Fig. 18).
7. Cleaning, maintenance and ordering of spare parts
Before putting away or cleaning the grass trimmer, pull out the battery pack (Fig. 15 and 16).
7.1 Cleaning
- Keep all safety devices, air vents and the motor housing free of dirt and dust as far as possible. Wipe the equipment with a clean cloth or blow it with compressed air at low pressure. ●We recommend that you clean the device immediately each time you have finished using it. ●Clean the equipment regularly with a moist cloth and some soft soap. Do not use cleaning agents or solvents; these could attack the plastic parts of the equipment. Ensure that no water can seep into the device.
- Remove deposits from the guard hood with a brush.
7.2 Replacing the blade (Fig. 11+12)
IMPORTANT! Make sure that you remove the battery pack before replacing the blade (Fig. 15-16).
● To remove the blade, push the blade inwards and remove via the larger opening as shown in Figure 11. ● To fit the new blade, proceed in reverse order. Make sure the blade locks into place correctly as shown in Figure 12.
7.3 Maintenance
There are no parts inside the equipment which require additional maintenance.
7.4 Ordering replacement parts:
Please quote the following data when ordering replacement parts:
●Type of machine ●Article number of the machine ●Identification number of the machine ●Replacement part number of the part required For our latest prices and information please go to www.isc-gmbh.info
Spare blade art. no.: 34.057.26
GB
8. Disposal and recycling
The unit is supplied in packaging to prevent damage during transit. This packaging is made of raw materials and can therefore be reused or returned to the raw material recycling system.
The unit and its accessories are made of various materials, such as metal and plastic.
Defective components must be disposed of as special waste. Ask your dealer or your local council.
9. Faults
The device does not operate:
Check whether the rechargeable battery is charged and whether the battery charger works. If the device still does not work even with a voltage supply, please send it to our customer services department at the address indicated.
F
Attention!
© Only for EU countries
Never place any electric tools in your household refuse.
To comply with European Directive 2002/96/EC concerning old electric and electronic equipment and its implementation in national laws, old electric tools have to be separated from other waste and disposed of in an environment-friendly fashion, e.g. by taking to a recycling depot.
Recycling alternative to the demand to return electrical devices:
As an alternative to returning the electrical device, the owner is obliged to cooperate in ensuring that the device is properly recycled if ownership is relinquished. This can also be done by handing over the used device to a returns center, which will dispose of it in accordance with national commercial and industrial waste management legislation. This does not apply to the accessories and auxiliary equipment without any electrical components which are included with the used device.
The reprinting or reproduction by any other means, in whole or in part, of documentation and papers accompanying products is permitted only with the express consent of ISC GmbH.
All of our products undergo strict quality checks to ensure that they reach you in perfect condition. In the unlikely event that your device develops a fault, please contact our service department at the address shown on this guarantee card. Of course, if you would prefer to call us then we are also happy to offer our assistance under the service number printed below. Please note the following terms under which guarantee claims can be made:
- These guarantee terms cover additional guarantee rights and do not affect your statutory warranty rights. We do not charge you for this guarantee.
- Our guarantee only covers problems caused by material or manufacturing defects, and it is restricted to the rectification of these defects or replacement of the device. Please note that our devices have not been designed for use in commercial, trade or industrial applications. Consequently, the guarantee is invalidated if the equipment is used in commercial, trade or industrial applications or for other equivalent activities. The following are also excluded from our guarantee: compensation for transport damage, damage caused by failure to comply with the installation/assembly instructions or damage caused by unprofessional installation, failure to comply with the operating instructions (e.g. connection to the wrong mains voltage or current type), misuse or inappropriate use (such as overloading of the device or use of non-approved tools or accessories), failure to comply with the maintenance and safety regulations, ingress of foreign bodies into the device (e.g. sand, stones or dust), effects of force or external influences (e.g. damage caused by the device being dropped) and normal wear resulting from proper operation of the device.
The guarantee is rendered null and void if any attempt is made to tamper with the device.
- The guarantee is valid for a period of 2 years starting from the purchase date of the device. Guarantee claims should be submitted before the end of the guarantee period within two weeks of the defect being noticed. No guarantee claims will be accepted after the end of the guarantee period. The original guarantee period remains applicable to the device even if repairs are carried out or parts are replaced. In such cases, the work performed or parts fitted will not result in an extension of the guarantee period, and no new guarantee will become active for the work performed or parts fitted. This also applies when an on-site service is used.
- In order to assert your guarantee claim, please send your defective device postage-free to the address shown below. Please enclose either the original or a copy of your sales receipt or another dated proof of purchase. Please keep your sales receipt in a safe place, as it is your proof of purchase. It would help us if you could describe the nature of the problem in as much detail as possible. If the defect is covered by our guarantee then your device will either be repaired immediately and returned to you, or we will send you a new device.
Of course, we are also happy to offer a chargeable repair service for any defects which are not covered by the scope of this guarantee or for units which are no longer covered. To take advantage of this service, please send the device to our service address.
Dear Customer,
Dear Customer,


- ATTENTION
- SAFETY INFORMATION
- CAUTION
- EXPLANATION OF THE WARNING SIGNS ON THE MACHINE (FIGURE 3)
- LAYOUT (FIG. 1/2)
- PROPER USE
- IMPORTANT! IT IS PROHIBITED TO USE THE TOOL TO CHOP MATERIAL FOR COMPOSTING BECAUSE OF THE POTENTIAL DANGER TO PERSONS AND PROPERTY
- TECHNICAL DATA
- POWER SUPPLY UNIT
- OUTPUT
- BEFORE STARTING
- 5.1 INSTALLING THE SAFETY HOOD (FIG. 4-7)
- 5.2 INSTALLING THE ADDITIONAL HANDLE (FIG. 9-10)
- 5.3 FITTING THE BLADE (FIG. 11-12)
- 5.4 HEIGHT ADJUSTMENT (FIG. 13)
- 5.5 ADJUSTING THE ADDITIONAL HANDLE (FIG. 10)
- 5.6 ADJUSTING THE ANGLE OF THE GUIDE HANDLE (FIG. 14)
- 5.7 CHARGING THE BATTERY (FIG. 15 - 17)
- OPERATION
- USING THE GRASS TRIMMER AS AN EDGE TRIMMER
- CLEANING, MAINTENANCE AND ORDERING OF SPARE PARTS
- 7.1 CLEANING
- 7.2 REPLACING THE BLADE (FIG. 11+12)
- IMPORTANT! MAKE SURE THAT YOU REMOVE THE BATTERY PACK BEFORE REPLACING THE BLADE (FIG. 15-16)
- 7.3 MAINTENANCE
- 7.4 ORDERING REPLACEMENT PARTS
- GB
- DISPOSAL AND RECYCLING
- FAULTS
- THE DEVICE DOES NOT OPERATE
- F
- DEAR CUSTOMER
Brand : EINHELL
Model : RG-CT 18 Li
Category : String Trimmer