EOK76030X - Microwave Oven ELECTROLUX - Free user manual and instructions
Find the device manual for free EOK76030X ELECTROLUX in PDF.

User questions about EOK76030X ELECTROLUX
0 question about this device. Answer the ones you know or ask your own.
Ask a new question about this device
Download the instructions for your Microwave Oven in PDF format for free! Find your manual EOK76030X - ELECTROLUX and take your electronic device back in hand. On this page are published all the documents necessary for the use of your device. EOK76030X by ELECTROLUX.
USER MANUAL EOK76030X ELECTROLUX
We were thinking of you
when we made this product
Welcome to the world of Electrolux
Thank you for choosing a first class product from Electrolux, which hopefully will provide you with lots of pleasure in the future. The Electrolux ambition is to offer a wide variety of quality products that make your life more comfortable. You find some examples on the cover in this manual. Please take a few minutes to study this manual so that you can take advantage of the benefits of your new machine. We promise that it will provide a superior User Experience delivering Ease-of-Mind. Good luck!
The following symbols are used in this user manual:

Important information concerning your personal safety and information on how to avoid damaging the appliance.

General information and tips

Environmental information
4 electrolux
Contents
Safety instructions 5
Description of the Appliance 8
Before Using for the first time 11
Using the Oven 13
Uses, Tables and Tips 30
Cleaning and Care 41
What to do if ... 44
Installation Instructions 45
Disposal 51
Important safety instructions! Read carefully and keep for furture reference!
Electrical safety
- This appliance must only be connected by a qualified installation engineer.
- In the event of a fault or damage to the appliance: Take the fuses out or switch off.
- Should the door seal and the door seal surfaces be damaged, the appliance must not be operated until they are repaired.
- Repairs to the appliance must only be carried out by qualified service engineers. Considerable danger may result from improper repairs. If repairs become necessary, please contact our Customer Care Department or your dealer.
Children's safety
- Small children must be kept away from the appliance. Make sure that children do not touch the appliance when playing.
- Always heat baby food in jars or bottles with the lid or top off. After heating, stir or shake well, so that the heat is equally distributed. Before you give the baby food to the child, please be sure to test the temperature.
- When operating the grill (alone or in combination with the microwave) the
viewing window becomes hot. Therefore keep small children away from the door of the appliance.
- Children should be supervised to ensure that they do not play with the appliance.
- The appliance is fitted with a child safety device.
Safety whilst Using
- This appliance is intended to be used for cooking, roasting and baking food in the home.
• Take care when connecting electric appliances to sockets nearby. Do not allow connecting leads to come into contact with or to catch beneath the hot oven door. - Warning: Risk of burns! The interior of the oven becomes hot during use.
- Using ingredients containing alcohol in the oven may create an alcohol-air mixture that is easily ignited. In this case, open the door carefully. Do not have embers, sparks or naked flames in the vicinity when opening the door.
- This appliance is not intended for use by persons (including children) with reduced physical, sensory or mental capabilities, or lack of experience and knowledge, unless the have been given supervision or instruction concerning use of the appliance by a person responsible for their safety.

Information on acrylamides According to the latest scientific knowledge, intensive browning of food, especially in products containing starch, can constitute a health risk due to acrylamides. Therefore we recommend cooking at the lowest possible temperatures and not browning foods too much.
Microwave
- Only switch the appliance on when there is food inside it. With no food in it, the appliance could be overloaded.
- Only use microwave safe cookware (see section Uses, Tables and Tips: Suitable Cookware and Materials)
- To protect the interior or the door of the appliance from corrosion through escaping steam (condensed water), please dry the appliance thoroughly with a cloth after each use.
- Do not leave the appliance unattended, if food is being heated or cooked in disposable containers made of plastic, paper or other flammable materials.
- If smoke appears, keep the appliance closed. Switch off the appliance and disconnect from the power supply. Do not use the appliance under any circumstances, if it is no longer working correctly.
- When heating liquids always put a coffee spoon or a glass rod in the container to avoid boiling delay. With boiling delay the boiling temperature is
reached without the typical steam bubbles rising.
If the container is shaken even slightly the liquid can suddenly boil over or spray violently. Risk of burns!

text_image
Illustration showing a spoon inside a glass with a checkmark and a cross, next to another empty glass filled with liquid.- Prick food with "skin" or "peel", such as potatoes, tomatoes, sausages, with a fork several times before cooking so that the food does not burst.

natural_image
Three-panel illustration showing a fork lifting a potato, with the third showing a tomato being held by chopsticks (no text or symbols)
text_image
70° 0° min 70° C- Ensure that a minimum temperature of 70^ is reached when cooking/ heating food. For this please refer to the power and time data in the tables. Never use mercury or liquid thermometers to measure the temperature of the food.
- Foods heated with microwaves give off heat to the cookware. Use oven gloves or something similar.
- Do not overcook the dishes by using powers and times that are too high. The food can dry out, burn or set itself alight in certain places.
- The interior of the oven, the grill heating element and the accessories become hot when the appliance is operating. Please be careful when handling them and use oven gloves or similar for this reason. Risk of burns!
- Metal objects must be at least 2 cm from the walls of the oven interior and the oven door. Otherwise spark discharges may be caused and the appliance can be damaged.
- If not advised otherwise, do not use aluminium foil.
- Do not get anything caught between the door and the door frame.
- Always keep the door seal, the door seal surfaces and the interior clean. Lack of cleanliness in the appliance can lead to dangerous situations.
- Do not store any flammable materials inside the oven. These could ignite when the oven is switched on.
How to avoid damage to the appliance
- Do not line the oven with aluminium foil and do not place baking trays, pots, etc. on the oven floor, as the heat that builds up will damage the oven enamel.
- Fruit juices dripping from the baking tray will leave stains, which you will not be able to remove. For very moist cakes, use a deep tray.
- Do not put any strain on the oven door when open.
- Never pour water directly into the oven when it is hot. This could cause damage to or discoloration of the enamel.
- Rough handling, especially around the edges of the front panel, can cause the glass to break.
- Do not store any flammable materials inside the oven. These could ignite when the oven is switched on.
- Do not store any moist foods inside the oven. This could damage the oven enamel.
- After switching off the cooling fan, do not keep uncovered dishes in the oven. Moisture may condense in the oven interior or on the glass doors and may get into the units.

Note on enamel coating
Changes in the colour of the oven's enamel coating as a result of use do not affect the appliance's suitability for normal and correct use. They therefore do not constitute a defect in the sense of the warranty law.
Do not use the appliance...
... for cooking eggs in their shells (with fried eggs, pierce the yolks first) and snails, as it causes these items to burst. ... for heating large amounts of cooking oil (fondue, deep frying) and drinks with high alcohol content: Spontaneous ignition! Risk of explosion!
... for heating tightly closed containers, e.g. tins, bottles, screw top jars.
... for drying animals, textiles, grain pillows and gel cushions and other flammable materials: Risk of fire!
... for cookware made of porcelain, ceramic or earthenware that has small holes, e.g. on handles or unglazed bottoms. Moisture penetrating holes can cause the cookware to crack when it is heated.

text_image
Image displaying a grid of symbolic icons including crossed-out items, food, and animals, likely representing food safety or behavioral problems.Description of the Appliance
General Overview
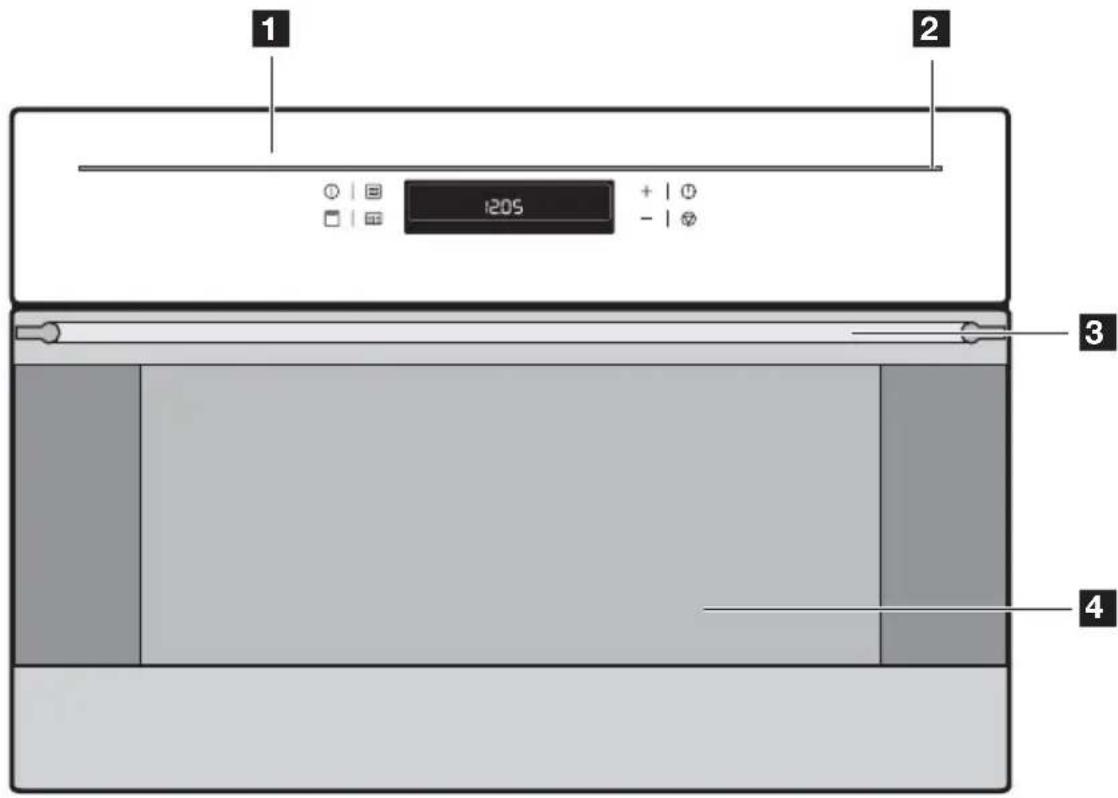
text_image
1 2 1205 + - 3 41 Control panel
2 Light bar
3 Door handle
4 Oven door

If no function is selected and nothing is changed on the appliance, the
appliance switches itself off after 2 minutes, but the light bar remains on.
To switch the light bar off, switch the appliance on using the Start ◆ button and switch it off again using the Stop Ⓥ button (press twice).
Control Panel
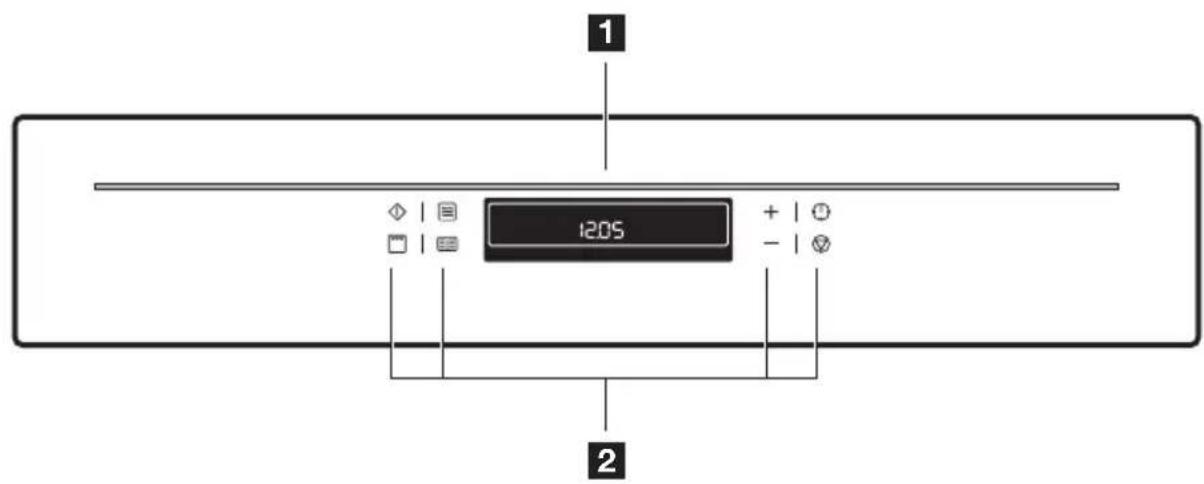
text_image
1 1205 + - 21 Oven display
2 Function buttons Oven
Oven Features

text_image
1 2 3 4 5 6 1 2 3 4 1 2 31 Grill heating element
2 Microwave generator
3 Oven lighting
4 Glass floor, removable
5 Oven shelf runners, removable
6 Shelf positions
Oven accessories
Oven shelf
For cookware, cake tins, roasts and grilled foods.

natural_image
Line drawing of a rectangular metal grate with evenly spaced vertical slats and two side handles (no text or symbols)Crunch plate
(non scratch and cut resistant)

natural_image
Simple 3D illustration of a gray oval-shaped object with no text or symbolsBefore Using for the first time
Setting and changing the time

The oven only operates when the time has been set.
When the appliance has been connected to the electrical supply or when there has been a power cut, the symbol for Time ⏻ automatically flashes.

text_image
12:00- To change a time of day that has already been set, press the Clock
Functions ⏻ button repeatedly until the symbol for Time ⏻ flashes.
- Using the + or — button, set the current time.

text_image
12:00After about 5 seconds, the flashing stops and the clock displays the time of day set.

text_image
12:05The appliance is now ready to use.

The time can only be modified, if the child safety device is deactivated, none of the clock functions Countdown ⏻ , Cook time → or End time → nor any oven functions are set.
Initial cleaning
Clean the oven before using it for the first time.

Do not use caustic or abrasive cleaning agents! These can damage the oven surfaces.

For the metal surfaces, use commercially available cleaning agents.
- Open the oven door.
The oven light is lit.
- Remove all oven accessories, and clean them with warm water and a scouring agent.
- Wash the oven in the same way, and wipe dry.
- Wipe the front of the appliance with a damp cloth.
Getting to know the appliance
The appliance can be operated in test mode for testing or performing all operating steps. The oven does not heat up.
Switching test mode on
- Switch off the appliance using the Stop ▼ button.
- Press and hold Baking/Roasting Programmes 📄 and buttons at the same time until an acoustic signal sounds and “d” lights up in the display.

text_image
d 88.00! 88.00 + - | ○ →Switching test mode off
- Switch off the appliance using the Stop Ⓥ button.
- Press and hold Baking/Roasting Programmes ☐ and buttons at the same time, until a signal sounds and “d” goes out in the display.
Using the Oven
The Electronic Oven Control
The display field
text_image
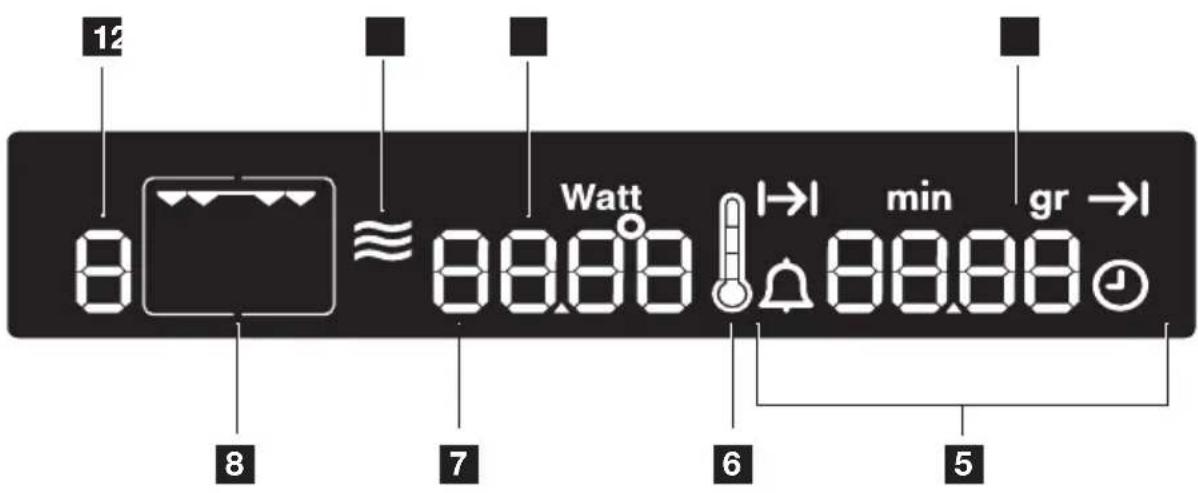
12 8 ≈ Watt 88.88 I→I min gr →I 7 6 51 Memory: P / Test: d
2 Microwave function
3 Temperature/Time/Microwave Power
4 Weight display
5 Clock functions Period of operation
6 Thermometer symbol
7 Baking/roasting programmes
8 Oven Functions
The control panel

text_image
13 2 ◇ | □ | □ | □ 7 8 6 5 + | - | ▽1 Start button
2 Microwave button
3 Button +
4 Clock Functions
5 Stop button/ Reset
6 Button —
7 Baking/roasting programmes
8 Grill Function button

General instructions
- Always confirm the selected function with the Start ◆ button.
If the selected function is not started within 120 seconds, the appliance switches itself off.
- When the selected function is started, the oven begins to heat up or the time set begins to count down.
- If the oven door is opened during operation, the function stops. After closing the door continue with the Start ◆ button. If the Start ◆ button is not pressed within 120 seconds, the appliance switches off.
- The oven light is switched on as long as an oven function is started or the oven door is open.
The oven light goes off after 10 minutes when the door is open and the appliance switched off.
- Stop operation with the Stop button, continue with the Start button. Switch the appliance off by pressing the Stop button again.
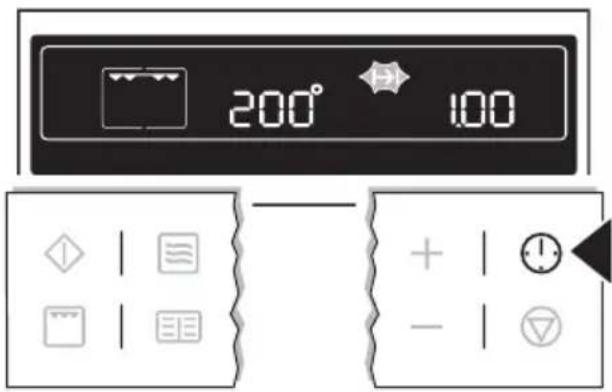
Switching the oven on
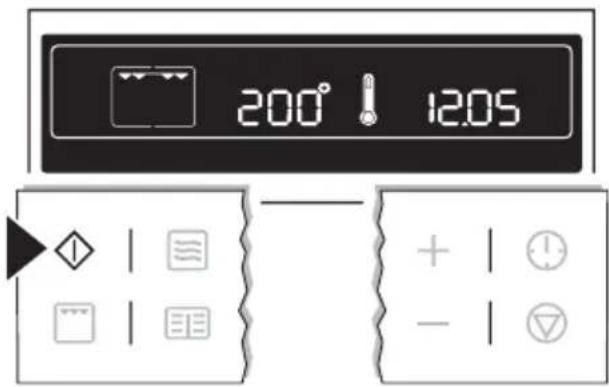
- Press the grill 📋 button. The oven function Grill 📋 appears.

text_image
200° 12.05 + | - |A suggested temperature appears in the temperature display.
- Press the Start ◆ button to start the oven function Grill ☐ .
text_image
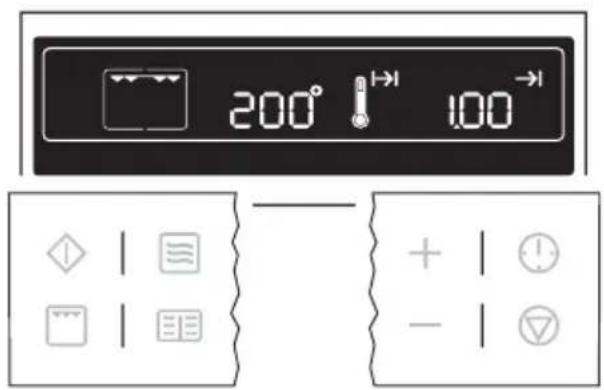
200° 12:05 + | - | ▽Changing the core temperature
Press the + or -button to raise or lower the temperature.
The setting changes in steps of 5^ C.

text_image
175° 12.05 + -Thermometer symbol
- The slowly rising thermometer symbol! indicates how far the oven has heated up.
- When the selected temperature is reached, an audible signal sounds.
Switching the oven off
To switch the oven off, press the Stop button repeatedly until only the time and any residual heat is displayed.

text_image
12.05
Cooling fan
The fan switches on automatically in order to keep the appliance's surfaces cool. When the oven is switched off, the fan continues to run to cool the appliance down, then switches itself off automatically.
Oven Functions
The oven has the following functions:
| Oven function Application Heating element/ | fan | ||
| Grill | Forgrillingflat foodstuffs and fortoasting. | Grill | |
| Microwave | Foreachingready meals anddrinks, fordefrostingmeat or fruitand forcookingvegetables andfish. | Microwave genera-tor | |
| CombiFunction | For the style of heating for the ovenfunction(s), the functionMicro-wavecan be switched on. Thedishes are cooked in the shortesttime and browned at the sametime. | ||
| MicrowaveQuick Start | Quick Start of the maximum mi-crowave power when the appli-ance is switched off using the Startbutton.Operating time from 30 seconds to 7 minutes. Each press of the button adds 30 seconds to the operating time displayed. | ||
Microwave
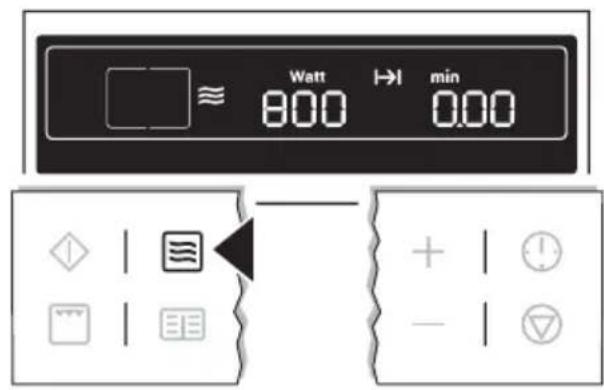
- If necessary, switch off the appliance using the Stop Ⓥ button.
- By repeatedly pressing the Microwave button, set the desired microwave power.
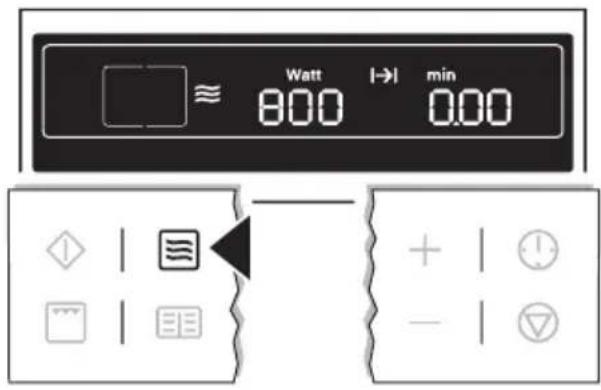
text_image
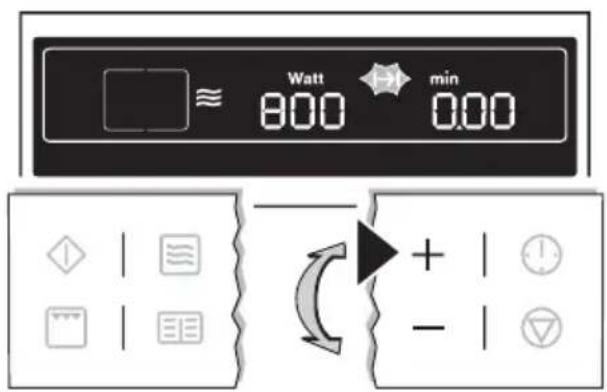
Watt |→| min 800 0.00- The settings options are in 100 Watt steps from 1,000 Watt to 100 Watt.
- Repeatedly pressing the Microwave button makes the power display begin again at 1,000 Watt.
- Using the + or —button set the desired cook time. The symbol for Cook time flashes.
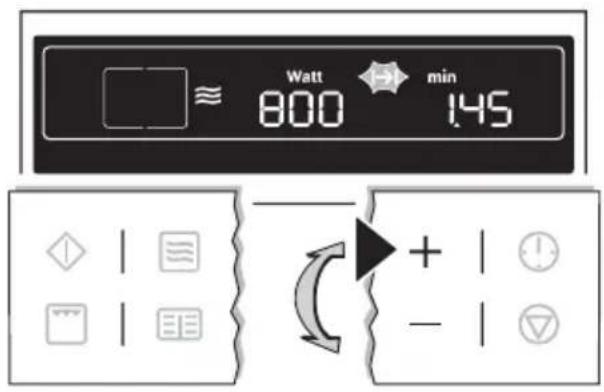
text_image
Watt min 800 145- The cooking times can be set as follows:
- from 0 to 2 mins. in 5 second steps,
- from 2 to 5 mins. in 10 second steps,
- from 5 to 10 mins. in 20 second steps,
- from 10 to 20 mins. in 30 second steps,
– from 20 mins. onwards in 1 minute steps.
- The maximum length of operation that can be set is:
- At 700 Watt to 1,000 Watt 0 to 7 minutes 40 seconds,
-
at 100 Watt to 600 Watt 0 to 59 minutes.
-
When the Start ◇ button is pressed, the time set begins to count down. The symbol for Cook time → lights up.
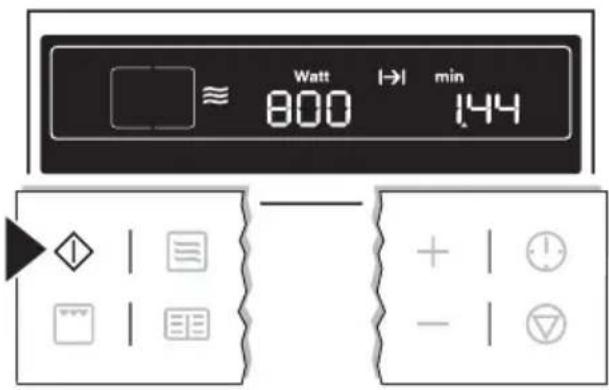
text_image
Watt → min ≈ 800 144- While the time counts down, the power can be changed using the Microwave button.
- While the time counts down, using the Clock Functions ⏻ and + buttons the cooking time can be increased or — reduced.
text_image
Watt min 800 000When the time has elapsed, an acoustic signal sounds for 2 minutes. The microwave switches itself off. The symbol for Cook time flashes and the time display appears.
To turn off the acoustic signal: Press any button.
Combi Function
- If necessary, switch off the appliance using the Stop Ⓥ button.
-
Press the grill button. The oven function Grill appears.
-
Using the +or button set the desired temperature.
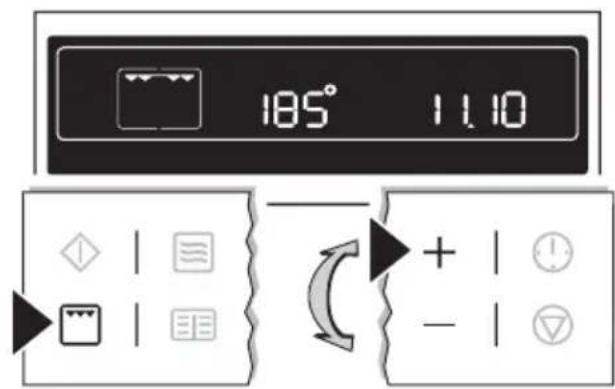
text_image
185° 1110- By repeatedly pressing the Microwave button, set the desired microwave power (max. 600 Watt).
- Using the + or —button set the desired cook time. The symbol for Cook time flashes.
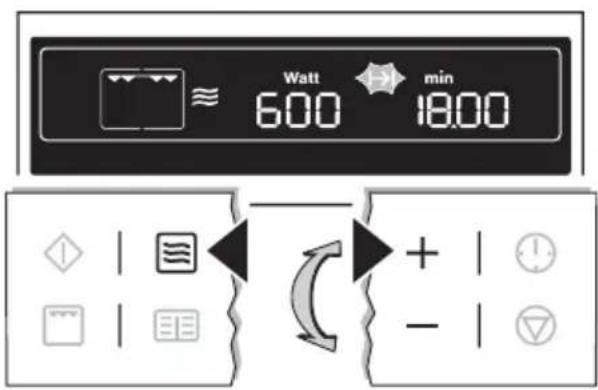
text_image
Watt min 600 18.00- The cooking times can be set as follows:
- from 0 to 2 mins. in 5 second steps,
- from 2 to 5 mins. in 10 second steps,
- from 5 to 10 mins. in 20 second steps,
- from 10 to 20 mins. in 30 second steps,
- from 20 mins. onwards in 1 minute steps.
The maximum length of operation that can be set is 59 mins.
- When the Start ◇ button is pressed, the time set begins to count down. Oven and microwave are on. The symbol for Cook time → lights up.
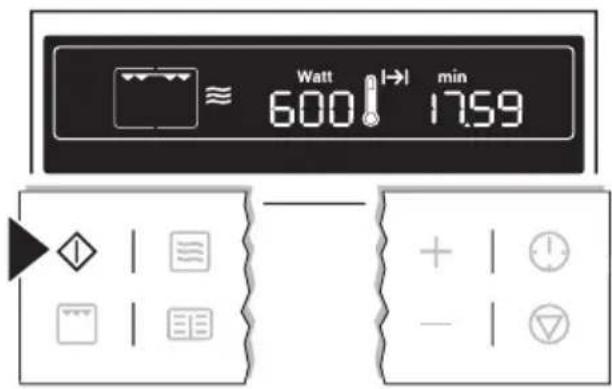
text_image
Watt 600 1→1 min 17:59- While the time counts down, the power can be changed using the Microwave button.
- While the time counts down, using the Clock Functions ⏻ and + buttons the cook time can be increased or — reduced.
When the time has elapsed, an acoustic signal sounds for 2 minutes. The appliance switches itself off. The symbol for Cook time flashes and the time display appears.
To turn off the acoustic signal: Press any button.

text_image
Watt min 600 0.00Microwave Quick Start
- If necessary, switch off the appliance using the Stop Ⓥ button.
- Press the Start ◇ button repeatedly until the desired period of operation appears. The appliance switches itself on at maximum microwave power.

text_image
Watt → min 1000 0.30– Each press of the button adds 30 seconds to the period displayed. Maximum of 7 mins. with maximum microwave power.
- While the time counts down, using the Clock Functions ⏻ and +
buttons the cooking time can be increased or — reduced.
- By repeatedly pressing the Microwave button, the microwave power can be changed.
- By pressing the Stop Ⓥ button once, operation can be interrupted. Continue operation using the Start ⏻ button. Pressing the Stop Ⓥ button twice switches the appliance off.
When the time has elapsed, an acoustic signal sounds for 2 minutes. The appliance switches itself off. The symbol for Cook time flashes and the clock display appears.
To turn off the acoustic signal: Press any button.

text_image
Watt 1000 min 0.00Information on power settings
The overview indicates at which power setting certain processes can be performed. The powers given are guidelines.
| Microwave power Suitable for | |
| 1,000 Watt900 Watt800 Watt700 Watt | · Heating liquids· Searing at the beginning of a cooking process· Cooking vegetables· Cooking foodstuffs· Melting gelatine and butter |
| 600 Watt500 Watt | · Defrosting and heating frozen meals· Heating one-plate meals· Simmering stews· Cooking egg dishes |
| 400 Watt300 Watt200 Watt | · Continuing to cook meals· Cooking delicate foodstuffs· Heating baby food· Simmering rice· Heating delicate foods· Melting cheese |
| 100 Watt | · Defrosting meat, fish, bread· Defrosting cheese, cream, butter· Defrosting fruit and cakes (gateaux)· Raising yeast dough· Warming up cold dishes and drinks |
Inserting the grill

Shelf runner safety and anti-tip device
As a shelf runner safety device, all insertable components have a small curved indentation at the bottom on the right and left-hand edge.
Always insert insertable components so that this indentation is at the back of the oven interior. This indentation is also im-
portant for preventing the insertable components from tipping.
Inserting the grill:
Insert the grill so that the feet point downwards.
Push the grill between the guide bars of the selected oven level.

natural_image
Diagram showing a grid structure with arrows indicating rotation or movement, and an inset magnified view of a mechanical component (no text or symbols)
The high rim around the grill is an additional device to prevent cookware from slipping.
Additional functions
Microwave Programmes

For this function, use the pre-set programmes (see chapter Uses, Tables and Tips: Programmes).
- If necessary, switch off appliance using the Stop Ⓥ button.
- By repeatedly pressing the Recipes button, select the desired programme (P 1 to P10).
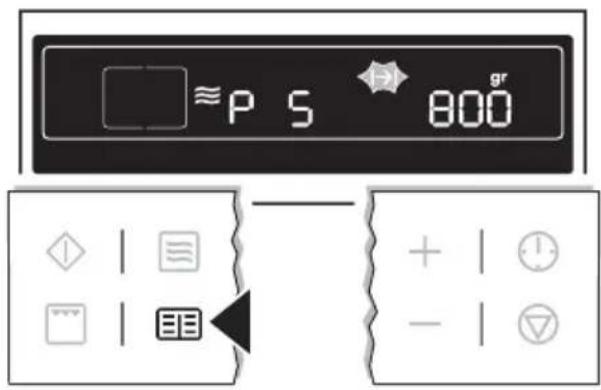
text_image
≈P S 800 gr + | - | ▼- In the display the preset weight "gr" is displayed. The symbol for Cook time flashes. Weight = Cook time
- By pressing the + or -button, the weight display can be adapted to the weight of the food, minimum 100 g, maximum 1,500 g (P 5 to P10 maximum 1,000 g).
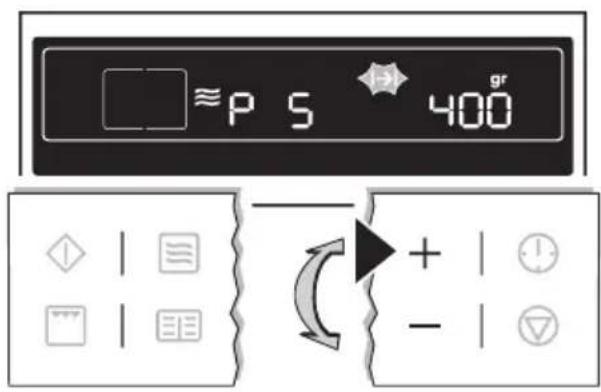
text_image
≈P S 400 + -- Inputting the weight automatically controls the length of time the microwave operates.
-
Always input the lower weight, e. g. a loaf weighs 460 g: Set the weight to 400 g.
-
When the Start ◆ button is pressed, the time set begins to count down. The symbols for Cook time and “min” light up.
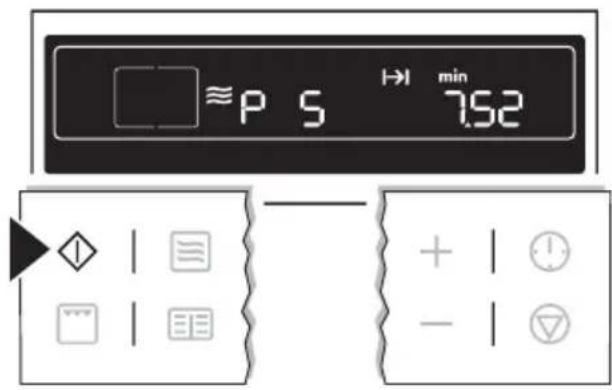
text_image
≈P S → min 7.52- When the time has elapsed, an acoustic signal sounds for 2 minutes. The oven switches itself off. The symbol for Cook time flashes.

With some programmes, after the time has elapsed a Keep Warm function is started. A signal sounds and in the display "HH" lights up.
After the Keep Warm function has ended, the signal sounds for 2 minutes. The oven switches itself off. The symbol for Cook time flashes and the time display appears.

text_image
HH 400 gr + -To turn off the acoustic signal: Press any button.
Memory Function
The Memory Function can be used to save one setting which is used very frequently.
- Set oven function, temperature and, if necessary the clock functions Cook time and/or End time or set microwave power and Cook time .
- Press and hold the Recipes 📄 button for approx. 2 seconds, until an acoustic signal sounds. The setting is saved.

text_image
160° 105- Continue by pressing the Start ◆ button or switch the appliance off using the Stop ▽ button.

To save another setting, press the Recipes 📄 button again for approx. 2 seconds. The previously saved setting is replaced by the new one.
Starting the Memory Function
- If necessary, switch off the appliance using the Stop Ⓥ button.
- Using the Recipes 📄 button, call up the saved setting.

text_image
P 160° 105 + | - |- Press the Start ◆ button.
Clock Functions

text_image
13 2 12.05 min 00.00 + - 61 Clock Functions
2 Time display
3 Clock
4 Cook time/End time/Operating time
5 Clock Functions
6 Settings buttons
Countdown 🔒
To set a countdown. When it has counted down, an audible signal sounds. This function has no effect on the operation of the microwave and oven.
Microwave cook time min
For setting how long the oven is to operate.
Cook time |→|
To set how long the oven is to be in use.
End time →
To set when the oven is to switch off again.
Time ⏱
To set, change or check the time (See also section "Before Using for the First Time").

General instructions
- After a clock function has been selected, the corresponding symbol flashes for about 5 seconds. During this time, the desired times can be set or modified using the + or -button.
- When the desired time has been set, the symbol continues to flash for approx. 5 seconds. After this the symbol lights up. The set Countdown ⏻ begins to count down.
- The time set for Cook time and End time begins to count down after the selected function starts.
Countdown 🔊
- Press the Clock Functions button repeatedly until the symbol for Countdown 🔒 flashes.
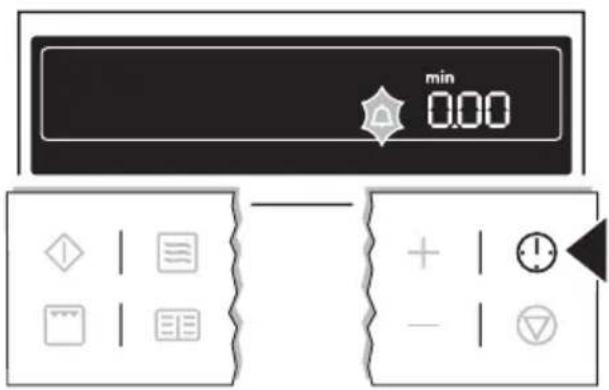
text_image
min 0.00 + | 1 - | ▼- Using the +or buttons, set the desired countdown (max. 99.00 minutes).
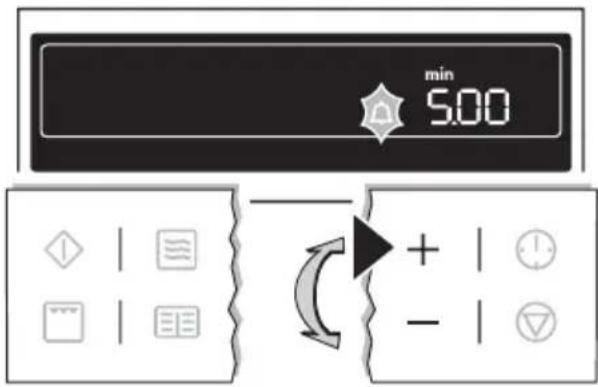
text_image
min 5.00 + - →After about 5 seconds the display shows the time remaining. The symbol for Countdown 🔒 lights up.

text_image
min 4.59 + | - |When the time set has elapsed, an acoustic signal sounds for 2 minutes. "0.00" lights up and the symbol for Countdown 🔒 flashes.
To turn off the acoustic signal: Press any button.

text_image
min 0.00 + | - | ▽Microwave cook time min
- Select microwave function and set the power by repeatedly pressing the Microwave button.
text_image
Watt → min 800 000- Using the +or button, set the desired cooking time. The symbol for Cook time flashes.

text_image
Watt min 800 145- When the Start button is pressed, the time set begins to count down. The symbol for Cook time lights up.

text_image
Watt → min 800 144
By repeatedly pressing the Clock Functions ⏻ button, the current time can be called up. While the time counts down, using the ⏻ and + buttons the cook time can be increased or — reduced.
When the time has elapsed, an acoustic signal sounds for 2 minutes. The microwave switches itself off.
"0.00" is displayed and the symbol for Cook time flashes.
To turn off the acoustic signal: Press any button.

text_image
Watt 800 min 0.00Cook time |→|
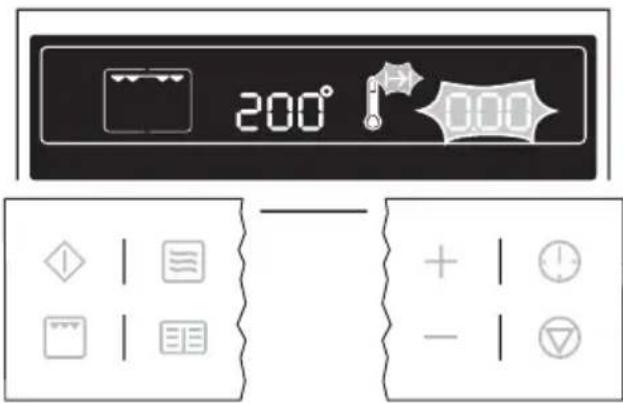
- Select oven function and temperature using the + or -button.
- Press the Clock Functions ⏻ button repeatedly until the symbol for Cook time ↗ flashes.

text_image
200° 0.00 + | ! | - | ▼- Using the +or button, set the desired cooking time.
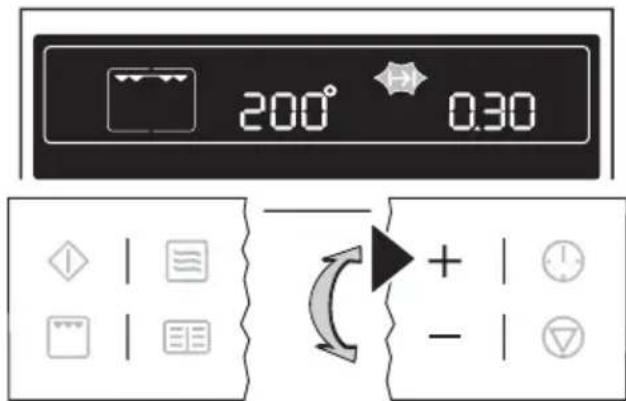
text_image
200° 0.30 + -- When the Start button is pressed, the time set begins to count down. The symbol for Cook time lights up.
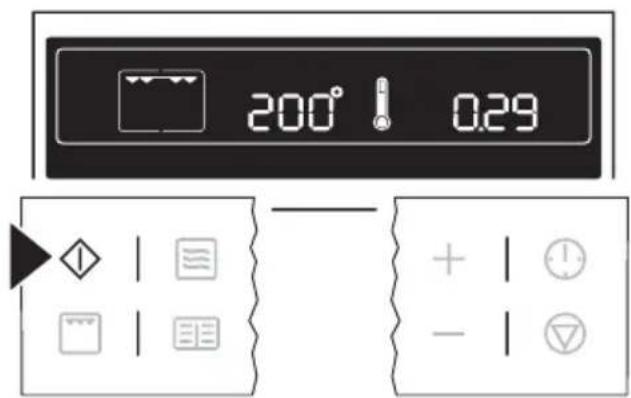
text_image
200° 0.29 + | ! | - | ▽
By repeatedly pressing the Clock Functions ⏻ button, the current time can be called up.
When the time has elapsed, an acoustic signal sounds for 2 minutes. The oven switches itself off.
"0.00" is displayed and the symbol for Cook time flashes.
To turn off the acoustic signal: Press any button.
text_image
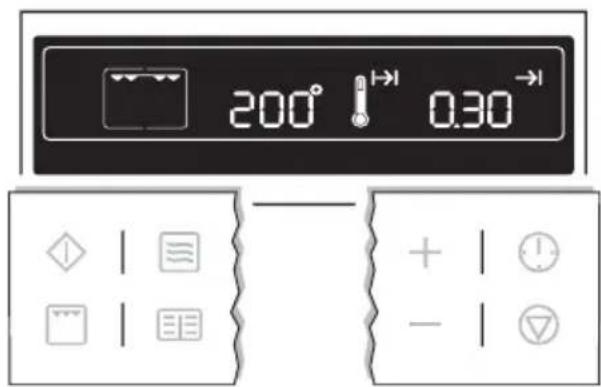
200° 0.00 + | - |End time →
- Select oven function and temperature using the + or -button.
- Press the Clock Functions ⏻ button repeatedly until the symbol for End time →1 flashes.
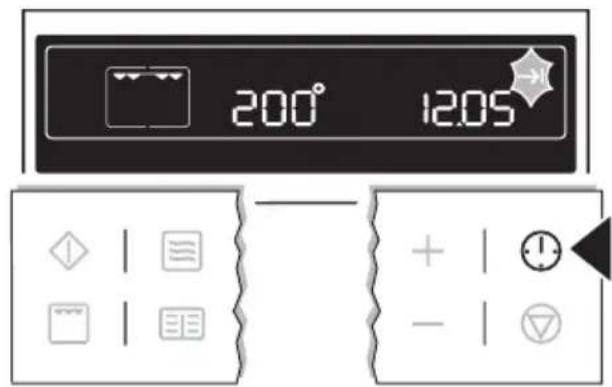
text_image
200° 1205- Using the +or button, set the desired switch-off time.

text_image
200° 12.35 + -The symbols for End time → and Cook time → light up.
The oven switches itself off automatically.
text_image
200° 1→ 0.30→ + | - |
By repeatedly pressing the Clock Functions ⏻ button, the current time can be called up.
When the time has elapsed, an acoustic signal sounds for 2 minutes. The oven switches itself off.
"0.00" is displayed and the symbols for End time → and Cook time →flash.
To turn off the acoustic signal: Press any button.

text_image
200° 0.00Cook time and End time combined

Cook time | and End time can be used simultaneously, if the oven is to be switched on and off automatically at a later time.
- Select oven function and temperature.
- Using the Cook time function, set the time required for cooking the dish.
e.g. 1 hour.
text_image
200° 100- Using the End time function, set the time at which the dish is to be ready.
e.g. at 14:05.

text_image
200° → 14.05 + | - |The symbols for Cook time and End time light up.
The oven switches on automatically at the time calculated. e.g. at 13:05.
When the set cooking time has elapsed, an acoustic signal sounds for 2 minutes and the oven switches itself off. e.g. at 14:05.
text_image
200° 100°Other functions
Switching off the display

You can save energy by switching off the display.
Switching off the display
-
If necessary, switch off the appliance using the Stop Ⓥ button. Residual heat must not be displayed.
-
Press buttons Clock Functions and —at the same time until the display goes out.
flowchart
graph TD
    A["Input"] --> B{Decision}
    B -->|Yes| C["Process Step 1"]
    B -->|No| D["Process Step 2"]
    C --> E["Output"]
    D --> E

As soon as the appliance is switched on again, the display automatically switches itself on. When the appliance is next switched off, the display goes out again.
To have the time permanently displayed again, you must switch the display on again.
Switching on the display
-
If necessary, switch off the appliance using the Stop Ⓥ button.
-
Press buttons Clock Functions and —at the same time until the display comes on again.
Child safety device
As soon as the child safety device is activated, it is no longer possible to operate the appliance.
Activating the child safety device
-
If necessary, switch off the appliance using the Stop Ⓥ button. An oven function must not be selected.
-
Press Recipes and buttons at the same time until SAFE appears in the display.

text_image
SAFE + | ⏻ - | ▽The child safety device is now activated. Deactivating the child safety device
- If necessary, switch off appliance using the Stop Ⓥ button.
- Press Recipes 📄 and —buttons at the same time until SAFE goes out in the display.
The child safety device is now deactivated and the appliance is again ready for use.
Button beep Switching off button beep
- If necessary, switch off appliance using the Stop Ⓥ button.
- Press and hold + and -buttons at the same time until a signal sounds (approx. 2 seconds).

text_image
12:00 + | ⏻ - | ▽The button beep is now switched off. Switching on button beep
Press + and - hold and buttons at the same time until a signal sounds (approx. 2 seconds).
The button beep is switched on again.
Oven safety cut-out

If not switched off after a certain time, or if the temperature is not modified, the oven switches off automatically.
The last temperature set flashes in the temperature display.
The oven switches itself off at an oven temperature of:
30 - 120°C after 12.5 hours
120 - 200°C after 8.5 hours
200 - 250°C after 5.5 hours
OFF appears in the display.
Using the appliance after a safety cut-out
Switch the oven off completely. It can then be switched on again.
Uses, Tables and Tips
Grill
Oven function: Grill with maximum temperature setting

Always grill with the oven door closed.
- For grilling, use both the shelf and the tray together.
- The grilling times are guidelines.
- Grilling is particularly suitable for flat pieces of meat or fish.
Grilling table
| Food to be grilled Oven level Grilling time | 1st side 2nd side | ||
| Rissoles 3 8-10 mins. 6-8 mins. | |||
| Pork fillet | 2 | 10-12 mins. | 6-10 mins. |
| Sausages 3 8-10 mins. 6-8 mins. | |||
| Fillet steaks, veal steaks | 3 | 6-7 mins. | 5-6 mins. |
| Fillet of beef, roast beef (approx. 1 kg) | 2 10-12 mins. 10-12 mins. | ||
| Toast^1) | 3 4-6 mins. 3-5 mins. | ||
| Toast with topping | 2 | 8-10 mins. | --- |
1) Use the grill shelf without a tray
Microwave
Information about operation General
- After switching off the appliance, let the food stand for a few minutes (see Microwave Tables: Standing Time).
- Remove aluminium foil packaging, metal containers, etc. before preparing the food.
Cooking
- If possible, cook food covered with material suitable for use in the microwave. Only cook food uncovered, if a crust is to be kept.
- Chilled or frozen foods require a longer cooking time.
- Dishes containing sauce should be stirred from time to time.
-
Vegetables that have a firm structure, such as carrots, peas or cauliflower, should be cooked in water.
-
Turn larger pieces about halfway through the cooking time.
- If possible, cut vegetables into similar sized pieces.
- Use flat, wide dishes.
Defrosting meat, poultry, fish
- Place the frozen, unwrapped food on a small upturned plate with a container underneath or on a defrosting rack or plastic sieve so that the defrosting liquid can run off.
- Turn the food after half the defrosting time. If possible, divide, remove pieces that have started to defrost.
Defrosting butter, portions of ga- teau, quark
- Do not defrost completely in the appliance, but leave to defrost at room temperature. This gives a more even result. Remove any metal or aluminium packaging or parts before defrosting completely.
Defrosting fruit, vegetables
- Do not completely defrost fruit and vegetables, which are to be further prepared while still raw, in the appliance, but at room temperature.
- Fruit and vegetables that are to be cooked, can be cooked directly using a higher microwave power, without being defrosted.
Ready Meals
- Ready meals in metal packaging or plastic trays with metal covers may only be defrosted or heated in the microwave if these are expressively designated as suitable for use in the microwave.
- You must follow the manufacturer's instructions printed on the packaging (e.g. remove metal cover and pierce plastic film).
Suitable cookware and materials
| Cookware/Material Microwave Oven | Grill | |||
| Defrosting | Heating | Cooking | ||
| Ovenproof glass and porcelain (with no metal components, e. g. Pyrex, heatproof glass) | XXXX | |||
| Non-ovenproof glass and porcelain1) | X----- | |||
| Glass and glass ceramic made of ovenproof/ frostproof material (e. g. g. Arcoflam), grill shelf | XXXX | |||
| Ceramic2), stoneware2) | XXXX-- | |||
| Plastic heat-resistant to 200°C3) | XXXX-- | |||
| Cardboard, paper | X----- | |||
| Clingfilm X -- -- -- | ||||
| Roasting film with microwave safe closure3) | XXXX -- | |||
| Roasting dishes made of metal, e.g. enamel, cast iron | -- -- -- X | |||
| Baking tins, black lacquer or silicon-coated3) | -- -- -- X | |||
| Baking tray -- -- -- X | ||||
| Browning cookware, e. g. Crostino or Crunch plate | -- XX -- | |||
| Ready meals in packaging3) | XXXX | |||
1) with no silver, gold, platinum or metal plating/ decorations
2) Without quartz or metal parts, no metallic glaze
3) Please observe the maximum temperatures quoted by the manufacturer.
X is suitable
-- is not suitable

Other things to think about ...
- Foods have different shapes and qualities. They are prepared in different amounts. Therefore the necessary times and powers for defrosting, heating or cooking are all different. As a rough guide: Double the amount = Almost double the time
- When heating with the microwave the heat is produced in the food itself. For
this reason all places cannot be heated at the same time. The heated dishes should therefore be stirred or turned, especially in the case of larger amounts of food.
- The standing time is given in the tables. Let the food stand, in the appliance or outside it, so that the heat is distributed more evenly. - You get better results for rice using flat, wide dishes.
Microwave Cooking Table Defrost
| Dish Microwave | Size (g) | Power (Watts) | Cook time (Mins.) | Standing time (Mins.) | Comments |
| Meat | |||||
| Meat generally | 500 | 200 | 10-12 | 10-15 | Turn halfway through cooking |
| Steaks 200 200 3-5 | 5-10 Turn | halfway | through cooking time, remove de-frosted parts | ||
| Mixed minced meat | 500 200 10-15 | 10-15 | |||
| Goulash 500 200 10-15 | 10-15 | ||||
| Poultry | |||||
| Chicken 1000 200 25-30 | 10-20 | Turn halfway | through cooking time, cover de-frosted parts with aluminium foil | ||
| Chicken breast 100-20 | 200 3-5 | 10-15 | |||
| Chicken thighs | 100-20 | 200 3-5 | 10-15 | ||
| Duck | 2000 200 | 45-60 | 20-30 | ||
| Fish | |||||
| Fish generally | 500 | 100 | 10-15 | 15-20 | Turn halfway through |
| Fish fillets | 500 100 | 10-12 | 15-20 | ||
| Sausage | |||||
| Sliced sausage | 100 | 100 | 2-4 | 20-40 | Turn halfway through |
| Dairy products | |||||
| Quark | 250 | 100 | 10-15 | 25-30 | Remove aluminium parts, turn halfway through |
| Butter | 250 100 | 3-5 | 15-20 | ||
| Cheese | 250 100 | 3-5 | 30-60 | ||
| Cream | 200 | 100 | 7-12 | 20-30 | Remove aluminium top, stir half-way through |
| Cakes/Pastries/Bread | |||||
| Dish Microwave | |||||
| Size (g) | Power (Watts) | Cook time (Mins.) | Standing time (Mins.) | Comments | |
| Yeast dough | 1 piece | 100 | 2-3 | 15-20 | Turn plate halfway through |
| Cheesecake 1 piece | 100 2-4 | 15-20 | |||
| Cake (gateau) 1 piece | 100 1-2 | 15-20 | |||
| Dry cake (e. g. pound cake) | 1 piece | 100 2-4 | 15-20 | ||
| Fruit flan 1 piece 100 | 1-2 | 15-20 | |||
| Bread 1000 100 15-20 | 10-15 | Turn halfway | through | ||
| Sliced bread 500 100 | 8-12 | 10-15 | |||
| Bread rolls 4 rolls 100 | 5-8 | 5-10 | |||
| Fruit | |||||
| Strawberries | 300 | 100 | 8-12 | 10-15 | Defrost covered, stir halfway through |
| Plums, cherries, raspberries, black-currants, apricots | 250 | 100 | 8-10 | 10-15 | |
| Melting | |||||
| Chocolate / Choco-late coating | 150 | 600 | 2-3 | Stir halfway | through |
| Butter | 100 | 200 | 2-4 | --- | |
| Heating | |||||
| Baby food in jars | 200 | 300 | 2-3 | --- | Stir halfway through Check temperature! |
| Baby milk (180 ml bottle) | 200 | 1000 | 0:20-0:40 | --- | Put spoon in the bottle, stir, Check temperature! |
| Ready meals 400-50 | 0 | 600 4-6 | 5 Remove any alu- | minium covers, turn halfway through | |
| Frozen ready meals 400-50 | 0 | 400 14-20 | 5 | ||
| Milk 1 cup | ap-prox. 200ml | 1000 1:15-1:45 | --- Put spoon in the container | ||
| Water 1 cup | ap-prox. 200ml | 1000 1:30-2 | --- | ||
| Sauce | 200 ml | 600 | 1-2 | --- | Stir halfway through |
| Soup | 300 ml | 600 | 2-4 | --- | |
Cooking
| Dish Microwave | Size (g) | Power (Watts ) | Cook time (Mins. ) | Standing time (Mins.) | Comments |
| Fish generally | 500 | 500 | 8-10 | --- | Cook covered, turn container several times dur-ing cooking |
| Fish fillets | 500 | 500 | 6-8 | --- | |
| Vegetables, short cooking time, fresh1) | 500 | 600 | 12-16 | --- | Add approx. 50 ml water, cook cov-ered, stir halfway through |
| Dish Microwave | |||||
| Size (g) | Power (Watts ) | Cook time (Mins.) | Standing time (Mins.) | Comments | |
| Vegetables, short cooking time, fro-zen1) | 500 600 | 14-18 --- | |||
| Vegetables, long cooking time, fresh1) | 500 600 | 14-20 | |||
| Vegetables, long cooking time, fro-zen1) | 500 600 | 18-24 --- | |||
| Boiled potatoes 800 g + 600 ml | 1000 5-7 300 W / 15-20 | Cook covered, stir halfway through | |||
| Rice 300 g + 600 ml | 1000 4-6 --- | ||||
1) Cook all vegetables with a cover on the container. The times given are guidelines only and depend upon the type and qualities of the foodstuffs.
Combi-Function Table Oven Functions: Grill + Microwave

| Dish Bake-ware/Roasting dishes | Oven function | Temp. in °C | Microw.Watt | Oven level | Time in mins. | Comments | |
| Chicken halves 2 x 600 g | Oven-proof glass dish on oven shelf |  | 220 | 300 | 2 | 40 | Turn after 20 mins. 5 mins.standing time |
| Potato gratin 1000 g | 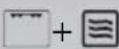 | 200 | 300 | 2 | 40 | 10 mins.standing time | |
| Dish Bake-ware/ Roasting dishes | Oven func-tion | Tem p. in °C | Mi-crow. Watt | Ove n level | Time in mins. | Comments | |
| Roast neck of pork 1,100 g |  | 200 | 300 | 1 | 70 | Turn once halfway through 10 mins. standing time | |
| Swiss apple tarts | Crunch plate on glass floor, pre-heat with pastry max. 5 mins. / 1000 W, turn once |  | 220 | 400 | --- | 25 | Turn half-way through |
| Frozen cheese-cake , 2 x 70 g | Crunch plate on glass floor, pre-heat max. 4 mins. / 700 W turn 1 once |  | 230 | 200 | --- | 25 | Turn half-way through |
| Frozen toasted sandwich with ham and cheese, 2 x 100 g |  | 230 | 200 --- | --- | 20 | Turn half-way through, turn over after 15 mins. | |
| Frozen hamburger, 2 x 90 g |  | 250 | 300 | --- | 20 | Turn half-way through, turn over after 12 mins. | |
| Dish Bake-ware/Roasting dishes | Oven function | Temp. in °C | Microw.Watt | Oven level | Time in mins. | Comments | |
| Frozen pizza ∅ 26cm 320 g | + | 250 | 200 | --- | 15 | Turn half-way through | |
The cooking times and temperatures given are guidelines only and depend upon the type and the qualities of the food.
Tips for the microwave
| Result Remedy | |
| You cannot find details for the amount of food prepared. | Look for a similar food. Increase or shorten the length of the cooking times according to the following rule:Double the amount = almost double the timeHalf the amount = half the time |
| The food has got too dry. Set shorter cooking time or select lower microwave power. | |
| The food is still not defrosted, hot or cooked after the time has elapsed. | Set longer cooking time or select higher microwave power. Please note that taller dishes need longer. |
| After the cooking time has elapsed, the food is overheated at the edge but is still not ready in the middle. | Next time select a lower power and a longer time. Stir liquids, e. g. soup, halfway through. |
Test dishes in accordance with IEC 60705
(Microwave power 1000 Watt)
The quality and function of microwave appliances are tested by test institutes using special dishes.
| Dish Pow-er Watt | Oven func-tion | Oven level | Cook time Mins. | Standing time Mins. | Comment |
| Egg cus-tard (12.3.1) | 300 Glass | floor | 30-40 120 Turn dish | once af-ter half the time | |
| Fatless sponge (12.3.2) | 600 Glass | floor | 8-10 5 | ||
| Cooking meat loaf (12.3.3) | 500 Glass | floor | 20-22 5 Cover, turn | dish once halfway through cooking time | |
| Defrosting mince (13.3.) | 100 Glass | floor | 15-20 5 Turn after | half the time, remove de-frosted parts | |
| Defrosting raspberries (B.2.1) | 100 Glass | floor | 11-13 5 Cover |
Programmes
The appliance has 10 programmed functions, which can be selected one after the other using the Recipes 📄 button.
For settings, see section Additional Functions: Microwave Programmes.
| Pro-gramme | Function | Recipe Weight Time | as per Preset-ting | Keep warm function “HH” | ||||
| Pre-set-ting | min. | max. | ||||||
P 1 De-frost 1) | Poultry 100  | g | 100g | 1500g | 19 mins.40 secs. | No | ||
| Programme | Function | Recipe Weight Time | as per Preset-ting | Keep warm function “HH” | ||||
| Pre-set-ting | min. | max. | ||||||
| P 2 | Meat 800 g  | g | 1500g | 17 mins.36 secs. | No | |||
| P 3 Fish | 1000 |  | g | 100g | 1500g | 15 mins.20 secs. | No | |
| P 4 | Bread 500 g  | g | 1500g | 6 mins. No | ||||
| P 5 | Boil ^1) | Frozen vegetables (small) + 50 ml water |  | 800 g | 100g | 1000g | 15 mins.44 secs. | Yes |
| P 6 Frozen | vegeta-bles (large) + 50 ml water |  | 800 g | 100g | 1000g | 22 mins.56 secs. | Yes | |
| P 7 | Fresh vegeta-bles (small) + 50 ml water |  | 800 g | 100g | 1000g | 24 mins. | No | |
| Pro-gramme | Function | Recipe Weight Time | as per Preset-ting | Keep warm function “HH” | ||||
| P 8 | Fresh vegetables (large) + 50 ml water |  | 800 g | 100g | 1000g | 26 mins.40 secs. | No | |
| P 9 | Pota- | toes + 100 ml water |  | 600 g | 100g | 1000g | 17 mins.12 secs. | No |
| P 10 | Fish 1000 |  | g | 100g | 1000g | 21 mins.40 secs. | Yes | |
1) With the functions Defrost and Boil turn the food several times
Cleaning and Care

For cleaning, the appliance must be switched off and cooled down.

For safety reasons, do not clean the appliance with steam jet or high-pressure cleaning equipment.

Do not use any scouring agents, sharp cleaning tools or scourers.
Do not use harsh abrasive cleaners or sharp metal scrapers to clean the oven door glass since they can scratch the surface, which may result in shattering of the glass.
Outside of the appliance
- Wipe the front of the appliance with a soft cloth and warm water and washing up liquid.
- For metal fronts, use normal commercially available cleaning agents.
Oven interior
Clean the appliance after each use. In this way, dirt is easier to clean off and is not allowed to burn on.
- When the oven door is opened, the oven light switches itself on automatically.
- After every use, wipe the oven with a solution of washing-up liquid and allow to dry.

Remove stubborn dirt with special oven cleaners.

If using an oven cleaner spray, please follow the manufacturer's instructions exactly.
Accessories
Wash all slide-in units (shelf unit, baking tray, shelf support rails etc.) after each use and dry well. Soak briefly to make them easier to clean.
Side rails
The left and right-hand side rails can be removed from the oven, so that the side walls of the oven can be cleaned.
Removing side rails
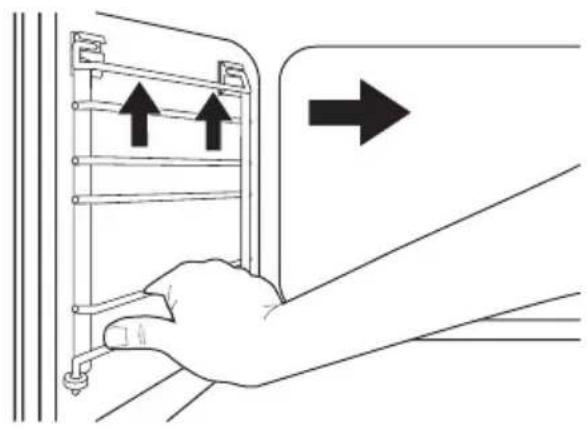
To remove rails, take hold of them and then raise and lift them out of the mounts.
natural_image
Line drawing of a hand inserting a device into a panel, with arrows indicating direction (no text or symbols)Replacing the side rails
To insert rails, re-insert them into the mounts and lower them.

natural_image
Illustration of a hand holding a ladder with two downward arrows indicating force or movement (no text or symbols)Oven lighting

Risk of electric shock! Before replacing the oven light bulb:
- Switch oven off.
• Take the fuses out of the fuse box or switch off.

To protect the oven light bulb and the glass cover, lay a cloth on the floor of the oven.
Replacing the side oven light bulb/Cleaning the glass cover
- Take out the side rails on the left.
- Take off the glass cover by turning it anti-clockwise and clean it.

natural_image
Illustration of hands holding a mechanical component with an arrow indicating rotation (no text or symbols)- If necessary: Replace with halogen oven light bulb 20 Watt, 12 V, 300°C heat-resistant.

Always take hold of the halogen light bulb with a cloth, to avoid burning on grease residues.
- Re-fit the glass cover.
- Replace the side rails.
What to do if ...
| Problem Possible cause Remedy | ||
| The oven is not heating up | The oven has not been switched on | Switch oven on |
| The clock has not been set Set the current time on the clock | ||
| The required settings have not been made | Check the settings | |
| The oven's safety cut-out has been triggered | See Safety Cut-out | |
| The child safety device is activated. | Deactivate child safety device | |
| The house wiring fuse (in the fuse box) has tripped | Check fuse If the fuses trip several times, please call a qualified electrician | |
| The microwave is not working | The oven door is not properly closed | Close the oven door |
| The door seals and door seal surfaces are dirty | Clean door seals and door seal surfaces | |
| The Start button was not touched | Press the Start button. | |
| The oven lighting is not operating | The oven light bulb is faulty Replace oven light bulb | |
| "d" is lit in the display and the oven is not heating up Fan not operating | Test mode is switched on Switch off the appliance Press and hold and buttons at the same time until acoustic signal sounds and "d" indicator goes out | |
If you are unable to remedy the problem by following the above suggestions, please contact your dealer or the Customer Care Department.

Repairs to the appliance are only to be carried out by qualified service engineers. Considerable danger to the user may result from improper repairs.

If the appliance has been wrongly operated, the visit from the customer service technician or dealer may not take place free of charge, even during the warranty period.

Advice on cookers with metal fronts: Because of the cold surface at the front of the cooker, opening the oven door during (or just after) baking or roasting may cause the glass to steam up.
Installation Instructions

The new appliance may only be installed and connected by a registered installation engineer. Please comply with this. If you do not, any damage resulting is not covered by the warranty.
If the supply cord is damaged, it must be replaced by the manufacturer, its service agent or similarly qualified persons in order to avoid a hazard.
Safety information for the installer
- The set-up of the electrical installation is arranged so that the appliance can
be isolated from the mains with a minimum 3mm all-pole contact separation.
Suitable separation devices include e.g. cut-outs, fuses (screw fuses are to be taken out of the holder), RCD's and contactors.
- The site must provide a connection to the electrical supply by means of a socket that is accessible and outside the coordination space.
- Anti-shock protection must be provided by the installation.
- The built-in unit must meet the stability requirements of DIN 68930.
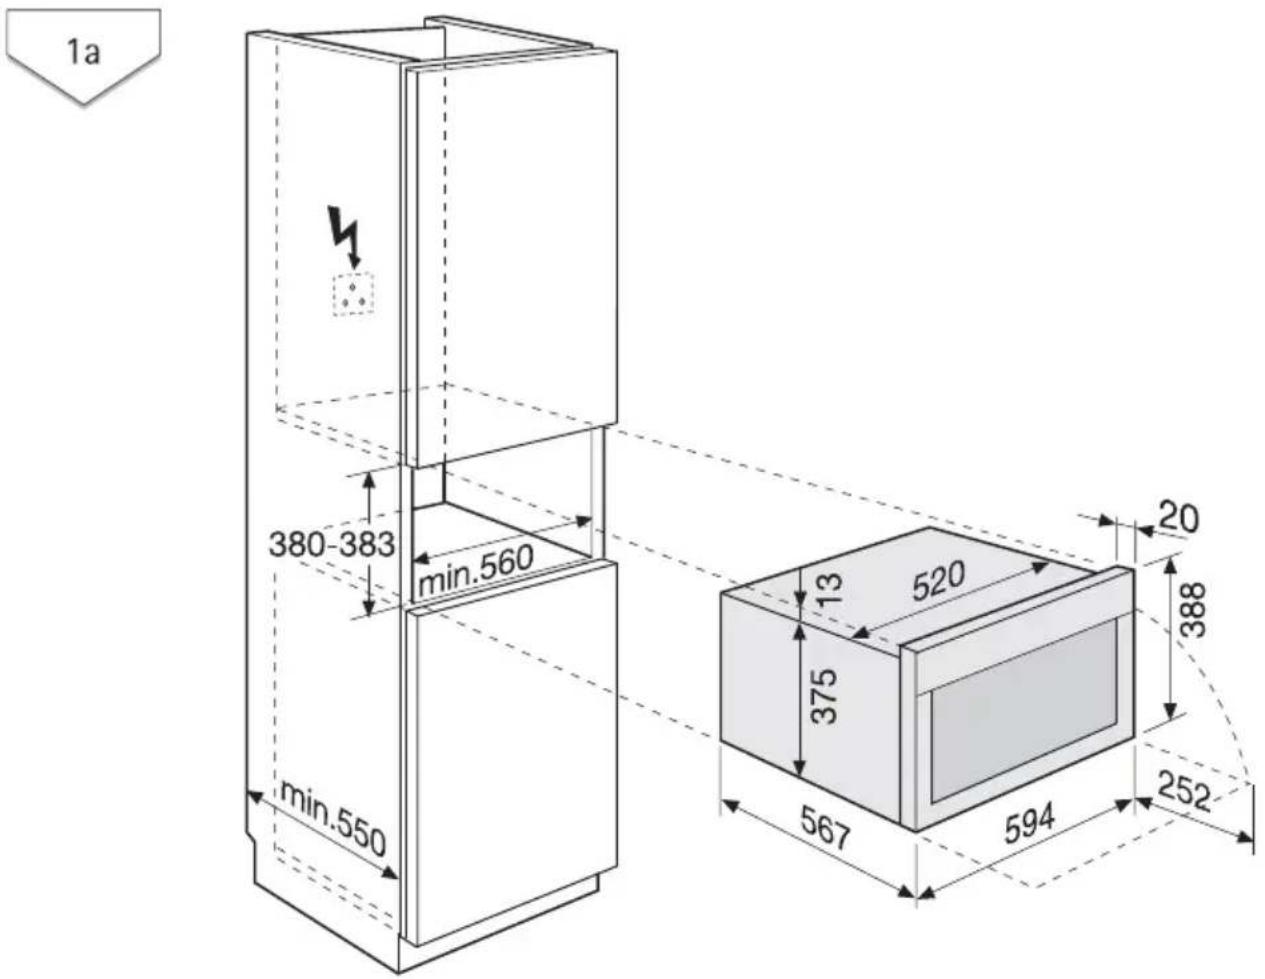
text_image
1a 380-383 min.560 min.550 13 520 375 567 594 20 388 252

text_image
380-383 380 min. 560 min. 550 594 20 375 13 388 388 567 594 252
text_image
380-383 380 380 min. 560 min. 550 594 20 13 375 388 388 388 567 594 252
text_image
2 H05VV-F H05RR-F min.1,60m alternativ
text_image
3 90°
text_image
4 2x3,5x25 13 20Disposal

Packaging material The packaging materials are environmentally friendly and can be recycled. The plastic components are identified by markings, e.g. >PE<, >PS<, etc. Please dispose of the packaging materials in the appropriate container at the community waste disposal facilities.
The symbol 📄 on the product or on its packaging indicates that this product may not be treated as household waste.
Instead it should be taken to the appropriate collection point for the recycling of electrical and electronic equipment. By ensuring this product is disposed of correctly, you will help prevent potential negative consequences for the environment and human health, which could otherwise be caused by inappropriate waste handling of this product. For more detailed information about recycling of this product, please contact your local council, your household waste disposal service or the shop where you purchased the product.

So that the old appliance can no longer cause any danger, make it un-
European Guarantee
This appliance is guaranteed by Electro-lux in each of the countries listed at the back of this user manual, for the period specified in the appliance guarantee or otherwise by law. If you move from one of these countries to another of the countries listed, the appliance guarantee will move with you subject to the following qualifications:-
- The appliance guarantee starts from the date you first purchased the appliance which will be evidenced by production of a valid purchase document issued by the seller of the appliance.
- The appliance guarantee is for the same period and to the same extent for labour and parts as exists in your
www.electrolux.com
usable before disposing of it. To do this, disconnect the appliance from the mains supply and remove the mains cable from the appliance.
new country of residence for this particular model or range of appliances.
- The appliance guarantee is personal to the original purchaser of the appliance and cannot be transferred to another user.
- The appliance is installed and used in accordance with instructions issued by Electrolux and is only used within the home, i.e. is not used for commercial purposes.
- The appliance is installed in accordance with all relevant regulations in force within your new country of residence.
The provisions of this European Guarantee do not affect any of the rights granted to you by law.
 |  |  |
| Albania +35 5 4 261 450 Rr. Pjeter Bogdani Nr. 7 | Tirane | |
| Belgique/België/Belgien | +32 2 363 04 44 | Bergensesteenweg 719, 1502 Lembeek |
| Česká republika | +420 2 61 12 61 12 | Budějovická 3, Praha 4, 140 21 |
| Danmark +45 70 11 74 00 Sjællandsgade 2, 7000 | Fredericia | |
| Deutschland +49 180 32 26 622 Muggenhofer Str. 135, | ||
| 90429 Nürnberg | ||
| Eesti +37 2 66 50 030 Mustamäe tee 24, 10621 | Tallinn | |
| España +34 902 11 63 88 Carretera M-300, Km. | 29,900 Alcalá de He-nares Madrid | |
| France www.electrolux.fr | ||
| Great Britain +44 8705 929 929 Addington Way, Luton, | ||
| Bedfordshire LU4 9QQ | ||
| Hellas +30 23 10 56 19 70 4, Limnou Str., 54627 | Thessaloniki | |
| Hrvatska +385 1 63 23 338 Slavonska avenija 3, | 10000 Zagreb | |
| Ireland +353 1 40 90 753 Long Mile Road Dublin | 12 | |
| Italia | +39 (0) 434 558500 | C.so Lino Zanussi, 26 - 33080 Porcia (PN) |
| Latvija | +37 17 84 59 34 | Kr. Barona iela 130/2, LV-1012, Riga |
| Lietuva | +370 5 2780609 | Ozo 10A, LT 08200 Vil-nius |
| Luxembourg | +352 42 431 301 | Rue de Bitbourg, 7, L-1273 Hamm |
| Magyarország | +36 1 252 1773 | H-1142 Budapest XIV, Erzsébet királyné útja 87 |
| Nederland | +31 17 24 68 300 | Vennootsweg 1, 2404 CG - Alphen aan den Rijn |
| Norge | +47 81 5 30 222 | Risløkkvn. 2 , 0508 Oslo |
| ÖsterreichPolska +48 22 43 47 300 ul. Kolejowa 5/7, Wars- | +43 18 66 400 | Herziggasse 9, 1230 Wienzawa |
| Portugal +35 12 14 40 39 39 Quinta da Fonte - Edificio | Gonçalves Zarco - Q 35 -2774-518 Paço de Ar- cos | |
| Romania +40 21 451 20 30 Str. Garii Progresului 2, | S4, 040671 RO | |
| Schweiz - Suisse - Sviz- zera | +41 62 88 99 111 Industriestrasse 10, CH-5506 Mägenwil | |
| Slovenija | +38 61 24 25 731 | Gerbičeva ulica 98, 1000 Ljubljana |
| Slovensko +421 2 43 33 43 22 Electrolux Slovakia s.r.o., | Electrolux Domáce spo- trebiče SK, Seberíniho 1, 821 03 Bratislava | |
| Suomi www.electrolux.fi | ||
| Sverige +46 (0)771 76 76 76 Electrolux Service, S:t | Göransgatan 143, S-105 45 Stockholm | |
| Türkiye | +90 21 22 93 10 25 | Tarlabași caddesi no : 35 Taksim İstanbul |
| Россия | +7 495 937 7837 | 129090 Москва, Олимпийский проспект, 16, БЦ "Олимпик" |
www.electrolux.com