40LED8100CS - TV SALORA - Free user manual and instructions
Find the device manual for free 40LED8100CS SALORA in PDF.

User questions about 40LED8100CS SALORA
0 question about this device. Answer the ones you know or ask your own.
Ask a new question about this device
Download the instructions for your TV in PDF format for free! Find your manual 40LED8100CS - SALORA and take your electronic device back in hand. On this page are published all the documents necessary for the use of your device. 40LED8100CS by SALORA.
USER MANUAL 40LED8100CS SALORA
text_image
Diagram showing a device interior with labeled components and directional arrows, including numbered parts 1, 2, and 3.1.Omhoog
natural_image
Close-up of a cylindrical battery with two charging leads and a paper feed, no visible text or symbolsStroom aansluiten
text_image
Broadband ISP Connection Lan(Ethernet cable) Rear of TVtext_image
Diagram showing connection between a monitor and brick wall, with a cable and labeled connector (5) pointing to it.text_image
Broadband ISP Connection USB Inputs (Side of the TV) Wireless Lan Adaptortext_image
OR World Jocomeno Jocomeno.com/ Viewster CinRisaker Search Edit Help Full Screen Facebook You've got 3 unread messages You've got 12 notificationstext_image
plugged into Skype™ UUOPMERKING
text_image
Skype started ? No default user plugged into Skype*Licentiemededeling
natural_image
Abstract graphic with a red diagonal stripe crossing two gray curved shapes (no text or symbols)text_image
plugged into Skype™ UU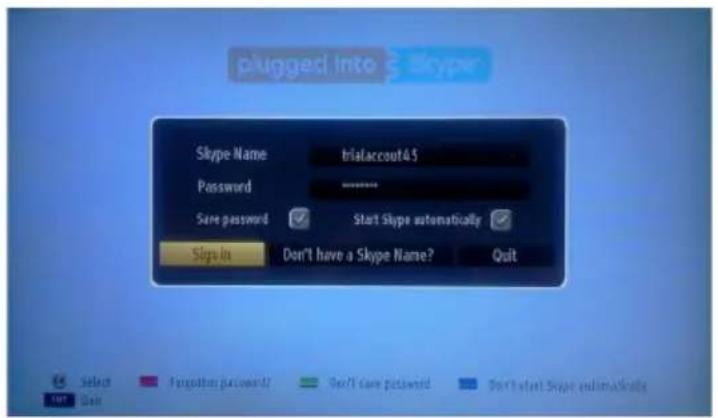
text_image
plugged into Skype Skype Name trialaccout45 Password ------------------ Save password Start Skype automatically Sign In Don't have a Skype Name? Quit Select Forgotten password/ Don't save password Don't start Skype automatics Quit Quit
natural_image
Green curved arrow pointing downward (no text or symbols)text_image
Connecting... Cancel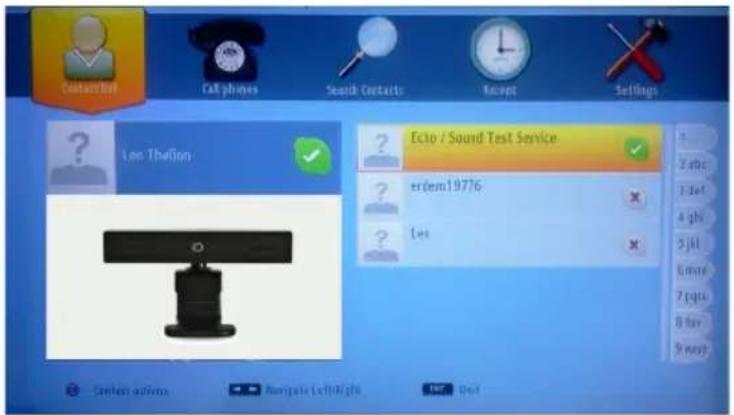
text_image
Ecto / Sound Test Service erdem19776 Iwi
natural_image
Green curved arrow pointing left, no text or symbols presenttext_image
Contact List Cell phones Search Contacts Recent Settings All Events All Calls New Contacts Existing Contacts Build Caps There are on recent events. Navigate Left Right Next Call Change Lab
text_image
plugged into Skype™ UU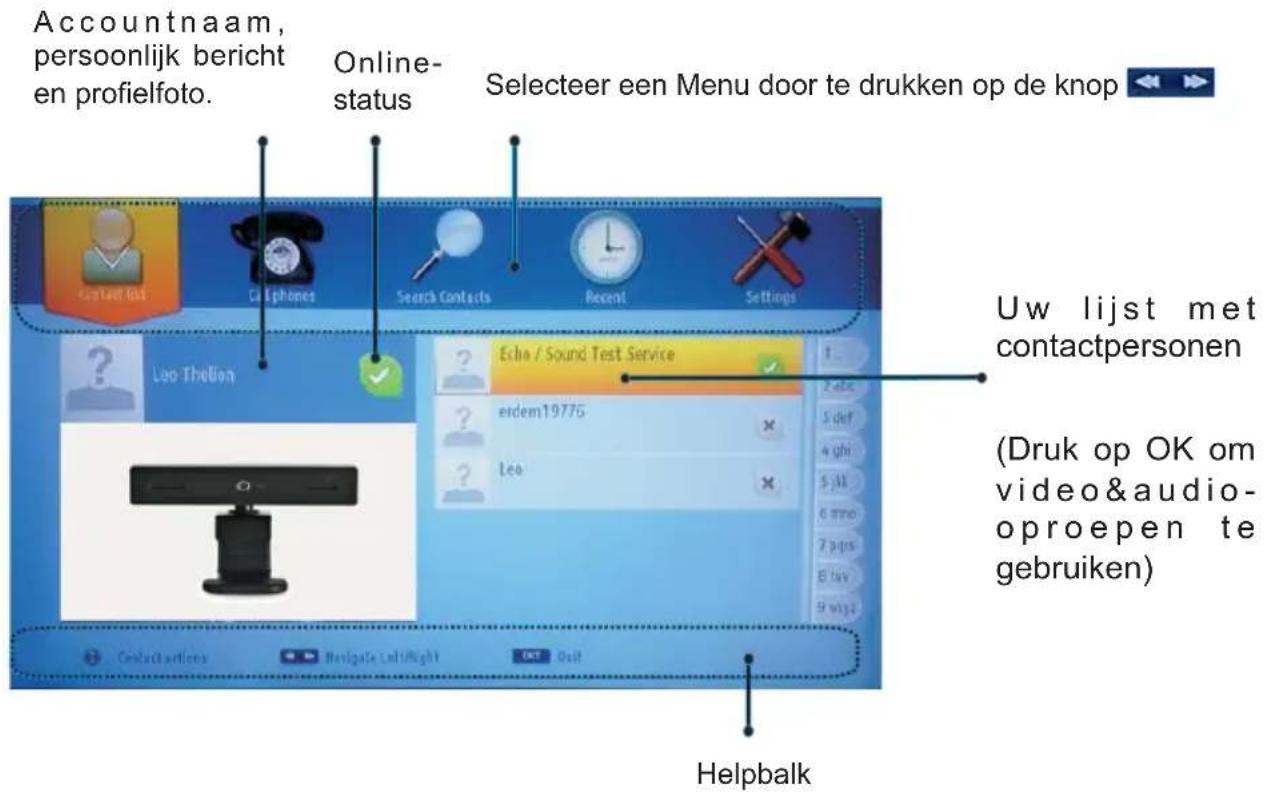
text_image
Active events ? Erdem Decline Accept Accept with videotext_image
Contact Dot On phone Search Contacts Bound Settings Region/Country Phone number 1 2 3 4 5 6 7 8 9 * 0 # Call SMS Clear Skype Credit balance 0.00 Select Upfront Left/right Help Gain Delete char Navigate Left/righttext_image
Contact Set Gillphems Search Contacts Recent Solutions General settings Turn ringing On/Off On Profile settings Preferred sort order in Contact List Sort by name Start Skype automatically Enabled Camera settings Save password Enabled About Show self preview in Contact list EnabledNotifications & Features & Accessories......27
Remote Control 29
Connections.... 30
First Time Installation - USB Connections......31
TV Menu Features and Functions 33
General TV Operation 36
Internet Portal 39
Software Upgrade.... 40
Troubleshooting & Tips 40
Appendix A: Nero MediaHome Installation......41
PC Input Typical Display Modes 42
Supported File Formats for USB Mode 42
AV and HDMI Signal Compatibility 42
Internet Browser 43
Getting Started with Skype 44

CAUTION
RISK OF ELECTRIC SHOCK DO NOT OPEN

CAUTION: TO REDUCE THE RISK OF ELECTRIC SHOCK DO NOT REMOVE COVER (OR BACK). NO USER-SERVICEABLE PARTS INSIDE. REFER SERVICING TO QUALIFIED SERVICE PERSONNEL.
To operate your TV in extreme ambient conditions may cause the damage of the device.
If there is lightning or storms, or if the TV is not going to be used for a while (e.g. if going away on holiday), disconnect the TV set from the mains. The mains plug is used to disconnect TV set from the mains and therefore it must remain readily operable.

The exclamation point within an equilateral triangle is intended to alert the user to the presence of important operating and maintenance (servicing) instructions in the literature accompanying the appliance.
Note : Follow the on screen instructions for operating the related features.

IMPORTANT - Please read these instructions fully before installing or operating

WARNING: Never let people (including dren) with reduced physical, sensory or tal capabilities or lack of experience and / or knowledge use electrical devices unsupervised.
- For ventilation purposes, leave a free space of at least 10 cm all around the set.
- Do not block ventilation holes.
- Do not place the TV on sloping or unstable surfaces, the TV may tip over.
- Use this device in moderate climates.
- The power cord plug should be easily accessible. Do not place the TV, furniture, etc. on the power cord. A damaged power cord/plug can cause fire or give you an electric shock. Handle the power cord by the plug, do not unplug the TV by pulling the power cord. Never touch the power cord/plug with wet hands as this could cause a short circuit or electric shock. Never make a knot in the power cord or tie it with other cords. When damaged it must be replaced, this should only be done by qualified personnel.
- Do not use this TV in a humid or damp place. Do not expose the TV to liquids. If any liquid falls into the cabinet unplug the TV and have it checked by qualified personnel before operating it any further.
- Do not expose the TV to direct sunlight or other heat sources.
- The TV should not be placed near to open flames or sources of intense heat such as an electric heater.
- Excessive sound pressure from earphones and headphones can cause hearing loss.
- Ensure that no open flame sources, such as lit candles are placed on top of the TV.
- To prevent injury, this TV must be securely attached to the wall in accordance with the installation instructions (if the option is available).
- Occasionally, a few non-active pixels may appear on the screen as a fixed blue, green or red point. Please note that this does not affect the performance
of your product. Take care not to scratch the screen with fingernails or other hard objects.

- Before cleaning, unplug the TV from the wall socket. Only use a soft, dry cloth while cleaning.
 Warning Warning | Serious injury or death ris |
| [HZZ3] Risk of electric shock | Dangerous voltage risk |
 Caution Caution | Injury or property damage risk |
| [CSAT] Important | Operating the system correctly |
 Notice Notice | Additional notes marked |
Getting Started
Notifications & Features & Accessories
Environmental Information
This television is designed to consume less energy to help save the environment. To reduce energy consumption, you should take the following steps: If you set the Power Save Mode as Eco, the TV will switch to energy-saving mode. The Power Save Mode settings can be found in the 'Picture' section of the Main Menu. Note that some picture settings will be unavailable to be changed.
If Picture Off is selected, "Screen will be off in 3 seconds." message will be displayed. Select PROCEED and press OK to continue. The screen will be off immediately.
When the TV is not in use, please switch off o disconnect the TV from the mains plug. This will also reduce energy consumption.
Standby Notifications
1) If the TV does not receive any input signal (e.g. from an aerial or HDMI source) for 5 minutes, the TV will go into standby. When you next switch-on, the following message will be displayed: "Standby Cause No Signal". Press OK to continue.
2) If the TV has been left on and not been operated for a while, the TV will go into standby. When you next switch-on, the following message will be displayed. "Standby Cause No Operation" Press OK to continue.
Features
- Remote controlled colour LED TV.
• Fully integrated digital/cable TV (DVB-T/C) - HDMI inputs are for connecting a device that has a HDMI socket.
- USB input.
- OSD menu system.
- Scart socket for external devices (such as DVD Players, PVR, video games, etc.)
- Stereo sound system.
- Teletext.
• Headphone connection.
• Automatic programming system. - Manual tuning.
• Automatic power down after up to six hours. - Sleep timer.
- Child lock.
• Automatic sound mute when no transmission. - NTSC playback.
• AVL (Automatic Volume Limiting).
- PLL (Frequency Search).
- PC input.
- Plug&Play for Windows 98, ME, 2000, XP, Vista, Windows 7.
- Game Mode (Optional).
- Ethernet (LAN) for Internet connectivity and service
• 802.11n WIFI Support (Optional)
• 100HZ BPR
Accessories Included
- Remote Control
- Batteries: 2 x AAA
- Instruction Book
- Side AV Connection Cable
- Nero Media Home CD
TV Control Switch & Operation

text_image
Technical diagram showing a mechanical assembly with numbered components and directional arrows indicating motion or flow.- Up direction
- Down direction
- Programme/Volume / AV / Standby-On selection switch
The Control button allows you to control the Volume/Programme/ Source and Standby-On functions of the TV.
To change volume: Increase the volume by pushing the button up. Decrease the volume by pushing the button down.
To change channel: Press the middle of the button, the channel information banner will appear on screen. Scroll through the stored channels by pushing the button up or down
To change source: Press the middle of the button twice, the source list will appear on screen. Scroll through the available sources by pushing the button up or down.
To turn the TV off: Press the middle of the button down and hold it down for a few seconds, the TV will turn into standby mode.
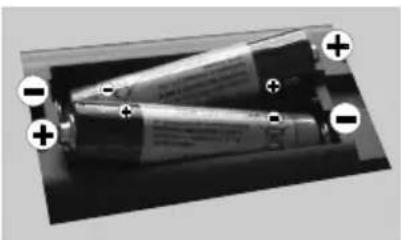
Inserting the Batteries into the Remote
Lift the cover on the back of the remote upward gently. Install two AAA batteries. Make sure to match the + and - ends of the batteries in the battery compartment (observe the correct polarity) Replace the cover.
natural_image
Close-up of two cylindrical batteries with positive and negative charge indicators (no text or symbols visible)Connect Power
IMPORTANT: The TV set is designed to operate on 220-240V AC, 50 Hz socket. After unpacking, allow the TV set to reach the ambient room temperature before you connect the set to the mains. Plug the power cable to the mains socket outlet.
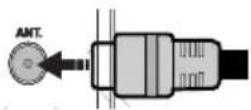
Antenna/Cable Connection
Connect the "aerial" or "cable TV" plug to AERIAL INPUT (ANT) socket located on the back of the TV.
Notification
Manufactured under license from Dolby Laboratories.
TRADEMARK ACKNOWLEDGMENT
"Dolby" and the double-D symbol are trademarks of Dolby Laboratories.

DOLBY. DIGITAL PLUS
"HDMI, the HDMI logo and High-Definition Multimedia Interface are trademarks or registered trademarks of HDMI Licensing LLC."

HIGH-DEFINITION MULTIMEDIA INTERFACE
“DLNA, the DLNA Logo and DLNA CERTIFIED are trademarks, service marks, or certification marks of the Digital Living Network Alliance.”


Information for Users on Disposal of Old Equipment and Batteries
[European Union only]
These symbols indicate that equipment with these symbols should not be disposed of as general household waste. If you want to dispose of the product or battery, please consider the collection systems or facilities for appropriate recycling.
Notice: The sign Pb below the symbol for batteries indicates that this battery contains lead.
![SALORA 40LED8100CS - [European Union only] - 1](/content/2026/06/1237084/images/da4904c416935caa5953f3c3e5db80161a2838f086c126892f9cb2da77804711.jpg)
text_image
Products BatterySpecification
| TV Broadcasting PAL B/G D/K K | |
| Receiving Channels | VHF (BAND I/III) - UHF (BAND U) - HYPERBAND |
| Number of Preset Channels | 1000 |
| Channel Indicator On Screen Display | |
| RF Aerial Input 75 Ohm (unbalanced) | |
| Operating Voltage 220-240V AC, 50Hz. | |
| Audio German+Nicam | |
| Audio Output Power (WRMS.) (10% THD) | 2 x 8 |
| Power Consumption 100W | |
| Weight | 11 |
| TV Dimensions DxLxH (with foot) | 220 x 933 x 592 |
| TV Dimensions DxLxH (without foot) | 70 x 933 x 559 |
| Display | 16/9 40"inch |
| Operation temperature and operation humidity: | 5°C up to 45°C, 85% humidity max |
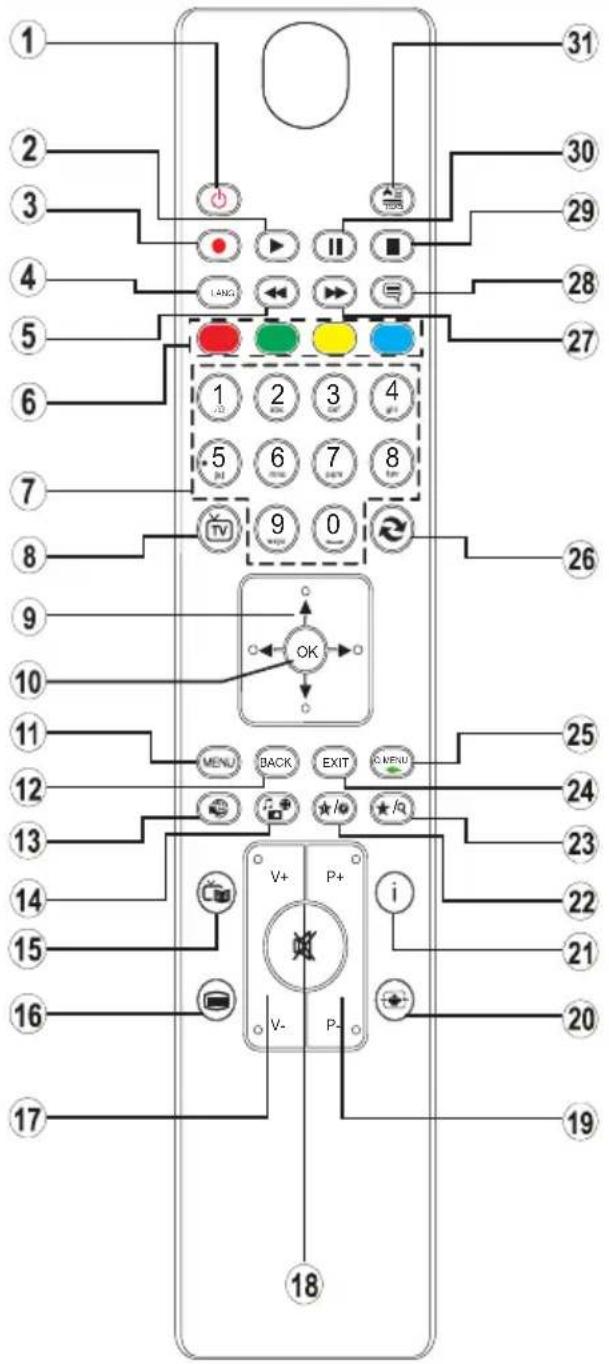
Remote Control
text_image
1 2 3 4 5 6 7 8 9 10 11 12 13 14 15 16 17 18 27 28 29 30 31 32 33 34 35 36 37 38 39 40 41 42 43 44 45 46 47 48 49 50 51 52 53 54 55 56 57 58 59 60 61 62 63 64 65 66 67 68 69 70 71 72 73 74 75 76 77 78 79 80 81 82 83 84 85 86 87 88 89 90 91 92 93 94 95 96 97 98 99 100Teletext
Press button to enter. Press again to activate mix mode. Press once more to exit. Follow the instructions displayed on digital teletext screen.
Digital Teletext (for UK only)
Press 📄 button to view digital teletext information. Operate it with the coloured buttons, cursor buttons and the OK button. The operation method may differ depending on the contents of the digital teletext. Follow the instructions displayed on the digital teletext screen. When the 📄 button is pressed again, the TV returns to television broadcast.
- Standby / On
- Play (in media browser mode)
- No function
- Mono-Stereo Dual I-II / Current language
- Fast rewind (in media browser mode)
- Colored buttons
- Numeric buttons
- Channel list
- Navigational buttons
- Ok / Confirm
- Menu on / off
- Return / back
- Internet
- Media browser
- Electronic programme guide
- Teletext - Mix
- Volume up / down
- Mute
- Programme up / down
- Image size
- Info / Reveal (in TXT mode)
- My button 1 / YouTube (*)
- My button 2: Switches between digital/cable (**)
- Exit
- Quick menu
- Previous programme / Now (in EPG mode)
- Fast forward (in media browser mode)
- Subtitle on-off / Subtitle (in media browser mode)
- Stop (in media browser mode)
- Pause (in media browser mode)
- AV / Source
Using My button 1
This button's main function is to run Youtube link. However, if you want to change this function, you can press MY BUTTON 1 for five seconds when on a desired source, channel or link, until the "MY BUTTON IS SET" message is displayed on the screen. This confirms that the selected MY BUTTON is now associated with the selected function. Note that if you perform first time installation, MY BUTTON 1 will return to its default function.
Using My button 2
Press MY BUTTON 2 for five seconds when on a desired source, channel or link, until the "MY BUTTON IS SET" message is displayed on the screen. This confirms that the selected MY BUTTON is now associated with the selected function.
| Connector Type Cables Device | |||
 | Scart Connection (back) | 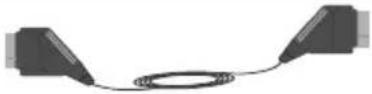 |  |
 | VGA Connection (back) |  |  |
SIDE AV | PC/YPbPr Audio Connection (side) | 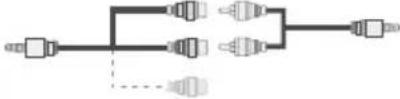 Side Audio/Video Connection Cable (Supplied) PC Audio Cable (Not supplied) Side Audio/Video Connection Cable (Supplied) PC Audio Cable (Not supplied) |  |
 | HDMI Connection (back) | 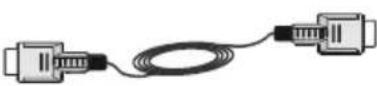 |  |
 SPDIF SPDIF | SPDIF Connection (back) |  |  |
SIDE AV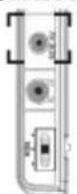 | Side AV Connection (side) |  AV Connection Cable (supplied) AV Connection Cable (supplied) |  |
HEADPHONE | Headphone Connection (side) |  | |
 YPBPR YPBPR | YPbPr Video Connection (side) |  YPbPr Connection Cable YPbPr Connection Cable |  |
 | USB Connection (side) |  |  |
 | CI Connection (side) |  |  |

NOTE: When connecting a device via the YPbPr or Side AV input, you must use a connection cables to enable connection. See the illustrations above. | To enable PC audio, you will need to use the SIDE AV CONNECTION cable's WHITE & RED inputs. | If an external device is connected via the SCART socket, the TV will automatically switch to AV mode. | When receiving DTV channels (Mpeg4 H.264) or while in Media Browser mode, output will not be available via the scart socket. | When using the wall mounting kit (optional), we recommend that you plug all your cables into the back of the TV before mounting on the wall. | Insert or remove the CI module only when the TV is SWITCHED OFF. You should refer to the module instruction manual for details of the settings.
First Time Installation - USB Connections
Switching On/Off
To Switch the TV On
Connect the power cord to the 220-240V AC, 50 Hz.
To switch on the TV from standby mode either:
Press the "button, P+P- or a numeric button on the remote control.
Press the side function switch until the TV comes on from standby.
To Switch the TV Off
Press the "button" on the remote control or press the side function switch until the TV switches into standby mode.
To power down the TV completely, unplug the power cord from the mains socket.
Note: When the TV is switched to standby mode, the standby LED can blink to indicate that features such as Standby Search, Over Air Download or Timer is active. The LED can also blink when you switch on the TV from standby mode.
First Time Installation
When turned on for the first time, the language selection screen is displayed. Select the desired language and press OK.
The First Time Installation (FTI) screen will be displayed next. Set your preferences using the navigation buttons and when finished, press OK to continue.
You can activate Store mode option to be available in "Other settings" menu and your TV's features will be illustrated on the top of the screen. a confirmation screen will be displayed. Select YES to proceed.
If Home Mode is selected, Store mode will not be available after the First Time Installation. Press OK button to continue.
Aerial Installation
If you select AERIAL option from the Search Type screen, the television will search for digital terrestrial TV broadcasts

NOTE: You can press MENU button to cancel.
After all the available stations are stored, the Channel List will be displayed on the screen. If you like how the channels are sorted according to the LCN (*), please select "Yes" and then press OK.
Press MENU button to quit channel list and watch TV. (*) LCN is the Logical Channel Number system that organizes available broadcasts in accordance with a recognizable channel sequence (if available).
Cable Installation
If you select CABLE option and press OK button on the remote control. To continue, please select YES and press OK. To cancel operation, select NO and press OK. You can select frequency ranges from this screen.
Enter the frequency range manually by using the numeric button.
Note: Searching duration will change depending on the selected search step.
Media Playback via USB Input
You can connect a 2.5" and 3.5" inch (hdd with external power supply) external hard disk drives or USB memory stick to your TV by using the USB inputs of the TV.
IMPORTANT! Back up your files before making any connections to the TV. Manufacturer will not be responsible for any file damage or data loss. Certain types of USB devices (e.g. MP3 Players) or USB hard disk drives/memory sticks may not be compatible with this TV. The TV supports FAT32 and NTFS disk formatting but recording will not be available with NTFS formatted disks.
While formatting a USB hard disk that has 1TB (Tera Byte) or more file capacity, you can experience problems with the formatting process. Do not repeatedly quickly plug and unplug the drive. This may cause physical damage to the USB player and USB device itself. Do not pull out USB module while playing a file.
Quick Menu
Quick Settings menu allows you to access some options quickly. This menu includes Power Save Mode, Picture Mode, Equalizer Settings, Favourites and Sleep Timer options. Press Q.MENU button on the remote control to view quick menu. See the following chapters for the details of the listed features.
Media Browser Menu
You can play photo, music, and movie files stored on a USB disk by connecting it to your TV. Connect a USB disk to one of the USB inputs located on the side of the TV. Pressing the MENU button while in the Media Browser mode will access the Picture, Sound and Settings menu options. Pressing the MENU button again will exit from this screen. You can set your Media Browser preferences by using the Settings Menu.
| Loop/Shuffle Mode Operation | |
Start playback with ▶ and activate  | TV plays next file and loop the list. |
Start playback with OK and activate  | the same file will be played in a loop (repeat) |
Start playback with OK/▶ and activate  | the file will be played in a shuffle. |
TV Menu Features and Functions
| Picture Menu Contents | |
| Mode | You can change the picture mode to suit your preference or requirements. Picture mode can be set to one of these options: Cinema, Game, Sport, Dynamic and Natural. |
| Contrast Sets the | lightness and darkness values of the screen. |
| Brightness Sets the brightness value for the screen. | |
| Sharpness Sets the sharpness value for the objects displayed on the screen. | |
| Colour Sets the colour value, adjusting the colors. | |
| Power Save Mode | To set the Power Save Mode as Eco, Picture Off and Disabled.(When the Mode is Dynamic, Power Save mode is automatically set as disabled.) |
| Backlight(Optional) | This setting controls the backlight level. The backlight function will be inactive if the Power Save Mode is set to Eco. The backlight cannot be activated in VGA, Media Browser mode or while the picture mode is set to Game. |
| NoiseReduction | If the broadcast signal is weak and the picture is noisy, use the Noise Reduction setting to reduce the amount of noise. |
| Advanced Settings | |
| DyanmicContrast | You can change the Dynamic Contrast ratio to desired value. |
| Colour Temp Sets the desired colour tone. | |
| Picture Zoom | Sets the desired picture size from picture zoom menu.Note: Auto (Only available in Scart mode with SCART PIN8 high voltage/low voltage switching) |
| HDMI TrueBlack | While watching from HDMI source, this feature will be visible in the Picture Settings menuYou can use this feature to enhance blackness in the picture. |
| Film Mode | Films are recorded at a different number of frames per second to normal television programmes. Turn this feature on when you are watching films to see the fast motion scenes clearly. |
| Skin Tone | Skin tone can be changed between -5 and 5. |
| Colour Shift Adjust the desired colour tone. | |
| RGB Gain | You can configure the colour temperature values using the RGB Gain feature. |
| Reset Resets the picture settings to factory default settings.(Except Game Mode) | |
| Autoposition(in PC mode) | Automatically optimizes the display. Press OK to optimize. |
| H Position (inPC mode) | This item shifts the image horizontally to the right hand side or left hand side of the screen. |
| V Position (inPC mode) | This item shifts the image vertically towards the top or bottom of the screen. |
| Dot Clock (inPC mode) | Dot Clock adjustments correct the interference that appear as vertical banding in dot intensive presentations like spreadsheets or paragraphs or text in smaller fonts. |
| Phase (in PCmode) | Depending on the resolution and scan frequency that you input to the TV set, you may see a hazy or noisy picture on the screen. In such a case you can use this item to get a clear picture by trial and error method. |
| While in VGA (PC) mode, some items in Picture menu will be unavailable. Instead, VGA mode settings will be added to the Picture Settings while in PC mode. | |
| Sound Menu Contents | |
| Volume Adjusts the volume level. | |
| Equalizer | Selects the equalizer mode. Custom settings can be made only when in user mode. |
| Balance This setting is | used for emphasizing left or right speaker balance. |
| Headphone Sets headphone volume. | |
| Sound Mode You can select a sound mode. (If the selected channel supports). | |
| AVL (Automatic Volume Limiting) | Function sets the sound to obtain fixed output level between programmes. |
| Headphone/Lineout | When you connect an external amplifier to your TV using the headphone jack, you can select this option as Lineout. If you have connected headphones to the TV, set this option as Headphone. |
| Dynamic Bass Enables or disables the Dynamic Bass. | |
| Surround Sound (optional) | Surround sound mode can be changed as On or Off. |
| Digital Out Sets digital out audio type. | |
| Settings Menu Contents | |
| Conditional Access Controls conditional access modules when available. | |
| Language | Configures language settings (may change depending on the country selected) Preferred and current settings will be available. Current settings can be changed only if the broadcaster supports. |
| Parental | Enter correct password to change parental settings. You can easily adjust menu lock, maturity lock(may change depending on the country selected) and child lock in this menu. You can also set new pin number. |
| Timers | Sets sleep timer to turn off the TV after a certain time. Sets timers for selected programmes. |
| Date/Time | Sets date and time. |
| Sources | Enables or disables selected source options. |
| Network Settings | Displays network settings. |
| Other Settings: Displays other setting options of the TV set: | |
| Menu Timeout Changes | timeout duration for menu screens. |
| Scan Encrypted Channels | When this setting is on, the search process will locate the encrypted channels as we |
| Blue Background | Activates or deactivates the blue background system when the signal is weak or absent. |
| Software Upgrade To ensure that your TV always has the most up to date firmware. | |
| Application Version Displays application version. | |
| Hard of Hearing Enables any special feature sent from the broadcaster. | |
| Audio Description | Audio description refers to an additional narration track for blind and visually impaired viewers of visual media, including television and movies. You can use this feature, only if the broadcaster supports that additional narration track. |
| Auto TV Off | You can set the timeout value of auto off feature. When the timeout value is reached and the TV has not been operated for a selected time, the TV will go into standby mod |
| Standby Search (Optional) | If the Standby Search is set to On, when the TV is in standby mode, available broadcasts will be searched. If the TV locates any new or missing broadcasts, a menu screen will be displayed, asking you whether or not to execute these changes The Channel list will be updated and changed after this process. |
| Store Mode | If you are displaying the TV in a store, you can activate this mode. Whilst Store Mode is enabled, some items in the TV menu may not be available. |
| DLNA Renderer | DLNA renderer feature allows you to share files stored on your smartphone. If you have a DLNA renderer compatible smartphone and software installed, you can share/play photos with your TV. See instructions of your sharing software for more information. DLNA renderer mode will not be available with internet portal feature |
| Power Up Mode This setting configures the power up mode preference. | |
| Virtual Remote (optional) | Enables or disables the virtual remote feature. |
| Install and Retune Menu Contents | |
| Automatic Channel Scan (Retune) (If available) | Displays automatic tuning options. Digital Aerial: Searches and stores aerial DVB stations. Digital Cable: Searches and stores cable DVB stations. Analogue: Searches and stores analogue stations. Digital Aerial & Analogue: Searches and stores aerial DVB and analogue stations. Digital Cable & Analogue Searches and stores cable DVB and analogue stations. |
| Manual Channel Scan This feature can be used for direct broadcast entry. | |
| Network Channel Scan Searches for the linked channels in the broadcast system. | |
| Analogue Fine Tune | You can use this setting for fine tuning analogue channels. This feature is not available if no analogue channels are stored. |
| First Time Installation | Deletes all stored channels and settings, resets TV to factory settings. |
General TV Operation
Using the Channel List
The TV sorts all stored stations in the Channel List. You can edit this channel list, set favourites or set active stations to be listed by using the Channel List options.
Configuring Parental Settings
To prohibit viewing of certain programmes, channels and menus can be locked by using the parental control system.
To display parental lock menu options, the PIN number should be entered. The factory default PIN number is 0000. After coding the correct PIN number, parental settings menu will be displayed.
Menu Lock: Menu lock setting enables or disables the menu access.
Maturity Lock: When set, this option gets the maturity information from the broadcast and if this maturity level is disabled, disables access to the broadcast.
Child Lock: When Child Lock is set, the TV can only be controlled by the remote control. In this case the control panel buttons will not work.
Set PIN: Defines a new PIN number.
Note: If the Country option is set to France, you can use 4725 as the default code.
Electronic Programme Guide (EPG)
Some, but not all channels send information about the current and next programmes. Press the "C" button to view the EPG menu.
Up/Down/Left/Right: Navigate EPG.
OK: Displays programme options.
INFO: Displays, in detailed, information on the programme selected.
GREEN: Switches to List Schedule EPG.
YELLOW: Switches to Timeline Schedule EPG.
BLUE: Displays filtering options.
Programme Options
In EPG menu, press the OK button to enter the Event Options menu.
Select Channel
In EPG menu, using this option, you can switch to the selected channel.
Set Timer / Delete Timer
After you have selected a programme in the EPG menu, press the OK button. Select the Set Timer on Event option and press the OK button. You can set a timer for future programmes. To cancel an already set timer, highlight that programme and press the OK button. Then select "Delete Timer" option. The timer will be cancelled.
Note: It is not possible to record two channels at the same time.
Connectivity Functions
Connecting to a Wired Network
- Connect broadband ISP connection ethernet cable to the ETHERNET INPUT of your modem.
- Ensure that Nero Media Home software is installed to your PC.(for DLNA function). See Appendix A.
- Connect your PC to the one of your modem's LAN connectors (e.g. LAN 1) by using a proper LAN cable.
- Use another LAN output of your modem (e.g. LAN 2) to enable the connection to your TV.
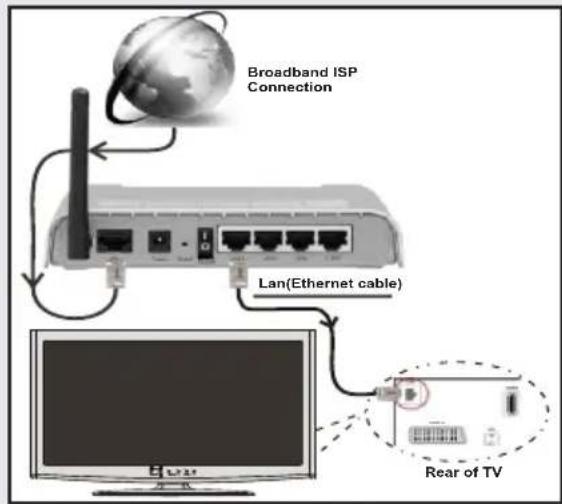
text_image
Broadband ISP Connection Lan(Ethernet cable) Rear of TV- To access and play shared files, you must Select Media Browser. Press Menu button and select Media Browser. Press OK to continue. Select the desired file type and press OK. You must always use the Media Browser screen to access and play shared network files.
- PC/HDD/Media Player or any other devices that are DLNA 1.5 compatible should be used with wired connection for higher playback quality.
To configure wired settings please refer Network Settings section in Settings menu.
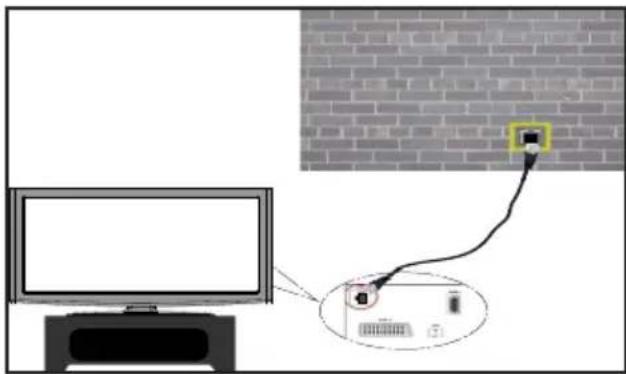
- You might be able to connect your TV to your LAN network depending on your network's configuration. In such a case, use an ethernet cable to connect your TV directly to the network wall outlet.
text_image
Diagram showing connection between a monitor and a brick wall, with a cable and device labeled in Chinese.Connecting to a Wireless Network
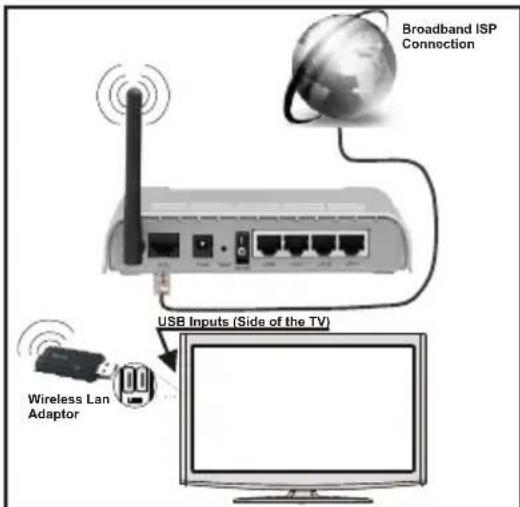
IMPORTANT: "Veezy 200" USB dongle is required to use wireless network feature.
- To make your modem's SSID visible, you should change your SSID settings via modem's software. The TV cannot connect to the networks with hidden SSID.
For connecting to a wireless LAN network, you should perform the following steps:
- Connect broadband ISP connection ethernet cable to the ETHERNET INPUT of your modem.
- Ensure that Nero Media Home software is installed to your PC (for DLNA function).
- Afterwards, you should connect wireless adaptor to one of the USB inputs of the TV.
- To configure wireless settings please refer Network Settings section in the following sections.
text_image
Broadband ISP Connection USB Inputs (Side of the TV) Wireless Lan Adaptor- A Wireless-N router (IEEE 802.11a/b/g/n) with simultaneous 2.4 and 5 GHz bands designed to increase bandwidth. Optimized for smoother and faster HD video streaming, file transfers, and wireless gaming.
-
Use LAN connection for quicker file sharing between other devices like computers.
• The frequency and channel differ depending on the area -
The transmission speed differs depending on the distance and number of obstructions between the transmission products, the configuration of these products, the radio wave conditions, the line traffic, and the products that you use. The transmission may also be cut off or get disconnected depending on the radio wave conditions DECT phones, or any other WiFi 11b appliances. The standard values of the transmission speed are the theoretical maximum values for the wireless standards. They are not the actual speeds of data transmission.
- The location where the transmission is most effective differs depending on the usage environment.
- Wireless LAN adaptor should be connected directly to the TV's USB port. USB hubs are not supported.
- Wireless LAN adaptor supports 802.11 a,b,g & n type modems. It is highly recommended that you should use IEEE 802.11n communication protocol in order to avoid any possible problems while watching videos.
- Use the other usb input, if you experience problems with audio/video performance.
- You must change your modem's SSID when there are any other modems around with the same SSID.
Configuring Network Settings
Your TV's Network Settings include Wired and Wireless Connection options. However, if your TV does not have USB Wi-Fi dongle, you should use Wired Connection type. If you try to connect via Wireless Connection when your TV does not have a USB Wi-Fi dongle, a warning screen will appear and the TV will not get an IP address. Try connecting the LAN cable after this and then the TV will be able to get an IP address.
Configuring Wired Device Settings
If you are connecting the TV via ETHERNET INPUT, select Network Type as Wired Device to configure.
Network Type
Network type can be selected as Wired or Wireless device, in accordance with the active connection to the TV set. Select this as Wired if you have connected to the TV a LAN cable. Select as Wireless if you connect via the wireless USB dongle.
Configuration Status
This section displays the status of the connection.
IP Address
If an active connection is available, the IP address will be displayed on this section. If you want to configure IP address preferences, press GREEN button and switch to the advanced mode.
Configuring Wired Network Settings in Advanced Mode
While in Advanced Mode, press RED button to edit settings. When finished, press OK to save, Press RETURN/BACK to cancel.
IMPORTANT: "Veezy 200" USB dongle is required to use wireless network feature.
Wi-Fi feature can be used for a wireless network connection. If you have the Veezy 200 Wifi Dongle, select Network Type as Wireless Device to start connection process.
To enable Wi-Fi feature, profiles should be configured properly. Please plug in the Wi-Fi dongle to one of the USB ports.
Press YELLOW button to scan wireless network. Afterwards, available network list will be displayed. Please select your desired network from the list.
If the selected network is protected with a password, please enter the correct key by using the virtual keyboard. You can use this keyboard via navigation buttons and OK button on the remote control.
Wait until the IP the address is shown on the screen.
This means that the connection is now established. To disconnect from a wireless network, you should highlight
Configuration Status and press OK.
You can navigate between menu tabs by pressing left/right buttons. The help bar on the bottom of the dialog shows features that you may use. Press BLUE button to check your internet connection speed.
You can check the signal strength by using the network settings menu for the wireless device mode.
Information
Configuration Status: Displays wi-fi status as connected or not connected.
IP Address: Displays the current IP address.
Network Name: Connected networks' name will be displayed.
Press GREEN button to switch to advanced mode and then press OK button to edit settings.
Delete Saved Wifi Profiles
Saved profiles will be deleted if you press red button while wireless device selection osd is on the screen.
Connecting to your Cell Phone via WiFi (Optional)
- If your cell phone has WiFi feature, you can connect your cell phone to your TV by using WiFi connection via a router, in order to play content from your phone. For this, your cell phone must have an appropriate sharing software.
- Connect to your router following the steps stated above in the Wireless Connection section.
-
Afterwards, engage your cell phone with the router and then activate sharing software on your cell phone. Then, select files that you would like to share with your TV.
-
If the connection is established correctly, you should now access the shared files of your cell phone via the Media Browser of your TV.
- Enter Media Browser menu and playback device selection OSD will be displayed. Select your cell phone's ident and press OK to continue.
Note: This feature may not be supported by some cell phones.
Connectivity Troubleshooting
Wireless Network Not Available
Ensure that the firewalls of your network allows the TV wireless connection. "Veezy 200" usb wifi dongle should be plugged properly (if available). If the wireless network does not function properly, try using the wired network in your home. Refer to the Wired Connection section for more information on the process.
Check the modem (router) first. If the router does not have a problem, check the internet connection of your modem. Try searching for wireless networks again, using the Network Settings menu screen.
Connection is Slow
See the instruction book of your wireless modem to get information on the internal service area, connection speed, signal quality and other settings. You need to have a high speed connection for your modem.
Distruption during playback or slow reactions
You could try the following in such a case:
Keep at least three meters distance from microwave ovens, mobile telephones, bluetooth devices or any other Wi-Fi compatible devices. Try changing the active channel on the WLAN router.
Using DLNA Network Service
DLNA (Digital Living Network Alliance) is a standard that eases viewing process of digital electronics and makes them more convenient to use on a home network. For further information, visit www.dlna.org.
DLNA standard allows you to view and play photos, music and videos stored in the DLNA media server connected to your home network.
Step 1: Nero Media Home
DLNA function cannot be used if the server program is not install to your PC. Please prepare your PC with the provided Nero Media Home programme.
For more information about the installation, please refer to Nero Media Home Installation section
Step 2: Connect to a Wired or Wireless Network
See the chapter Network Settings for detailed configuration information.
Step 3: Play Shared Files via Media Browser
Select Media Browser by using Left or Right button from the main menu and press OK button. Media browser will be then displayed.
DLNA support is available only with Media Browser folder mode. To enable folder mode, go to Settings tab in the main media browser screen and press OK. In the settings options, highlight View Style and change to Folder using Left or Right button.
Please select desired media type and press OK.
If sharing configurations are set properly, an OSD message will be displayed after selecting the desired media type. Select OK to display the selected network or USB memory content. If you want to refresh the device list, press GREEN button. You can press MENU to exit.
If available networks are found, they will be listed on this screen. Select media server or network that you want to connect by using “√” or “ ” buttons and press OK button.
If you select media type as Video and choose a device from the selection menu, a new menu screen will appear on the screen.
Select Videos from this screen to list all the available video files from the selected network.
To play other media types from this screen, you must go back to main Media Browser screen and select media type as desired and then perform the network selection again. Refer to Media Browser USB Playback section for further information on file playback.
Subtitle files do not work if you watch video from network through DLNA.
You can connect only one television with DLNA to same network. If a problem occurs with DLNA network, please switch on/off your television. Trick mode and jump are not supported with DLNA function.
CAUTION:
There may be some PC's which may not be able to utilize the DLNA function due to administrator and security settings. (such as business PC's).
For best home network streaming with this set, the supplied Nero software should be installed.
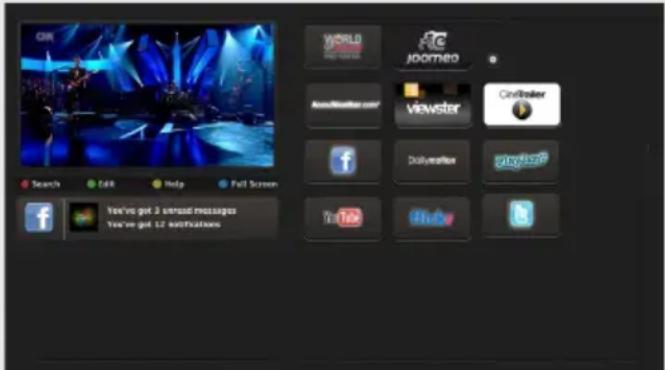
Internet Portal
You can access PORTAL mode using your TV. To do this, an active internet connection is required. Follow the steps on Connecting to a Wired/Wireless(optional) Network section to connect your TV to internet. After the connection is established, you can select or view portal options.
Note: Broadband internet connection is required for high quality viewing. Ensure that the internet connection is made properly. You must set the Country and Language data correctly in the First Time Installation for the proper operation of internet portal.
Press "button on your remote control and portal application options will be displayed. Application options will be displayed as the template below. Available applications' contents may change depending on the application content provider.
text_image
GIR WORLD JOGARNEO Search Edit Help Fall Screen Viewstar Civiloster Dollystation viviloster You've got 3 unread messages You've got 12 notificationsSelect a link or application using the Left and Right or Up or Down buttons and press OK to activate.
- Use Up/Down and Left/Right buttons to navigate between the items on Portal screen.
- Press OK button to confirm your selection.
- Press BACK to go to the previous screen.
- Press EXIT to quit internet portal mode.
Note: Possible application dependent problems may be caused by the content service provider.
Note on PIP Window
If you switch to portal mode while watching TV channels, current programme will be displayed on the PIP window. You can change channels using P+/P- buttons.
Current HDMI content will be displayed on the PIP window, if you switch to portal mode while watching HDMI source.
Use the “◀ or “ ”,◀” or “ ” to navigate between the items on Portal screen. Press the OK button to confirm your selection. Press the BACK button to go to the previous screen.
Press the EXIT button to quit the Internet portal mode.
Software Upgrade
Your TV is capable of finding and updating automatically via the Aerial/Cable signal or over the Internet.
Software upgrade search via user interface
Simply navigate on your main menu. Choose Settings and select Other Settings menu. In Other Settings menu navigate on to the Software for Upgrade item and press OK button to check for a new software upgrade.
Note : Internet connection is needed. If an internet connection is not available, try to upgrade via broadcast. If a new upgrade is found, it starts to download the upgrade. Press OK to continue with the reboot operation.
3 AM search and upgrade mode
While the TV is connected to an aerial signal. It Automatic scanning in the Upgrade Options menu is enabled, the TV wakes up at 03:00 and searches broadcast channels for new software upgrades. In new software is found and downloaded successfully, the next time the TV powers up, it will have the new software version.
Note: If the TV fails to come on after the upgrade unplug the TV for 2 minutes and plug in again.
Troubleshooting & Tips
Tv will not turn on
Make sure the power cord is plugged in securely to wall outlet. The batteries in the remote control may be exhausted. Press the Power button on the TV.
Poor picture
- Have you selected the correct TV system?
- Low signal level can cause picture distortion. Please check antenna access.
- Check if you have entered the correct channel frequency if you have done manual tuning.
- The picture quality may degrade when two devices are connected to the TV at the same time. In such a case, disconnect one of the devices.
No picture
- No Picture means that your TV is not receiving a transmission. Have you selected the correct button on the remote control? Try once more. Also make sure the correct input source has been selected.
• Is the antenna connected properly?
• Is the antenna cable damaged? - Are suitable plugs used to connect the antenna?
- If you are in doubt, consult your dealer.
No sound
- Has the TV been set to mute? To cancel mute, press the "button, or increase the volume level.
- Sound is coming from only one speaker. Is the balance set to one extreme? See Sound Menu section.
Remote control - does not operate
- The batteries may be exhausted. Replace the batteries.
Input sources - can not be selected
- If you cannot select an input source, it is possible that no device is connected. if not
- Check the AV cables and connections if you have tried to connect a device.
Appendix A: Nero MediaHome Installation
To install Nero MediaHome, please proceed as follows:
Note: To use DLNA function, this software should be installed to your PC.
- Insert the Nero Media Home installation disc in your optical disc drive.
- The Nero Multi Installer screen with a button to start the installation process will open automatically.
-
If below window is not displayed automatically double-click on the file SetupX located on the Nero MediaHome installation disc.
-
Click on the button labeled Nero MediaHome Essentials to start the installation process.
- The Nero MediaHome installation wizard is displayed.
- If necessary change installation language from the language selection menu before continuing.
- Click the Next button.
• The integrated serial is displayed.
- Please do not change displayed serial.
- Click the Next button.
- The License Conditions (EULA) screen is displayed.
-
Please read the license agreement carefully and select the appropriate check box if you agree to the terms of the agreement. Installation is not possible without this agreement.
-
Click the Next button.
- The Select Installation Type screen is displayed.
It is possible to choose between Typical, meaning standard installation, or Custom installation. User defined installation allows you to determine languages to be installed and to choose the installation path.
- Use Typical installation and click the Next button.
- The Prerequisites screen is displayed.
The Nero MediaHome installation wizard checks the availability of required third-party software on your PC. If applications are missing they are listed and must be installed before continuing installation.
- Click the Install button.
- As soon as all prerequisites are installed, the Install button will change to a Next button.
- Click the Next button.
- The Ready to Start Installation Process screen is displayed, installation begins and finishes automatically. A progress bar informs you of the progress of the installation process.
- Installation finishes.
The Help us to Enhance Nero Software screen is displayed. In order to offer a better service, Nero is collecting anonymous data to determine which features are used and what problems, if any, occur.
- If you would like to help by participating in the anonymous collection of usage data, select the check box and click the Next button.
- The final screen of the installation wizard is displayed.
-
Click the Exit button.
-
A shortcut called Nero MediaHome 4 is now placed on your desktop
Congratulations! You successfully installed Nero MediaHome 4 on your PC.
- Run Nero MediaHome by pressing shortcut icon.
- Click ADD icon from LOCAL FOLDERS to add the folder you want to share with the network. Select the folder that you want to share and click START SERVER.
- You can display all media types from the library. Click Refresh icon to refresh. Click STOP SERVER icon to stop server.
PC Input Typical Display Modes
The following table is an illustration of some of the typical video display modes. Your TV may not support all resolutions. Your TV supports up to 1920x1080.
| Index | Resolution | Frequency |
| 1 | 640x350p | 60 Hz |
| 2 | 640x400p | 60 Hz |
| 3 | 1024x768 | 60 Hz |
| 4 | 1280x768 | 60 Hz |
| 5 | 1360x768 | 60 Hz |
| 6 | 720x400 | 60 Hz |
| 7 | 800x600 | 56 Hz |
| 8 | 800x600 | 60 Hz |
| 9 | 1024x768 | 60 Hz |
| 10 | 1024x768 | 66 Hz |
| 11 | 1280x768 | 60 Hz |
| 12 | 1360x768 | 60 Hz |
| 13 | 1280x1024 | 60 Hz |
| 14 | 1280x960 | 60 Hz |
| 15 | 1280x1024 | 60 Hz |
| 16 | 1400x1050 | 60 Hz |
| 17 | 1600x1200 | 60 Hz |
| 18 | 1920x1080 | 60 Hz |
AV and HDMI Signal Compatibility
| Source | Supported Signals | Available | |
| EXT(SCART) | PAL 50/60 O | ||
| NTSC 60 O | |||
| RGB 50 O | |||
| RGB 60 O | |||
| Side AV | PAL 50/60 O | ||
| NTSC 60 O | |||
| PC/YPbPr | 480I, 480P | 60Hz O | |
| 576I, 576P | 50Hz O | ||
| 720P 50Hz,60Hz | O | ||
| 1080I | 50Hz,60Hz | O | |
| 1080P | 50Hz,60Hz | O | |
| HDMI1HDMI2 | 480I | 60Hz O | |
| 480P | 60Hz O | ||
| 576I, 576P | 50Hz O | ||
| 720P 50Hz,60Hz | O | ||
| 1080I | 50Hz,60Hz | O | |
| 1080P | 24Hz, 25Hz30Hz, 50Hz,60Hz | O | |
(X: Not Available, O: Available)
In some cases a signal on the LCD TV may not be displayed properly. The problem may be an inconsistency with standards from the source equipment (DVD, Set-top box, etc.). If you do experience such a problem please contact your dealer and also the manufacturer of the source equipment.
Supported File Formats for USB Mode
| Media File | Extension | Format | Remarks | |
| Video | Audio | (Maximum resolution/Bit rate etc.) | ||
| Movie | .mpg .mpeg MPEG1,2 MPEG Layer 1/2/3 | MAX 1920x1080 @ 30P 20Mbit/sec | ||
| .dat MPEG1,2 | MPEG2 | |||
| .vob | MPEG2 | |||
| .mkv H.264, MPEG1,2,4 EAC3/ AC3 | ||||
| .mp4 | MPEG4, Xvid 1.00, Xvid 1.01, Xvid 1.02, Xvid 1.03, Xvid 1.10-beta1/2, H.264 | PCM/MP3 | ||
| .avi | MPEG2, MPEG4 | |||
| Xvid 1.00, Xvid 1.01, Xvid 1.02, Xvid 1.03, Xvid 1.10-beta1/2, H.264 | PCM | |||
| Music | .mp3 - | MPEG 1 Layer 1 / 2 (MP3) | 32Kbps ~ 320Kbps(Bit rate)32KHz ~ 48KHz(Sampling rate) | |
| Photo | .jpg .jpeg | Baseline JPEG | - | max WxH = 15360x8640 4147200bytes |
| . | Progressive JPEG | - | max WxH = 9600x6400 3840000bytes | |
| .bmp -- max WxH = 5760x4096 3840000bytes | ||||
| Subtitle | .sub .srt | - | - | - |
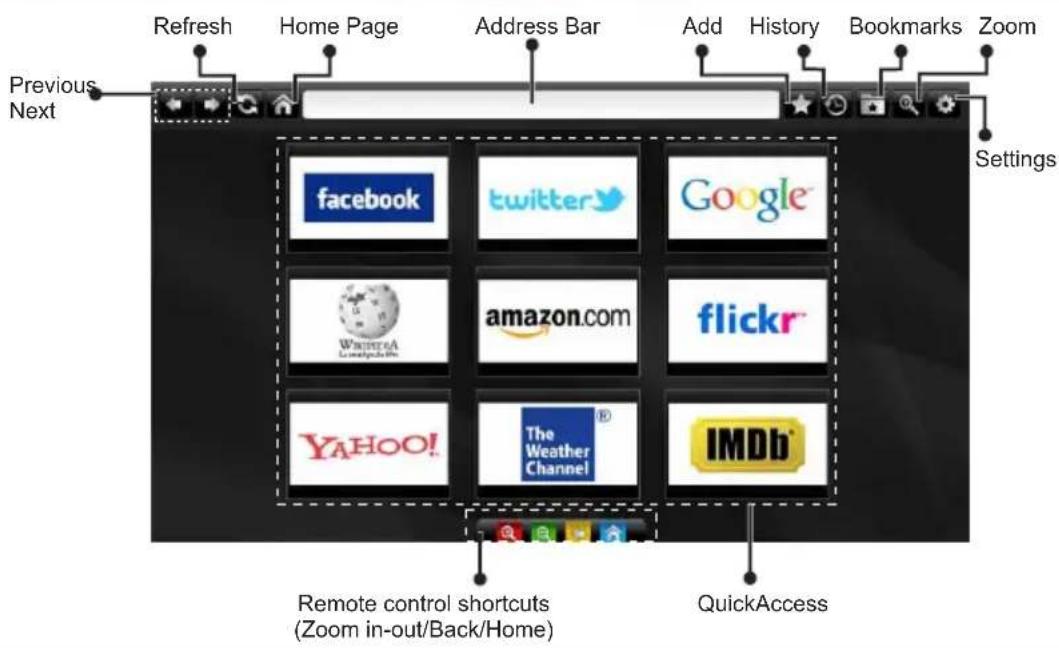
Internet Browser
To use the internet browser, please select the internet browser logo from the portal section.

text_image
Previous Next Refresh Home Page Address Bar Add History Bookmarks Zoom Settings facebook twitter Google Amazon.com flickr YAHOO! The Weather Channel IMDb Remote control shortcuts (Zoom in-out/Back/Home) QuickAccess- To navigate the web browser, use the arrow buttons on the remote control. Press OK to continue.
- After First time installation, predefined web sites and logos will be displayed on the browser's access page (see image above). To add a desired web page to the quick access page, whilst on the website you wish to add, select the "Add" menu and select "Quick Access" button.
- If you want to add bookmarks, select this item while the desired web page is on the screen.
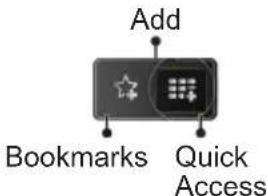
text_image
Add Bookmarks Quick Access- You can navigate the web browser in three ways. First, enter any URL in the address bar.
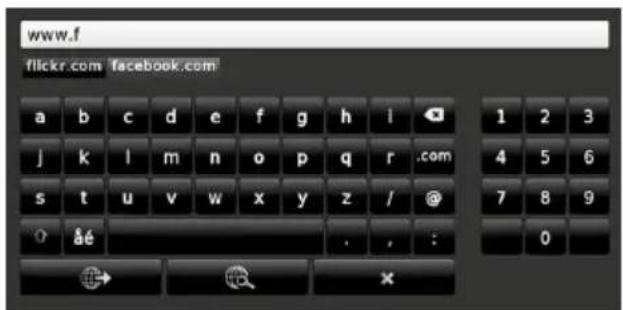
text_image
www.f flickr.com facebook.com a b c d e f g h i 1 2 3 j k l m n o p q r .com s t u v w x y z / @ 4 5 6 ? âé . , : 7 8 9 0- You can search keywords by clicking the search button in the address dialog box or another way to navigate to pages is by clicking on links on web
pages and these will take you to the appropriate pages.
- When you scroll the pointer down to the middle of the screen, the remote control's shortcuts will be shown.
- Use the zoom shortcut buttons or the zoom menu to zoom in or zoom out.
- You can clear cookies or clear all browser data from the settings menu.
- Your TV is compatible with USB mice. Plug your mouse or wireless mouse adaptor to the USB input of your TV.
- To view your browsing history, click the history button. You can also clear your browsing history from here.
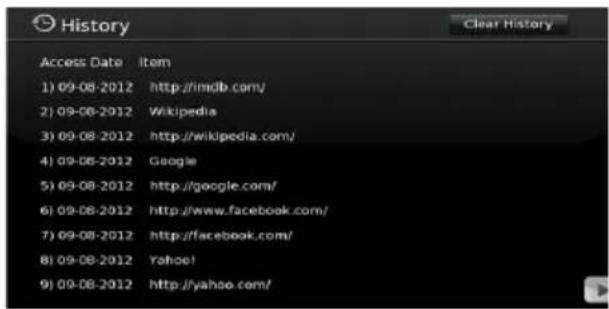
text_image
History Access Date Item 1) 09-08-2012 http://imdb.com/ 2) 09-08-2012 Wikipedia 3) 09-08-2012 http://wikipedia.com/ 4) 09-08-2012 Google 5) 09-08-2012 http://google.com/ 6) 09-08-2012 http://www.facebook.com/ 7) 09-08-2012 http://facebook.com/ 8) 09-08-2012 Yahoo! 9) 09-08-2012 http://yahoo.com/- The browser does not support multiple tabs.
- Some internet pages include flash content. These are not supported by the browser.
- Your TV does not support any download processes from the web browser.
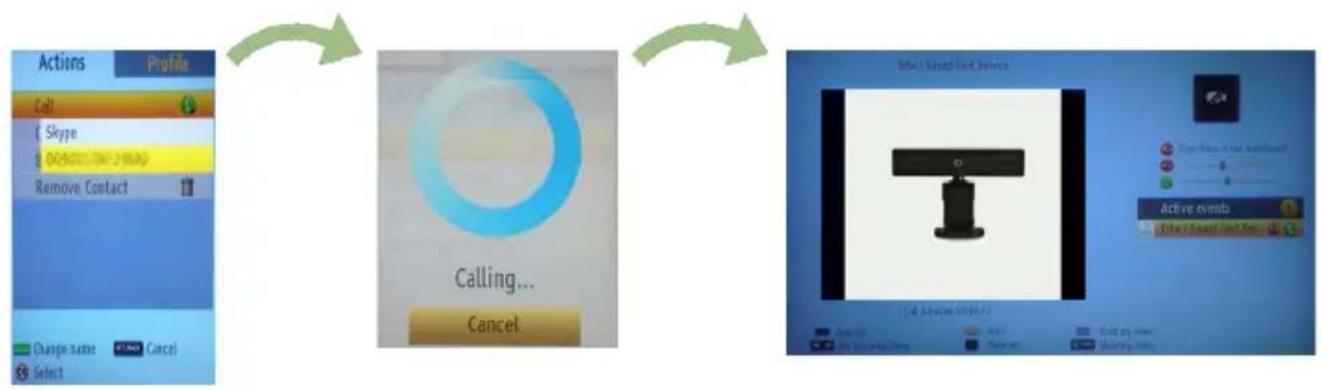
Getting Started with Skype
Make voice calls and video calls with Skype on your TV. Select the Skype app from the portal section to start a conversation.
Follow the on screen instructions to see how to operate related features.

text_image
plugged into Skype™ UUNOTE
- Connect your supported webcam directly to the USB port on your TV.
- If the camera is not working properly, switch off and unplug the TV. Connect your camera again and turn the TV on.
- As soon as the TV is turned off, Skype disconnects.
• Voice level and sound quality are affected by environmental noise.
- Call quality can change with accordance to your internet connection.
- Please visit www.skype.com to learn more information and to see the Terms of Use about Skype.
- The TV must be connected to a network for Skype connection.
- The Skype app will alert you when someone calls whilst you are watching your TV or operating the Skype application.
- A Skype camera (can be sold separately) is required to get the full benefit of Skype's features. If you do not already have one, you will need to purchase a camera (compatible with Vesca100) to get the full benefits of Skype.
Note : When you turn on the TV and no users have been set up for Skype, the image shown to the side will appear on screen.

text_image
Skype started ? No default user plugged into Skype*Licence Notification
Skype is a trade mark of Skype or its related companies. This product/application has not been approved or endorsed by Skype, Skype Communications S.a.r.l. or any of their related companies.

natural_image
Abstract graphic with a red diagonal stripe crossing two gray curved shapes (no text or symbols)No emergency calls with Skype
Skype is not a replacement for your ordinary telephone and can't be used for emergency calling. Select the Skype app from the portal section to start a conversation.
Sign In & Sign Up Now

text_image
plugged into Skype™ UU
text_image
plugged into Skype Skype Name trialaccout45 Password ------------------ Save password ✓ Start Skype automatically ✓ Sign In Don't have a Skype Name? Quit Select Forgotten passwords/ ✓ Don't save password ✓ Don't start Skype automatics
natural_image
Green curved arrow pointing downward (no text or symbols)To use the Skype application, you need a Skype account.
You can create a Skype account, using this app, in the 'Sign In & Sign Up Now' menu if you don't already have one. If you already have a Skype account, enter your name and password correctly. Select Sign In and press OK.
If you have a Skype account and you forgot your password, press the Red button to view the "reset password" screen.
After successfully logging in to your account, the contact list will be displayed on screen.

text_image
Connecting... Cancel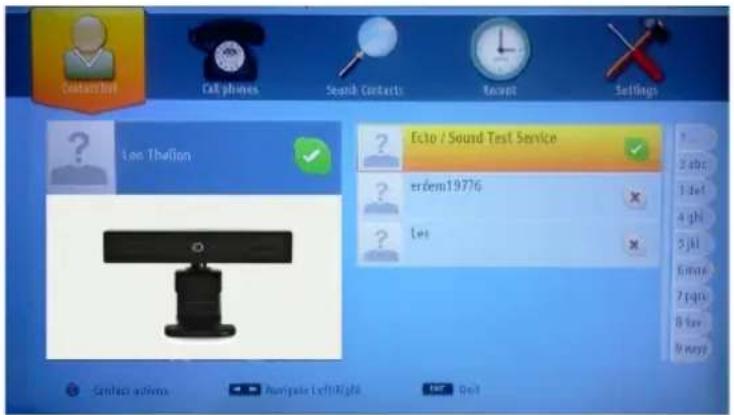
text_image
Contactor Cat phones Search Contacts Recent Settings Len Thotion Ecto / Sound Test Service ? erdem19776 ? Let 2 abc 3 sel 4 gh 5 kl 6 mn 7 pqs 8 lov 9 reqs Contact options Ankyale Left Right Del Del
natural_image
Green curved arrow pointing left, no text or symbols presentYou can review your contact list on the right side of the screen. Your Skype name, mood message and your camera preview (if connected) will be displayed on the left hand side of screen.
Adding a contact
text_image
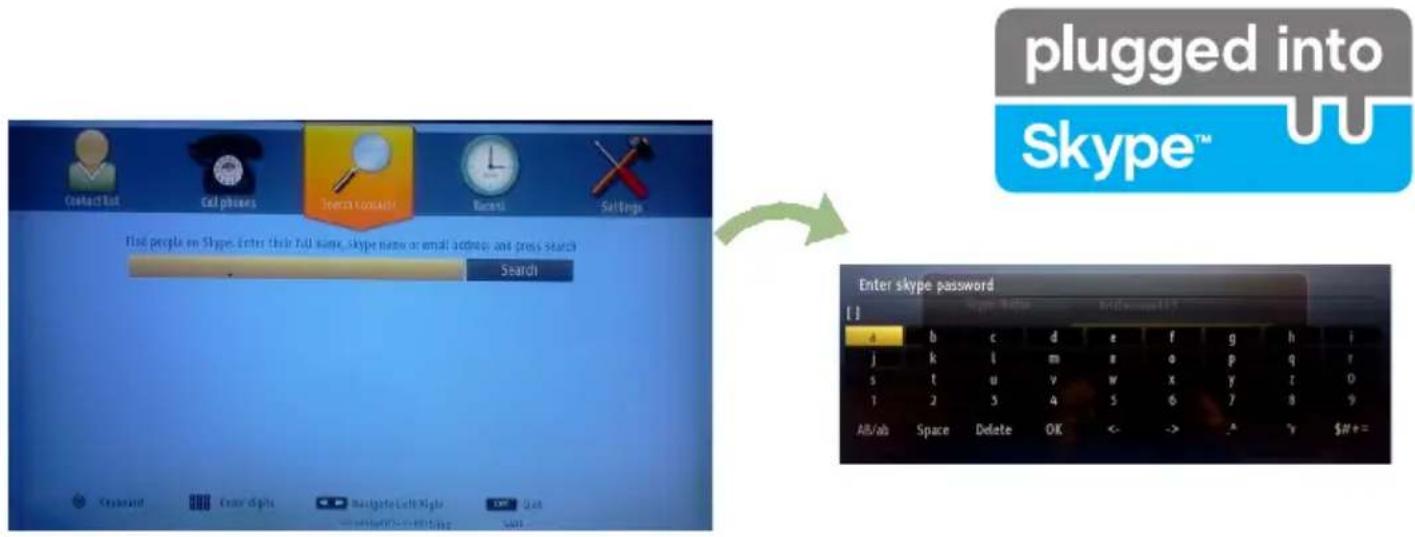
plugged into Skype™ Search Search Enter skype password [1] a b c d e f g h i j k l m n a o p q r s t u v w x y t 0 t j s 4 s 6 y 8 9 AB/ab Space Delete OK <- -> -y $##=By pressing the button select the "Search Contacts" option. Enter the full name, skype name or email address of the contact you want to find and add.
Use the remote control or virtual keyboard to enter a keyword.
Recent history
text_image
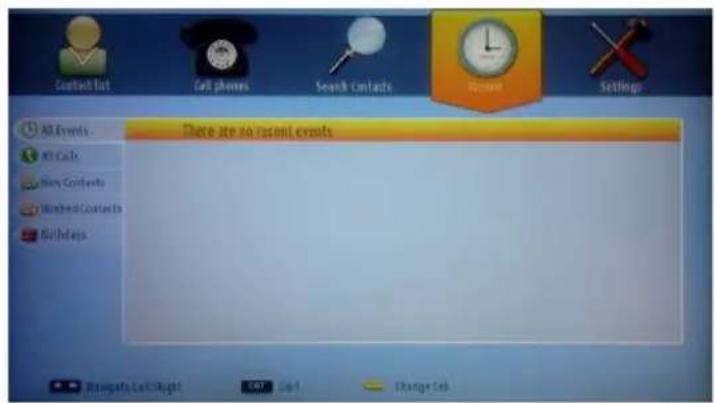
Contact List Call phones Search Contacts Record Settings All Events. There are no recent events All Cacks New Contacts Modified Contacts Birthday Blueprints Last Right OK Cancel Change OK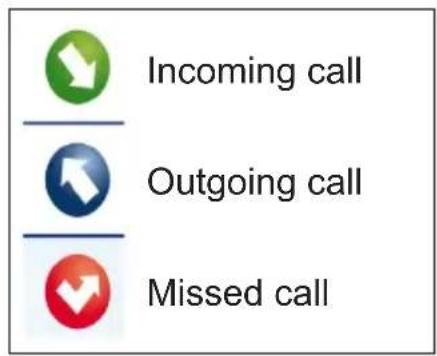
text_image
Incoming call Outgoing call Missed callIcon meaning
Your Skype history can be seen in this section. To view recent history options, use the p+ and p- buttons. To delete a conversation, press the Red button. When you press the OK button, the contact review will be displayed. Also Profile information can be displayed in this section.

text_image
plugged into Skype™ UU
text_image
Account Name, mood message and profile picture. Online status Select a Menu by pressing the Your contact list (Press Ok to use video&voice call) Help barSelect a person from the contact list screen and press OK. Choose an action from the list and then press OK to start the selected process. Voice and video call is ready for your use.
If available you will see the thumbnail view of yours and the other person's camera feed.
flowchart
graph LR
    A["Actions"] --> B["Call"]
    B --> C["Cancel"]
    C --> D["Active events"]
When a conversation is active, you can mute the microphone or put the other person on the line on hold. Press the Red button to end a call.

text_image
plugged into Skype™ UU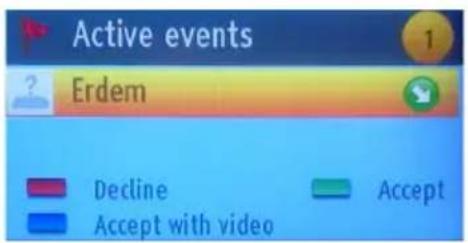
text_image
Active events Erdem ? Decline Accept Accept with videoThe incoming call dialog is shown when you are logged into Skype and when other users initiate a Skype call.
A small dialog box will appear in the lower right corner of the TV screen whether the user watches TV or is browsing through Skype. Use the remote control button and choose your action.
Dialing Phones

text_image
Contact Gift Gift Phone Search Contacts Record Settings Region/Country Phone number 1 2 March 3 June 4 May 5 June 6 July 7 August 8 September 9 October * Call SMS Clear Skype Credit balance 0.00 Select Up/Down Left/Right Info Go Delete Buy Navigate Left/RightThe option to call phones is available if you have Skype Credit. Please buy credit first. Afterwards, select a country then enter a phone number which you want to call.
Press the Yellow button to save an entered telephone number. Press the Green button to start a conversation.
Settings

text_image
General settings Preview settings Camera settings About Turn ringing On/Off Preferred sort order in Contact list Start Skype automatically Save password Show self preview in Contact list On Sort by name Enabled Enabled EnabledAll your Skype settings can be changed by using the Settings menu. Please use P+ and P- buttons on the remote control to move up or down. Select an option, then change the selected option by using the navigation buttons. In the about section, please find the Skype terms and conditions.
Please read this notice carefully.
Table des matières
Connexions (Connections) 55
Installation initiale- Connections USB.... 56
RISQUE D'ELECTROCUTION NE PAS OUVRIR

ATTENTION: POUR EVITER TOUT RISQUE D'ELECTROCUTION, NE RETIREZ PAS LE COUVERCLE. (OU LE ARRIÈRE).L'ENTRETIEN DES PIÈCES INTERNES EST INTERDIT AUX UTILISATEURS. VEUILLEZ CONFIER L'ENTRETIEN A UN PERSONNEL QUALIFIE.
text_image
Diagram showing a device with labeled parts and directional arrows, including numbered annotations ①, ②, and ③.natural_image
Close-up of a cylindrical battery with two charging leads and positive charge indicators (no text or symbols visible)Connexions (Connections)
text_image
Broadband ISP Connection Lan(Ethernet cable) Rear of TVtext_image
Diagram showing connection between a monitor and a brick wall, with a cable and labeled connector near the screen.text_image
Broadband ISP Connection USB Inputs (Side of the TV) Wireless Lan Adaptortext_image
GIRI World Music Joomed Viewster Cinflaser Search Add Help Full Screen You've got 3 seconds messages You've got 12 notificationsnatural_image
Abstract graphic with a red diagonal stripe over two gray curved shapes (no text or symbols)text_image
plugged into Skype™ UU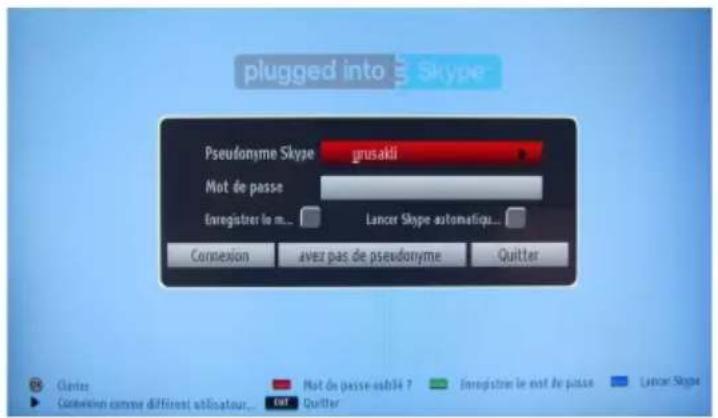
natural_image
Green curved arrow pointing downward (no text or symbols)natural_image
Green curved arrow pointing left, no text or symbols presenttext_image
plugged into Skype™ UU
| A | Product Fiche | ||
| B | Commercial Brand: SALORA | ||
| C | Product No. 10084865 | ||
| D | Model No. 40LED8100CS | ||
| E | Energy efficiency class A | ||
| F | Visible screen size (diagonal, approx.) (inch/cm) | 40 inches 102 cm | |
| G | On mode average power consumption (Watt) | 63 | |
| H | Annual energy consumption (kWh/annum) | 91 | |
| I | Standby power consumption (Watt) | 0,5 | |
| J | Off mode power consumption (Watt) | 0 | |
| K | Display resolution (px) 1920 x 1080 | ||
| A | B | C | D | E | F | ||
| English | Product Fiche Commercial Brand Product No. | Model No. Energy efficiency class | Visible screen size (diagonal, approx.) (inch/cm) | ||||
| Deutsch | Produkt-Datenblatt | Markenzeichen | Produkt-Nr. | Modell-Nr. | Energieeffizienzklasse | Sichtbare Bildschirmgröße (diagonal,ca.) (Zoll /cm) | |
| عربي | قيابس مensing | العامة التجارية شقووكن | رقم مensing | قيم الموديل | قيابس مensing | الجع اشئاشه المربئية (قطرى) (الجع) | |
| Български | Справочен лист с техническите данни | Търговска марка | Продукт No | Модел No | Клас на енергийна ефективност | Видим размер на екрана (диагонал,прибл.) (инча /см ) | |
| čeština | Produktový list | Značka výrobce | Číslo produktu | Model č. | Energetická třída | Viditelná velikost obrazovky (úhlopřicka,přibl).(palcú /cm) | |
| Dansk | Produktoplysningsskema | Varemærke | Produktnr. | Model nr. | Energieffektivitetsklasse | Synlig skærmstørrelse (diagonalt,ca.) (HK/cm) | |
| Suomi | Tuote fiche | Kaupallinen merkki | Tuote nro. | Malli nro. | Virran tehokkuusluokka | Nakyván kuvaruudun koko (diagonaalinen.n.) (tuumaa/cm) | |
| Français | Fiche du produit | Marque commerciale | Produit N° | Modèle N° | Classe d'efficacité énergétique | I aille d ecran visibie (diagonale,approx (pouces/cm) | |
| Hrvatski | SAŽETAK PROIZVODA | Trgovačka marka | Br. proizvoda | Br. modela | Klasa energetske učinkovitosti | Vidljiva veličina ekran (dijagonalna,približno) (inča/cm) | |
| Nederlands | Productliche | Commercieel merk. | Productnr. | Modelnr. | Energie efficiëntie klasse | Zichtbare schermgrootte (diagonaal,ca.) (inches/cm) | |
| Español | Ficha del Producto | Marca Comercial | No de Producto | No de Modelo | Clasificación Energética | Tamaño de pantalla visible (diagonal,aprox.) (pulgadas/cm) | |
| Svenska | Produktspecifikation | Varumärke | Produktnr. | Modellnr. | Energiklass | Synlig skärmstoriek (diagonal,ungefärlig) (tum/cm) | |
| Italiano | Scheda prodotto | Marchio commerciale | Numero prodotto | Numero modello | Classe di efficienza energetica | Dimensoni visibili dello schermo (diagonale,circa)(pollici/cm) | |
| Polski | KARTA PRODUKTU | Marka produktu | Nr produktu | Nr modelu | Klasa efektywności energetycznej | Widoczny obraz ekranu (przekątna,około)(cali/cm) | |
| Magyar | Termékismertető adatlap | Kereskedelmi márka | Termékszám | Modellszám | Energiahatékonysági osztály | Latható képtartomány (diagonális,kb.) (inches/cm) | |
| Norsk | Produktinformasjon | Kommersiell merkevare | Produkt nr. | Modell nr. | Energieffektivitet klasse | Synlig skjermstørrelse (diagonal, ca.) (tommer/cm) | |
| Português | Ficha do produto | Marca Comercial | Produto N° | Modelo N° | Classificação eficiência energética | Tamanho ecrã visivel (diagonal, aprox.) (polegadas/cm) | |
| Română | Fişă produs | Marcă comercială | Nr. Produs | Nr. Model | Clasa de eficiență energetică | Dimensiunea ecranului vizibil (diagonală, aprox.) (inch/cm) | |
| Русский | Справочный листок технических данных изделия | Торговая марка | Номер изделия | Номер модели | Класс энергопотребления | Видимый размер экрана (по диагонали. Около) (дюймов/см) | |
| беларуская | Справочный листок технических данных изделия | Торговая марка | Номер изделия | Номер модели | Класс энергопотребления | Видимый размер экрана (по диагонали.Около)(дюймов/см ) | |
| македонски | Технички податоци | Комерцијална марка | Производ бр. | Модел бр. | Класа на енергетска ефикасност | Големина на видлив екран (дијагонала, окопу) (инчи/cm) | |
| український | Технічні дані | Кормеційна марка | Артикул | Модель | Клас енергоспоживання | Видимий розмір екрана (диагональ, Приблизно) (дюймів/cm) | |
| Srpski | Tehničke odlike | Komercijalna marka | Proizvod br. | Model br. | Klasa energetske efikasnosti | VECicina vojjvog ekran (oijagonala, tokom) (inča/cm) | |
| Slovenčina | Produktový list | Značka výrobcu | Číslo produktu | Model č. | Energetická trieda | Viditelná velikost'obrazovky (uhlopriečka, zhruba) (palcov/cm) | |
| Slovenščina | Opis izdelka | Komercialna znamka | Št. Izdelka | Št. Modela | Razred energetske učinkovitosti | Vidna velikost zaslona (diagonala pribl.) (palcev/cm) | |
| Еллянік | Делію проїóvtos | Емпорікό σήμα | Ар. Проїóvtos | Ар. Movtélou | Катнгорія ін (% ) ато́боои % | Орато мүүвөс овоны (оидушыо, тер.) (ітюсяс/cm) | |
| Bosanski | Tehnički podaci | Komercijalna marka | Produkt br. | Model br. | Klasa energetske efikasnosti | Vidljiva veličina ekran (diagonala, približno.) (inča/cm) | |
| لاوي | لاوي عيرد | لاوي عيرد | لاوي 'on | لاوي 'on | لاوي عيرد نلاوي عيرد | لاوي عيرد نلاوي عيرد | |
| Türkçe | Ürün fişi | Ticari Marka | Ürün No. | Model No. | Enerji verimiliği sınıfı | Görulen ekran boyutu (çapraz, yaklsk.) (inc/cm) | |
| Shqip | Tê dhênat e produktit | Marka tregtare | Nr. i produktit. | Nr. i modelit. | Klasa e eficiencês sê energjisê | Magnesia e ekranit te duksnem (diagonal, afërsisht) (inc/cm) | |
| Lietuviu | Gaminio etiketé | Gamintojas | Gaminio Nr. | Modelio Nr. | Energetinio efektyvumo klasé | Matomas ekran o dydis (istrižainé, approx.) (coliy/cm) | |
| Latviešu | Produkta apraksts | Marka | Produkta nr. | Modela nr. | Energoefektivitätes klase | Ekrána izmërs (pa diognâli, apmçram) (collas/cm) | |
| Eesti | TOOTEKIRJELDUS Tootja firma | Toote nr. | Mudeli nr. Energiaklass | Vaadatava ekraani suurus (diagonaal, umbes) (tolli/cm) | |||
| فارسي | مشخصف محصول | imarک دجرای | 朦زه محصول | 朦زه مدل | گروه کار آبی اترزی | النازه صفحه قابل مشاهده (هنستي تقربيا) /نingsانلى متر) | |