22LED3315TDW - TV SALORA - Free user manual and instructions
Find the device manual for free 22LED3315TDW SALORA in PDF.

User questions about 22LED3315TDW SALORA
0 question about this device. Answer the ones you know or ask your own.
Ask a new question about this device
Download the instructions for your TV in PDF format for free! Find your manual 22LED3315TDW - SALORA and take your electronic device back in hand. On this page are published all the documents necessary for the use of your device. 22LED3315TDW by SALORA.
USER MANUAL 22LED3315TDW SALORA
natural_image
Simple line drawing of a computer monitor with a circular base and abstract lines at the bottom (no text or symbols)22LED3305TD
22LED3315TDW
GEBRUIKERSHANDLEIDING (NL)
LEES DIT ZORGVULDIG DOOR VOOR GEBRUIK

natural_image
Simple line drawing of a monitor mounted on a stand with labeled parts 1 and 2 (no text or symbols beyond labels)PANEEL TOETSEN

text_image
1 2 3 4 5 6 7 8 9 %II ▲ SOURCE MENU CH- CH+ VOL- VOL+ ●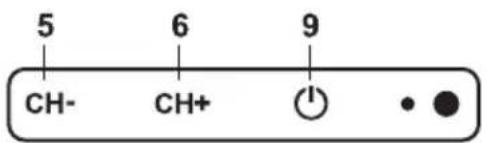
text_image
5 CH- 6 CH+ 9 •text_image
Diagram showing the internal structure and wiring of an audio or signal device, including antenna, VGA, connectors, and car.
OPMERKING
Toont EPG (Electronic Programme Guide). (DTV)
5
natural_image
Simple line drawing of a device with an arrow indicating rotation (no text or symbols)
text_image
Diagram showing two positive charges above a battery cell with downward arrows indicating charge distribution or polarity.LEVENSDUUR BATTERIJ
text_image
Picture Picture Mode Standard Brightness 50 Contrast 50 Sharpness 5 Colour 50 Tint 50 Colour Temperature Standard Noise Reduction Middle Move Enter Enter Exit Exit Menu Returntext_image
Picture Picture Mode Standard Brightness 50 Contrast 50 Sharpness Colour Off Tint Middle Colour Temperature High Noise Reduction Middle Move Enter Enter Ext Exit Menu ReturnBeeldmodus
natural_image
Horizontal black bar with a teal fill and plus sign at the end (no text or symbols)50
Scherpte
text_image
Message Do You Want to delete the Selected items? OK Canceltext_image
TV Successfully updated...text_image
Channel- Channel Manage -Rename Channel - 0 1 2 3 4 5 6 7 8 9 A B C D E F G H I J K L M N O P Q R S T U V W X Y Z _ @ - # Space Caps Del Save Move Enter Enter Menu Returntext_image
Message Please confirm saving? OK Canceltext_image
TV Save successfulFavorite beheerder
text_image
Channel - Favorite Manager No. Program Name Fav1 Fav2 Fav3 Fav4 0001 ✓ ✓ ✓ ✓ 0002 ✓ ✓ ✓ ✓ 0003 ✓ ✓ ✓ ✓ 0004 ✓ ✓ ✓ ✓ 0005 ✓ ✓ ✓ ✓ 0006 ✓ ✓ ✓ ✓ 0007 ✓ ✓ ✓ ✓ 0008 ✓ ✓ ✓ ✓ 0009 ✓ ✓ ✓ ✓ ✓ Move CH+ Page+ Exit Exit Menu Returntext_image
Message Are you sure? OK Canceltext_image
Channel - Tuning Analogue channels found: 0 Digital channels found: 0 Radio channels found: 0 Channel Feature 50% Setup Menu Skip Exit Exittext_image
Feature - Child Lock Child Lock Off Keypad Lock Off Parental Lock Off Change Pin Code ENTER Picture Sound Channel Feature Setup Move Enter Enter Exit Exit Menu ReturnKeypad Lock
text_image
Feature - Change Pin Code Picture Sound Channel Feature Setup Old Password New Password Confirm New Password Move Enter Enter Exit Exit Menu Returntext_image
Feature - Language OSD Language English Preferred Subtitle English Preferred Audio English Digital Teletext Language English Analog Teletext Language West Picture Sound Channel Feature Setup Move Enter Enter Exit Exit Menu ReturnOSD-taal
text_image
Password —text_image
Message Do you want to reset Database to default? OK Canceltext_image
Auto Installation - Setup 1 - Language English French Italian Spanish Portuguese Next Page Move Enter Enter Exit ExitSetup 1
text_image
Auto Installation - Setup 2 - Country: UK France Italy Poland Spain Previous Page Next Page Move Enter Enter Exit ExitSetup 2
text_image
Auto Installation - Setup 3 - TV Location : Please select where the TV will be placed. The picture will be optimized for that location. Home Store Previous Page Next Page Move Enter Enter Exit ExitSetup 3
text_image
Auto Installation - Setup 4 - Auto Power Off : Off Your TV has been set to Power off after 4 hours of continuous viewing. If you want to change this setting, please choose Off.This setting can also be changed in the MENU. 1 Hour 2 Hours 4 Hours Previous Page Next Page Move Enter Enter Exit ExitSetup 4
text_image
Auto Installation - Setup 5 - Start Auto Tune (Digital) Previous Page Next Page Move Enter Enter Exit ExitSetup 5
text_image
Auto Installation Analogue channels found: 0 Digital channel founds: 0 Radio channels found: 0 42% Exit Exittext_image
Auto Installation - Setup 6 - Start Auto Tune (Analogue) Previous Page Move Enter Enter Exit ExitSetup 6
text_image
Auto Installation Analogue channels found: 0 Digital channel founds: 0 Radio channels found: 0 42% Exit Exittext_image
Channel - Digital Manual Search Channel 21 Frequency(KHz) 474000 BandWidth(MHz) 8 Sound Channel Start Strength 18% Quality 0% Feature Setup Move Enter Enter Exit Exit Menu ReturnKanaal
text_image
Partition List Total Size: ----G Free Size: ----G Format Set Default Partition Move Enter EnterTimer
text_image
Message Delete the selected timer? OK Canceltext_image
Message Delete all timers? OK Canceltext_image
Record List Delete Menu Return ▲ Move Enter EnterGehoorgestoord
text_image
Common Interface Viaccess Access Move Enter Enter Menu Return Exit Exittext_image
Multi-Audio Stereo English Dutch Movetext_image
Message Device speed not enough, RECORD anyway? OK Canceltext_image
Message Do you want to start Recording? OK Canceltext_image
DTV Initialing Recorder...text_image
Message Do you want to stop Recording? OK Canceltext_image
No signaltext_image
Setup - PC Setup Auto Adjust ENTER H Position 0 V Position 0 Phase 57 Clock 0 Picture Sound Channel Feature Setup Move Enter Enter Exit Exit Menu Return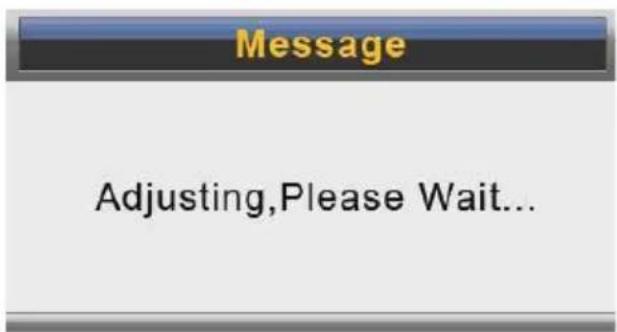
text_image
Message Adjusting,Please Wait...Auto Adjust
text_image
/udska1/test/music Get down.mp3 God is a girl.mp3 Never grow old.mp3 Dying in the sun.mp3 Pretty boy.mp3 Over the rainbow.mp3 Caseblance.mp3 Forever.mp3 Delete Move CH+ Page+/- Enter Enter Exit Return 001/010 4.27MB Backstreet boy Applesmjtext_image
Music Player Get down.mp3 God is a girl.mp3 Never grow old.mp3 Dying in the sun.mp3 Pretty boy.mp3 Over the rainbow.mp3 Caseblance.mp3 Forever.mp3 00:03:34/00:14:03 Move Enter Enter Exit ReturnFILM
text_image
/udska1/test/movie 148_CONT-3E.mp4 149_CONT-3F.mp4 VersaEmerge_Toxic_Cover_0.avi you give love a bad name.avi Delete Move CH+ - Page+/- Enter Enter Exit ReturnPVR
Surround - surround modus
natural_image
Line drawing of a hand holding a circular object with a central hole (no text or symbols)Reinigen van discs
natural_image
Illustration of a hand holding a pinwheel with a directional arrow indicating rotation (no text or symbols)DVD PROBLEEMOPLOSSING
natural_image
Simple line drawing of a computer monitor with a circular base and abstract lines at the bottom (no text or symbols)22LED3305TD
22LED3315TDW
MANUEL DE L'UTILISATEUR (FR)
A LIRE ATTENTIVEMENT AVANT L'UTILISATION

natural_image
Line drawing of a monitor mounted on a stand with labeled parts 1 and 2 (no text or symbols beyond labels)PANNEAUX DES TOUCHES

text_image
1 2 3 4 5 6 7 8 9 %II ▲ SOURCE MENU CH- CH+ VOL- VOL+ ●
text_image
5 CH- 6 CH+ 9 •text_image
Diagram showing installation components of an audio equipment module with labeled connectors and ports
REMARQUE
natural_image
Simple line drawing of a device with an arrow indicating rotation (no text or symbols)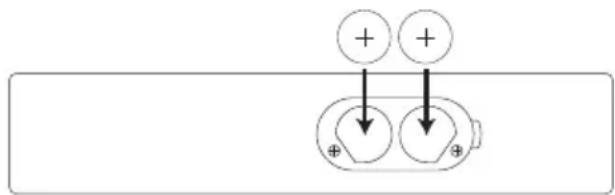
text_image
Diagram showing two positive charges above a battery with downward arrows indicating charge directionAUTONOMIE DES PILES
text_image
Picture Picture Mode Standard Brightness 50 Contrast 50 Sharpness 5 Colour 50 Tint 50 Colour Temperature Standard Noise Reduction Middle Picture Sound Channel Feature Setup Move Enter Enter Exit Exit Menu Returntext_image
Picture Picture Mode Standard Brightness 50 Contrast 50 Sharpness Colour Off Tint Middle Colour Temperature High Noise Reduction Middle Move Enter Enter Ext Exit Menu ReturnMode image
natural_image
Simple horizontal bar with a teal fill and plus/minus symbols, no text or labels present.50
Netteté
text_image
Message Do You Want to delete the Selected items? OK Canceltext_image
TV Successfully updated...text_image
Channel- Channel Manage -Rename Channel - 0 1 2 3 4 5 6 7 8 9 A B C D E F G H I J K L M N O P Q R S T U V W X Y Z _ @ - # Space Caps Del Save Move Enter Enter Menu Returntext_image
Message Please confirm saving? OK Canceltext_image
TV Save successfulGestion de Favori
text_image
Message Are you sure? OK Canceltext_image
Channel - Tuning Analogue channels found: 0 Digital channels found: 0 Radio channels found: 0 Channel Feature 50% Setup Menu Skip Exit Exittext_image
Feature - Child Lock Child Lock Off Keypad Lock Off Parental Lock Off Change Pin Code ENTER Picture Sound Channel Feature Setup Move Enter Enter Exit Exit Menu ReturnKeypad Lock
text_image
Feature - Change Pin Code Picture Sound Channel Feature Setup Old Password New Password Confirm New Password Move Enter Enter Exit Exit Menu Returntext_image
Feature - Language OSD Language English Preferred Subtitle English Preferred Audio English Digital Teletext Language English Analog Teletext Language West Picture Sound Channel Feature Setup Move Enter Enter Exit Exit Menu ReturnLangue OSD
text_image
Password —text_image
Message Do you want to reset Database to default? OK Canceltext_image
Auto Installation - Setup 1 - Language English French Italian Spanish Portuguese Next Page Move Enter Enter Exit ExitRéglage 1
text_image
Auto Installation - Setup 2 - Country: UK France Italy Poland Spain Previous Page Next Page Move Enter Enter Exit ExitRéglage 2
text_image
Auto Installation - Setup 3 - Auto Power Off : Off Your TV has been set to Power off after 4 hours of continuous viewing. If you want to change this setting, please choose Off.This setting can also be changed in the MENU. 1 Hour 2 Hours 4 Hours Previous Page Next Page Move Enter Enter Exit ExitRéglage 3
text_image
Auto Installation - Setup 4 - TV Location : Please select where the TV will be placed. The picture will be optimized for that location. Home Store Previous Page Next Page Move Enter Enter Exit ExitRéglage 4
text_image
Auto Installation - Setup 5 - Start Auto Tune (Digital) Previous Page Next Page Move Enter Enter Exit ExitRéglage 5
text_image
Auto Installation Analogue channels found: 0 Digital channel founds: 0 Radio channels found: 0 42% Exit Exittext_image
Auto Installation - Setup 6 - Start Auto Tune (Analogue) Previous Page Move Enter Enter Exit ExitRéglage 6
text_image
Auto Installation Analogue channels found: 0 Digital channel founds: 0 Radio channels found: 0 42% Exit Exittext_image
Channel - Digital Manual Search Channel 21 Frequency(KHz) 474000 BandWidth(MHz) 8 Sound Channel Start Strength 18% Quality 0% Feature Setup Move Enter Enter Exit Exit Menu ReturnCanaux
text_image
Partition List Total Size: ----G Free Size: ----G Format Set Default Partition Move Enter EnterMinutiere
text_image
Message Delete the selected timer? OK Canceltext_image
Message Delete all timers? OK Canceltext_image
Record List Delete Menu Return Move Enter EnterRecord List
text_image
Common Interface Viaccess Access Move Enter Enter Menu Return Exit ExitEPG (GUIDE DE PROGRAMMA ELECTRONIQUE)
text_image
Multi-Audio Stereo English Dutch Movetext_image
Message Device speed not enough, RECORD anyway? OK Canceltext_image
Message Do you want to start Recording? OK Canceltext_image
DTV Initialing Recorder...text_image
Message Do you want to stop Recording? OK Canceltext_image
No signaltext_image
Setup - PC Setup Auto Adjust ENTER H Position 0 V Position 0 Phase 57 Clock 0 Picture Sound Channel Feature Setup Move Enter Enter Exit Exit Menu Return
text_image
Message Adjusting,Please Wait...Réglage automatique
text_image
/udska1/test/music Get down.mp3 God is a girl.mp3 Never grow old.mp3 Dying in the sun.mp3 Pretty boy.mp3 Over the rainbow.mp3 Caseblance.mp3 Forever.mp3 Delete Move CH+ Page+/- Enter Enter Exit Return 001/010 4.27MB Backstreet boy Applesmjtext_image
Music Player Get down.mp3 God is a girl.mp3 Never grow old.mp3 Dying in the sun.mp3 Pretty boy.mp3 Over the rainbow.mp3 Caseblance.mp3 Forever.mp3 00:03:34/00:14:03 Move Enter Enter Exit ReturnFILM
text_image
/udska1/test/movie 148_CONT-3E.mp4 149_CONT-3F.mp4 VersaEmerge_Toxic_Cover_0.avi you give love a bad name.avi Delete Move CH+ - Page+/- Enter Enter Exit ReturnPVR
TITLE, SUBTITLE, DISPLAY, PLAY, SETUP, STOP, SLOW/STEP, AUDIO, F.FWD, F.REV, PREV, NEXT, GOTO, ZOOM, ANGLE, PROGRAM, PREVIEW, REPEAT, A-B.
PSG/PSD - surround mode
natural_image
Line drawing of a hand holding a circular object with a central hole (no text or symbols)natural_image
Illustration of a hand holding a pinwheel with a directional arrow indicating rotation (no text or symbols)natural_image
Simple line drawing of a computer monitor with a circular base and abstract sketch lines at the bottom (no text or symbols)22LED3305TD
22LED3315TDW
USER MANUAL (GB)
This symbol indicates dangerous voltage inside the product that presents a risk of electric shock or personal injury.

This symbol indicates important instructions accompanying the product.
Please read this manual carefully before using this product.
- Before connecting the AC power cord to the DC adapter outlet, make sure the voltage designation of the LED TV corresponds to the local electrical supply. If you are unsure of your power supply, ask your local power company.
● Never insert anything metallic into the cabinet openings of the liquid crystal display LED TV/monitor; otherwise it may create the danger of electric shock. - To avoid electric shock, Never touch the inside of the LED TV/monitor and adapter. Only a qualified technician should open the case of the LED TV/monitor/adapter.
- Never use your LED TV/monitor/adapter if the power cord has been damaged. Do not allow anything to rest on the power cord, and keep the cord away from place where people can trip over it.
- Be sure to hold the plug, not the cord, when disconnecting the adapter from an electric socket.
- Excessive sound pressure from earphones and headphones can cause hearing loss.
● Batteries shall not be exposed to excessive heat such as sunshine, fire or the like. - Ensure a minimum distance of 5 cm around the apparatus for sufficient ventilation.
- Ensure that the ventilation is not impeded by covering the ventilation openings with items such as newspapers, table-cloths, curtains, etc.
- Do not place naked flame sources, such as lighted candles on the apparatus.
● Take attention to the environmental aspects of battery disposal. - Use the apparatus only in moderate climates (not in tropical climates).
● The mains plug shall remain readily operable.
- Openings in the LED TV/monitor/adapter cabinet are provided for ventilation. To prevent overheating, these openings should not be blocked or covered. Also, avoid using the LED TV/monitor on a bed ,sofa ,rug, or other soft surface. Doing so may block the ventilation openings in the bottom of the cabinet. If you put the LED TV/monitor in a bookcase or some other enclosed space, be sure to provide adequate ventilation.
- Do not expose the LED TV/monitor to extreme temperature conditions or to extreme humidity conditions.
- The apparatus shall not be exposed to dripping or splashing and that no objects filled with liquids, such as vases, shall be placed on the apparatus.
- Do not place the LED TV/monitor on an unstable cart, stand, tripod, bracket, table, or floor where it can fall. It is damaged if dropped, hit or scratched. Do not clean the front with keton-type materials (e.g. Acetone), ethyl alcohol, toluene, ethyl lacid, methyl, or chloride-these may damage the panel.
- Locate your DC adapter near an easily accessible AC outlet.
- If your LED TV/monitor does not operate normally in particular, if there are any unusual sounds or smells coming from it unplug it immediately and contact an authorizeddealerorservice center.
- High temperature can cause problems. Don't use your LED TV/monitor in direct sunlight, and keep it away from heaters, stoves, fireplaces, and other sources of heat.
- Unplug the DC adapter when it is going to be left unused for an extended period of time.
- To reduce the risk of fire or electric shock, and annoying interference, use the recommended accessories only.
- If the LED TV/monitor is broken, do not try to repair it yourself. Contact qualified service personnel.
● Unplug your DC adapter from the AC outlet before any service.
- Be sure the service technician uses authorized replacement parts or their equivalents. Unauthorized parts may cause fire, electrical shook, or other hazards.
- Following any service or repair, be sure the service technician performs safety checks to certify that your TFT-LED TV/monitor is in safe operating order.
- The apparatus with CLASS I construction shall be connected to a MAINS socket outlet with a protective earthing connection.

CAUTION: Before mounting a TV stand, place TV on a blanket or quilt with the TV screen facing down, to avoid surface damage.
PANEL BUTTON FUNCTIONS
Front panel....1
EXTERNAL EQUIPMENT
Side panel....2
Back panel....2
Connecting diagram....3
REMOTE CONTROL
Remote buttons....4
Battery installation....6
LET'S START
Switching On....7
Select source operation....7
TV MENU SETUP
Picture....8
Sound....10
Channel....11
Feature....16
Setup....18
DTV MENU SETUP
Channel 23
Feature....24
TELETEXT FUNCTION
Teletext function 32
SCART/AV/COMPONENT MENU SETUP
Setting menu.... 33
HDMI MENU SETUP
Setup.... 34
PC MENU SETUP
Setup.... 35
USB OPERATION
Brief introduction....37
USB Multimedia Playback Format....37
Photo....38
Music....38
Movie....39
PVR....40
E-Book....41
DVD OPERATION
Basic operation....42
Supporting 4V4 format.... 42
4V4 functions operating instructions.... 43
5P3/7PE0 Playbac+....45
Function Settings....46
General Setup.... 46
Speaker Setup Page....47
Digital Setup 47
Preferences Page 48
TROUBLE SHOOTING
Care and 5aintenance....50
4isplay troubleshooting....51
Sound and TV troubleshooting.... 51
4V4 troubleshooting....52
SPECIFICATIONS
Specifications....53
FRONT PANEL
- IR sensor window
- Indicator (the indicator is red when in standby mode, and green when in working normally).
- Mains Power Switch - Completely turns ON or OFF the power to the TV set to save on electricity (option).
natural_image
Line drawing of a monitor setup with labeled components (no text or symbols present)- Start of play or pause of play
- Take the disc out
- Select input source
- Enter or exit menu
- Decrease channel number
- Increase channel number
- Decrease sound volume
- Increase sound volume
- Switch between standby and power-on mode

text_image
DVD VIDEO™ LABEL SIDESIDE PANEL

text_image
1 2 3 4 5 6 7- CI Slot
- TV signal input
- CVBS / S-Video R Audio input
- CVBS / S-Video L Audio input
- CVBS input
- Component input
- Coaxial output
BACK PANEL
text_image
1 2 3 4 5 6 7- 12V DC power input
- USB connector
- HDMI input
- PC VGA input
- SCART connector
- PC Audio input
- Audio Earphone output
CONNECTING DIAGRAM

text_image
Diagram showing various electronic components and connectors, including antenna, VGA, audio jack, and car.
NOTE
You should insert all necessary cables BEFORE plugging in the power cord
REMOTE BUTTONS
1 POWER
Switches the TV between on and standby mode.
② 0-9 Number Button
- Press to select a programme. (ATV / DTV mode)
- Select numbered items in a menu. (DVD mode*)
③ DISPLAY
- Display the present channel information such as the current time and channel name. (ATV / DTV mode)
- Display the present disc information. (DVD mode*)
4 EPG
Displays the EPG (Electronic Programme Guide). (DTV mode)
5
Allows you to navigate the OSD menus and adjust the system settings to your preference.
6 SETUP
Display the OSD (On Screen Display) menu.
7 CH.LIST
Display the channel list. (ATV / DTV mode)
8 S.MODE
Select sound mode.
9 CH + / -
Select a channel. PAGE + / -
- To skip to next/previous page on the teletext screen. (ATV mode)
- Zoom in/out on the displayed picture. (USB mode)
10 RECORD LIST
To open a record list.
11 RECORD
Recording to USB device. (DTV mode)
12 INDEX
To select the page number of the index from teletext. (ATV mode)
■ (Stop)
To stop the playback or recording. (USB / DVD mode*)
13 REVEAL
Reveals hidden information such as the answer to a quiz in teletext. (ATV mode)
|▶/||
• To start/pause playback. (DVD / USB mode)
• Time Shift Function. (DTV mode)
14 Coloured buttons
Access the TELETEXT items or channel edit when using Digital / Freeview TV Channels. (ATV / DTV mode) GOTO (RED)
To skip to a specific location on a DVD / CD. (DVD mode ^* ) A–B (GREEN)
Repeat a segment between A and B. (DVD mode ^* ) REPEAT (YELLOW)
Select between different repeat modes. (DVD mode ^* ) ANGLE (BLUE)
Select different angles for the video. (DVD mode*)
text_image
1 2 3 4 5 6 7 8 9 0 1 2 3 4 5 6 7 8 9 OUTPUT RECALL EPG SOURCE SETUP OK CHLIST EXITCANCEL PAGE4 + - CH SUBDE VOL PAGE- RCDRD RECORD LIST AUDIO SUBTITLE TITLE RENDI INDEX MIX TEXT GOTO AS REPRT ANGLE DVD-MINYL TITLE ZOOM-ZOOM JUNGE HOLD SIZE ELECT SLEEP SCALER TV/DVD15 HOLD
Freezes a multi-page passage on screen in teletext. (ATV mode)
TITLE
Displays the DVD title content. (DVD mode*)
16 S.PAGE
Displays the subpage on the teletext screen. (ATV mode)
DVD-MENU
Display the DVD menu. (DVD mode*)
17 SLEEP
Sets the TV sleep timer.
18 EJECT
Eject a disc. (DVD mode*)
9 MUTE
Mutes and restores your TV sound.
20 RECALL
Return to the previous viewing channel. (ATV / DTV mode)
21 SOURCE
Select among the different input signal sources.
22 FAV
Display the favourite channel list. (ATV / DTV mode)
23 OK
Confirm selection.
24 EXIT/CANCEL
Exit menu / cancel operation.
25 VOL + / -
Adjusts the volume.
26 P.MODE
Select picture mode.
27 S.TITLE
Selects subtitles which are broadcast with the programme. (DTV mode).
SUBTITLE
Selects subtitles on the DVD. (DVD mode*)
28 AUDIO
Switches between the audio languages (only applicable when the TV programme / disc has this features.) (DTV / DVD mode*)
29 TEXT
Turns on and off the teletext function. (ATV / DTV mode)
▶ ▶ / ▶ ▶ |
• To advance playback rapidly. (DVD / Media mode*)
- Hold 3 seconds to skip to the beginning of the next chapter / track / photo. (DVD / Media mode*)
30 MIX
Select TELETEXT with a TV programme. (ATV mode)
◀◀/1◀◀
• To reverse playback rapidly. (DVD / Media mode*)
- Hold 3 seconds to skip to the beginning of the previous chapter / track / photo. (DVD / Media mode*)
31 SIZE
To enlarge the picture on the TV in teletext. (ATV mode)
ZOOM+
Zoom in on the displayed frame. (DVD mode*)
32 ZOOM-
Zoom out on the displayed frame. (DVD mode*)
33 TV/RADIO
To switch between TV and radio modes. (DTV mode)
34 SCALER
Allows you to watch the screens in various formats.
text_image
19 1 2 3 4 5 6 7 8 9 DISPLAY 0 RECALL SETUP EPG SOURCE OK CALLIST FAN EXIT/CANCEL PAGE+ + SMOB + CH VOL - PAGE- RECORD RECORD LIST AUDIO SUBTITLE ● ■ ◀ MIO REBEL INDEX MIX TEXT GOTO A/B REPEAT ANGLE DVD-VENU TITLE ZOOM+ ZOOM+ SPACE HOLD SIZE ELECT SLEEP SCALE BYWIND 31 32 33 34*Only for model with DVD.
BATTERY INSTALLATION
Remove the battery cover. Insert two CR2025 (3V) batteries as shown in the picture:

natural_image
Simple line drawing of a device with an arrow indicating rotation (no text or symbols)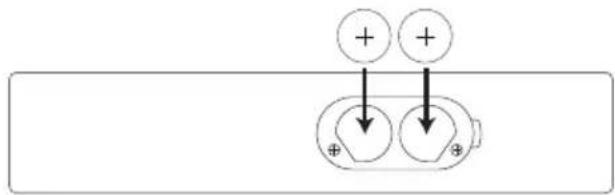
text_image
Diagram showing positive and negative charges with arrows pointing to circular symbols, likely representing a physics or electrostatic setup.BATTERY LIFE
● Normally, battery can be used for one year.
- If the remote control is still not working, when very near to the TV's remote sensor window, please use new batteries.
- Please use CR2025 (3V) batteries.
i NOTES:
● Never use rechargeable battery.
● Never charge, short-circuit, disassemble and heat the battery, or throw it into fire.
● Pay attention not to fall or knock the remote controller, which will cause damage or function failure to it.
- Do not use new and old battery together.
- When not using the remote controller for a long time, please take out battery to avoid liquid leakage. Before placing new battery, please clean the electrolyte in the remote controller.
- If electrolyte splashes into body, please clean it with water.
CAUTION:
Please put battery in the place children can not touch. If swallow by accident, please contact with the local doctor immediately.
SWITCHING ON
After the unit has been suitably placed / fixed, on the desk or on the wall, and all necessary cables include power have connected, the next you should do is:
Press the button on the remote control to make the unit switch to power-on mode - you will see the LED indicator turn green. Now you can enjoy the many features of your new TV.
SELECT SOURCE OPERATION
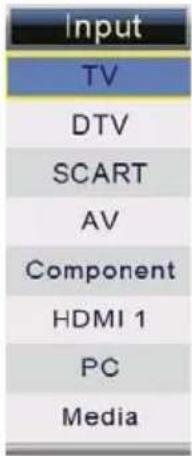
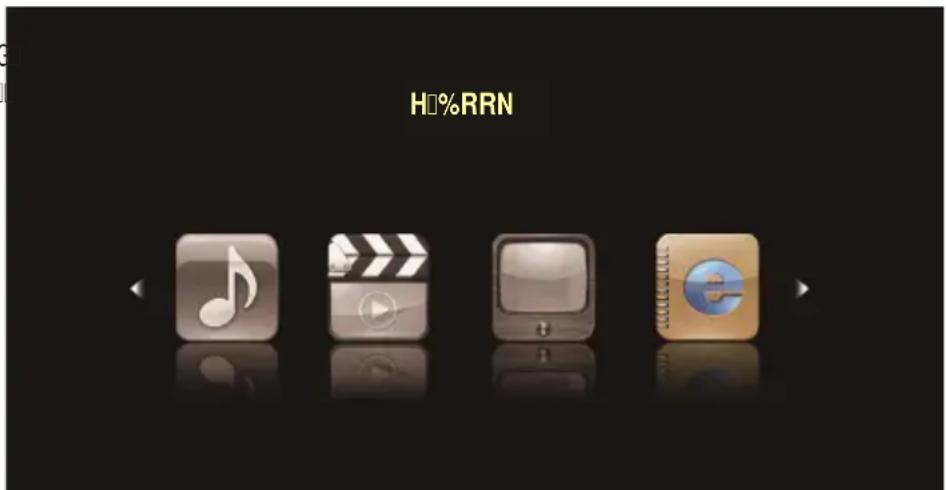
You can select input source by using source menu. Press SOURCE button on the remote control to show the menu as follows:
text_image
Input TV DTV SCART AV Component HDMI 1 PC MediaThe current source item is highlighted. Through press ▲/▼ button on the remote control to select your desire. Press OK or ▶ button to confirm your choice.
PLEASE NOTE, THAT IF SOME ITEMS ARE INACTIVE/UNAVAILABLE (GRAYED-OUT IN THE OSD MENU) THEY ARE NOT DISCUSSED IN THIS CHAPTER. THESE ITEMS ARE DETAILY DESCRIBED IN OTHER CHAPTERS.
In TV mode, press SETUP button on the remote control. Through pressing ▲/▼ button on the remote control, you can select LED menu sections (menu sections consist of "PICTURE", "SOUND", "CHANNEL", "FEATURE" and "SETUP").
Press OK button or ▶ button to enter the sub menu, and press ◀ button to return back to the previous menu. Press ▲/▼ button to select the option and then press OK button or ▶ button to enter the submenu, press ◀/▶ button to adjust the value or press ▲/▼ button to select in the sub menu. You can press SETUP button to save and return back to the previous menu, and press EXIT button to exit the entire menu.
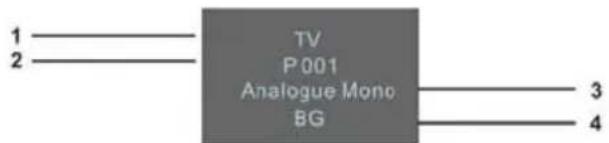
Press DISPLAY button on the remote control to display program information.
text_image
TV P 001 Analogue Mono BG 1 2 3 4- Current Source.
- Current program Number.
- The NICAM mode of current program.
- The sound system of current channel could be changed on Analog Manual Search Menu.
PICTURE
Press TV MENU button to display the main menu.
Press ▲/▼ button to select Picture in the main menu, then press OK button or ▶ button to enter.

text_image
Picture Picture Mode Standard Brightness 50 Contrast 50 Sharpness 5 Colour 50 Tint 50 Colour Temperature Standard Noise Reduction Middle Picture Sound Channel Feature Setup Move Enter Enter Exit Exit Menu Return- Press ▲/▼ button to select the option that you want to adjust in the Picture menu, and then press OK button or ▶ button to enter.
- Press ◀/▶ button to adjust or press ▲/▼ button to select. And press OK button or ▶button to select the sub menu.
- After finishing your adjustment, press SETUP button to save and return back to the previous menu, and press EXIT button to exit the entire menu.

text_image
Picture Picture Mode Standard Brightness 50 Contrast 50 Sharpness Colour Off Tint Low Colour Temperature Middle Noise Reduction High Setup Move Enter Enter Exit Exit Menu ReturnPicture Mode
Press ▲/▼ button to select Picture Mode, then press OK button or ▶ to enter and press ▲/▼ button to select. (Available Picture Mode: User, Standard, Vivid, Sft, Optimal) You only can change the value of brightness, contrast, sharpness, color, when the picture is in User mode.
TIPS: You can press P.MODE button on the remoter control again and again to change the picture mode directly.
Picture: Standard
Brightness
Press ▲/▼ button to select Brightness, then press OK button or ▶ button to enter and press ◀/▶ button to adjust. Then press SETUP button to return back the previous menu directly.
Contrast
Press ▲/▼ button to select Contrast, then press OK button or ▶ button to enter and press ◀/▶ button to adjust. Then press SETUP button to return back the previous menu directly.
Contrast

natural_image
Simple horizontal bar with a teal fill and a plus sign at the end (no text or symbols)50
Sharpness
Press ▲/▼ button to select Sharpness, then press OK button or ▶ button to enter and press ◀/▶ button to adjust. Then press SETUP button to return back the previous menu directly.
Colour
Press ▲/▼ button to select Colour, then press OK button or ▶ button to enter and press ◀/▶ button to adjust. Then press SETUP button to return back the previous menu directly.
Tint
Press ▲/▼ button to select Tint, then press OK button or ▶ button to enter and press ◀/▶ button to adjust. Then press SETUP button to return back the previous menu directly.
Colour Temperature
Press ▲/▼ button to select Colour Temperature, then press OK button or ▶ button to enter and ▲/▼ button to select Standard, Cool, Warm.
Noise Reduction
Press ▲/▼ button to select Noise Reduction, then press OK button or ▶ button to enter and ▲/▼ button to select Off, Low, Middle, High.
Reset
Press ▲/▼ button to select Reset, then press OK button or ▶ button to enter the confirm menu, and then choose OK to reset the value.
SOUND
Press SETUP button to display the main menu.
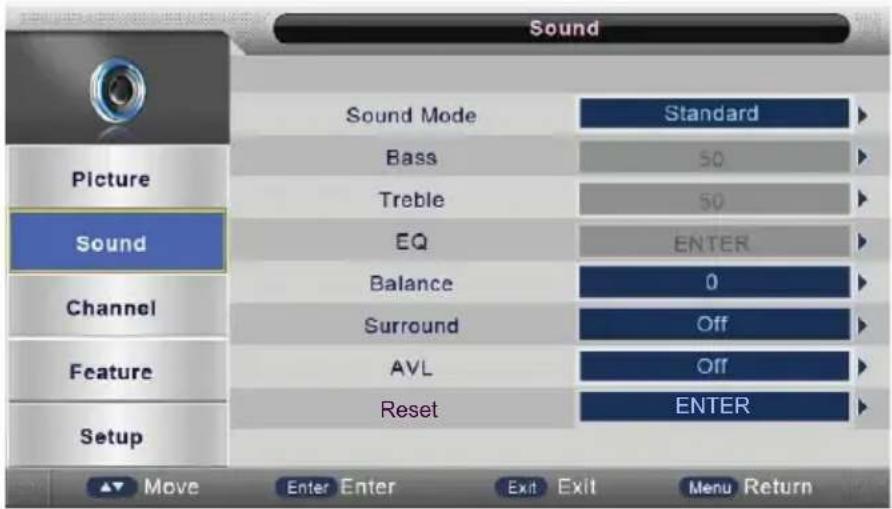
Press ▲/▼ button to select Sound in the main menu, then press OK button or ▶ button to enter.
text_image
Sound Sound Mode Standard Picture Bass 50 Sound Treble 50 EQ ENTER Balance 0 Surround Off Feature AVL Off Reset ENTER Setup Move Enter Enter Exit Exit Menu Return- Press ▲/▼ button to select the option that you want to adjust in the Sound menu, then press OK button or ▶ button to enter.
- press ◀/▶ button to adjust or press ▲/▼ to select, and press OK or ▶ button to select submenu.
- After finishing your adjustment, Press SETUP button to save and return back to the previous menu, or press EXIT button to exit the entire menu.
Sound Mode
Press ▲/▼ button to select Sound Mode, and then press OK or ▶ button to enter. And then press ▲/▼ button to select. (Available Sound mode: User, Standard, Movie, Music, Speech).
You can change the value of bass and treble, Balance and EQ, when the sound is in User mode.
TIPS: You can press S.MODE button on the remote control to change the Sound Mode directly.
Sound: Music
Bass
Press ▲/▼ button to select Bass, then press OK or ▶ button to enter and press ◀/▶ button to adjust. Then press SETUP button to return back the previous menu directly.
Balance
Press ▲/▼ button to select Balance, then press OK or ▶ button to enter and press ◀/▶ button to adjust. Then press SETUP button to return back the previous menu directly.
Treble
Press ▲/▼ button to select Treble, then press OK or ▶ button to enter and press ◀/▶ button to adjust. Then press SETUP button to return back the previous menu directly.
EQ
Press ▲/▼ button to select EQ, then press OK or ▶ button to enter and press ▲/▼ button to select.
(Available EQ mode: EQ100HZ, EQ300HZ, EQ1KHZ, EQ3KHZ, EQ8KHZ)
Then press OK or ▶ button to enter and press ◀/▶ button to adjust. Then press SETUP button to return back the previous menu directly.
Surround
Press ▲/▼ button to select Surround, then press OK or ▶ button to enter and press ▲/▼ button to select ON or OFF.
AVL
Press ▲/▼ button to select AVL, then press OK or ▶ button to enter and press ▲/▼ button to select ON or OFF.
Reset
Press ▲/▼ button to select Reset, then press OK button or ▶ button to enter the confirm menu, and then choose OK to reset the value.
CHANNEL
Press SETUP button to display the main menu.
Press ▲/▼ button to select Channel in the main menu, then press OK button or ▶ button to enter.
text_image
Channel Picture Sound Channel Feature Setup Channel Management Favorite Management Country Auto Search Digital Manual Search Analogue Manual Search LCN On/Off ENTER ENTER UK ENTER ENTER ENTER On Move Enter Enter Exit Exit Menu Return- Press ▲/▼ button to select the option that you want to adjust in the Channel menu, then press OK or ▶ button to enter.
- Press ▲/▼ button to select and press OK or ▶ button to select the sub menu.
- After finishing your adjustment, press SETUP button to save and return back to the previous menu, or press EXIT button to exit the entire menu.
Channel Management
Press ▲/▼ button to select Channel Management, then press OK or ▶ button to enter.
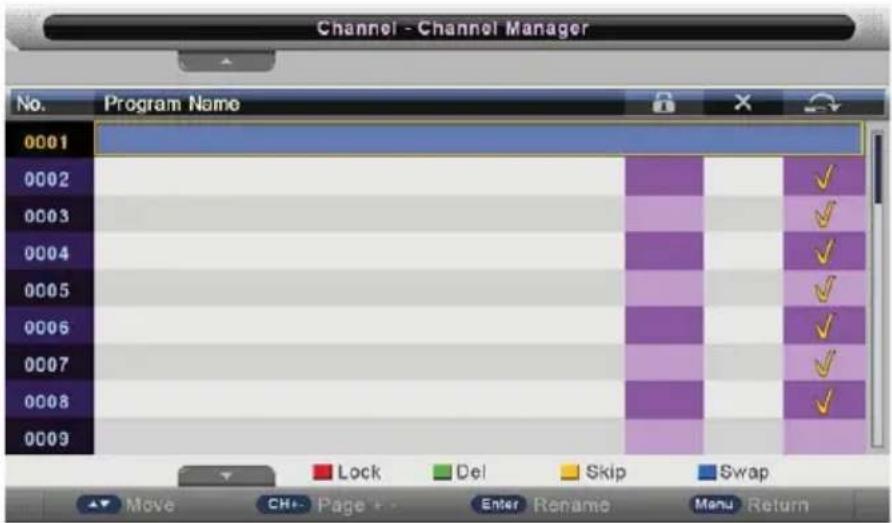
text_image
Channel - Channel Manager No. Program Name 0001 0002 0003 0004 0005 0006 0007 0008 0009 Lock Del Skip Swap Move Ctrl+Page+Enter Rename Menu ReturnPress RED button to set the current channel to lock, if the current channel already lock, press RED button again cancel lock.
Press GREEN button to set the current channel to delete, if the current channel already delete, press GREEN button again will cancel delete.
Press YELLOW button to skip the current channel, if the current channel already skip, press YELLOW button again will cancel skip.
Press BLUE button to swap the channel position.
If one of the channel has been incorrectly placed in the station listing, you may move it to the current position you want using the ▲/▼ select the channel to be moved, press BLUE button, move the channel to the new location and press OK button or BLUE button, this will move the station to the new location.
If there is delete channel logo press SETUP button or OK button, the menu will appear as follows:

text_image
Message Do You Want to delete the Selected items? OK CancelPress ◀ button to choose OK, press ▶ button choose cancel, press OK to confirm.
text_image
TV Successfully updated...Press ▲/▼ button to select channel, then press OK to enter the rename channel menu.

text_image
Channel- Channel Manage -Rename Channel - 0 1 2 3 4 5 6 7 8 9 A B C D E F G H I J K L M N O P Q R S T U V W X Y Z _ @ - # Space Caps Del Save Move Enter Enter Menu ReturnPress RED button to enter a space.
Press GREEN button to change case,
Press ▲/▼ or ▲/▼ button to select the character, and press OK to confirm.
Press YELLOW button to delete the previous character.
Press BLUE button to save the change and return to the previous page.
Press EXIT button the menu will appear as follows:

text_image
Message Please confirm saving? OK CancelExit the entire menu if select "Cancel" and there will nothing be change.
Save successful if select "OK" the menu will appear as follows: and it means the changes has been saved.

text_image
TV Save successfulFavorite Manager
Press ▲/▼ button to select Favorite Manager, then press OK or ▶ button to enter.

text_image
Channel - Favorite Manager No. Program Name Fav1 Fav2 Fav3 Fav4 0001 ✓ ✓ ✓ ✓ 0002 ✓ ✓ ✓ 0003 ✓ ✓ ✓ 0004 ✓ ✓ ✓ 0005 ✓ ✓ ✓ 0006 ✓ ✓ ✓ 0007 ✓ ✓ ✓ 0008 ✓ ✓ ✓ 0009 ✓ ✓ ✓ Move CH+ Page+ Exit Exit Menu ReturnPress ▲/▼ button to select Channel, press RED button to set to Fav1.
Press ▲/▼ button to select Channel, press GREEN button to set to Fav2.
Press ▲/▼ button to select Channel, press YELLOW button to set to Fav3.
Press ▲/▼ button to select Channel, press BLUE button to set to Fav4.
If the current channel already be one of your favorite channel, press the RED/ GREEN/YELLOW/ BLUE button again will set it to a normal channel.
Press SETUP button or EXIT button, the successfully updated menu will appear.
Country
Press OK button or ▶ button to enter, then Press ▲/▼ button to select appropriate country, and press OK or ▶ button to confirm.
Auto Search
Press ▲/▼ button to select Auto Search, then press OK or ▶ button to enter (When the System Lock is on, please input the default password "0000").

text_image
Channel - Auto Search All ENTER Digital ENTER Analogue ENTER Picture Sound Channel Feature Setup Move Enter Enter Exit Exit Menu ReturnPress ▲/▼ button to select All, Digital, Analogue, then press OK or ▶ button to enter.

text_image
Message Are you sure? OK CancelAuto Search selected items if select "OK" and press OK, other wise select CANCEL to return back to previous page. After a few second, the menu will appear as follows:

text_image
Channel - Tuning Analogue channels found: 0 Digital channels found: 0 Radio channels found: 0 Channel Feature 50% Setup Menu Skip Exit ExitWhen auto search finish, the save successful menu will appear a few second.
Analogue Manual Search
Press ▲/▼ button to select Analogue Manual Search, then press OK or ▶ button to enter (When the System Lock is on, please input the default password "0000").

text_image
Channel - Analogue Manual Search Current Channel 001 Frequency 45.25MHz Search ENTER Fine Tune ENTER Color System Auto Sound System BG Save Move Enter Enter Exit Exit Menu Return Picture Sound Channel Feature SetupCurrent Channel
Press OK or ▶ button to enter, then Press ▲/▼ button to select Current Channel.
Press ▲/▼ button to select Current Channel, then press OK or ▶ button to select.
Search
Press ▲/▼ button to select Search, then press OK or ▶ button to enter, the menu will appear as follows and then press ◀/▶ to scan the channel.

text_image
Search 45.25 MHz Adjust Menu Returnpress ◀/▶ to button shortly to adjust program frequency, press SETUP button to return back to the previous menu.
Note: press RED button to save the result of the adjustment.
Color System
Press ▲/▼ button to select Color System, then press OK or ▶ to enter the sub menu. Press ▲/▼ button to select Auto/PAL/SECAM, then press OK or ▶ button to confirm.
Sound System
Press ▲/▼ button to select Sound System, and press OK or ▶ to enter the sub menu, Press ▲/▼ button to select BG, DK, I, L, L'. Then press OK or ▶ to confirm.
FEATURE
Press SETUP button to display the main menu.
Press ▲/▼ button to select Feature in the main menu, then press OK or ▶ to enter.
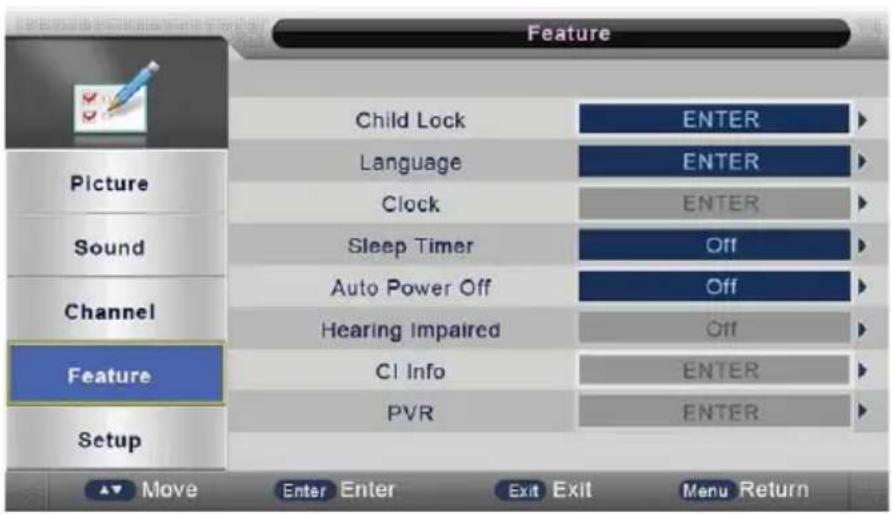
text_image
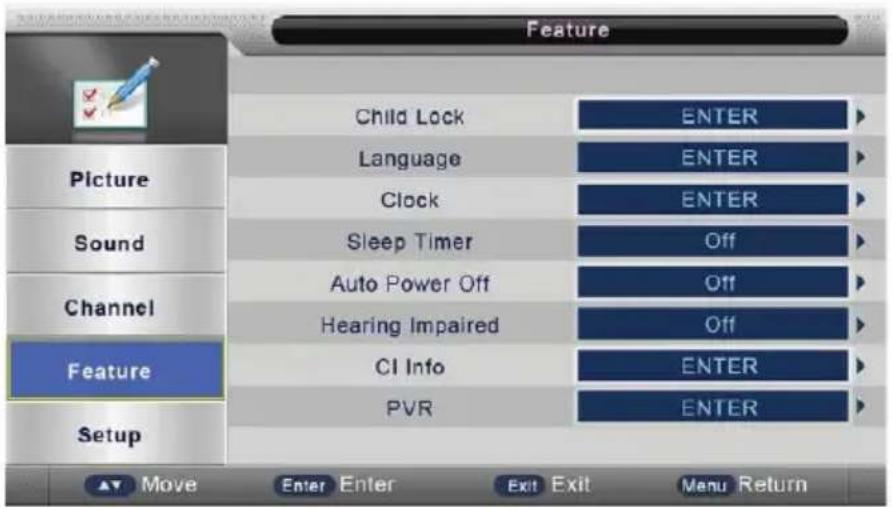
Feature Child Lock ENTER Language ENTER Clock ENTER Sound Sleep Timer Off Auto Power Off Off Hearing Impaired Off Feature CI Info ENTER PVR ENTER Setup Move Enter Enter Exit Exit Menu Return- Press ▲/▼ button to select the option that you want to adjust in the Feature menu, then press OK or ▶ button to enter.
- Press ◀/▶ button to adjust or press ▲/▼ button to select.
- After finishing your adjustment, press SETUP button to save and return back to the previous menu and press EXIT button to exit the entire menu.
Child Lock
Press ▲/▼ button to select Child Lock, then press OK or ▶ button to enter. (Please input the default password "0000")

text_image
Feature - Child Lock Child Lock Off Keypad Lock Off Parental Lock Off Change Pin Code ENTER Picture Sound Channel Feature Setup Move Enter Enter Exit Exit Menu ReturnKeypad Lock
Press ▲/▼ button to select Keypad Lock, then press OK or ▶ to enter the sub menu. Then press
▲/▼ button to select On or Off (Please input the default password "0000").
Then press OK or ▶ to confirm.
Parental Lock
Press ▲/▼ button to select Parental Rating, then press OK or ▶ button to enter the sub menu. Then press ▲/▼ button to select Rate (From4-18, or OFF). Then press OK or ▶ button to confirm.
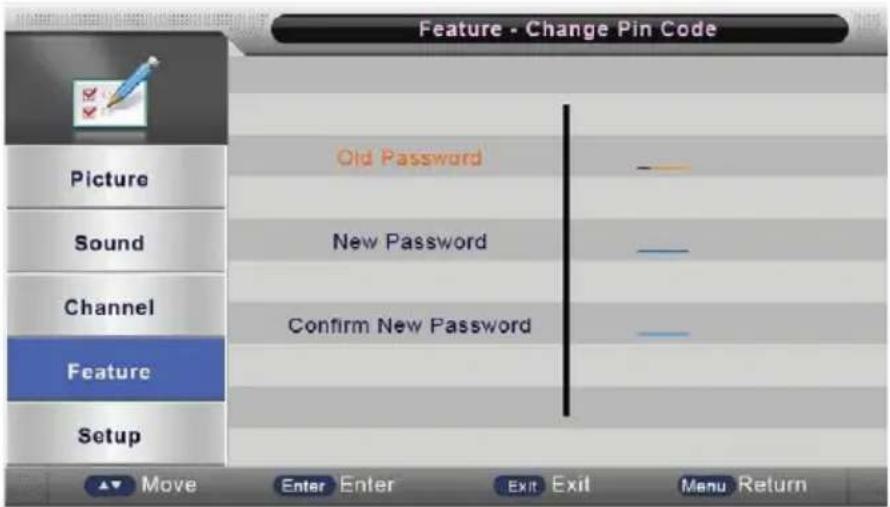
Change Pin Code
Press ▲/▼ button to select Change Pin Code, then press OK or ▶ button to enter and Change Pin Code menu will appear as follows:
text_image
Feature - Change Pin Code Picture Sound Channel Feature Setup Old Password New Password Confirm New Password Move Enter Enter Exit Exit Menu ReturnInput old password at "Old Password", (if the old password is incorrect, the password will not be allowed to modify.)
Input new password at "New Password".
Input new password again at "Confirm New Password", if new password and confirm new password consistent, the successfully updated menu will appear a few second, otherwise, the menu will display the password mismatch.
Language
Press ▲/▼ button to select Language, then press OK or ▶ button to enter the sub menu.

text_image
Feature - Language OSD Language English Preferred Subtitle English Preferred Audio English Digital Teletext Language English Analog Teletext Language West Picture Sound Channel Feature Setup Move Enter Enter Exit Exit Menu ReturnOSD Language
Press ▲/▼ button to select OSD Language, then press OK or ▶ button to enter the sub menu, then press ▲/▼ button to select, then press OK or ▶ button to confirm.
Preferred Subtitle
Press ▲/▼ button to select Preferred Subtitle, then press OK or ▶ button to enter the sub menu, then Press ▲/▼ button to select, then press OK or ▶ button to confirm.
Preferred Audio
Press ▲/▼ button to select Preferred Audio, press OK or ▶ button to enter the sub menu, then press ▲/▼ button to select, then press OK or ▶ button to confirm.
Digital Teletext Language
Press ▲/▼ button to select Digital Teletext language, then press OK or ▶ button to enter the sub menu. Then Press ▲/▼ button to select, then press OK or ▶ button to confirm.
Analog Teletext Language
Press ▲/▼ button to select Analog Teletext language, then press OK or ▶ button to enter the sub menu, Then Press ▲/▼ button to select, then press OK or ▶ button to confirm.
Sleep Timer
Press ▲/▼ button to select Sleep Timer, then press OK or ▶ button to enter the sub menu, Then Press ▲/▼ button to select, then press OK or ▶ button to confirm.
Auto Power Off
Press ▲/▼ button to select Auto Power Off, then press OK or ▶ button to enter the sub menu. Then Press ▲/▼ button to select, then press OK or ▶ button to confirm.
SETUP
Press SETUP button to display the main menu.
Press ▲/▼ button to select Setup in the main menu, then press OK or ▶ to enter.
text_image
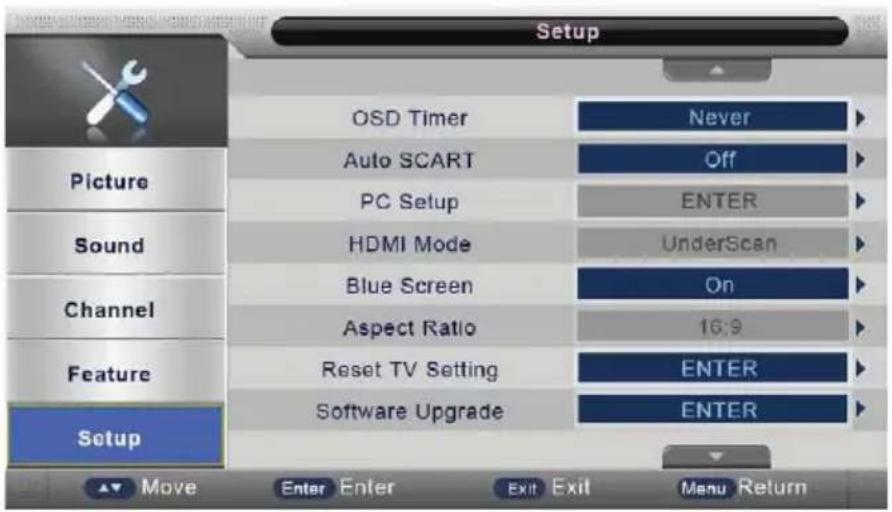
Setup OSD Timer Never Auto SCART Off PC Setup ENTER Sound HDMI Mode UnderScan Blue Screen On Channel Aspect Ratio 16:9 Feature Reset TV Setting ENTER Software Upgrade ENTER Setup Move Enter Enter Exit Exit Menu Return- Press ▲/▼ button to select the option that you want to adjust in the Setup menu, then press OK or ▶ button to enter.
- Press ◀/▶ button to adjust or press ▲/▼ button to select.
- After finishing your adjustment, press SETUP button to save and return back to the previous menu and press EXIT button to exit the entire menu.
OSD Timer
Press ▲/▼ button to select OSD Timer, then press OK or ▶ button to enter the sub menu, Then Press ▲/▼ button to select.(Available OSD Timer:5 Second, 10 Second, 15 Second, 20 Second, 25 Second, 30 Second, never), then press OK or ▶ button to confirm.
Auto SCART
Press ▲/▼ button to select Auto SCART, then press OK or ▶ button to enter the sub menu, Then Press ▶ button to select ON or Off, then press OK or ▶ button to confirm.
PC Setup
Press ▲/▼ button to select PC Setup, then press OK or ▶ to enter the sub menu, Then Press ▶ to enter, then press OK or ▶ to confirm(when the PC signal is connected).
HDMI Mode
Press ▲/▼ button to select HDMI Mode, then press OK or ▶ to enter the sub menu, Then Press ▶ to select.(Available: Auto, PC, Video), then press OK or ▶ to confirm(when the PC signal is connected).
Blue Screen
Press ▲/▼ button to select Blue Screen, then press OK or ▶ to enter the sub menu, Then Press ▲/▼ to select On or Off. Then press OK or ▶ to confirm.
Reset TV Setting
Press ▲/▼ button to select Reset TV Setting, and then press OK or ▶ to enter. The password menu will appear when the Child Lock is on.

text_image
Password —At the cursor input password to enter default password is "0000"
The menu will appear as follows:

text_image
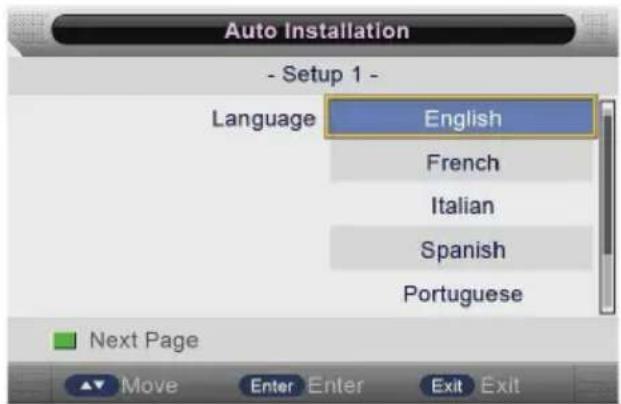
Message Do you want to reset Database to default? OK CancelReturn back to the previous menu if select "CANCEL" and press OK button. If select "OK" and press OK button, the resetting menu will appear a few second. Then the first time installation menu will appear as follows:
text_image
Auto Installation - Setup 1 - Language English French Italian Spanish Portuguese Next Page Move Enter Enter Exit ExitPress EXIT button to exit entire menu and ignore following set.
Setup 1
Press ▲/▼ button to select language.
Press ENTER button or GREEN button to enter setup 2 menu.
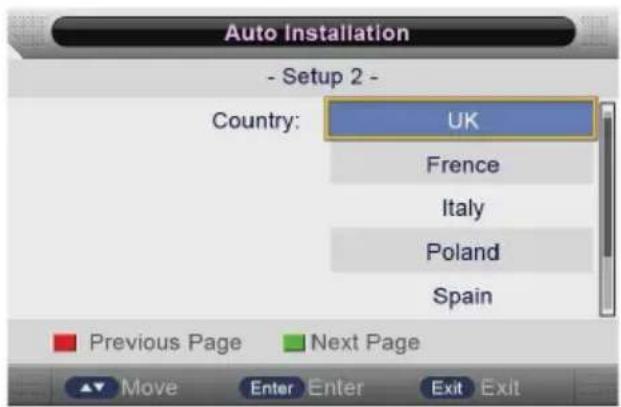
text_image
Auto Installation - Setup 2 - Country: UK France Italy Poland Spain Previous Page Next Page Move Enter Enter Exit ExitSetup 2
Press ▲/▼ button to select country.
Press RED button to enter setup 1 menu.
Press ENTER button or GREEN button to enter setup 3 menu.
text_image
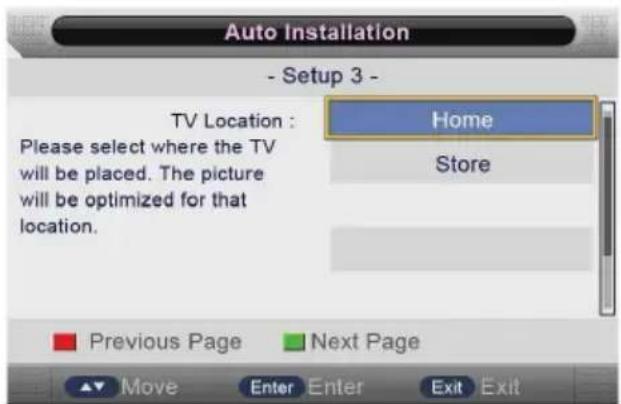
Auto Installation - Setup 3 - TV Location : Please select where the TV will be placed. The picture will be optimized for that location. Home Store Previous Page Next Page Move Enter Enter Exit ExitSetup 3
Press ▲/▼ button to select country.
Press RED button to enter setup 2 menu.
Press OK button or GREEN button to enter setup 4 menu.

text_image
Auto Installation - Setup 4 - Auto Power Off : Off Your TV has been set to Power off after 4 hours of continuous viewing. If you want to change this setting, please choose Off. This setting can also be changed in the MENU. 1 Hour 2 Hours 4 Hours Previous Page Next Page Move Enter Enter Exit ExitSetup 4
Press ▲/▼ button to select country.
Press RED button to enter setup 3 menu.
Press OK button or GREEN button to enter setup 5 menu.

text_image
Auto Installation - Setup 5 - Start Auto Tune (Digital) Previous Page Next Page Move Enter Enter Exit ExitSetup 5
Press RED button to enter setup 4 menu.
Press OK button to enter Auto Tune (Digital), the menu will appear as follow:
text_image
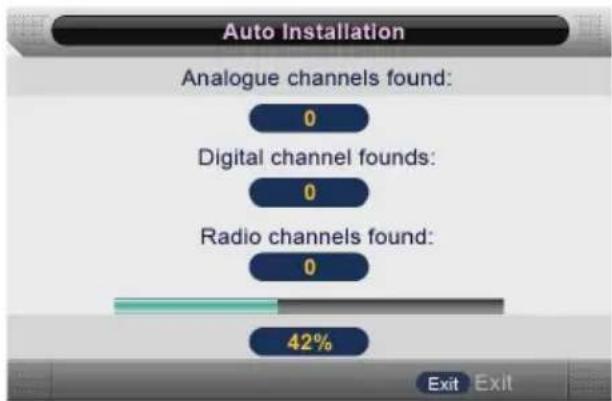
Auto Installation Analogue channels found: 0 Digital channel founds: 0 Radio channels found: 0 42% Exit ExitPress SETUP button to exit Auto Tune (Digital) menu, and enter setup 6 menu.
text_image
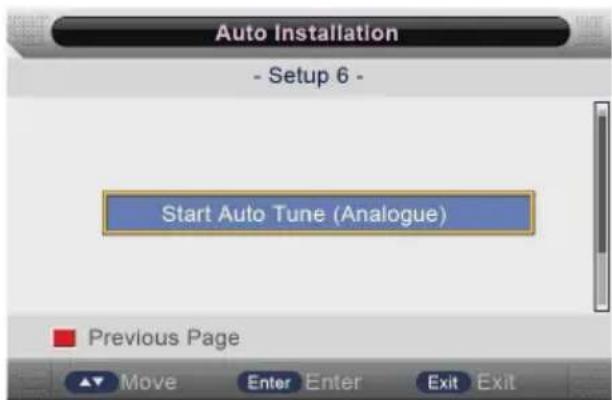
Auto Installation - Setup 6 - Start Auto Tune (Analogue) Previous Page Move Enter Enter Exit ExitSetup 6
Press RED button to enter setup 5 menu.
Press OK button to enter Auto Tune (Analogue), the menu will appear as follow:

bar
Auto Installation | Channel Type | Percentage (%) | | :--- | :--- | | Analogue channels found: | 0 | | Digital channel founds: | 0 | | Radio channels found: | 42 | Exit ExitPress SETUP button to return back the setup 6 menu.
DTV MENU SETUP
Press DISPLAY button on the remote control to display program information.

text_image
0802 YLE TV 2 576i MPGE2 07:37 No Event Info 02:00 - 12:59 VII No Event Info 5 6 7 Frequency(KHz) : 722000 BandWidth(MHz) : 8 Strength: 10% Quality: 10%- The current channel No. and channel name.
- The current program event info.
- The current time.
- TV channel icon, if the current channel is RADIO channel, it will be a RADIO icon.
- The current program's start-stop time.
- Language icon.
- Text icon.
- Subtitle icon.
- Favorite program icon.
Notes: 1. Picture menu and description are the same as that for TV source.
2. Sound menu and description are the same as that for TV source.
3. Setup menu and description are the same as that for TV source.
CHANNEL
Press SETUP button to display the main menu.
Press ▲/▼ button to select Channel in the main menu, then press OK or ▶ to enter.

text_image
Channel Channel Management ENTER Favorite Management ENTER Country UK Auto Search ENTER Digital Manual Search ENTER Analogue Manual Search ENTER LCN On/Off On Move Enter Enter Ext Exit Menu Return- Press ▲/▼ button to select the option that you want to adjust in the Channel menu, then press OK or ▶ button to enter.
- Press ◀/▶ button to adjust or press ▲/▼ button to select.
- After finishing your adjustment, press SETUP button to save and return back to the previous menu and press EXIT button to exit the entire menu.
Channel Management
Press ▲/▼ button to select Channel Management, then press OK or ▶ button to enter.

text_image
Channel - Channel Manager No. Program Name 0001 YLE TV1 0002 YLE TV2 0005 YLE FST 0008 YLE24 0009 YLE Teema Lock Del Skip Swap Move Ctrl+Page+Enter Rename Menu ReturnDigital Manual Search
Press ▲/▼ button to select Digital Manual Search, then press OK or ▶ button to enter. (when the system Lock is On, please input the default password "0000").

text_image
Channel - Digital Manual Search Channel 21 Frequency(KHz) 474000 BandWidth(MHz) 8 Sound Channel Start Strength 18% Quality 0% Feature Setup Move Enter Enter Exit Exit Menu ReturnChannel
Press ▲/▼ button to select Channel, and then press OK or ▶ button to enter and press ▲/▼ to select channel, then press OK or ▶ to confirm.
Start
Press ▲/▼ button to select Start, and then press OK or ▶ button to start scan, the channel tuning menu will appear a few second.
FEATURE
Press SETUP button to display the main menu.
Press ▲/▼ button to select Feature in the main menu, then press OK or ▶ to enter.
text_image
Feature Child Lock ENTER Language ENTER Clock ENTER Sleep Timer Off Auto Power Off Off Hearing Impaired Off CI Info ENTER PVR ENTER Picture Sound Channel Feature Setup Move Enter Enter Exit Exit Menu Return- Press ▲/▼ button to select the option that you want to adjust in the Channel menu, then press OK or ▶ button to enter.
- Press ◀/▶ button to adjust or press ▲/▼ button to select.
- After finishing your adjustment, press SETUP button to save and return back to the previous menu and press EXIT button to exit the entire menu.
PVR
Press ▲/▼ button to select PVR, and then press OK or ▶ button to enter.

text_image
Feature - PVR Record File Format TS Partition Select ENTER Auto Off Buffer Auto Timer ENTER Record List ENTER Feature Setup Move Enter Enter Exit Exit Menu ReturnRecord File Format
Press ▲/▼ button to select Record File Format, press OK or ▶ button to enter the sub menu. Then press ▲/▼ to select the 'TS' or 'PS', then press OK or ▶ to confirm.
Partition Select
Press ▲/▼ button to select Partition Select, press OK or ▶ button to enter. Then will appear as follows:

text_image
Partition List Total Size: ----G Free Size: ----G Format Set Default Partition Move Enter EnterTimer
Press ▲/▼ button to select Timer, press OK or ▶ to enter. Then will appear as follows:
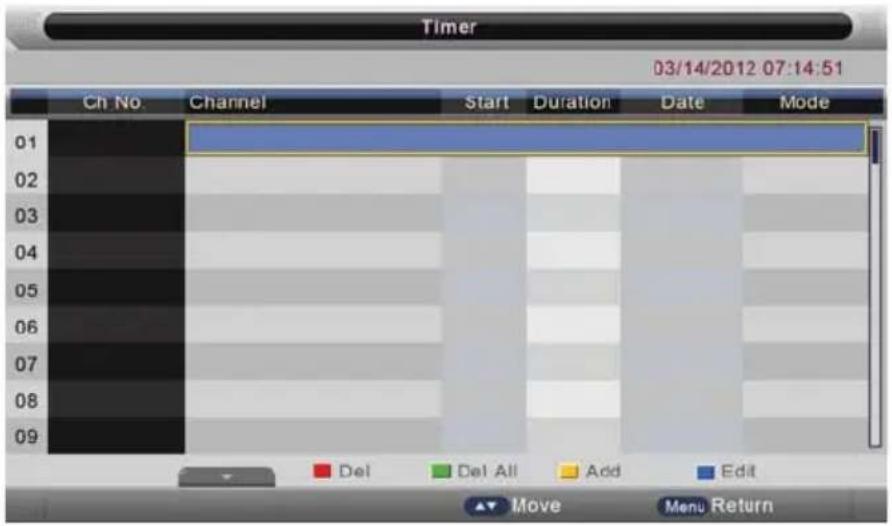
text_image
Timer 03/14/2012 07:14:51 Ch No. Channel Start Duration Date Mode 01 02 03 04 05 06 07 08 09 Del Del All Add Edit Move Menu ReturnPress ▲/▼ button to select Ch No, then press RED button to delete selected channel, the menu will appear as follows:

text_image
Message Delete the selected timer? OK CancelReturn back to the previous menu if select "CANCEL" and press OK button.
If select "OK" and press OK button to delete the selected program from the timer list.
- Press GREEN button to delete all timers the menu will appear as follows:

text_image
Message Delete all timers? OK CancelReturn back to the previous menu if select "CANCEL" and press OK button.
If select "OK" and press OK button to delete all timers.
- Press YELLOW button to add channel to the timer list the menu will appear as follows:
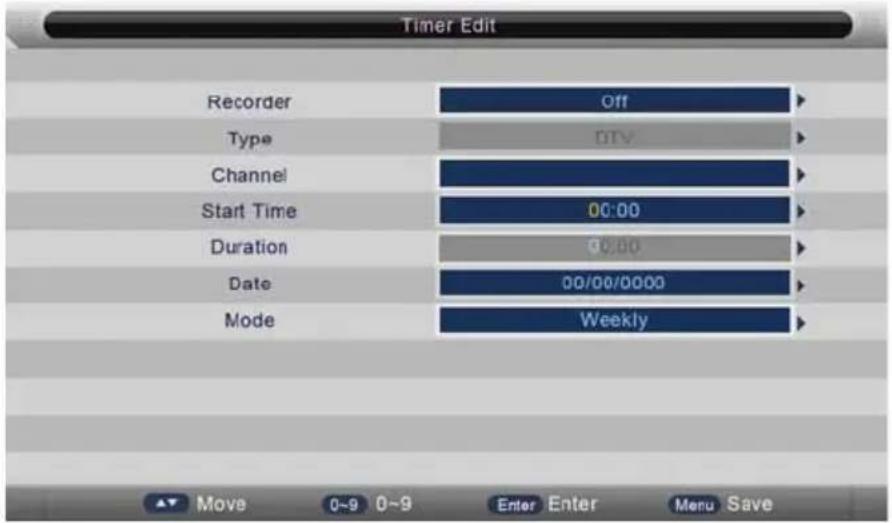
text_image
Timer Edit Recorder Off Type DTV Channel Start Time 00:00 Duration 90:00 Date 00/00/0000 Mode Weekly Move 0~9 0~9 Enter Enter Menu SaveRecorder [ When the PVR format support]
Press ▲/▼ to select Recorder, and then press OK or ▶ to enter and press ▲/▼ to select Recorder or Reminder. Press SETUP to save the settings, press EXIT button to exit.
Press ▲/▼ to select channel that you want to edit.
Press BLUE to edit selected channel, the timer edit menu will appear.
Type
Press ▲/▼ to select Type, then press OK or ▶ to enter and press ▲/▼ to select DTV or Radio.
Program
Press ▲/▼ to select Channel, then press OK or ▶ to enter and press ▲/▼ to select channel which you want to add to the timer list.
Start Time
Press ▲/▼ to select Start Time, and then press OK or ▶ to enter and press 0-9 button to input duration.
Duration
Press ▲/▼ to select Duration, then press OK to enter and press 0-9 button to input duration.
Date
Press ▲/▼ to select Date, then press OK to enter and press 0-9 button to input date.
Mode
Press ▲/▼ to select Mode, then press OK or ▶ to enter and press ▲/▼ to select Once, Daily, Weekly, Monthly.
Record List
Press ▲/▼ to select Record List, then press OK or ▶ to enter. Then will appear as Follows:

text_image
Record List Delete Menu Return Move Enter EnterHearing Impaired
Press ▲/▼ to select Hearing Impaired, press OK or ▶ to enter the sub menu.
Then press OK or ▲/▼ to select On or Off, then press OK or ▶ to confirm.
CI Info
Press ▲/▼ to select CI Info, press OK or ▶ to enter, CI Info menu will appear as follows:

text_image
Common Interface Viaccess Access Move Enter Enter Menu Return Exit ExitPress OK or ▶ to enter.
Notes: 1. This is just an example for reference, different CI module will have different CI menu.
- Other menu and description are the same as that for TV source.
Channel List
Please LIST button on the remote control to display the channel list menu.
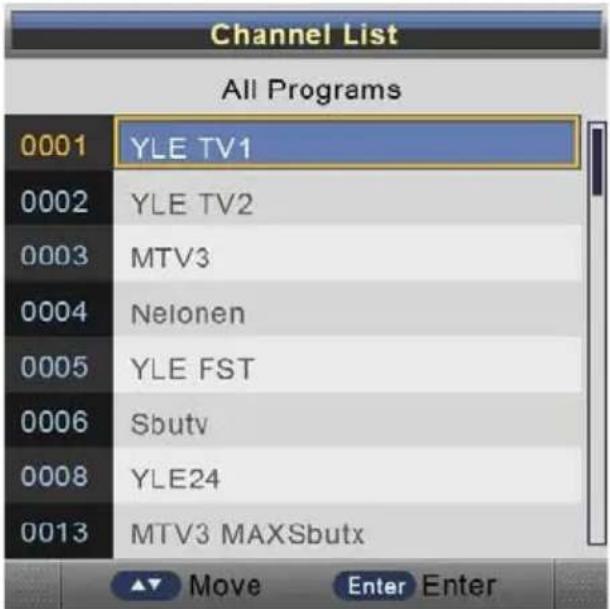
text_image
Channel List All Programs 0001 YLE TV1 0002 YLE TV2 0003 MTV3 0004 Nelonen 0005 YLE FST 0006 Sbutv 0008 YLE24 0013 MTV3 MAXSbutx Move Enter EnterPress ▲/▼ button to select channel that you want to view, then press OK to view.
FAV List
Press FAV button on the remote control to display the FAV list menu.

text_image
Favorite List Favorite 1 0001 YLE TV1 0003 MTV3 0013 MTV3 MAXSbutx 0014 JIM Move Enter EnterPress ▲/▼ button to select channel that you want to view, then press OK button to view. Press ◀/▶ button to switch favorite 1, favorite 2, favorite 3 and favorite 4.
Subtitle
Press subtitle button on the remote control, the subtitle menu will appear as follows:
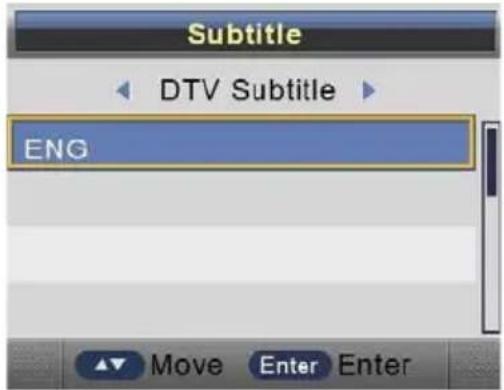
text_image
Subtitle DTV Subtitle ENG Move Enter EnterPress ◀/▶ button to OFF, then press OK button, will not display subtitle.
Press ▲/▼button to ENG, then press OK button, show the subtitle in English.
Press EXIT to exit.
EPG (ELECTRONIC PROGRAM GUIDE)
Press EPG button on the remote control to display the EPG daily mode menu.

text_image
EPG Weekly Mode 07/12/2005 09:38:14 → 3 07/12/2005 09:15- 07/12/2005 10:03 Sydämen asialla Likainen Len. Mike tutkii, onko maatyoläisen kuolemalla yhteyttä lukuisiin elainten kuolemin. Alfred saattaa Davidin nousuveden vangiksi. Stereo. Wed 07/12 09:00 09:30 10:00 10:30 11:00 YLE TV1 No E... Sydämen asialla No ... Koul... No Event Info YLE TV2 No Event Info YLE FST No Event Info YLE24 No Event Info E ... No Event Info YLE Teema No Event Info Daily Reminder Prev Day Next Day Move Info Exit Exit- The current channel No. and channel name.
- The current program's start-shop time and program name.
- The current date and time.
Press ▲/▼ button to select the channel or program.
Press ◀/▶ button to choose between the channel and program.
Press RED button to switch between EPG weekly mode and EPG daily mode.
To see programmers for the yesterday or further, press the YELLOW button to decrease the date.
To see programmers for the next day or further, press BLUE button to increment the date.
For more information about a program, press INFO.
Press GREEN button once to Reminder the program, there will be a small logo or beside the program (●).
Press GREEN button twice to add channel to the recorder list (☐).
Press EPG once more or EXIT once to cancel the operation.
Means the channel is encoded channel.
Multi-Audio
Press AUDIO button on the remote control to display the multi-audio menu.

text_image
Multi-Audio Stereo English Dutch MovePress ◀/▶ button to select the audio format of the language, (available audio format: right, stereo, left).
Press ▲/▼ button to select different language.
You can press on the remote control under the DTV Source.
If you device speed is not enough, there will be a dialog as follows:
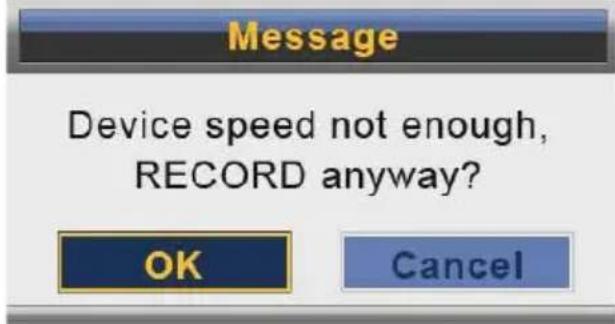
text_image
Message Device speed not enough, RECORD anyway? OK CancelYou'd better change a high speed device or select "OK" to continue.
Press □ on the remote control again to start record; there will be a dialog as follow:

text_image
Message Do you want to start Recording? OK CancelSelect "Yes" to start recording. You'll see the dialog:

text_image
DTV Initialing Recorder....During Recording, there will be a small dialog on the left: REC
Press • on the remote control again to set the Recorder duration time.

Press □ on the remote control to stop recording.

text_image
Message Do you want to stop Recording? OK CancelTo stop recording by choose "Yes", to continue recording by choose "No".
Most TV stations provide cost-free teletext information, including the latest news, weather information, TV program list and stock information etc. You just input the needed teletext page according to the teletext content.
TELETEXT DISPLAY
Select the channel with teletext signal.
Press TEXT button.
Select the corresponding page according to the colourized buttons on the remote control.
Press TEXT button twice again and only TV screen displays.
PAGE SELECTION
You can input 3 digit numbers to enter the page you want to watch trough number buttons.
If the inputted number is invalid, you need to input correct 3 digit numbers again after you finished inputting this 3 digit numbers.
You can select to turn pages forward or backward through PAGE+/PAGE-.
MIX MODE
This function may let you enjoy TV and teletext information at the same time.
When a certain teletext page displays, press TEXT button again, TV and teletext information will display on screen at the same time.
Press TEXT button again and only TV screen displays.
LOCK
You can press HOLD button to lock teletext page. Press this button again to cancel locking.
INDEX
Press INDEX button to display content page.
Enter a certain teletext page through inputting number buttons.
ZOOM IN TELETEXT
When teletext page shows, you may double zoom into display this teletext page.
Press SIZE button to zoom in the upper half part of teletext page.
Press SIZE button again to enter under half part of teletext page.
Press this button once more to return to original display mode.
DISPLAY MODE
Press REVEAL button to display the hidden teletext information. Press this button again to cancel.
COLOURIZED BUTTONS (RED, GREEN, YELLOW, BLUE)
Select the corresponding teletext page through colourized buttons.
SETTING MENU
Picture menu and description are the same as that for TV source.
Sound menu and description are the same as that for TV source.
Channel menu is not available, and it will be shown in gray.
Feature menu and description are the same as that for TV source.
Setup menu and description are the same as that for TV source.
NOTE
If no signal input in TV, DTV, SCART/AV/COMPONENT/HDMI, the screen will show as below.

text_image
No signalThis unit will switch to standby mode automatically if no signal input more than 15 minutes.
SETUP
Press SETUP button to display the main menu.
Press ▲/▼ button to select Setup in the main menu, and then press OK or ▶ to enter.
text_image
Setup OSD Timer Never Auto SCART On PC Setup ENTER HDMI Mode UnderScan Blue Screen Off Aspect Ratio 16:9 Reset TV Setting ENTER Software Upgrade ENTER Picture Sound Channel Feature Setup Move Enter Enter Exit Exit Menu Return- Press ▲/▼ button to select the option that you want to adjust in the Setup menu, then press OK or ▶ button to enter.
- Press ◀/▶ button to adjust or press ▲/▼ button to select.
- After finishing your adjustment, press SETUP button to save and return back to the previous menu and press EXIT button to exit the entire menu.
HDMI Setup
Press ▲/▼ button to select HDMI Setup, and then press OK or ▶ to enter.
text_image
Setup OSD Timer Never Auto SCART On PC Setup ENTER Sound HDMI Mode OverScan Blue Screen Auto Channel Aspect Ratio UnderScan Feature Reset TV Setting OverScan Software Upgrade ENTER Setup Move Enter Enter Exit Exit Menu ReturnNotes:
- Other menu and description are the same as that for TV source.
- HDMI source's channel menu is not available, and it will be shown in gray.
- Picture menu and description are the same as that for TV source.
- Sound menu and description are the same as that for TV source.
- Feature menu and description are the same as that for TV source.
SETUP
Press SETUP button to display the main menu.
Press ▲/▼ button to select Setup in the main menu, then press OK or ▶ to enter.

text_image
Setup OSD Timer Never Auto SCART On PC Setup ENTER HDMI Mode UnderScan Blue Screen Off Aspect Ratio 16:9 Reset TV Setting ENTER Software Upgrade ENTER Picture Sound Channel Feature Setup Move Enter Enter Exit Exit Menu Return- Press ▲/▼ button to select the option that you want to adjust in the Setup menu, then press OK or ▶ button to enter.
- Press ◀/▶ button to adjust or press ▲/▼ button to select.
- After finishing your adjustment, press SETUP button to save and return back to the previous menu and press EXIT button to exit the entire menu.
PC Setup
Press ▲/▼ button to select PC Setup, and then press OK or ▶ to enter.

text_image
Setup - PC Setup Auto Adjust ENTER H Position 0 V Position 0 Phase 57 Clock 0 Picture Sound Channel Feature Setup Move Enter Enter Exit Exit Menu Return
text_image
Message Adjusting,Please Wait...Auto Adjust
Press ▲/▼ button to select Auto Adjust, and then press OK or ▶ button, the menu will appear a few second.
H Position
Press ▲/▼ button to select H Position, and then press OK or ▶ to enter, press ◀/▶ to adjust the picture horizontally.
V Position
Press ▲/▼ button to select V Position, and then press OK or ▶ to enter, press ◀/▶ to adjust the picture vertically.
Phase
Press ▲/▼ button to select Phase, and then press OK or ▶ to enter, press ◀/▶ to adjust the picture phase.
Clock
Press ▲/▼ button to select Clock, and then press OK or ▶ to enter, press ◀/▶ to adjust the clock.
Notes:
- Other menu and description are the same as that for TV source.
- PC source's channel menu is not available, and it will be shown in gray.
- Picture menu and description are the same as that for TV source.
- Sound menu and description are the same as that for TV source.
- Feature menu and description are the same as that for TV source.
BRIEF INTRODUCTION
This product has a USB 2.0 interface; you can play music, movie and picture files from USB equipment. USB refers to Universal Serial Bus. Most of USB devices on the market are USB1.1 or USB2.0. There are some types USB1.1 devices:
Monitors Communication devices, Audio, Human Input Device (HID), Mass Storage, Most flash memory, USB HDD ect. Belongs to Mass Storage Class.
Mass Storage Class includes 2 transport maners:
- USB1.1 Mass Storage Class Control/Bulk/Interrupt (CBI) Transport.
- USB1.1 Mass Storage Class Bulk-Only Transport. This unit supports USB1.1
Mass Storage Class Bulk-Only Transport, we are not sure that other USB Devices can be supported! So please find out about the features of USB equipments before using it.
NOTES
- This product supports MP3, MPEG1, MPEG2, AVI, JPEG and BMP format files.
- The file system supports FAT16, FAT32 and NTFS.
- MTP (Media Transfer Protocol) is not supported.
- Please connect directly to the USB port of your TV. If you are using a separate cable connection, there may be a USB compatibility problem.
- Before connecting your device to the TV, please back up your files to prevent them from damage or loss of data. The manufacturer is not responsible for any data file damage or data loss.
- Do not disconnect the USB device while it is loading.
- If you want to change playing mode, firstly you have to exit current playing mode through pressing EXIT button.
- The higher the resolution of the image, the longer it takes to display on the screen.
- For unsupported or corrupted files, the 'Unsupported format' message is displayed.
USB MULTIMEDIA PLAYBACK FORMAT
| Media | File Extension | Code | |
| Video | Audio | ||
| MOVIE | .avi | Xvid, MPEG-4 | MP3,WMA,AAC |
| .mpg | MPEG-1,MPEG-2 | ||
| .dat | MPEG-1 | ||
| MUSIC | .mp3 | -- | MP3 |
| .wma | -- | WMA | |
| .m4a/.aac | -- | AAC | |
| PHOTO | .jpg/.jpeg | Progressive JPEG | |
| Baseline JPEG | |||
| .bmp | BMP | ||
| .png | Non-Interlaced | ||
| Interlaced | |||
NOTE
Before operating Media menu, plug in USB device, then press SOURCE button to set the Input Source to Media.
Press ▲/▼ button to select Media in the Source menu, then press OK or ▶ button to enter.
PHOTO
Press ◀/▶ button to select Photo in the main menu, and then press OK button to enter. Press EXIT button to return back to the previous menu.
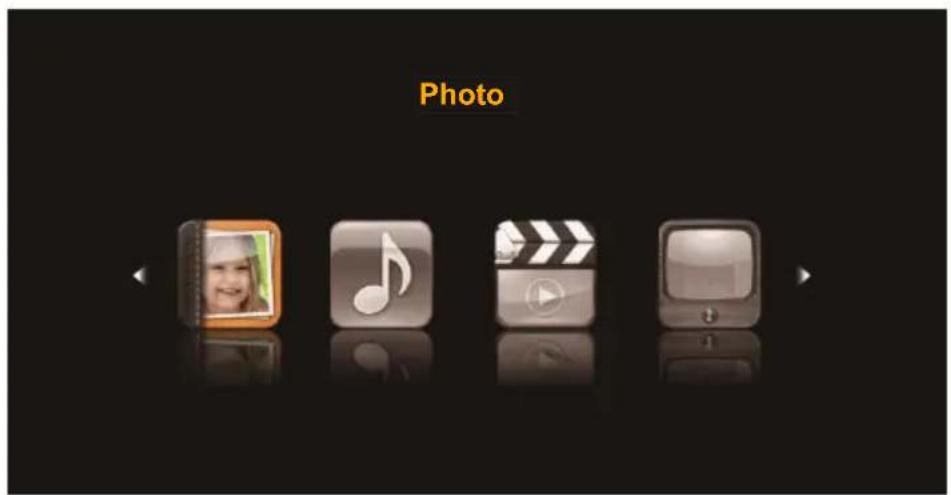
text_image
PhotoPress ▲/▼ to select the photos, press OK or I▶/II button or ▶ button to view.

text_image
/udska1/test/Photo 01.jpg 02.jpg 03.jpg 04.jpg 001/004 504KB 2011/05/17 1440x900 Delete Move CH+ Page+/- Enter Enter Exit ReturnPress OK button to select the sub folder. Press OK button or ▶/□ button to play or pause. You can see the information of the current playing media at the first few seconds or after press DISPLAY button. Press ▲/▼ or ◀/▶ button to rotate the picture. Press ■ button or EXIT button to stop playing. Press the ◀ button to return back to previous page.
MUSIC
Press ◀/▶ button to select Music in the main menu, and then press OK button to enter. Press EXIT button to return back to the previous menu.

text_image
MusicPress ▲/▼button to select the song you want to listen, and then press OK or I▶/II or ▶ button to play.
Press ◀ button to return back to the previous menu.
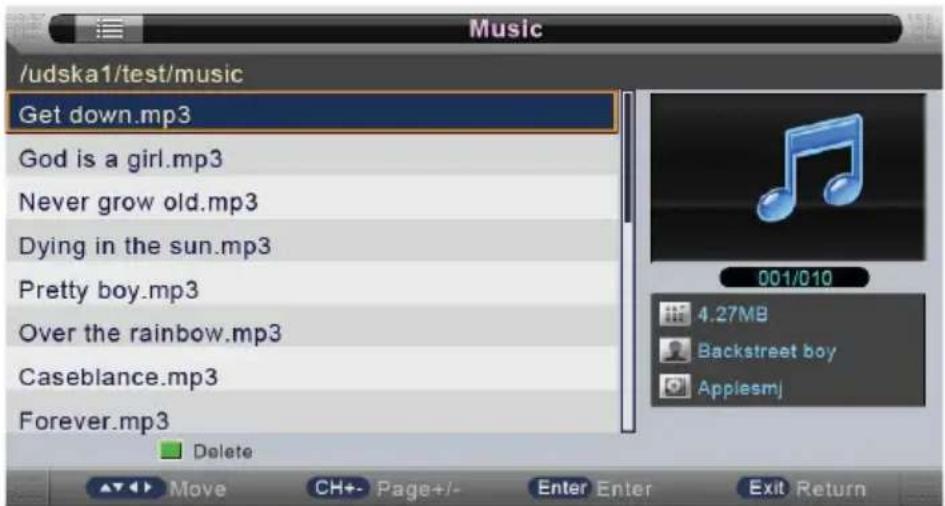
text_image
/udska1/test/music Get down.mp3 God is a girl.mp3 Never grow old.mp3 Dying in the sun.mp3 Pretty boy.mp3 Over the rainbow.mp3 Caseblance.mp3 Forever.mp3 Delete Move CH+ - Page+/- Enter Enter Exit ReturnYou can see the information of the current playing song at the left of the menu.

text_image
Music Player Get down.mp3 God is a girl.mp3 Never grow old.mp3 Dying in the sun.mp3 Pretty boy.mp3 Over the rainbow.mp3 Caseblance.mp3 Forever.mp3 00:03:34/00:14:03 Move Enter Enter Exit ReturnMOVIE
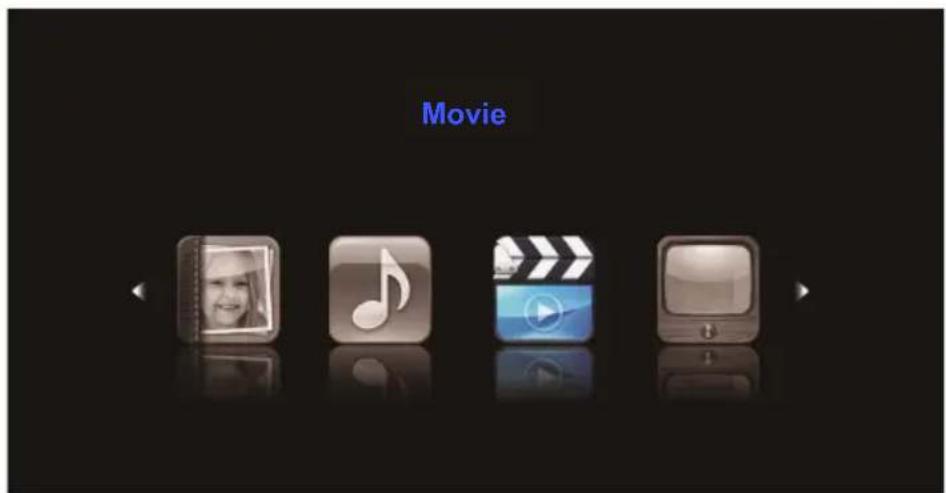
Press ◀/▶ button to select Movie in the main menu, and then press OK button to enter.
Press EXIT button to return back to the previous menu.
text_image
MoviePress ▲/▼ to select the video, press OK or I▶/II button or ▶ button to view.
Press OK button or ▶/□ button to play, Press ■ button or EXIT button to stop playing. Press the ◀ button to return back to previous page. You can see the information of the current playing media at the first few second or after press DISPLAY button.
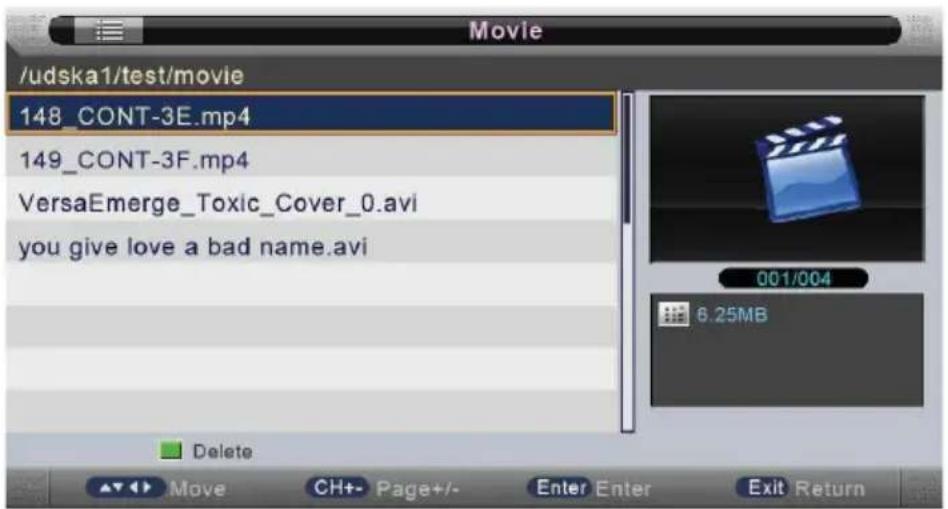
text_image
/udska1/test/movie 148_CONT-3E.mp4 149_CONT-3F.mp4 VersaEmerge_Toxic_Cover_0.avi you give love a bad name.avi Delete Move CH+ - Page+/- Enter Enter Exit ReturnPVR
Press ◀/▶ button to select PVR in the main menu, and then press OK button to enter. Press EXIT button to return back to the previous menu.

text_image
PVRPress ▲/▼ to select the video, press OK or ▶/□ button or ▶ button to view.

text_image
PVR M6(20081114_135146) 001/001 11.02MB Delete Move CH+- Page+/- Enter Enter Exit ReturnYou can see the information of the current video playing at the first few seconds or after press DISPLAY button. Then press ▶/□ button to play, you can see the playing state in the right.
Notes: Other menu and description are the same as that for Movie menu.
( %2 2 .
3UHVV☐Z ☐Z EXINWRQ□WR□VH0HFW ( □%RRN□LQ□WKH□P DLQ□P HQX□□DQG WKHQ□SUHVV□2. □EXINWRQ□WR□HQNHU□ 3UHVV□( ;,7□EXINWRQ□WR□UHNXUQ□ EDFN□WR□WKH□SUHYLRXV□P HQX□□
text_image
H0%RRN3UHVVY 2WRVHOHFWKHILCHSUHVV2. RU, Z, EXWRQRUZ EXWRQWRYLHZ
BASIC OPERATION
1. Insert Disc to DVD
- Insert the Disc to the Disc slot (mirror (record) side of the disc has to face towards front of the unit), the player will load the disc automatically. There will have an on screen indication CLOSE
"LOADING". After loading the disc content, it will switch to play mode automatically. If the disc is already placed inside, the disc will be read automatically.
NOTE: - For some discs, after loading the content of the disc, need to press I▶/II or select from the disc menu to start.
- Please make sure when inserting the Disc, the mirror (record) side of the disc should be facing you. When inserting the Disc incorrectly, you may damage the DVD mechanism.
2. Play the DVD
- According to the disc content, the disc menu will display for your selection. When playing the disc, you may use ▶/□ button to toggle between Play and Pause mode. This product also supports Menu, Title, Sequential and Program playback.
- Press ■ button once to stop. Press ▶/□ button to resume from where you stopped.
- Press ■ button Twice to stop. Press ▶/□ button to start from beginning.
- In order to protect the disc, press ■ button then press EJECT button to take the disc out. When the disc is ejected, hold the disc edge slightly and take it from the eject direction to prevent scratches.
- When not using the DVD function (in stand-by mode or using others modes for a long time), please take out the disc to protect the DVD loader and the disc.
3. Title playback (for DVD disc only)
- Press TITLE button, there will have an on screen indication "Title Menu".
- Press the direction or numeric buttons to select your favorite title.
- Then will play from the first chapter of the selected title.
SUPPORTING DVD FORMAT
This products can play the following format of DVD disc.
| Disc Type | Disc Size (Diameter) | Recorded Time | Recorded Content | Remarks |
| DVD 12cm | Single side:120mins. Approx | DVD format: Compressed digital audio and video | ||
| Double side:240mins. Approx | ||||
| Super VCD | 12cm | 45mins. Approx | MPEG2 Compressed digital audio and video | Include SVCD |
| VCD | 12cm | 74mins. Approx | MPEG1 Compressed digital audio and video | Include: VCD2.0/ VCD1.1 VCD1.0/ DVCD |
| CD | 12cm | 74mins. Approx CD-DA: | Digital audio | |
| HD-CD | 12cm | 74mins. Approx | HD-DA: Digital audio | |
| MP3/JPEG | 12cm | 600mins. Approx | Digital audio |
NOTE: Also support DVD-R, CD-R, CD-RW playback.
WARNING! DO NOT INSERT OR PLAY 8CM DISC, THEY WILL GET STUCK.
Region Code


As it is usual for DVD movies to be released at different times in different regions of the world, all players have region codes and discs can have an optional region code. If you load a disc of a different region code into your player you will see the region code notice on the screen. The disc will not playback and should be unloaded.
DVD FUNCTIONS OPERATING INSTRUCTIONS
1. Play (for DVD/ Super VCD/ VCD/ CD/ CD-G/HD-CD and Mp3/ JPEG discs)
- For DVD disc, press ▶/II button from root or title menu; while playing the DVD, you may play your favorite title directly with title selection by pressing the TITLE button.
- For Super VCD & VCD discs, while playing the disc, you may play your favorite tracks by numeric buttons.
(NOTE: When using the Program playback or when it is PBC ON status, you can only use ▶▶/▶▶ I or
◀◀/I◀◀ buttons to change the track)
- For CD, CD-G & HD-CD discs, while playing the disc, you may play your favorite tracks by numeric buttons.
- For MP3 / JPEG disc, you may play your favorite tracks by numeric buttons from the content menu.
- If input track number is not valid, it will not function.
NOTE: From track 1-10, use numeric buttons directly; For tracks over 10use numeric buttons directly or press - / -- button first(E.g. Track 15, press - / -- then 5)
2. Previous/Next (for DVD/ Super VCD/ VCD/ CD/ CD-G/HD-CD and Mp3/ JPEG discs)
- While playing the disc;
- Press ◀◀/I◀◀ button to play to the last Title / Chapter / track.
- Press ▶▶/▶▶ I button to play to the next Title / Chapter / track
- For super VCD & VCD discs, in PBC OFF status;
• If the current track is the first one, press ◀◀/I◀◀ button will stop the playback.
- If the current track is the last one, press ▶▶/▶▶ I button will stop the playback
- For DVD discs, the above functions may vary due to different DVD disc's structure
3. Forward/ Backward (for DVD/ Super VCD/ VCD/ CD/ CD-G/HD-CD and Mp3/ JPEG discs)
- While playing the disc, you may use forward or backward function
-
There are 5 speeds for forward or backward. Press ◀◀/I◀◀ or ▶▶/▶▶ I button to toggle between different speeds in sequent. (FFx2 /FFx4 / FFx8 / FFx16 / FFx32 / Play, or FRx2 /FRx4 / FRx8 / FRx16 / FRx32 / Play).
-
While in forward or backward, you may press I▶/II to resume normal speed.
- For CD, HD-CD, Mp3, forward or backward also has audio output.
- For DVD discs, if backward to first title / chapter, it will start from the beginning.
- For Super VCD & VCD discs, in PBC ON status, if backward to the first track, it will start from the beginning NOTE: During Forward or Backward, the sound will be off.
4. Pause (for DVD/ Super VCD/ VCD/ CD/ CD-G/HD-CD and Mp3/ JPEG discs)
- FOR DVD, Super VCD, VCD, CD, CD-G, HD-CD & MP3/JPEG discs, press I▶/II button to pause; press I▶/II button to resume.
5. Repeat (for DVD/ Super VCD/ VCD/ CD/ CD-G/HD-CD and Mp3/ JPEG discs)
- Press REPEAT button once to display the current repeat mode.
- For Super VCD, VCD, CD, CD-G, HD-CD, discs, while playing in sequent, you may use the repeat playback. There are 2 repeat modes, press REPEAT to toggle between different modes in sequent. (REPEAT (OFF)/ REPEAT (1)/REPEAT (ALL)).
- For DVD discs, you may setup the repeat playback mode. There are 2 repeat modes, press REPEAT to toggle between different modes in sequent. (REP: (OFF) / REP: (CHAPTER) / REP: (TITLE) / REP:
- (ALL)). For MP3 / JPEG discs, while playing the disc, you may use the repeat playback. There are 3 repeat modes, press REPEAT to toggle between different modes in sequent. (REPEAT (OFF) / REPEAT (1) / REPEAT (DIR) / REPEAT (ALL)).
6. Display (for DVD/ Super VCD/ VCD/ CD/ CD-G/HD-CD and Mp3/ JPEG discs)
- Press DISPLAY button to activate the on screen roll-down menu for the current Title, Chapter, time and other information.
7. Goto (for DVD/ Super VCD/ VCD/ CD/ CD-G/HD-CD and Mp3/ JPEG discs)
- This function allows you to play your favorite Title / Chapter / track. Press GOTO button to activate the on screen scroll-down menu for edit. According to the highlighted area, input your favorite Title / chapter / Track number by numeric buttons or input the playback time. After editing, press OK to start. If the input is invalid, it will not function
NOTE: While editing, the GOTO button is not function.
- If it is in PBC ON status, this function will switch it to OFF.
- For Mp3/JPEG discs, use numeric buttons directly to select your favorite songs or pictures
8. AUDIO (for DVD/ Super VCD/ VCD/ CD/ CD-G/HD-CD and Mp3/ JPEG discs)
- Press AUDIO button once to display current audio mode.
- Press again to toggle between different audio modes in sequent.
• For CD, CD-G, HD-CD, MP3 discs: (L/L, R/R, STEREO, MIX MONO) Super VCD & VCD,
NOTE: Switching to Auto L / R audio channel may be varied due to different discs contents. Bilingual VCD discs can use AUDIO button to switch between different languages.
9. Language and (for DVD Super VCD discs)
- Press AUDIO button once to display current language.
- Press again to toggle between different languages mode in sequent.
NOTE: For Multi-languages DVD & Super VCD discs, press AUDIO button to select your favorite language.
10. Subtitle and (for DVD Super VCD discs)
- Press SUBTITLE button once to display current sub-title.
- Press again to toggle between different subtitle modes in sequent.
NOTE: For Multi-languages subtitle DVD & Super VCD discs, press SUBTITLE button to select your favorite subtitle language.
11. Angle (for DVD disc)
- Press ANGLE button once to display current playback angle.
- Press again to toggle between different playback angle codes in sequent. (E.g. Angle -/- (Current/Full) or OFF)
NOTE: Only for DVD with multi-angle, press ANGLE button to select your favorite playback angle.
Selectable playback angle depends on the availability of the DVD contents.
12. Mute (for DVD/ Super VCD/ VCD/ CD/ CD-G/HD-CD and Mp3/ JPEG disc\$
- Press MUTE button to mute the audio output. There will have an on screen symbol indicate "MUTE".
- Press again to cancel, or Press VOL + to cancel and adjust the volume.
- In case there is no audio output, try to press MUTE button to cancel mute.
13. ZOOM / and (for DVD/ Super VCD/ VCD Mp3 JPEG discs)
- Press ZOOM+ button to zoom in the picture.
- There are 3 zoom modes, press ZOOM+ button to toggle between different zoom modes in sequent. (Zoom OFF, Zoomx2, Zoomx3, Zoomx4).
- In Zoomx2, Zoomx3 and Zoomx4, you may use the navigation buttons to pan the picture for your favorite portion.
14. A- B (for DVD/ Super VCD/ VCD/ CD/ CD-G/HD-CD and Mp3/ JPEG discs)
- In normal Playback, fast forward or fast reverse, press A-B button at where you want to start the repeat portion. There will have an on screen indication "REPEAT A".
- In normal Playback, fast forward or fast reverse, press A-B button again at where you want to stop the repeat portion. There will have an on screen indication "REPEAT A B".
- The repeat function started to playback the portion from A to B automatically.
-
Press A-B button again to cancel. There will have an on screen indication "REPEAT OFF".
-
For Super VCD, VCD & CD discs, repeat A-B is only function within the same track. When playing the others, repeat A-B will cancel automatically.
-
For Super DVD discs, repeat A-B is only function within the same Title /Chapter. When playing the others, repeat A-B will cancel automatically.
-
Volume (for DVD/ Super VCD/ VCD/ CD/ CD-G/HD-CD and Mp3/ JPEG discs)
- Press - VOL / VOL + buttons to adjust the output volume.
NOTE: Playback DVD discs in original code, is not adjustable
- INTRO (for Super VCD/ VCD/ CD/ CD-G/ HD-CD)
- 9 picture displays.Intro/Scan/
MP3/JPEG PLAYBACK
After loading the MP3 / JPEG disc, it will start to scan for the stored MP3 /JPEG folders. Then will firstly display the MP3 contents automatically. Screen as follow:

text_image
00:00 00:00 001/100 MP 3 01_ _ _ MP 3 02_ _ MP 3 03_ _ MP 3 04_ _ _ _ 01/100- Using the navigation buttons to check you favorite folder and playback the first file or move to the your favorite file.
NOTE:
- Press ◀/▶ buttons to move the highlight to folders, documents or mode selection.
- Press numeric buttons to select the contents directly. For number over 10, use numeric buttons directly or press - / -- button first(E.g. Track 15, press - / -- then 5)
- When playback MP3 files, there is no picture display, only audio output
- When play or pause with picture playback, you may use navigation butoons to flip / rotate the picture
- ▲ button to flip horizontally.
- button to flip vertically.
- button to rotate left 90°.
- button to rotate right 90°.
- When play or pause with picture playback, Press ◀◀/I ◀◀ / ▶▶/▶▶ I button to select next / previous page or press numeric buttons to view the corresponding pictures.
FUNCTION SETTINGS

text_image
-- General Setup -- TV display mode OSD Language Screen Saver Last MemoryPress [DVD-MENU] button to activate the DVD player OSD menu.
Setup Mode provides the menu for the configuration of General Setup, Speaker Setup Page, Digital Setup and Preferences Page. Press [▲/▼] button to switch between these categories. Press [OK] or [▶] button to enter highlighted submenu. Press [◀] to back the OSD menu and [DVD-MENU] button to exit the OSD menu.
NOTE: In Setup mode, the following functions will be cancel or pause: TITLE, SUBTITLE, DISPLAY, PLAY, SETUP, STOP, SLOW / STEP, AUDIO, F.FWD, F.REV, PREV, NEXT, GOTO, ZOOM, ANGLE, PROGRAM, PREVIEW, REPEAT, A-B.
General setup

text_image
-- General Setup -- TV display mode 4:3PS OSD Language 4:3LB Screen Saver 16:9 Last MemoryTV DISPLAY MODE
DVDs are produced in a variety of screen aspect ratios. This menu allows you to select one of the three aspect ratios:
4:3 PS
4:3 LB
• 16:9
- Select the most appropriate aspect ratio for the DVD being viewed.
4:3PS
Pan and Scan is used for most normal television broadcasts and it is the default setting. It has an aspect ration of 4:3. If you select this setting when viewing a DVD the picture will fill the screen but, you will not see the left and right edges of the picture.
4:3LB
Letter Box will show the DVD in its original aspect ratio so depending on the size of your television screen, you may see black borders above and below the picture.
16:9
Choose this setting if you have a widescreen television.
NOTE:
- Playback screen size may vary according to the discs contents.
- For discs with 4:3 contents, using any mode would only display a 4:3 screen
- Screen ratio selection should be according to the connected TV / Display aspect ratio.

text_image
-- General Setup -- TV display mode English OSD Language Français Screen Saver Deutsch Last Memory Español Italiano Português Nederlands

OSD LANGUAGE
Use navigation buttons to select the OSD Language setup icon, press [OK] button to confirm. There are few languages for your selection, press [▼/▲] buttons to toggle between different languages. Press [OK] button to confirm.
NOTE: If the selected language is not included in you DVD disc content, it will select the default language of the disc automatically. The default language setting is English

text_image
-- General Setup -- TV display mode On OSD Language Off Screen Saver Last MemorySCREEN SAVER
Enable or disable Screen Saver.
It will appear when the player stops or the picture is frozen for a few minutes. Screen saver can prevent the screen from being damaged.

text_image
-- General Setup -- TV display mode On OSD Language Off Screen Saver Last MemoryLAST MEMORY
Enable or disable Last Memory.
On - next time you start playback Last Memory resumes it from the last point and restores last used settings.
Off - automatically switches back to the default settings.
Speaker Setup Page
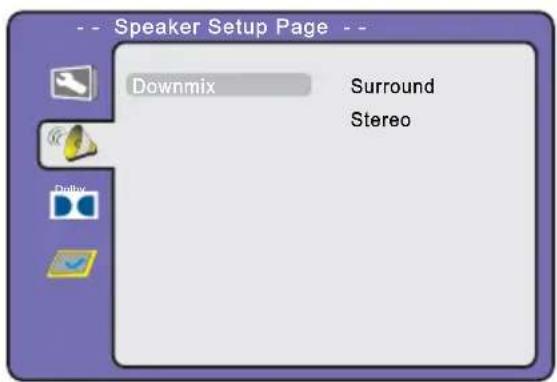
text_image
-- Speaker Setup Page -- Downmix Surround StereoDOWNMIX
Use navigation buttons to select Surround or Stereo option:
Surround - Surround mode
Stereo - Select this option if you don't have a 5.1 channels amplifier.
Digital Setup

text_image
Digital Setup Dynamic Full 3/4 1/2 1/4 OffDYNAMIC
This option is used to set the compression ratio in order to control the sound (Volume) contrast.
Preferences Page
Preferences Page only valid when you press ■ (Stop) button twice to playback and then enter setup menu.

text_image
Preferences Page TV Type PAL Language Multi Subtitles NTSC Disc Menu Lang. Parental Password DefaultTV TYPE
This menu enables you to set the picture format for your TV/DVD.
PAL - This is the format used in the EUROPE and the default setting.
Multi - The player will set the TV system according to the disc in the tray.
NTSC - This format is used by some other countries, e.g. USA
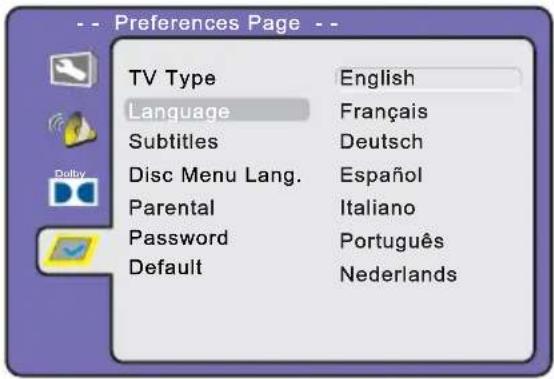
text_image
Preferences Page -- TV Type English Language Français Subtitles Deutsch Disc Menu Lang. Espanol Parental Italiano Password Português Default NederlandsLANGUAGE
Use navigation buttons to select the Language setup icon, press [OK] button to confirm. There are few languages for your selection, press [▼/▲] buttons to toggle between different languages. Press [OK] button to confirm.
NOTE: If the selected language is not included in you DVD disc content, it will select the default language of the disc automatically. The default language setting is English.
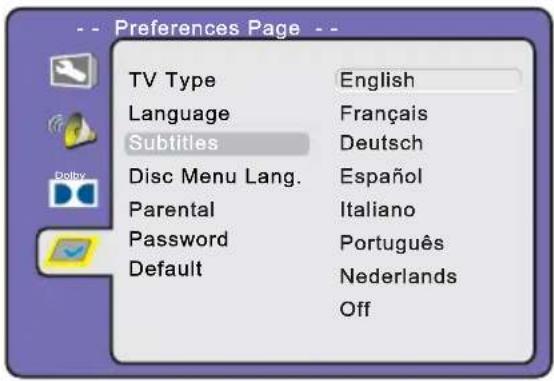
text_image
Preferences Page -- TV Type English Language Français Subtitles Deutsch Disc Menu Lang. Espanol Parental Italiano Password Português Default Nederlands OffSUBTITLES
Use navigation buttons to select the Subtitles setup icon, press [OK] button to confirm. There are few languages for your selection, press [▼/▲] buttons to toggle between different languages. Press [OK] button to confirm.
NOTE: If the selected language is not included in you DVD disc content, it will select the default language of the disc automatically. The default language setting is English.
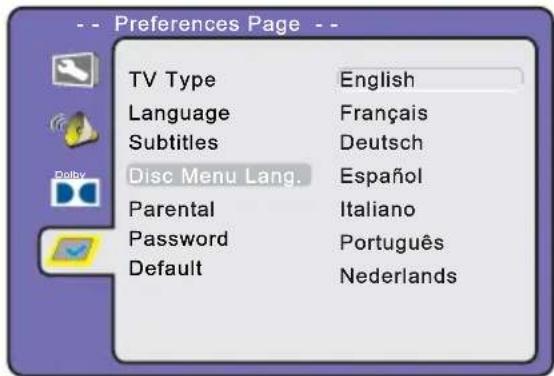
text_image
Preferences Page -- TV Type English Language Français Subtitles Deutsch Disc Menu Lang. Espanol Parental Italiano Password Português Default NederlandsDISC MENU LANGUAGE
Use navigation buttons to select the Disc Menu Language setup icon, press [OK] button to confirm. There are few languages for your selection, press [▼/▲] buttons to toggle between different languages. Press [OK] button to confirm.
NOTE: If the selected language is not included in you DVD disc content, it will select the default language of the disc automatically. The default language setting is English.

text_image
Preferences Page TV Type 1 KID Language 2 G Subtitles 3 PG Disc Menu Lang. 4 PG - 13 Parental 5 PG - R Password 6 R Default 7 NC - 17 8 ADULTPARENTAL
For some discs with rating, you can select the Parental setting, according to your preference. Rating restriction divided in eight different category from KID to ADULT.
NOTE: Only editable when password is unlocked. And only can function when password is locked. It does not, however, reset either the Password or the Rating setting.
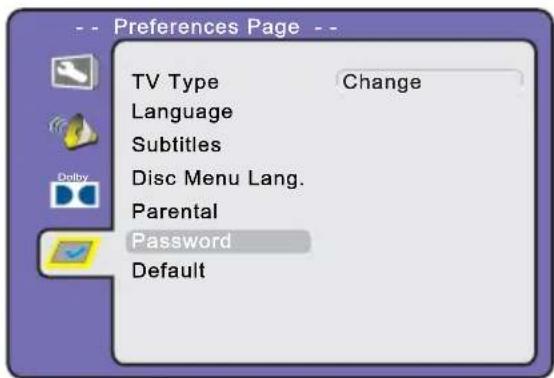
text_image
Preferences Page -- TV Type Change Language Subtitles Disc Menu Lang. Parental Password DefaultPASSWORD
The default setting is locked. No Parental selection or Password change could be done. To edit the Parental setting, please enter default password 136900 by numeric buttons, then press [OK] button to confirm.
To change password, input any 6 digit number when the lock is unlocked. Once the 6 digit number is entered, that will be your new password.

text_image
Preferences Page -- TV Type Reset Language Subtitles Disc Menu Lang. Parental Password DefaultDEFAULT
Restores factory default settings. Press [OK]/[▶] to select Default setup icon, then press [OK]/[▶] button again to reset settings.
CARE AND MAINTENANCE
Early malfunctions can be prevented. Careful and regular cleaning can extend the amount of time you will have your new TV. Be sure to turn the power off and unplug the power cord before you begin any cleaning.
Cleaning the screen
- Here's a great way to keep the dust off your screen for a while. Wet a soft cloth in a mixture of lukewarm water and a little fabric softener or dish washing detergent. Wring the cloth until it's almost dry, and then used it to wipe the screen.
- Make sure the excess water is off the screen, and then let it air-dry before you turn on your TV.
Cleaning the cabinet
To remove dirt or dust , wipe the cabinet with a soft, dry, lint-free cloth. Please be sure not to use a wet cloth.
Extended Absence

If you expect to leave your TV dormant for a long time(such as a vacation), it's a good idea to unplug the power cord to protect against possible damage from lightning or power surges.
Handing Discs
- To remove a disc from its storage case, press on the centre of the case and take the disc out.
- Hold the disc by the edges, to avoid touching the Recorded side of the disc.

natural_image
Line drawing of a hand holding a circular object with a central hole (no text or symbols)Cleaning discs
- Fingerprints and dust should be carefully wiped from the disc's surface with a soft Cloth. Audio discs and DVD discs have no grooves to collect dust and microscopic debris so gently wiping with a soft cloth should remove most particles. Wipe in a straight line from the inside to the outside of the disc. Small dust particles and light stains should have no effect on reproduction quality.
- Never use chemicals such as record sprays, antistatic sprays, Benzine, or thinners to clean the discs. These chemicals can irreparably damage the disc's surface.
- Discs should be returned to their cases after use. This avoids serious scratches that could cause the laser pickup to skip.
- Do not expose discs to direct sunlight, high humidity, or high temperature for extended periods. Exposure to high temperatures can warp the disc.
- Do not stick paper or write anything with a ball point pen on the label side of the disc.

natural_image
Illustration of a hand holding a pinwheel with a directional arrow indicating rotation (no text or symbols)Please check for causes of problems in accordance with the following chart before contacting any maintenance personnel.
DISPLAY TROUBLESHOOTING
| Symptom | Causes and Correction |
| Black screen, power indicator light off | ◆ Check whether power cord is well connected, and whether this unit is power on |
| ◆ Check whether the signal cord of input device is well connected◆ Check whether input device is power on | |
| Image display flicker, unstable | ◆ Check whether the input device signal is in this unit's specification |
| ◆ Check computer output mode: control panel-display-setup◆ If the setup does not accord with this unit's specification, please change the display setup | |
| ◆ Hor scanning frequency: 30KHz~75KHz◆ Ver scanning frequency: 50 Hz-75Hz |
SOUND AND TV TROUBLESHOOTING
| Symptom | Causes and Correction |
| Cannot power on | ◆ Please make sure the well connecting of power cord |
| No sound | ◆ Please make sure the well connecting of audio cord |
| ◆ Check volume | |
| ◆ Make sure there is nothing plugged in the headphone jack | |
| Volume too low | ◆ Check volume |
| ◆ If volume is still too low when adjusting volume to maximum, please check whether the input device is well set | |
| Snowy picture | ◆ Input antenna damaged or not well connected |
| Remote control failure | ◆ Check whether remote control battery used up◆ Whether battery installation is correct◆ Whether obstacles exists between remote control and the unit's receiving window◆ Check whether receiving window has strong light |
DVD TROUBLESHOOTING
| Symptom | Causes | Correction |
| Not play | 1. Condensation on laser head2. Disc not properly loaded3. Disc not compatible with the unit | 1. Switch on power and wait for 1 to 2 hours2. Make sure label side of the disc facing up3. Confirm whether this unit compatible with the placed disc |
| Sound distortion | 1. Too large volume of connected device2. Sound field mode not suitable for disc | 1. Adjust the device volume2. Adjust appropriate sound field |
| No sound | 1. Disc warped or dirty2. The unit in mute state | 1. Clean the disc2. Press MUTE button to cancel it. |
| No image | 1. TV not set for proper system | 1. Reset AV/TV state of TV |
| No color | 1. TV system not right2. TV color not well adjusted | 1. Try to change the color system2. Reset the TV color |
| No disc reading | 1. Disc warped or dirty2. Disc not correctly placed3. Condensation on laser head | 1. Clean the disc2. Reload a disc with label side facing up3. Witch on power, unload disc and leave it for about 1 hour |
| Temporary function failure | 1. Mal-fabricated disc used2. Wrong buttons pressed3. Static leakage into the unit from outside | 1. Wait for 5 to 10 seconds to restore to normality automatically2. Operate again3. Power off for 1 to 2 minutes to power on again |
| No subtitle | 1. No subtitle made in disc2. The unit subtitle is turned off | 1. Disc problem2. Press Subtitle button to select it |
| Image rolling | 1. System setup not suitable for disc | 1. Adjust system mode |
- If the above methods still cannot solve the problems or the troubles are special, please contact the local maintenance personnel.
| ♦ LED screen | Type | TFT color21.5"- 55 cm | |
| ♦ Frequency | Hor scanning frequencyVer scanning frequencyDisplay color | 30 KHz~80 KHz50 Hz~75 Hz16.7M color ( ) | |
| ♦ Display mode | Recommended modeMax mode | 1920 X 1080 (Full HD) | |
| Panel Life | Hours | 30 000 | |
| Input signal | Synchronous signalVideo signal | H/V separation, TTL positive/negative;H/V composite, TTL positive/negativeGreen synchronous, 0.3Vp p,negative0.7 Vp p@75ohm | |
| TV/Video | Image systemAudio systemVideo form | PAL/SECAM/NTSC(In video mode)DK/I/BG/LCVBS、RGB, YPbPr,VGA | |
| Power From | ACFrom DC (car) | ~ 100V-240V(50/60) Hz= 12V/23.6" - 2.4A | |
| Environmental factor | Working temperatureWorking humidityStoring temperatureStoring humidity | 5°C 3 °C 5 ~10 80%% ~-20°C 45°e5 95%% ~ | |
| Media play (USB) | File format | MP3, MPEG1, MPEG2, AVI, JPEG and BMP | |
| Audio parameter | Audio inputFrequency response | Φ3.5jack(L,R),0.5±0.3VrmsTV signal: 100 Hz 12 KHz(-3dB)~AV: 100 Hz~15 KHz (-3dB) | |
| DVD | Disc type | DVD VIDEOMPEG4*; SVCD**VCD1.0, 1.1, 2.0 version; CD-DA | |
| Digital TV | Digital tunerInput connectorFrequencyrange (VHF/UHF)Channel range(VHF/UHF) | DVB-C/T MPEG2, MPEG4 (H.264)IEC-Type, IEC 169-2, Female174MHz 858MHz7 & 8 Mhz | |
Hint: the items with "?" symbol are related to LED screen. Specifications and design are subject to change without notice.
* Some discs labelled with MPEG 4 on the market actually are *.rm/*.ram/*.rmm and others which are not compatible. Please take care when buying discs.
** This unit cannot play some SVCD discs with VCD format.
Because of disc quality and format difference, we cannot make sure smoothly read all discs; some functions cannot be fulfilled for the disc speciality, but not machine trouble.

Disposal of Used Electrical & Electronic Equipment
The meaning of the symbol on the product, its accessory or packaging indicates that this product shall not be treated as household waste. Please, dispose of this equipment at your applicable collection point for the recycling of electrical & electronic equipments waste. In the European Union and Other European countries which there are separate collection systems for used electrical and electronic product. By ensuring the correct disposal of this product, you will help prevent potentially hazardous to the environment and to human health, which could otherwise be caused by unsuitable waste handling of this product. The recycling of materials will help conserve natural resources. Please do not therefore dispose of your old electrical and electronic equipment with your household waste. For more detailed information about recycling of this product, please contact your local city office, your household waste disposal service or the shop where you purchased the product.

natural_image
Simple line drawing of a computer monitor with a stand and abstract lines (no text or symbols)This item incorporates copy protection technology that is protected by U.S. patents and other intellectual property rights of Rovi Corporation. Reverse engineering and disassembly are prohibited.