P-661HNU-F1 - Router ZYXEL - Free user manual and instructions
Find the device manual for free P-661HNU-F1 ZYXEL in PDF.

User questions about P-661HNU-F1 ZYXEL
0 question about this device. Answer the ones you know or ask your own.
Ask a new question about this device
Download the instructions for your Router in PDF format for free! Find your manual P-661HNU-F1 - ZYXEL and take your electronic device back in hand. On this page are published all the documents necessary for the use of your device. P-661HNU-F1 by ZYXEL.
USER MANUAL P-661HNU-F1 ZYXEL
802.11n Wireless ADSL2+ 4-port Security Gateway
Support Notes
Version3.10
Oct 2010
ZyXEL Unleash Network
FAQ....6
ZLD FAQ 6
- What is ZLD?......6
- What's Multilingual Embedded Web Configurator? 6
- How do I update the firmware and configuration file?......6
- What should I do if I forget the system password?......6
- How to use the Reset button? 6
- Is it possible to access a server running behind SUA from the outside Internet? How can I do it? 7
- Is there any troubleshooting method on ZLD platform? ...... 7
Product FAQ 8
- How can I manage P-661HNU-Fx? 8
- What is the default password for Web Configurator? 8
- What's the difference between 'Common User Account' and 'Administrator Account'? 8
- Will the device work with my Internet connection? 8
- How do I know the P-661HNU-Fx's WAN IP address assigned by the ISP?......9
- What is the micro filter or splitter used for? 9
- The P-661HNU-Fx supports Bridge and Router mode, what's the difference between them? 9
- How do I know I am using PPPoE?......9
- Why does my provider use PPPoE?......9
- What is NAT? 10
- How NAT works?......10
- What is DDNS? 11
- When do I need DDNS service? 11
- What is DDNS wildcard? Does the P-661HNU-Fx support DDNS wildcard? 12
- What is Traffic Shaping? 12
- Why do we perform traffic shaping in the P-661HNU-Fx?...... 12
- What do the parameters (PCR, SCR, MBS) mean?...... 12
- What do the ATM QoS Types (CBR, UBR, VBR-nRT, VBR-RT) mean? 13
ADSL FAQ 14
- How does ADSL compare to Cable modems? 14
- What is the expected throughput? 14
- What is the microfilter used for? 14
- How do I know the ADSL line is up? 14
-
How does the P-661HNU-Fx work on a noisy ADSL? .... 14
-
Does the VC-based multiplexing perform better than the
LLC-based multiplexing? 15
-
How do I know the details of my ADSL line statistics? ..... 15
-
What are the signaling pins of the ADSL connector?...... 15
-
What is triple play? 15
Firewall FAQ 17
General....17
-
What is a network firewall? 17
-
What makes P-661HNU-Fx secure? 17
-
What are the basic types of firewalls? 17
-
What kind of firewall is the P-661HNU-Fx? 18
-
Why do you need a firewall when your router has NAT built-in?
18
-
What is Denials of Service (DoS) attack?...... 18
-
What is Ping of Death attack? 19
-
What is Teardrop attack? 19
-
What is SYN Flood attack? 19
-
What is LAND attack? 19
11 What is Brute-force attack? 19
-
What is IP Spoofing attack? 20
-
What are the default firewall rules in P-661HNU-Fx? ...... 20
Configuration 20
-
How do I configure the firewall?......20
-
How do I prevent others from configuring my firewall? ...... 20
-
Why can't I configure my P-661HNU-Fx using Web Configurator/Telnet over WAN? 21
-
Why can't I upload the firmware and configuration file using FTP over WAN? 22
Wireless FAQ 23
General FAQ....23
-
What is a Wireless LAN? 23
-
What are the advantages of Wireless LAN? 23
-
What is the disadvantage of Wireless LAN? 23
-
Where can you find 802.11 wireless networks? ..... 24
-
What is an Access Point? 24
-
Is it possible to use wireless products from a variety of vendors? 24
-
What is Wi-Fi? 24
-
What types of devices use the 2.4GHz Band? ...... 24
-
Does the 802.11 interfere with Bluetooth device? ..... 25
-
Can radio signals pass through wall? 25
-
What are potential factors that may causes interference among WLAN products? 25
-
What's the difference between a WLAN and a WWAN? 26
-
Can I manually swap the wireless module without damage any hardware? 26
- What wireless security mode does P-661HNU-Fx support? 26
- What Wireless standard does P-661HNU-Fx support? .26
- Does P-661HNU-Fx support MAC filtering? 26
- Does P-661HNU-Fx support auto rate adaption?......26
Advanced FAQ....27
- What is Ad Hoc mode? 27
- What is Infrastructure mode? 27
- How many Access Points are required in a given area? 27
- What is Direct-Sequence Spread Spectrum Technology – (DSSS)? 27
- What is Frequency-hopping Spread Spectrum Technology – (FHSS)? 27
Security FAQ....28
- How do I secure the data across the P-661HNU-Fx Access Point's radio link? 28
- What is WEP? 28
- What is WPA-PSK? 29
- What is the difference between 40-bit and 64-bit WEP? . 29
- What is a WEP key? 29
- Will 128-bit WEP communicate with 64-bit WEP? ..... 29
- Can the SSID be encrypted? 29
- By turning off the broadcast of SSID, can someone still sniff the SSID? 29
- What are Insertion Attacks? 30
- What is Wireless Sniffer? 30
Application Notes......31
General Application Notes 31
- Internet Access Using P-661HNU-Fx under Bridge mode....31
- Internet Access Using P-661HNU-Fx under Routing mode..35
- Internet Access Using 3G Backup 37
- SUA Notes 40
- Using the Dynamic DNS (DDNS)....49
- File Sharing....50
- QoS....57
- Using syslog 60
- Using IP Multicast....61
Wireless Application Notes......62
- Configure a Wireless Client to Ad hoc mode....62
- Setup WEP (Wired Equivalent Privacy)....66
- Site Survey....70
-
WPS application 73
-
Configure 802.1x and WPA....74
- The WPS/WLAN Button 78
Support Tool 79
- Upgrading Firmware via web GUI 79
- Backing – up the Configuration 79
- Upload Configuration via web GUI 81
- Using FTP to Upload the Firmware and Configuration Files ..... 82
Using Windows command 83
FAQ
ZLD FAQ
1. What is ZLD?
ZLD is ZyXEL Linux Distribution. It is the Linux based platform abbsorted free and open source software on our routers that delivers network services and applications. It is designed in a modular fashion so it is easy for developers to add new features.
2. What's Multilingual Embedded Web Configurator?
Multilinggual Embedded Web Configurator means that it can display with 4 kinds of languanges: English, Turkish, German and French. By factory default it displays with English, and you can change it in Web GUI.
3. How do I update the firmware and configuration file?
You can do this if you access the P-661HNU-Fx as Administrator. You can upload the firmware and configuration file to Prestige from Web Configurator, or using FTP or TFTP client software. You CAN NOT upload the firmware and configuration file via Telnet because the Telnet connection will be dropped during uploading the firmware. Please do not power off the router right after the FTP or TFTP uploading is finished, the router will upload the firmware to its flash at this moment.
Note: There may be firmware that could not be upgraded from Web Configurator. In this case, ZyXEL will prepare special Upload Software for you. Please read the firmware release note carefully when you want to upload a new firmware.
4. What should I do if I forget the system password?
In case you forget the system password, you can erase the current configuration and restore factory defaults this way:
Use the RESET button on the rear panel of P-661HNU-Fx to reset the router. After the router is reset, the LAN IP address will be reset to '192.168.1.1', the common user account will be reset to 'user/1234', the Administrator account will be reset to 'admin/1234'.
5. How to use the Reset button?
a. Turn your P-661HNU-Fx on. Make sure the POWER led is on (not blinking)
b. Press the RESET button for longer than one second and shorter than five seconds and release it.
c. Press the RESET button for six seconds and then release it. If the POWER LED begins to blink, the default configuration has been restored and the P-661HNU-Fx restarts.
6. Is it possible to access a server running behind SUA from the outside Internet? How can I do it?
Yes, it is possible because P-661HNU-Fx delivers the packet to the local server by looking up to a SUA server table. Therefore, to make a local server accessible to the outside users, the port number and the inside IP address of the server must be configured. (You can configure it in Web Configurator, Advanced Setup, Network Setting -> NAT -> Port Forwarding.
7. Is there any troubleshooting method on ZLD platform?
You could mirror WAN packet to LAN host
Telnet into the device, triggle command '/var/trafficmirror.sh nas 1 192.168.1.x'
Note: It is protected by super username & password, 'root/1234' by factory default.
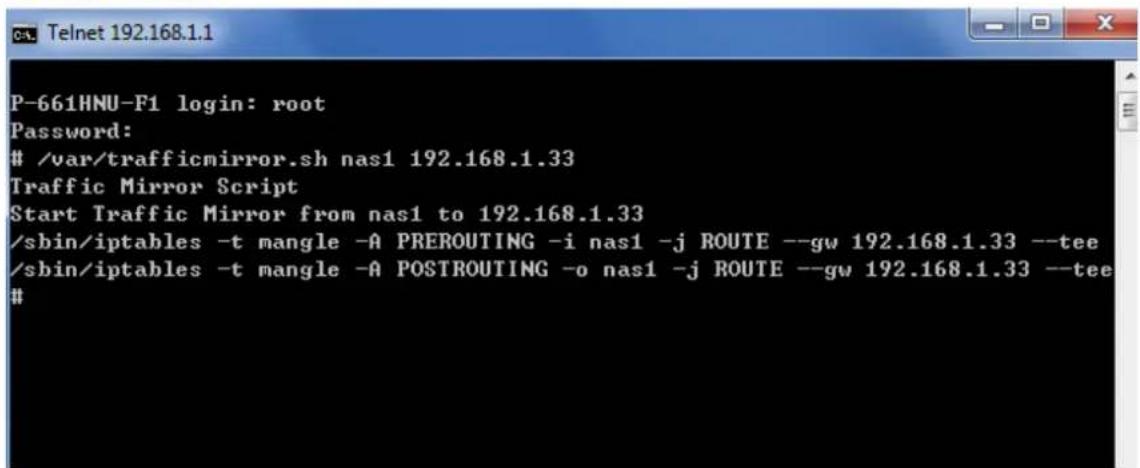
text_image
P-661HNU-F1 login: root Password:/var/trafficmirror.sh nas1 192.168.1.33
Traffic Mirror Script Start Traffic Mirror from nas1 to 192.168.1.33 /sbin/iptables -t mangle -A PREROUTING -i nas1 -j ROUTE --gw 192.168.1.33 --tee /sbin/iptables -t mangle -A POSTROUTING -o nas1 -j ROUTE --gw 192.168.1.33 --tee #Make sure your PC which is used to capture WAN packets has been set with a static ip 192.168.1.x in case the PC will be allocated another IP after DHCP lease time.
Product FAQ
1. How can I manage P-661HNU-Fx?
- Multilingual Embedded Web GUI for Local and Remote management
- Telnet support ('root/1234' Protected) for remote configuration change and status monitoring
- FTP sever, firmware upgrade and configuration backup and restore are supported('admin/1234' Protected)
2. What is the default password for Web Configurator?
There are two different accounts for P-661HNU-Fx Web Configurator:
Common User Account and Administrator Account.
By factory default the password for the two accounts are:
• Common User Account: user/1234
• Administrator Account: admin/1234.
You can change the password after you logging in the Web Configurator.
Please record your new password whenever you change it. The system will lock you out if you have forgotten your password.
3. What's the difference between 'Common User Account' and 'Administrator Account'?
For Common User Account, it can just change the password of common user but can't change the password of Administrator.
For Administrator Account, it can change both Administrator Account's password and Common User Account's password.
Moreover, to manage the P-661HNU-Fx via Telnet, you should use another account 'root/1234'.
4. Will the device work with my Internet connection?
P-661HNU-Fx is designed to be compatible with major ISPs utilize ADSL as a broadband service. P-661HNU-Fx offers Ethernet ports to connect to your computer so the device is placed in the line between the computer and your ISP. If your ISP supports PPPoE you can also use the device, because PPPoE is supported in the device.
5. How do I know the P-661HNU-Fx's WAN IP address assigned by the ISP?
You can view "- IP Address : x.x.x.x" shown in Web Configurator 'Connection Status -> System Info -> Device Information -> WAN 1 Information' to check this IP address.
6. What is the micro filter or splitter used for?
Generally, the voice band uses the lower frequency ranging from 0 to 4KHz, while ADSL data transmission uses the higher frequency. The micro filter acts as a low-pass filter for your telephone set to ensure that ADSL transmissions do not interfere with your voice transmissions. For the details about how to connect the micro filter please refer to the user's manual.
7. The P-661HNU-Fx supports Bridge and Router mode, what's the difference between them?
When the ISP limits some specific computers to access Internet, that means only the traffic to/from these computers will be forwarded and the other will be filtered. In this case, we use bridge mode which works as an ADSL modem to connect to the ISP. The ISP will generally give one Internet account and limit only one computer to access the Internet.
For most Internet users having multiple computers want to share an Internet account for Internet access, they have to add another Internet sharing device, like a router. In this case, we use the router mode which works as a general Router plus an ADSL Modem.
8. How do I know I am using PPPoE?
PPPoE requires a user account to login to the provider's server. If you need to configure a user name and password on your computer to connect to the ISP you are probably using PPPoE. If you are simply connected to the Internet when you turn on your computer, you probably are not. You can also check your ISP or the information sheet given by the ISP. Please choose PPPoE as the encapsulation type in the P-661HNU-Fx if the ISP uses PPPoE.
9. Why does my provider use PPPoE?
PPPoE emulates a familiar Dial-Up connection. It allows your ISP to provide services using their existing network configuration over the broadband connections. Besides, PPPoE supports a broad range of existing applications
and service including authentication, accounting, secure access and configuration management.
10. What is NAT?
The NAT (Network Address Translation-NAT RFC 1631) is the translation of an Internet Protocol address used within one network to a different IP address known within another network. One network is designated as the inside network and the other is the outside. Typically, one company maps its local inside network addresses to one or more global outside IP addresses and “unmaps” the global IP addresses on the incoming packets back into local IP addresses. The IP addresses for NAT can be either fixed or dynamically assigned by the ISP. In addition, you can designate servers, e.g., a Web server and a Telnet server, on your local network and make them accessible to the outside world. If you do not define any servers, the NAT offers the additional benefit of firewall protection. In such case, all incoming connections to your network will be filtered out by the CPE, thus preventing intruders from probing your network.
For more information on the IP address translation, please refer to RFC 1631, The IP Network Address Translator (NAT).
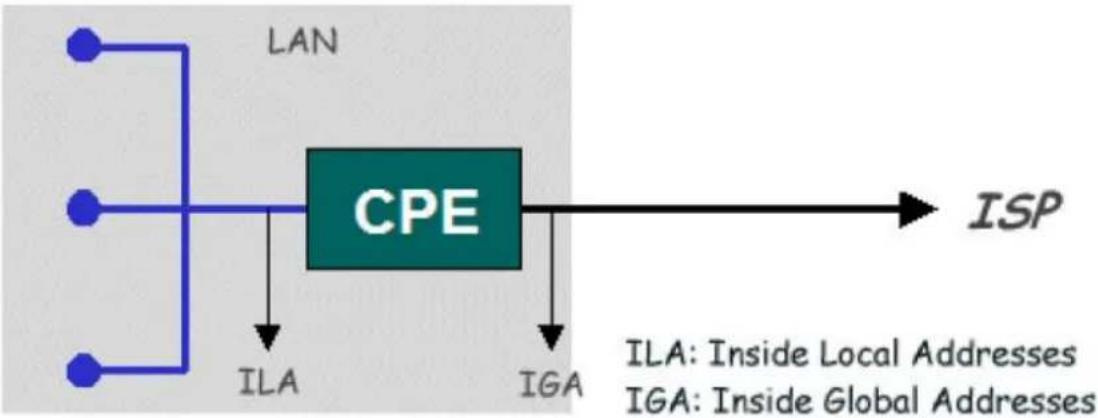
11. How NAT works?
If we define the local IP addressed as the Internal Local Addresses (ILA) and the global IP addresses as the Inside Gloable Address (IGA), see the following figure. The term ‘inside’ refers to the set of networks that are subject to translation. The NAT operates by mapping the ILA to the IGA required for communication with hosts on other networks. It replaces the original IP source address (and TCP or UDP source port numbers) and then forwards each packet to the Internet ISP, thus making them appear as if they came from the NAT system itself (e.f., the PCE router). The CPE keeps track of the original addresses and port numbers, so the incoming reply packets can have their original values restored.
flowchart
graph TD
    A["LAN"] --> B["CPE"]
    C["LAN"] --> B
    D["ILA"] --> B
    E["IGA"] --> B
    B --> F["ISP"]
    style B fill:#99ccff,stroke:#333
    note right of B: ILA: Inside Local Addresses
    note right of E: Inside Global Addresses
Figure1: Local/Global IP Addresses
12. What is DDNS?
The Dynamic DNS service allows you to alias a dynamic IP address to a static hostname, allowing your computer to be more easily accessed from various locations on the Internet. To use the service, you must first apply an account from several free Web servers such as http://www.dyndns.org/.
Without DDNS, we always tell the users to use the WAN IP of the P-661HNU-Fx to reach our internal server. It is inconvenient for the users if this IP is dynamic. With DDNS supported by the P-661HNU-Fx, you apply a DNS name (e.g., www.zyxel.com.tw) for your server (e.g., Web server) from a DDNS server. The outside users can always access the web server using the www.zyxel.com.tw regardless of the WAN IP of the P-661HNU-Fx.
When the ISP assigns the P-661HNU-Fx a new IP, the P-661HNU-Fx updates this IP to DDNS server so that the server can update its IP-to-DNS entry. Once the IP-to-DNS table in the DDNS server is updated, the DNS name for your web server (i.e., www.zyxel.com.tw) is still usable.
13. When do I need DDNS service?
When you want your internal server to be accessed by using DNS name rather than using the dynamic IP address we can use the DDNS service. The DDNS server allows to alias a dynamic IP address to a static hostname. Whenever the ISP assigns you a new IP, the P-661HNU-Fx sends this IP to the DDNS server for its updates.
14. What is DDNS wildcard? Does the P-661HNU-Fx support DDNS wildcard?
Some DDNS servers support the wildcard feature which allows the hostname, *.yourhost.dyndns.org, to be aliased to the same IP address as yourhost.dyndns.org. This feature is useful when there are multiple servers inside and you want users to be able to use things such as www.yourhost.dyndns.org and still reach your hostname.
Yes, the P-661HNU-Fx supports DDNS wildcard that http://www.dyndns.org/supports. When using wildcard, you simply enter your host.dyndns.org in the Host field in 'Network Setting -> Dynamic DNS' to configure Dynamic DNS.
15. What is Traffic Shaping?
Traffic Shaping allocates the bandwidth to WAN dynamically and aims at boosting the efficiency of the bandwidth. If there are several VCs in the P-661HNU-Fx but only one VC activated at one time, the P-661HNU-Fx allocates all the Bandwidth to the VC and the VC gets full bandwidth. If another VCs are activated later, the bandwidth is yield to other VCs after ward.
16. Why do we perform traffic shaping in the P-661HNU-Fx?
The P-661HNU-Fx must manage traffic fairly and provide bandwidth allocation for different sorts of applications, such as voice, video, and data. All applications have their own natural bit rate. Large data transactions have a fluctuating natural bit rate. The P-661HNU-Fx is able to support variable traffic among different virtual connections. Certain traffic may be discarded if the virtual connection experiences congestion. Traffic shaping defines a set of actions taken by the P-661HNU-Fx to avoid congestion; traffic shaping takes measures to adapt to unpredictable fluctuations in traffic flows and other problems among virtual connections.
17. What do the parameters (PCR, SCR, MBS) mean?
Peak Cell Rate(PCR): The maximum bandwidth allocated to this connection. The VC connection throughput is limited by PCR.
Sustainable Cell Rate(SCR): The least guaranteed bandwidth of a VC. When there are multi-VCs on the same line, the VC throughput is guaranteed by SCR.
Maximum Burst Size(MBS): The amount of cells transmitted through this VC at the Peak Cell Rate before yielding to other VCs. Total bandwidth of the line is dedicated to single VC if there is only one VC on the line. However, as the other VC asking the bandwidth, the MBS defines the maximum number of cells transmitted via this VC with Peak Cell rate before yielding to other VCs.
The P-661HNU-Fx holds the parameters for shaping the traffic among its virtual channels. If you do not need traffic shaping, please set SCR = 0, MBS = 0 and PCR as the maximum value according to the line rate (for example, 2.3 Mbps line rate will result PCR as 5424 cell/sec.)
18. What do the ATM QoS Types (CBR, UBR, VBR-nRT, VBR-RT) mean?
Constant bit rate(CBR): An ATM bandwidth-allocation service that requires the user to determine a fixed bandwidth requirement at the time the connection is set up so that the data can be sent in a steady stream. CBR service is often used when transmitting fixed-rate uncompressed video.
Unspecified bit rate(UBR): An ATM bandwidth-allocation service that does not guarantee any throughput levels and uses only available bandwidth. UBR is often used when transmitting data that can tolerate delays, such as e-mail.
Variable bit rate(VBR): An ATM bandwidth-allocation service that allows users to specify a throughput capacity (i.e., a peak rate) and a sustained rate but data is not sent evenly. You can select VBR for bursty traffic and bandwidth sharing with other applications. It contains two subclasses:
Variable bit rate nonreal time (VBR-nRT): Variable bit rate real time (VBR-RT):
ADSL FAQ
1. How does ADSL compare to Cable modems?
ADSL provides a dedicated service over a single telephone line; cable modems offer a dedicated service over a shared media. While cable modems have greater downstream bandwidth capabilities (up to 24 Mbps), that bandwidth is shared among all users on a line, and will therefore vary, perhaps dramatically, as more users in a neighborhood get online at the same time. Cable modem upstream traffic will in many cases be slower than ADSL, either because the particular cable modem is inherently slower, or because of rate reductions caused by contention for upstream bandwidth slots. The big difference between ADSL and cable modems, however, is the number of lines available to each. There are no more than 12 million homes passed today that can support two-way cable modem transmissions, and while the figure also grows steadily, it will not catch up with telephone lines for many years. Additionally, many of the older cable networks are not capable of offering a return channel; consequently, such networks will need significant upgrading before they can offer high bandwidth services.
2. What is the expected throughput?
In our test, we can get about 1.6Mbps data rate on 15Kft using the 26AWG loop. The shorter the loop, the better the throughput is.
3. What is the microfilter used for?
Generally, the voice band uses the lower frequency ranging from 0 to 4KHz, while ADSL data transmission uses the higher frequency. The micro filter acts as a low-pass filter for your telephone set to ensure that ADSL transmissions do not interfere with your voice transmissions. For the details about how to connect the micro filter please refer to the user's manual.
4. How do I know the ADSL line is up?
You can see the DSL LED Green on the P-661HNU-Fx's front panel is on when the ADSL physical layer is up.
5. How does the P-661HNU-Fx work on a noisy ADSL?
Depending on the line quality, the P-661HNU-Fx uses "Fall Back" and "Fall Forward" to automatically adjust the date rate.
6. Does the VC-based multiplexing perform better than the LLC-based multiplexing?
Though the LLC-based multiplexing can carry multiple protocols over a single VC, it requires extra header information to identify the protocol being carried on the virtual circuit (VC). The VC-based multiplexing needs a separate VC for carrying each protocol but it does not need the extra headers. Therefore, the VC-based multiplexing is more efficient.
7. How do I know the details of my ADSL line statistics?
- You can use the following CI commands to check the ADSL line statistics.
Cl>dsl_cpe_pipe.sh g997lsg 0 1 (upstream)
CI>dsl_cpe_pipe.sh g997lsg 1 1 (downstream)
- You can also do it in Web Configurator, Advanced Setup,
Maintenance -> Diagnostic -> DSL Line -> DSL Line Status:
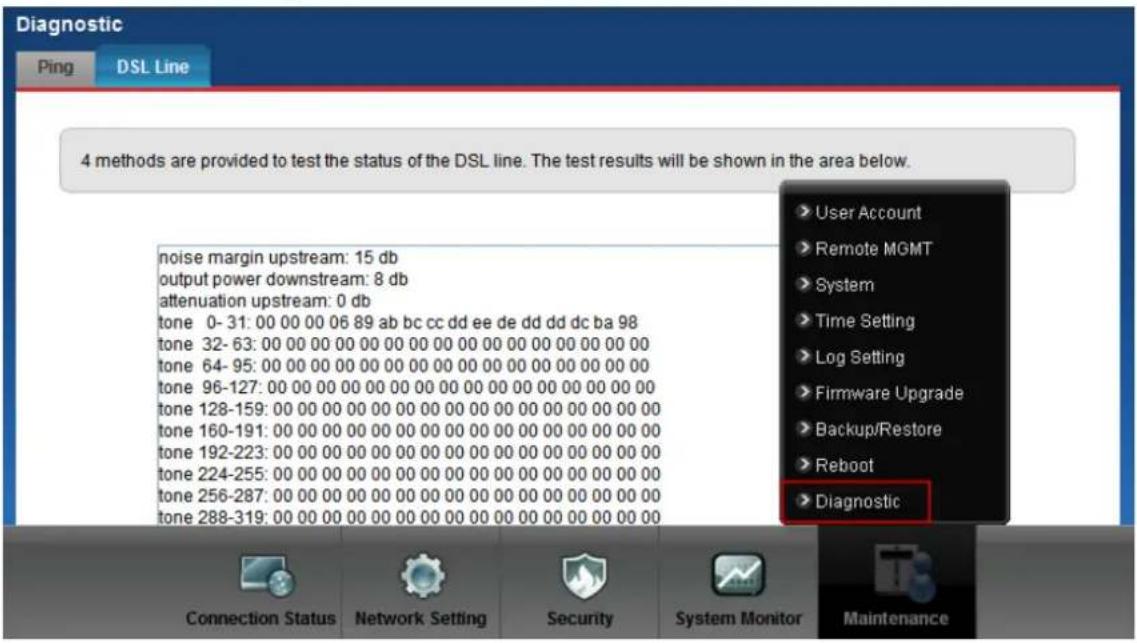
text_image
Diagnostic Ping DSL Line 4 methods are provided to test the status of the DSL line. The test results will be shown in the area below. noise margin upstream: 15 db output power downstream: 8 db attenuation upstream: 0 db tone 0-31:00 00 00 06 89 ab bc cc dd ee de dd dd dc ba 98 tone 32-63:00 00 00 00 00 00 00 00 00 00 00 00 00 00 00 tone 64-95:00 00 00 00 00 00 00 00 00 00 00 00 00 00 00 00 tone 96-127:00 00 00 00 00 00 00 00 00 00 00 00 00 00 00 00 tone 128-159:00 00 00 00 00 00 00 00 00 00 00 00 00 00 00 00 tone 160-191:00 00 00 00 00 00 00 00 00 00 00 00 00 00 00 00 tone 192-223:00 00 00 00 00 00 00 00 00 00 00 00 00 00 00 00 tone 224-255:00 00 00 00 00 00 00 00 00 00 00 00 00 00 00 00 tone 256-287: 15 dB tone 288-319:15 dB User Account Remote MGMT System Time Setting Log Setting Firmware Upgrade Backup/Restore Reboot Diagnostic Connection Status Network Setting Security System Monitor Maintenance8. What are the signaling pins of the ADSL connector?
The signaling pins on the P-661HNU-Fx's ADSL connector are pin 3 and pin 4. The middle two pins for a RJ11 cable.
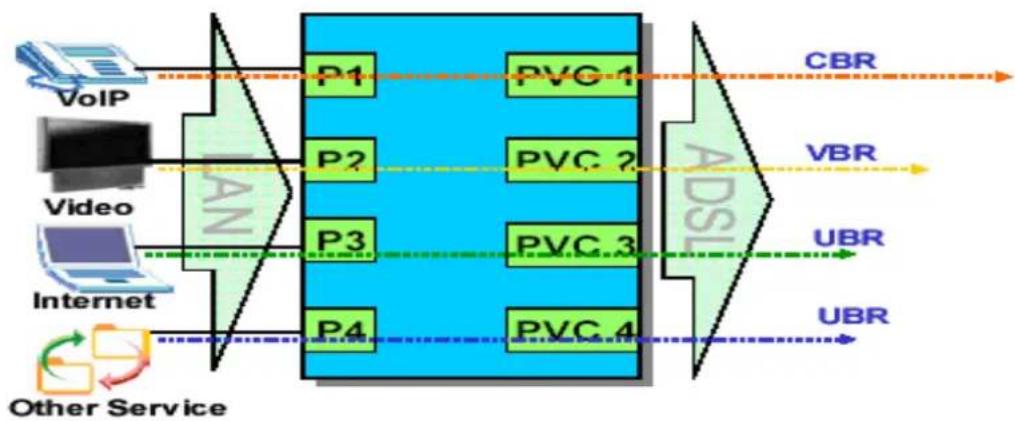
9. What is triple play?
More and more Telco/ISPs are providing three kinds of services (VoIP, Video and Internet) over one existing ADSL connection.
- The different services (such as video, VoIP and Internet access) require different Quality of Service.
• The high priority is Voice (VoIP) data.
• The Medium priority is Video (IPTV) data. - The low priority is internet access such as ftp etc ...
flowchart
graph LR
    VoIP["VoIP"] --> P1["P1"]
    VoIP --> P2["P2"]
    VoIP --> P3["P3"]
    VoIP --> P4["P4"]
    P1 --> PVC1["PVC 1"]
    P2 --> PVC2["PVC 2"]
    P3 --> PVC3["PVC 3"]
    P4 --> PVC4["PVC 4"]
    PVC1 --> ADBR["ABR"]
    PVC2 --> ADBR
    PVC3 --> ADBR
    PVC4 --> ADBR
    ADBR --> VBR["VBR"]
    VBR --> UBR["UBR"]
    UBR --> UBRb["UBR"]
    UBRb --> OtherService["Other Service"]
    OtherService --> OtherService
Triple Play is a port-based policy to forward packets from different LAN port to different PVCs, thus you can configure each PVC separately to assign different QoS to different application.
Firewall FAQ
General
1. What is a network firewall?
A firewall is a system or group of systems that enforces an access-control policy between two networks. It may also be defined as a mechanism used to protect a trusted network from an untrusted network. The firewall can be thought of two mechanisms: One to block the traffic, and the other to permit traffic.
2. What makes P-661HNU-Fx secure?
The P-661HNU-Fx is pre-configured to automatically detect and thwart Denial of Service (DoS) attacks such as Ping of Death, SYN Flood, LAND attack, IP Spoofing, etc. It also uses stateful packet inspection to determine if an inbound connection is allowed through the firewall to the private LAN. The P-661HNU-Fx supports Network Address Translation (NAT), which translates the private local addresses to one or multiple public addresses. This adds a level of security since the clients on the private LAN are invisible to the Internet.
3. What are the basic types of firewalls?
Conceptually, there are three types of firewalls:
- Packet Filtering Firewall
- Application-level Firewall
- Stateful Inspection Firewall
Packet Filtering Firewalls generally make their decisions based on the header information in individual packets. These headers information include the source, destination addresses and ports of the packets.
Application-level Firewalls generally are hosts running proxy servers, which permit no traffic directly between networks, and which perform logging and auditing of traffic passing through them. A proxy server is an application gateway or circuit-level gateway that runs on top of general operating system such as UNIX or Windows NT. It hides valuable data by requiring users to communicate with secure systems by mean of a proxy. A key drawback of this device is performance.
Stateful Inspection Firewalls restrict access by screening data packets against defined access rules. They make access control decisions based on IP address and protocol. They also 'inspect' the session data to assure the integrity of the connection and to adapt to dynamic protocols. The flexible nature of Stateful Inspection firewalls generally provides the best speed and transparency, however, they may lack the granular application level access control or caching that some proxies support.
4. What kind of firewall is the P-661HNU-Fx?
-
The P-661HNU-Fx's firewall inspects packets contents and IP headers. It is applicable to all protocols, that understands data in the packet is intended for other layers, from network layer up to the application layer.
-
The P-661HNU-Fx's firewall performs stateful inspection. It takes into account the state of connections it handles so that, for example, a legitimate incoming packet can be matched with the outbound request for that packet and allowed in. Conversely, an incoming packet masquerading as a response to a nonexistent outbound request can be blocked.
-
The P-661HNU-Fx's firewall uses session filtering, i.e., smart rules, that enhance the filtering process and control the network session rather than control individual packets in a session.
-
The P-661HNU-Fx's firewall is fast. It uses a hashing function to search the matched session cache instead of going through every individual rule for a packet.
5. Why do you need a firewall when your router has NAT built-in?
With the spectacular growth of the Internet and online access, companies that do business on the Internet face greater security threats. Although NAT restrict access to particular computers and networks, however, for the other companies this security may be insufficient, but firewall can maintain session state. Thus, for greater security, a firewall is considered.
6. What is Denials of Service (DoS) attack?
Denial of Service (DoS) attacks are aimed at devices and networks with a connection to the Internet. Their goal is not to steal information, but to disable a device or network so users no longer have access to network resources.
There are four types of DoS attacks:
-
Those that exploits bugs in a TCP/IP implementation such as Ping of Death and Teardrop.
-
Those that exploits weaknesses in the TCP/IP specification such as SYN Flood and LAND Attacks.
-
Brute-force attacks that flood a network with useless data such as Smurf attack.
-
IP Spoofing
7. What is Ping of Death attack?
Ping of Death uses a 'PING' utility to create an IP packet that exceeds the maximum 65535 bytes of data allowed by the IP specification. The oversize packet is then sent to an unsuspecting system. Systems may crash, hang, or reboot.
8. What is Teardrop attack?
Teardrop attack exploits weakness in the reassemble of the IP packet fragments. As data is transmitted through a network, IP packets are often broken up into smaller chunks. Each fragment looks like the original packet except that it contains an offset field. The Teardrop program creates a series of IP fragments with overlapping offset fields. When these fragments are reassembled at the destination, some systems will crash, hang, or reboot.
9. What is SYN Flood attack?
SYN attack floods a targeted system with a series of SYN packets. Each packet causes the targeted system to issue a SYN-ACK response, While the targeted system waits for the ACK that follows the SYN-ACK, it queues up all outstanding SYN-ACK responses on what is known as a backlog queue. SYN-ACKs are moved off the queue only when an ACK comes back or when an internal timer (which is set a relatively long intervals) terminates the TCP three-way handshake. Once the queue is full, the system will ignore all incoming SYN requests, making the system unavailable for legitimate users.
10. What is LAND attack?
In a LAN attack, hackers flood SYN packets to the network with a spoofed source IP address of the targeted system. This makes it appear as if the host computer sent the packets to itself, making the system unavailable while the target system tries to respond to itself.
11 What is Brute-force attack?
A Brute-force attack, such as 'Smurf' attack, targets a feature in the IP specification known as directed or subnet broadcasting, to quickly flood the target network with useless data. A Smurf hacker flood a destination IP
address of each packet is the broadcast address of the network, the router will broadcast the ICMP echo request packet to all hosts on the network. If there are numerous hosts, this will create a large amount of ICMP echo request packet, the resulting ICMP traffic will not only clog up the 'intermediary' network, but will also congest the network of the spoofed source IP address, known as the 'victim' network. This flood of broadcast traffic consumes all available bandwidth, making communications impossible.
12. What is IP Spoofing attack?
Many DoS attacks also use IP Spoofing as part of their attack. IP Spoofing may be used to break into systems, to hide the hacker's identity, or to magnify the effect of the DoS attack. IP Spoofing is a technique used to gain unauthorized access to computers by tricking a router or firewall into thinking that the communications are coming from within the trusted network. To engage in IP Spoofing, a hacker must modify the packet headers so that it appears that the packets originate from a trusted host and should be allowed through the router or firewall.
13. What are the default firewall rules in P-661HNU-Fx?
If you enable firewall, that means the firewall will block any unauthorized accesses to your network.
If you want to stop certain Internet services, you can enable LAN to WAN Services Blocking and add common services which are pre-configured to Blocked Services.
Configuration
1. How do I configure the firewall?
You can use the Web Configurator to configure the firewall for P-661HNU-Fx. By factory default, if you connect your PC to the LAN Interface of P-661HNU-Fx, you can access Web Configurator via 'http://192.168.1.1'.
2. How do I prevent others from configuring my firewall?
There are several ways to protect others from touching the settings of your firewall.
-
Change the default Administrator password and Common User password since it is required when setting up the firewall.
-
Enable MAC Filter, and add the MAC addresses of the LAN clients in your home or office to 'MAC Address Filter' table if you wish to allow only them to access your network. Then others can't configure your device any more.
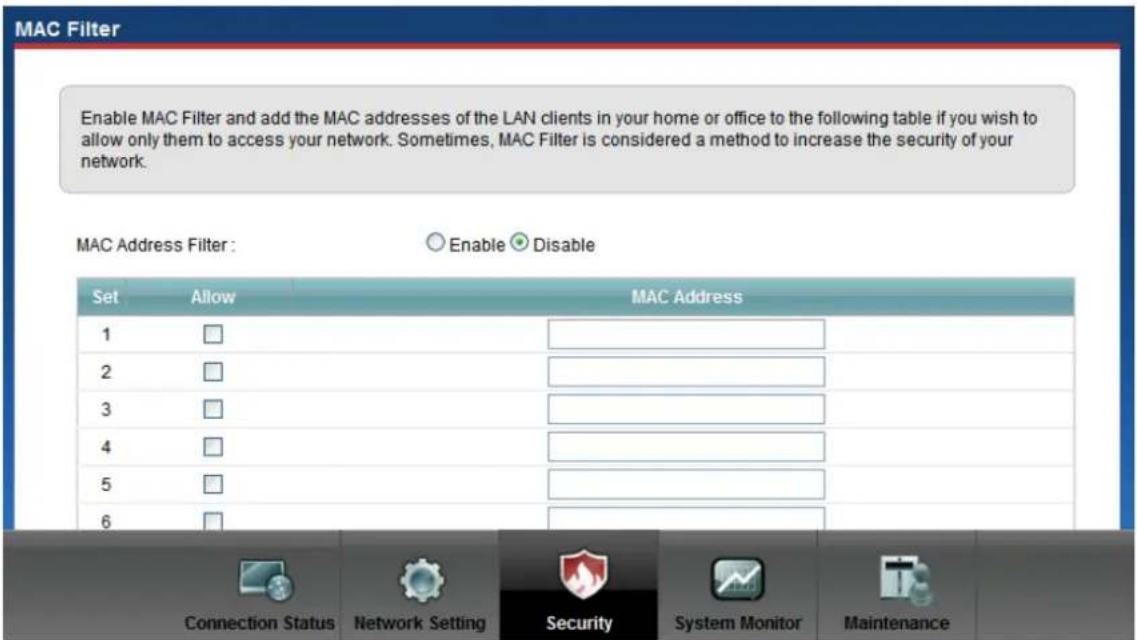
text_image
MAC Filter Enable MAC Filter and add the MAC addresses of the LAN clients in your home or office to the following table if you wish to allow only them to access your network. Sometimes, MAC Filter is considered a method to increase the security of your network. MAC Address Filter : Enable Disable Set Allow MAC Address 1 □ 2 □ 3 □ 4 □ 5 □ 6 □ Connection Status Network Setting Security System Monitor Maintenance3. Why can't I configure my P-661HNU-Fx using Web Configurator/Telnet over WAN?
There are two possible reasons that WWW/Telnet from WAN is blocked.
(1) You have disabled WWW/Telnet service in Web Configurator, Advanced setup, Maitenance -> Remote MGMT:
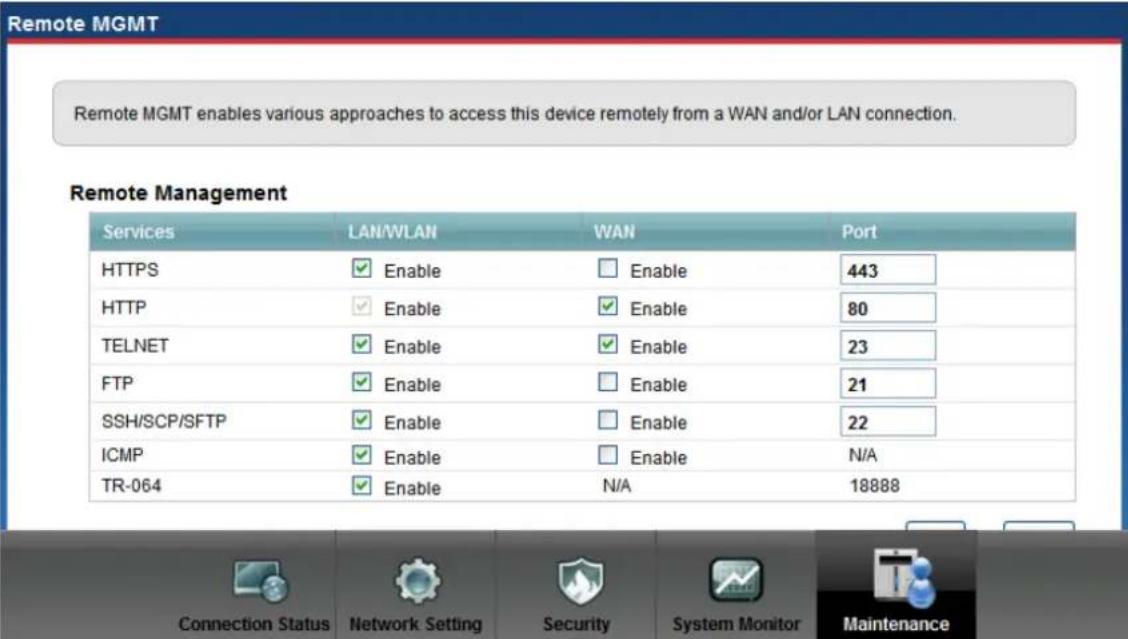
text_image
Remote MGMT Remote MGMT enables various approaches to access this device remotely from a WAN and/or LAN connection. Remote Management Services LAN/WLAN WAN Port HTTPS ✓ Enable ☐ Enable 443 HTTP ✓ Enable ✓ Enable 80 TELNET ✓ Enable ✓ Enable 23 FTP ✓ Enable ☐ Enable 21 SSH/SCP/SFTP ✓ Enable ☐ Enable 22 ICMP ✓ Enable ☐ Enable N/A TR-064 ✓ Enable N/A 18888 Connection Status Network Setting Security System Monitor Maintenance(2) A MAC filter set but your host is not in the MAC address list, Security -> MAC Filter
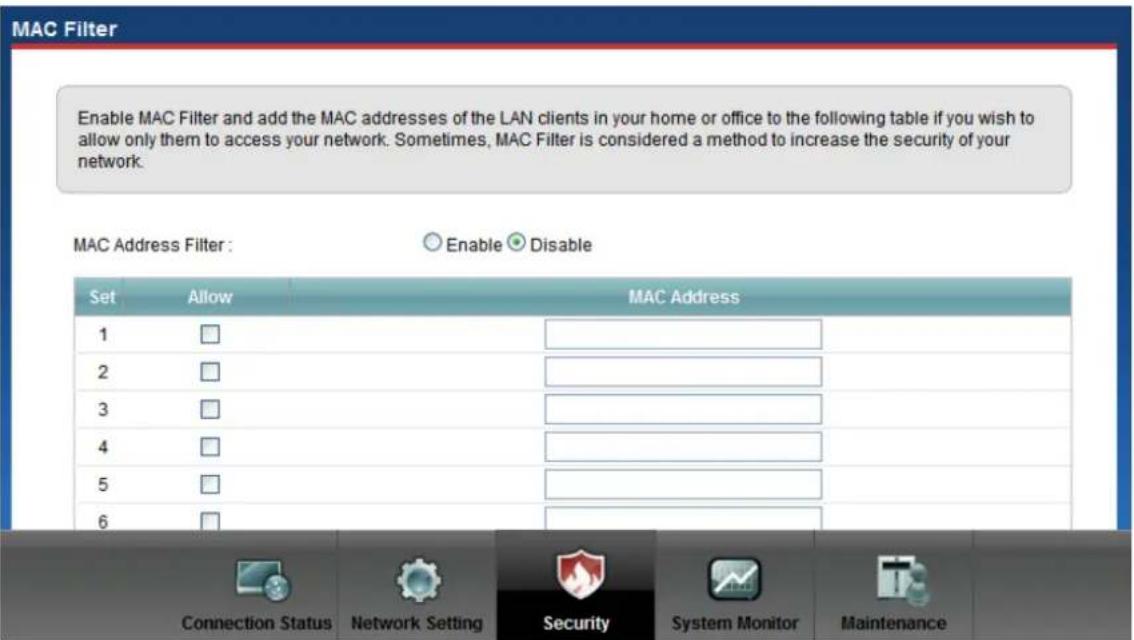
text_image
MAC Filter Enable MAC Filter and add the MAC addresses of the LAN clients in your home or office to the following table if you wish to allow only them to access your network. Sometimes, MAC Filter is considered a method to increase the security of your network. MAC Address Filter : Enable Disable Set Allow MAC Address 1 □ 2 □ 3 □ 4 □ 5 □ 6 □ Connection Status Network Setting Security System Monitor Maintenance4. Why can't I upload the firmware and configuration file using FTP over WAN?
(1) You have disabled FTP service in Web Configurator, Advanced setup, Maintenance -> Remote MGMT.
(2) A MAC filter set but your host is not in the MAC address list, Security -> MAC Filter
Wireless FAQ
General FAQ
1. What is a Wireless LAN?
Wireless LANs provide all the functionality of wired LANs, without the need for physical connections (wires). Data is modulated onto a radio frequency carrier and transmitted through the ether. Typical bit-rates are 11Mbps and 54Mbps, although in practice data throughput is half of this. Wireless LANs can be formed simply by equipping PC's with wireless NICs. If connectivity to a wired LAN is required an Access Point (AP) is used as a bridging device. AP's are typically located close to the centre of the wireless client population.
2. What are the advantages of Wireless LAN?
Mobility: Wireless LAN systems can provide LAN users with access to real-time information anywhere in their organization. This mobility supports productivity and service opportunities not possible with wired networks.
Installation Speed and Simplicity: Installing a wireless LAN system can be fast and easy and can eliminate the need to pull cable through walls and ceilings.
Installation Flexibility: Wireless technology allows the network to go where wire cannot go.
Reduced Cost-of-Ownership: While the initial investment required for wireless LAN hardware can be higher than the cost of wired LAN hardware, overall installation expenses and life-cycle costs can be significantly lower. Long-term cost benefits are greatest in dynamic environments requiring frequent moves and changes.
Scalability: Wireless LAN systems can be configured in a variety of topologies to meet the needs of specific applications and installations. Configurations are easily changed and range from peer-to-peer networks suitable for a small number of users to full infrastructure networks of thousands of users that enable roaming over a broad area.
3. What is the disadvantage of Wireless LAN?
The speed of Wireless LAN is still relatively slower than wired LAN. The setup cost of Wireless LAN is relative high because the equipment cost including access point and PCMCIA Wireless LAN card is higher than hubs and CAT 5 cables.
4. Where can you find 802.11 wireless networks?
Airports, hotels, and even coffee shops like Starbucks are deploying 802.11 networks, so people can wirelessly surf the Internet with their laptops.
5. What is an Access Point?
The AP (access point also known as a base station) is the wireless server that with an antenna and a wired Ethernet connection that broadcasts information using radio signals. AP typically acts as a bridge for the clients. It can pass information to wireless LAN cards that have been installed in computers or laptops allowing those computers to connect to the campus network and the Internet without wires.
6. Is it possible to use wireless products from a variety of vendors?
Yes. As long as the products comply to the same IEEE 802.11 standard. The Wi-Fi logo is used to define 802.11b compatible products. Wi-Fi5 is a compatibility standard for 802.11a products running in the 5GHz band.
7. What is Wi-Fi?
The Wi-Fi logo signifies that a product is interoperable with wireless networking equipment from other vendors. A Wi-Fi logo product has been tested and certified by the Wireless Ethernet Compatibility Alliance (WECA). The Socket Wireless LAN Card is Wi-Fi certified, and that means that it will work (interoperate) with any brand of Access Point that is also Wi-Fi certified.
8. What types of devices use the 2.4GHz Band?
Various spread spectrum radio communication applications use the 2.4 GHz band. This includes WLAN systems (not necessarily of the type IEEE
802.11b), cordless phones, wireless medical telemetry equipment and Bluetooth™ short-range wireless applications, which include connecting printers to computers and connecting modems or hands-free kits to mobile phones.
9. Does the 802.11 interfere with Bluetooth device?
Any time devices are operated in the same frequency band, there is the potential for interference.
Both the 802.11b/g and Bluetooth devices occupy the same2.4-to-2.483-GHz unlicensed frequency range-the same band. But a Bluetooth device would not interfere with other 802.11 devices much more than another 802.11 device would interfere. While more collisions are possible with the introduction of a Bluetooth device, they are also possible with the introduction of another 802.11 device, or a new 2.4 GHz cordless phone for that matter. But, BlueTooth devices are usually low-power, so the effects that a Bluetooth device may have on an 802.11 network, if any, aren't far-reaching.
10. Can radio signals pass through wall?
Transmitting through a wall is possible depending upon the material used in its construction. In general, metals and substances with a high water content do not allow radio waves to pass through. Metals reflect radio waves and concrete attenuates radio waves. The amount of attenuation suffered in passing through concrete will be a function of its thickness and amount of metal re-enforcement used.
11. What are potential factors that may causes interference among WLAN products?
Factors of interference:
(1) Obstacles: walls, ceilings, furniture... etc.
(2) Building Materials: metal door, aluminum studs.
(3) Electrical devices: microwaves, monitors, electric motors.
Solution:
(1) Minimizing the number of walls and ceilings
(2) Antenna is positioned for best reception
(3) Keep WLAN products away from electrical devices, eg: microwaves, monitors, electric motors,..., etc.
(4) Add additional APs if necessary.
12. What's the difference between a WLAN and a WWAN?
WLANs are generally privately owned, wireless systems that are deployed in a corporation, warehouse, hospital, or educational campus setting. Data rates are high and there are no per-packet charges for data transmission.
WWANs are generally publicly shared data networks designed to provide coverage in metropolitan areas and along traffic corridors. WWANs are owned by a service provider or carrier. Data rates are low and charges are based on usage. Specialized applications are characteristically designed around short, burst messaging.
13. Can I manually swap the wireless module without damage any hardware?
Yes, it will not harm the hardware, but the module will not be detected and work after inserting to the slot. You need to reboot the router to initialize the module.
14. What wireless security mode does P-661HNU-Fx support?
The wireless security modes supported on P-661HNU-Fx are: Static WEP, WPA-PSK, WPA, WPA2-PSK, and WPAPSKMixed.
15. What Wireless standard does P-661HNU-Fx support?
It supports IEEE 802.11b/g/n standard.
16. Does P-661HNU-Fx support MAC filtering?
Yes, it supports up to 32 MAC Address filtering.
17. Does P-661HNU-Fx support auto rate adaption?
Yes, it means that the AP on P-661HNU-Fx will automatically decelerate when devices move beyond the optimal range, or other interference is present. If the device moves back within the range of a higher-speed transmission, the connection will automatically speed up again. Rate shifting is a physical-layer mechanism transparent to the user and the upper layers of the protocol stack.
Advanced FAQ
1. What is Ad Hoc mode?
A wireless network consists of a number of stations without using an access point or any connection to a wired network.
2. What is Infrastructure mode?
Infrastructure mode implies connectivity to a wired communications infrastructure. If such connectivity is required the Access Points must be used to connect to the wired LAN backbone. Wireless clients have their configurations set for "infrastructure mode" in order to utilise access points relaying.
3. How many Access Points are required in a given area?
This depends on the surrounding terrain, the diameter of the client population, and the number of clients. If an area is large with dispersed pockets of populations then extension points can be used for extend coverage.
4. What is Direct-Sequence Spread Spectrum Technology – (DSSS)?
DSSS spreads its signal continuously over a wide frequency band. DSSS maps the information bearing bit-pattern at the sending station into a higher data rate bit sequence using a "chipping" code. The chipping code (also known as processing gain) introduces redundancy which allows data recovery if certain bit errors occur during transmission. The FCC rules the minimum processing gain should be 10, typical systems use processing gains of 20. IEEE 802.11b specifies the use of DSSS.
5. What is Frequency-hopping Spread Spectrum Technology – (FHSS)?
FHSS uses a narrowband carrier which hops through a predefined sequence of several frequencies at a specific rate. This avoids problems with fixed channel narrowband noise and simple jamming. Both transmitter and receiver must have their hopping sequences synchronized to create the effect of a single "logical channel". To an unsynchronised receiver an FHSS transmission appears to be short-duration impulse noise. 802.11 may use FHSS or DSSS.
6. Do I need the same kind of antenna on both sides of a link?
No. Provided the antenna is optimally designed for 2.4GHz or 5GHz operation. WLAN NICs often include an internal antenna which may provide sufficient reception.
7. Why the 2.4 GHZ Frequency range?
This frequency range has been set aside by the FCC, and is generally labeled the ISM band. A few years ago Apple and several other large corporations requested that the FCC allow the development of wireless networks within this frequency range. What we have today is a protocol and system that allows for unlicensed use of radios within a prescribed power level. The ISM band is populated by Industrial, Scientific and Medical devices that are all low power devices, but can interfere with each other.
8. What is Server Set ID (SSID)?
SSID is a configurable identification that allows clients to communicate to the appropriate base station. With proper configuration, only clients that are configured with the same SSID can communicate with base stations having the same SSID. SSID from a security point of view acts as a simple single shared password between base stations and clients.
9. What is an ESSID?
ESSID stands for Extended Service Set Identifier and identifies the wireless LAN. The ESSID of the mobile device must match the ESSID of the AP to communicate with the AP. The ESSID is a 32-character maximum string and is case-sensitive.
Security FAQ
1. How do I secure the data across the P-661HNU-Fx Access Point's radio link?
To secure the date across the P-661HNU-Fx Access Point's radio link, we could select any one of the security mode: Static 64/128 bit WEP, WPA-PSK, WPA, WPA2-PSK, WPA2.
2. What is WEP?
Wired Equivalent Privacy. WEP is a security mechanism defined within the 802.11 standard and designed to make the security of the wireless medium
equal to that of a cable (wire). WEP data encryption was designed to prevent access to the network by "intruders" and to prevent the capture of wireless LAN traffic through eavesdropping. WEP allows the administrator to define a set of respective "Keys" for each wireless network user based on a "Key String" passed through the WEP encryption algorithm. Access is denied by anyone who does not have an assigned key. Note, WEP has shown to have fundamental flaws in its key generation processing.
3. What is WPA-PSK?
WPA-PSK (Wi-Fi Protected Access Pre-Shared Key) can be used if user do not have a Radius server but still want to benefit from it. Because WPA-PSK only requires a single password to be entered on wireless AP/gateway and wireless client. As long as the passwords match, a client will be granted access to the WLAN.
4. What is the difference between 40-bit and 64-bit WEP?
40 bit WEP and 64 bit WEP are the same encryption level and can interoperate. The lower level of WEP encryption uses a 40 bit (10 Hex character) as "secret key" (set by user), and a 24 bit "Initialization Vector" (not under user control) (40+24=64). Some vendors refer to this level of WEP as 40 bit, others as 64 bit.
5. What is a WEP key?
A WEP key is a user defined string of characters used to encrypt and decrypt data.
6. Will 128-bit WEP communicate with 64-bit WEP?
No. 128-bit WEP will not communicate with 64-bit WEP. Although 128 bit WEP also uses a 24 bit Initialization Vector, but it uses a 104 bit as secret key. Users need to use the same encryption level in order to make a connection.
7. Can the SSID be encrypted?
No, WEP only encrypts the data packets not the 802.11n management packets. The SSID is in the beacon and probe management messages and SSID goes over the air in clear text. This makes obtaining the SSID easy by sniffing 802.11n wireless traffic.
8. By turning off the broadcast of SSID, can someone still sniff the SSID?
Many APs by default have broadcasting the SSID turned on. Sniffers typically will find the SSID in the broadcast beacon packets. Turning off the broadcast of SSID in the beacon message (a common practice) does not prevent getting the SSID; since the SSID is sent in the clear in the probe message when a client associates to an AP, a sniffer just has to wait for a valid user to associate to the network to see the SSID.
9. What are Insertion Attacks?
The insertion attacks are based on placing unauthorized devices on the wireless network without going through a security process and review.
10. What is Wireless Sniffer?
An attacker can sniff and capture legitimate traffic. Many of the sniffer tools for Ethernet are based on capturing the first part of the connection session, where the data would typically include the username and password. An intruder can masquerade as that user by using this captured information. An intruder who monitors the wireless network can apply this same attack principle on the wireless.
Application Notes
General Application Notes
1. Internet Access Using P-661HNU-Fx under Bridge mode
- Setup your workstation
• Setup your P-661HNU-Fx under bridge mode
If the ISP limits some specific computers to access Internet, that means only the traffic to/from these computers will be forwarded and the other will be filtered. In this case, we use P-661HNU-Fx which works as an ADSL bridge modem to connect to the ISP. The ISP will generally give one Internet account and limit only one computer to access the Internet.
Set up your workstation
(1) Ethernet connection
To connect your computer to the P-661HNU-Fx's LAN port, the computer must have an Ethernet adapter card installed. For connecting a single computer to the P-661HNU-Fx, we use a Ethernet cable.
(2) TCP/IP configuration
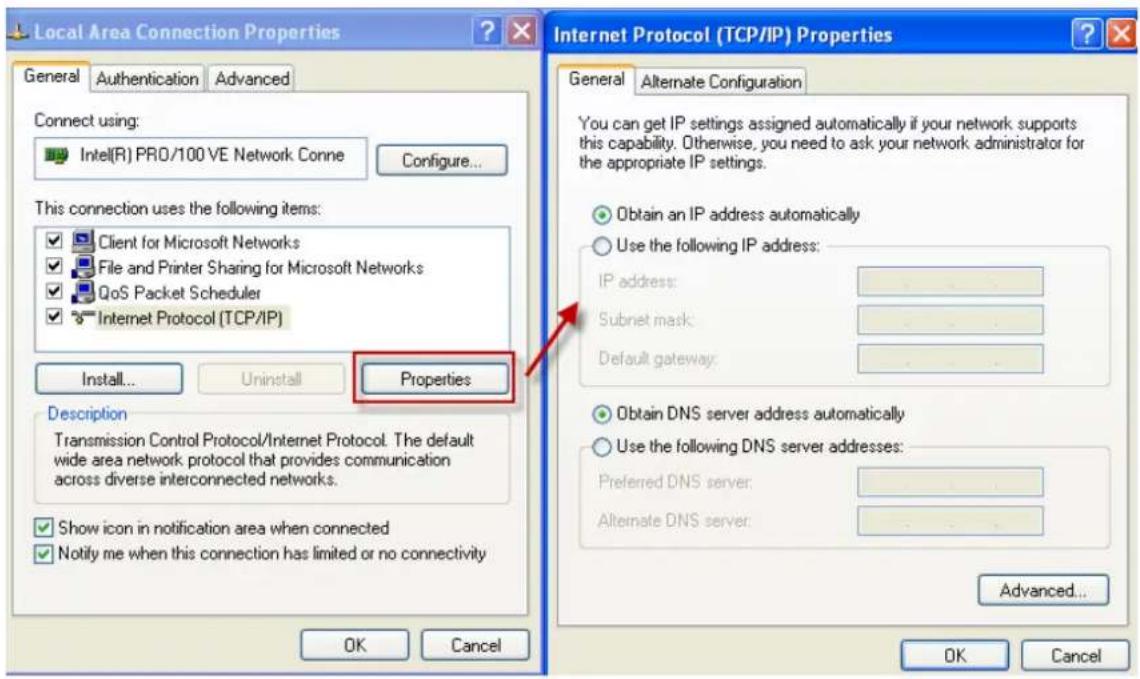
In most cases, the IP address of the computer is assigned by the ISP dynamically so you have to configure the computer as a DHCP client which obtains the IP from the ISP using DHCP protocol. The ISP may also provide the gateway, DNS via DHCP if they are available. Otherwise, please enter the static IP addresses for all that the ISP gives to you in the network TCP/IP settings. For Windows, we check the option 'Obtain an IP address automatically' in its TCP/IP setup, please see the example shown below.

text_image
Local Area Connection Properties General Authentication Advanced Connect using: Intel(R) PRO/100 VE Network Conne Configure... This connection uses the following items: Client for Microsoft Networks File and Printer Sharing for Microsoft Networks QoS Packet Scheduler Internet Protocol (TCP/IP) Install... Uninstall Properties Description Transmission Control Protocol/Internet Protocol. The default wide area network protocol that provides communication across diverse interconnected networks. Show icon in notification area when connected Notify me when this connection has limited or no connectivity Internet Protocol (TCP/IP) Properties General Alternate Configuration You can get IP settings assigned automatically if your network supports this capability. Otherwise, you need to ask your network administrator for the appropriate IP settings. Obtain an IP address automatically Use the following IP address: IP address: Subnet mask: Default gateway: Obtain DNS server address automatically Use the following DNS server addresses: Preferred DNS server: Alternate DNS server: Advanced... OK Cancel OK CancelSetup your P-661HNU-Fx under bridge mode
The following procedure shows you how to configure your P-661HNU-Fx as bridge mode. We will use Web Configurator to guide you through the related menu.
1. Retrieve Prestige Web
Please enter the LAN IP address of the Prestige router in the URL location to retrieve the web screen from the Prestige. The default LAN IP of the Prestige is 192.168.1.1. See the example below. Note that you can either use http://192.168.1.1

text_image
ZyXEL Welcome Welcome to P-661HNU-F1 configuration interface. Please enter username and password to login. Username: Password: ...... Login2. Login first
The default password is the default SMT password, '1234'.
(1) Configure P-661HNU-Fx as bridge mode and configure Internet setup parameters in Web Configurator, Advanced Setup, Network Setting->Broadband.
Click 'Add new WAN Interface'

text_image
Broadband Broadband 3G Backup You can configure the Internet settings of this device. Correct configurations build successful Internet connection. Add new WAN Interface Internet SetupName Type Mode Enca... VPI VCI Vlan... Vlan... ATM ... IGMP... NAT Defa... Modify
1 ADSL... ADSL Routi... IPoE 0 33 N/A N/A UBR Enabl... Enabl... Yes Connection Status Network Setting Security System Monitor MaintenanceConfigure Internet Setup

text_image
Add New WAN Interface General Name : BridgeWAN Type : ADSL Mode : Bridge Bridge Group Select LAN/WLAN port(s) you wish to together with this WAN interface Available LAN/WLAN Port(s) Bonded LAN/WLAN Port(s) LAN1 Add >> LAN2 LAN3 LAN4 Remove << ZyXEL_05
text_image
Add New WAN Interface Select LAN/WLAN port(s) you wish to together with this WAN interface Available LAN/WLAN Port(s) LAN1 LAN2 LAN3 LAN4 Zy0XEL_05 Add >> Remove << Bridged LAN/WLAN Port(s) ATM PVC Configuration VPN[0-255] : 8 VCI[32-65535] : 34 Encapsulation Mode : LLC/SNAP-BRIDGING Service Category : UBR Without PCR Apply BackKey Settings:
| Option | Description |
| Encapsulation Mode | Select the correct Encapsulation type that your ISP supports. For example, LLC/SNAP-BRIDGING. |
| VPI & VCI | Specify a VPI (Virtual Path Identifier) and a VCI (Virtual Channel |
number Identifier) given to you by your ISP.
(2) Turn off DHCP Server and configure a LAN IP for the P-661HNU-Fx in Web Configurator, Advanced Setup, Network Setting -> Home Networking -> LAN Setup. We use 192.168.1.1 as the LAN IP for P-661HNU-Fx in this case:
Step 1: Disactive DHCP Server and apply it:
Step 2: Assign an IP to the LAN Interface of P-661HNU-Fx, e.g.: 192.168.1.1:
2. Internet Access Using P-661HNU-Fx under Routing mode
For most Internet users having multiple computers want to share an Internet account for Internet access, they have to install an Internet sharing device, like a router. In this case, we use the P-661HNU-Fx which works as a general Router plus an ADSL Modem.
Set up your workstation
(1) Ethernet connection
Connect the LAN ports of all computers to the LAN Interface of P-661HNU-Fx using Ethernet cable.
(2) TCP/IP configuration
Since the P-661HNU-Fx is set to DHCP server as default, so you need only to configure the workstations as the DHCP clients in the networking settings. In this case, the IP address of the computer is assigned by the P-661HNU-Fx. The P-661HNU-Fx can also provide the DNS to the clients via DHCP if it is available. For this setup in Windows, we check the option 'Obtain an IP address automatically' in its TCP/IP setup. Please see the example shown below.
text_image
Local Area Connection Properties General Authentication Advanced Connect using: Intel(R) PRO/100 VE Network Conne Configure... This connection uses the following items: Client for Microsoft Networks File and Printer Sharing for Microsoft Networks QoS Packet Scheduler Internet Protocol (TCP/IP) Install... Uninstall Properties Description Transmission Control Protocol/Internet Protocol. The default wide area network protocol that provides communication across diverse interconnected networks. Show icon in notification area when connected Notify me when this connection has limited or no connectivity Internet Protocol (TCP/IP) Properties General Alternate Configuration You can get IP settings assigned automatically if your network supports this capability. Otherwise, you need to ask your network administrator for the appropriate IP settings. Obtain an IP address automatically Use the following IP address: IP address: Subnet mask: Default gateway: Obtain DNS server address automatically Use the following DNS server addresses: Preferred DNS server: Alternate DNS server: Advanced... OK Cancel OK CancelSet up your P-661HNU-Fx under routing mode
The following procedure shows you how to configure your P-661HNU-Fx as Routing mode for routing traffic. We will use Web Configurator to guide you through the related menu.
(1) Configure P-661HNU-Fx as routing mode and configure Internet setup parameters in Web Configurator, Advanced Setup, Network Setting->Boradband.
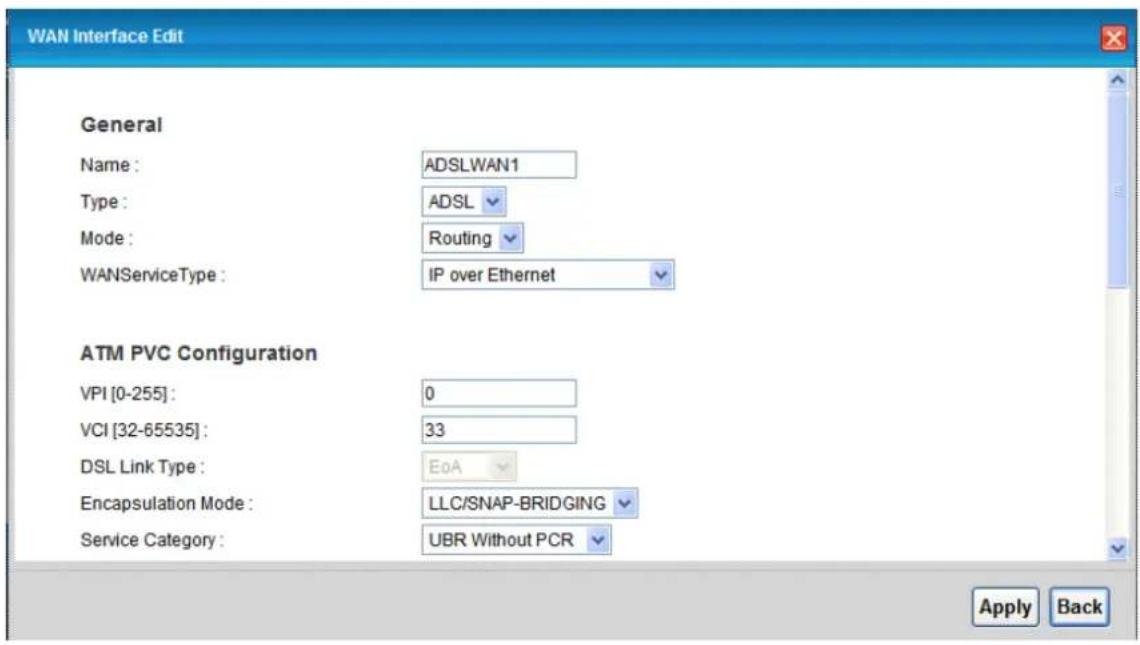
text_image
WAN Interface Edit General Name : ADSLWAN1 Type : ADSL Mode : Routing WANServiceType : IP over Ethernet ATM PVC Configuration VPI [0-255] : 0 VCI [32-65535] : 33 DSL Link Type : EoA Encapsulation Mode : LLC/SNAP-BRIDGING Service Category : UBR Without PCR Apply BackKey Settings:
| Option | Description |
| WANServiceType | Select the correct Encapsulation type that your ISP supports. For example, IP over Ethernet. |
| Encapsulation Mode | Select the correct Multiplexing type that your ISP supports. For example, LLC/SNAP-BRIDGING. |
| VPI & VCI number | Specify a VPI (Virtual Path Identifier) and a VCI (Virtual Channel Identifier) given to you by your ISP. |
| IP Address | Set to Obtain an IP Adress Automatically if the ISP provides the IP for the P-661HNU-Fx dynamically. Otherwise, set to Static IP Adress and enter the IP in the IP Address field. |
(2) Configure a LAN IP for the P-661HNU-Fx and the DHCP settings in Web Configurator, Advanced Setup, Network Setting-> Home Networking -> LAN Setup.
3. Internet Access Using 3G Backup
The USB port allows you to wirelessly connect to a 3G network to get Internet access by attaching a 3G wireless dongle. P-661HNU-Fx switches to the 3Gwireless WAN connection if the wired DSL connection falls. And it can automatically change back to the wired DSL connection when it is available.
Currently, the 3G cards you can use in the ZyXEL Device are Huawei E220 and E270.

flowchart
graph TD
    A["Computer"] -->|LAN| B["DSL"]
    B -->|Wireless Signal| C["3G"]
    C --> D["INTERNET"]
    D -->|Data Flow| E["DSL"]
    E -->|Wireless Signal| B
    style A fill:#f9f,stroke:#333
    style B fill:#ccf,stroke:#333
    style C fill:#cfc,stroke:#333
    style D fill:#fcc,stroke:#333
    style E fill:#cff,stroke:#333
Configuration:

text_image
ZyXEL P-661HNU-F1 Language : English E Logout Broadband Broadband 3G Backup Whenever the WAN connection is down, 3G Backup takes over the job and keeps you online. It is valid when a 3G USB dongle is attached to the device and proper settings are configured. You may consult your 3G service provider for the following settings. 3G Backup Enable 3G Backup Card Description : N/A Username : (Optional) Password : (Optional) PIN : (Optional) Only for unlock PIN next time (PIN remaining authentication times: N/A) Dial String : Connection Status Network Setting Security System Monitor Maintenance ZyXEL P-661HNU-F1 Language : English E Logout Connection : Nailed UP Obtion an IP Address Automatically Use the following static IP address Obtain DNS info dynamically Use the following static DNS IP address Primary DNS Server : Secondary DNS Server : Apply Cancel Connection Status Network Setting Security System Monitor MaintenanceThe following table describes the labels in this screen.
| Option | Description |
| 3G Backup | Select this option to have the ZyXEL Device use 3G connection as your WAN or a backup when the wired WAN connection fails. |
| Card Description | This field displays the manufacturer and model name of your 3G card if you inserted one in the ZyXEL Device. Otherwise, it displays N/A. |
| Username | Type the user name (of up to 70 ASCII Printable characters) given to you by your service provider. |
| Password | Type the password (of up to 70 ASCII Printable characters) associated with the user name above. |
| PIN | A PIN (Personal Identification Number) code is a key to a 3G card. Without the PIN code, you cannot use the 3G card.If your ISP enabled PIN code authentication, enter the 4-digit PIN code (0000 for example) provided by your ISP. If you enter the PIN code incorrectly, the 3G card may be blocked by your ISP and you cannot use the account to access the Internet.If your ISP disabled PIN code authentication, leave this field blank. |
| Dial String | Enter the pnhone number (dial string) used to dial up a connection to your service provider's base station. Your ISP should provide the phone number.For example, *99# is the dial string to establish a GPRS or 3G connection in Taiwan. |
| APN Code | Enter the APN (Access Point Name) provided by your service provider. Connections with different APNs may provide different services (such as Internet access or MMS (Multi-Media Messaging Service)) and charge method.You can enter up to 31 ASCII printable characters. Spaces are allowed. |
| Connection | Select Nailed-UP if you do not want the connection to time out.Select On-Demand if you do not want the connection up all the time and apecify an idle time-out in the Max Idle Timeout field. |
| Obtain an IP Address Automatically | Select this option If your ISP did not assige you a fixed IP address. |
| Use the following static IP address | Select this option If the ISP assigned a fixed IP address. |
| IP Address | Enter your WAN IP address in this field if you selected Use the following static IP address. |
| Obtain DNS info dynamically | Select this to have the ZyXEL Device get the DNS server addresses from the ISP automatically |
| Use the following static DNS IP address | Select this to have the ZyXEL Device use the DNS server addresses you configure manually. |
| Primary DNS server | Enter the first DNS server address assigned by the ISP. |
| Secondary DNS server | Enter the second DNS server address assigned by the ISP. |
| Apply | Click Apply to save your changes back to the ZyXEL Device. |
| Cancel | Click Cancel to return to the previous configuration. |
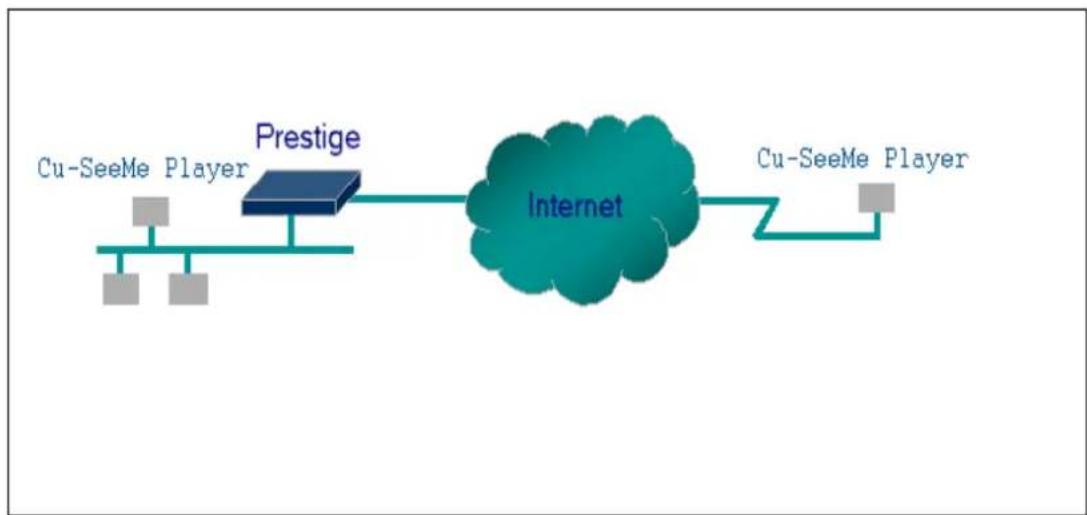
4. SUA Notes
Tested SUA/NAT Applications (e.g., Cu-SeeMe, ICQ, NetMeeting)
flowchart
graph LR
    A["Cu-SeeMe Player"] --> B["Prestige"]
    B --> C["Internet"]
    C --> D["Cu-SeeMe Player"]
Introduction
Generally, SUA makes your LAN appear as a single machine to the outside world. LAN users are invisible to outside users. However, some applications such as Cu-SeeMe, and ICQ will need to connect to the local user behind the P-661HNU-Fx. In such case, a SUA server must be configured to forward the incoming packets to the true destination behind SUA. After the required server are configured in Web Configurator, Advanced Setup, Network Setting->NAT -> Port Forwarding, the internal server or client applications can be accessed by using the P-661HNU-Fx's WAN IP Address.
SUA Supporting Table
The following are the required Web Configurator, Advanced Setup, Network Setting -> NAT -> Port Forwarding for the various applications running SUA mode.
ZyXEL SUA Supporting Table ^1
| Application | Required Settings in Port Forwarding Port/IP | |
| Outgoing Connection | Incoming Connection | |
| WWW | None | 80/client IP |
| FTP | None | 21/client IP |
| TELNET | None | 23/client IP(and active Telnet service from WAN) |
| POP3 | None | 110/client IP |
| SMTP | None | 25/client IP |
| mIRC | None for Chat.For DCC, please setDefault/Client IP | . |
| Windows PPTP | None | 1723/client IP |
| ICQ 99a | None for Chat.For DCC, please set:ICQ -> preference ->connections -> firewalland set the firewall timeout to 80 seconds infirewall setting. | Default/client IP |
| ICQ 2000b | None for Chat | None for Chat |
| ICQ Phone 2000b | None | 6701/client IP |
| Cornell 1.1 Cu-SeeMe | None | 7648/client IP |
| White Pine 3.1.2 Cu-SeeMe ^2 | 7648/client IP &24032/client IP | Default/client IP |
| White Pine 4.0 Cu-SeeMe | 7648/client IP &24032/client IP | Default/client IP |
| Microsoft NetMeeting 2.1 &3.01 ^3 | None | 1720/client IP1503/client IP |
| Cisco IP/TV 2.0.0 | None | . |
| RealPlayer G2 | None | . |
| VDOLive | None | . |
| Quake1.06 ^4 | None | Default/client IP |
| QuakeII2.30 ^5 | None | Default/client IP |
| QuakeIII1.05 beta | None | . |
| StartCraft. | 6112/client IP | . |
| Quick Time 4.0 | None | . |
| pcAnywhere 8.0 | None | 5631/client IP5632/client IP22/client IP |
| IPsec (ESP tunneling mode) | None (one client only) | Default/Client |
| Microsoft Messenger Service 3.0 | 6901/client IP | 6901/client IP |
| Microsoft Messenger Service 4.6/ 4.7/ 5.0/⋯ (none UPnP)6 | None for Chat, File transfer ,Video and Voice | None for Chat, File transfer, Video and Voice |
| Net2Phone | None | 6701/client IP |
| Network Time Protocol (NTP) | None | 123 /server IP |
| Win2k Terminal Server | None | 3389/server IP |
| Remote Anything | None | 3996 - 4000/client IP |
| Virtual Network Computing (VNC) | None | 5500/client IP5800/client IP5900/client IP |
| AIM (AOL Instant Messenger) | None for Chat and IM | None for Chat and IM |
| e-Donkey | None | 4661 - 4662/client IP |
| POLYCOM Video Conferencing | None | Default/client IP |
| iVISTA 4.1 | None | 80/server IP |
| Microsoft Xbox Live7 | None | N/A |
^1 Since SUA enables your LAN to appear as a single computer to the Internet, it is not possible to configure similar servers on the same LAN behind SUA.
^2 Because White Pine Cu-SeeMe uses dedicate ports (port 7648 & port 24032) to transmit and receive data, therefore only one local Cu-SeeMe is allowed within the same LAN.
^3 In SUA mode, only one local NetMeeting user is allowed because the outsiders can not distinguish between local users using the same internet IP.
^4 Certain Quake servers do not allow multiple users to login using the same unique IP, so only one Quake user will be allowed in this case. Moreover, when a Quake server is configured behind SUA, P-661HNU-Fx will not be able to provide information of that server on the internet.
^5 Quake II has the same limitations as that of Quake I.
^6 P-661HNU-Fx supports MSN Messenger 4.6/ 4.7/ 5.0/ ·s video/ voice pass-through NAT. In addition, for the Windows OS supported UPnP (Universal Plug and Play), such as Windows XP and Windows ME, UPnP supported in P-661HNU-Fx is an alternative solution to pass through MSN Messenger video/ voice traffic. For more detail, please refer to UPnP application note.
^7 P-661HNU-Fx support Microsoft Xbox Live with factory default configuration.
Configurations
Configure an Internal Server behind SUA

flowchart
graph LR
    A["Web Server"] --> B["Prestige"]
    B --> C["Internet"]
    C --> D["Remote client"]
Introduction
If you wish, you can make internal servers (e.g., Web, ftp or mail server) accessible for outside users, even though SUA makes your LAN appear as a single machine to the outside world. A service is identified by the port number. Also, since you need to specify the IP address of a server behind the P-661HNU-Fx, a server must have a fixed IP address and not be a DHCP client whose IP address potentially changes each time P-661HNU-Fx is powered on.
In addition to the servers for specific services, SUA supports a default server. A service request that does not have a server explicitly designated for is forwarded to the default server. If the default server is not defined, the service request is simply discarded.
Configuration
To make a server visible to the outside world, specify the port number of the service and the inside address of the server in Web Configurator, Advanced Setup, Network Setting -> NAT -> Port Forwarding. The outside users can access the local server using the P-661HNU-Fx's WAN IP address which can be obtained from Web Configurator, Connection Status -> System Info -> WAN Information.
For example:
Configuring an internal Web server for outside access (suppose the Server IP Address is 192.168.1.10):
(1) Fill in the service name and server IP Address, press button 'Add new rule'
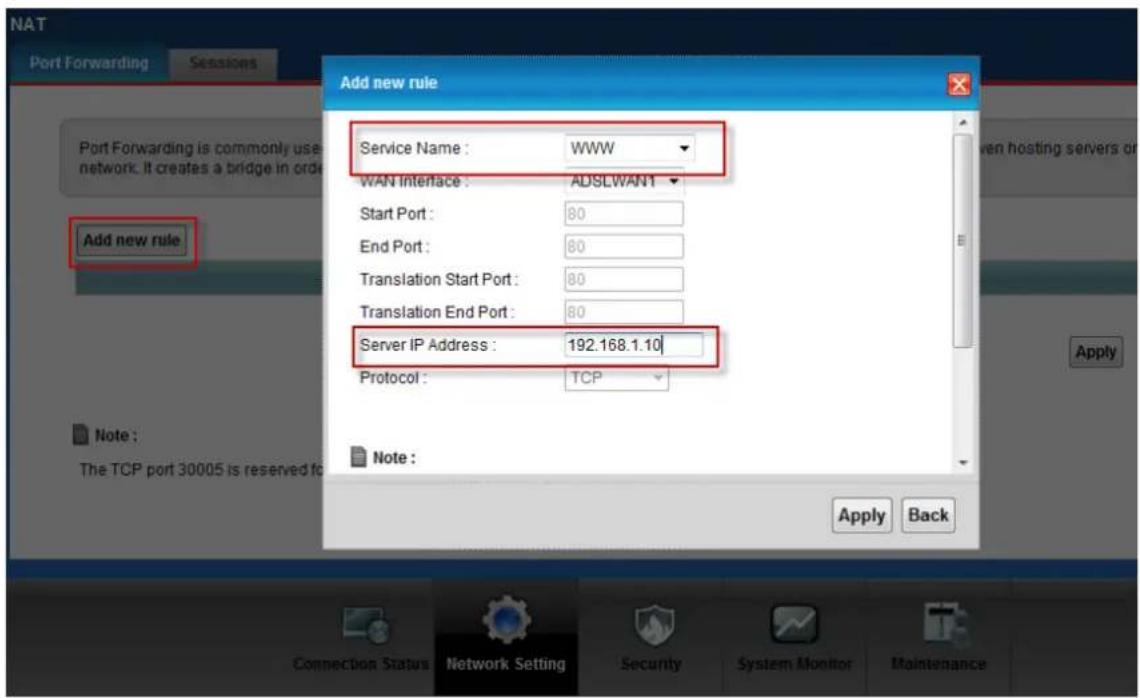
text_image
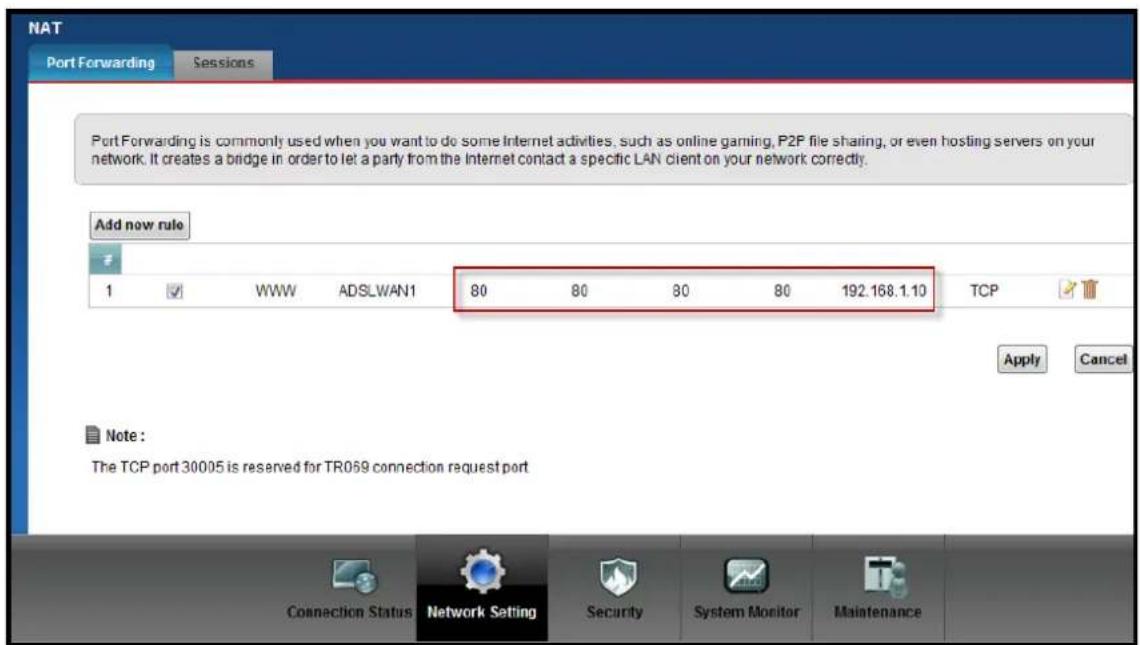
NAT Port Forwarding Sessions Add new rule Service Name : WWW WAN Interface : ADSLWAN1 Start Port : 80 End Port : 80 Translation Start Port : 80 Translation End Port : 80 Server IP Address : 192.168.1.10 Protocol : TCP Note : The TCP port 30005 is reserved to Apply Back Connection Status Network Setting Security System Monitor Maintenance(2) If add successfully, the Web Configurator will display message 'Configuration updated successfully' at the bottom. You can see the port forwarding rule on the same page, the default port for Web Server is 80:
text_image
NAT Port Forwarding Sessions Port Forwarding is commonly used when you want to do some Internet activities, such as online gaming, P2P file sharing, or even hosting servers on your network. It creates a bridge in order to let a party from the Internet contact a specific LAN client on your network correctly. Add now rule 1 ✓ WWW ADSLWAN1 80 80 80 80 192.168.1.10 TCP Apply Cancel Note : The TCP port 30005 is reserved for TR069 connection request port Connection Status Network Setting Security System Monitor Maintenance(3) If you want to change the port for Web Server, you could press button 'Edit' on corresponding rule, then modify and apply it.
Default port numbers for some services
| Service | Port Number |
| FTP | 21 |
| Telnet | 23 |
| 25 | |
| PPTP | 1723 |
| www-http (Web) | 80 |
| IPSec | 500 |
| TFTP | 69 |
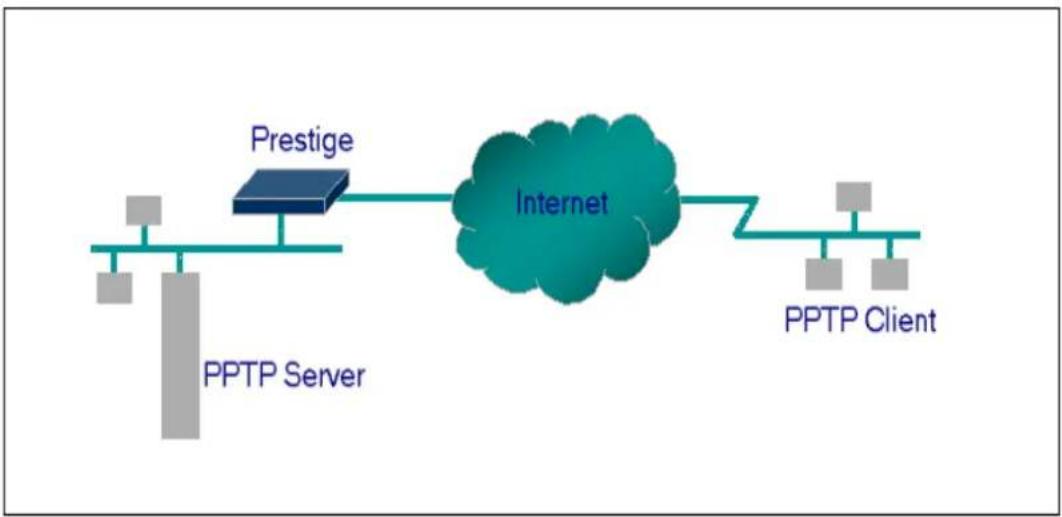
Configure a PPTP server behind SUA
Introduction
PPTP is a tunneling protocol defined by the PPTP forum that allows PPP packets to be encapsulated within Internet Protocol (IP) packets and forwarded over any IP network, including the Internet itself.
In order to run the Windows 9x PPTP client, you must be able to establish an IP connection with a tunnel server such as the Windows NT Server 4.0 Remote Access Server.
Windows Dial-Up Networking uses the Internet standard Point-to-Point (PPP) to provide a secure, optimized multiple-protocol network connection over dial-up telephone lines. All data sent over this connection can be encrypted and compressed, and multiple network level protocols (TCP/IP, NetBEUI and IPX) can be run correctly. Windows NT Domain Login level security is preserved even across the Internet.

flowchart
graph TD
    subgraph Top
        A["IP, IPX, NBF"] <--> B["IP, IPX, NBF"]
        C["PPP"] <--> D["PPP"]
        E["PPTP"] <--> F["PPTP"]
        G["IP"] <--> H["IP"]
        I["PPP"] <--> J["PPP"]
        K["V.34, etc."] <--> L["V.34, etc."]
    end

    subgraph Middle
        M["IP"] <--> N["IP"]
        O["PPP"] <--> P["PPP"]
        Q["V.34, etc."] <--> R["V.34, etc."]
        S["IP"] <--> T["IP"]
        U["*"]
        V["+"]
        W["+"]
    end

    subgraph Bottom
        X["RAS Client"] --> Y["Modem"] --> Z["ISP"] --> AA["IP WAN / LAN"] --> AB["NT RAS Server"]
    end
Window98 PPTP Client / Internet / NT RAS Server Protocol Stack
PPTP appears as new modem type (Virtual Private Networking Adapter) that can be selected when setting up a connection in the Dial-Up Networking folder. The VPN Adapter type does not appear elsewhere in the system. Since PPTP encapsulates its data stream in the PPP protocol, the VPN requires a second dial-up adapter. This second dial-up adapter for VPN is added during the installation phase of the Upgrade in addition to the first dial-up adapter that provides PPP support for the analog or ISDN modem.
The PPTP is supported in Windows NT and Windows 98 already. For Windows 95, it needs to be upgraded by the Dial-Up Networking 1.2 upgrade.
Configuration
This application note explains how to establish a PPTP connection with a remote private network in the P-661HNU-Fx SUA case. In ZLD, all PPTP packets can be forwarded to the internal PPTP Server (WinNT server) behind SUA. The port number of the PPTP has to be entered in the Web Configurator, Advanced Setup, Network Setting-> NAT -> Port Forwarding on P-661HNU-Fx to forward to the appropriate private IP address of Windows NT server.
flowchart
graph LR
    A["Prestige"] --> B["Internet"]
    C["PPTP Server"] --> B
    B --> D["PPTP Client"]
Example
The following example shows how to dial to an ISP via the P-661HNU-Fx and then establish a tunnel to a private network. There will be three items that you need to set up for PPTP application, these are PPTP server (WinNT), PPTP client (Win9x) and the P-661HNU-Fx.
(1) PPTP server setup (WinNT)
- Add the VPN service from Control Panel ->Network
- Add an user account for PPTP logged on user
- Enable RAS port
- Select the network protocols from RAS such as IPX, TCP/IP NetBEUI
- Set the Internet gateway to P-661HNU-Fx
(2) PPTP client setup (Win9x)
- Add one VPN connection from Dial-Up Networking by entering the correct username & password and the IP address of the P-661HNU-Fx's Internet IP address for logging to NT RAS server.
- Set the Internet gateway to the router that is connecting to ISP
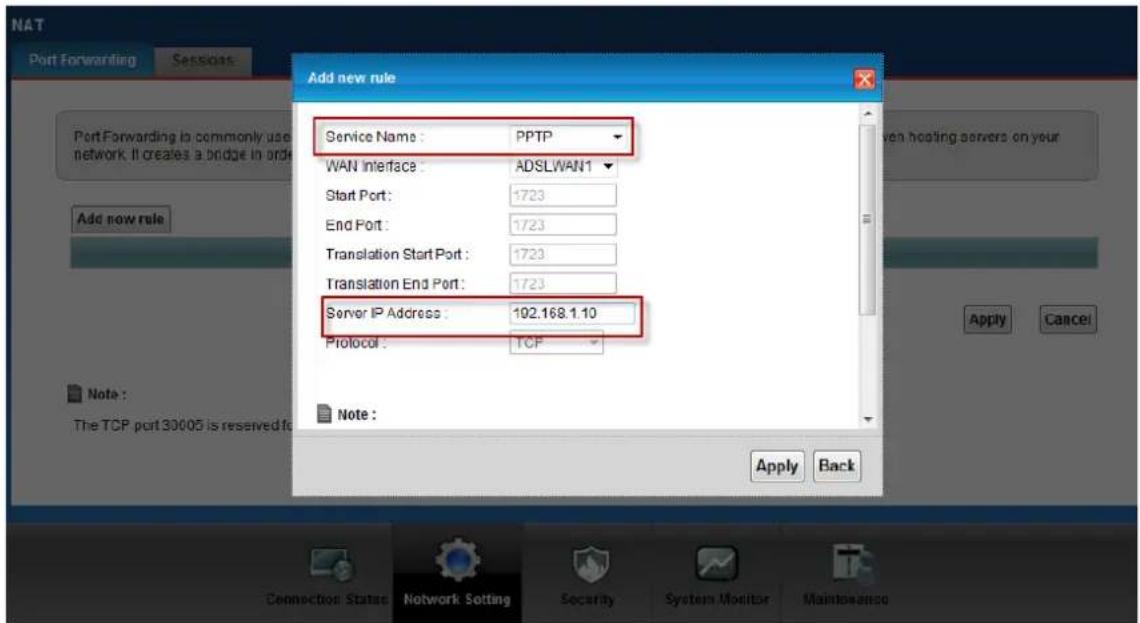
(3) P-661HNU-Fx setup
- Before making a VPN connection from Win9x to WinNT server, you need to connect P-661HNU-Fx router to your ISP first.
- Enter the IP address of the PPTP server (WinNT server) and the port number for PPTP as shown below:
Select service name as 'PPTP', fill in the Server IP Address, then press button 'Add'.
text_image
NAT Port Forwarding Sessions Add new rule Service Name : PPTP WAN Interface : ADSLWAN1 Start Port : 1723 End Port : 1723 Translation Start Port : 1723 Translation End Port : 1723 Server IP Address : 102.168.1.10 Protocol : TCP Note : Apply Back Connection Status Network Setting Security System Monitor MaintenanceWhen you have finished the above settings, you can ping to the remote Win9x client from WinNT. This ping command is used to demonstrate that remote the Win9x can be reached across the Internet. If the Internet connection between two LANs is achievable, you can place a VPN call from the remote Win9x client.
For example: C:\ping 203.66.113.2
When a dial-up connection to ISP is established, a default gateway is assigned to the router traffic through that connection. Therefore, the output below shows the default gateway of the Win9x client after the dial-up connection has been established.
Before making a VPN connection from the Win9x client to the NT server, you need to know the exact Internet IP address that the ISP assigns to P-661HNU-Fx router in SUA mode and enter this IP address in the VPN dial-up dialog box. You can check this Internet IP address from PNC Monitor or S Web Configurator, Connecting Status -> System Info -> WAN Information. If the Internet IP address is a fixed IP address provided by ISP in SUA mode, then you can always use this IP address for reaching the VPN server.
In the following example, the IP address '140.113.1.225' is dynamically assigned by ISP. You must enter this IP address in the 'VPN Server' dialog box for reaching the PPTP server. After the VPN link is established, you can start the network protocol application such as IP, IPX and NetBEUI.
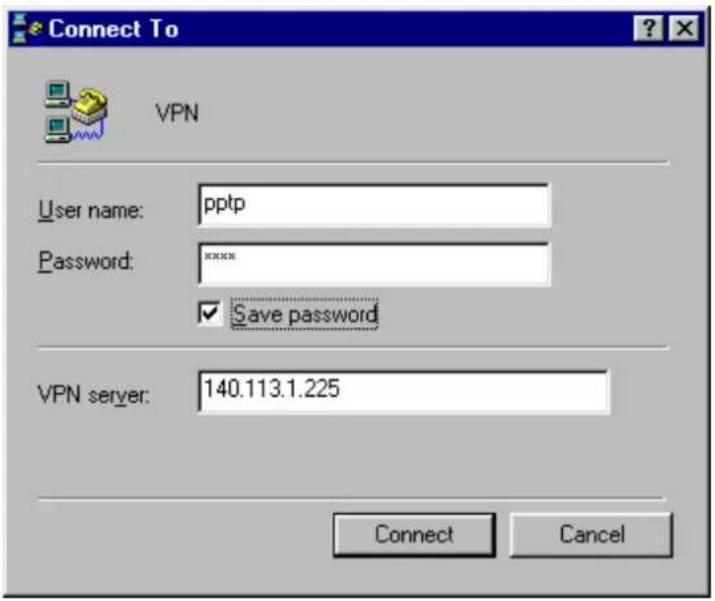
text_image
Connect To VPN User name: pptp Password: xxxxx ✓ Save password VPN server: 140.113.1.225 Connect Cancel5. Using the Dynamic DNS (DDNS)
- What is DDNS?
The DDNS service, an IP Registry provides a public central database where information such as email addresses, hostnames, IPs etc. can be stored and retrieved. This solves the problems if your DNS server uses an IP associated with dynamic IPs.
Without DDNS, we always tell the users to use the WAN IP of the P-661HNU-Fx to access the internal server. It is inconvenient for the users if this IP is dynamic. With DDNS supported by the P-661HNU-Fx, you apply a DNS name (e.g., www.zyxel.com.tw) for your server (e.g., Web server) from a DDNS server. The outside users can always access the web server using the www.zyxel.com.tw regardless of the WAN IP of the P-661HNU-Fx.
When the ISP assigns the P-661HNU-Fx a new IP, the P-661HNU-Fx must inform the DDNS server the change of this IP so that the server can update its IP-to-DNS entry. Once the IP-to-DNS table in the DDNS server is updated, the DNS name for your web server (i.e., www.zyxel.com.tw) is still usable.
The DDNS servers the P-661HNU-Fx supports currently is WWW.DYNDNS.ORG where you apply the DNS from and update the WAN IP to.
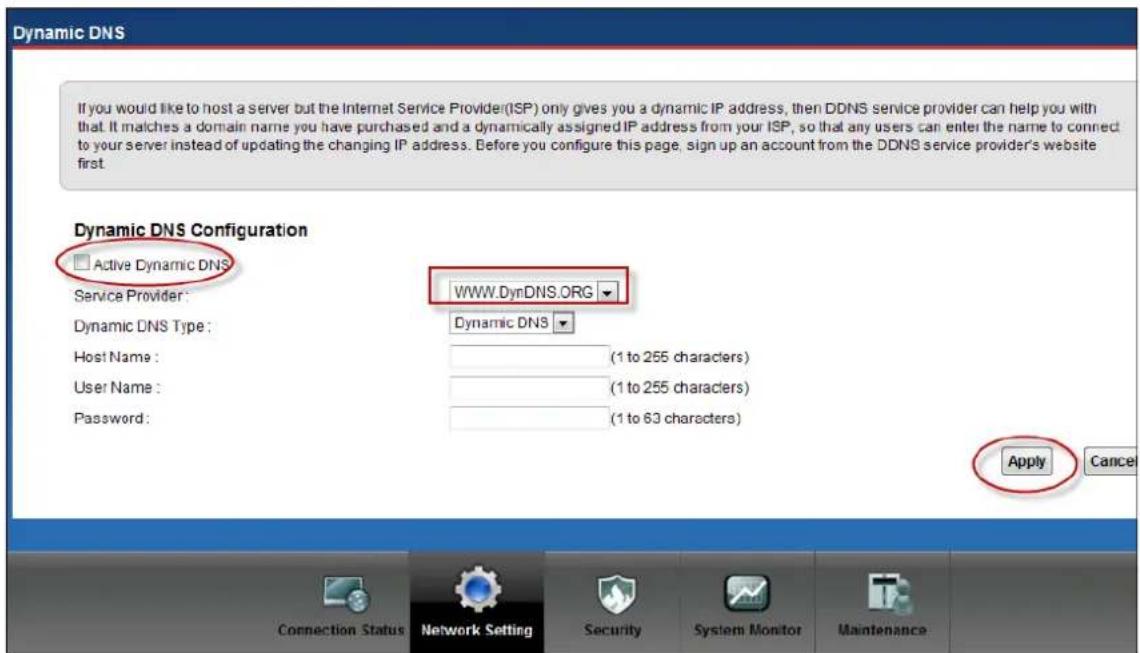
- Setup the DDNS
- Before configuring the DDNS settings in the P-661HNU-Fx, you must register an account from the DDNS server such as
WWW.DYNDNS.ORG first. After the registration, you have a hostname for your internal server and a password using to update the IP to the DDNS server.
- Login Web Configurator, Advanced Setup, Network Setting -> Dynamic DNS Select 'Active Dynamic DNS' option:
text_image
Dynamic DNS If you would like to host a server but the Internet Service Provider(ISP) only gives you a dynamic IP address, then DDNS service provider can help you with that. It matches a domain name you have purchased and a dynamically assigned IP address from your ISP, so that any users can enter the name to connect to your server instead of updating the changing IP address. Before you configure this page, sign up an account from the DDNS service provider's website first. Dynamic DNS Configuration Active Dynamic DNS Service Provider: WWW.DynDNS.ORG Dynamic DNS Host Name: (1 to 255 characters) User Name: (1 to 255 characters) Password: (1 to 63 characters) Apply Cancel Connection Status Network Setting Security System Monitor MaintenanceKey Settings:
| Option | Description |
| Service Provider | Enter the DDNS server in this field. Currently, we support WWW.DYNDNS.ORG. |
| Active | Toggle to 'Yes'. |
| Host Name | Enter the hostname you subscribe from the above DDNS server. For example, zyxel.com.tw. |
| User Name | Enter the user name that the DDNS server gives to you. |
| Password | Enter the password that the DDNS server gives to you. |
6. File Sharing
Sharing files on a USB memory stick or hard drive connected to P-661HNU-Fx with other users on the network, the topology showed bellow allowing PC A, B & C to access file on a USB Hard drive.

flowchart
graph TD
    PCB["PCB"] -->|Wireless Signal| PCA["PCA"]
    PCC["PCC"] -->|Wireless Signal| PCA
    PCA -->|Red Line| USB["USB Hard Drive"]
    USB -->|Red Line| P661HNU-Fx["P-661HNU-Fx"]
1) Plug in Flash disk in USB port.
2) Go to Network Setting -> Home Networking -> File sharing
3) Click on "Share Configuration" to enable "SMB" function.

text_image
Home Networking LAN Setup Static DHCP UPnP File Sharing Printer Server The device can share files from your USB flash drive or disk when you attach it to the USB port. You may start from deciding which folders in the USB disks to share and which users can access the shared folders. Server Configuration File Sharing Services(SMB): Enable Disable Account Management Add New User Apply Cancel Connection Status Network Setting Security System Monitor Maintenance4) Click on "Apply".
When File Sharing feature is enabled, P-661HNU-Fx will find the attached USB Hard Drive.

text_image
The device can share files from your USB flash drive or disk when you attach it to the USB port. You may start from deciding which folders in the USB disks to share and which users can access the shared folders. Server Configuration File Sharing Services(SMB) : Enable Disable Share Directory List Add New ShareStatus Share Name Share Path Share Description Modify
Teclast_CoolFlash_000000... Teclast_CoolFlash_00000001FB_1 Teclast_CoolFlash_00000001FB_1 Account Management Add New User Apply Cancel Connection Status Network Setting Security System Monitor Maintenance5) Click on "Edit".
6) Select Access Level "Public" to allow access to anyone who can login to the flash disk.

text_image
Home Networking LAN Setup Static DHCP UPAP File Sharing Printer Server Modify Share Directory Share Name: Tedast_CoolFlash_000000001FB_1 Share Path: Tedast_CoolFlash_000000001FB_1 Description: Tedast_CoolFlash_000000001FB_1 Access Level: Public Apply Back Account Management Add New User Connection Status Network Setting Security System Monitor Maintenance7) Click on "Add New User" to create a new account for access log in.
text_image
Server Configuration File Sharing Services(SMB) : Enable Disable Share Directory List Add New ShareStatus Share Name Share Path Share Description Modify
Teclast_CoolFlash_000000... Teclast_CoolFlash_000000001FB_1 Teclast_CoolFlash_000000001FB_1 Account Management Add New User Apply Cancel Connection Status Network Setting Security System Monitor Maintenance8) Enter "User Name" and "New Password".
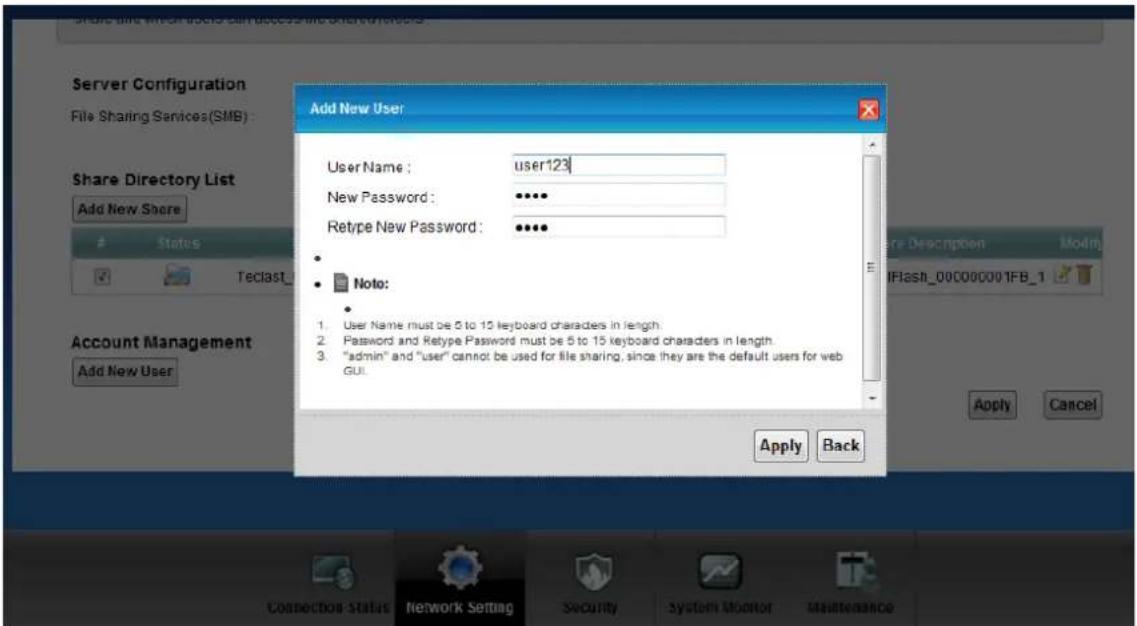
text_image
Add New User User Name: user123 New Password: ••••• Retype New Password: ••••• • • Note: 1. User Name must be 5 to 15 keyboard characters in length. 2. Password and Retype Password must be 5 to 15 keyboard characters in length. 3. "admin" and "user" cannot be used for file sharing, since they are the default users for web GUI. Apply Back Account Management Add New User Share Directory List File Sharing Services(SMB): Add New Share Status Teclist_ Apply Cancel Connector Status Network Setting Security System Monitor Maintenance9) Click on "Apply".

text_image
Account Management Add New User Active Status User Name Modify ✓ user123 Apply Cancel10) Repeat the steps 5 and 6 to change the access control level.
11) Select Access Level as "Security".
12) Select user123 as "Allow User".

text_image
Home Networking LAN Setup Static DHCP UPoP File Sharing Printer Setup Modify Share Directory Share Part: Tedast_CooFlash_00000001FB_1 Description: Tedast_CooFlash_00000001FB_1 Access Level: Security Available Users Allow Users user123 Apply Back Account Management Add Now User Contraction Status Network Setting Security System Monitor MaintenanceThe following steps will show you how the PC A, B or C Access the USB Hard Drive from the PC.
13) Go to Windows "Run" and connect to P-661HNU-Fx.
text_image
Internet Internet Explorer E-mail Outlook Express Command Prompt Notepad Paint VLC media player Mozilla Firefox µTorrent All Programs My Documents My Recent Documents My Pictures My Music My Computer My Network Places Control Panel Set Program Access and Defaults Connect To Printers and Faxes Help and Support Search Run... Log Off Turn Off Computer
text_image
Run Type the name of a program, folder, document, or Internet resource, and Windows will open it for you. Open: \\192.168.1.1\ OK Cancel Browse...14) After connected to P-661HNU-Fx, the USB hard drive will be displayed on the screen.

text_image
P-661HNU-F1 (192.168.1.1) File Edit View Favorites Tools Help Back Search Folders Address \\192.168.1.1 Network Tasks Add a network place View network connections Set up a home or small office network Set up a wireless network for a home or small office View workgroup computers Show icons for networked UPnP devices Teclast CoolFlash 000000001... Printers and Faxes Other Places Workgroup My Computer My Documents Shared Documents Printers and Faxes Details15) Click on the USB hard drive, and a pop up window will be displayed asking the login information.
Key in the user account: user123, password: xxxxx
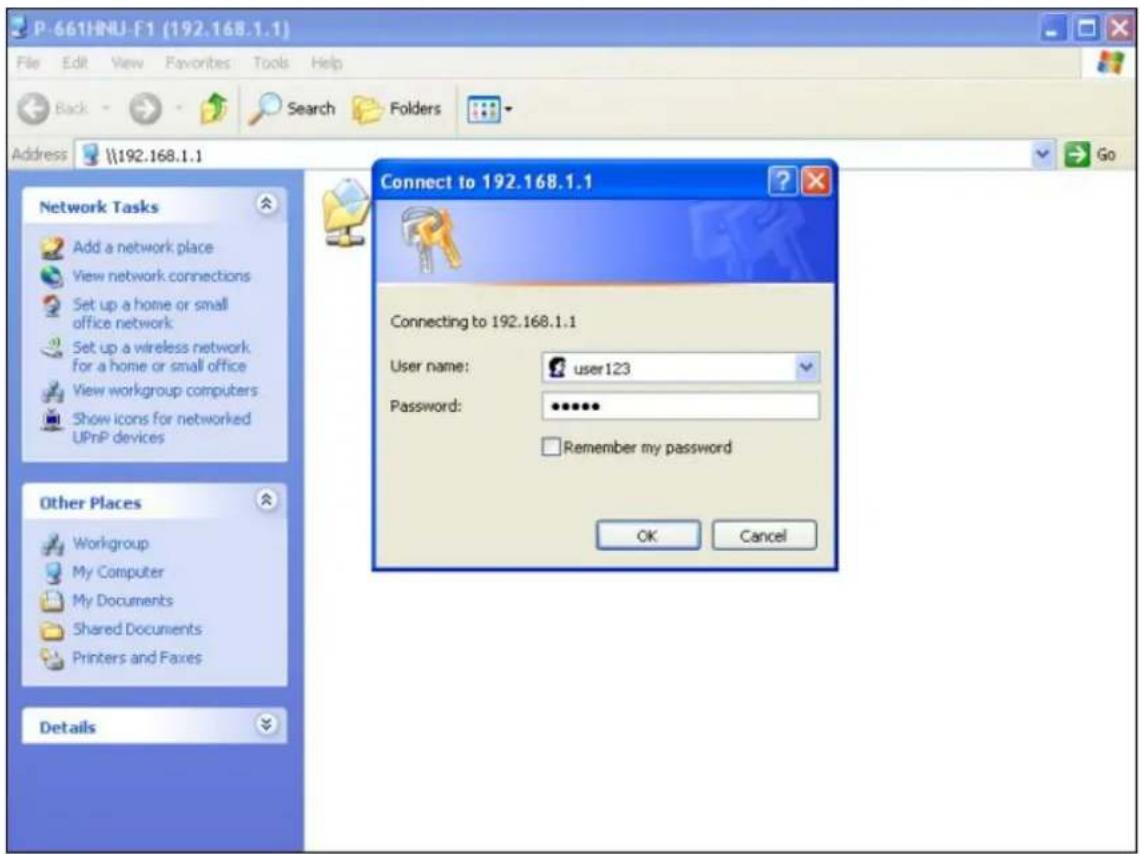
text_image
P-661HNU-F1 (192.168.1.1) File Edit View Favorites Tools Help Back Search Folders Address \\192.168.1.1 Network Tasks Add a network place View network connections Set up a home or small office network Set up a wireless network. for a home or small office View workgroup computers Show icons for networked UPnP devices Other Places Workgroup My Computer My Documents Shared Documents Printers and Faxes Details Connect to 192.168.1.1 Connecting to 192.168.1.1 User name: user123 Password: ••••••• Remember my password OK CancelAfter successful log in, the content of the USB hard drive will be displayed.

text_image
Teclast_CoolFlash_000000001FB_1 on P-661HNU-F1 (192.168.1.1) File Edit View Favorites Tools Help Back Search Folders Address \\192.168.1.1\Teclast_CoolFlash_000000001FB_1 File and Folder Tasks Rename this file Move this file Copy this file Publish this file to the Web E-mail this file Delete this file BT Dying2602 Http Blocked huipuguanfang Janet Kitty PPPoE disconnect PQA Test qudong qudong2 RECYCLER Steam_Video Vignette ZyConfGen_Win32 1.2.5.0 ZyConfGen_Win32 2.2.4.0 1.png 921 x 497 PNG Image 2.png 340ADQ8C0_20100920_2.bin Other Places P-661HNU-F1 (192.168.1.1) My Documents Shared Documents My Computer My Network Places Details7. QoS
The QoS General Screen
Click Network Setting > QoS to open the screen as shown next. Use this screen to enable or disable QoS.

text_image
QoS General Queue Setup Class Setup Monitor Quality of Service (QoS) defines the traffic priority of Internet services to the home network. Active QoS Note : You can assign the upstream bandwidth manually. If the field is empty, the CPE set the value automatically. If Enable QoS checkbox is selected, choose an automapping type to assign traffic priority automatically. Apply Cancel Connection Status Network Setting Security System Monitor MaintenanceThe Queue Setup Screen
Queue Setup decides the priority on WAN interfaces. Use this screen to configure QoS queue assignment.

text_image
QoS General Queue Setup Class Setup Monitor Queue Setup decides the priority on WAN interfaces. Use this page to configure QoS queue assignment. Add new QueueStatus Name Interface Priority Weight Buffer Rate Limit Modify
1 WAN_Default_Queue WAN 4 1 DT 2 LAN_Default_Queue LAN 4 1 DT Note: Maximum 8 configurable entries for WAN port, and maximum 3 configurable entries for each LAN port. If queue is deleted, then related classifiers will be removed too. Connection Status Network Setting Security System Monitor MaintenanceThere are two default queues. One is for WAN interface, the other is for LAN interface. You could add more queues by applying 'Add new Queue' button.
text_image
QoS General Queue Setup Class Setup Monitor Add new Queue Active Name: Interface: WAN Priority: 1(Low) Weight: 1 Rate Limit: (kbps) Note: Maximum 8 configura removed too. Apply Back Connection Status Network Setting Security System Monitor MaintenanceThe Class Setup Screen
Use this screen to add, edit or delete classifiers. A classifier groups traffic into data flows according to specific criteria such as the source address, destination address, source port number, destination port number or incoming interface.
Click Network Setting -> QoS -> Class Setup

text_image
QoS General Queue Setup Class Setup Monitor A classifier groups traffic into data flows according to specific criteria. Class Setup can add, edit, or delete QoS classifiers. Add new Classifier Order Status Class Name Classification Crite... Foward to DSCP Mark To Queue Mod Connection Status Network Setting Security System Monitor MaintenanceThe Class Configuration Screen
Click the Add new Classifier button to configure a classifier.
text_image
Edit Classifier Setting Class Configuration Active: Class Name: Classification Order: Forward To Interface DSCP Mark: To Queue: Criteria Configuration Use the configurations below to specify the characteristics of a data flow need to be managed by this QoS rule Basic From Interface ADSLWAN1 Ether Type IP (0x0800) Apply Back Connection Status Network Setting Security System Monitor Maintenance
text_image
EditClassifier Setting Source MAC Address MAC Mask IP Address IP Subnet Mask Port Range ~ (1~65535) Destination MAC Address MAC Mask IP Address IP Subnet Mask Port Range ~ (1~65535) Others IP Protocol TCP IP Packet Length ~ (46~1504) DSCP TCP 12% Exclude Exclude Exclude Exclude Apply Back Connection Status Network Setting Security System Monitor MaintenanceThe QoS Monitor Screen
To view the ZyXEL Device's QoS packet statistics, click Network Setting > QoS > Monitor. The screen appears as shown.
text_image
General Queue Setup Class Setup Monitor Monitor shows the statistics of QoS on WAN/LAN interface and the status of Queue setup. Monitor Refresh Interval: No Refresh Status : ■ Interface MonitorName Pass Rate(bps)
1 nas1 0 2 br0 ■ Queue MonitorName Interface Pass Rate(bps) Drop Rate(bps)
1 WAN_Default_Queue WAN 0 0 2 LAN_Default_Queue LAN 0 0 Connection Status Network Setting Security System Monitor Maintenance8. Using syslog
text_image
Log Setting Log Setting defines which types of logs and which log levels you want to record. If you have a LAN client on your network that is running a syslog utility, you can also save the log files there by enabling Syslog Logging and enter the IP address of that LAN client. Syslog Setting Syslog Logging: Enable Disable Syslog Server: 0.0.0.0 (IP Address) UDP Port: 514 (Server Port)You can configure it in Web Configurator, Advanced Setup, Maintenance -> Log Setting
Key Settings:
Syslog Logging: Select Enable to active Syslog.
Syslog Server: Enter the IP address of the server that you wish to send the syslog.
UDP Port: Enter server port which you want to send the syslog on.
9. Using IP Multicast
• What is IP Multicast?
Traditionally, IP packets are transmitted in two ways - unicast or broadcast. Multicast is a third way to deliver IP packets to a group of hosts. Host groups are identified by class D IP addresses, i.e., those with "1110" as their higher-order bits. In dotted decimal notation, host group addresses range from 224.0.0.0 to 239.255.255.255. Among them, 224.0.0.1 is assigned to the permanent IP hosts group, and 224.0.0.2 is assigned to the multicast routers group.
IGMP (Internet Group Management Protocol) is the protocol used to support multicast groups. The latest version is version 2 (see RFC2236). IP hosts use IGMP to report their multicast group membership to any immediate-neighbor multicast routers so the multicast routers can decide if a multicast packet needs to be forwarded. At start up, the P-661HNU-Fx queries all directly connected networks to gather group membership.
After that, the P-661HNU-Fx updates the information by periodic queries. The P-661HNU-Fx implementation of IGMP is also compatible with version 1. The multicast setting can be turned on or off on Ethernet and remote nodes.
P-661HNU-Fx supports IGMP v1 ,v2 and IGMP v3 without source filtering.
- IP Multicast Setup
Enable IGMP in P-661HNU-Fx's remote node in Web Configurator, Advanced Setup, Network Setting-> Broadband
Wireless Application Notes
1. Configure a Wireless Client to Ad hoc mode
Ad hoc Introduction
What is Ad Hoc mode?
Ad hoc mode is a wireless network consists of a number of stations without access points. Without using an access point or any connection to a wired network, a client unit in Ad hoc operation mode can communicate directly to other client units just as using a cross over Ethernet cable connecting 2 host together via a NIC card for direct connection when configured in Ad hoc mode without an access point being present. Ad hoc operation is ideal for small networks of no more than 2-4 computers. Larger networks would require the use of one, or perhaps several, access points.
flowchart
graph LR
    A["Wireless Station A"] -->|Wireless NIC| B["RF signal"]
    B -->|Wireless NIC| C["Wireless Station B"]
Configuration for Wireless Station A
To configure Ad hoc mode on your ZyAIR B-100/B-200/B-300 wireless NIC card please follow the following step.
Step 1: Double click on the utility icon in your windows task bar the utility will pop up on your windows screen.
Step 2: Select configuration tab.
text_image
IEEEB02.11b WLAN PCI Card Utility Link Info Configuration Site Survey Encryption Advanced About Profile default Remove Create Activate Configuration Operating Mode Ad-Hoc Service Set Identifier B200 (SSID) Transfer Rate Auto Rate Channel 1 Power Saving Mode Disabled Restore Defaults Undo Changes Apply Changes OK Cancel HelpStep 3: Select Ad hoc from the operation mode pull down menu, fill you an SSID and select a channel you want to use than press OK to apply.
Step 4: Since there is no DHCP server to give the host IP you must first designate a static IP for your station. From Windows Start select Control Panel >Network Connection>Wireless Network Connection.

text_image
Wireless Network Connection Properties General Authentication Advanced Connect using: IEEE802.11b WLAN PCI Card v3.0 Configure... This connection uses the following items: ✓ Client for Microsoft Networks ✓ File and Printer Sharing for Microsoft Networks ✓ QoS Packet Scheduler ✓ Internet Protocol (TCP/IP) Install... Uninstall Properties Description Transmission Control Protocol/Internet Protocol. The default wide area network protocol that provides communication across diverse interconnected networks. ✓ Show icon in notification area when connected OK CancelStep 5: From general tab select TCP/IP and click property
text_image
Internet Protocol (TCP/IP) Properties General You can get IP settings assigned automatically if your network supports this capability. Otherwise, you need to ask your network administrator for the appropriate IP settings. Obtain an IP address automatically Use the following IP address: IP address: 192 . 168 . 1 . 1 Subnet mask: 255 . 255 . 255 . 0 Default gateway: . Obtain DNS server address automatically Use the following DNS server addresses: Preferred DNS server: . Alternate DNS server: . Advanced... OK CancelStep 6: Fill in your network IP address and subnet mask and click OK to finish.
Configuration for Wireless Station B
To configure Ad hoc mode on your ZyAIR B-100/B-200/B-300 wireless NIC card please follow the following step.
Step1: Double click on the utility icon in your windows task bar the utility will pop up on your windows screen.
Step 2: Select configuration tab.

text_image
IEEE802.11b WLAN PCI Card Utility Link Info Configuration Site Survey Encryption Advanced About Profile default Remove Create Activate Configuration Operating Mode Ad-Hoc Service Set Identifier B200 (SSID) Transfer Rate Auto Rate Channel 1 Power Saving Mode Disabled Restore Defaults Undo Changes Apply Changes OK Cancel HelpStep 3: Select Ad hoc from the operation mode pull down menu, fill you an SSID and select a channel you want to use than press OK to apply.
Step 4: Since there is no DHCP server to give the host IP you must first designate a static IP for your station. From Windows Start select Control Panel >Network Connection>Wireless Network Connection.
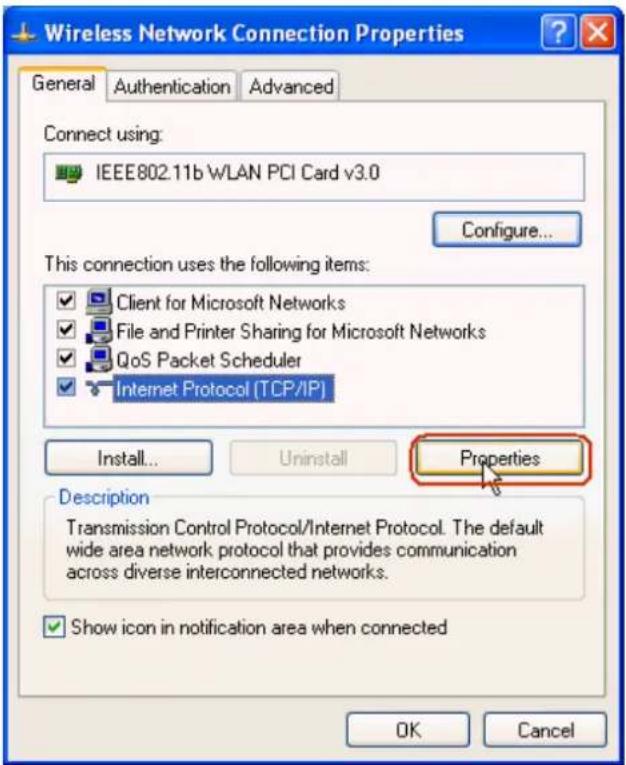
text_image
Wireless Network Connection Properties General Authentication Advanced Connect using: IEEE802.11b WLAN PCI Card v3.0 Configure... This connection uses the following items: ✓ Client for Microsoft Networks ✓ File and Printer Sharing for Microsoft Networks ✓ QoS Packet Scheduler ✓ Internet Protocol (TCP/IP) Install... Uninstall Properties Description Transmission Control Protocol/Internet Protocol. The default wide area network protocol that provides communication across diverse interconnected networks. ✓ Show icon in notification area when connected OK CancelStep 5: From general tab select TCP/IP and click property
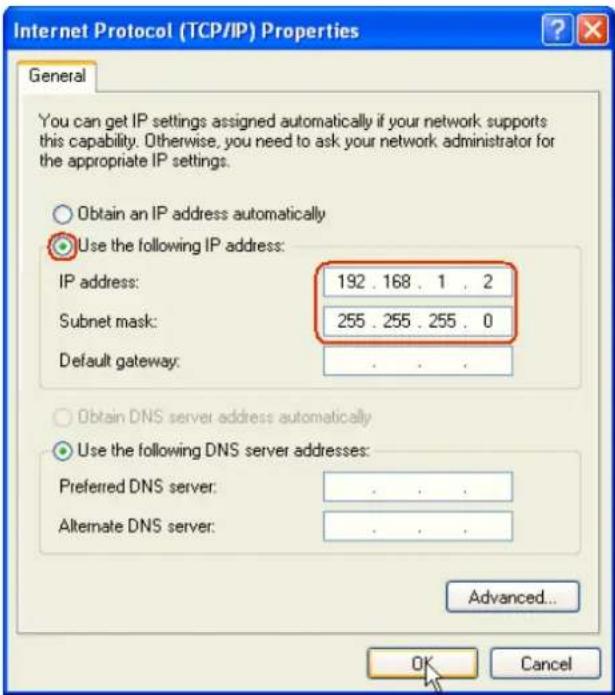
text_image
Internet Protocol (TCP/IP) Properties General You can get IP settings assigned automatically if your network supports this capability. Otherwise, you need to ask your network administrator for the appropriate IP settings. Obtain an IP address automatically Use the following IP address: IP address: 192 . 168 . 1 . 2 Subnet mask: 255 . 255 . 255 . 0 Default gateway: Obtain DNS server address automatically Use the following DNS server addresses: Preferred DNS server: . Alternate DNS server: . Advanced... OK CancelStep 6: Fill in your network IP address and subnet mask and click OK to finish.
Step 7: Station A now are able to connect to Station B.
2. Setup WEP (Wired Equivalent Privacy)
Introduction
The 802.11 standard describes the communication that occurs in wireless LANs.
The Wired Equivalent Privacy (WEP) algorithm is used to protect wireless communication from eavesdropping, because wireless transmissions are easier to intercept than transmissions over wired networks, and wireless is a shared medium, everything that is transmitted or received over a wireless network can be intercepted.
WEP relies on a secret key that is shared between a mobile station (e.g. a laptop with a wireless Ethernet card) and an access point (i.e. a base station). The secret key is used to encrypt packets before they are transmitted, and an integrity check is used to ensure that packages are not modified during the transition. The standard does not discuss how the shared key is established. In practice, most installations use a single key that is shared between all mobile
stations and access points APs. You can refer to the User Guide for more detailed information about it.
Setting up the Access Point
You can set up the Access Point from Web configurator, Network Setting->Wireless -> General. (You can also configure it via CLI):
Step 1: Select 'Static WEP' from the pull down menu 'Security Mode' in Web Configurator:
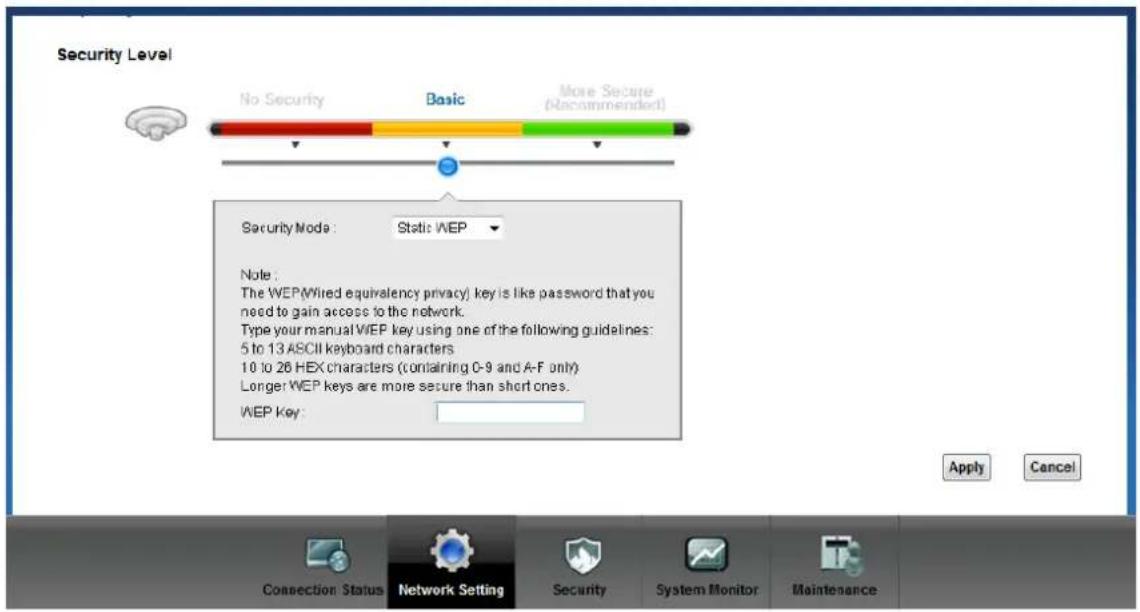
text_image
Security Level No Security Basic More Secure (Because) Security Mode: Static WEP Note: The WEP(Wired equivalency privacy) key is like password that you need to gain access to the network. Type your manual WEP key using one of the following guidelines: 5 to 13 ASCII keyboard characters 10 to 26 HEX characters (containing C-9 and A-F only) Longer WEP keys are more secure than short ones. WEP Key: Apply Cancel Connection Status Network Setting Security System Monitor MaintenanceStep 2: Set up WEP Key in the Web Configurator. You need to set the one of the following parameters:
- 64-bit WEP key (secret key) with 5 characters
- 64-bit WEP key (secret key) with 10 hexadecimal digits
- 128-bit WEP key (secret key) with 13 characters
- 128-bit WEP key (secret key) with 26 hexadecimal digits
- 256-bit WEP key (secret key) with 29 characters
- 256-bit WEP key (secret key) with 58 hexadecimal digits
- Setting up the Station
Step 1: Double click on the utility icon in your windows task bar or right click the utility icon then select 'Show Config Utility'.

text_image
Show Config Utility ExitThe utility will pop up on your windows screen:

text_image
ZyAIR G-200 Wireless LAN USB Adapter Link Info | Configuration | Site Survey | About | Current SSID: Status: Disconnected Re-Connect Settings Channel: Security: Transfer Rate: Current IP: Operating Mode: TX/RX(Total frame) Transmitted Received Signal Strength: Link Quality: OK Cancel HelpNote: If the utility icon doesn't exist in your task bar, click Start -> Programs -> …… to start the utility.
Step 2: Select the 'Configuration' tab.
Select 'Set Security' to configure encryption type and parameters correspond with access point.
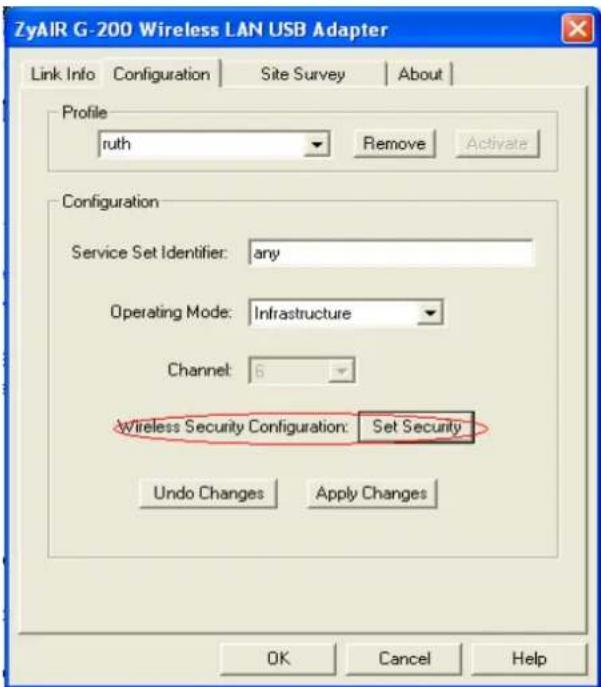
text_image
ZyAIR G-200 Wireless LAN USB Adapter Link Info Configuration Site Survey About Profile ruth Remove Activate Configuration Service Set Identifier: any Operating Mode: Infrastructure Channel: 6 Wireless Security Configuration: Set Security Undo Changes Apply Changes OK Cancel Help
text_image
ZyAIR G-200 Wireless LAN USB Adapter ZyAIR G-200 Wireless LAN USB Adapter Security C... Authentication: WEP Encryption: 64-bit Authentication Type: Open System Passphrase: Transmit Key: 1 Key Type: HEX Key1: 1b9dda483d Key2: Key3: Key4: OK OK Cancel HelpNote: You should select Key 1 as default Transmit Key, since the P-660HN-Fx is supposed to use Key 1 by default.
Key settings
The WEP Encryption type of station has to equal to the access point. Check 'ASCII' field for characters WEP key or uncheck 'ASCII' field for Hexadecimal digits WEP key.
Hexadecimal digits don't need to preceded by '0x'.
For example:
64-bits with characters WEP key : Key1= 2e3f4
64-bits with hexadecimal digits WEP key : Key1= 123456789A
3. Site Survey
Introduction
What is Site Survey?
An RF site survey is a MAP to RF contour of RF coverage in a particular facility. With wireless system it is very difficult to predict the propagation of radio waves and detect the presence of interfering signals. Walls, doors, elevator shafts, and other obstacles offer different degree of attenuation. This will cause the RF coverage pattern be irregular and hard to predict.
Site survey can help us overcome these problem and even provide us a map of RF coverage of the facility.
Preparation
Below are the steps to complete a simple site survey with simple tools.
-
First you will need to obtain a facility diagram, such as blueprints. This is for you to mark and take record on.
-
Visually inspect the facility, walk through the facility to verify the accuracy of the diagram and mark down any large obstacle you see that may effect the RF signal such as metal shelf, metal desk, etc on the diagram.
-
Identify user's area, when doing so ask a question where is wireless coverage needed and where does not, and note and take note on the diagram this is information is needed to determine the number of AP required.
-
Determine the preliminary access point location on the facility diagram base on the service area needed, obstacles, power wall jack considerations.
Survey on Site
Step 1: With the diagram with all information you gathered in the preparation phase. Now you are ready to make the survey.
Step 2: Install an access point at the preliminary location.
Step 3: Use a notebook with wireless client installed and run it's utility. An utility will provide information such as connection speed, current used channel, associated rate, link quality, signal strength and etc information as shown in utility below.

text_image
ZyAIR G-200 Wireless LAN USB Adapter Link Info | Configuration | Site Survey | About | Current SSID: Test Status: Connected Re-Connect Settings Channel: 1 Security: Disabled Transfer Rate: 24 Current IP: 192.168.1.65 Operating Mode: Infrastructure TX/RX(Total frame) Transmitted Received 1587 3577 Signal Strength: Excellent (100%) Link Quality: Excellent (100%) OK Cancel HelpStep 4: It's always a good idea to start with putting the access point at the corner of the room and walk away from the access point in a systematic manner. Record down the changes at point where transfer rate drop and the link quality and signal strength information on the diagram as you go alone.

text_image
Stock Room with Metal Shelves AP AP Offices Hitches/Trailers Offices C APStep 5: When you reach the farthest point of connection mark the spot. Now you move the access point to this new spot as have already determine the farthest point of the access point installation spot if wireless service is required from corner of the room.
Step 6: Repeat step 1\~5 and now you should be able to mark an RF coverage area as illustrated in above picutre.
Step 7: You may need more than one access point is the RF coverage area have not cover all the wireless service area you needed.
Step 8: Repeat step 1\~6 of survey on site as necessary, upon completion you will have an diagram and information of site survey. As illustrated below.
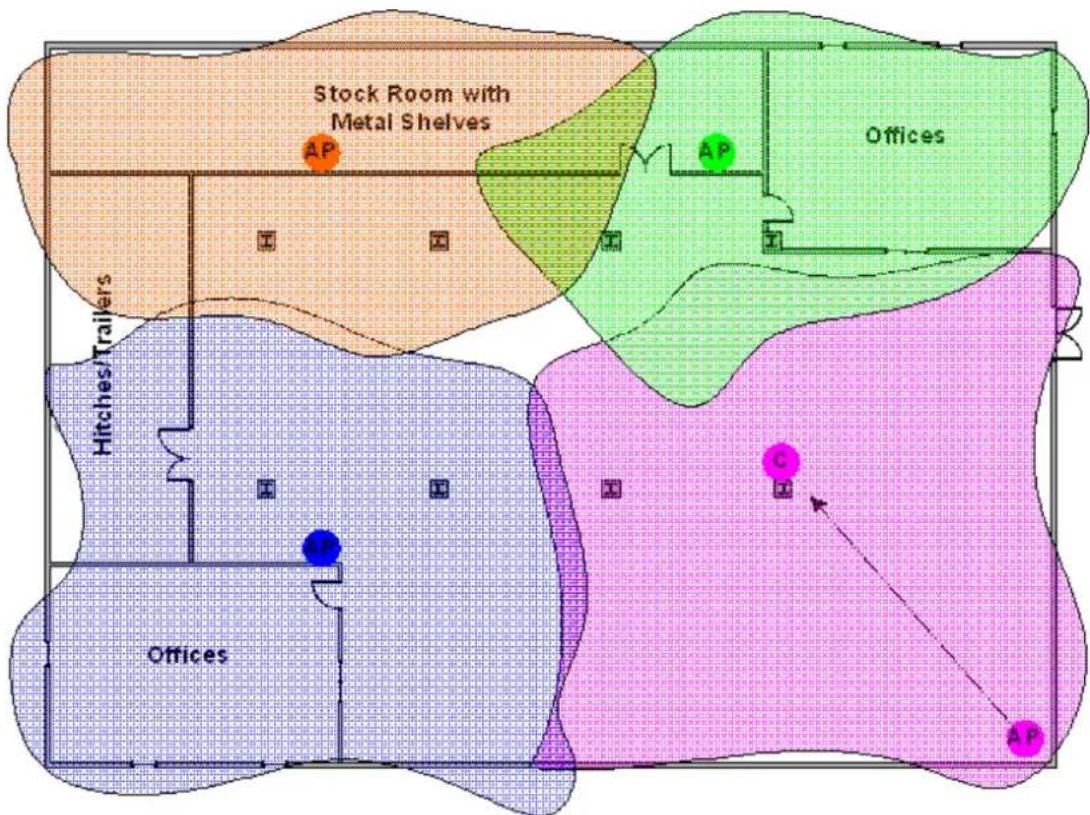
text_image
Stock Room with Metal Shelves Hitches/Trailers Offices AP AP Offices C APNote: If there are more than one access point is needed be sure to make the adjacent access point service area over lap one another. So the wireless station is able to roam. For more information please refer to roaming at
4. WPS application
What is WPS?
Wi-Fi Protected Setup (WPS) is a standard created by the Wi-Fi Alliance for easy and secure establishment of a wireless home/office network. The goal of the WPS protocol is to simplify the process for configuring the security of the wireless network, and thus calling the name Wi-Fi Protected Setup.
There are several different methods defined in WPS to simplify the process of configuration. P-661HNU-Fx supports two of those methods, which are the PIN Method and PBC Method.
PIN Method:
A PIN (Personal Identification Number) has to be read from either a sticker on the new wireless client device or a display, and entered at either the wireless access point (AP) or a Registrar of the network.
PBC Method:
A simple action of "push button" suffices the process to activate the security of the wireless network and at the same time be subscribed in it.
You could configure WPS via below screen:

text_image
Wireless General More AP WPS WMM Scheduling Enabling Wi-Fi Protected Setup (WPS) lets you add new WPS-compatible devices to the wireless network with ease. Select one of the WPS methods and follow the instructions to establish WPS connection. If your wireless client device is equipped with a WPS button, Push Button Configuration (FBC) method would be the preferable way to do WPS. General WPS . Enable Disable WPS Configuration Summary AP PIN : 00000055 Status : Not Configured 802.11 Mode : SSID : Security : Connection Status Network Setting Security System Monitor Maintenance5. Configure 802.1x and WPA
• What is the WPA Functionality?
- Configuration for Access Point
- Configuration for your PC
• What is WPA Functionality?
Wi-Fi Protected Access (WPA) is a subset of the IEEE 802.11i security specification draft. Key differences between WAP and WEP are user authentication and improved data encryption. WAP applies IEEE 802.1x Extensible Authentication Protocol (EAP) to authenticate wireless clients using an external RADIUS database. You can not use the P-661HNU-Fx's local user database for WPA authentication purpose since the local user database uses MD5 EAP which can not to generate keys.
WPA improves data encryption by using Temporal Key Integrity Protocol (TKIP), Message Integrity Check and IEEE 802.1x. Temporal Key Integrity Protocol uses 128-bits keys that are dynamically generated and distributed by the authentication server. It includes a per-packet key mixing function, a Message Integrity Check (MIC) named Michael, an extend initialization vector (IV) with sequencing rules and a re-keying mechanism.
If you do not have an external RADIUS, server, you should use WPA-PSK (WPA Pre-Share Key) that only requires a single (identical) password entered into each access point, wireless gateway and wireless client. As long as the passwords match, a client will be granted access to a WLAN.
Here comes WPA-PSK Application example for your reference.
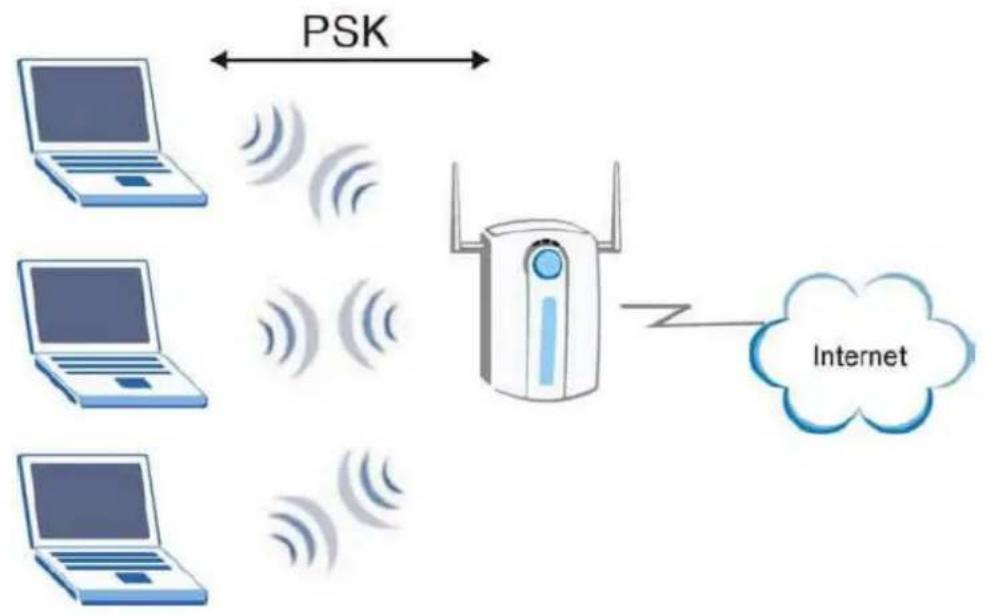
flowchart
graph TD
    A["Laptop"] <-->|PSK| B["Wireless Device"]
    C["Laptop"] <-->|PSK| B
    D["Laptop"] <-->|PSK| B
    E["Laptop"] <-->|PSK| B
    B --> F["Internet"]
- Configuration for Access point
The IEEE 802.1x standard outlines enhanced security methods for both the authentication of wireless stations and encryption key management. Authentication can be done using local user database internal to the P-661HNU-Fx (authenticate up to 32 users) or an external RADIUS server for an unlimited number of users.
Step 1: To change your P-661HNU-Fx's authentication settings, login Web Configurator, Advanced Setup, Network Setting-> Wireless-> General
Step 2: Select 'Security Mode' as WAP-PSK.
Step 3: Type the Pre Shared Key in the Pre-Shared Key field.
Step 4: Click Apply to finish.
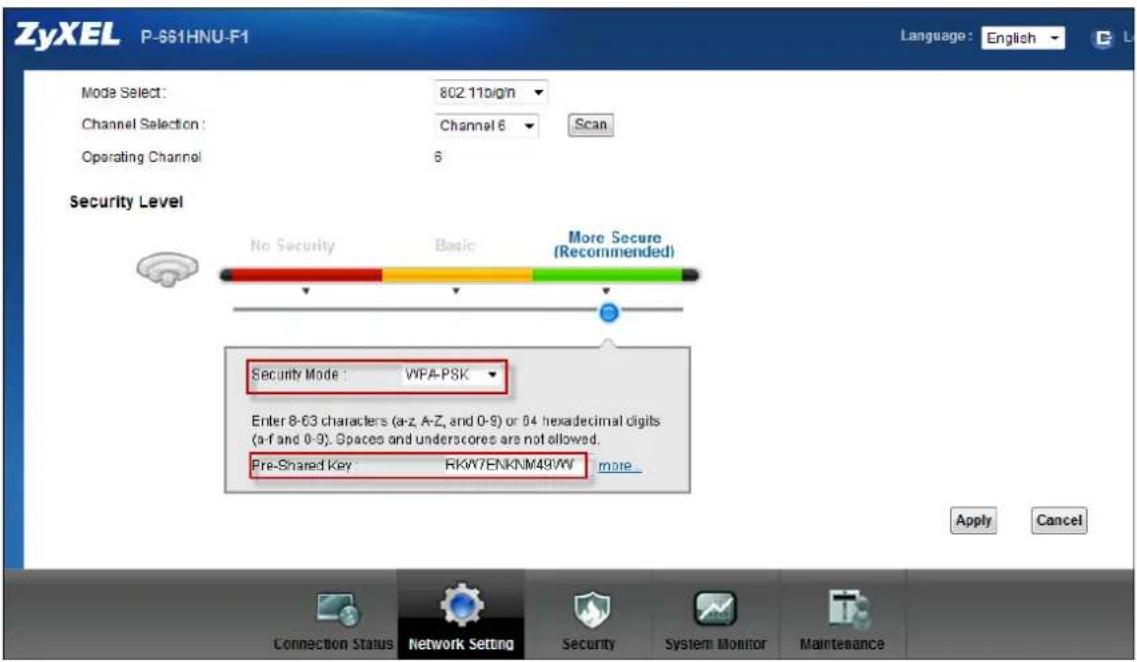
text_image
ZyXEL P-651HNU-F1 Language: English Mode Select: 802.11b/g/n Channel Selection: Channel 6 Scan Operating Channel 6 Security Level No Security Basic More Secure (Recommended) Security Mode: VIPA-PSK Enter 8-03 characters (a-z, A-Z, and 0-9) or 04 hexadecimal digits (a-f and 0-9). Spaces and underscores are not allowed. Pre-SShared Key RKW7ENKNM49VM more Apply Cancel Connection Status Network Setting Security System Monitor Maintenance- Configuration for your PC
Step 1: Double click on your wireless utility icon in your windows task bar, the utility will pop up on your windows screen.
Step 2: Select the configuration tab, type in the SSID (Service Set Identifier), select the operating Mode as Infrastructure, and select proper channel.
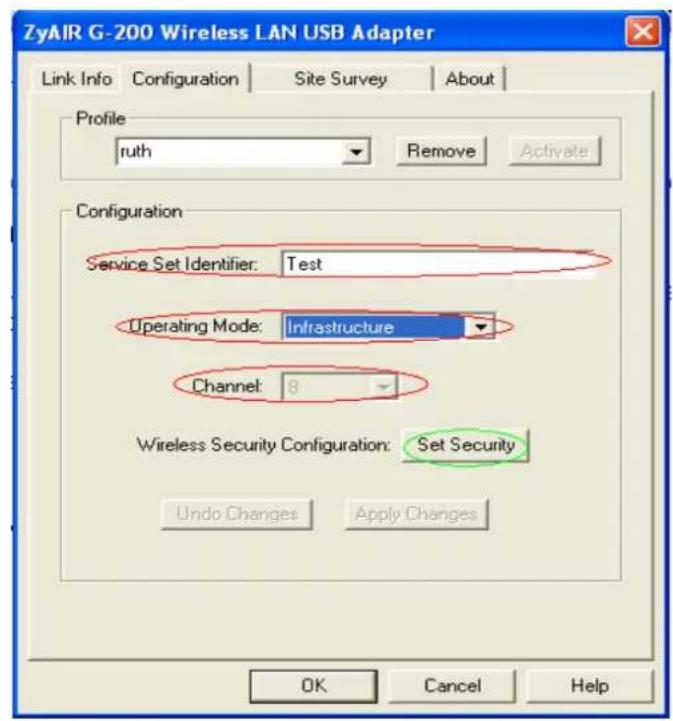
text_image
ZyAIR G-200 Wireless LAN USB Adapter Link Info Configuration Site Survey About Profile ruth Remove Activate Configuration Service Set Identifier: Test Operating Mode: Infrastructure Channel: 8 Wireless Security Configuration: Set Security Undo Changes Apply Changes OK Cancel HelpStep 3: Click Set Security to configure the security parameters:
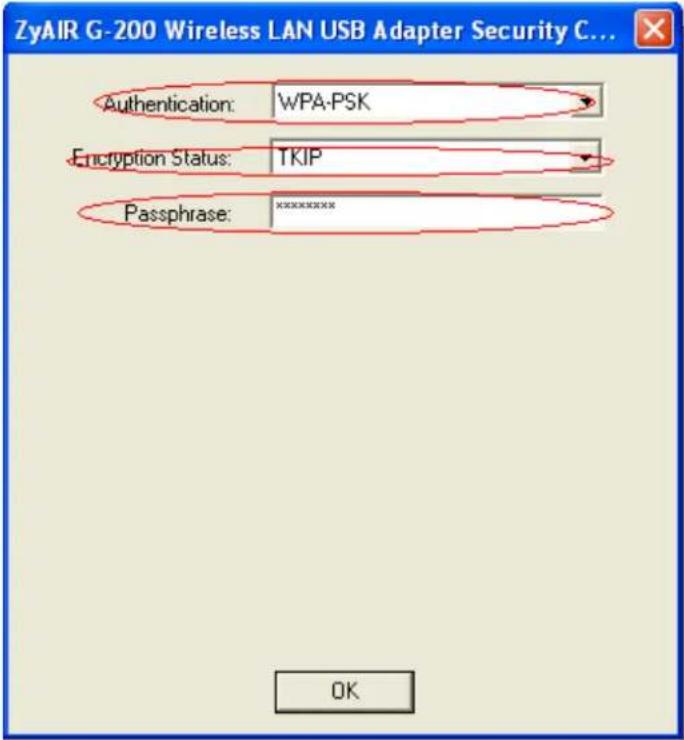
text_image
ZyAIR G-200 Wireless LAN USB Adapter Security C... Authentication: WPA-PSK Encryption Status: TKIP Passphrase: ********x OKStep 4: Click OK for finish, and begin to Site survey. Connect to the AP as you have configured.
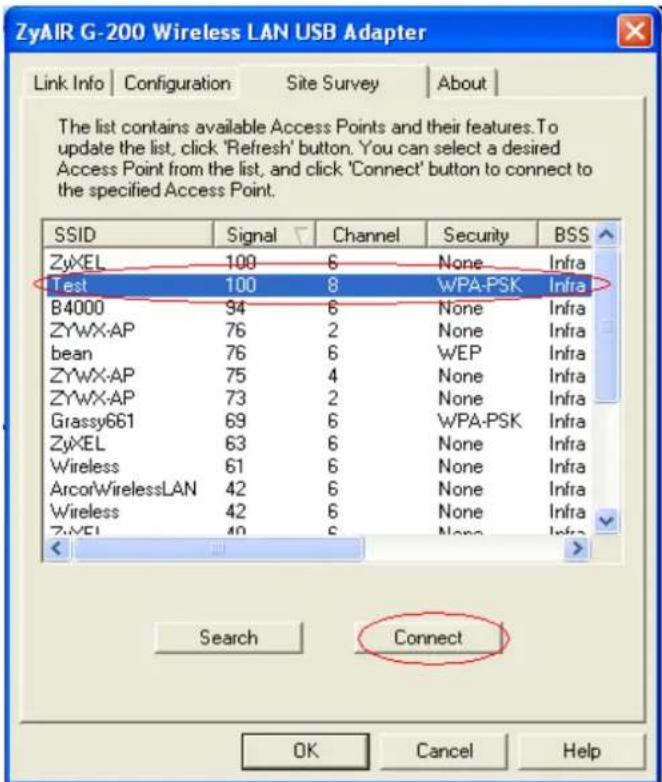
text_image
ZyAIR G-200 Wireless LAN USB Adapter Link Info | Configuration | Site Survey | About | The list contains available Access Points and their features. To update the list, click 'Refresh' button. You can select a desired Access Point from the list, and click 'Connect' button to connect to the specified Access Point. SSID Signal Channel Security BSS ZyXEL 100 6 None Infra Test 100 8 WPA-PSK Infra B4000 94 6 None Infra ZYWX-AP 76 2 None Infra bean 76 6 WEP Infra ZYWX-AP 75 4 None Infra ZYWX-AP 73 2 None Infra Grassy661 69 6 WPA-PSK Infra ZyXEL 63 6 None Infra Wireless 61 6 None Infra ArcorWirelessLAN 42 6 None Infra Wireless 42 6 None Infra ZYXEL 40 6 None Infra <_ Search Connect OK Cancel HelpStep 5: Click Link Info tab, if the PC associated and authenticated with AP successfully, we will see the following information.
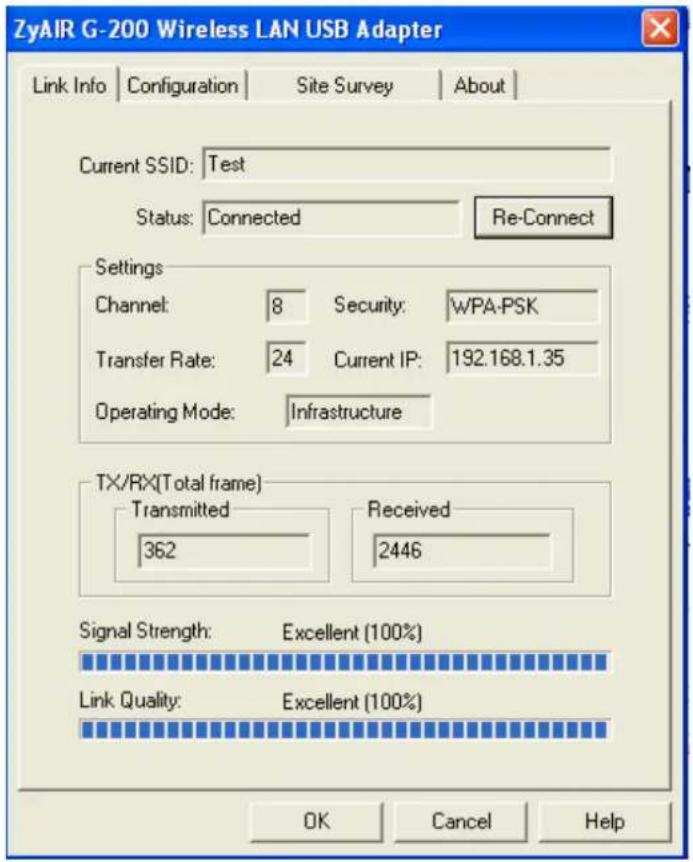
text_image
ZyAIR G-200 Wireless LAN USB Adapter Link Info | Configuration | Site Survey | About | Current SSID: Test Status: Connected | Re-Connect Settings Channel: 8 Security: WPA-PSK Transfer Rate: 24 Current IP: 192.168.1.35 Operating Mode: Infrastructure TX/RX(Total frame) Transmitted | Received 362 2446 Signal Strength: Excellent (100%) Link Quality: Excellent (100%) OK Cancel Help6. The WPS/WLAN Button
You can use the WPS WLAN ON/OFF button to turn the wireless LAN off or on. You can also use it to activate WPS in order to quickly set up a wireless network with strong security.
- Turn the Wireless LAN Off or On
(1) Make sure the POWER LED is on (not blinking).
(2) Press the WPS WLAN ON/OFF button for 1 to 5 seconds and release it. The WPS/WLAN LED should change from on to off or vice versa.
- Activate WPS
(1) Make sure the POWER LED is on (not blinking).
(2) Press the WPS WLAN ON/OFF button for 5 to 10 seconds and release it.
Support Tool
1. Upgrading Firmware via web GUI
- Go to Maintenance -> Firmware Upgrade

text_image
ZyXEL P-661HNU-F1 Language: English Firmware Upgrade Firmware Upgrade is where you can update the device with newly released features by upgrading the latest firmware. You can download the latest firmware file from the manufacturer website of this device. Upgrade Firmware Current Firmware Version: V3.10(TSX.0)b1 FilePath: Browse... Upload Connection Status Network Setting Security System Monitor MaintenanceClick Browse.
Select the Firmware to upload and click Open.
Click Upload
2. Backing – up the Configuration
- Go to Maintenance -> Backup/Restore
Backup/Restore
You can save the current device settings in a backup file in your computer, or restore previous settings from a backup file. You can also reset the device back to its factory default.
Backup Configuration
Click Backup to save the current configuration of your system to your computer.
Backup
Restore Configuration
To restore a previously saved configuration file to your system, browse to the location of the configuration file and click Upload
FilePath:
Browse.
Upload
Back to Factory Defaults
Click Reset to clear all user-entered configuration information and return to factory defaults. After resetting, the
- LAN IP address will be 192.168.1.1
- DHCP will be reset to server
Reset

Connection Status

Network Setting

Security

System Monitor

Maintenance
- Click "Backup".
- Click "Save".
Backup/Restore
You can save the current device settings to its factory default.
Backup Configuration
Click Backup to save the current configura
Restore Configuration
To restore a previously saved configuratio FilePath :
Back to Factory Defaults
Click Reset to clear all user-entered config
-LAN IP address will be 192.168.1.1
- DHCP will be reset to server
Reset
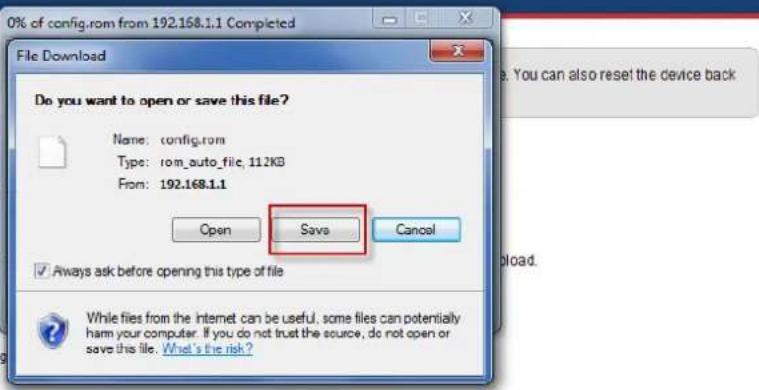
text_image
0% of config.rom from 192.168.1.1 Completed File Download Do you want to open or save this file? Name: config.rom Type: rom_auto_file, 112KB From: 192.168.1.1 Open Save Cancel ✓ Always ask before opening this type of file While files from the internet can be useful, some files can potentially harm your computer. If you do not trust the source, do not open or save this file. What's the risk?
Connection Status

Network Setting

Security

System Monitor

Maintenance
- Select the directory to save and click Save.
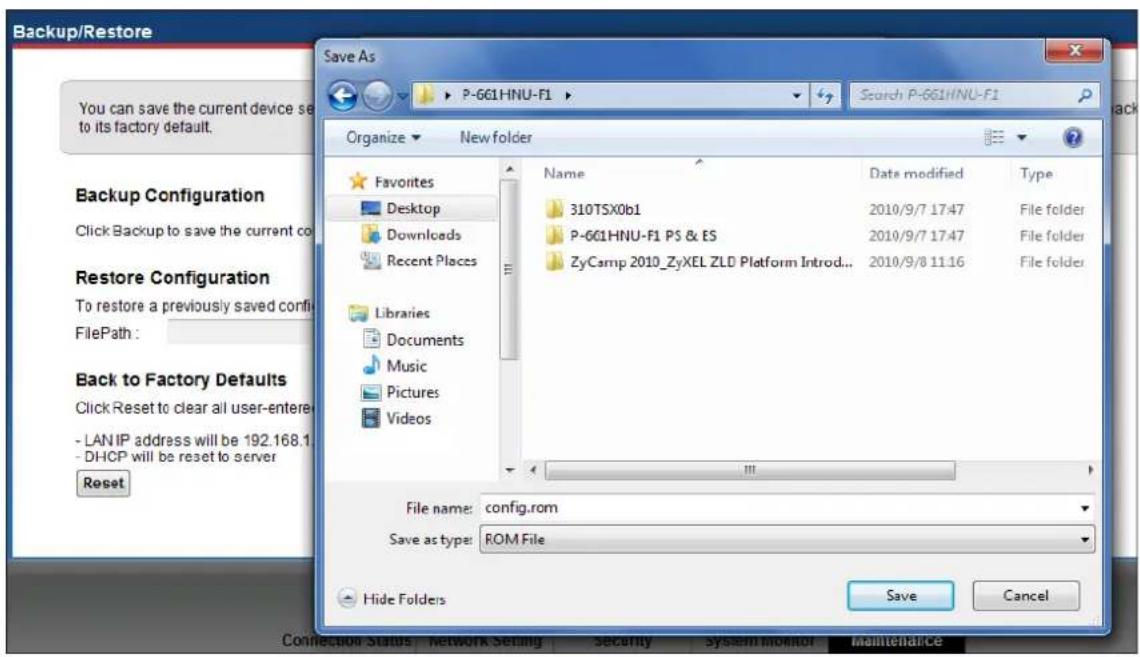
text_image
Backup/Restore You can save the current device set to its factory default. Organize New folder Favorites Desktop Downloads Recent Places Libraries Documents Music Pictures Videos Name Data modified Type 310TSX0b1 2010/9/7 17:47 File folder P-661HNU-F1 PS & ES 2010/9/7 17:47 File folder ZyCamp 2010_ZyXEL ZLD Platform Intro... 2010/9/8 11:16 File folder File name: config.rom Save as type: ROM File Hide Folders Save Cancel Connection Status Network Setting Security System Monitor Maintenance3. Upload Configuration via web GUI
- Go to Maintenance -> Backup/Restore
- Click Browse.
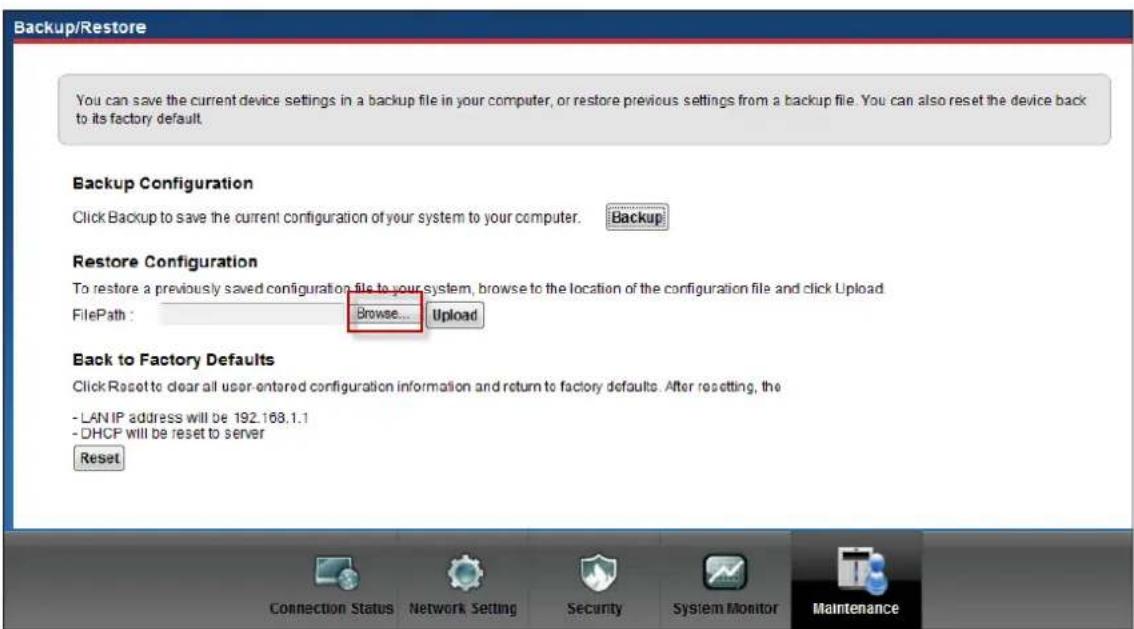
text_image
Backup/Restore You can save the current device settings in a backup file in your computer, or restore previous settings from a backup file. You can also reset the device back to its factory default. Backup Configuration Click Backup to save the current configuration of your system to your computer. Backup Restore Configuration To restore a previously saved configuration file to your system, browse to the location of the configuration file and click Upload FilePath : Browse... Upload Back to Factory Defaults Click Reset to clear all user-entered configuration information and return to factory defaults. After resetting, the - LAN IP address will be 192.168.1.1 - DHCP will be reset to server Reset Connection Status Network Setting Security System Monitor Maintenance- Select the configuration file to upload and click Open.
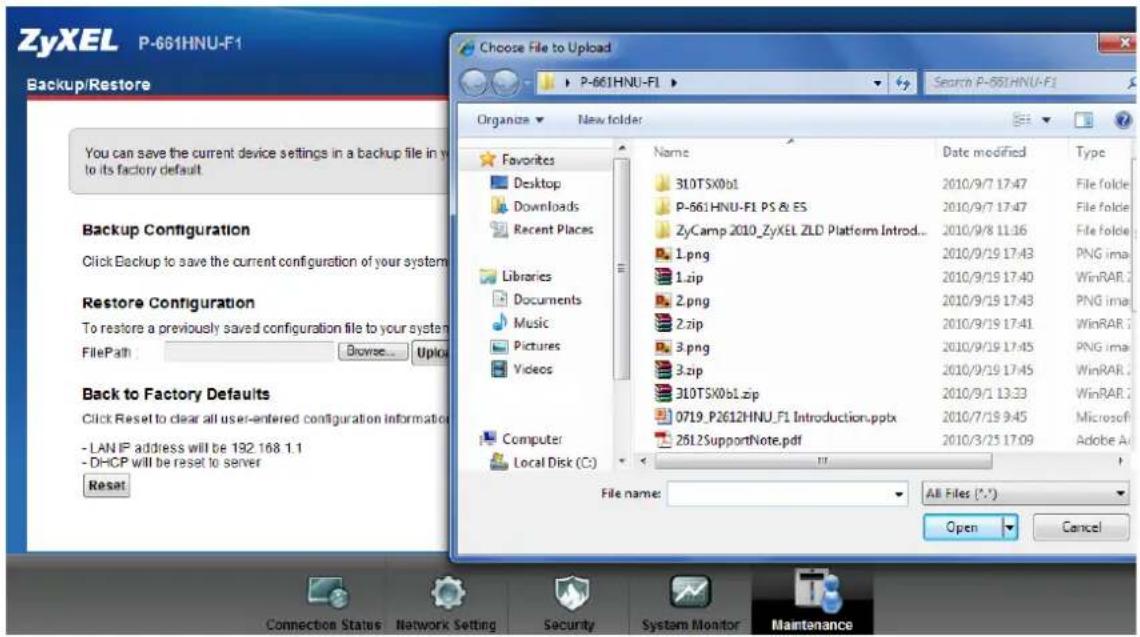
text_image
ZyXEL P-661HNU-F1 Backup/Restore Choose File to Upload P-661HNU-F1 Search P-661HNU-F1 Organize New folder Favorites Desktop Downloads Recent Places Libraries Documents Music Pictures Videos Back to Factory Defaults Click Reset to clear all user-entered configuration information -LAN IP address will be 192.168.1.1 -DHCP will be reset to server Reset Name Date modified Type 310TSX0b1 2010/9/7 17:47 File folder P-561HNU-F1 PS & ES 2010/9/7 17:47 File folder ZyCamp 2010_ZyXEL ZLD Platform Introd... 1.png 2010/9/8 11:46 File folder 1.zip 2010/9/9 17:43 PNG image 2.png 2010/9/9 17:40 WinRAR 2.zip 2010/9/9 17:43 PNG image 3.png 2010/9/9 17:41 WinRAR 3.zip 2010/9/9 17:45 PNG image 310TSX0b1.zip 2010/9/9 13:33 WinRAR 0719_P2612HNU_F1 Introduction.pptx 2010/7/9 9:45 Microsoft 25L2SupportNote.pdf 2010/3/25 17:09 Adobe A File name: All Files (*.*) Open Cancel Connection Status Network Setting Security System Monitor Maintenance4. Using FTP to Upload the Firmware and Configuration Files
In addition to upload the firmware and configuration file via web GUI, you can also upload the firmware and configuration files to the Prestige using FTP.
To use this feature, your could use a FTP client software or just use windows command program. See the example shown below.
• Using FTP client software
Note: The remote file name for the firmware is 'ras' and the configuration file is 'rom'.
| Step 1 | Use FTP client from your workstation to connect to the Prestige by entering the IP address of the Prestige. |
| Step 2 | Enter the Administrator username and password as the FTP login password, the default is 'admin/1234'. |
| Step 3 | Transfer the file to the Prestige. |
Example:
Step 1: Connect to the Prestige by entering the Prestige's IP and Administrator password in the FTP software.
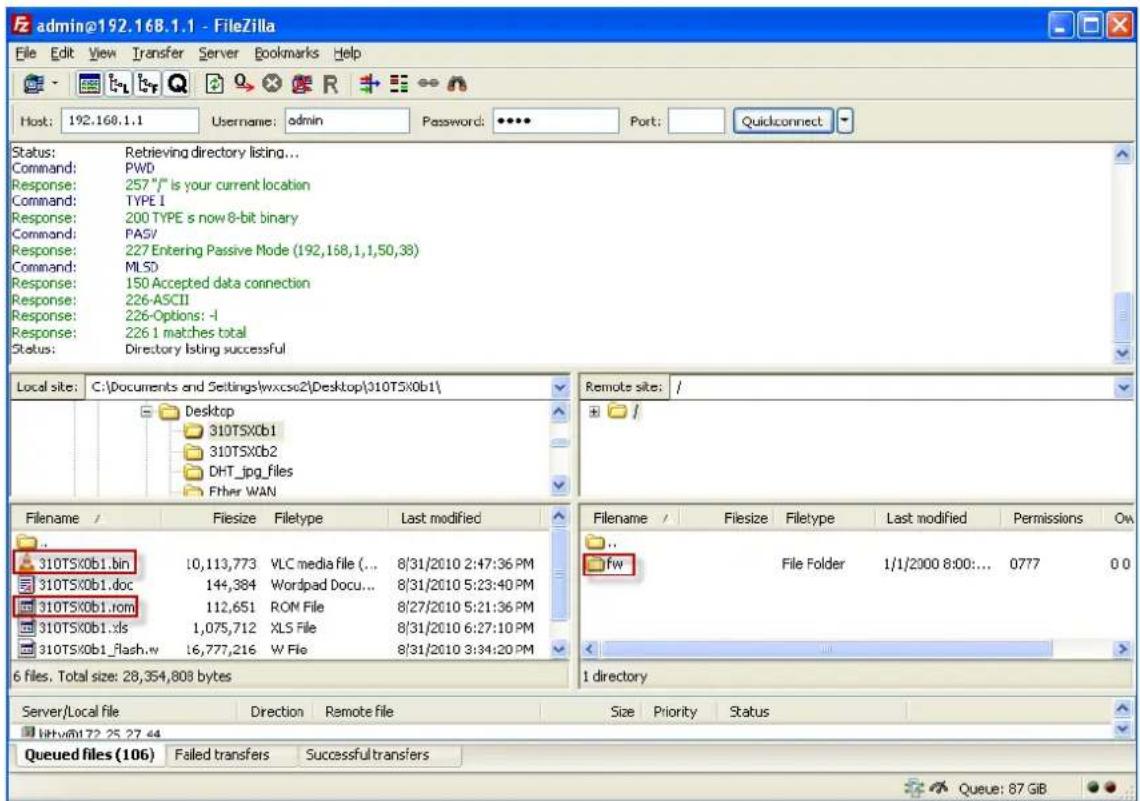
text_image
admin@192.168.1.1 - FileZilla File Edit View Transfer Server Bookmarks Help Host: 192.168.1.1 Username: admin Password: **** Port: Quickconnect Status: Retrieving directory listing... Command: PWD Response: 257 "/" is your current location Command: TYPE I Response: 200 TYPE s now 8-bit binary Command: PAS/ Response: 227 Entering Passive Mode (192,168,1,1,50,38) Command: MLSD Response: 150 Accepted data connection Response: 226-ASCII Response: 226-Options: -I Response: 226 1 matches total Status: Directory listing successful Local site: C:\Documents and Settings\wxcsc2\Desktop\310TSX0b1\ Desktop 310TSX0b1 310TSX0b2 DHT_jpg_files Ether WAN Remote site: / + / Filename / Filesize Filetype Last modified 310TSX0b1.bin 10,113,773 VLC media file (... 8/31/2010 2:47:36 PM 310TSX0b1.doc 144,384 Wordpad Docu... 8/31/2010 5:23:40 PM 310TSX0b1.com 112,651 ROM File 8/27/2010 5:21:36 PM 310TSX0b1.xls 1,075,712 XLS File 8/31/2010 6:27:10 PM 310TSX0b1_flash.w 16,777,216 W File 8/31/2010 3:34:20 PM 6 files. Total size: 28,354,808 bytes Filename / Filesize Filetype Last modified Permissions Ow ... fw File Folder 1/1/2000 8:00:... 0777 0.0 1 directory Server/Local file Direction Remote file Size Priority Status http://t2.25.27.44 Queued files (106) Failed transfers Successful transfersStep 2: To upload the firmware file, we transfer the local 'bin' file to the remote 'fw' fold.
To upload the configuration file, we transfer the local 'rom' to the remote 'fw' fold.
Step 3: The Prestige reboots automatically after the uploading is finished. Please do not power off the router at this moment.
Using Windows command
Step 1: Connect to the Prestige by entering the Prestige's IP to access it.

text_image
Microsoft Windows [Version 6.1.7600] Copyright (c) 2009 Microsoft Corporation. All rights reserved. C:\Users\CS02>ftp 192.168.1.1 Connected to 192.168.1.1. 220---- Welcome to Pure-FTPd [privsep] [TLS] ---- 220-You are user number 1 of 64 allowed. 220-Local time is now 00:27. Server port: 21. 220-This is a private system - No anonymous login 220 You will be disconnected after 15 minutes of inactivity. User (192.168.1.1:(none)):Step2: Enter the Administrator username & password as the FTP login password, the default is 'admin/1234'.
Step3: Find the fw fold and access the fold.
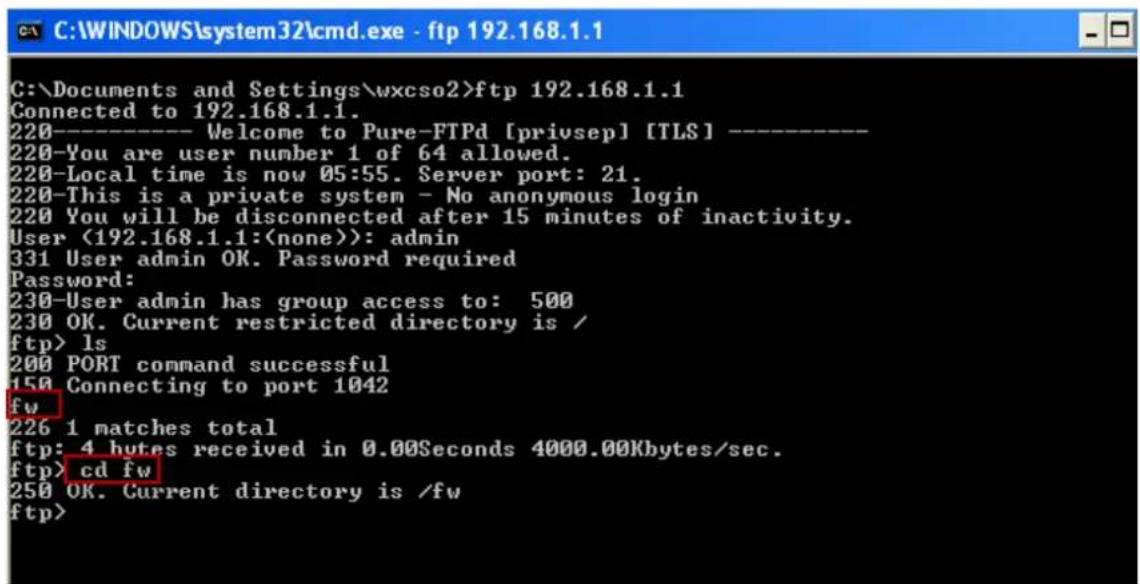
text_image
C:\Documents and Settings\wxcso2>ftp 192.168.1.1 Connected to 192.168.1.1. 220---- Welcome to Pure-FTPd [privsep] [TLS] ---- 220-You are user number 1 of 64 allowed. 220-Local time is now 05:55. Server port: 21. 220-This is a private system - No anonymous login 220 You will be disconnected after 15 minutes of inactivity. User (192.168.1.1:(none)): admin 331 User admin OK. Password required Password: 230-User admin has group access to: 500 230 OK. Current restricted directory is / ftp> ls 200 PORT command successful 150 Connecting to port 1042 fw 226 1 matches total ftp: 4 bytes received in 0.00Seconds 4000.00Kbytes/sec. ftp> cd fw 250 OK. Current directory is /fw ftp>Step4: Enter "binary".
Step5: To upload the firmware file, we put the ras file to the fold. To upload the configuration file, we put the rom file to the fold.
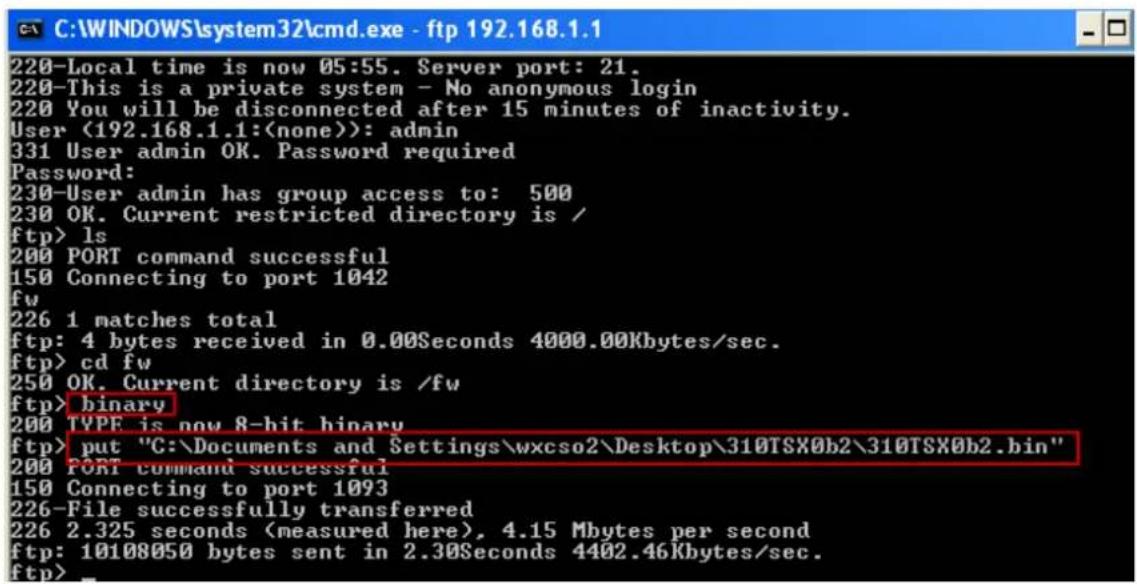
text_image
C:\WINDOWS\system32\cmd.exe - ftp 192.168.1.1 220-Local time is now 05:55. Server port: 21. 220-This is a private system - No anonymous login 220 You will be disconnected after 15 minutes of inactivity. User (192.168.1.1:(none)): admin 331 User admin OK. Password required Password: 230-User admin has group access to: 500 230 OK. Current restricted directory is / ftp> ls 200 PORT command successful 150 Connecting to port 1042 fw 226 1 matches total ftp: 4 bytes received in 0.00Seconds 4000.00Kbytes/sec. ftp> cd fw 250 OK. Current directory is /fw ftp> binary 200 TYPE is now 8-hit binary ftp> put "C:\Documents and Settings\wxcso2\Desktop\310TSX0b2\310TSX0b2.bin" 200 PORT command successful 150 Connecting to port 1093 226-File successfully transferred 226 2.325 seconds (measured here), 4.15 Mbytes per second ftp: 10108050 bytes sent in 2.30Seconds 4402.46Kbytes/sec. ftp>Step6: The Prestige reboots automatically after the uploading is finished. Please do not power off the router at this moment.