MED1000X3D - Media player Mede8er - Free user manual and instructions
Find the device manual for free MED1000X3D Mede8er in PDF.

User questions about MED1000X3D Mede8er
0 question about this device. Answer the ones you know or ask your own.
Ask a new question about this device
Download the instructions for your Media player in PDF format for free! Find your manual MED1000X3D - Mede8er and take your electronic device back in hand. On this page are published all the documents necessary for the use of your device. MED1000X3D by Mede8er.
USER MANUAL MED1000X3D Mede8er
MED1000X3D High Definition 3D Multimedia Player

natural_image
Two remote devices: a silver CD-ROM with a circular lens and a silver TV remote with a keypad (no text or symbols visible)User Manual
Based on Firmware V1.0.3
29 September 2012
INDEX
| page 1 | Index |
| page 2 | Introduction |
| page 3 | Unpacking / Contents |
| page 4 | General Overview |
| page 5 | Installing a Hard Drive |
| page 6 | Connections |
| page 7 | Connections continued |
| page 8 | Power Up & Standby |
| page 9 | TV Output / Audio Settings |
| page10 | Formatting the Hard Drive / USB Connection to PC |
| page11 | Remote Functionality |
| page12 | Placement / External IR Sensor |
| page13 | USB Keyboard / Wired Network |
| page14 | My Shortcuts (Password protected shares) |
| page15 | USB WiFi Dongle / PCIE WiFi |
| page16 | Wireless Setup |
| page17 | Firmware Update Procedure / Web Remote / NDNLA DMR |
| page18 | Home Network Samba Server |
| page19 | Home Page |
| page20 | Media Library |
| page21 | Media Library Continued |
| page22 | Media Library Metadata |
| page23 | Adding Custom Backdrops |
| page24 | Movie JukeBox - XML Search |
| page25 | Using Movie JukeBox - XML Search |
| page26 | Music Jukebox |
| page27 | Music Jukebox Continued |
| page28 | Music Jukebox Continued |
| page29 | Music Jukebox Continued |
| page30 | Music Jukebox Continued |
| page31 | Cover Art Preview in Media Library |
| page32 | Play Folder / Play Video From Cover Art / Watched Indicator |
| page33 | Lock Facility / Pin Code / Folder Protection / Safely Remove USB |
| page34 | Favourites Manager |
| page35 | Adding Genre Art to Favourites / Locking - Unlocking Favourites - Scan XML |
| page36 | Video Info - GOTO Search / Alpha Jump |
| page37 | 3D Menus / Toggle BD Manu / Video Zoom |
| page38 | Subtitles |
| page39 | Music Playlists / File Manager |
| page40 | File Manager Multiple Files |
| page41 | Pictures |
| page42 | Plasma Mode / Autoplay / Internet Media |
| page43 | NFS |
| page44 | Transmission BT |
| page45 | Setup Menu |
Thank you for purchasing the Mede8er Multimedia Player.
Mede8er has achieved the ultimate balance in design and functionality with the new MED1000X3D High Definition 3D Multimedia Player. It may look like an alien spaceship but we can assure you that it was designed and developed by very passionate people right here on Earth.
The Mede8er has some very unique features so we suggest you read this guide and visit the Mede8er forum for additional help and information. The firmware is always “work in progress” so we suggest you regularly check the Mede8er forum for updated firmware releases and updated User Manuals.
Please check the Mede8er forum for the latest user guide. www.mede8erforum.com
Warranty International
Mede8er products carry a 12 month from date of purchase warranty. In the event of warranty service please provide proof of purchase. Return your product to the store that it was purchased from or return it directly to Sanji Electronics (Pty) Ltd 12, Saddle Drive Woodmead Office Park, Woodmead, Gauteng, South Africa.
Warranty & Support Europe
Mede8er products carry a 60* month from date of purchase limited warranty. In the event of warranty service or support, please contact one of the Mede8er Service Centers; www.mede8er.eu/support, support@mede8er.eu or call +31(0)10-7142861 during business hours (CET). In order to obtain the extended warranty service of in total 60* months after purchase, you need to register your product on www.mede8er.eu/register within 1 month after purchase. * On accessories 24 months applies.
Warranty does not cover damage by
a) Lightning or over voltage b) Water damage or liquid spill c) Misuse or abuse d) User tampering e) Using non Mede8er approved Firmware
Sanji Electronics (Pty) Ltd is not responsible for any loss of data irrespective of the cause.
Important Safety Instructions
Read these instructions for all components before using this product.
During electrostatic discharge and the strong electromagnetic field, the product may malfunction. In such a case, unplug the power cable to power off your player and the player will return to normal performance next time it is powered on.
- Do not use this apparatus near water or moisture. Do not use this product near a bathtub, washbowl, kitchen sink, laundry tub, in a wet basement, near a swimming pool, or anywhere else that water or moisture are present.
- Clean only with a soft dry cloth and as directed by the manufacturer. Unplug this product from the wall outlet before cleaning.
- Do not block any ventilation openings. Install in accordance with the manufacturer instructions. To ensure reliable operation of the product and to protect it from overheating, put the product in a position and location that will not interfere with its proper ventilation. For example, do not place the product on a bed, sofa, or similar surface that may block the ventilation openings. Do not put it in a built-in system, such as a bookcase or a cabinet that may keep air from flowing through its ventilation openings.
- Do not install near any heat sources, such as radiators, heat registers, stoves or other apparatus that produce heat.
- Protect the power cord from being walked on or pinched, particularly at plugs, convenience receptacles, and the point where they exit from the apparatus.
- Only use attachments or accessories specified by the manufacturer.
- Unplug this apparatus during lightning storms or when unused for long periods of time to prevent damage to this product.
UNPACKING / CONTENTS
Contents: - X3 Remote, European Region only - AC/ DC Adapter 2 Pin Euro with slot in UK Plug, International Region - 2 Pin Euro AC/DC Adapter, USB3.0 Cable, HDMI 1.4 Cable, AV Cable, Zip Bag with Hard Drive Securing Screws, Spare X3 remote side buttons.

natural_image
Front view of a silver remote control with keypad and function buttons (no visible text or symbols)X3 Remote

natural_image
Black cable with multiple red, gray, and yellow connectors (no text or symbols visible)AV Cable

Hard Drive Securing Screws

natural_image
Blue USB cable with gold connector, no text or symbols visibleUSB 3.0 Cable
natural_image
Black HDL cable with gold connectors, no text or symbols visibleHDMI 1.4 Cable

natural_image
Electric power adapter with black body, cable, and terminal plug (no visible text or symbols)
natural_image
Electric power adapter with black body, cable, and two terminal leads (no visible text or symbols)AC/DC Adapter Europe / UK AC/DC Adapter International
Spare X3 Remote Side Buttons
Remove 5.5mm
Foam Pad
Should your X3 be pre bundled with a thinner casing Hard Drive then you must remove the protective foam pad that is placed on top of the hard drive.
natural_image
Technical line drawing of a mechanical component with no visible text or symbolsGENERAL OVERVIEW
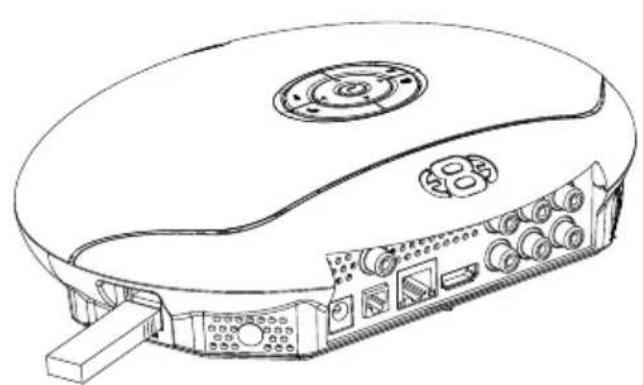
text_image
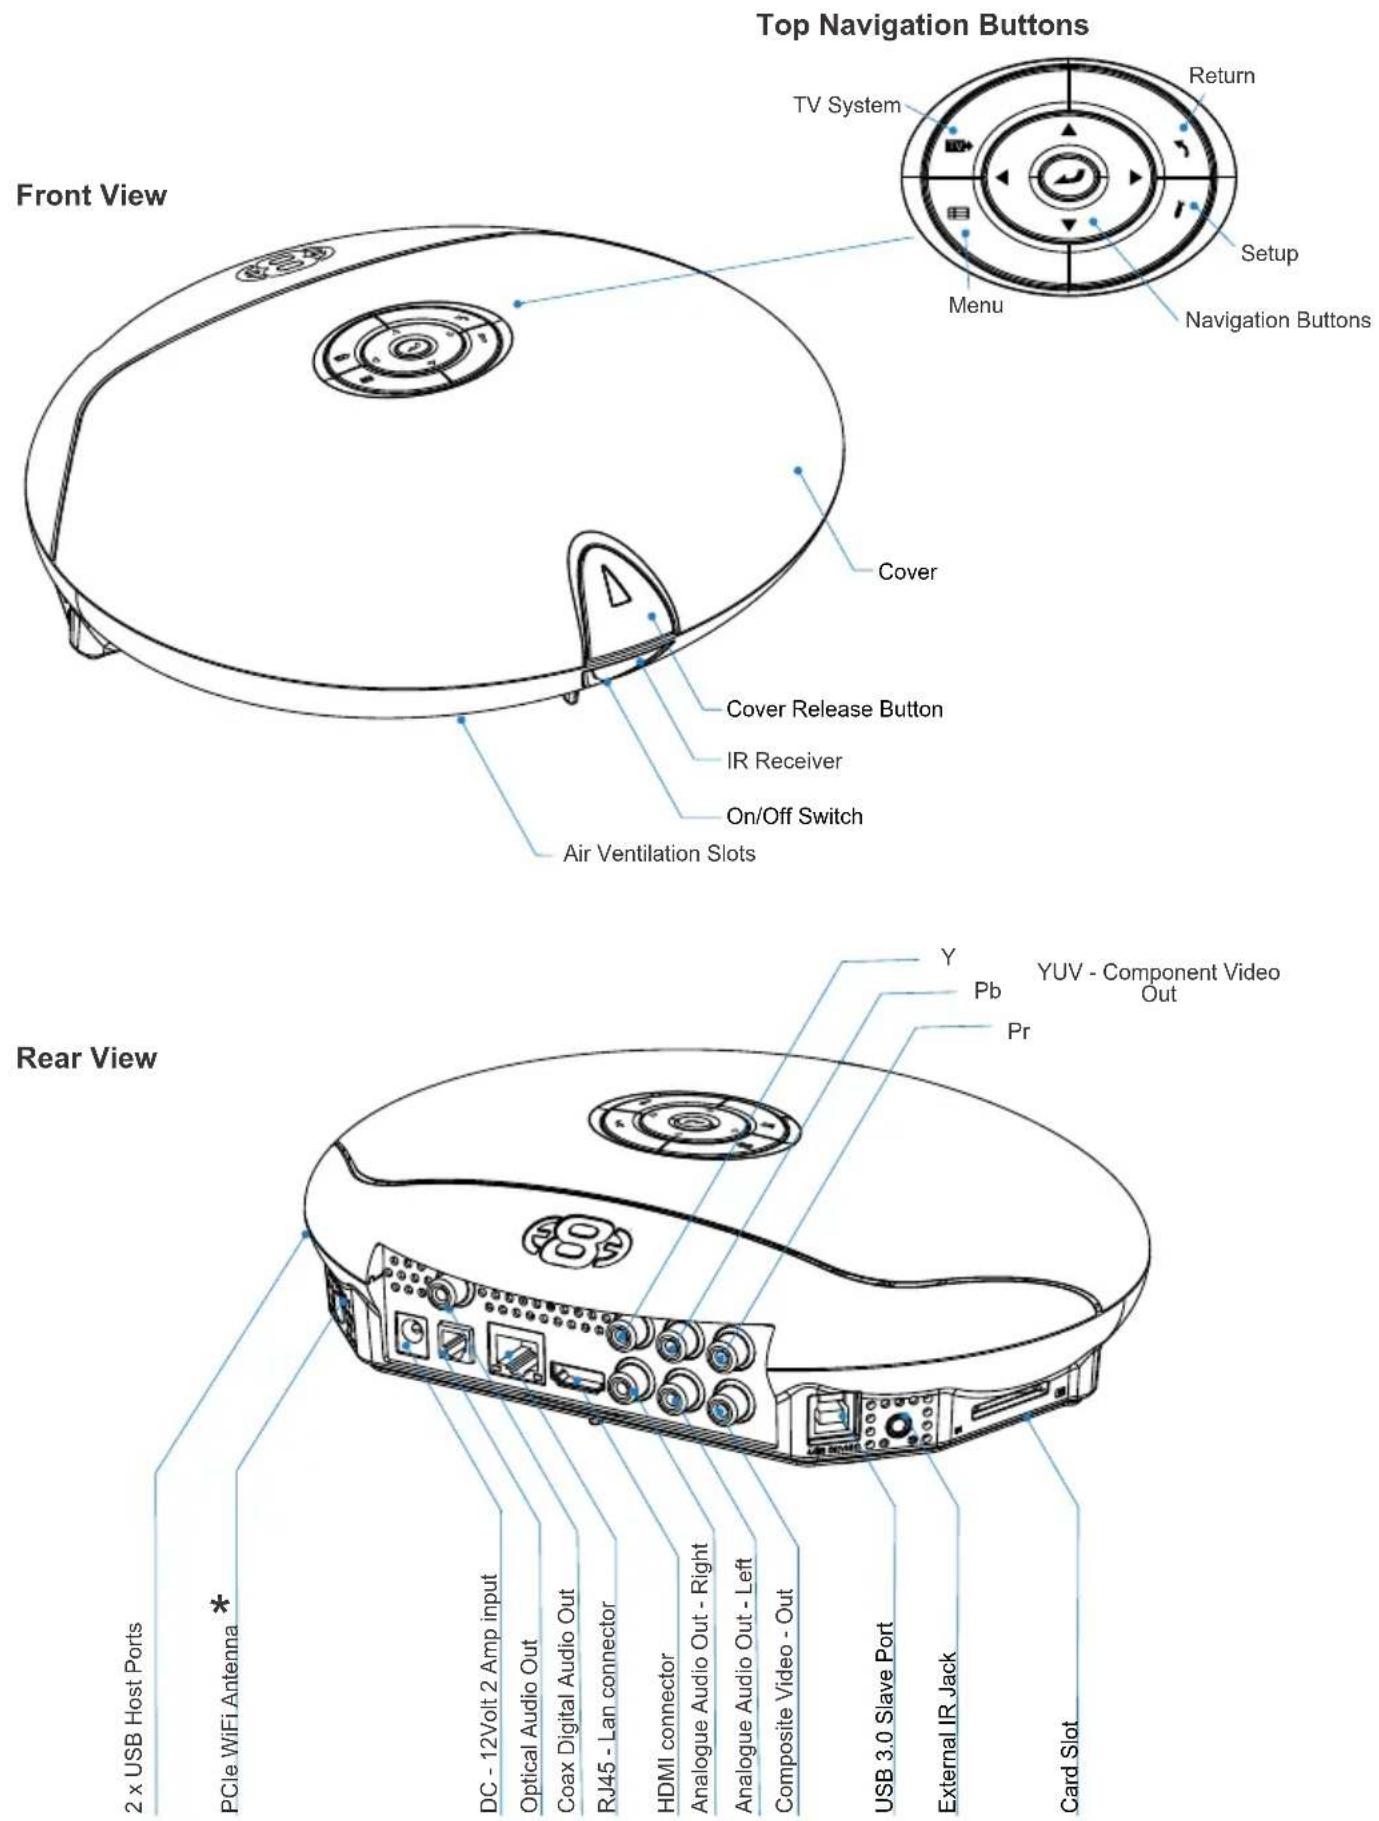
Top Navigation Buttons TV System Return Menu Setup Navigation Buttons Front View Cover Cover Release Button IR Receiver On/Off Switch Air Ventilation Slots Y Pb Pr YUV - Component Video Out Rear View 2 x USB Host Ports * PCle WiFi Antenna DC - 12Volt 2 Amp input Optical Audio Out Coax Digital Audio Out RJ45 - Lan connector HDMI connector Analogue Audio Out - Right Analogue Audio Out - Left Composite Video - Out USB 3.0 Slave Port External IR Jack Card SlotINSTALLING A HARD DRIVE

text_image
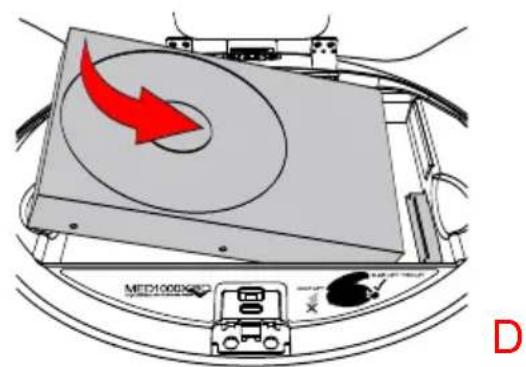
A B 3.5" HDD 2.5" HDD CMost 3.5" or 2.5" SATA Hard Drive can be installed into the X3. If the unit is going to be moved around or transported we strongly suggest you use the supplied Hard Drive securing screws. Use the Silver screw for 3.5" Hard Drives and the Black screw for 2.5" Hard Drives. Screw them in as shown in 'A' then turn the Hard Drive around as shown in 'B'. Press the lid opening release button as shown in 'C' and carefully lift the lid up to its maximum position.
text_image
MCD1000X D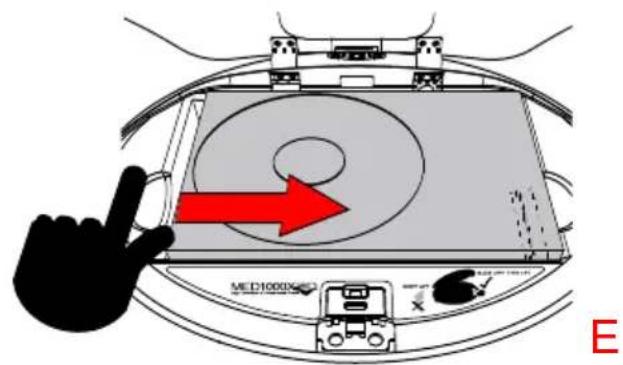
text_image
MED10000 ECarefully slide the Hard Drive into position as shown in 'D'. To secure the Hard Drive and engage the connector you need to push the Hard Drive casing with the left hard to to right side as shown in 'E'.

text_image
2.5" HDD F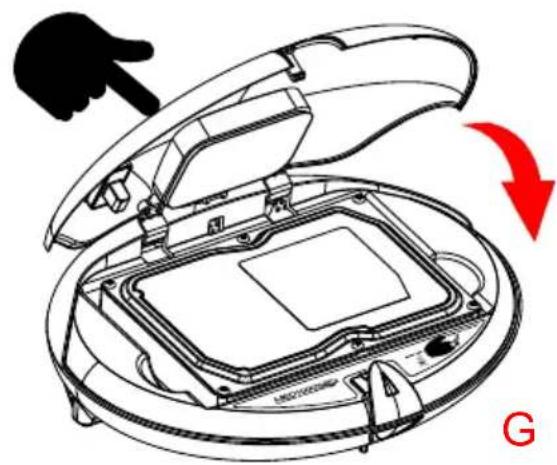
natural_image
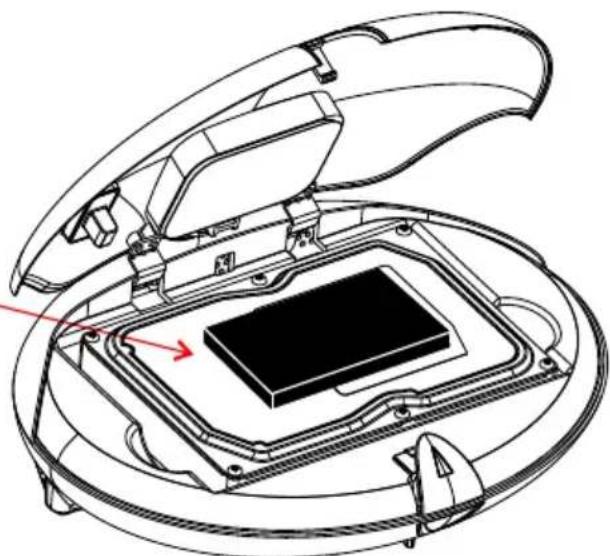
Diagram of a robotic vacuum cleaner with open lid and internal circuit board, showing red directional arrow (no text or symbols)2.5" HDD Securing Screw (BLACK)
If you are using a 2.5" Hard Drive then you must use the Black 2.5" Hard Drive securing screws and additionally add a black screw as indicated in 'F'. Once you have completed the Hard Drive fitment then close the lid as shown in 'G'
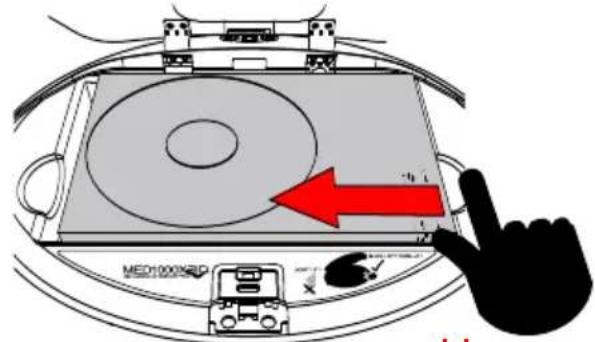
To remove the Hard Drive you must firstly release it on the Devices screen with F2 Button functionality or switch the X3 'off' and then push the Hard Drive casing with your right hand finger to the left side as indicated in 'H'. The Hard Drive will be released from the Sata connector and then it can be lifted out.
text_image
MED100036P ← →H
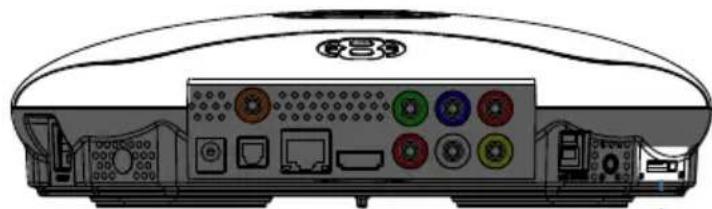
CONNECTIONS

natural_image
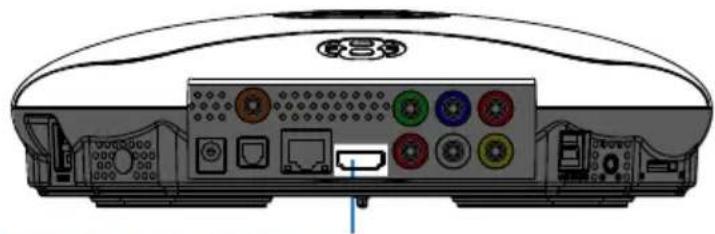
Back panel of a computer interface showing ports, buttons, and a central display (no text or symbols visible)HDMI 1.4 Cable
HDMI offers the best picture quality and should be used in preference of any other connection. Use the supplied HDMI 1.4 Cable for use with the X3. The HDMI can be connected to a AV Amplifier or directly to a TV.

natural_image
Three colored audio/video cables (red, blue, green) connected by wires, no text or symbols visible.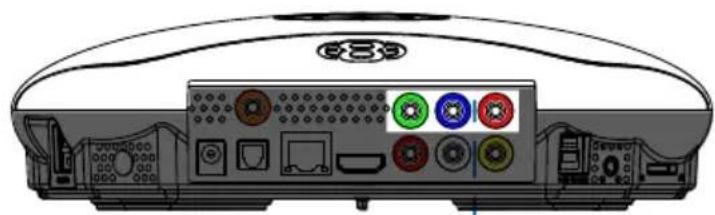
natural_image
Back panel of a computer interface showing ports, connectors, and a central display (no readable text or symbols)Component YUV
Component Video offers the next best picture quality to HDMI so if your system does not have a HDMI input we suggest you use the Component Video Connection.

natural_image
Three colored audio/video cables (white, red, yellow) with no text or symbols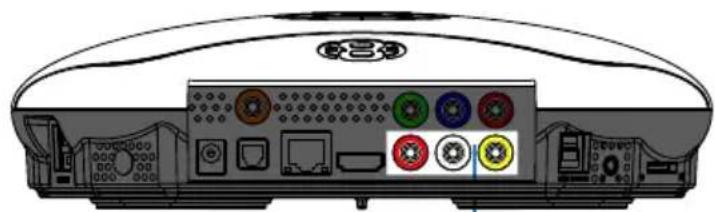
natural_image
Back panel of a computer interface showing ports, buttons, and a central display (no text or symbols visible)Composite Video / Analogue Audio
Composite Video offers the most basic picture quality connection and should only be used if your TV does not have a HDMI or Component Video input. Use RCA analogue audio outputs in the absence of HDMI or Digital Audio inputs on your TV or Home Theatre system. RCA analogue outputs will downmix all content from mutli-channel to stereo.

natural_image
Illustration of two connected audio/video cables with orange and gray connectors (no text or symbols)
natural_image
Back panel of a computer interface showing ports, buttons, and a central display (no readable text or symbols)Co- Axial Digital / SPDIF Optical Audio
For digital audio connection to your Home Theatre System you can either use the TOSLINK Optical or the Co-Ax Digital output. The X3 supports both Passthrough and Downmix for both Dolby Digital and DTS signals. If you want your Home Theatre Amplifier to decode the surround sound Bit Stream you can use either either output and set the Audio Output to SPDIF Passthrough in the Setup menu.


natural_image
Back panel of a computer interface showing ports, buttons, and a central display (no text or symbols visible)Rj45 Ethernet Network
The X3 is equipped with Rj45 connector for connection to a wired network.
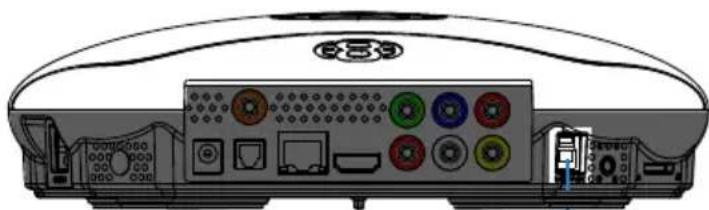
CONNECTIONS CONTINUED
natural_image
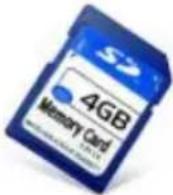
Back panel of a computer interface showing ports, connectors, and a central display (no text or symbols visible)SD Card Slot
SD / SDHC / Sony Pro Due Memory Cards supported.


natural_image
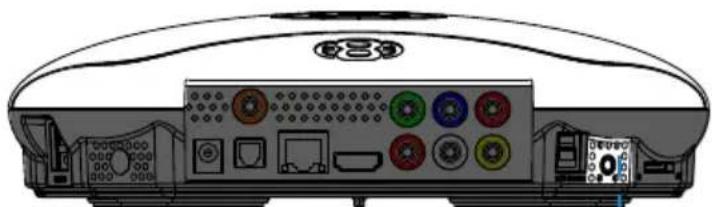
Back panel of a computer interface showing ports, connectors, and a central display (no text or symbols visible)DC Power Jack
DC input is specified at 12 Volt 2 Amp DC. Important-- Only use the supplied AC DC Adapter.


natural_image
Back panel of a computer interface showing ports, connectors, and a central control panel (no text or labels visible)2 X USB Host Ports
Host up to two external 'Type A' connector USB Devices. Note - Many USB External drives require an independent power source and must be supplied power from there own power supplies.

natural_image
Back panel of a computer interface showing ports, buttons, and a CD89 logo (no readable text or symbols beyond branding)USB 3.0
You can transfer files to and from the X3's internal hard drive via USB2.0 or USB3.0 transfer.

natural_image
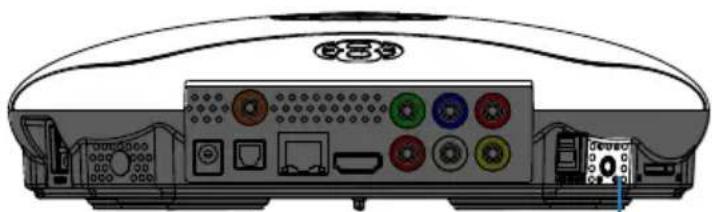
Back panel diagram of a computer interface showing ports, connectors, and drive slots (no text or labels visible)External IR Jack (Not Supplied)
The X3 is equipped with an external IR Jack for those who want to add a third party external IR Receiver to the unit.
POWER UP AND STANDBY
Plug the AC/DC adapter into the mains outlet and plug the DC Jack into the DC IN at the rear of the X3. DO NOT USE ANY AC/DC ADAPTER AND ONLY USE THE ONE SUPPLIED otherwise you may cause damage to the unit. The Navigation Pad LED will light up 'RED'. Press the On/Off button on the X3 front panel and Navigation Pad will LED will turn to Blue. You can switch the X3 'Off' by pressing the 'On/Off' button on the remote or by pressing the 'On/Off' button on the unit. When in standby the Top Navigation LED will turn Red.

natural_image
Line drawing of a CD-ROM device with ports and connectors (no text or symbols)Multi Voltage AC/DC Power Adapter

natural_image
Illustration of a hand pointing at a mechanical component with a dome-shaped component above a rail (no text or symbols)On/Off Button
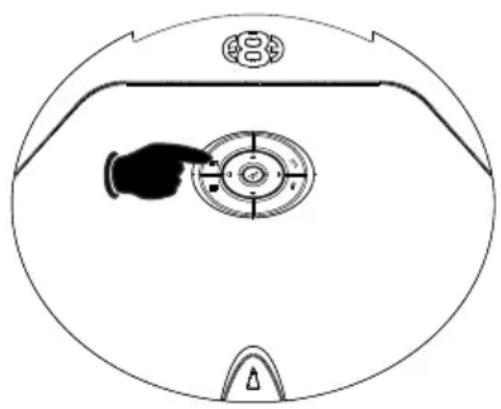
SCREEN CALIBRATION
For better accuracy in Video Play and Image Zoom we suggest you calibrate your TV screen. Go to System Setup then Video and select Screen Size.

text_image
ADJUST THE RED SQUARE TO THE SIZE OF YOUR SCREEN PRESS "ENTER" TO SAVE
natural_image
Blue hand pointing at a circular mechanical component with directional arrows (no text or symbols)Press Enter to save
Using the left, right, up and down navigation buttons you can adjust the red rectangle to fit the outer frame of your TV screen. Note - Do not oversize the screen size as this could result in image artifacts when viewing still images on certain brands of TV's.
TV OUTPUT SETTINGS
If you do not get to see the X3 GUI on your TV you will need to toggle the X3 TV output until you get a picture.
TV SYS Toggle Procedure
The X3 has three video output options ie Composite Video (yellow RCA connector, Component Video (Red - Green- Blue connectors) and HDMI. Each output option offers different screen resolution settings and these will need to be adjusted to match the type of TV used.
It is suggested to use the Setup Menu to change the TV Out resolution. If you do not get a picture in the first place then you can try to change the TV Out Resolution via the TV Sys button. To change the Video Output on the X3 press the TV SYS button on the remote and it will change the Video Output to the next available output option. If after pressing the TV SYS button you still do not get a picture then press the TV SYS again until you see the X3 GUI on your TV. Keep repeating this procedure until you see a picture on your TV.
natural_image
Top-down schematic of a device with a hand pointing to a circular component, enclosed in a circular frame (no text or symbols)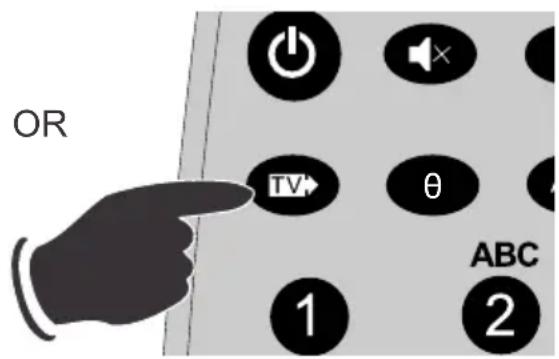
text_image
OR TV θ 1 2 ABCOnce you see the X3 GUI on your TV then you must enter the Video Setup mode and adjust the Video settings to match the screen size resolution of your TV.
AUDIO SETTINGS
Surround Sound
Select "Don't Care" if you are using 2 CH stereo. If you are using SPDIF or Co-Axial Digital then select "AC3". If you are using HDMI Audio to amplifier then select "True HD"
HDMI Auto
HDMI Auto is the suggested setting for HDMI Audio. All audio will automatically passed through to the amplifier - Dolby / DTS Bitstream - Dolby True HD / DTSMA - PCM / Multi-Channel LPCM. It is suggested to always use HDMI Auto in preference to HDMI Passthrough or LPCM Multi CH
SPDIF Passthrough
Use this setting to connect to an amplifier via Toslink optical cable or Co-Axial Digital RCA cable. The sound will be passed through as Bitstream or PCM and the amplifier. Dolby True HD and DTSMA HD Audio and Multi-Channel LPCM will not work on either SPDIF option.
SPDIF Downmix (2 channel)
Use this setting to connect to a Amplifier via Toslink optical cable or Co-Axial Digital RCA cable. The sound will be downmixed to 2 channel stereo.
FORCE DECODE AAC/MP3
Use this setting if you do not get AAC/MP3 Audio in HDMI 'Auto' or Passthrough.
FORMATTING THE HARD DRIVE
The X3 has a built in Hard Drive format feature that formats the internal hard drive. Once the Hard Drive is formatted in the X3 it will have a main NTFS partition and two small internal Linux partitions for propriety use.
The Hard Drive should be formatted in the X3 to ensure full functionality. A pre formatted Hard Drive can be used but you may not be able to use all the internal features of the X3.
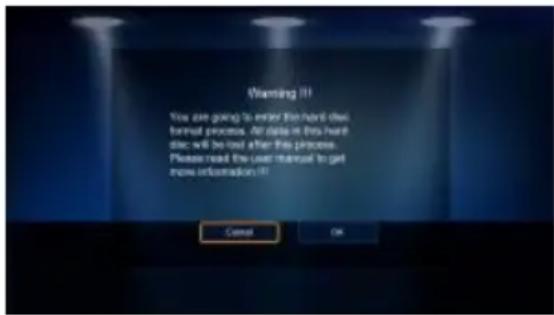
To Format the internal Hard Drive select Setup menu and then HDD Format. The Hard Drive format function can be protected by the built in "Pin Code Lock" function. To enable Hard Drive Format protection you must enable "Pin Protection" option in the Setup menu.
text_image
Warning (I) You are going to enter the hard disk tunnel process. All data in this hard disk will be lost after this process. Please read the user manual to get more information (I) Cancel OK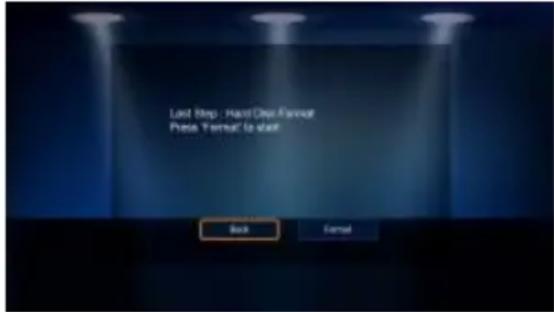
text_image
Last Step: Hard-Dry Format Press Format is left. Back FormalWARNING: FORMATTING THE HARD DRIVE WILL ERASE ALL DATA
VIRGIN HARD DRIVES SHOULD BE FORMATTED TWICE BEFORE USE
USB CONNECTION TO PC
You can transfer files to and from the X3 via USB2.0 or fast USB3.0 transfer. Use the included Blue USB3.0 cable to connect the X3 to your PC. After you have connected the USB cable press the on/off button on the X3 and the LED's on the navigation buttons will turn "off". The Computer will automatically install the correct drivers and then you will be able to navigate the X3 like any normal external USB drive. Note: Some Computers may take up to a few minutes to install the correct USB drivers. If you cannot connect to the X3 than try another USB Port on your computer. The PC will detect the X3 and it will display a connection Dialogue Screen.
If you are using Windows 7 it may prompt you to do format on the Linux Partitions and you must not accept this and select 'Cancel'
Windows 7 PC's displays the propriety Linux partitions on 3TB hard drives so you must follow these instruction to hide these.
1) Right-Click on 'Computer' Icon on desktop
2) Select 'Manage'
3) Select 'Disk Management'
4) All your Hard Disk drives and its partitions will be show in the right hand side
5) Locate the X3 drive
a) It will show a main NTFS Partition 2789.85GB (This is the one you will use)
b) 118MB RAW Partition (Linux)
c) 509MB RAW Partition (Linux)
6) Right-Click on 'b' Linux Partitions and select option 'Change Drive Letter and Path' --- A new dialogue screen will open with the Partition showing and now select 'Remove'
7) Repeat Step 6 for 'c'
The Linux Partitions will now be hidden when you connect the X3 to your PC
Windows Checkdisk
When you connect any USB Drive to a Windows PC it will prompt you to do a file system check 'checkdisk' and you should accept this as this as it will attempt to fix any file systems errors on the Hard Drive.
EXTERNAL USB DEVICE DRIVER NOT REQUIRED
IMPORTANT:
FOR USB3.0 - USE THE SUPPLIED BLUE USB3.0 CABLE.
FOR USB2.0 - USE THE SUPPLIED BLUE CABLE OR ANY USB2.0 BLACK CABLE.
REMOTE FUNCTIONALITY
text_image
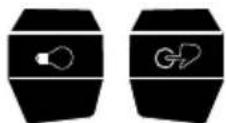
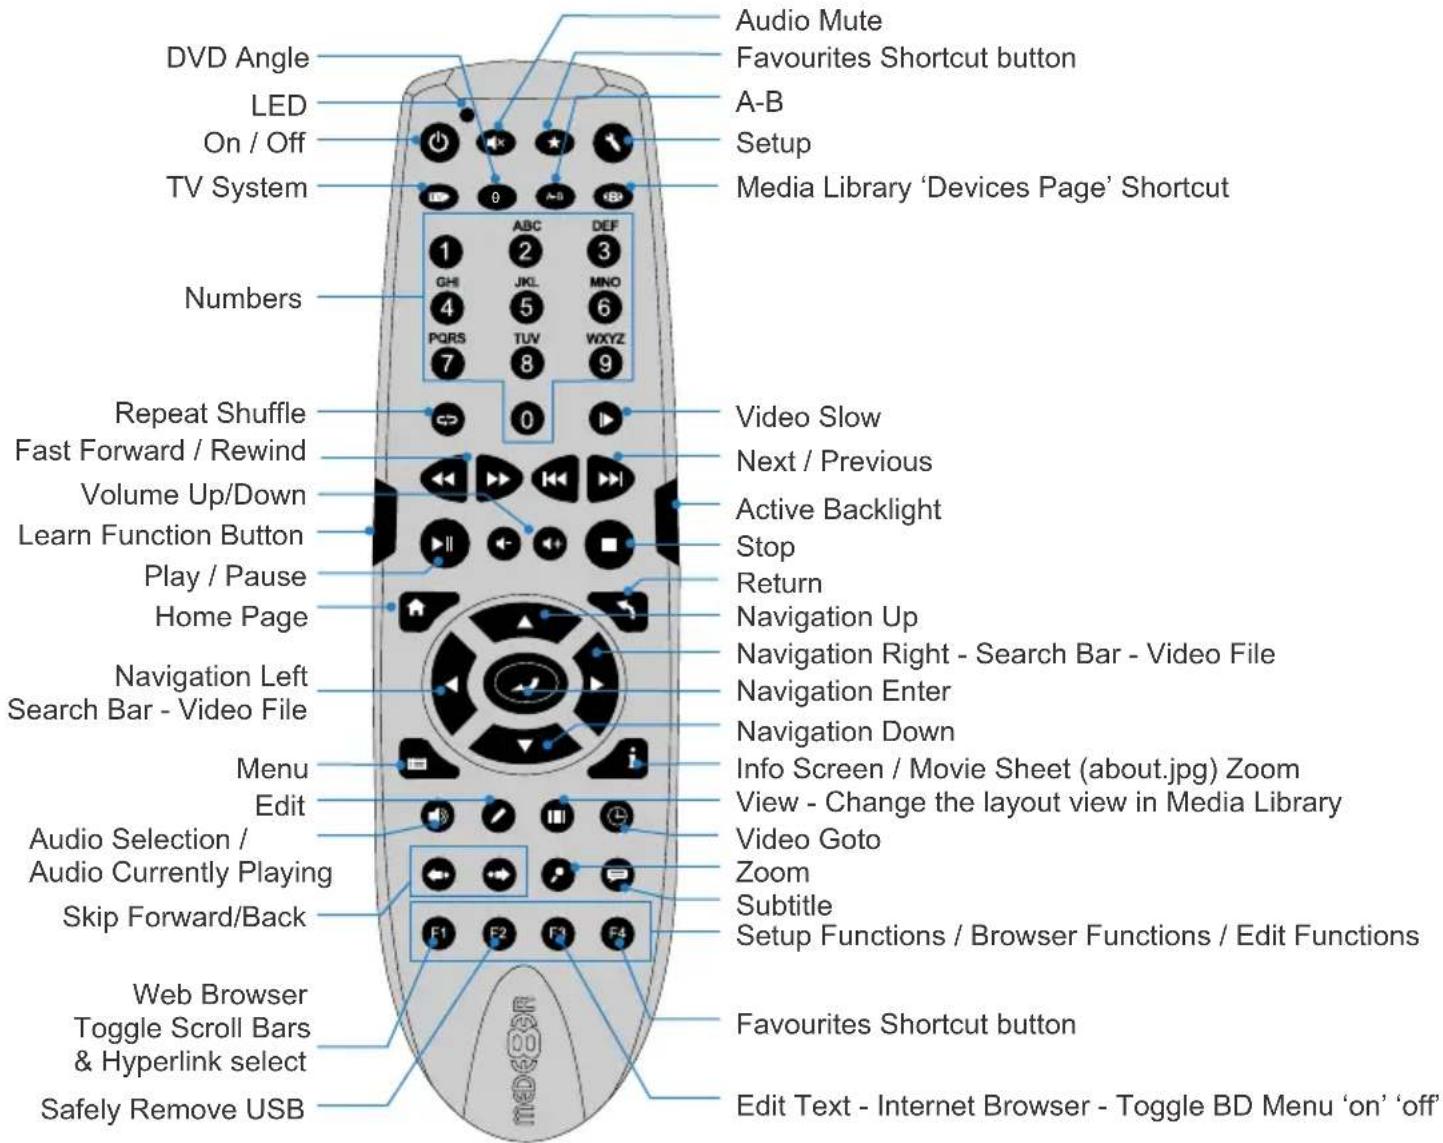
DVD Angle LED On / Off TV System Numbers Repeat Shuffle Fast Forward / Rewind Volume Up/Down Learn Function Button Play / Pause Home Page Navigation Left Search Bar - Video File Menu Edit Audio Selection / Audio Currently Playing Skip Forward/Back Web Browser Toggle Scroll Bars & Hyperlink select Safely Remove USB Audio Mute Favourites Shortcut button A-B Setup Media Library 'Devices Page' Shortcut 1 ABC DEF 2 3 4 JKL MNO 5 6 6 PQRS TUV WXYZ 7 8 9 Video Slow Next / Previous Active Backlight Stop Return Navigation Up Navigation Right - Search Bar - Video File Navigation Enter Navigation Down Info Screen / Movie Sheet (about.jpg) Zoom View - Change the layout view in Media Library Video Goto Zoom Subtitle Setup Functions / Browser Functions / Edit Functions Favourites Shortcut button Edit Text - Internet Browser - Toggle BD Menu 'on' 'off'Remote Back Light

The X3 remote uses active Back Light technology. The activation button is conveniently located on the right side of the remote for easy access in the dark. Press the Back Light button and the remote buttons will light up. The backlighting will auto switch 'off' after 15 seconds of no activity. Press the Back Light button to manually switch 'off' the Back Lighting.
text_image
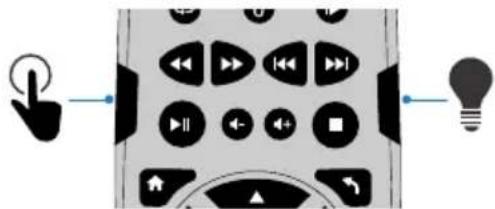
Diagram showing a mobile phone interface with playback controls, navigation buttons, and a lightbulb symbol connected to it.Remote Function Button

You can assign any button on the remote to the 'Function' button. This is designed to be used as a shortcut button for a function that is used a lot.
To assign a button -- press the 'Function Button' for 3 seconds and the Remote will enter 'Learn Mode' and the LED will turn on solid. Now press the button you want to assign and it will be learned and the LED will flash and then turn off. You can change the function button assignment at any time by repeating this procedure.
REMOTE SIDE BUTTON REPLACEMENT
Should the remote TPE side buttons get worn or damaged you can install the spare set of button that are supplied standard with the X3. Remove the side TPE side buttons. Place the correct side solid button into position and push it firmly and the button will self lock into position.

text_image
Diagram showing two mechanical components with red arrows indicating motion or force, one pointing at a button and the other holding a cylindrical object.PLACEMENT
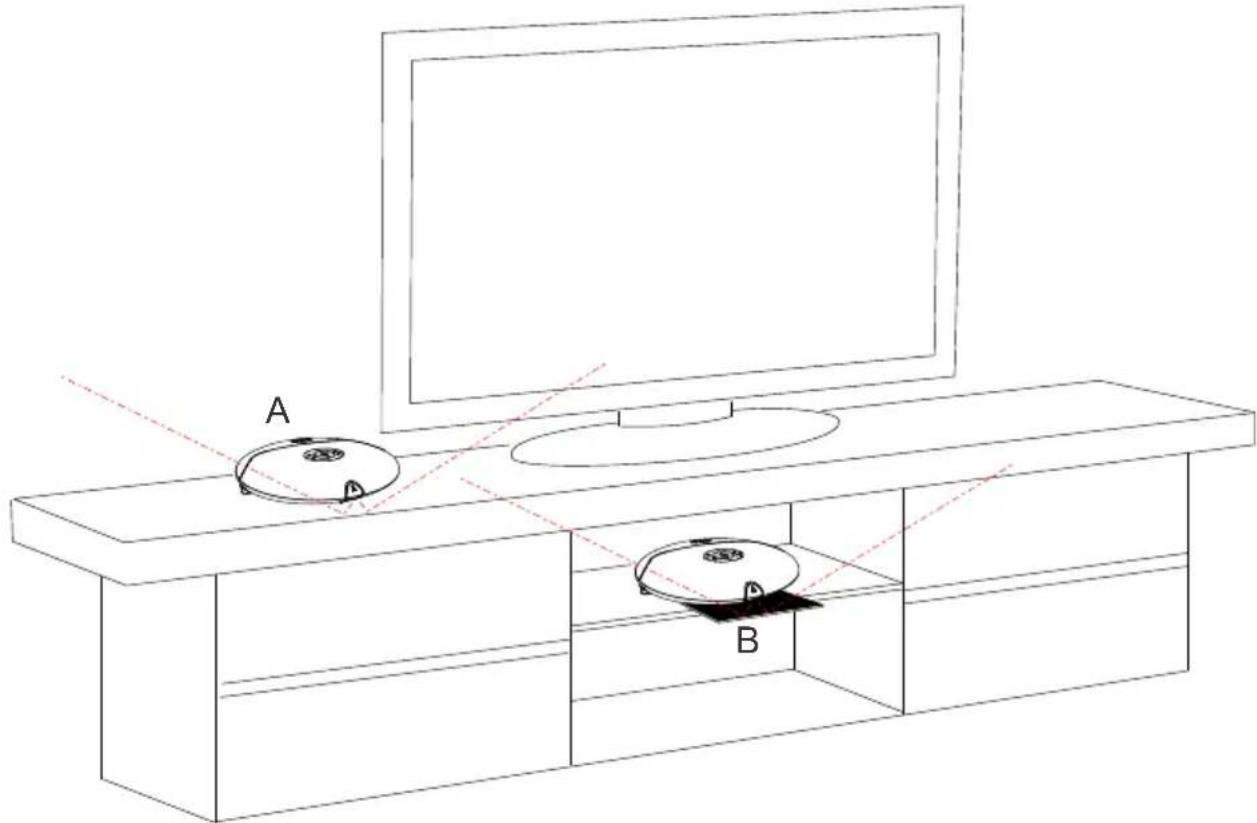
text_image
A BThe X3 is designed to be placed on the top of a TV cabinet so that the IR Receiver can receive reflected IR signals from the ceiling and walls - 'A' diagram above. The X3 should not be placed to close to the front edge as it uses the front surface to receive the reflected signals. If the top shelf of the cabinet is glass or perspex then we suggest you place a solid material matt underneath the X3 protruding approximately 40mm to the front.
Should you require to place your X3 on a shelf inside the cabinet - 'B' diagram above - then we suggest you place it very close to the front edge. Now place a reflector made of any solid material under the X3 and protruding by approx 40mm to the front. You can use any solid material as a Infra Red reflector and even a plain piece of folded photo copy paper will work.
EXTERNAL IR SENSOR

natural_image
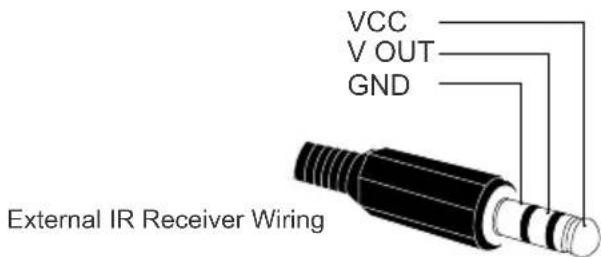
Front view of a computer interface panel with ports, buttons, and a logo (no readable text or symbols beyond basic labels)External IR Sensor (Not Supplied)
The X3 is equipped with an external IR Jack for those users who require to place the unit in a particular location that is not in line-of-site of the remote. A third party external IR Receiver can be used as long as the wiring termination is the same as the diagram below. For those who want to make the external IR cable themselves we can recommend the Vishay part TSOP31138 (or equivalent) as it has been tested and works well with the X3 .
text_image
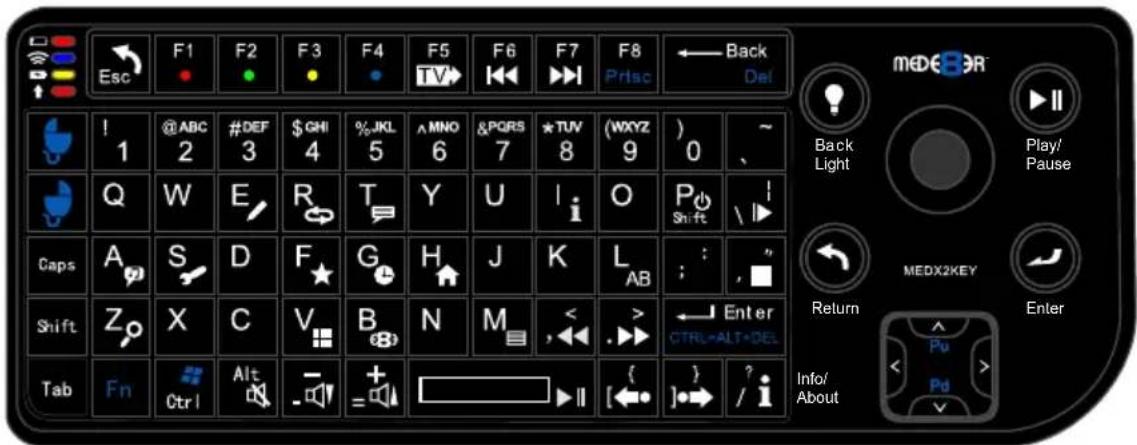
VCC V OUT GND External IR Receiver WiringUSB Keyboard Function Keys (based on MEDX2KEY) Optional Extra
text_image
Esc F1 F2 F3 F4 F5 F6 F7 F8 Prisc Back Del ! 1 @ABC 2 #DEF 3 $GHI 4 %JKL 5 ^MNO 6 &PQRS 7 *TUV 8 (WXYZ 9) 0 ~ Q W E R T Y U I O P Shift / Caps A S D F G H J K L AB : , " Shift Z X C V B N M < > ← Enter CTRL=ALT+DEL Info/ Tab Fn Ctrl Alt - + = [←] → ? / i Info/ Back Light Play/Pause MEDX2KEY Return Enter Pu Pd Info/ About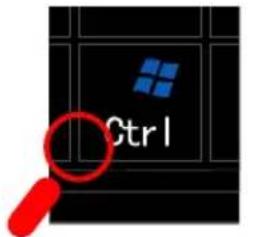
text_image
Ctrl'Ctrl' - ZOOM YouTube, Internet Browser
ESC: RETURN SPACE: PLAY
ENTER: SELECT(ENTER)
'0': 0 '1': 1 '2': 2 '3': 3 '4': 4 '5': 5 '6': 6 '7': 7 '8': 8 '9': 9
'-: VOL_DOWN '+': VOL_UP
'P' + 'SHIFT': POWER OFF
'R(r)': REPEAT 'T(t)': SUBTITLE
'I(i)': INFO 'A(a)': AUDIO
'G(g)': GOTO 'H(h)': HOME
'Z(z)': ZOOM '/(?)': Info / About
"Ctrl": ZOOM YouTube, Internet Browser
',(<)': FRWD '.(>)': FFWD
'F(f)': Favourite 'E(e)': EDIT
'M(m)': MENU 'S(s)': Setup
'V(v)': View 'L(I)': AB
(|)\': SLOW " (")': STOP
'/(?)': Info / About '[({')': Back Skip
']()': Forward Skip 'W(w)': Launch Web Browser
'B(b)': Browser - Devices
'Alt': Mute 'FI': Red button
'F2': Green button 'F3': Yellow button
'F4': Blue button 'F5': TV Sys
'F6': Previous Chapter 'F7': Next Chapter
'F8': Menu - Internet Browser
WIRED NETWORK CONNECTION AND SETUP
The X3 can be connected to your local network by means of a RJ45 CAT5 cable. The X3 is supplied standard with a UPnP facility, Samba Client and NFS that allows connection to your local area network via a router or switch. You can share media files from your PC or NAS and stream media content to the X3 and you can use the X3 as a Media Server to stream media content to other devises on your network.
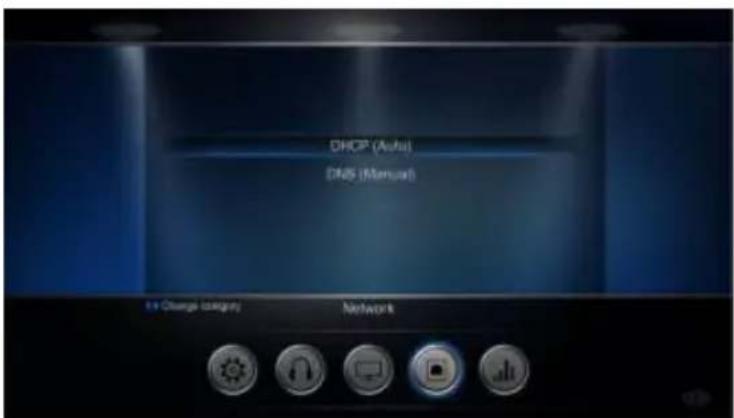
Press the "Setup" button on the X3 Remote or "Setup" on the Home Page then select "Network" option in the Setup window then select 'Wired Lan Setup'.
Network configuration allows for either automatic or manual IP setup.
DHCP IP (AUTO)
Choose this option if you want your router to assign a dynamic IP address to the X3. This option is easy to use and recommended for normal users.
FIX IP (MANUAL)
This option allows you to assign a static IP address to the X3. This option requires modifying network settings of the X3 and is recommended for advanced users. To set a Static IP for your X3, enter the IP Address, Subnet Mast, Gateway and DNS Server Address as relevant to your router.
SAMBA (Network Setup)
If your PC or NAS has Share's setup to specific users then you will need to setup a shortcut on the X3 to each User Share and specify the IP, Username and Password
Setting up Samba shortcuts on the X3
Select 'Network' and then select the 'My_Shortcuts' icon. Now press the 'Menu' button and select 'Add New Shortcut'. Fill in the fields User Name, Password, IP Address (Host Machine), and select 'OK'
NOTE: In order to browse your secure shares you will have to enter 'My_Shortcuts' and then select the Shortcut's that you have setup.

text_image
My_ShortcutsTip - Navigate to the Share Via 'My Shortcuts' and press the 'Menu' button and select 'Add to Favourites' - Now you will be able to launch the share from the Favourite Desktop.
PUBLIC SHARES
Public Shares (shares that do not have a Username and Password) can be browsed via the Media Library ---> Network and no user name or password is required.
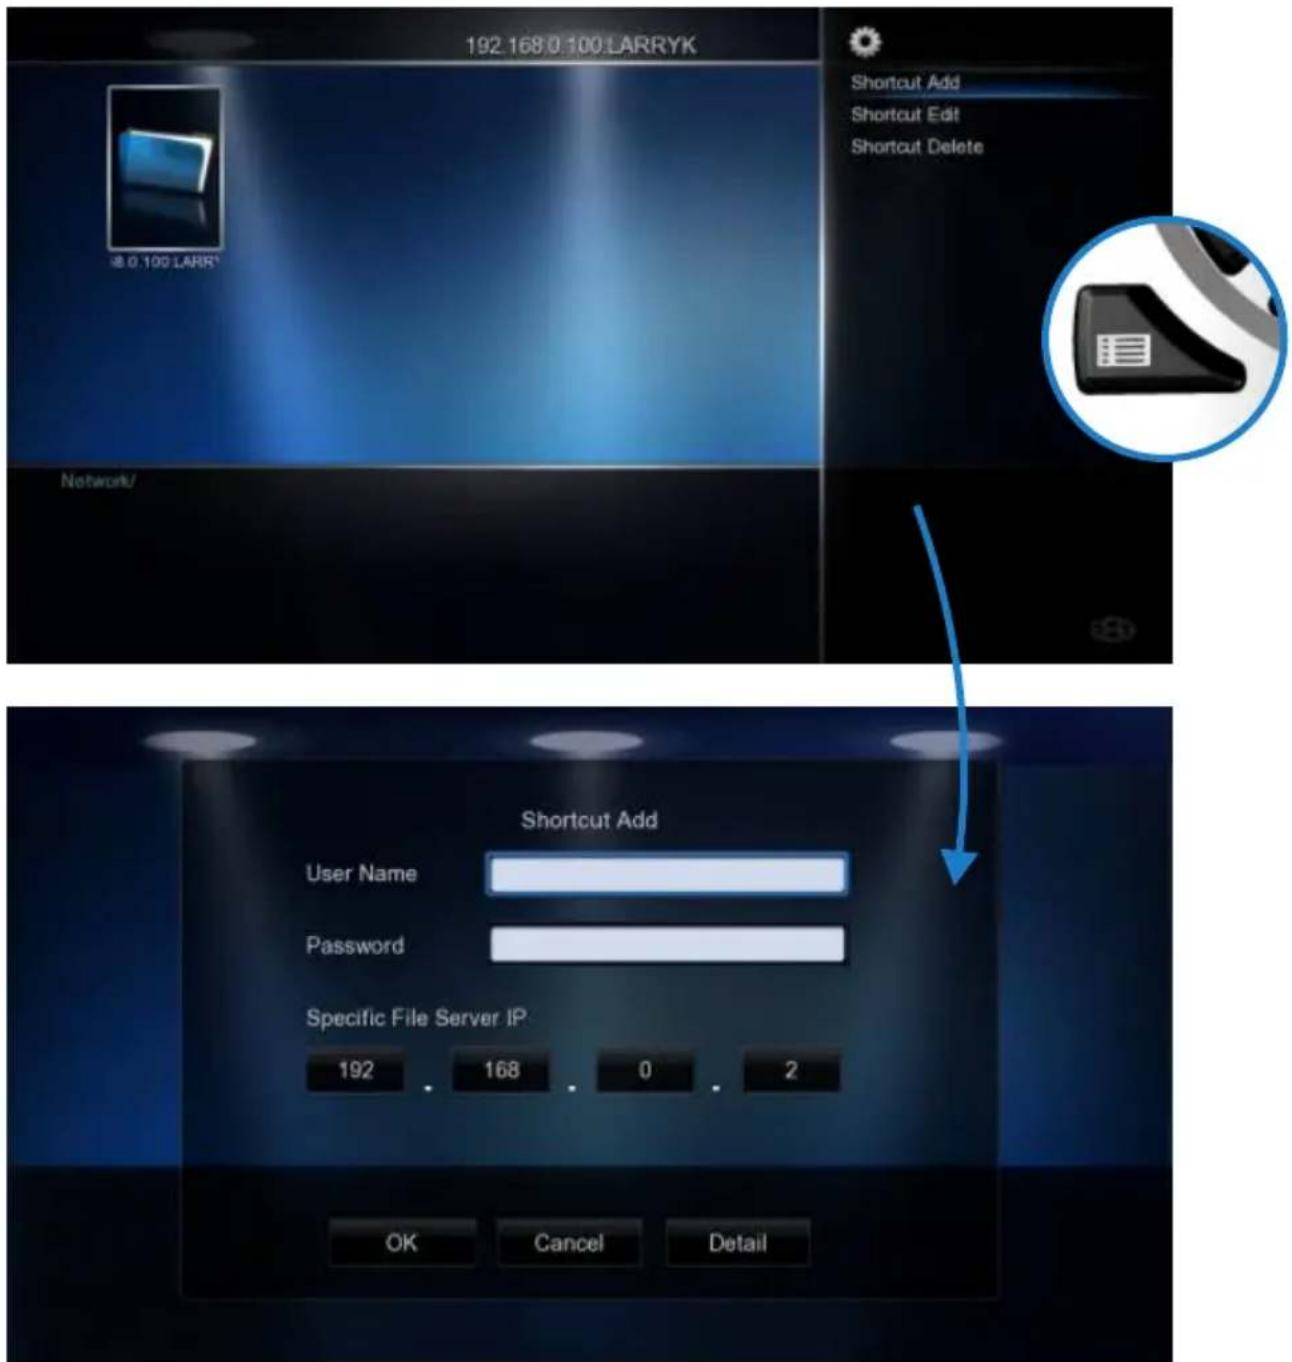
text_image
192.168 0.100 LARRYK Shortcut Add Shortcut Edit Shortcut Delete 0.100 LARRY* Netrolu/ Shortcut Add User Name Password Specific File Server IP. 192 168 0 2 OK Cancel DetailWIRELESS USB DONGLE INSTALLATION (After Market)
The X3 is only compatible with the optional (unless otherwise stated on the packaging) Mede8er Wireless Dongle MED10WFB. (Other brands will not work)
Refer to User Instructions supplied with the Mede8er dongle for detailed wireless connection setup.
WIRELESS NETWORK CONNECTION
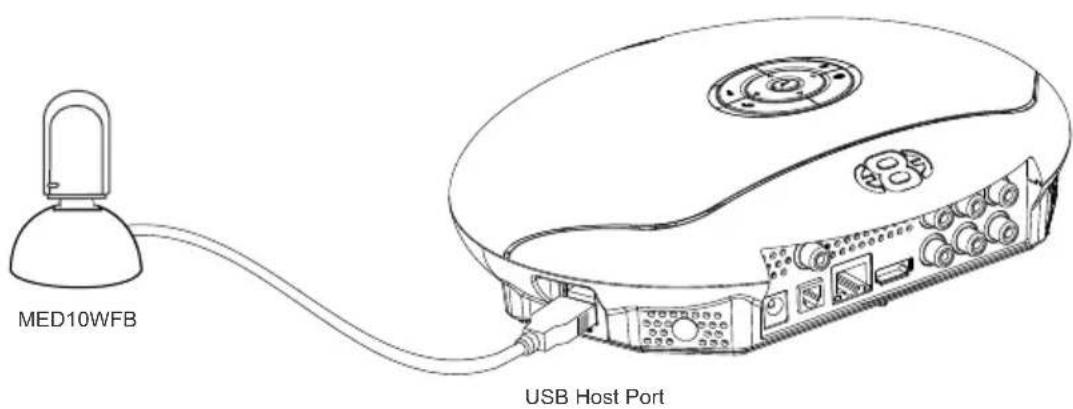
Plug the WiFi Dongle into the USB extension base that was supplied with the MED10WFB. Plug the USB cable into one of the USB host ports on the side of the X3. Extend the cable and place the base in a position that is away from any metal object that could effect the Radio Frequency signal strength. The best placement for the WiFi Dongle will depend on your particular environment. In order to get the best placement you may need to extend the length with an additional USB extension cable.
text_image
MED10WFB USB Host PortWIRELESS PCIE ANTENNA INSTALLATION (Factory Fit)
Certain models of the X3 (depending on the region) may be available with a factory fitted PCIE WiFi kit. Check the packaging information to confirm if your model has the pre installed WiFi Kit.
Screw the antenna into the SMA antenna connector on the X3. Twist the antenna gently into the vertical position as shown.

text_image
a . PCIE Antenna SMA Antenna ConnectorThe operating distance or range of your wireless connection can vary significantly based on the physical placement of the Router and the WiFi Dongle or PCIE antenna.
For best results, place your Router:
* Near the center of the area in which your X3 will operate.
* In an elevated location such as a high shelf.
* Away from potential sources of interference, such as PCs, microwaves, and cordless phones.
* The Antenna should be screwed in tight and in the upright position.
* Away from large metal surfaces.
WIRELESS SETUP
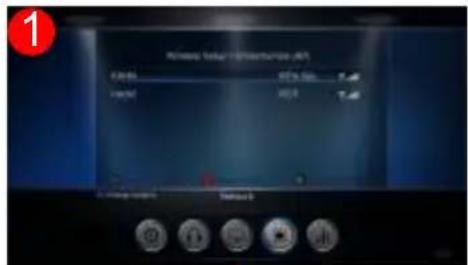
Open Setup Menu then 'Wireless Setup' and you should see a list of available SSID's with signal strength info. Press the 'Zoom button to refresh the list. Select the SSID you want to connect to and press 'Enter'
If the WiFi Router has password protection enabled then you will be required to enter the security key of your WiFi router. Enter the key int the virtual keyboard.
Select DHCP IP (AUTO) if you want your router to assign a dynamic IP address to the X3.
Select FIX IP (MANUAL) if you want to assign a static IP address to the X3.
If you selected Fix IP then you must enter the
IP Address
Subnet Mask
Default Gateway
DNS Server IP
After inputting these settings press 'Enter'
The X3 will now test the connection.
If the connection was successful then the X3 will display the Net Info screen. This screen shows details of the connection.
Press 'Enter' and then you can you can press 'Return' to exit the WiFi Setup Page.
text_image
1 Achstasi Setup Hellenburg/An Extral Hellenburg Extral Hellenburg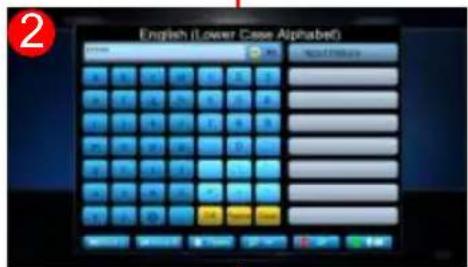
text_image
English (Lower Case Alphabet)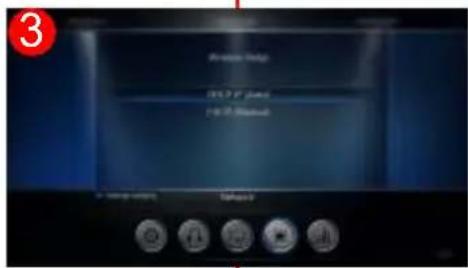
text_image
Analog Hertz Hertz (GHz) Hertz (MHz)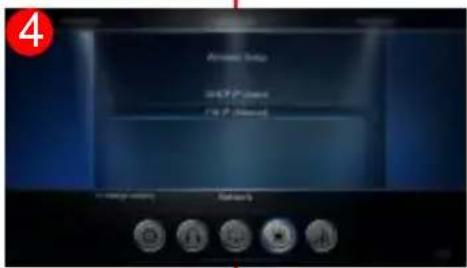
text_image
Analog Setup USB Protection USB Protection
text_image
FBIT Minimum IP Address 1000 1000 8 2 Subunit Name 253 253 253 4.0 Foreign Refinency 1000 1000 8 2 FBIT on your IP address 427 427 8 2 In charge options Battery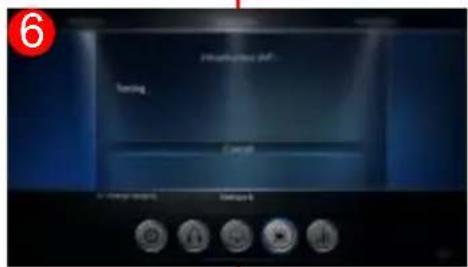
text_image
6 Tuning Check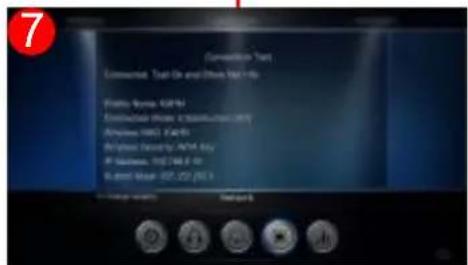
text_image
Connection Tap Connected Tap On and Inside Make Up Fruit Name: GFP Connected Home Distribution (M) Albumin (MB): GAP Off-shot Audio/ Auto Key IF Wireless: 102.746.0 Hz Rural Music: 102.252 (93.1)
text_image
8 Window Limit Setup 0% Static Design 1% PHRGL Setup Standard Deviation 5% Frequency Primes 1% Case Runner OR:134950000 Display Control Default 6FIRMWARE UPDATE
Download the latest X3 Firmware from www.mede8erforum.com. UnZIP or UnRAR or join with HJ Split and will find a file named install.img. Copy this file to the root directory of a Flash Drive. Plug the USB Flash drive into one of the USB Host Ports on the X3.
DO NOT REMOVE POWER DURING THE EMERGENCY RECOVERY PROCEDURE.
Setup Menu Update with Auto Configuration Restore
Open the Setup Menu and select the "Misc" tab. Now select USB upgrade option. After +- 5 sec the screen will display the current Firmware Version and the New Firmware Version. You will have the option to select "OK" or "Cancel". Select "OK" and the X3 will reboot and after +- 10 seconds the update process will begin. During the update process the top Navigation Buttons LED will flash and you should see an install progress bar on your TV screen. After the update is complete the X3 will reboot with the new firmware installed.
If the X3 does not reboot within 5 seconds (after pressing the "Enter" button) then press the "Home" button to initiate
Emergency Method (Resets Configuration to Default)
Disconnect the power jack at the rear of the X3 then plug it back in - Now press the on/off button and hold it pressed for 20 seconds and then release.
After approximately 15 seconds the LED on the X3 will flash blue and you will get a progress bar on your TV display (some TV's will not display this) wait until the X3 re boots itself +- 60 sec. Your X3 firmware is now updated.
natural_image
Line drawing of a computer mouse with control panel and drive buttons (no text or symbols)USB Host Port Press on/off button for 20 Sec

natural_image
Line drawing of a circular object with a central circular feature and a red handle attached (no text or symbols)REMOTE CONTROL OVER NETWORK
Enable the Web Remote in the Setup Menu. Remote Control the X3 from a mobile device such as a iPhone, iPad or any device that has WiFi and a built in Web Browser. Enter the X3 IP into your Web Browser with the correct Port number eg http://xxx.xxx.xxx.xxx:1024 "x" is your actual IP
DLNA DMR
The X3 comes with a DLNA DMR function. That stands for Digital Living Network Alliance Digital Media Renderer. That means another DLNA device can use the X3 to process media without you having to do anything else with the X3 other than turning it on. Music can be played without having to turn on the TV, or you can display photo's on your TV directly from your phone.
A Device which controls this process is called a DLNA DMC - Digital Media Controller. You can get DMC apps for many devices - Android phones / tabs - Iphone / Ipad. Android Honeycomb doesn't come with a DMC installed. Android Market has a lot of them, but not all are able to detect both the X3's DMR, and the X3's Upnp server successfully. Bubbleupnp has been tested with X3 and we suggest that this is a good app to start playing and testing DLNA DMR functionality. Remember to turn the DMR 'on' in the X3 Setup Menu.
HOME NETWORK SAMBA SERVER
The X3 has NAS (Network Attached Storage) functionality built in. And although it is limited in transfer speed compared to standalone NAS servers it performs well if speed is not your major requirement. You can also use the X3 as a Media Server and stream content to other Mede8er's on your home network. The Samba function is enabled or disabled in the 'Network' menu under 'Samba Process'.
You can browse your X3 in Windows - Computer ---> My Network Places ---> View Workgroup Computers. If the Hostname is not picked up by your PC then you can enter either the Host Name or the IP Address into the Explorer address bar
\192.168.0.3 - You type in the actual ip address of the X3
\MED1000X3D - If you have changed the Host Name then type in the new Host Name
If you are using more than one Mede8er on your Network then you should change the Hostname in the Setup Menu. Each X3 should have its own unique Hostname. You must reboot the X3 after changing the Hostname.
SAMBA NAS SECURITY
By default the Samba NAS is a open Public share and it does not require any Login.
You can enable Samba NAS Security and set your own Password to limit access to the content on the X3 Hard Drive.
Username: admin
Password: 'your login password'
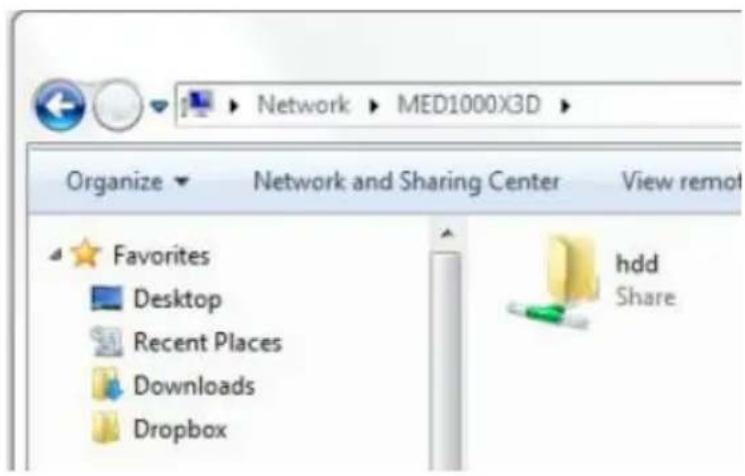
text_image
Network ▶ MED1000X3D ▶ Organize ▼ Network and Sharing Center View remot Favorites Desktop Recent Places Downloads Dropbox hdd Share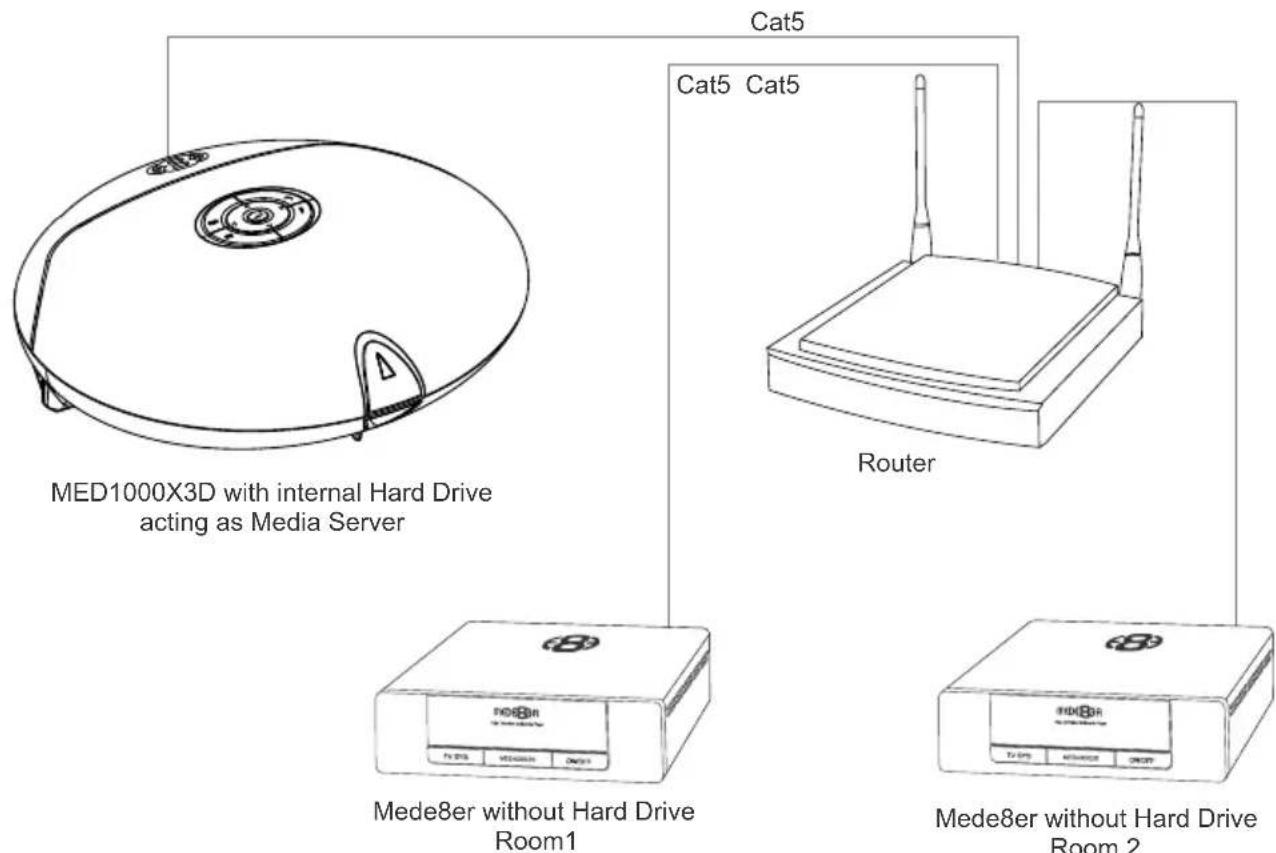
text_image
MED1000X3D with internal Hard Drive acting as Media Server Cat5 Cat5 Cat5 Router Mede8er without Hard Drive Room1 Mede8er without Hard Drive Room 2HOME PAGE
The X3 Home Page is the central point where you can launch all the user applications. Press the Right/Left/Up/Down Navigation buttons on the remote to navigate the Home Page and press "Enter" to launch the selected page.

text_image
Favourites HAVA Laboratory TredPower XL Savanna Dramble Delta
text_image
Media Library Fonzentax TextNow AI Jeward Setup
text_image
YouTube XL
text_image
http://www
natural_image
Stacked black electronic devices with visible labels (no readable text or symbols on devices)FAVOURITES
Create, manage, apply Genre cover art to local and network folder shortcuts.
MEDIA LIBRARY
The Media Library allows you to browse all your media content on your Hard Drive, SD Card, USB Devices and Network and launch the built in File Manager to manage and transfer your content to and from your X3.
YouTube XL
Search and Stream online YouTube videos to your TV.
INTERNET MEDIA
The Internet Media page contains the Internet Media functionality such as Web Browser, Social Media, Internet Radio, Flicker etc
SETUP
The Setup page is the area where you personalize the setup options to suit your individual needs.
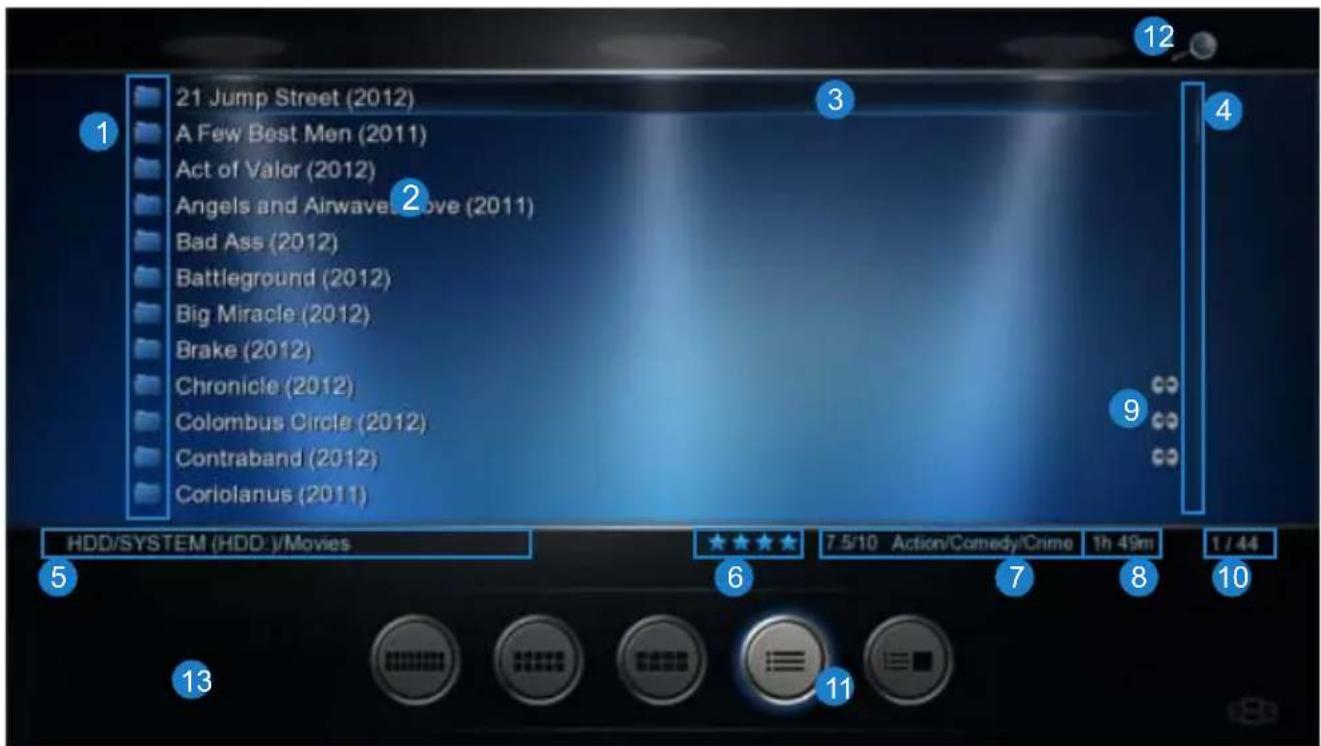
MEDIA LIBRARY
The X3 Media Library has five built in standard views ie Movie, Music, Picture, List, and Preview. The Media Library has been designed so that the view can be easily changed on the fly. In the Media Library you have the option of changing the Views Manually or you can enable the 'Auto View' option in the Setup Menu. If the 'Auto View' option is enabled the X3 will automatically save the last used 'View' of the folder. The next time you enter the same folder it will automatically change to the saved View. Auto View mode requires that the X3 has 'write' permissions as it needs to save a xml file to each folder. Auto View is disabled in Jukebox mode.

Movie View Music View Picture View List View Preview View
text_image
21 Jump Street (2012) A Few Best Men (2011) Act of Valor (2012) Angels and Airwave Love (2011) Bad Ass (2012) Battleground (2012) Big Miracle (2012) Brake (2012) Chronicle (2012) Colombus Circle (2012) Contraband (2012) Coriolanus (2011) HDD/SYSTEM (HDD:)/Movies 7.5/10 Action/Comedy/Crime 1h 49m 1 / 44 6 7 8 9 10 11 12 3 4 5 13- Media Icons 2. File Name 3. Focus Bar 4. Scroll Bar 5. Folder Path 6. Metadata Rating 7. Metadata Genre 8. Metadata Movie Length 9. Watched Indicator 10. Index 11. View Icons 12. JukeBox Icon 13. XML Info
natural_image
Grid of nine grayscale images showing urban scenes with buildings and structures, set against a dark blue background (no text or symbols visible)Movie View Music View Picture View

text_image
G. Star (2007 August 2015) A Star (2007 August 2015) A Star Life (2008) A Star of Green (2009) High Time Series (2010) Advanced Series Alpha The Moon (2011) Asian Tornado (2013) Alpha - Late Green (2014) Binary (2015) Binary (2016) Binary (2017) Binary (2018) © 2017 © 2016 © 2015 © 2014 © 2013 © 2012 © 2011 © 2010 © 2009 © 2008 © 2007 © 2006 © 2005 © 2004 © 2003 © 2002 © 2001 © 2000 © 1999 © 1998 © 1997 © 1996 © 1995 © 1994 © 1993 © 1992 © 1991 © 1990 © 1989 © 1988 © 1987 © 1986 © 1985 © 1984 © 1983 © 1982 © 1981 © 1980 © 1979 © 1978 © 1977 © 1976 © 1975 © 1974 © 1973 © 1972 © 1971 © 1970 © 1969 © 1968 © 1967 © 1966 © 1965 © 1964 © 1963 © 1962 © 1961 © 1960 © 1959 © 1958 © 1957 © 1956 © 1955 © 1954 © 1953 © 1952 © 1951 © 1950 © 1949 © 1948 © 1947 © 1946 © 1945 © 1944 © 1943 © 1942 © 1941 © 1940 © 1939 © 1938 © 1937 © 1936 © 1935 © 1934 © 1933 © 1932 © 1931 © 1930 © 1929 © 1928 © 1927 © 1926 © 1925 © 1924 © 1923 © 1922 © 1921 © 1920 © 1919 © 1918 © 1917 © 1916 © 1915 © 1914 © 1913 © 1912 © 1911 © 1910 © 1909 © 1908 © 1907 © 1906 © 1905 © 1904 © 1903 © 1902 © 1901 © 1900
text_image
2017 ■ 5 October 1984 (2013) ■ A Starlight: The Dark (2013) ■ A Starlight: The Dark (2013) ■ A Starlight: The Dark (2013) ■ A Starlight: The Dark (2013) ■ A Starlight: The Dark (2013) ■ A Starlight: The Dark (2013) ■ A Starlight: The Dark (2013) ■ A Starlight: The Dark (2013) ■ AStarlight: Los Angeles (2013) ■ Baryon: Los Angeles (2013) ■ Baryon: Los Angeles (2013) ■ Baryon: Los Angeles (2013) ■ Baryon: Los Angeles (2013) ■ Baryon: Los Angeles (2013) ■ Baryon: Los Angeles (2013) ■ Baryon: Los Angeles (2013) ■ Baryon: Los Angeles (2013)List View Preview View
MEDIA LIBRARY CONTINUED
To change the View of the Media Library press the "View" button on the remote and the View Icons will show. Press the 'View' button again and the focus will change to the next View Icon. Repeat pressing the 'View' button until the icon you require is selected and then after a short pause the on-screen View will be updated.

natural_image
Five circular button icons with basic symbols (grid, cross, minus, square) in grayscale, no text or labels present.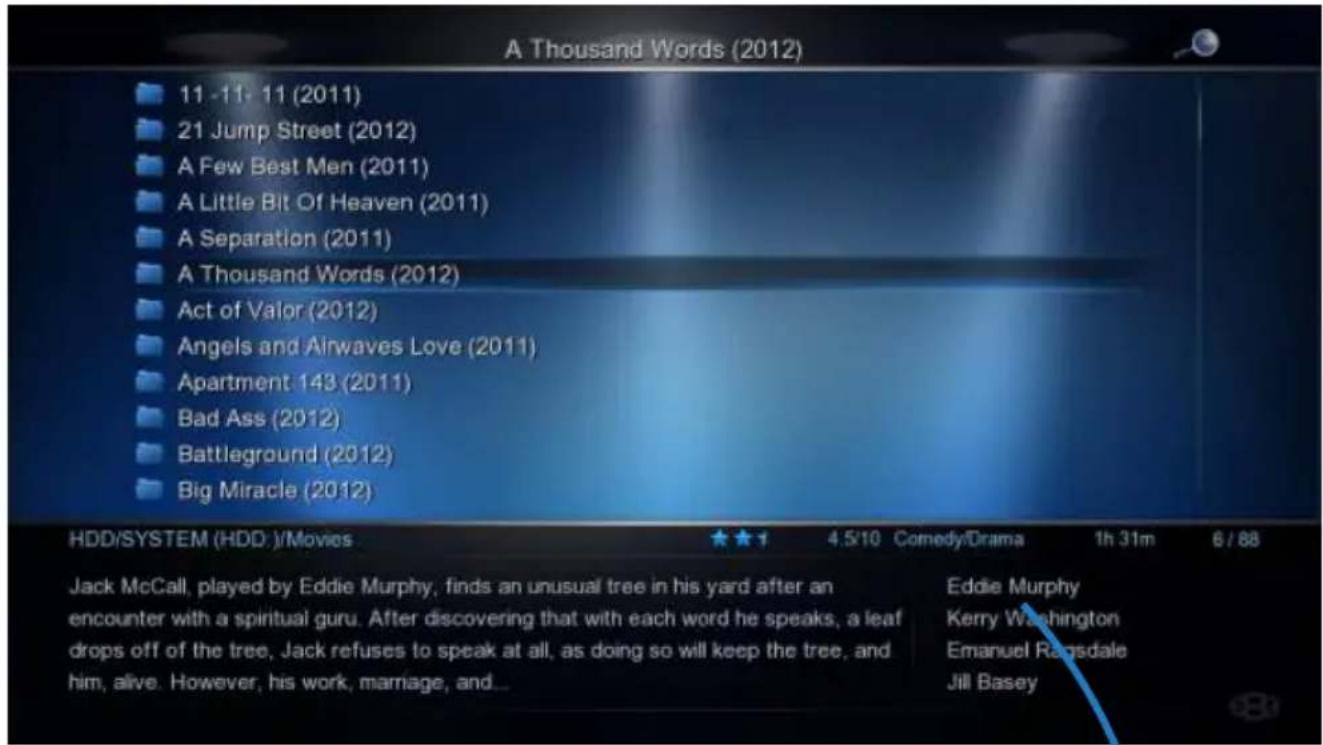
text_image
A Thousand Words (2012) 11 - 11, 11 (2011) 21 Jump Street (2012) A Few Best Men (2011) A Little Bit Of Heaven (2011) A Separation (2011) A Thousand Words (2012) Act of Valor (2012) Angels and Airwaves Love (2011) Apartment 143 (2011) Bad Ass (2012) Battleground (2012) Big Miracle (2012) HDD/SYSTEM (HDD ):/Movies 4.5/10 Comedy/Drama 1h 31m 6 / 88 Jack McCall, played by Eddie Murphy, finds an unusual tree in his yard after an encounter with a spiritual guru. After discovering that with each word he speaks, a leaf drops off of the tree, Jack refuses to speak at all, as doing so will keep the tree, and him, alive. However, his work, marriage, and... Eddie Murphy Kerry Washington Emanuel Ragsdale Jill Basey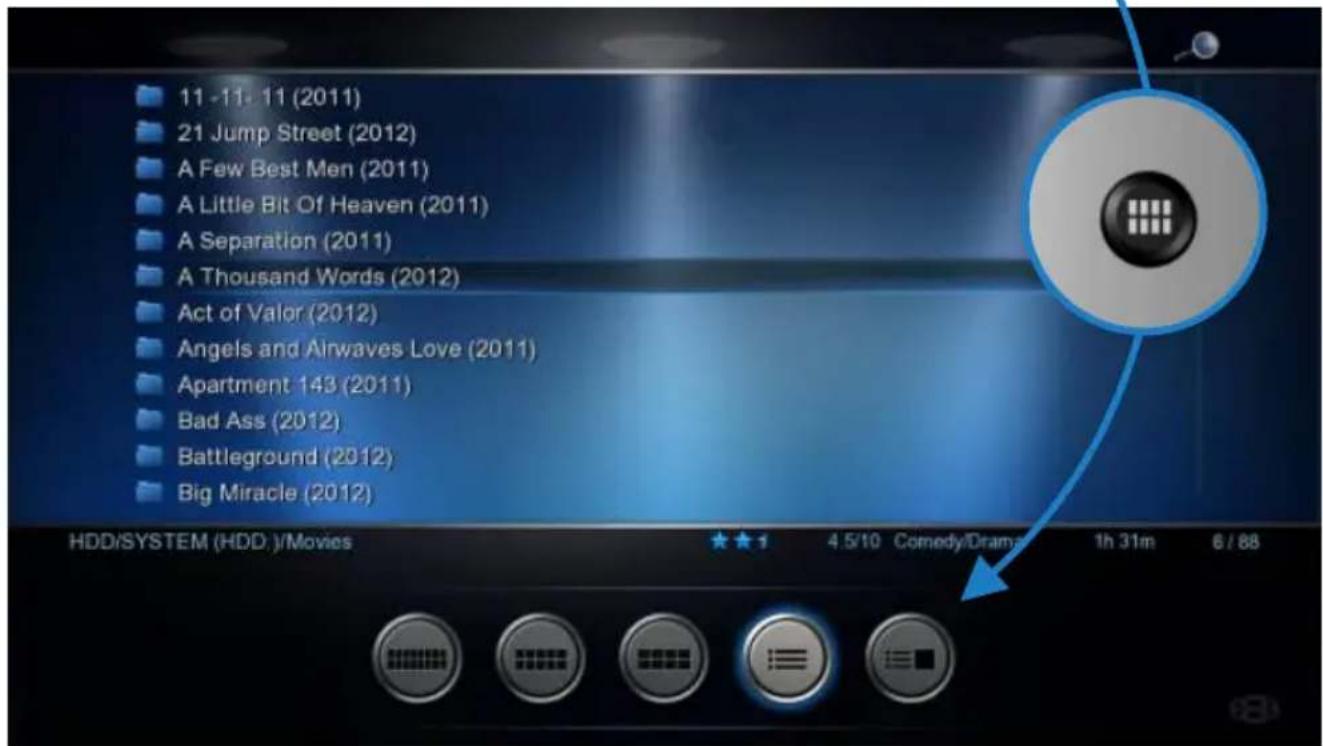
text_image
11 - 11 - 11 (2011) 21 Jump Street (2012) A Few Best Men (2011) A Little Bit Of Heaven (2011) A Separation (2011) A Thousand Words (2012) Act of Valor (2012) Angels and Airwaves Love (2011) Apartment 143 (2011) Bad Ass (2012) Battleground (2012) Big Miracle (2012) HDD/SYSTEM (HDD.)/Movies 4.5/10 Comedy/Drama 1h 31m 6 / 88
natural_image
Illustration of two hands pointing at a circular device with directional arrows indicating rotation (no text or symbols)MEDIA LIBRARY METADATA DISPLAY
The Media Library will display basic Movie Metadata in all 'Views'. This unique X3 functionality will greatly enhance your Media Library browsing experience. In order to take advantage of this advanced functionality you will need to scan your movie collection to make the required xml files. To create the xml files with Windows use Y2M (YAMJ to Mede8er) or Thumbgen and for Apple Mac we suggest you use DunX2Mede8er. PIs check the Mede8er Forum for more details on these PC Programs.
Meta Data Information
Plot - Genre - Star Rating - Actors - Runtime
Visit the Mede8er Forum for downloads and instructions on using Y2M. www.mede8erforum.com
text_image
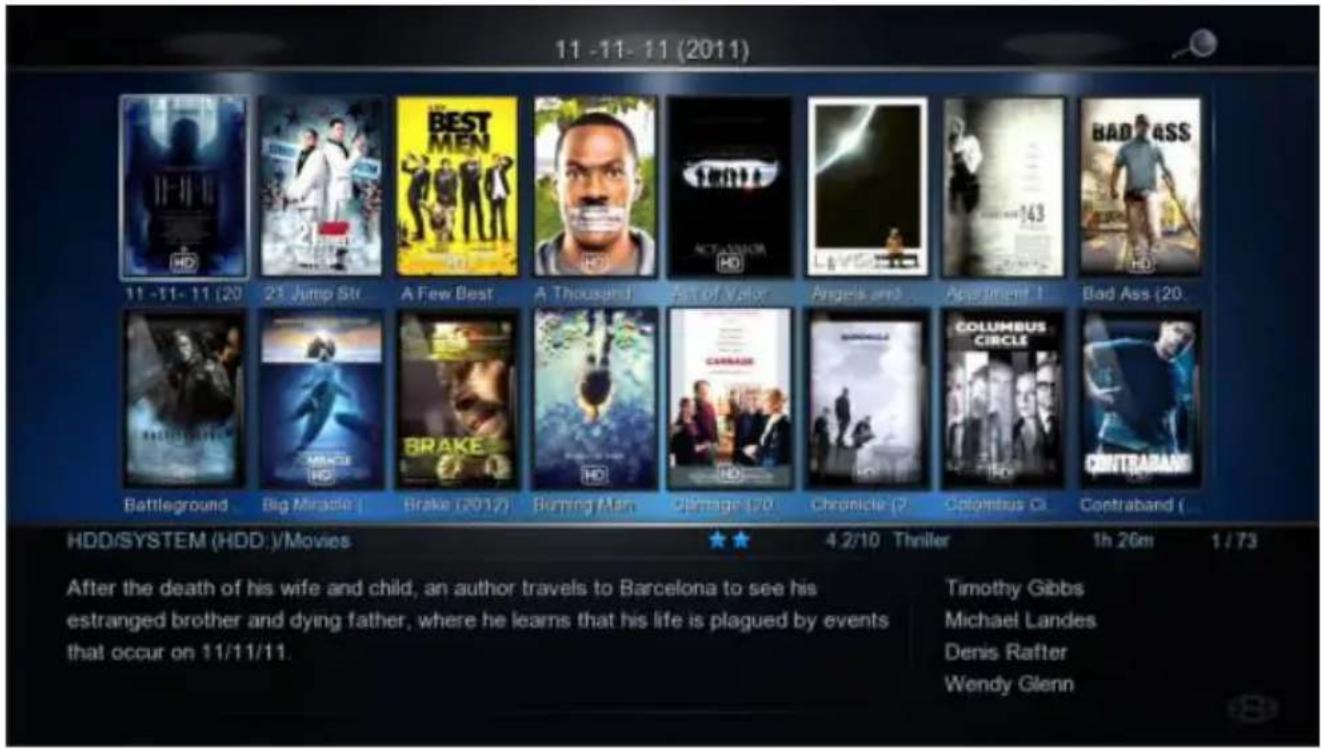
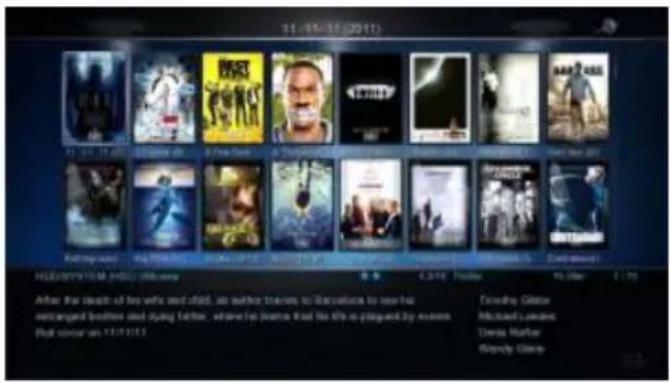
11 -11-11 (2011) 11 -11-11 (20) 21 Jump Str A Few Best A Thousand Set of Valor Angels and Appagment App Bad Ass (20) Battleground Big Miracle Brake (2012) Burning Man Damage (20) Chronicle C Columbus Contraband HDD/SYSTEM (HDD.)/Movies ★★ 4.2/10 Thriller 1h 26m 1 / 73 After the death of his wife and child, an author travels to Barcelona to see his estranged brother and dying father, where he learns that his life is plagued by events that occur on 11/11/11. Timothy Gibbs Michael Landes Denis Rafter Wendy GlennYou can view the Movie Sheet that contains the full movie details by focusing on the thumbnail cover and pressing the "Info" button on the remote control.

text_image
11-11-11 The successful American writer and atheist Joseph Crone participates in a support group to accept the death of his beloved wife Sarah and their son Diogo. Joe befriends Sadie in one of the meetings and she helps him when he has a car accident. When Joe's estranged religious brother Samuel Crone (Michael Landes) tells him that their father is terminal, he travels to Barcelona to stay ... DIRECTED BY Darren Lynn Bousman GENRE Horror / Thriller STARRING Timothy Gibbs Michael Landes Wendy Glenn Benjamin Cook Lolo Herrero Salomé Jiménez H204 0h:5.1 1080 23 16.9 800 MEDEERADDING CUSTOM BACKDROPS AND SKINS
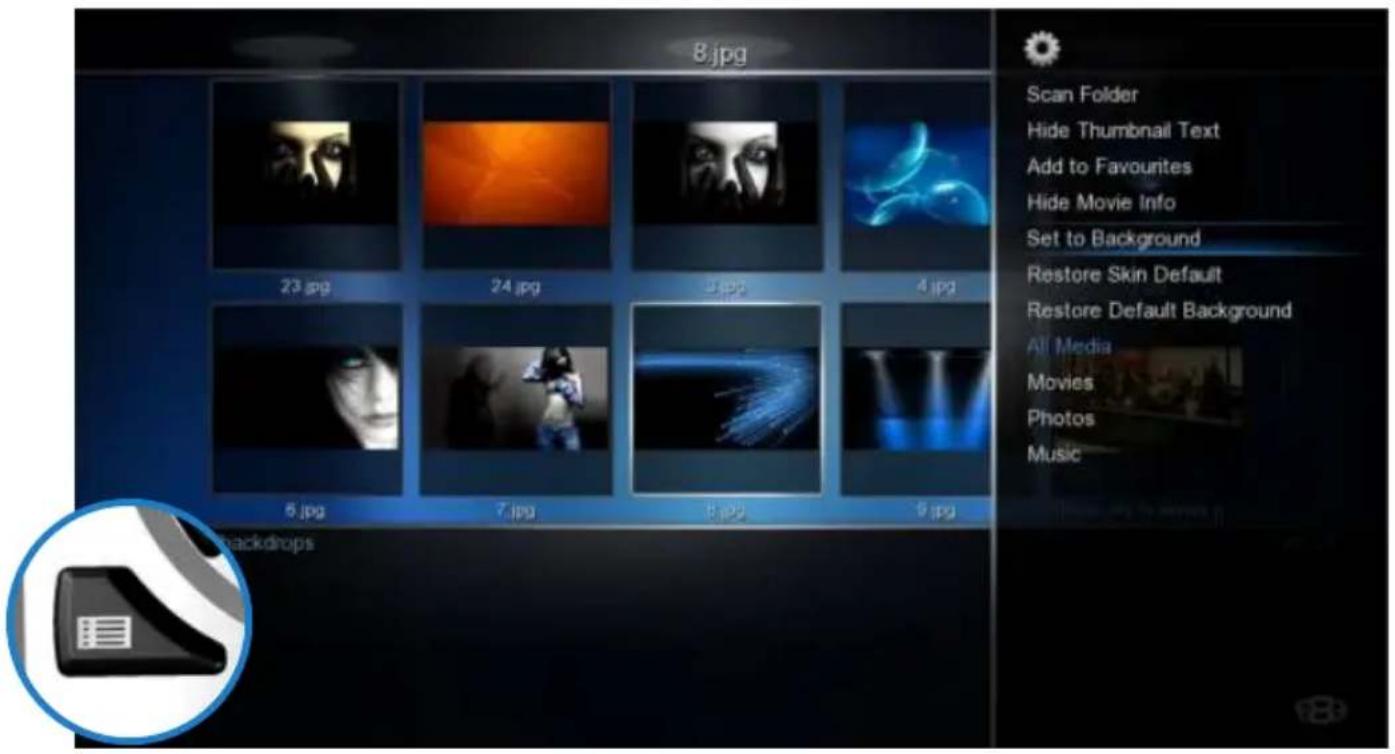
You can customise your X3 by adding your own backdrop image. Prepare the jpg image to size 1280 x 720 pixels with max size 500KB. In the X3 Media Library navigate to the image and press the 'Menu' button. Select the option 'Set to Background' and the X3 will load your new backdrop into flash memory and use it as its default background. You can at any time revert to the X3 original default by selecting the option 'Restore Default Background'
text_image
8.jpg Scan Folder Hide Thumbnail Text Add to Favourites Hide Movie Info Set to Background Restore Skin Default Restore Default Background All Media Movies Photos Music 23.jpg 24.jpg 3.jpg 4.jpg 5.jpg 7.jpg 8.jpg 9.jpg 0.jpgThe skin option is community driven and you can find some unique designs available for download from the Mede8er Forum. To load a skin -- just download it and unzip /unrar it to a folder. In X3 navigate to this folder and press the 'Menu' button and select 'Add to Skin Option' The new Skin will be loaded into flash memory and used as the new default skin. You can revert back to the original skin at any time by selecting the option 'Restore Default Skin'
text_image
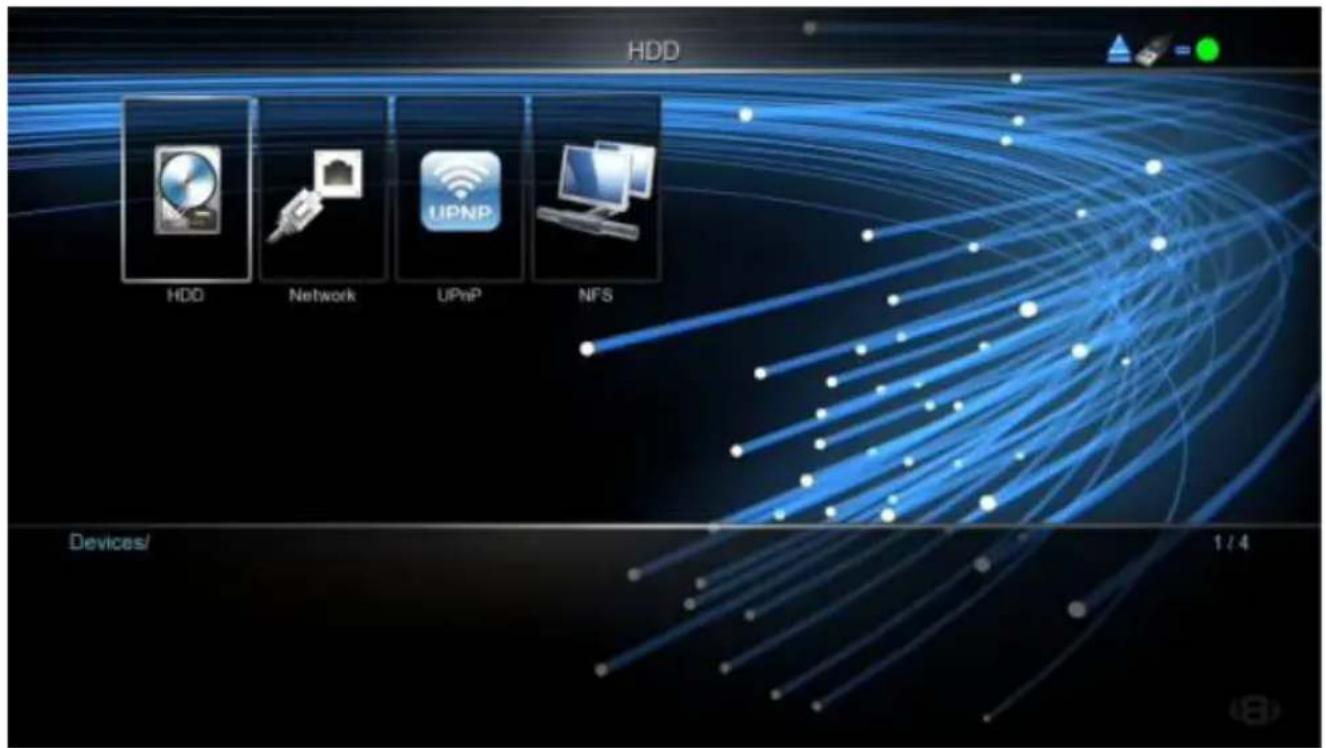
HDD HDD Network UPnP NFS Devices/ 1 / 4Once you have decided on the Background or Skin we recommend that the X3 be be Re-booted for reliable system operation.
MOVIE JUKEBOX - XML SEARCH FUNCTION
The X3 has a built in XML Search facility that will allow you to sort and arrange your Movie Collection by pre-defined xml filters. The XML Search can be used with content on the internal Hard Drive, external USB Hard Drives, Samba and NFS Network shares.
Library Preparation for XML Search operation
The Media Library must conform to the Mede8er standard with all the relevant movie file information in it's own folder. A typical folder will contain - Video File - Folder.jpg - About.jpg - XML File - Subtitle file. Once you have arranged your Video Collection into individual folders you can use Windows - Y2M (YAMJ To Mede8er) or Thumbgen / Mac - DunX2Mede8er to scan the folders to make the requires images and xml files.
Scanning your Library
In order to provide XML Search functionality the X3 must scan your library and build a Database file. To scan your library you must focus on the Root Folder of your library and press the 'Menu' button and then select 'Add to Favourite' option. Open the Favourite screen and focus on the shortcut and press the 'menu' button and select the 'Scan' option. The X3 will start the scan process and Scan all folders and sub folders in order to build the dBase file. The scan criteria is to only include folders that have a valid Y2M/ Thumbgen / DunX2Mede8er XML inside. The folder depth level is not limited in the X3 firmware but the path of the string cannot be longer than 512 characters and the max number of sub folders cannot exceed 4096. The Database file 'Mede8er.db' will be save to the root of the folder that has been scanned. Network shares must be 'Write Enabled' for the scan process to complete. If new content is added to the root folder then the scan operation must be repeated. Scanning time is quick and it should take about 30 seconds to scan +- 1000 movie folders.
Note: The Maximum amount of Movies in one Database is currently +- 2000. If you scan a library with more movies than 2000 then the operation of the xml Search can become erratic and you may experience that the X3 often crashes.

text_image
Movies Movie Scan Folder Remove Genre Lock Unlock Favourites Scan FolderJukeBox View
In the Setup menu under 'Misc Options' you can select JukeBox View -- on/off
JukeBox View 'off' - Favourite Links to a Jukebox will be presented in a normal structure and you can navigate the scanned Folders and Sub Folders folder as you normally would in the Media Library.
JukeBox View ‘on’ - Favourite Links to Jukebox will be presented in JukeBox View ie 16 Covers in a flat display. The internal folder structure of the folders will be ignored.
You can add a scanned XML Folder to Favourites in the normal way.
JukeBox View
On
Using XML Search - Media Library
To use the XML Search you must navigate to the root folder that was scanned and open it. You will see a XML Search icon on the top right of the screen.

natural_image
Simple illustration of a magnifying glass with a blue lens on a black background (no text or symbols)Using XML Search - Favourite Link
If the Jukebox was launched from a Favourite link then the contents will be displayed in Jukebox Style (provided the Jukebox View in enables in the Setup Menu).
If the Search Icon on the top right of the screen is visible then Jukebox functionality is available. Press the Menu Button and you will have a choice of XML Search options.
Sort Search Results by Latest / Alphabetically
This option will allow you to have the Search results filtered by 'Latest' (date you added the movie to your collection) or in Alphabetic order. This is a global setting and will be stored in memory. After selecting this option you must then do a XML Search.
Watched Indicator
If the Watched Indicator option is enabled in the Setup Menu then it will show on the XML Search Menu. You have the option to mark the Video as Watched / Unmark as Watched. The Video file will be automatically marked as Watched if more than 10% of the Video has been played.
Folder Lock
If enabled in the Setup Menu (Folder Protection) You will be able to lock any Movie in the Jukebox. Focus on the Movie cover and press the Menu Button and select the 'Lock' option and the Movie will be locked. To unlock the Movie just focus on the cover and press the Menu Button and select 'Unlock' then enter your 4 digit pin code and the Movie will be unlocked. Default code is 0000
Hide Movie Info
If this option is selected the XML Movie Info will be hidden
Title Search
Select the 'Title' option to perform a Movie Name Search. Enter the 'movie name' or 'key word' into the Virtual Keyboard and the X3 will search the folder names for a match and display the results.
All - All content will be displayed by 'Latest' or in 'Alphabetic' order.
Genre - list of all the available Genres in the dBase will be displayed.
Year - This is the release date of the movie. A list of all the 'Years' ie release dates in the dBase will be displayed.
Star Rating - The star rating is the IMDB users rating for the movie.
Alpha Search - Use the Alpha buttons on the remote. An Alpha search can be conducted within a dBase XML Search.

text_image
XML Search All Genre Year Star Rating Title Sort Search Alphabetically Hide Movie InfoSelect any supported music file and the Music Player Screen will launch. If the music file has embedded information tags and images then these will be displayed on the right hand side in the preview window area. If you do not want to use embedded mp3 art or you are using .m4a, ape or flac files you can save the Album Cover as a jpg file named 'folder.jpg' to the Music Album Folder. The X3 will use the 'folder.jpg' it if it does not find any embedded art in the music files. Suggested size of the embedded art is 230 x 230pixels.
The X3 also supports Music Fan Art. Make a image called 'fanart.jpg' size 1280 x 720 and save it to the Album folder. The X3 will automatically display the Fan Art background when you select any track in the Album.

text_image
01 - What's In It For Me.mp3 02 - I Got My Baby.mp3 03 - Love Is A Sweet Thing.mp3 05 - Let a Make Love (With Tim McGraw).mp3 06 - It Will Be Me.mp3 08 - If I'm No In Love.mp3 09 - Bring in Out The Elvis.mp3 11 - If I Should Fall Behind.mp3 12 - That's How Love Moves.mp3 13 - There Will Come A Day.mp3 What's In It For Me Album: Faith Hill - Breathe Genre: Country Artist: Faith Hill Year: 0 00:00:10 00:05:32 Music 1 / 10Currently Playing - Music Shortcut
Press the 'Audio' button to take you back to the Currently Playing music.

natural_image
Circular icon with a speaker symbol inside, no text or labels presentAlbum Art Screensaver
The X3 supports Album Art Screensaver. Copy a image named 'folder.jpg' to each Album folder with max size 230 x230 pixels and the currently playing Album Art will be shown on the screensaver.
Music Jukebox
PIs visit the Mede8er website for the Online Guide www.mede8er.com/mede8er_music_jukebox_user_guide.html

text_image
FAITH HILL BREATHE What's In It For Me Album: Faith Hill - Breathe Genre: Country Artist: Faith Hill Year: 0 00:00:10 00:05:32Current Track Time
Total Track Time

OFF - Repeat and Shuffle off
Repeat Track - Repeat the current track
Repeat All - Repeat all tracks in the folder. Shuffle off
Shuffle - Shuffle all tracks in the current folder

text_image
or Page
text_image
V2 Music Jukebox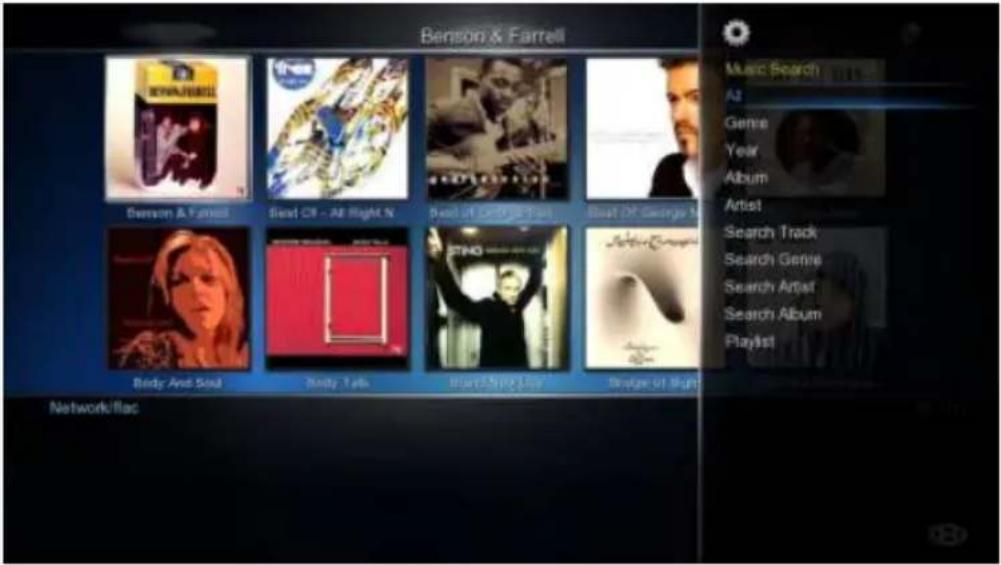
text_image
Benson & Farrell Benson & Farrell First Of - At Right N Best Of Go/Go/Go/Go Best Of George M Body And Seal Body Talk Hunt/SHP/Loy Bridge St High Network files Music Search At Genre Year Album Artist Search Track Search Genre Search Artist Search Album PlaylistThe X3 Jukebox relies on the embedded Music files 'Tag' information and correct image sizing for its functionality, so it is critical that you spend the time to correctly Tag your music collection.
Music Jukebox Features
Direct MP3 Scan * Supports Mp3, OGG, Monkey's Audio, Flac, AAC, wma, m4a -- when scanned with Tagscanner * Works on local drives and Network shares * Displays Tag information in the Music Player Screensaver with Album Artwork * Supports .cue files play function (Album based) * QPL (Quick Play List) Function * Make and Save Mede8er m3u Playlists on the GUI * Supports Playlist Creator 3 - 'Non extended information' m3u Playlists * Search Album Year, Artist by drop list or Text input, Genre, Track Keyword * Large collections supported +- 40 000 tracks * Supports the Auto View function * Easy Drop List selection with Right / Left Nav Alpha Jump * Results filtered by Album or Title option * Easy Setup for Multiple Music Jukeboxes * iTunes DRM m4a / WMA DRM and advanced profile -- not supported
Note: The Music collection cannot be mixed with Video content.
Basic MP3 direct Scanner Operation
Navigate to the root folder of your Music Collection and press the 'Menu' button and select the option 'Add to Favourites'. Press the 'F4' button on the remote to go to the Favourite page. On the Favourite page select the Icon Shortcut of the Music Collection you just made and press the 'Menu' button and select the 'Scan Folder' Option - the firmware will automatically detect the music files and then scan all the MP3 tags and build a music.db (music database) file and save it to the root folder of your collection. All non MP3 tags will be ignored. Your Music Collection can be in a nested folder arrangement. Approx scanning time = 48 sec /1000 tracks
Multi Codec Scanner Operation
A free Windows PC program called Tagscanner together with a special Mede8er Script is used to scan the music collection and to export the Tag information to a file named TrackList.xml. Once you have installed Tagscanner then download the Mede8er Script and copy it to the 'Script' folder in Tagscanner ie C:\Program Files\tagscan5.1.610\scripts. Remember you still need to install the Mede8er Script. The script download link can be found on the Mede8er Music Online Jukebox Online User Guide.
Once you have completed using Tagscanner to tag and arrange your music collection you must export the tag information to a file called Tracklist.xml. Go to 'List Maker' page in Tagscanner and select 'ALL' the files in your scanned collection and then select the Mede8er script on the right hand side and then select 'export'. The Tracklist.xml will be saved to the root of your Music Collection.
In X3 GUI Navigate to the root folder of your Music Collection and press the 'Menu' Button and select the option 'Add to Favourites'. Press the 'F4' button on the remote to go to the Favourite page. On the Favourite page select the Icon Shortcut of the Music Collection you just made and press the 'Menu' button and select the 'Scan Folder' Option - the firmware will automatically detect the Tracklist.xml file and then scan it and build a music.db (music database) file and save it to the root folder of your collection. Your Music Collection can be in a nested folder arrangement. Approx scanning time = 20 sec /1000 tracks
MUSIC JUKEBOX - Continued
Root of Collection
The 'Root' of the music collection is the folder that will be scanned and linked to the Favourites Page The music collection 'Root' will contain the Tracklist.xml (if used), Music.db and m3u files eg
Music Collection <---- Root Folder
Music Collection/Music Folder1
Music Collection/Music Folder2
Music Collection/Music Folder3 etc
Music Collection/TrackList.xml
Music Collection/Music.db
Music Collection/Playlist1.m3u
Music Collection/Playlist2.m3u etc

text_image
V2 Music JukeboxMusic Box Sets / Double Albums
For Music Box Sets or Double Albums you have two options
a) Different 'Album' name for each CD (each CD in their own folder)
b) Same 'Album' name for all tracks (tracks for all Albums in one folder) & insert a prefix in the 'Filename' for each CD eg 1- xxxxxx 2- xxxxx for the sorting order.
Album Artist Field
To avoid the database mixing up the same Album name by different Artists we suggest you use the 'AlbumArtist' tag Another advantage of using the 'Albumartist' tag is that the Artist will be displayed after the Album name on the 'All' page and any Album based page.
Mixed Artist in a Album
For mixed Artists in a Album you must add 'Various' (or whatever name you want) to the 'AlbumArtist' tag for each track. If you do not then each Track will become a Album
Embedded Album Art
IMPORTANT: If you are using embedded art it should be optimized otherwise the V2 GUI can be very slow. We suggest you use Tagscanner to Batch your collection
A) Open Tagscanner Setup and Select the TAG's option and change the settings as foll
- Coverart Filename ----> folder
- Custom size of covers ----> 230 x230 Quality 85%
B) On the Tagscanner GUI select the custom image option and it will display 230x230(Custom)
C) Scan your collection with Tagscanner and select all the files and select 'Save' and Tagscanner will resize all the embedded images.
The preferred method is to use a image named folder.jpg in each folder. The folder.jpg will take priority over embedded art and will also show on the Screensaver. Ideal image size is 230 x 230 pixels at 72 dpi in jpg format saved with compression setting of 85%.
For batch processing we suggest a free program Fastone Photo Resizer and for normal image manipulation, correcting aspect ratios. cropping and resizing of the folder.jpg we suggest a free program called Photoscape
Suggested 'Filename' naming convention
We suggest you use the following 'Filename' naming convention (This is not compulsory but suggested)
a) Normal Albums %track%-%title% b) Double Albums/Box Sets 1-%track%-%title% 2-%track%-%title%
You can use Tagscanner 'Music Renamer' function to do this. Note you must firstly make sure that all the Tag Info is updated and correct before you do the Filename renaming.
MUSIC JUKEBOX - Continued
Arranging your collection
Your collection can be located on your local Hard Drive, USB Drive or Network Share. The advantage of using a Network share is that you can access one central collection with multiple Mede8er's thus making it ideal for a Multi-Room setup.
If you have a big music collection it makes sense to split it up into main categories. This gives you the advantage of being able to better manage your collection in smaller bits as you can still scan the total collection with the added advantage of separate shortcut links on the Favourite Page
So in this example you would have a main folder with sub folders Music Backup_all
text_image
V2 Music JukeboxYou can make a Favourite shortcut link to each of these folders.
Favourite Links and Scanning
Before you can 'Scan' a folder you must add it to the Favourite Page. Navigate to the Folder in the Media Library and focus on the folder you want to add and then press the 'Menu' button on the remote and select the option 'Add to Favourites'. The Favourite link will be created and if successful a confirmation 'tick' will be displayed top left of the screen. If you get a 'x' then it means the link already exists or the link cannot be made.
Press the 'Blue' button on the remote to go to the Favourite Page. Focus on the Favourite Shortcut and press the 'menu' button and you see options
Scan Folder - Scan the folder to make a Mede8er database (Music.db).
Remove - Remove the Favourite Link. This option just removes the link and does not delete the source files.
Genre - Change the default folder image into a Genre artwork image for the Favourite Link.
Lock - Lock the Favourite Link so that it is Pin Code Protected.
Unlock - Unlock a 'Locked' Favourite Link.
If you get a warning message "Set NAS to 'off' for Scan" then you must first switch 'off' the NAS function in the Setup Menu and then scan the collection.
Using the Music Jukebox
1) Setup ----> Misc ----> Set 'JukeBox View' to 'on' -- AutoView - We suggest you set this to 'on'
2) Select a Favourite Shortcut Icon and press 'Enter' ----> the Music Database will be imported and opened.
3) Press the 'Menu' button and you will see the list of Search options on the Menu screen
Alpha Jump
To jump to a Alpha character in the Drop List ie - Genre - Album - Artist
a) Use the 'ABC' buttons on the Remote
b) Use the Left Right Navigation buttons on the Remote
Music Player Page Jump
Use the Left Right Navigation buttons to jump to the next or previous page in the Music Player
QPL - Quick Play List
The 'Quick Play List' is a easy way to group and play selected Albums or Tracks. The QPL is a one time play facility and will be automatically cancelled one you exit the Music Player. Focus on a Album or Track and press the 'F2' button on the Remote Control and the QPL icon will be added to the Album or Track. To remove a QPL just focus on the Album or Track and press the 'Green' button and the QPL icon will be removed.
Once you are happy with your QPL selection press the 'Play' button and the QPL list will be loaded and you can now select the first track you want to play and the press 'Enter'.
MUSIC JUKEBOX - Continued
Saved Playlists
'Saved Play List' is a easy way to make a Playlist via the GUI and save it so that it can be played at any time.
Focus on a Album or Track in the order you want them saved and press the 'Green' button on the Remote Control and the QPL icon will be added to the Album or Track. To remove a QPL just focus on the Album or Track and press the 'Green' button and the QPL icon will be removed.
Once you are happy with your Playlist selection press the 'Menu' button and the screen will open and you will see a option 'Save Playlist'. Select this option and a text dialogue screen will open allowing you to rename the Playlist. The Playlist will be saved to the 'Root' folder of your collection.
To play a saved playlist press the 'Menu' button and select the Playlist option and all available Playlists will be listed.

text_image
V2 Music JukeboxMaking X3 compatible m3u Playlist with Playlist Creator 3
Download and install Playlist Creator 3 -- Correct Playlist Creator 3 Setup Options
1) Extended Information -- Uncheck the option 'Write extended information'
2) Playlist Details -- Select 'Relative and 'Use Forward Slash instead of back slashes'
3) Make your Playlist and save it to the 'Root' folder of your Music Collection in m3u format.
Album Art on Music Jukebox Screensaver
If you use a folder.jpg image in each folder with max size of 250 x 250 pixel (recommended size is 230 x 230 pixel) it will be used in the Screensaver together with Album Tag information. For normal image manipulation, correct aspect ratio cropping and resizing of the folder.jpg we suggest a free program called Photoscape.
Add to Jukebox
Mp3 scan only - The Jukebox has a facility that enables you to add Albums to a pre scanned collection. If you are adding multiple Albums the easiest way would be to make a new folder with a date eg 'new_4July2012' and copy your new Albums into this folder. Now focus on the new folder 'new_4July2012' and press the 'Menu' button and select the option 'Add to Jukebox'. The new Albums will be added to the data base.
Tracklist.xml- For Tracklist.xml it is probably a lot easier to just do a re-scan. For those who want the facility you can follow these instructions. Make a new folder eg 'new' and copy your new Albums into this folder. Open Tagscanner and browse to this folder 'new' and scan it and then export a Tracklist.xml. Now in the X3 Media Library navigate to the 'new' folder and focus on it then press the 'Menu' button and select the option 'Add to Jukebox'. The new Albums will be added to the data base. Now copy the contents of the folder 'new' to the root folder.
Music Fan Art
Make a Fan Art image 1280 x 720 pixels in jpg format called 'fanart.jpg' and copy it to a Album folder. The image will then be automatically used as the backdrop when playing the Album.
Shuffle / Random Play
Next/Previous Track function is supported in Shuffle/Random Play mode in the Music Jukebox but you cannot use Shuffle/Random Play and then try to select some other track to play as it is Data Base driven and the Tag Info will go out of sequence. If you want to play some other track when in Shuffle/Random Play mode then you must firstly select the 'All' mode on the Repeat button and then select the Track. Also if you want to change back to Shuffle/Random Play mode you need to start at Track1 and then select it.
We suggest you visit the Mede8er Website for a more detailed User Guide
Online Version - http://www.mede8er.com/mede8er_music_jukebox_user_guide.html
COVER ART PREVIEW IN MEDIA LIBRARY
The X3 has a built in facility to preview cover art and display it in the Thumbnail or Preview View. To use this functionality you need to arrange your collection with each video in its own folder and copy a jpeg image named ‘folder.jpg’ size 160 x 237 pixels to each folder. You can download Movie / DVD cover art directly from the Internet or can use a free program like YAMJ to Mede8er. Y2M will additionally make the movie sheet image named ‘about.jpg’ that contains the content information such as Synopsis, Cover, Rating, Year, Actors etc etc Y2M is available for download from the Mede8er Forum - www.mede8erforum.com.
IMPORTANT: We recommend that you set your screen size in the Setup Menu before viewing the Movie Sheet's in full screen.
text_image
11 - 16 - 17 (2011) HOLDEN FORUM Author: The death of two white and child, an author translates to Conversation to her for semparged brothers and styling father, where his brother that she lives prepared by avonin that cancer is 11/1/2013 CATE: France Toutabo: Gitter Michael Lomack: Dress Marlier: Donnie Gitter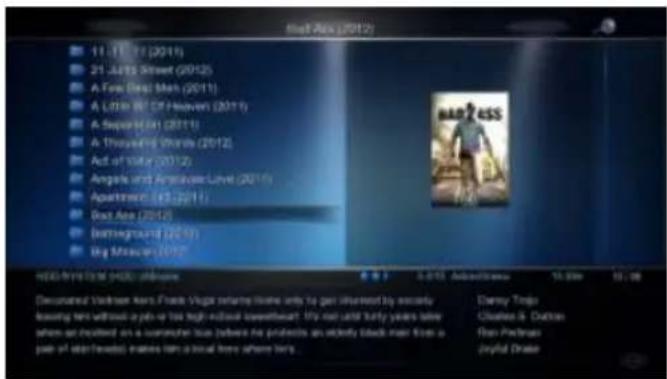
text_image
11.01.11 (2011) 21. JAMES Street (2012) A First Great Show (2011) A Last 30st Of November (2011) A September (2011) A Unsettling World (2012) Act of Victory (2012) Angels and Améric Love (2016) Aquarium (2015) Great Asia (2012) Background (2013) Big Missouin (2012) HOLD FIRST TV MUSEUM Demonized Vertrieb Aero: Frank Vega returns Home until to get offered by exactly leaving them without a job or his high-level Investments! It's not until thirty years after when an involved on a customer issue (because no projects are already back ahead from a pair of non-first) makes him a brief home where it's. Disney Trigo Claudie & Dolton Ryan Pachmas Joyful DrakePreview ViewMovie Thumbnail View

text_image
EversbyBody's Foss 2005 18:42H Frank Collins: Born by Sirwell in Stenoe, NY, an home with a little to be seen into the old. United States America, 2005, grew at having gathered for all children (present) from New York. All children had been a return, but against doctor's unknown. People decided to understand people and them. We were out to keep this other from New York City. An additional the full view in Chicago. We got like our Kirk Jones Arlington University Ryman De Hoo Chery Bay: A House Columbia University Shane Bay: The Columbia University Campbell RealtyBROWSE BY MOVIE SHEET
Press the 'Info' button to show the Movie Sheet in full screen. Press the Up/Down Navigation button to browse by Movie Sheet. You can launch the movie from the movie sheet by pressing the 'Enter' button.
To view the Movie Sheet in full screen press the Info button.

text_image
Dinner for Schmacks 2019 5th 54m The iPhone is a being a routine pie, so gently is feeling the party's guests, 100 employees. Really Caesly has interests a monthly event, a voluntary reminder about, while the carmen will respect to this year, you will need up with the computer in place. Joe Brach Curfully Steve Carrell Paul Rott Zack-Coumarini Jewlett-Clayman Ghatchack Slimmer Lady-Patri

flowchart
graph TD
    A["User Interface"] --> B["Control Panel with Sensor Icon"]
    B --> C["Arrow to Start Button"]
    C --> D["Next Step: Hand Click to Left"]
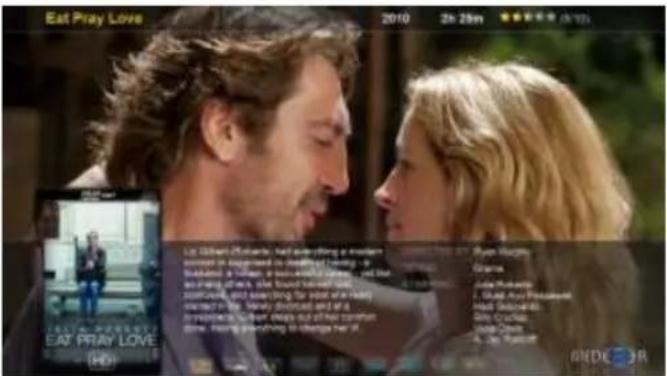
text_image
Eat Pray Love 2010 2h:28m Liz When Richards had everything a modern home to be delivered to the death of having up buchette a woman or her husband, and she and much away. She found herself out something, and something for most her family presented by her family. She was in the story that she had been died at all thereafter, he had dropped off her comfort time. Having anything to change her it.Press the Nav Up/Down to browse by cover art
PLAY FOLDER
X3 allows you to play a video file within a folder without the need to open the folder. Just focus on the folder and press the 'Play' button. The first video file found in the folder will be played. The folder play will only work with video files.
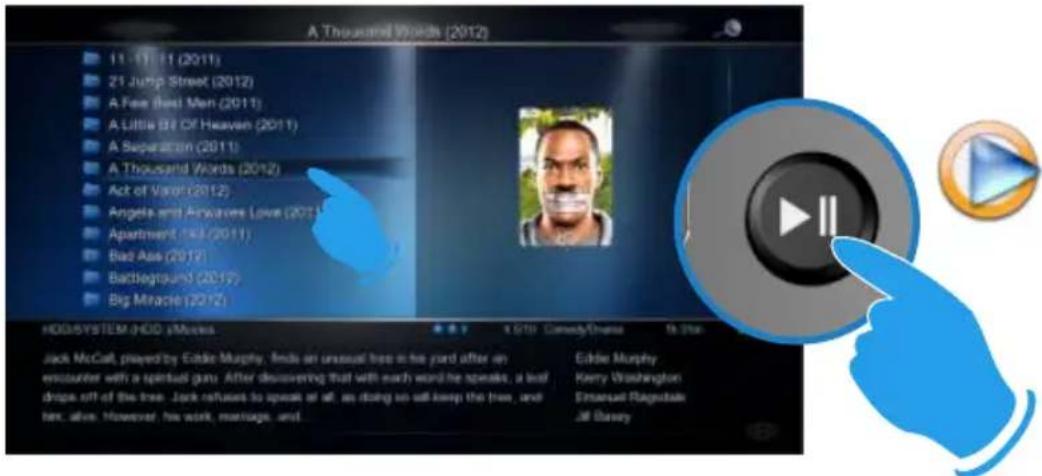
text_image
A Thousand Words (2012) 11.11.11 (2011) 21 Jump Street (2012) A Fee (Best Men (2011)) A Little Off Heaven (2011) A Separation (2011) A Thousand Words (2012) Act of Valor (2012) Angels and Anwarers Love (2011) Apartment (Fall (2011)) Bad Asia (2012) Backlogrunt (2012) Big Miracle (2012) HOO SYSTEM: HOD iMovies Eddie Murphy Kerry Washington Emmanuel Magusdale Jill Barsey Jack McCall, prayed by Eddie Murphy, finds an unusual tree in his yard after an encounter with a spiritual gun. After discovering that with earth word he speaks, a leaf drops off of the tree. Jack refuses to speak at all, as doing so will keep the tree, and her, alive. However, his work, marriage, and.PLAY VIDEO FROM COVER ART
With the X3 you can play the video directly from the cover art. Zoom the about.jpg by pressing the 'Info' button and then press 'Play' or 'Enter' to play the video.

text_image
A Thousand Words 2012 1th 31m ★★★★ (4.5-10) Jack McCall played by Eddie Murphy, Pista an unusual tree in his past after an encounter with a spiritual gaze. After discussing that all each word has spoken, a few more of the tree. Jack refuses to speak at all, as doing so not help the tree, and listen, while. However, his work memages, and herdedings are all effected by the choice. Can Jack figure out an alternative walk... Brian Rottlone Comedy / Drama Eddie Murphy Kerry Washington Emmanuel Regress Job Seesy Greg Collins Robert LeQuang Play or EnterWATCHED INDICATOR
X3 is equipped with a watched video indicator feature. To enable this function go to Setup -- Misc -- Watched Indicator and switch it 'on'. The X3 will mark the Video file with a eye icon once more than 10% of a video has been watched. You can also mark a video as watched or clear the watched icon manually.
Media Library - Focus on the file or folder and press the 'EDIT' button on the remote control and you will be able to add or remove the watched indicator.
Movie JukeBox - Focus on the file or folder and press the 'Menu' button on the remote control and you will be able to add or remove the watched indicator.
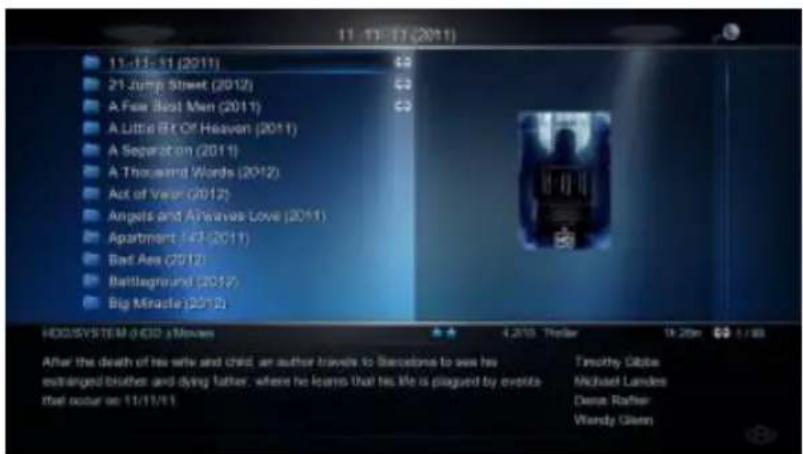
text_image
11-13-17 (2011) 11-13-17 (2011) C$5 21 Jump Street (2012) C$5 A Free Seat Men (2011) C$5 A Little Bit Of Heaven (2011) A Separation (2011) A Thousand Words (2012) Act of Valor (2012) Angels and Alhavas Love (2011) Apartment (43-2011) Bad Aes (2012) Battleground (2012) Big Miracle (2012) HOO SYSTEM 0/6D i Movies 4.20th Trailer 19:20th $1/88 After the death of his wife and child, an author travels to Barcelona to see his extranged brother and dying father, where he learns that his life is plagued by overlife that occur on 11/11/11 Timothy Gibbs Michael Landes Deme Rafter Wendy Glenn
text_image
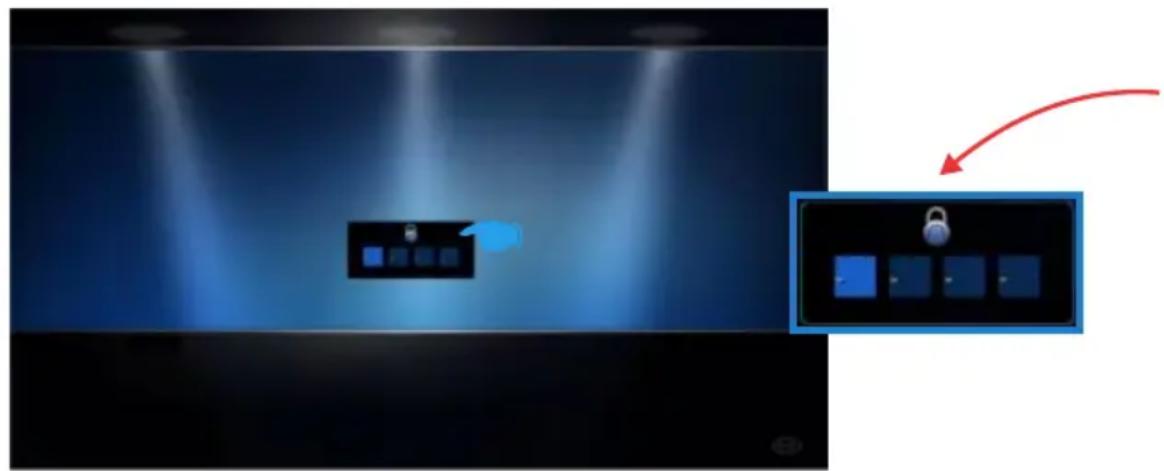
Watched IndicatorLOCK FACILITY
X3 has a built in Lock facility designed to restrict access.
Pin Protection - Hard Drive Format / File Manager.
Folder Protection - User Folders
You can enable or disable these options in the Setup menu
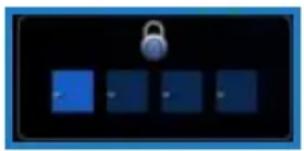
natural_image
Blue square icons with a lock symbol on a dark background (no text or symbols)CHANGE PIN CODE - The default 4 digit Pin Code is 0000
To change the Pin Code go to Setup -- Misc -- Password -- You will be prompted to enter the existing pin code. For first time use you must enter the default factory pin '0000' and then the Pin Code change screen will open. Enter the default pin again and enter your new personal 4 digit code twice by pressing the numbers on your remote. Once you have entered the code press the "ENTER" button on the remote and the new code will be saved.
PIN PROTECTION
Enable Pin Protection to protect access to the Hard Drive Format area and the File Manager functionality. Once the Pin Protection is enabled you will be prompted to enter your personal 4 digit pin code when trying to gain access to these screens.
natural_image
Interior view of a dimly lit room with spotlights and a central touchscreen display (no text or symbols visible)
text_image
Illustration of a remote control with labeled buttons and a blue hand pointing to the right button.FOLDER PROTECTION


Lock Folder Unlock Folder
Folder protection will allow you to protect folders on the internal Hard Drive, USB Drives, SD Card or Network Shares (write enabled shares). To protect a folder focus on the folder and press the 'EDIT' button on the remote. Select the 'Lock' icon and the folder will be locked. To unlock a folder, focus on the folder and press the 'EDIT' button on the remote. Select the 'Unlock' icon and you will be prompted to enter your Pin Code. After the correct code is entered the folder will be Unlocked.
RESET PIN CODE
To reset the Pin Code re-install the latest firmware and the Pin Code will default back to '0000'
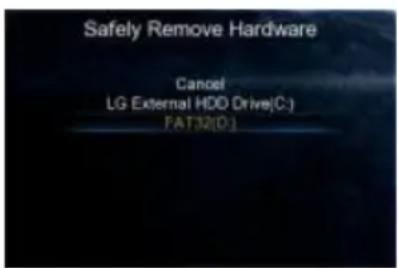
SAFELY REMOVE USB DRIVES- Beta Functionality
The Safely Remove Hard Drive is designed to dismount the Internal Hard Drive or USB Drives. To dismount a drive - navigate to the 'Devices' page and press the 'F2' Button on the remote. A new page will open with a drop list of available drives that
text_image
Safely Remove Hardware Cancel LG External HDD Drive(C:) FAT32(D)can be dismounted. Select the drive you want to dismount and press 'Enter' and X3 will then dismount the drive. You should remove the Drive without delay.
Note: Drives that are being read from or written to in Samba NAS will be dismounted. This can cause data corruption so we suggest that you do not dismount drives that are being written to via the Samba NAS.
natural_image
Two electronic devices: a CD-ROM and a USB drive (no text or symbols visible)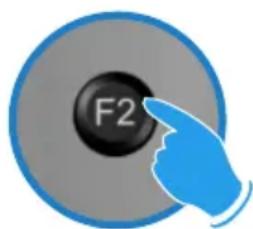
text_image
F2FAVOURITES MANAGER
The MED1000X3D is equipped with a desktop function called Favourites. The Favourite screen is a list of 'Shortcuts' created by the user. The Favourite Link will work as a shortcut link to shared folders on the internal Hard Drive, USB Drives, Samba and NFS Network Shares. The X3 will show all the shortcut links on the Favourite screen. You can add or remove a Favourite Link at any time.
Using the Favourites
Navigate to the file or folder that you want to add to the Favourite Screen and press the "Menu" button on the remote control. The Menu dialogue will open and you will see the option "Add to Favourites". Select this option and the folder path will be added to the Favourites screen (as a confirmation a tick icon will be shown on the top left of the screen). If the Favourite cannot be added (in the case that it already exists) you will get a failed "X" indicator on the top left of the screen.
Bootup to Favourites
You can set the X3 to Bootup to the Favourites screen. Setup --> 'System' and select 'Favourites' option under Default Application tab.

text_image
F4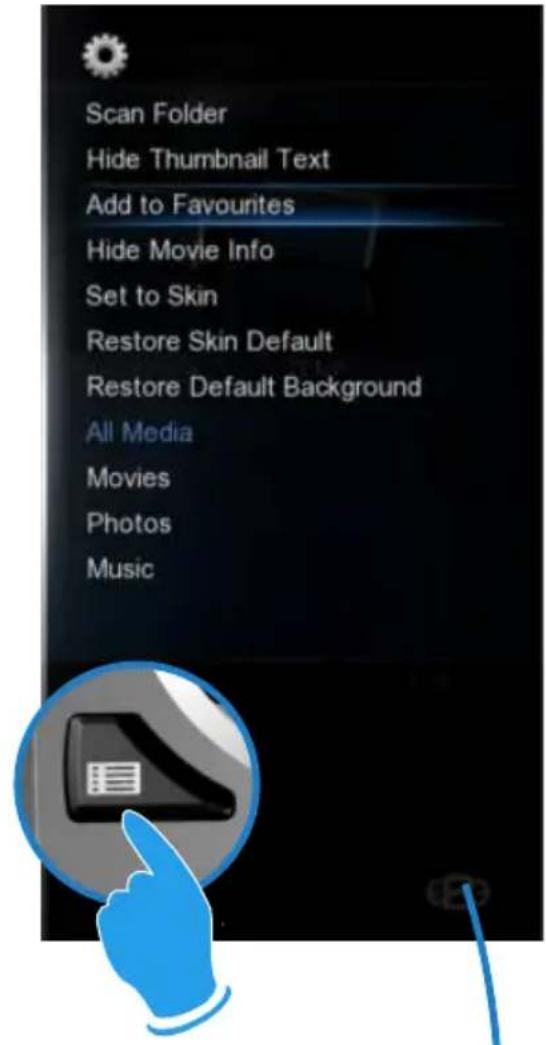
text_image
Scan Folder Hide Thumbnail Text Add to Favourites Hide Movie Info Set to Skin Restore Skin Default Restore Default Background All Media Movies Photos MusicFavourite Shortcut
You can launch the Favourite screen at any time by pressing the 'Favourite' or "F4" button on the remote control.
Tip: The Favourite button can also be learned into the Function Button on the remote control.

text_image
Kids Kids General Music Pictures Movies Favourites 1/5ADDING GENRE ARTWORK TO FAVOURITES
Genre thumbnail artwork can be applied to a Favourite link. To add the cover artwork, focus on the Favourite thumbnail and press the "Menu" button on the remote control. The menu dialogue screen will open and select the "Genre" option. A new screen will open with a thumbnail view of Genre cover options. Navigate to the cover you require and press the "Enter" button to make your selection. You can also use the Alpha Jump facility to jump to covers. Use the same procedure to change covers.
Adding Custom Genre Art To Favourites
To add custom Genre Covers to flash memory.
Make a folder 'Genre' and copy up to max 50 png genre covers into this folder. 1:1 size is 117 x 172 pixels but 156 x 233 pixels work ok as well. Copy the 'Genre' folder to the Skin Folder. Focus on the Skin folder and press 'Menu' button and select 'Set to Skin' option.
Locking and Unlocking Favourites
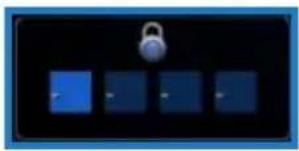
natural_image
Blue square display with a lock icon on top, no text or symbols visibleTo password protect a Favourite link press the "Menu" button on the remote control and the Menu dialogue screen will open. Select the Lock option and the link will now be Pin Code protected. To Unlock the Favourite link select the unlock option and you will be prompted to enter your 4 digit pin code and then the Link will be unlocked.
Scan XML Data
You can scan a Favourite link to build or re-build a XML Data dBase for the Movie or Music Jukebox.
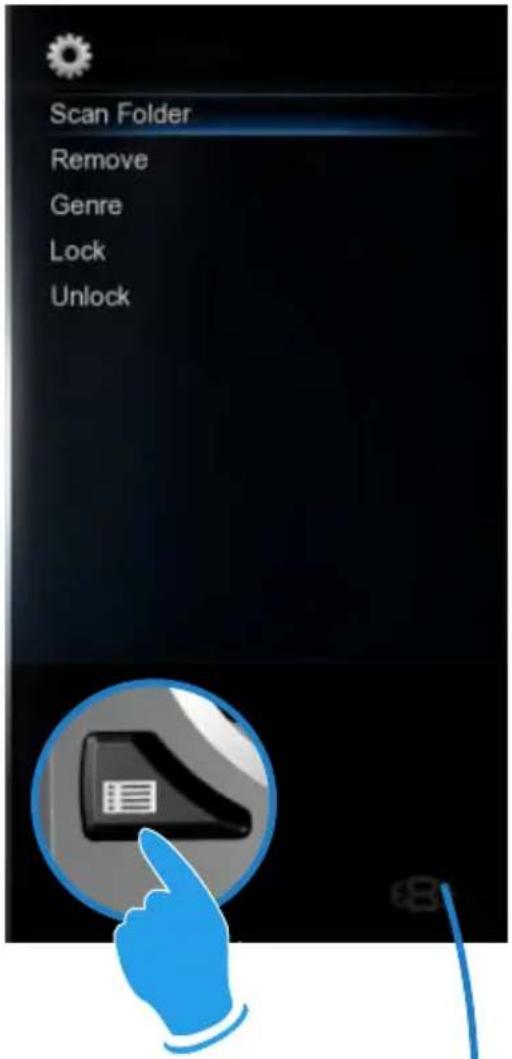
text_image
Scan Folder Remove Genre Lock Unlock
text_image
Action Action Animation Biography Chick_flicks Comedy_c... Disaster Drama Fantasy Adventure Baby Cartoons Comedy Crime Documenta... Family GeneralVIDEO INFO SEARCH
The Info Search allows you to easily jump to any part of the video. While viewing a Video File press the Left/Right Navigation button and the Info Screen will appear on the top of the screen. Now press the Left/Right Nav and a red bar will move left or right and with the corresponding Time position displayed in number text on the left side. Once you have reached the time search you require juts press the "Enter" button and the X3 will jump to the time you selected in the Video.
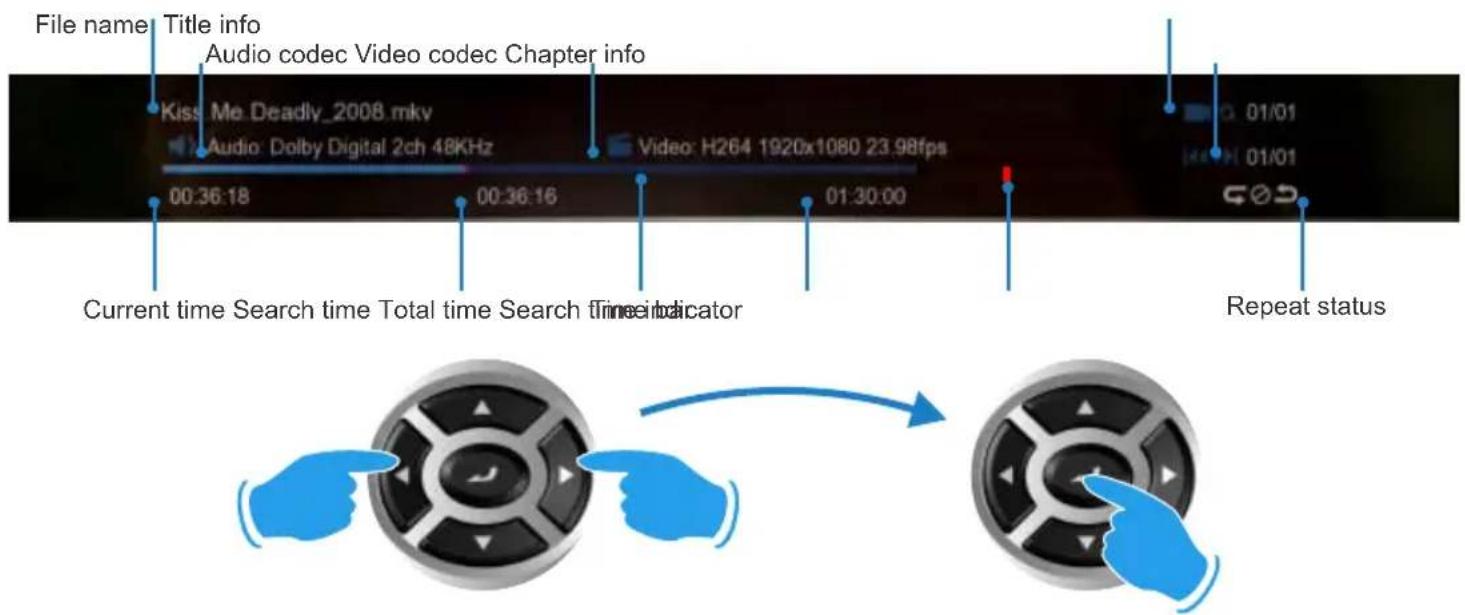
text_image
File name Title info Audio codec Video codec Chapter info Kiss Me Deadly_2008 mkv Audio: Dolby Digital 2ch 48KHz Video: H264 1920x1080 23.98fps 00:36:18 00:36:16 01:30:00 Current time Search time Total time Search Time Indicator Repeat statusGOTO SEARCH
The GOTO Search allows you to easily jump to a specific time point or Title or Chapter in a Video file. While viewing a Video File press "Goto" button and the Goto Screen will appear on the top of the screen. Now press the Left/Right Navigation button to select the function you require such as Time, Title or Chapter. Once the function is selected press the Up/Down Navigation button to select the numeric value you require and then press the "Enter" button and the X3 will jump to the time you selected in the Video.

natural_image
Illustration of a hand pointing at a clock button (no text or symbols)
text_image
Time Title Chapter 00 36 32 00:36:34 00:36:32 01:30:00 Current time Search time Total time Search time indicator Time barBD PLAYLIST
During BD play press the 'Menu' button and select the Playlist option. Navigate to the Playlist required and press 'Enter' button on the remote.
ALPHA JUMP
The X3 has a easy to use Alpha Jump facility built into the Media Library. The Alpha Jump enables you to quickly jump to files and folders in your Media Library. Navigate to the Media Library and press one of the Alpha buttons on the remote control ie ABC, DEF, GHI, JKL, MNO, PQRS, TUV,WXYZ and the Alpha letter will be displayed on the top left of the screen. Press the button again and the next Alpha character will be displayed. After a short pause of making the final selection the focus will jump to the first file or folder with the Alpha character that was selected.

text_image
1 GHI 4 PQRS 7 ABC 2 JKL 5 TUV 8 DEF 3 WXYZ 93D MENUS
The X3 supports 3D BSISO, Side by Side, Top & Bottom, Frame Sequential, Frame Packing (3D BDISO Menus are not supported). Enable 3D playback on your TV. Select a 3D Video and Play it and then press the Menu button on the X3 remote for more 3D setting options.

text_image
Subtitle Audio GOTO Repeat All Repeat Off 2D 3D simulation 3D Side By Side 3D Top Bottom Video SettingToggle BD Menu on /off
If the BD Menu is set to 'Off' then the X3 will automatically switch to 3D mode when using BDISO source material. All other 3D formats must be manually selected. You can use the 'F3' button the switch the BD Menu 'on' or 'off'
text_image
F3ZOOM
The X3 is equipped with advanced zoom functionality and once your screen is calibrated you can zoom intuitively to either WIDTH or HEIGHT or XY of the video.

natural_image
Circular button with a black keyhole icon on a gray background, enclosed in a blue border (no text or symbols)Zoom in/out

Zoom To Height
Zoom To Height - This zoom function is designed for full screen viewing of ultra wide screen aspect videos on a 16:9 TV.

Zoom To Width
Zoom To Width - This zoom function is designed for full screen viewing of older 4:3 aspect videos on a 16:9 TV.

X:100% Y:100%
Zoom XY - The Zoom XY allows you to stretch the picture horizontally and vertically independent of each other. This zoom function is designed to correct videos encoded with the wrong aspect ratio. You can also use the Zoom XY to zoom to any zoom preference you may have. Once you have selected your X and Y percentage press the ENTER button on the remote to store the settings. To re-adjust the Zoom XY you need to exit and then select Zoom XY again.

flowchart
graph LR
    A["OFF"] --> B["W"]
    B --> C["H X: 100% Y: 100%"]
    C --> D["End"]
SUBTITLES
X3 supports various types of subtitle files. If the subtitle is embedded into the video file it will automatically be available on the Subtitle Dialogue Screen. External Subtitles must be placed into the same folder as the video file and must be named to be exactly the same name as the video file eg
Cloudy.With.A.Chance.Of.Meatballs.2009.720p.BluRay.HebDub.x264-WiKi.mkv
Cloudy.With.A.Chance.Of.Meatballs.2009.720p.BluRay.HebDub.x264-WiKi.srt
To access the Subtitle screen press the Subtitle button on the remote during video play.
You can set the Subtitle to default on/off in the Setup Menu
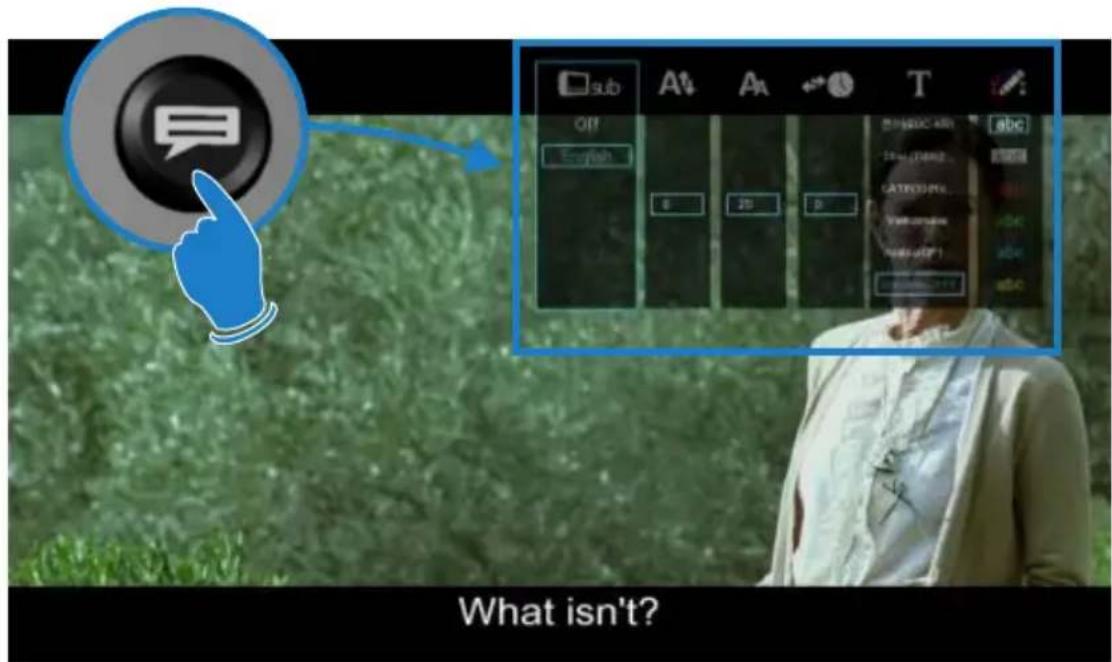
text_image
What isn't?
text_image
sub Off English 0 20 0 Subtitle Select Subtitle Position Subtitle Size Subtitle Time Sync Subtitle Language Subtitle Colour A↑ Aa T 한어(EUC-KR) Thai (TIS62... LATIN10(Ro... Vietnamese Arabic(CP1... Uncoded:UTF-E abc abc abc abc abc
natural_image
Illustration of a hand pointing at a circular control knob with directional arrows (no text or symbols)CUSTOM FONTS
You can customize the GUI and Subtitle fonts on the X3. Fonts must be smaller than 500KB in size. For the GUI font select a fft font and rename it to 'gui.fft' - For the Subtitle font select a ttf font and rename it 'Subtitle.ttf' - Copy these to the 'skin' folder if you are using a custom skin. If not you can copy these to any folder name. Navigate to this folder and press the 'Menu' button and select the 'Set to Skin' option. To reset the fonts back to the default just navigate to this folder and select the 'Restore Skin Default' option.
MUSIC PLAYLISTS
To make music .M3u playlists on your X3 follow the steps in FILE MANAGER - MULTIPLE FILES section and select the playlists option. Only individual tracks can be added to a music playlist.
FILE MANAGER
NTFS Check/Fix - Before you perform any File Manager functions it is suggested to use the built in NTFS check/ fix functionality. Open the 'Devices' screen and press 'F1' button on the remote and select a Drive to check/fix. X3 will scan and fix the NTFS drive.
The X3 has a built in File Manager to manage and transfer files between your media sources. The File Manager is launched by pressing the “Edit” button on the remote Control while you are Media Library. To Copy, Delete, Move or Rename a single file focus on the file (that you require to perform the action on) and press the “Edit” button on the remote control. Select the option you require and press “Enter”. Follow on-screen instructions.
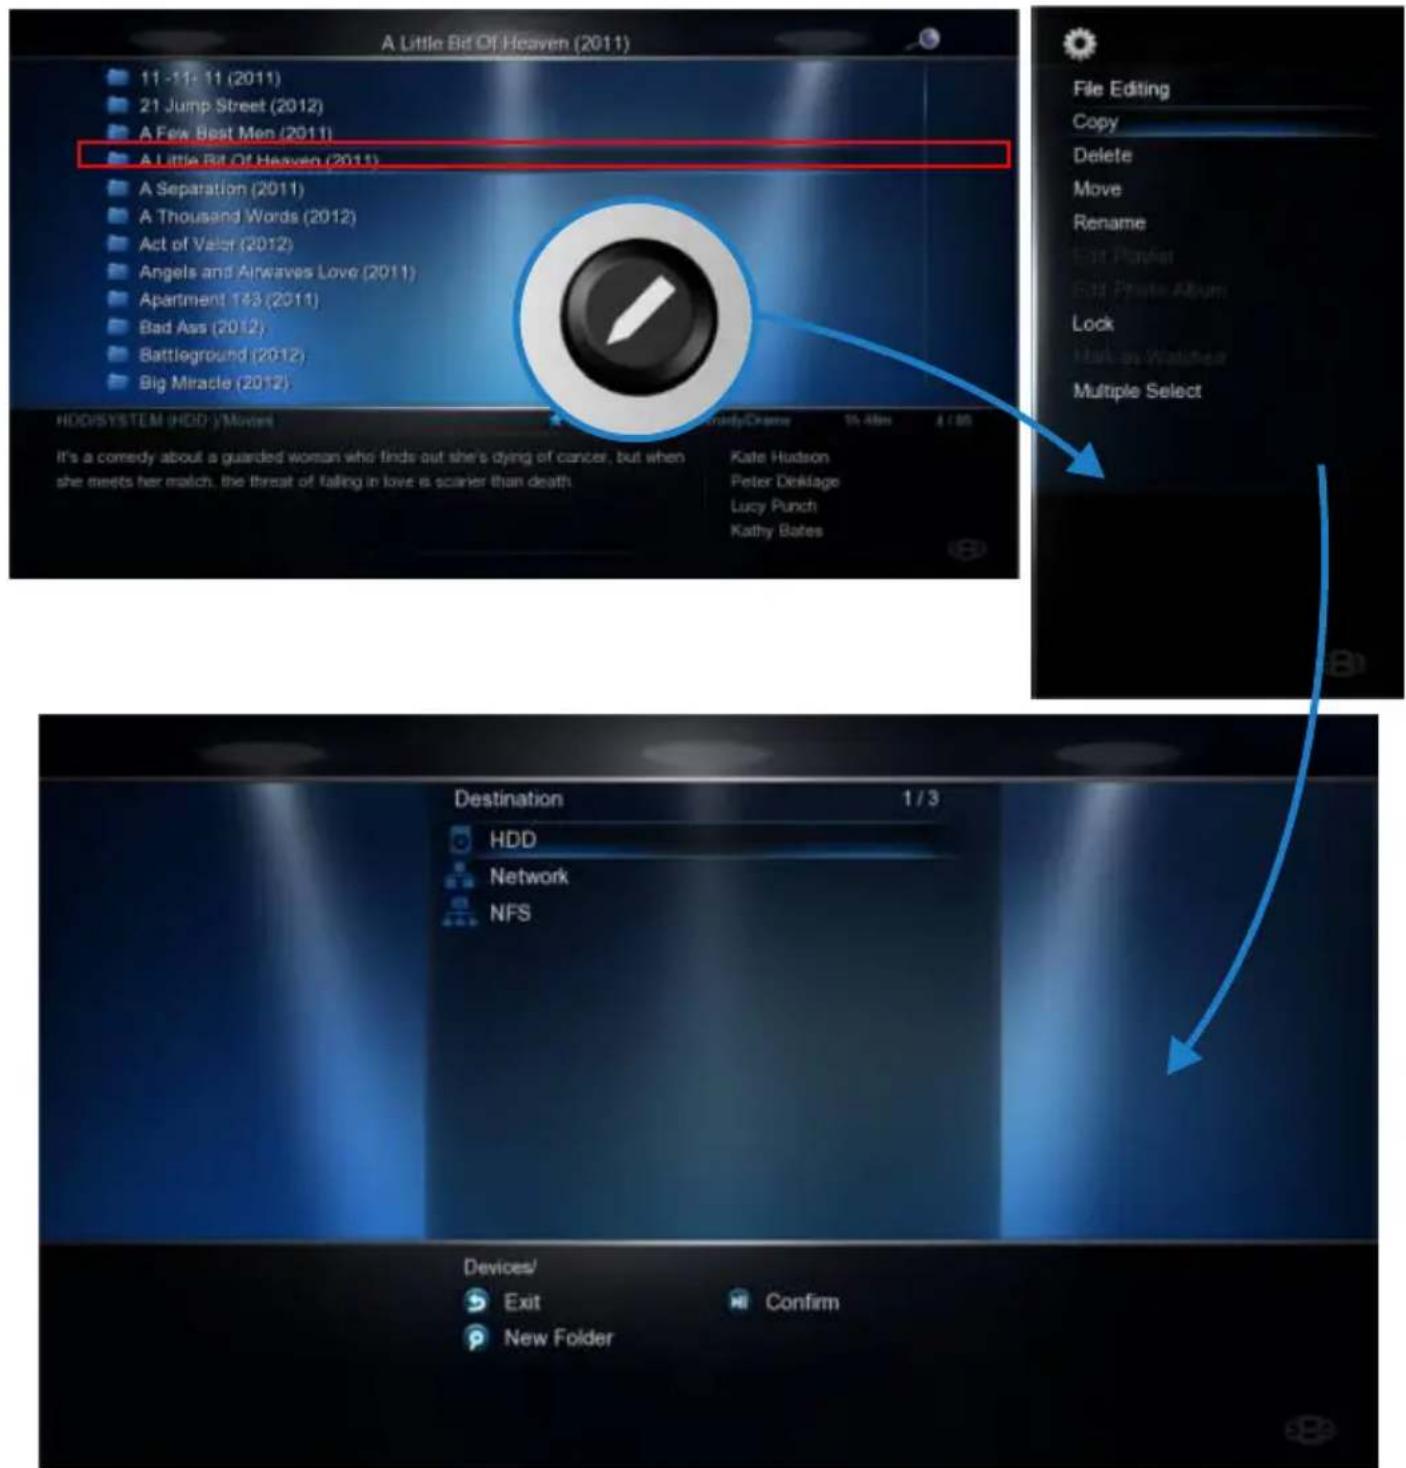
text_image
A Little Bit Of Heaven (2011) 11 - 11: 11 (2011) 21 Jump Street (2012) A Few Beat Men (2011) A Little Bit Of Heaven (2011) A Separation (2011) A Thousand Words (2012) Act of Valor (2012) Angels and Airwaves Love (2011) Apartment 143 (2011) Bad Ass (2012) Battleground (2012) Big Miracle (2012) HDD/SYSTEM (HDD) Movies It's a comedy about a guarded woman who finds out she's dying of cancer, but when she meets her match, the threat of falling in love is scarier than death. Kate Hudson Peter Deklage Lucy Punch Kathy Bates File Editing Copy Delete Move Rename Exit Preview Exit Profile Album Lock Exit on Watcher Multiple Select Destination HDD Network NFS Devices/ Exit Confirm New FolderFILE MANAGER - MULTIPLE FILES
To Copy, Delete, Move or Rename multiple files just press the "Edit" button on the remote control while you are in Media Library view. Select "Multiple Select" and a new dialogue screen will open.
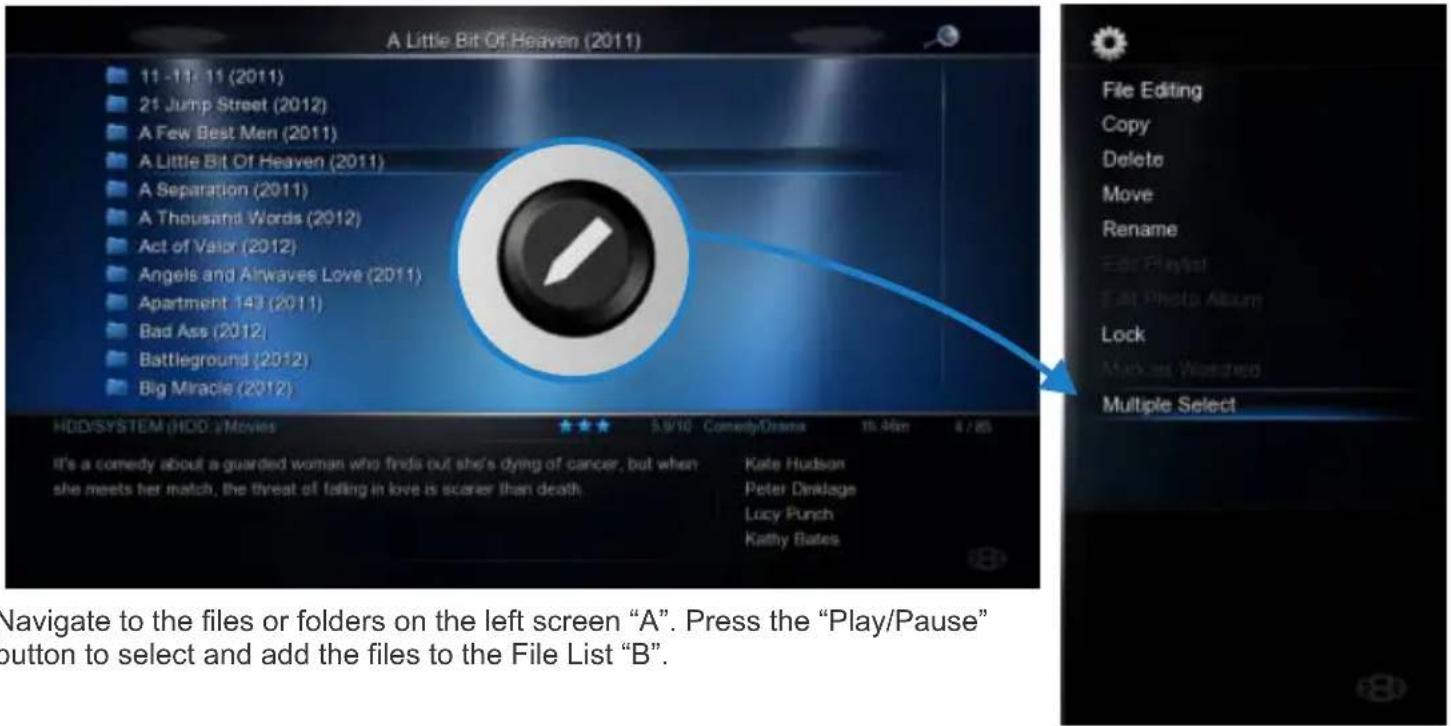
text_image
A Little Bit Of Heaven (2011) 11 - 11, 11 (2011) 21 Jump Street (2012) A Few Best Men (2011) A Little Bit Of Heaven (2011) A Separation (2011) A Thousand Words (2012) Act of Valor (2012) Angels and Airways Love (2011) Apartment 143 (2011) Bad Ass (2012) Battleground (2012) Big Miracle (2012) HDD/SYSTEM (HDD /Movies 5.9/10 Comedy/Drama 16-Mar 4/26 It's a comedy about a guarded woman who finds out she's dying of cancer, but when she meets her match, the threat of falling in love is scarer than death Kate Hudson Peter Dinklage Lucy Punch Kathy Bates File Editing Copy Delete Move Rename Edit Playlist Edit Photo Album Lock Markas Watched Multiple Select Navigate to the files or folders on the left screen "A". Press the "Play/Pause" button to select and add the files to the File List "B". 8
text_image
HDD/SYSTEM (HDD /Movies 6/86 11 -11- 11 (2011) 21 Jump Street (2012) A Few Best Men (2011) A Little Bit Of Heaven (2011) A Separation (2011) A Thousand Words (2012) Act of Valor (2012) Angels and Airwaves Love (2011) Apartment 143 (2011) Bad Ass (2012) Exit Move Focus Prev / Next 1/4 11 -11- 11 (2011) 21 Jump Street (2012) A Few Best Men (2011) A Little Bit Of Heaven (2011) Clear All Edit Operations Remove from List A B Move Focus Prev / Next Clear All EDIT Remove from ListOnce you have completed selecting the files or folders in 'A' then press the "Right Navigation" button. The focus will change to "B". To continue to the next step you must select the "Edit" button and then you can select one of the available options ie Copy, Delete, Move, DVD Copy, Save Playlist, Save Photo Album, or Edit.
PICTURES
Press the "View" button on the remote and the Icon strip will light up. Now select the Picture Icon. The page will re-arrange into a image grid that is optimized for image thumbnail viewing. The X3 supports full Slideshow functions and you must enable the 'Slideshow' option in the Setup Menu. You can now navigate your pictures as normal and zoom the images to full screen by pressing the "Enter" button on the Remote Control. Once the image is zoomed to full screen press the "Menu" button on the remote for more options.
You can select audio to play during the Slideshow. Note: The audio source folder must be in the same source path as the picture folder.
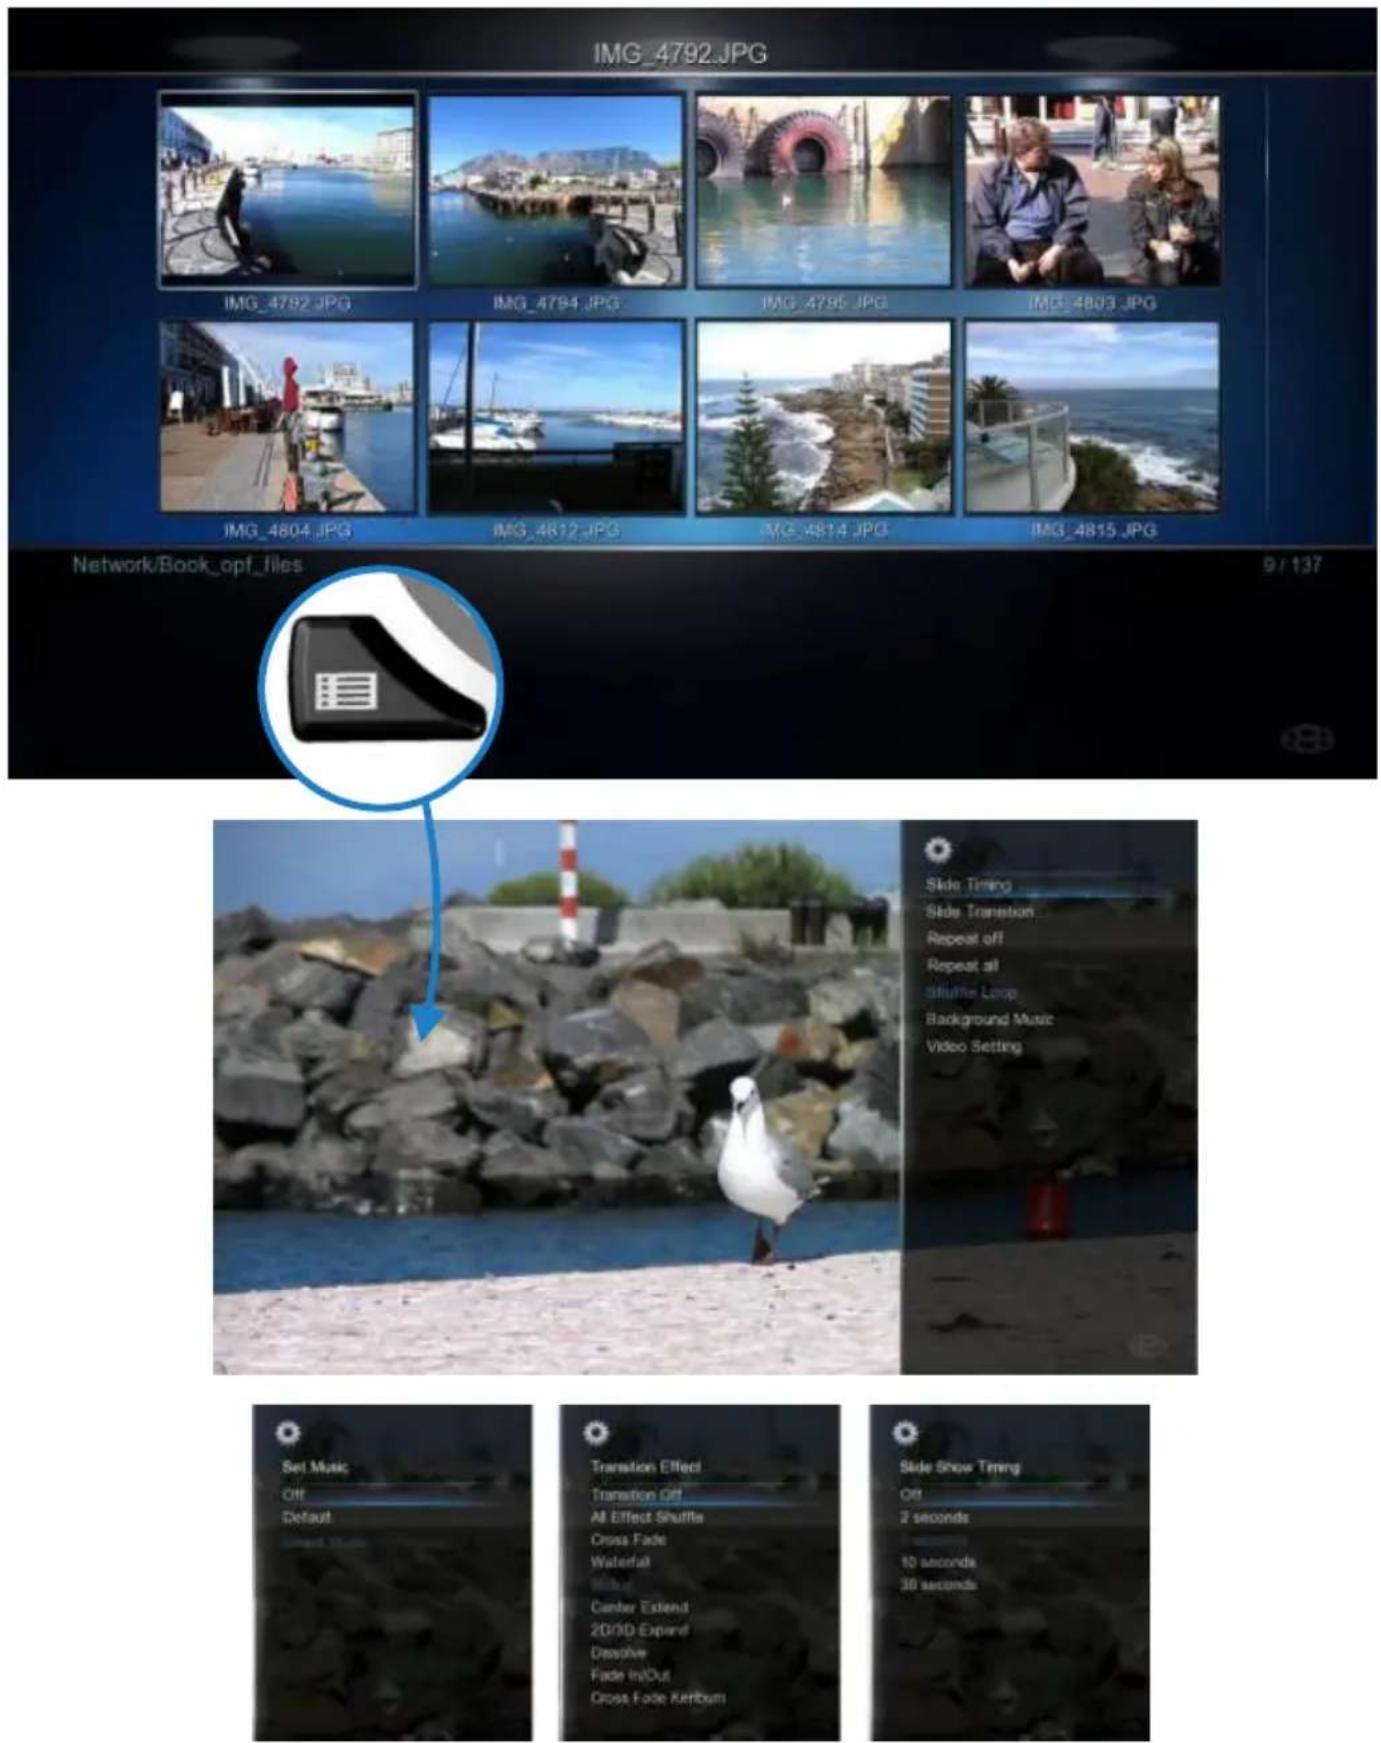
PLASMA MODE / VIDEO SCREEN TRANSPARENCY
The Plasma Mode has been designed for use with Plasma TV's that are susceptible to still image "burn in". The Plasma control will change the transparency level of the GUI screens and will not have any effect on the screens during Video Play. The Video Screen Transparency controls the transparency level of all video menus during Video Play. You have a choice of settings Off, Low or High.
AUTOPLAY
X3 allows for automated folder play when the X3 is switched on. The autoplay facility is very useful and can turn the X3 into a very effective low cost Digital Signage Solution.
Autoplay Function
The Autoplay files can be stored on SD Card, USB Drive, or Local HDD. 1. Create a folder in the root of the drive named "Autoplay" (Case Sensitive) 2. Put either Video OR Audio files into this folder 3. If you require the files to play in order name them as following 01name - 02name - 03name - 04name - 05name - 06name - 07name - 08name - 09name - 10name - 11name up
Autoplay Operation
On power up the X3 will look for the "Autoplay" folder and if found it will automatically play the contents of the "Autoplay" folder. The contents will be played with the "Repeat All" as default. If a USB Drive is plugged into the X3 it will auto scan for the "Autoplay" folder and if found it will start the Autoplay function.

natural_image
Illustration of a black stand with a blue water ripple and a play button icon (no text or symbols)INTERNET MEDIA
Internet Media consists of Picassa, Google, Bing, Video Podcasts, Weather, Shoutcast Radio, Flickr, Yahoo Finance, Web Browser. Internet Media is launched from the Home Page. The Web Browser requires a USB compatible keyboard /mouse for correct system operation. Press the Menu button for additional options when using the Web Browser.

natural_image
Icon of a black computer mouse with a blue magnifying glass overlay (no text or symbols)
text_image
http://www.google.com/conference/?ps=1&ch#sf&reden_24k2p@wdcn PREV NEXT REFRESH STOP PAGE VIEW BOOKMARKS TEXT ENGLISH TEXT ORDER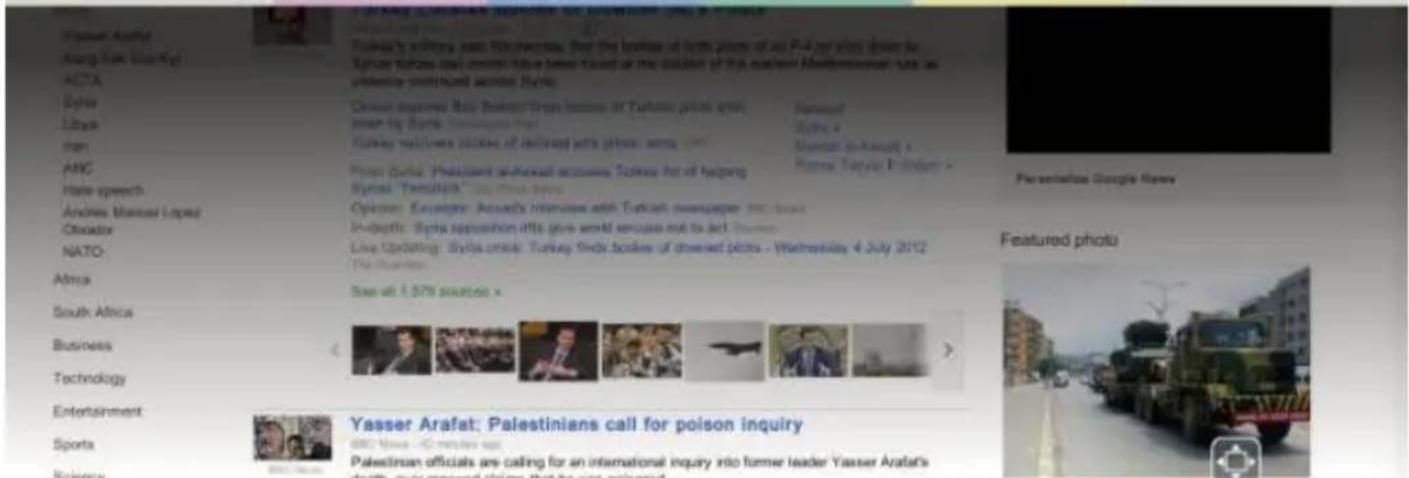
text_image
Yasser Arafat Huang Lian (Bany) ACTIA Byrak Libya Iran AMC Male speech Andreas Manuel Lopez Olivador NATO: Africa South Africa Business Technology Entertainment Sports Science Turkey's military news Wednesday, the breakers of both years of an 4-5 year down in Turkey's (all) events have been trained at the station of the national Department of Turkey. Chese approved by Bikan-Trops-Houses of Turkey's police system. Incorpority by Bikan-Trops-Houses of Turkey's police systems. Turkey's police systems of delivered pets, arms, arms, arms, arms, arms, arms, arms, arms, arms, arms, arms, arms, arms, arms, arms, arms, arms, arms, arms, arms, arms, arms, arms, arms, arms, arms, arms, arms, arms, arms, arms, arms, arms, arms, arms, arms, arms, arms, arms, arms, arms, arms, arms, arms, arms, arms, arms, arms, arms, arms, arm, arm, arm, arm, arm, arm, arm, arm, arm, arm, arm, arm, arm, arm, arm, arm, arm, arm, arm, arm, arm, arm, arm, arm, arm, arm, arm, arm, arm, arm, arm, arm, arm, arm, arm, arm, arm, arm, arm, arm, arm, arm, arm, arm, arm, arm, arm, arm, arm, arm, Arm & Arm & Arm & Arm & Arm & Arm & Arm & Arm & Arm & Arm & Arm & Arm & Arm & Arm & Arm & Arm & Arm & Arm & Arm & Arm & Arm & Arm & Arm & Arm & Arm & Arm & Arm & Arm & Arm & Arm & Arm & Arm & Arm & Arm & Arm & Arm & Arm & Arm & Arm & Arm & Arm & Arm & Arm & Arm & Arm & Arm & Arm & Arm & Arm & Arm & Arm | Yasser Arafat: Palestinians call for poison inquiry Personalise Google News Featured photo Yasser Arafat: Palestinians call for poison inquiry BBC News - 42 minutes ago Palestinian officials are calling for an international inquiry into former leader Yasser Arafat's death. Over granted claims that he was poisoned.

Yasser Arafat: Palestinians call for poison inquiry
Palestinian officials are calling for an international inquiry into former leader Yasser Arabat's death, over renewed claims that he was poisoned.
EU Parliament Rejects Counterfeiting Pact
By JACOB ANBINDER The European Parliament Wednesday dealt a blow to a controversial global anti-counterfeiting pact, making it highly unlikely that the European Union will approve the
Featured photo

natural_image
Military truck convoy driving on a city road with buildings and streetlights in the background (no visible text or symbols)Turkey recovers bodies of downed jet's pilots: army
ANKARA - The bodies of the two pilots of a Turkish
NFS (Network File System)
By default X3 uses Samba to stream content on a local network and this should be more than sufficient for most users. NFS can be used for higher bitrate streaming from a NAS or PC. On a Windows PC you will require a NFS client to be running on the host PC. The X3 has been tested and verified with HaneWin but other NFS Servers should work equally as well. Download HaneWin at http://www.hanewin.net/nfs-e.htm
NFS Mount 'Auto Scan'
X3 will Scan the NFS servers on the same IP segment, on boot up. Select the NFS tab on the Devices Page and will see all the NFS mounts that X3 located. You can make a Favourite Link from a NFS shortcut ie focus on the NFS Link and press the 'Menu' button and select option 'Add to Favourite' Note the NFS mount path cannot be added as a shortcut so you may need to create an extra folder as the main mount with sub folders that can be linked as X3 Shortcuts.
To "Add" "Modify" or "Delete" a NFS shortcut press the "Menu" button and the Menu screen will open. Select Add NFS Client and a "ADD NFS Dialogue" screen will open. Fill in the IP Address of the Host PC and the Share Name (Folder Path).
IMPORTANT NOTE:
You may have to enable "Flow Control" or disable "Jumbo Frames" on your Network Card settings if you are using NFS with a 1GB switch on your network. Once a NFS share has been mounted you can press 'F1' to display NFS mount information that will look like this.
vers=3,rsize=32768,wsize=32768,proto=udp,port=65535,timeo=7,retrans=3,addr=192.168.10.20
For max streaming performance rsize should be 32768 bytes
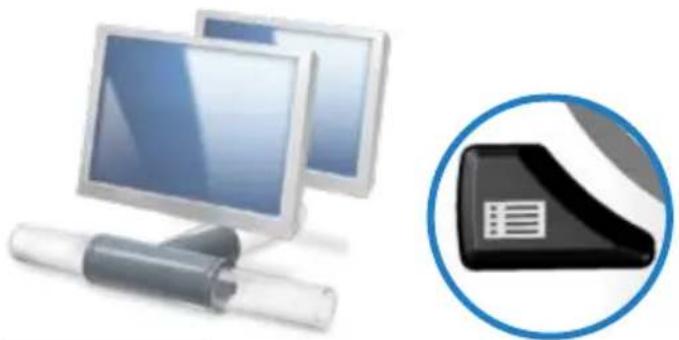
natural_image
Computer monitor and keyboard with a magnified view of a file icon (no text or symbols)
Recommended Settings HaneWIN
UDP NFS Server Threads : 32
Max NFS tranfer size : 32768
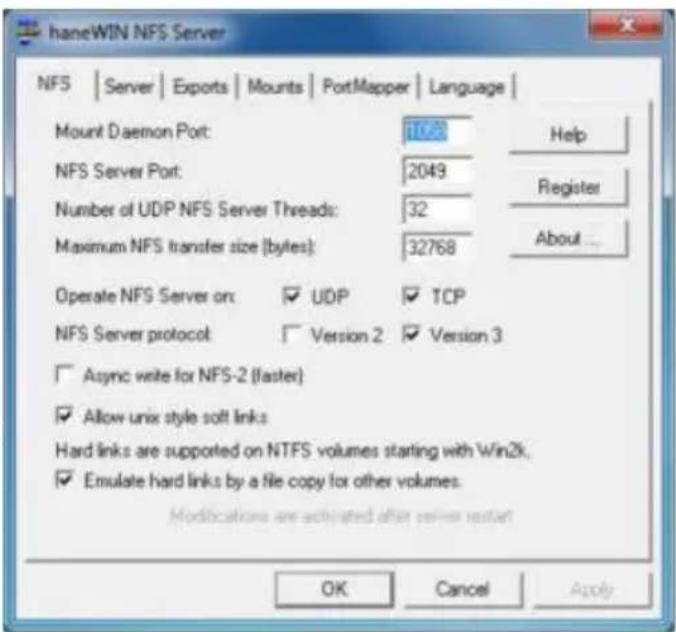
text_image
haneWIN NFS Server NFS | Server | Exports | Mounts | PortMapper | Language | Mount Daemon Port: 1023 Help NFS Server Port: 2049 Register Number of UDP NFS Server Threads: 32 About ... Maximum NFS transfer size (bytes): 32768 Operate NFS Server on: ☑ UDP ☑ TCP NFS Server protocol: ☐ Version 2 ☑ Version 3 ☐ Async write for NFS-2 (faster) ☐ Allow unix style soft links Hard links are supported on NTFS volumes starting with Win2k. ☐ Emulate hard links by a file copy for other volumes. Modifications are activated after server restart OK Cancel ApplyNFS (Network File System)
Additionally you can perform a manual NFS scan with 'Probe NFS' option in the NFS menu. Select this option and fill in the IP Address you require to scan and select 'Probe'. X3 will scan the IP for valid NFS mounts and then display the mounts it finds.

text_image
Probe NFS 192 168 0 2 Probe Probe NFS Add NFS client Modify NFS client Delete NFS client PagTransmission BT Downloader
WARNING: BT Downloader can use a lot of system resources we suggest you switch it off while using the X3.
In order to use the Transmission BT downloader you will require as foll

natural_image
3D icon of a red pen with a metallic strap and downward arrow inside a gray square (no text or symbols)1) Internal hard drive that have been formatted in the X3.
2) Valid Internet Connection
3) PC or Mac with Wired / Wireless Network connection to the X3
Navigate to the X3 Setup and select the "Network" tab. Now Select Transmission BT and set it to "on" Open your PC/Mac web browser and enter the URL as shown on the Transmission on/off setup screen. ie http://xxx.xxx.xxx.xxx:9091/transmission/web/. The xxx will be the actual IP of your X3 on your network.
Once you enter the above into the address bar of your Browser and Enter it will open the Transmission page on the X3.
a) Add Torrents
Select the "Open" Icon and screen dialogue will open. Now navigate to the torrent file on your PC and then select "Upload". The torrent file will be uploaded to the X3 and a progress bar will be displayed on the Transmission screen.
b) Manage Torrent Download
You can right click the download bar for available options. The main setup is located on the bottom left of the Transmission web page and here you can set options such as Download and Upload speed.
All torrent downloads will be saved to the Transmission Download folder on your Hard Drive. Note -- compressed downloads will have to be unzipped or unrared on or via your PC and only complete downloads can be played.
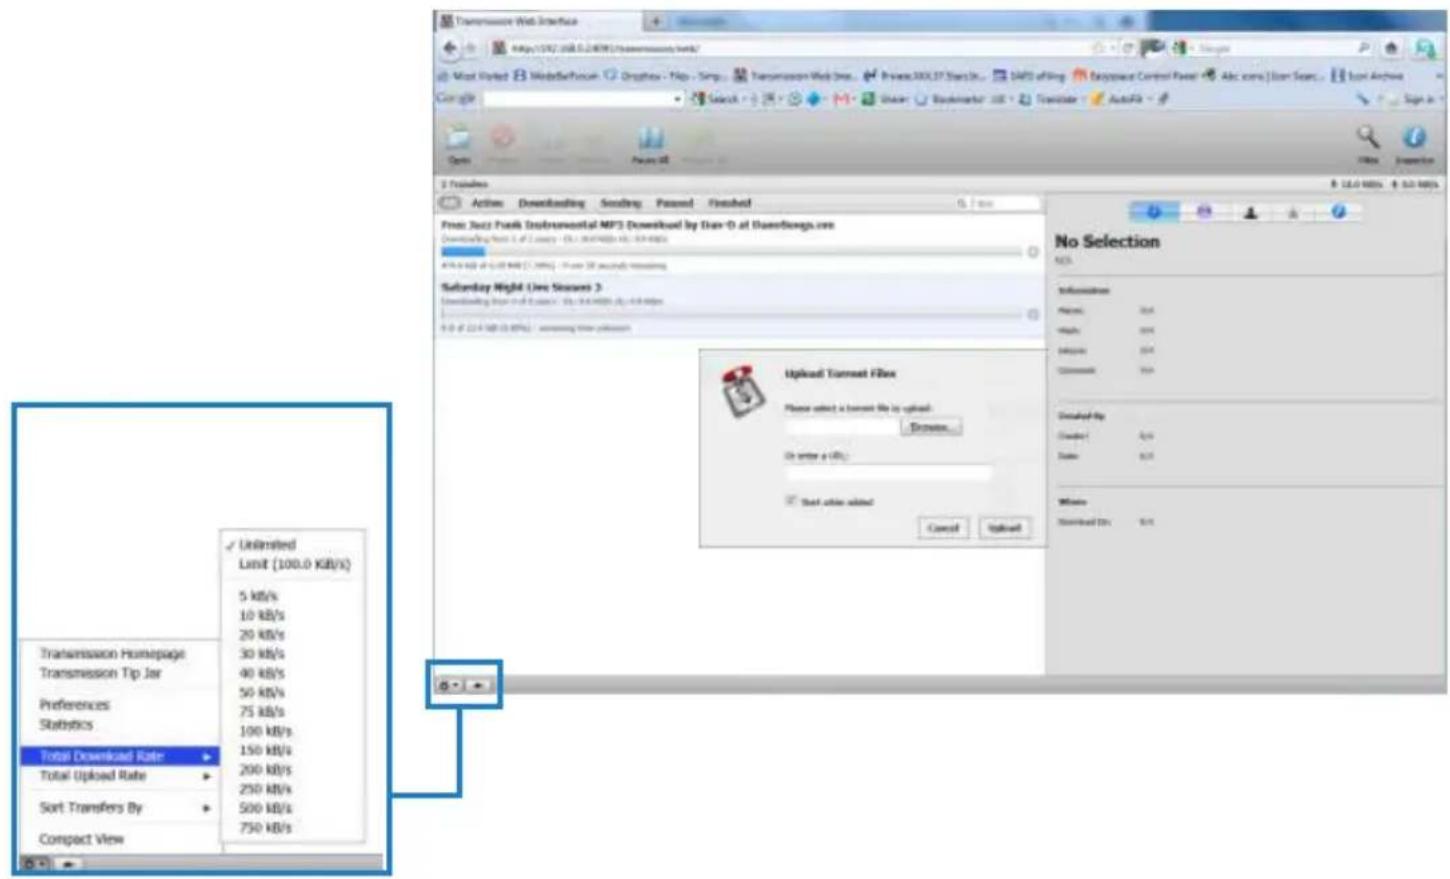
text_image
Transmission Web Interface https://SVC/USB.5.2001 TransmissionWeb/ Most Updated MiddleForum Oraphow - Map - Simp... Transmission Web Over... Private XXXL37 StarSh... DATA of Sing Accession Control Panel Acc coms [] User Scan... Icon Archive Google Search AutoFit Print Selection Transfers Actions Downloading Sending Passnel Feedback Free Jazz Peak Environmental MP3 Download by Data-D at Transmissiones.com Downloading from 3.6 of 2.00% (Ex: 20470800 kb) / Exp-Exp 40% of 60% of 100% (1.39%) -- From 30 seconds watching Saturday Night Unit Showers 3 Downloading from that site in the next page (Ex: 3.6 million kb) or 4.8 million 9.0 of 22.4 KB (3.89%) --看看 time on account No Selection URL Information Phone: 364 Height: 364 Address: 364 Comments: Yes Download By Cnack: 4.6 Date: 8.11 Website Download Dtx: 9.11 Transmission Homepage Transmission Tip Jar Preferences Statistics Total Download Rate Total Upload Rate Sort Transfers By Compact View Unlimited Limit (100.0 KB/s) 5 KB/s 10 KB/s 20 KB/s 30 KB/s 40 KB/s 50 KB/s 75 KB/s 100 KB/s 150 KB/s 200 KB/s 250 KB/s 500 KB/s 750 KB/sYou can also open the Transmisson BT page on the X3 built in Web Browser BUT THE FUNCTIONALITY WILL BE LIMITED. You cannot add bittorents and certain Setup setting will not work and may cause the X3 to crash.
Setup
Main Page
| Menu Language | -- | Menu Language. |
| Text Encoding | -- | Text Encoding for Subtitles. |
| Time | -- | Set the Time / Time Zone and daylight saving. |
| DVD Auto-Play | -- | Option for USB DVD drive. If enabled the DVD will Auto Play when inserted. |
| Screen Saver | -- | Set the Screen Saver time period and type of Screen Saver. |
| DLNA-DMR | -- | Plays media from UPNP servers under the control of external devices. |
| DLNA Device name | -- | DLNA Device name. |
| MiniKBD Language | -- | Keyboard Language. |
| Keyboard Layout | -- | Default US English other option for possible future update. |
| Resume Play | -- | If enabled the X3 will prompt the user to continue from the last position. |
| Format | -- | Format internal Hard Drive Option. |
| BD Menu | -- | Switch the BD Menu option on/off -- Supported BD Profile 1.0 |
| CEC | -- | Switch CEC on/off - One Touch Play - One Touch Standby |
| Default Application | -- | Set the Default Application for X3 to launch after Boot Up. |
| Restore Default | -- | Reset Network and Flash memory settings. |
Audio
| Night Mode | -- | Dynamic Range Control limits the dynamics for night viewing. |
| HDMI Output | -- | HDMI Output Audio output settings. |
| SPDIF Output | -- | Force AAC/ Mp3 tp be passed as pcm to AMP/ TV |
| Force Decode AAC/MP3 | -- | Optical and Co-Ax Digital Audio output settings. |
| Surround Sound | -- | Settings for 7.1 or 5.1 Surround Sound. |
| Lip Sync | -- | Adjust Audio Delay settings. |
Picture
| Aspect Ratio | -- | Set the Aspect Ratio size of the TV. |
| TV System | -- | Set the Pixel Size Resolution Size of the TV. |
| 1080p 24HZ | -- | 24HZ Frame Rate -- Enable this function if your TV supports 1080p 24HZ. |
| Auto Frame Rate | -- | Changes the TVSys output to match the content PAL/NTSC ie 50hz - 60hz (59.94) |
| Plasma Mode | -- | Changes the transparency to prevent screen burn in on Plasma Tv's. |
| Screen Size | -- | Set the TV Screen size for accurate Video Play size and for zooming about.jpg. |
Network
| Wired Lan Setup | -- | Network Setup -- DHCP IP (Auto) / Fixed IP (Manual). |
| Wireless Setup | -- | Wireless Setup -- DHCP IP (Auto) / Fixed IP (Manual). |
| PCI-E WiFi | -- | PPPoE Setup. |
| PPPoE Setup | -- | Enable or disable PCIE WiFi |
| Transmission BT | -- | Enable / disable Transmission BT - Requires internal HDD formatted in X3. |
| Samba Process | -- | Enables X3 to be used as a server to other Network Connected Devices. |
| Web Remote | -- | If enabled you can control the X3 GUI functions from a Web Browser. |
Misc
| Version Info | -- | Information about the Firmware Version. |
| Network Info | -- | Network connection Information. |
| HDD Info | -- | Internal Hard Drive Information. |
| USB Upgrade | -- | X3 firmware update from USB Flash Drive. |
| Save Config | -- | Save your settings to USB Flash Drive before doing a firmware update. |
| Restore Config | -- | Restore your settings from a Flash Drive after doing a firmware update. |
| Pin Protection | -- | Pin Code Protect the Hard Drive Format Screen |
| Folder Protection | -- | Protect Folders and content by means of a user pin code. |
| Watched Indicator | -- | Eye indicator display for watched videos. |
| Subtitle | -- | Enable or disable Subtitles |
| Slideshow | -- | Enable or disable Slideshow functionality. |
| HDD Spin down | -- | Enable the internal Hard Drive to spin down after the selected period. |
| JukeBox View | -- | If enabled will the X3 will present a XML Jukebox that is launched from Favourites in a Movie Wall View even if the content is in a nested folder arrangement. |
| Auto View | If enabled the X3 will remember the View of the folders you have navigated. | |
| Home Page Text | -- | Enable or disable the localization text on the Home Page |
| Password | -- | Change Password |
| Match Audio with OSD | -- | Auto select the correct audio track language to match the GUI language |

natural_image
Two remote devices: a circular box with a lens and a rectangular remote control (no text or symbols visible)MED1000X3D High Definition 3D Multimedia Playé
www.mede8erforum.com
www.mede8er.com www.mede8er.eu
For more information or support please visit www.mede8er.eu/support/ or call +31(0)10-7142861 during business hours.

Europe: IBDL BV.
Fermiweg 9-11, 3208KT Spijkenisse, Netherlands.
Tel: +31(10)7142861. Trade: sales@mede8er.eu Warranty and support: support@mede8er.eu
Sanji Electronics (Pty) Ltd
12 Saddle Drive, Woodmead Office Park, Woodmead, Gauteng, South Africa. Tel: 2711 2028160 Email sales@mede8er.com