Trigger Happy - Remote trigger Multiblitz - Free user manual and instructions
Find the device manual for free Trigger Happy Multiblitz in PDF.

User questions about Trigger Happy Multiblitz
0 question about this device. Answer the ones you know or ask your own.
Ask a new question about this device
Download the instructions for your Remote trigger in PDF format for free! Find your manual Trigger Happy - Multiblitz and take your electronic device back in hand. On this page are published all the documents necessary for the use of your device. Trigger Happy by Multiblitz.
USER MANUAL Trigger Happy Multiblitz
Quality & Reliability
OVER
60
YEARS
Designed € Manufactured
in Cologne / Germany
Multiblitz®
+ MADE IN GERMANY
BEDIENUNGSANLEITUNG
D
Thank you for choosing MULTIBLITZ, we hope you enjoy working with this high quality product. MULTIBLITZ units are without exception designed and manufactured in Germany.
PLEASE READ THE INSTRUCTION MANUAL CAREFULLY BEFORE USING THIS PRODUCT.
Do not open the unit by yourself! Service should only be executed by an authorized MULTIBLITZ service location.
Do not expose the unit to water, nor spray-/or dripping water.
When permanently in use, this unit should be serviced once a year by an authorized MULTIBLITZ service location.
The crossed out wheeled bin label that can be found on your product indicates that this product should not be disposed of via the normal household waste stream. To prevent possible harm to the environment or human health please separate this product from other waste streams to ensure that it can be recycled in an environmentally sound manner. For more details on available collection facilities please contact your local government office or the retailer where you purchased this product.

CE
ÜBERSICHT
D
- Power On/Off & Test Fire
- Modeling Light ON - 100% - OFF
3./4. ID +/-, Channel Select and Easy Clip Function Activator
5./6. Output Control & Channel +/- - Display
- Battery Compartmen
- Sync Lead Connector
- Hot Shoe

text_image
1.0 5 OUTPUT / CHANNEL 6 - CHANNEL SELECT 3 ID EASY - CLIP 4 + UNIT / SYSTEM -ON - OFF - TEST MODELING LIGHT -ON (PROP.) - 100% - OFF 1 MULTIBLITZ 2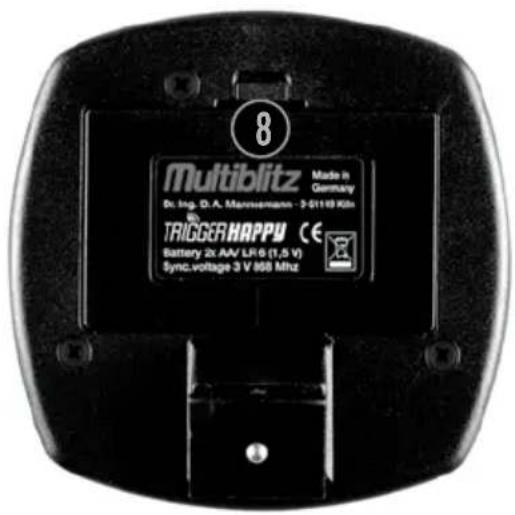
text_image
8 Multiblitz Made in Germany Dr. Ing. Dr. A. Mannsermann - 2-0110 KIN TRIGGER HAPPY CE Battery 2x AW LR6 (1,5 V) Sync.voltage 3 V 868 MHz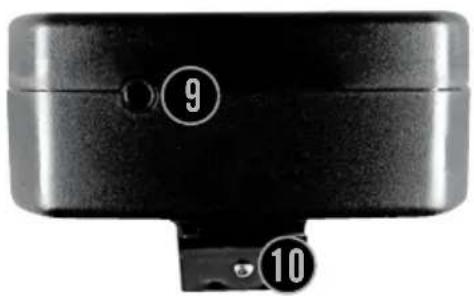
text_image
9 10text_image
1 1st exposure (channel „01.“) 2nd exposure (channel „02.“) 3 White Background Flash No.2 Object or Model 4 Flash No.1natural_image
Black-and-white portrait of a woman with long wavy hair, wearing a patterned top, against a blurred mountainous background (no text or symbols visible)MÖGLICHES ERGEBNIS
natural_image
Black-and-white portrait of a woman with long wavy hair, wearing a patterned top (no visible text or symbols)
natural_image
Silhouette of a person with long, wavy hair against a white background (no text or symbols)
natural_image
Silhouette of a bright, elongated object against a black background, with a small gray circle in the corner (no text or symbols)OWNER'S MANUAL TRIGGER HAPPY
DIGITAL DISPLAY
- The remote's display only indicates CHANNEL and EASY CLIP settings when the corresponding buttons are pushed, otherwise the display always indicates ID settings.
- When no button is pushed for 10 sec, the display switches to energy saver mode, where the first decimal point indicates that the remote is still active.
UNIT/SYSTEM ON-OFF
- To switch unit/system On or Off, press and hold POWER ON/OFF (1) for 2 sec.
- Display read out when switching On: Last selected ID before switch off.
- When switching Off, the units will fire a flash because (1) is also the TEST button.
CHANNEL +/- & CHANNEL SELECT
Always leave the remote set to channel 1. You only might need to change channels if you mix your equipment with other equipment, when you encounter interferences from other systems, or while working outside. In Easy Clip mode, the remote automatically addresses the next higher channel from the selected channel in order to make two consecutive exposures possible (see)
- Display read out: "C H, 0 1. ... 1 6." (factory setting: channel 01)
- Push CHANNEL +/- (5/6) to select the desired channel out of 16 channels: "01." to "16."
Be sure to select the corresponding channel on your Profilux Plus or X System unit: "01" to "16".
Channel Select
- Press and hold CHANNEL SELECT (3) for 6 sec.
- Since (3) is also a ID-select button, the numbers on the display will run down.
- "C H" appears in the display.
- Let go of the pushbutton.
- The previously chosen channel (or the factory-set channel "O 1") is being displayed, the right decimal point indicates CHANNEL SELECT mode.
- Select the desired channel by pressing CHANNEL +/-
- Push CHANNEL SELECT (3) again to confirm the selection.
- The display changes to ID indication again.
ID +/-
The ID +/- buttons are the main buttons to control the flash units within your system.
- Display read out: "All ... 1 5".
- Push ID +/- (3/4) to select the desired ID out of 16 IDs: "00(All)" to "15".
Hint: Let's assume that you are working with more than one Profilux Plus or X System unit. You can either control the flash output of one flash unit, or several flash units independently or all together.
SCENARIO 1, controlling the flash output of one or several flash units:
- Set the ID of the remote to "All" using the ID+/-buttons (3/4). (See, ID +/-).
- Set the ID of the flash unit(s) to any ID from "01" to "15".
- Now, one may alter flash output and modeling light as well as test fire the units.
PLEASE NOTE: When controlling several flash units together, flash output settings are relative, modeling light settings are absolute.
SCENARIO 2, controlling the flash output of several flash units independently:
-
Set the ID setting of the remote to "01".
-
Set the ID setting of flash unit 1 to "01".
-
Now, one may alter the flash output for unit 1.
-
Set the ID setting of the remote to "02".
-
Set the ID setting of flash unit 2 to "02".
-
Now, one may alter the flash output for unit 2.
-
Set the ID setting of the remote to "03".
-
Set the ID setting of flash unit 3 to "03".
-
Now, one may alter the flash output for unit 3.
-
Set the ID setting of the remote to "04".
-
etc.
You can assign any ID to each flash unit, therefore it is possible to create numerous subgroups with more than one unit. E.g. first unit = ID "1", second unit = ID "2", and third unit = ID "3". Etc. ...
Please note that the UNIT SYSTEM ON/OFF & TEST (1) and the MODELING LIGHT (2) buttons always address all units, no matter if you work in a Scenario 1 or Scenario 2 environment.
OUTPUT +/-
- You can alter the flash energy in 1/10 f-stops by pushing the OUTPUT +/- buttons (5, 6).
- No display read out on the remote, visual feedback via flash unit's display.
„TEST“ BUTTON
- Push briefly to fire test flashes.
MODELING LIGHT ON(PROP.), 100%, OFF
- Push to cycle thru settings: PROPORTIONAL ON - 100% - OFF.
- No display read out on the remote, visual feedback via flash unit.
GENERAL HINTS
- Use IDs to generally address all your flash units.
- The TRIGGERHAPPY features total recall, the status before switch off will be recalled at switch on.
- Be sure to always deactivate EasyClip when not using it, otherwise mistriggering could occur.
EASY CLIP
The EasyClip feature helps you create clipping paths & masks within your photo editing software with minimum effort.
One needs at least two flashes to use the EasyClip feature: one for the main motif/subject and one for the background. Both flashes are being triggered with a time gap of max 0.5 sec between exposures.
This results in two different pictures that will help you create the desired clipping path and mask.
The first exposure shows the actual scene, without any restriction of light, point of view and sharpness.
The second exposure will be made without change of object. At constant aperture only a white background will be flashed behind the motif/subject.
The more flashes are used for the background the better the results will be. The illumination of the background is a key factor and must be as even as possible in order to get a high contrast between the main motif/subject and the background.
You also may want to use separation walls in order to control stray light.
HOW DOES EASYCLIP WORK?
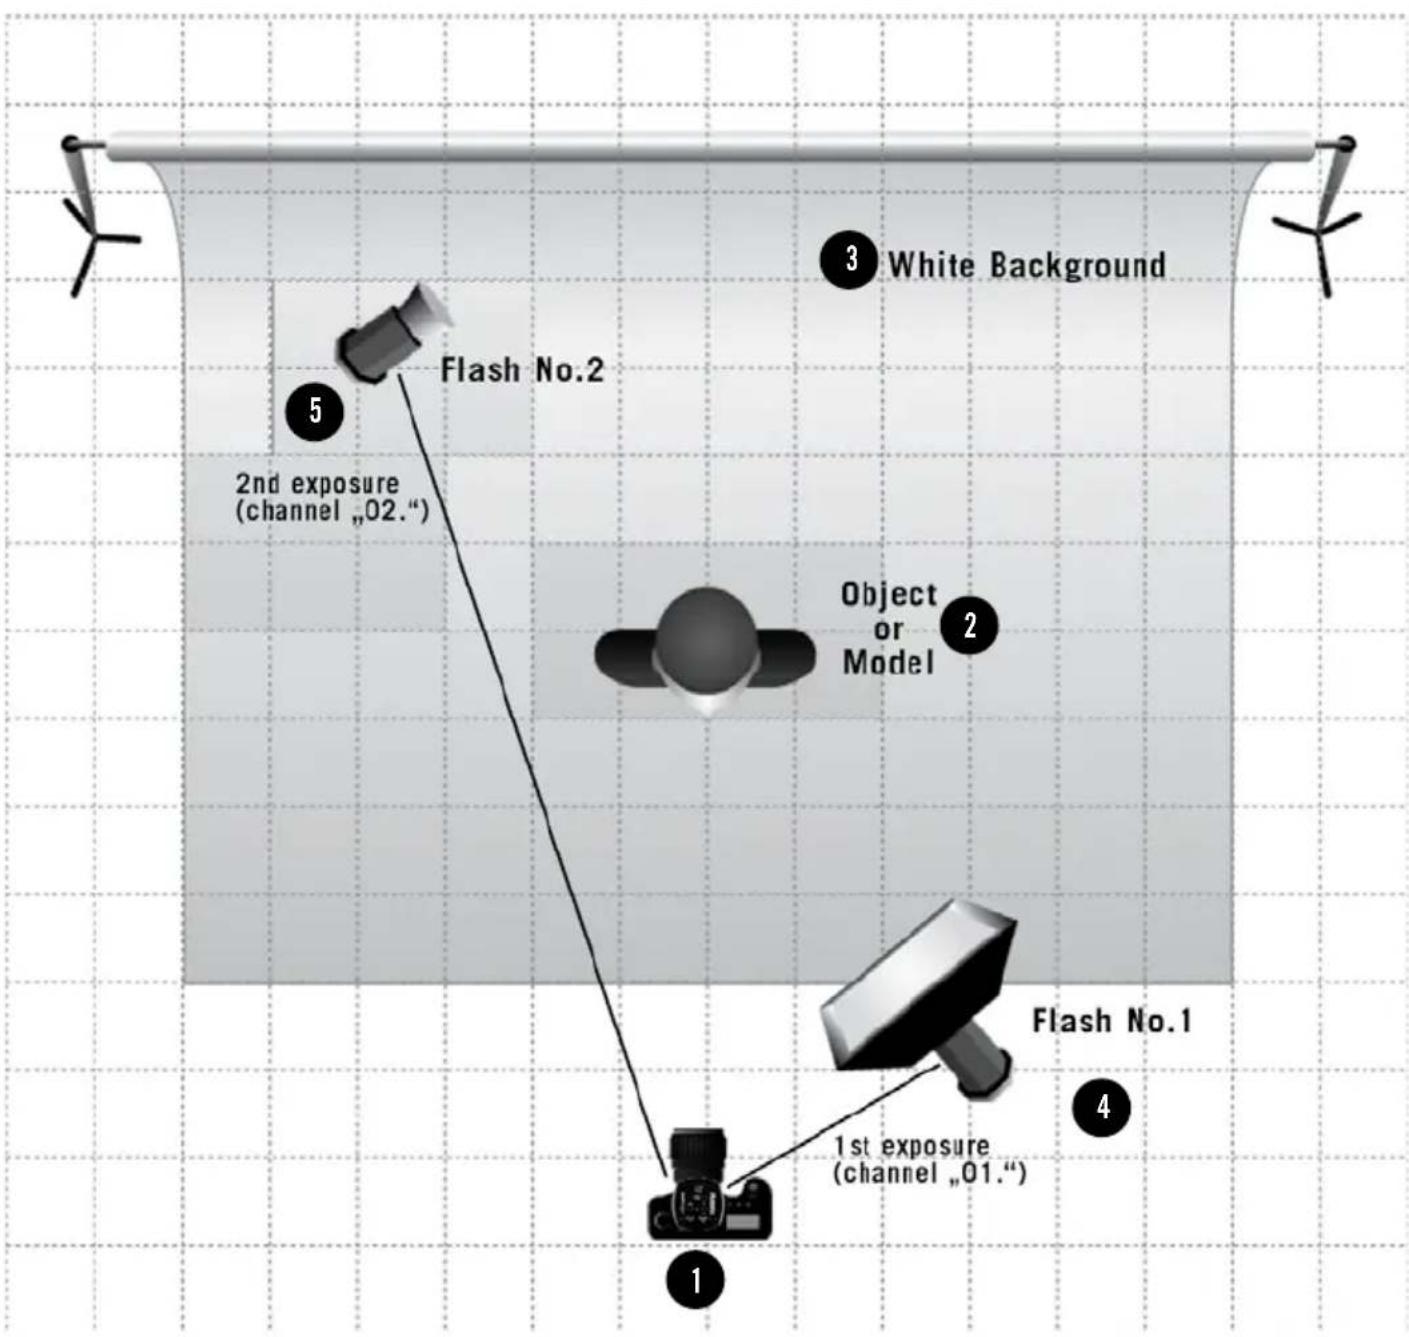
In Easy Clip mode, the TRIGGERHAPPY automatically addresses the next higher channel from the selected channel in order to make two consecutive exposures with two or more flashes possible. For example:
Flash no. 1, or a group of flashes used for the main motif/subject is/are addressed by channel 1 (1st exposure).
Flash no. 2, or a group of flashes used for the background shot is/are addressed by channel 2 with a delay of max 0.5 sec (2nd exposure).
You see that it is also possible to use the EasyClip feature with more complex set-ups. Of course you could use as many as three flashes (or more) for your main motif/subject and as many as two flashes (or more) for the background.
text_image
White Background Flash No.2 2nd exposure (channel „02.“) Object or Model Flash No.1 1st exposure (channel „01.“)1) Put the TriggerHappy remote into EasyClip mode:
- Press and hold EasyClip Function Activator (4) for 6 sec.
- Since (4) is also the ID+ button, the numbers on the display will run up.
- "EC" appears in the display.
- Let go of the pushbutton.
- Depending on the previously chosen setting, "on" (On) or "of" (Off) appears on the display: Factory Setting "of" (Off).
- Repeat the procedure to achieve the desired setting: "on" (On) or "of" (Off).
- Use the ID– button to reselect the original ID.
- In Easy Clip mode, the TRIGGERHAPPY automatically addresses the next higher channel to the selected channel in order to make two consecutive exposures possible.
2) One can use the EasyClip feature with still or moving objects. Although the delay between flashes will only be 0.5 sec (see 5.), it is crucial that there is no movement between the two exposures.
3) Use a white or, light grey background and make sure that it is evenly lit. Use a FILNOS or FILNOS 2 standard reflector for Flash No.2.
4) Trigger your camera (using the camera's automatic mode), flash no. 1 is being fired. The resulting picture may look this: see ④
5) Trigger your camera again with a delay of max 0.5 sec (using the camera's automatic mode), flash no. 2 is being fired. The resulting picture should look like this: see 5)
Import the shot made with flash no. 2 into your photo editing software.
There might be some fine tuning necessary to get a perfect contrast between the main motif/subject and the background. In Photoshop® one could use the „Brightness/Contrast“ filter.
6) After tonal value adaption and inversion the second shot becomes an alpha channel that can be placed as a mask and isolates the object from the background. It might be necessary to rework the mask minimally. See 6)

natural_image
Black-and-white portrait of a woman with long wavy hair against a blurred sky background (no text or symbols)POSSIBLE RESULT
Isolated object/subject pasted into desired background.

natural_image
Black-and-white portrait of a woman with long wavy hair, wearing a patterned top (no visible text or symbols)
natural_image
Silhouette of a person with long, wavy hair against a white background (no text or symbols)
natural_image
Silhouette of a bright, elongated object against a black background, with a small gray circle in the corner (no text or symbols)D
PROGRAMMIERUNG DER EMPFANGS-KANÄLE BEI EINEM PROFILUX PLUS ODER X SYSTEM GERÄT:
- Press and hold the "TEST" button (1) for approx. 3 sec., the unit fires once and the symbol for channel selection "CH" appears on the display, now let go of the button.
- After approx. 2 sec. the unit emits a beep and the symbol on the display changes from „CH“ to „--“, meaning that the receiver is not activated and no channel is selected (factory setting).
- The desired receiving channel can now be set by turning the output control (3), e.g. to "12" (channel 12). Confirm the selection of the channel by pressing the "Test" button (1), the previously selected output appears on the display again.
SELECTING IDs ON A PROFILUX PLUS OR X SYSTEM UNIT:
- Press and hold the "Beep/Lamp" button (2) for approx. 3 sec., the unit fires once and the symbol for ID selection "Id" appears on the display, now let go of the button.
After approx. 2 sec. the unit
emits a beep and the symbol on the display changes from „ld” to „--“, meaning that there is no ID selected (factory setting).
- The desired ID can now be set by turning the output control (3), e.g. to "12" (ID 12). Confirm the selection of the ID by pressing the "Beep/Lamp" button (2), the previously selected output appears on the display
