My Book Live Duo - NAS WESTERN DIGITAL - Free user manual and instructions
Find the device manual for free My Book Live Duo WESTERN DIGITAL in PDF.

User questions about My Book Live Duo WESTERN DIGITAL
0 question about this device. Answer the ones you know or ask your own.
Ask a new question about this device
Download the instructions for your NAS in PDF format for free! Find your manual My Book Live Duo - WESTERN DIGITAL and take your electronic device back in hand. On this page are published all the documents necessary for the use of your device. My Book Live Duo by WESTERN DIGITAL.
USER MANUAL My Book Live Duo WESTERN DIGITAL
natural_image
Line drawing of a rectangular electronic device with a small logo on the front panel (no text or symbols on the device itself)WDServiceandSupport
Shouldyouencounteranyproblem,pleasegiveusanopportunitytoaddressitbeforereturningthis product.Mosttechnicalsupportquestionscanbeansweredthroughourknowledgebaseore-mail support service at http://support.wdc.com. If the answer is not available or if you prefer, please contactWD ^® atthebesttelephonenumbershownbelow.
Yourproductincludes30daysoffreetelephonesupportduringthewarrantyperiod.This30-day periodstartsonthedateofyourfirsttelephonecontactwithWDTechnicalSupport.E-mailsupport isfreefortheentirewarrantyperiodandourextensiveknowledgebaseisavailable24/7.Tohelpus keep you informed of new features and services, remember to register your product online at http://register.wdc.com.
AccessingOnlineSupport
Visitourproductsupportwebsiteatsupport.wdc.comandchoosefromthesetopics:
- Downloads — Downloaddrivers, software, and updates for your WD product.
- Registration — Registry your WD product to get the latest updates and special offers.
- Warranty & RMA Services—Get warranty, product replacement (RMA), RMA status, and datarecoveryinformation.
- KnowledgeBase—Searchbykeyword,phrase,oranswerID.
- Installation — GetonlineinstallationhelpforyourWDproductorsoftware.
- WDCommunity — ShareyourthoughtsandconnectwithotherWDusers.
ContactingWDTechnicalSupport
When contacting WDforsupport, have your WD product serial number, system hardware, and system software versions available.
NorthAmericaAsiaPacific
| English800.ASK.4WDCAustralia1800429861(800.275.4932)China8008206682/+6562430496Spanish800.832.4778HongKong +80060086008 | |||
| India | 1800119393(MNTL)/18002005789(Reliance)01126384700(PilotLine) | ||
| Europe (toll free)* | 00800 ASK4 WDEU(0080027549338) | Indonesia | +803 852 9439 |
| Japan | 0120-994-120/00531-65-0442 | ||
| Korea | 027036550 | ||
| Europe | +31 880062100 | Malaysia | +800 6008 6008 / 1 800 88 1908/+65 62430496 |
| Middle East | +31 880062100 | Philippines | 1 800 1441 0159 |
| Africa | +31 880062100 | Singapore | +800 6008 6008 / +800 608 6008/+65 62430496 |
| Taiwan | +80060086008/+6562430496 | ||
* Toll free number is available in the following countries: Austria, Belgium, Denmark, France, Germany, Ireland, Italy, Netherlands, Norway, Spain, Sweden, Switzerland, United Kingdom.
RegisteringYourWDProduct
RegistryourWDproducttogetthelatestupdatesandspecialoffers.Youcaneasilyregisteryour drive online at http://register.wdc.com or by using My Book Live Duo software (see "System Settings"onpage61).
TableofContents
WDServiceandSupport....ii
RegisteringYourWDProduct....ii
1ImportantUserInformation.... 1
ImportantSafetyInstructions.... 1
RecordingYourWDProductInformation.... 2
2ProductOverview....3
AbouttheSystem.... 3
Features.... 3
PackageContents. 5
SystemRequirements. 7
PreinstallationInstructions....8
HandlingPrecautions....8
Specifications. 8
ProductView....9
3ConnectingtheDriveandGettingStarted.....10
ConnectingtheDrivetoYourNetwork.... 10
GettingStartedUsingtheCD(WindowsandMac)....12
Getting Started Without the CD (Windows 7/Vista & Mac) ..... 19
WhatCanIDoNow? 23
4BackingUpandRetrievingFiles. 2 4
Using the WD SmartWare™ Software (Windows Only) ..... 24
Using Windows 7/Windows Vista Backup....40
UsingAppleTimeMachine.... 4 1
5ManagingYourDriveWithWDQuickView ..... 4 6
AccessingWDQuickViewShortcutOptions.... 4 6
CheckingDriveStatus. 47
LaunchingWDSmartWare(Windowsonly)....47
Exiting WD SmartWare Safely (Windows only). 48
OpeningShares. 48
LaunchingtheMyBookLiveDuoDashboard. 49
MappingtheDrive(Windowsonly). 49
CreatingaShortcuttothePublicShare(Windowsonly). . . . . . . 4 9
Viewing Drive Properties. 50
MonitoringStorage....51
SafelyShuttingDown. 51
MonitoringAlerts. 51
AccessingtheLearningCenter....53
EjectingAUSBStorageDeviceUsingQuickView. 53
UninstallingtheWDQuickViewIcon. 54
6UsingtheMyBookLiveDuoDashboard.....5 5
LaunchingtheMyBookLiveDuoDashboard. 5 5
StartingtheMyBookLiveDuoDashboard. 56
UnderstandingDashboardComponents. 57
ObtainingCustomerSupport. 58
WhatCanIDoNow? 60
7ConfiguringBasicSettings....61
SystemSettings. 61
NetworkSettings.... 65
UtilitiesSettings....67
RemoteAccessSettings. 71
MediaServerSettings.... 7 1
StorageSettings. 71
8ManagingUsers....77
ViewingUsers. 77
CreatingaUser. 78
CreatingaPrivateShareforaUser. 79
ChangingaUser'sPassword. 80
EditingUserSettings....80
DeletingaUser....80
9ManagingShares....81
ViewingaListofShares. 81
Creating a New Share. 82
CreatingaNewUser....83
MakingaSharePublic....84
DeletingaShare....84
OpeningaShare. 84
10ManagingComputerBackupsandSafepoints....86
ListingComputerBackups. 86
ViewingtheListofComputerBackups....86
DeletingaBackup....86
BackingUpaMyBookLiveDuoDriveWithSafepoints. . . . . . . . 8 7
11AccessingYourMyBookLiveDuoRemotely.....94
WD2go:ThePathwaytoYourPersonalCloud....94
EnablingRemoteAccess....96
SettingUpMobileAccess....98
SettingUpWebAccessThroughWD2go....105
12Playing/StreamingVideos,Photos,&Music.....112
MediaServerOverview....112
MediaServerSettings....1 1 2
MediaTypesSupported....1 1 4
MediaStorage....1 1 4
AccessingMyBookLiveDuofromMediaPlayers....1 1 5
AccessingMyBookLiveDuoUsingiTunes....121
13ConnectingaUSBHardDrive....123
ConnectingaUSBHardDriveOverview....1 2 3
ConnectingAUSBDrive. 123
MappingAUSBDrive(WindowsOnly). 124
CreatingaShortcuttotheUSBDrive(Windowsonly). . . . . . . . 1 2 4
14ReplacingaDrive. 125
15Troubleshooting....128
FirstStepsChecklist....128
ResettingtheMyBookLiveDuoDevice....128
SpecificProblemsandCorrectiveActions....129
16RegulatoryandWarrantyInformation ..... 1 3 2
RegulatoryCompliance....132
WarrantyInformation(AllRegionsExceptAustralia/NewZealand)133
WarrantyInformation(Australia/NewZealandonly). 134
17Index....136
1
ImportantUserInformation
ImportantSafetyInstructions
RecordingYourWDProductInformation
ImportantSafetyInstructions
This device is designed and manufactured to assure personal safety. Improper use can result in electric shock or fire hazard. The safeguards incorporated into this unit will protect you if you observe the following procedures for installation, use, and servicing.
■ Followallwarningsandinstructionsmarkedontheproduct.
- Unplugthisproductfromthewalloutletbeforecleaning.Donotuseliquid cleanersoraerosolcleaners.Useadampclothforcleaning.
■ Donotusethisproductnearanyliquids.
- Donotplacethisproductonanunstablesurface.Theproductmayfall, causingseriousdamagetotheproduct.
■ Donotdroptheproduct.
- Donotblocktheslotsandopeningsonthetopandbottomofthechassis;to ensureproperventilationandreliableoperationoftheproductandtoprotect itfromoverheating,theseopeningsmustnotbeblockedorcovered.Making surethedriveisstandinguprightalsohelpspreventoverheating.
- Operatethisproductonlyfromthetypeofpowerindicatedonthemarking label.Ifyouarenotsureofthetypeofpoweravailable,consultyourdealeror localpowercompany.
- Donotallowanythingtorestonthepowercord.Donotlocatethisproduct wherepersonswillwalkonthecord.
- Ifanextensioncordisusedwiththisproduct,makesurethatthetotal ampereratingoftheequipmentpluggedintotheextensioncorddoesnot exceedtheextensioncordampererating.Also,makesurethatthetotal ratingofallproductspluggedintothewalloutletdoesnotexceedthefuse rating.
- Neverpushobjectsofanykindintothisproductthroughthechassisslotsas theymaytouchdangerousvoltagepointsorshortoutpartsthatcouldresult inafireorelectricshock.
- Unplugthisproductfromthewalloutletandreferservicingtoqualifiedservice personnelunderthefollowingconditions:
-Whenthepowercordorplugisdamagedorfrayed.
-Ifliquidhasbeenspilledontheproduct.
- If the product has been exposed to rain or water.
- If the product does not operate normally when the operating instructions are followed. Adjust only those control that are recovered by the operating instructions since improper adjustment may result in damage and require extensive work by a qualified technician to the product tonormal condition.
- If the product has been dropped or the chassis has been damaged.
- If the product exhibits ad distinct change in performance, contact WDCustomer Support at http://support.wdc.com.
RecordingYourWDProductInformation
In the following table, writetheserialnumberandmodelnumberofyournewWDproduct foundonthelabelonthebackofthedevice. Also, writethepurchasedateandothernotes such as youroperatingsystemandversion. This information is necessary for setup and technical support.
| SerialNumber: |
| ModelNumber: |
| PurchaseDate: |
| SystemandSoftwareNotes: |
ProductOverview
Thischapterincludesthefollowingtopics:
AbouttheSystem
Features
PackageContents
SystemRequirements
PreinstallationInstructions
HandlingPrecautions
Specifications
ProductView
AbouttheSystem
MyBookLiveDuoPersonalCloudStoragedeviceisahigh-performancedual-drivesystem providingsecurewirelessaccesstoyourmediaandfilesfromanycomputer, tablet, or smartphonewhenconnectedtoawirelessrouter. SharefileswithMac ^® computersand PCs, streammediatoyourentertainmentcenter, and accessfilesremotelyviatheInternetor withappsforyourmobiledevices.
Connectthispowerfulsystemtoyourwirelessrouterforsharedstorageonyourhome network,accessingyourfilesfromwithinandoutsidethehome.SharefileswithyourMac andPCs,streammediatoyourtelevisionthroughyourDLNA-enableddevices,andaccess yourfilesremotelywiththeWD2goappsandwebsite.
Thisusermanualprovidesstep-by-stepinstallationinstructionsandotherimportant informationaboutyourWDproduct.Translatedversionsandupdatestothisusermanual canbedownloadedfromhttp://products.wdc.com/mybookliveduo.Formoreinformation and news about this product, visit our website at http://www.wdc.com/.
Features
Maximumstoragecapacitywithdrivespanning — Out-of-the-box, thistwo-drive systemcombinesbothdrivesintoonevolumethatactslikeonebigdriveformaximum capacity.
Double-safebackupwithRAID1technology—Setthissystemtodataprotectionmode (alsoknownasmirroredmodeorRAID1)andthecapacityisdividedinhalf.Halfofthe capacityisusedtostoreyourdataandhalfisusedforasecondcopy.Ifonedrivefails,your dataisprotectedbecauseitisduplicatedontheotherdrive.
Completeout-of-the-boxsolution — MyBookLiveDuocomescompletewithtwo WDlargecapacityharddrivesofferinghigh-capacity,lowpowerconsumption,andcool, quietoperation. Thedrivesarefactorytestedwithintheenclosureforoptimizedperformance andWDqualityyoucancounton.
Sharedstorageforallyourcomputers—Theperfectdual-drivesolutionforcentralizing andsharingdataonyourwiredorwirelessnetwork.ConnecttheMyBookLiveDuodevice toyourwirelessroutertoshareandaccessfileswithanyPCorMac® computeronyour network.
Speedwithoutcompromise — Builtwithan800MHzRISCprocessorformaximum performancetopowerallyourapplicationsfromstreamingtoremoteaccess. Designed aroundthemostrecentadvancesinEthernetchiptechnology,MyBookLiveDuodevice deliversbest-in-classreadspeedsfasterthantraditionalUSBdrives.
Yourmediaandfilesonyourownpersonalcloud — Createyourownpersonalcloud, without themonthlyfeesandmysteriouslocationofyourdata.Storeyourmediaandfilesin thesystemandaccessthemsecurelyovertheInternetwithanyPCorMac ^® computer.Or, useWD'smobileappsforeasyaccesswithyourtabletorsmartphone.
NowstreamingtoyourHDTV — Watchyourdaughter'sbirthdaypartyvideoorshowoff yourvacationslideshowonyourTV. The built-in mediaserverstreamsmusic, photos, and moviestoanyDLNA ^® -certified multimediadevicesuchasaWDTV ^TM Live ^TM networkmedia player, Blu-rayDisc ^® player, Xbox360 ^TM , PlayStation ^® 3andconnectedTV. It is DLNA1.5& UPnP certified.
Automatic, wireless backup for all your computers — Protect your precious memories and backup all the PC and Mac ^® computerson your network to one reliable location. On Windows computers you can us the included WDSmartWare software and every time you saves something, it is instantly backed up. On Mac computers you can use all the features of Apple Time Machine backup software to protect your data.
ServeupyourmusicwithiTunes®—ThedriveincludesiTunesserversupportsoyoucan centralizeyourmusicandstreamittoanyPCorMac®computerusingiTunes.
Easytosetup,easytofindonyournetwork—Setupisasnap.Injustafewminutes, youareupandrunning.Mac,Windows ^® 7,andWindowsVista ^® computerswill automaticallyfindyourMyBookLiveDuosysteminseconds.Ifyou'rerunningWindowsXP,oursimpleinstallationsoftwaremakesiteasytosetupthedrive.
Addanextralayerofprotectionforyourfiles — Youcanautomaticallymakeasecond copy,orsafepoint,ofyourMyBookLiveDuoonanotherMyBookLiveDuoorNASdriveon yourhomenetwork.Nowyouhaveextra-safeprotectionforallyourmediaandultimate peaceofmind.
USBexpansionport—TurnanyUSBdriveintoaninstantshareddriveforeextracapacityon yourMyBookLiveDuoPersonalCloudStorage.JustconnectthedrivetotheUSBportand itwillautomaticallybesharedonyournetwork.
WD2go™:ThePathwaytoYourPersonalCloud
•Whatisapersonalcloud?
Apersonalcloudisyourcontent,secureathomeandunderyourcontrol.Unlike publicclouds,apersonalcloudkeepsallyourcontentinonesafeplaceonyour homenetwork.Sharefiles,streammedia,andaccessyourcontentanywhere.There isnomonthlyfeesandnomysteriouslocationofyourdata.Keepyourvideos,music, photos,andfilessafeathomeandalwayswithyou.
- GettoyourcontentfromanywherewithWD2gowebaccess
If you can access the Internet from a computer, you can securely access your media and files any where in the world. WD2 gowebaccess provides fee - freeremote access to your My Book Live Duopersonal cloud storage. Once you login, WD2 go mount the My Book Live Duodevicetoy our computer like a local drive and your remotefolders are available on any Windows or Maccomputer. Seamlessly open, save, and attach filesto emails from this virtual drive.
•MobilizeyourmediawithWD2gomobileapps
TheWD2goandWDPhotos™mobileappsbringyourphotosandfilestoyour fingertipsonyourApple ^ iPhone ^ ,iPodtouch ^ ,iPad ^TM ,Android ^TM tablet,orAndroid smartphone.
PackageContents
•MyBookLiveDuopersonalcloudstorage
- Ethernetcable
- ACpoweradapter
•InstallationandsoftwareCD
- QuickInstallGuide
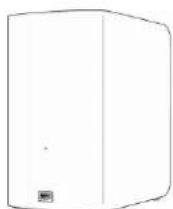
MyBookLiveDuo
Homenetworkdrive

ACadapter*
Ethernetcable

InstallationCDwith applicationsoftware andusermanual
QuickInstallGuide
GlobalACAdapterConfigurations


natural_image
Two black electrical plug connectors with green and yellow highlights, separated by a dashed line (no text or symbols)
natural_image
Five black abstract shapes resembling stylized letters or icons, arranged horizontally (no text or symbols)
natural_image
Two black electrical components with green and yellow connectors, separated by a dashed line (no text or symbols)Forinformationonadditionalaccessoriesforthisproduct,visit:
| USwww.shopwd.comorwww.wdstore.com |
| Canadawww.shopwd.caorwww.wdstore.ca |
| Europewww.shopwd.euorwww.wdstore.eu |
| AllothersContactWDTechnicalSupportinyourregion.ForalistofTechnicalSupportcontacts,visithttp://support.wdc.comandseeKnowledgeBaseAnswerID1048. |
SystemRequirements
OperatingSystem
Windows®
- Windows ^ XP*(SP3)
- WindowsVista ®
- Windows ^® 7
*WD2gowebaccessisnotcompatiblewith 64-bitWindowsXP.
Mac OS X®
- Leopard ®
- SnowLeopard ®
- Lion ^® **
**ForLion,youwillneedtoinstallthe Javaruntimeclient.Foradditional information,visit http://support.apple.com/kb/dl1-
Note: Compatibility may vary depending on your computer's hardware configuration and operating system.
For highest performance and reliability, install the latest updates and service pack(SP):
- ForWindows, gototheStartormenuandselectWindowsUpdate.
- ForaMac, gototheAppledenuandselectSoftwareUpdate.
WebBrowsers
- InternetExplorer7.0andlateronsupportedWindowscomputers
- Safari4.0andlateronsupportedMaccomputers
- Firefox3.6andlateronsupportedWindowsandMaccomputers
- GoogleChrome14andlateronsupportedWindowsandMaccomputers.
LocalNetwork
Router/switch(Gigabitrecommendedtomaximizeperformance.)
WideAreaNetwork
BroadbandInternetconnectionforremoteaccessusingWD2goandWDPhotos.
PreinstallationInstructions
Beforeinstallingthedrive,selectasuitableplaceforthesystemformaximumefficiency. Placethesysteminaplacethatis:
•Nearagroundedpoweroutlet
- Cleananddustfree
• Onastablesurfacefreefromvibration
- Wellventilated, with nothing blocking or covering the slots and openings on the top and bottom of the drive, and away from sources of heat
- Secluded from electromagnetic fields from electrical devices such as air conditioners, radio and television receivers.
HandlingPrecautions
WDproductsareprecisioninstrumentsandmustbehandledwithcareduringunpacking andinstallation.Roughhandling,shock,orvibrationcandamagethedrives. Observethe followingprecautionswhenunpackingandinstallingyourexternalstorageproduct:
- Donotdroporjoltthedevice.
- Donotmovethedevicewhileitispoweredon.
- Donotusethisproductasaportabledevice.
Specifications
| EthernetHighperformance(10/100/1000)GigabitEthernetconnection | |
| Internalharddrive2WD3.5-inchSATAharddrives | |
| SupportedprotocolsCIFS/SMB,NFS,FTP,AFP | |
| I/OportsEthernet(RJ-45)port | USB(Host) |
| SupportedclientsWindowsXP | WindowsVistaWindows7MacOSXLeopardMacOSXSnowLeopardMacOSXLion |
| PhysicaldimensionsDepth:6.06in(154mm)Width:3.86in(98mm)Height:6.68in(169.7.0mm)Weight:4.88lbs(2.2kg) | |
| Powersupply | Inputvoltage:100Vto240VACInputfrequency:50to60HzOutputvoltage:12VDC,3.0APowersupply:36W |
| Temperature | Operatingtemperature:5to35°C(41to95°F)Non-operatingtemperature:-20to65°C(-4to149°F) |
ProductView

text_image
Multi-colorLED Kensington® SecuritySlot Resetbutton USBport Ethernetport 12VDC| ComponentIconDescription | ||
| EthernetportCon |  | thedevicetoalocalnetwork. |
| USBportConnect |  | JSBharddriveforadditionalstorage. |
| ResetbuttonRest |  | settingssuchastheadminusernameandpasswordforthe device.See“ResettingtheMyBookLiveDuoDevice”onpage128for moreinformation. |
 | ||
| PowerportConne |  | devicetoanACadapterandthepoweroutlet. |
 | ||
| Kensington securityslot | [3BGY] | Fordrivesecurity, thedeviceisequippedwithasecurityslotthat supportsastandardKensingtonsecuritycable. Visithttp://www.kensington.com/formoreinformation. |
ConnectingtheDriveandGettingStarted
ConnectingtheDrivetoYourNetwork GettingStartedUsingtheCD(WindowsandMac) GettingStartedWithouttheCD(Windows7/Vista&Mac) WhatCanIDoNow?
ConnectingtheDrivetoYourNetwork
ItiseasytosetuptheMyBookLiveDuodevice--allyouhavetodoisconnectittoyourhomeorsmallofficenetwork.LEDsonthefrontandthebackofthedriveletyouknowwhethertheconnectionsarefunctioningproperly.
Note: For information about safely shutting down and disconnecting the drive, see "SafelyShuttingDown" on page 51 or "Reboot/Shutdown" on page 68.
PhysicallyConnectingtheDrive
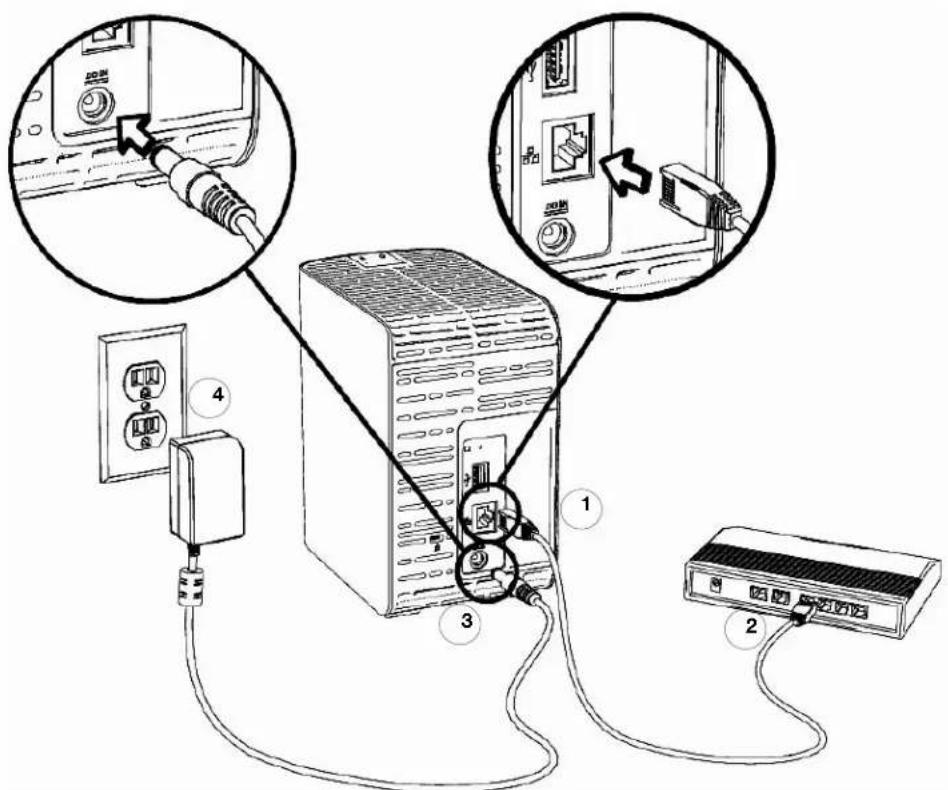
text_image
Diagram showing connections between a server, power outlet, and network device with labeled parts 1, 2, 3, and 4.FollowthestepsbelowtoconnecttheMyBookLiveDuodevicetoahomeorsmalloffice network.
Important: To avoid overheating, makes sure the drive is upright as shown in the illustration above. In the event of overheating, the device will perform as a feshutdown, interrupting all processes currently being performed. If this occurs, datam may belost.
- ConnectoneendoftheEthernetcabletotheEthernetportlocatedonthebackofthe drive.
Important: WerecommendthatyouusetheenclosedEthernetcableforbest performance.
- ConnecttheotherendoftheEthernetcabledirectlyintoarouterornetworkswitchport.
- Connectoneendoftheadapterintothepowersupplysocketonthebackofthedrive.
- Plug the power adapter into a power outlet. The unit powers up automatically.
Important: WaitfortheMyBookLiveDuodrivetofinishpoweringup (approximatelythreeminutes) beforeconfiguringthedrive. You will knowitisreadywhentheLEDstopsflashingandturnssolidgreen (normal)orblue(standby). Standbyisusedtoconserveenergy.
CheckingtheFrontPanelLED
The following table describes the front panel tricolor (red/green/blue) LED behavior.
| StateColorAppearance | State | Description | |
| PowerOffNoneDisplays | sifthedriveis | unplugged. | |
| PowerOnBlueSolid | Displayswhenyoufirst | applypowertothe unit. | |
| Boot | Yellow | Solid | Drive has begun loading the Operating System(OS). |
| Attention | Yellow | Blink | The following circumstances trigger this state:• Diskthermalwarningthreshold exceeded (underovertemp)• Networkcablenotinserted |
| ReadyGreen Solid | TheOSisnowready. | ||
| Activity | Green | Blink | Unit is performing read or write commands to/fromtheHardDriveDisk(HDD). |
| Fault/action required | Red | Solid | The following faults trigger this state:• DiskSMARTfailure• DataVolumedoesnotexist• SystemVolumedoesnotexist |
| Standby | BlueSolid | UnitisinHDDstandbymode. | |
| Software/firmware update | White (maylook somewhat violet) | Solid | Firmwareiscurrentlybeingupdated. |
CheckingBackPanel(Network)LEDs
The following table describes the network state and activity LEDs.
Note: Lookingattheport, with the LED on the bottom, the LED on the top is the Activity LED, and the one on the bottom is the Link LED.
| StateLEDAppearance | State | Description | |
| LinkdownLinkOff | Cableordriveisnotpluggedin,orother endoflinkisnotoperational. | ||
| Linkup-10/100 Mbps | LinkYellow | Cableispluggedin,andbothendsofthe linkhavesuccessfullyestablished communications.Networknegotiatedat 10/100Mbps. | |
| Link up - 1000 Mbps | Link | Green | Cable is plugged in, and both ends of the linkhavesuccessfullyestablished communications.Networknegotiatedat 1000Mbps. |
| Link idle | Activity | Off | Active communication is not in progress. |
| Link busy | Activity | Green - Blinks | Active communication is in progress. |
GettingStartedUsingtheCD(WindowsandMac)
ForWindowsandMacOSX,afterphysicallyconnectingthedrive,inserttheproductCDto discoverthedriveandgetstartedusingit.
UsingWindowsXP
- IfAutoRun(AutoPlay)isenabled,theMyBookLiveDuoWelcomescreendisplays.If youareaskedwhetheryouwanttorunthesetupfile,double-clickSetup.exe.
- IfAutoRun(AutoPlay)isdisabled,clickStart>MyComputerandlocatethe MyBookLiveDuoCDdriveunderDeviceswithRemovableStorage.Double-clickthe CD,andthendouble-clickSetup.exetodisplaytheMyBookLiveDuoWelcome screen.
UsingWindowsVista/Windows7
-
Click Start or > Computer and locate the My Book Live Duo CD drive under DeviceswithRemovableStorage.
-
Double-clicktheCD, andthendouble-clickSetup.exetodisplaytheMyBookLiveDuo Welcomescreen.
UsingMacLeopard/SnowLeopard/Lion
Double-clicktheMyBookLiveDuoCD, andthendouble-clickSetup.apptodisplaythe MyBookLiveDuoWelcomescreen.
MyBookLiveDuoWelcomeScreen
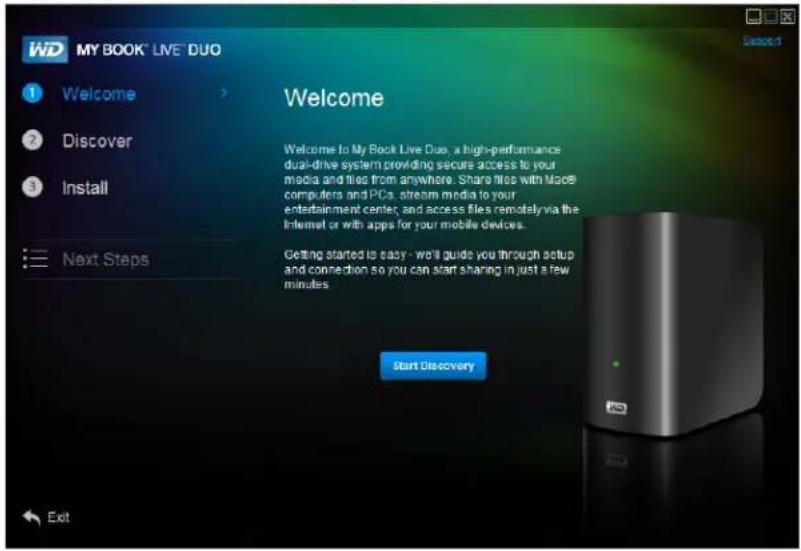
text_image
WD MY BOOK® LIVE® DUO Welcome 1 Welcome 2 Discover 3 Install Next Steps Welcome Welcome to My Book Live Duo, a high-performance dual-drive system providing secure access to your media and files from anywhere. Share files with Mac8 computers and PCs, stream media to your entertainment center, and access files remotely via the Internet or with apps for your mobile devices. Getting started to easy - we'll guide you through setup and connection so you can start sharing in just a few minutes. Start Discovery ExitDiscoveringandConnectingtoYourDrive
StartingwiththeWelcomescreen,theAdministrator:
•DiscoversandassignsalettertotheMyBookLiveDuodriveonthenetwork.
- InstallsWDQuickViewforeasyaccesstothedrive,drivestatus,andotheroptions.
- UsestheNextStepsfeaturetonavigatetoessentialproceduressuchasbackingup filesandconfiguringdrivesettings.
Note: Non-administratorscandiscoverthedrive,accesstheMyBookLiveDuo dashboard,andopenthePublicshare.
Step1:DiscovertheMyBookLiveDuoDrive
- On the Welcome screen, click the Start Discovery button. The My Book Live Duo Discoveryprogressscreenappears.
Note: The processingicondisplayswhenthesystemisprocessinginformation, for example, whenitisdiscoveringthedevice.
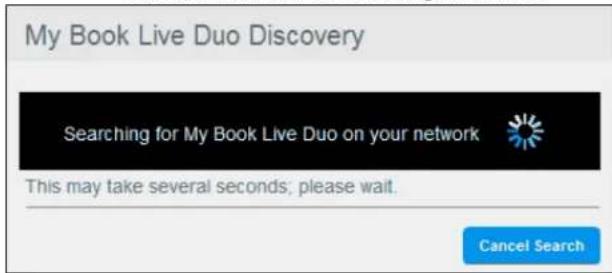
text_image
My Book Live Duo Discovery Searching for My Book Live Duo on your network This may take several seconds; please wait. Cancel SearchNote: Clicking the Cancel Search button displays the Connecting your Drive screen, providing assistance with connecting your drivetothenetwork.
- If the process finds a My Book Live Du or drive on then network, the My Book Live Duo Foundscreendisplays along with default description and a drive letter assignment. In then navigation panel a check mark appears beside Discover.
Note: The My Book Live Duoscreenshaves several helpful features:
-Placingthemouseoveratooltipicondisplaysdetailsaboutanoptionor term.
- The Support link at the top right of the screen connects to a Help file on your CD.
- To exit the screen, click the Exit link at the bottom-left of any page, or press the ESCkeyonthekeyboard.

text_image
My BOOK® LIVE® DUO Welcome Discover Install Next Steps My Book Live Duo Discovery My Book Live Duo Found Your device has been located on the network and is ready for use Drive Name: MyBookLIVEDuo Details Drive Description: My Book Live Duo Network Storage Drive Letter: Y Change Map network drive Create a desktop shortcut to MyBookLiveDuo Continue- If the process does not find a My Book Live Duo on then network, the Connecting your Drivescreen appears. Proceed to "Connecting and Troubleshooting" on page 18.
Note: The CDenables UPnPFramework in the Windows XP firewall ifithas not been enabled previously. UPnPFramework must be enabled for the discovery process to detect your drive. Formore information about enabling UPnPFramework, see http://support.microsoft.com/kb/886257#8.
- Ifmorethanonedrivewasdiscovered,selectyourMyBookLiveDuofromtheDrive Namedrop-downlist.ThescreendisplaysadefaultdescriptioninDriveDescription.
Note: You can change the name and description of the device later when you configure the drive using the My Book Live Duodashboard (see "General" on page 61).
- Todisplaydriveproperties, clicktheDetailslink. A pop-upwindowliststhemodel name, IPaddress, and MACaddress. ClicktheCloselink.
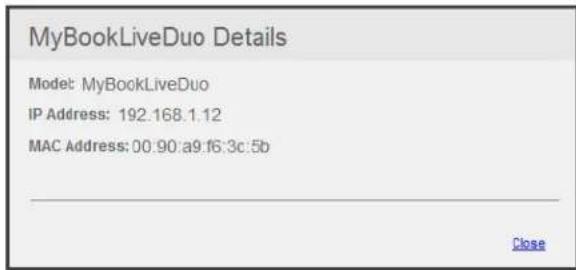
text_image
MyBookLiveDuo Details Model: MyBookLiveDuo IP Address: 192.168.1.12 MAC Address: 00.90:a9:f6:3c:5b Close- TheDriveLetterfielddisplaysthenextavailabledriveletteronthenetworktowhichyou mapthedrive.Ifyoudonotwanttomapthedrivetothatletter,youhavethefollowing options:
- If you donotwantmapthedrive automatically, clear the Map network drive check box near the bottom of the screen. The drivewill not be mapped after you click the
Continuebuttoninstep5.
- If you want to map to another letter, click the Changelink, and select the desired letter in one of the white boxes in the table that appears:

text_image
Click a drive letter A B C D E F G H I J K L M N O P Q R S T U V W X Y ZAfteryouselectthedriveletter,thescreencloses.Toclosewithoutchangingthedrive letter,clickthearrowatthebottomrightofthetable.YoucanalsopressEnteror Esc.
TheMyBookLiveDuoFoundscreendisplaysagain:

text_image
WD MY BOOK® LIVE® DUO Welcome Discover Install Next Steps My Book Live Duo Discovery My Book Live Duo Found Your device has been located on the network and is ready for use. Drive Name: MyBookLiveDuo Details Drive Description: My Book Live Duo Network Storage Drive Letter: Y Change Map network drive Create a desktop shortcut to MyBookLiveDuo Continue-
TocreateadesktopshortcuttoamappeddriveinWindows,selecttheCreatea desktopshortcuttoMyBookLiveDuocheckbox.OnaMac,selecttheCreatean aliastoMyBookLiveDuocheckbox.
-
ClicktheContinuebutton. The installWDQuickViewscreendisplays.
Note: To continue without installing WD Quick View, click the Skip to Next Steps linkandcontinuewith"Step3:PerformNextSteps"onpage17.Youmay installWDQuickViewlaterbyclickingInstallinthenavigationpanel.
Step2:InstallWDQuickView
WDQuickViewinstallstheWDQuickViewiconintheWindowssystemtrayorintheMacOSXmenubar, so that you can perform important functions such as launching WD SmartWareorcheckingdrivestatus quickly.
•TheWindowsiconisblue.
•TheMaciconisblack.


text_image
WD MY BOOK® LIVE® DUO Welcome Discover Install Next Steps My Book Live Duo Install WD Quick View WD Quick View provides a quick and easy way to access your devices, check drive status, and launch WD SmartWare. 8:00 PM WD Quick View Choose WD Quick View from the system tray or Menu bar to open apps, access devices, and check drive status. I accept License Agreement Skip to Next Steps Start Install-
Click the License Agreement link, and after reading the agreement, click the IAcceptcheckbox.
-
ClicktheStartInstallbutton.AprogressbardisplaysuntilthelnstallationComplete screenappears.TheWindowssystemtraynowdisplaystheicon;theMacOSX menubarnowdisplaystheicon
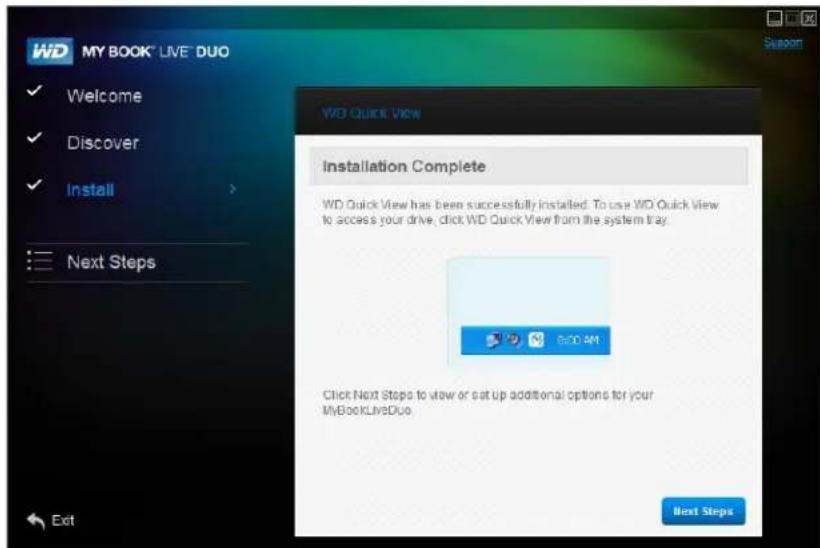
text_image
WD MY BOOK® LIVE® DUO Welcome Discover Install Next Steps Installation Complete WD Quick View has been successfully installed. To use WD Quick View to access your drive, click WD Quick View from the system tray. 6:00 AM Click Next Steps to view or set up additional options for your MyBookLiveDuo Next StepsForinformationonusingWDQuickView,see"ManagingYourDriveWithWDQuickView"onpage46.
Note: Once you install WD Quick View, you can upgrade it in similar way. Instead of the Start Install button, a Start Upgrade button is available.
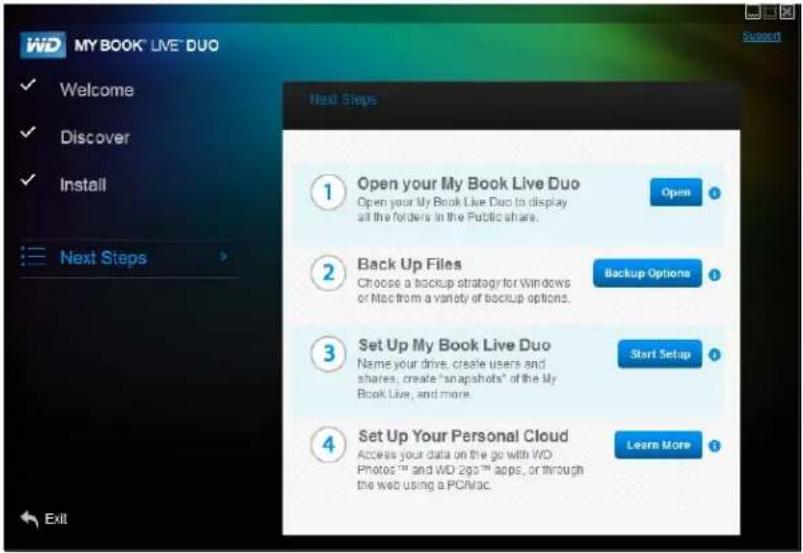
Step3:PerformNextSteps
- Click the Next Steps button on the Install Complete screen, or the Next Steps link in thenavigationpanelatanytime,todisplaytheNextStepsscreen:
Note: Discovery must take place before next steps is available.
text_image
WD MY BOOK® LIVE® DUO Welcome Discover Install Next Steps ① Open your My Book Live Duo Open your My Book Live Duo to display all the folders in the Public share. ② Back Up Files Choose a backup strategy for Windows or Mac from a variety of backup options. ③ Set Up My Book Live Duo Name your drive, create users and shares, create "snapshots" of the My Book Live, and more. ④ Set Up Your Personal Cloud Access your data on the go with V/D Photos™ and WD 2ggt™ apps, or through the web using a PC/Mac. ① Open Backup Options Start Setup Learn MoreNextStepsscreenforWindows
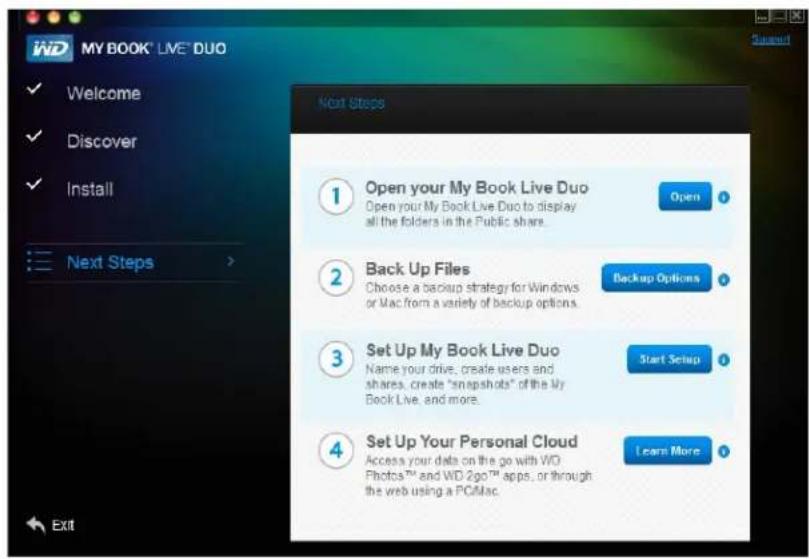
text_image
My BOOK® LIVE® DUO Welcome Discover Install Next Steps ① Open your My Book Live Duo Open your My Book Live Duo to display all the folders in the Public share. ② Back Up Files Choose a backup strategy for Windows or Mac from a variety of backup options. ③ Set Up My Book Live Duo Name your drive, create users and shares, create "snapshots" of the My Book Live, and more. ④ Set Up Your Personal Cloud Access your data on the go with WD Photos™ and WD 2go™ apps, or through the web using a PCMac. ① Open Backup Options Start Setup Learn MoreNextStepsscreenforMacOSX
IFyouwantto...THEN...
OpenyourMyBookLiveDuodriveand viewthecontentsofitsPublicshares,
ClicktheOpenbutton.
BackupthefilesonaPC, ClicktheBackupOptionsbutton.Continuewith "BackingUpandRetrievingFiles"onpage24or"Using Windows7/WindowsVistaBackup"onpage40.
IFyouwantto...THEN...
| BackupthefilesonaMac,ClicktheLearnMorebuttonbesidetheTimeMachineoption,andthencontinuewith“UsingAppleTime Machine”onpage41. | |
| Createorrestorefromasafepoint,ClicktheStartSetupbutton,andthencontinuewith“RemoteAccessSettings”onpage71 | |
| Setup(configyour MyBookLiveDuodrive, | ClicktheStartSetupbutton.Continuewith“Usingthe MyBookLiveDuoDashboard”onpage55. |
| •Accessphotosandotherfilesstored inyourMyBookLiveDuo’sPublic folderanddisplaythemonaniPhone,iPad,IPodtouch,orAndroidmobile device,•Remotelyaccessfilesandfolders usingyourPCorMaccomputerby loggingintoWD2go.com, | ClicktheLearnMorebutton,andthencontinuewith “RemoteAccessSettings”onpage71. |
| •Streammediatoyourhome entertainmentcenterand/orother computersonyourhomenetwork, | Continuewith“Playing/StreamingVideos,Photos,& Music”onpage112. |
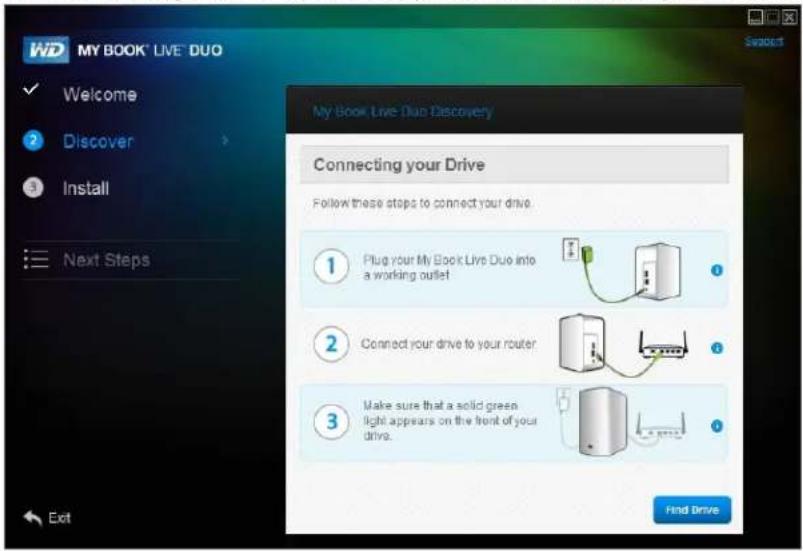
ConnectingandTroubleshooting
TheConnectingYourDrivescreenappearswhen"Discovery"cannotfindadrive:
text_image
WD MY BOOK® LIVE® DUO Welcome Discover Install Next Steps My Book Live Duo Discovery Connecting your Drive Follow these steps to connect your drive. 1 Plug your My Book Live Duo into a working outlet 2 Connect your drive to your router 3 Make sure that a solid green light appears on the front of your drive. Find Drive- Follow the graphical instructions and tooltips for information about each step.
- ClicktheFindDrivebutton.
- If the drive is found, the My Book Live Duo Found screen appears. Continue with "Step1: Discover the My Book Live Duo Drive" on page 13.
- If the drive is not found, the Troubleshooting screen appears, offering more information about connecting the My Book Live Duo:
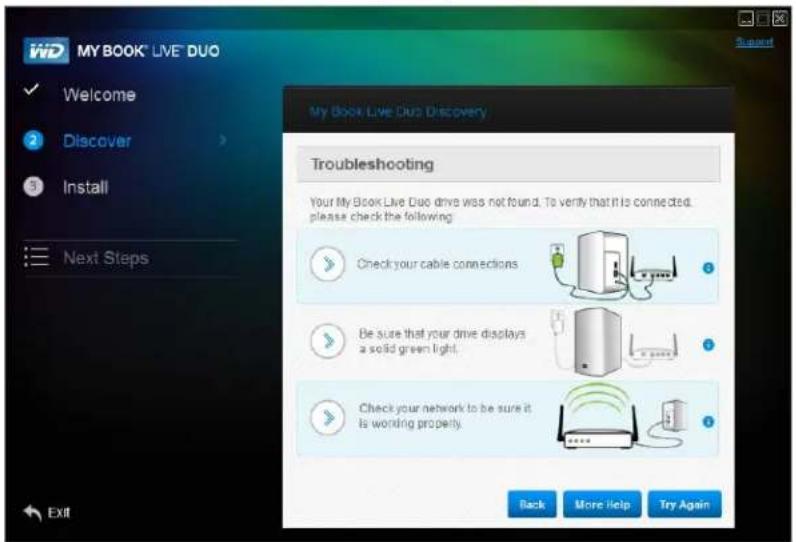
text_image
My BOOK® LIVE DUO Welcome Discover Install Next Steps Troubleshooting Your My Book Live Duo drive was not found. To verify that it is connected. please check the following: Check your cable connections Be sure that your drive displays a solid green light. Check your network to be sure it is working property. Back More Help Try Again- Follow the screen instructions and tooltips.
IFyouwantto...THENclickthe...
| ReturntotheHowtoConnectscreentomakesure youhaveproperlyconnectedyourdrive, | Backbutton |
| ViewtheHelptopic,MoreHelpbutton | |
| Trytodiscoverthedriveagain,TryAgainbutton |
Note: If you still cannot connect your drive, search for AnswerID5679 in the WD KnowledgeBase at http://support.wdc.com.
GettingStartedWithouttheCD(Windows7/Vista&Mac)
If you donot us the product CD forgetting started and installing WDSmartWare(Windows only), you can still:
- UseyourMyBookLiveDuodeviceasanexternalharddrive,dragginganddroppingfilestoandfromthedrive.
- ConfigurethedriveusingtheMyBookLiveDuodashboard.(See"UsingtheMyBook LiveDuoDashboard"onpage55.)
- SaveandrestorefilesusingWindowsBackup(see"UsingWindowsVista/Windows 7"onpage19)orAppleTimeMachine(see"UsingAppleTimeMachine"onpage41).
UsingWindowsVista/Windows7
OpeningthePublicFolder
AsanalternativetousingtheproductCD,openthedriveasfollows:
-
Physicallyconnectthedrivetoyournetwork(see "ConnectingtheDrivetoYour Network" onpage10).
-
Click>Computer>Network>MyBookLiveDuo, and locatethedrive's Public folder.
-
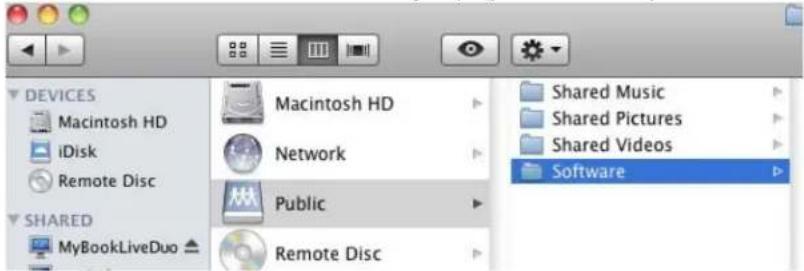
Double-click the Public folder to display the Shared Music, Shared Pictures, Shared Videos, and Software sub folders. You can now drag and drop files into the shared media folders using Windows Explorer:

text_image
Network > MYBOOKLIVEBUO > Public > Select Public Organize > New folder Favorites Desktop Downloads Recent Place Libraries Documents Music Pictures Videos Computer Network Name Data modified Shared Music 7/14/201012:48 PM Shared Pictures 7/14/201012:48 PM Shared Videos 7/14/201012:48 PM Software 7/14/201012:52 PM Select a file to preview. & Items Offline status Online Offline availability: Not availableNote: The Software folder contains all the software necessary for the MyBookLiveDuodevice. Double-click the folder, and then double-click WD SmartWare to display the software. If your operating system is 32-bit, click WDSmartWare Setup (x86). Otherwise click WDSmartWare Setup (x64).
-
MaptheMyBookLiveDuoPublicfolderforquickaccessinthefuture:
-
InWindowsExplorer, underNetwork, clickMyBookLiveDuo.
- Right-clickthePublicfolderandselectMapNetworkDrivefromtheRight-click menu.
- SelectthedesiredletterfromtheDrivedrop-downlist.
- SelecttheReconnectatlogincheckbox.
- ClickFinish.YourPublicdriveisnowmapped.
LaunchingtheMyBookLiveDuoDashboardtoSetUpYourDrive
ToaccesstheMyBookLiveDuodashboardtosetupyourdrive:
- Physicallyconnectthedrivetoyournetwork(seepage10).
2.Openabrowser, andenter http:///astheaddress. Example:http://195.168.1.10/orhttp://mybookliveduo/
Note: If you don't know the I address for your My Book Live Duodevice, use WD Quick View to setup your drive (see "Managing Your Drive With WD Quick View" on page 46).
3.Continuewith"UnderstandingDashboardComponents"onpage57.
LaunchingWDSmartWare
TheveryfirsttimeyouconnecttheMyBookLiveDuodevicetoyournetworkandopen WindowsVista/Windows7,youarepromptedtoallowthesystemtolocatetheWDRally driver.Ifyouallowit,thesystemlooksontheWindowsupdatesiteforthedriver.Ifitcannot findthedriver,(forexample,ifyouarenotconnectedtothelnternet),amessageinformsyou ofthis.Youmaycancelthemessageandcontinue.
Whenproperlyinstalled, RallyputsalargeMyBookLiveDuoiconunderNetwork.ToinstallWDSmartWaresoftwareusingthedriver,right-clicktheiconandselectInstallWDSmartWare.
UsingMacOSXLeopard/SnowLeopard/Lion
UsingFindertoOpenthePublicFolder
- In a Finder window, click MyBookLiveDuo under the shared items in the side bar.
- If presented with an authorization screen, select Guest, and then click Connect to displaythePublicshare:

text_image
Enter your name and password for the server "MyBookLiveDuo" so that Time Machine can access it. Connect as: Guest Registered User Cancel Connect- Double-click the Public folder to display themediasub folders: Shared Music, Shared Pictures, and Shared Videos. You can now drag and drop files into the shared folders using Finder:
Note: The Publicfolder icon automatically display on the desktop.
text_image
DEVICES Macintosh HD iDisk Remote Disc MACintosh HD Network Public Remote Disc Shared Music Shared Pictures Shared Videos Software SHARED MyBookLiveDuoNote: The Software folder contains all the software that is on the CD. Double-click the folder, and then double-click the Smart Ware folder to display a list of WD SmartWare and other files. Although you cannot install WDSmartWareona Macat thistime, you may want to set the othersoftware files.
- If you want to make ashare drive icon permanent on your desktop, create an alias. Following are twoway stodo that:
Note: Before creating an alias, click Finder > Preferences > General and make sureConnectedServersischecked.
- Clicktheitemyouwishtoalias(e.g.,SharedMusic),holddownthemousebutton, hold down the Cmd and Option keys simultaneously, and drag the item to where youwantthealiastoappear.Insteadofmovingtheoriginalitem,thiscreatesanalias atthenewlocation.
-OR-
- Right-clicktheitemyouwanttoalias(e.g.,SharedMusic),andthenclick File>MakeAlias.
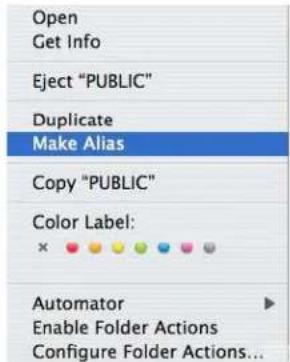
text_image
Open Get Info Eject "PUBLIC" Duplicate Make Alias Copy "PUBLIC" Color Label: × Automator Enable Folder Actions Configure Folder Actions...UsingBonjourtoFindandSetuptheDrive
1.OpenSafariandclickthebookmarkicon:

text_image
Bonjour http://mybooklive2.local/Ui/ Google Apple Yahoo! Google Maps YouTube Wikipedia News (77) Popular * COLLECTIONS History Bookmarks Bar (77) Bookmarks Menu Address Book Religion All RSS Feeds MyBookLive2 Search Bookmark About Bonjour Wehpages MyBookLiveDus WDShareSpace Printers2.ClickBonjourandthendouble-clickyourMyBookLiveDuodrivetodisplaythe MyBookLiveDuodashboardhomepage.
3. Continue with "Understanding Dashboard Components" on page 57.
WhatCanIDoNow?
YourMyBookLiveDuodriveisreadytouseandisaccessibleasadriveletteroralias, enablingyoutodraganddropfilesintoyourdriveandmovefilesfromittoanycomputerin yournetworkthathasbeensetupaccordingtotheinstructionsinthischapter.Youcanalso backupyourcomputerfilesautomatically,customizethedrivesettings,accessyourfiles fromaremotelocation,andusethedriveasamediaserver.
Thisusermanualcontainsinformationandinstructionsforsettingupandusingthe MyBookLiveDuodrive.Themostcommonactivitiesarelistedbelow:
| Howdol... See... | |
| BackupmycomputerdatatotheMyBookLiveDuodrivepage28 | |
| RestoremydatafromtheMyBookLiveDuodrivetomycomputerpage33 | |
| Setupauto-updateofWDSmartWareSoftwarepage39 | |
| LaunchtheMyBookLiveDuodashboardontheWebpage55 | |
| UsetheMyBookLiveDuodashboardtocustomizemydrivepage55 | |
| Openaprivatesharepage82 | |
| RestoretheMyBookLiveDuofirmwaretofactorydefaultspage68 | page128 |
| UpdateMyBookLiveDuofirmwarepage63 | |
| BackupMyBookLiveDuodevicebystoringasafepoint(snapshot)ofitonanothercompatiblenetworkdriveornetworkshare | page87 |
| AccessphotosandfilesontheMyBookLiveDuodrivefrommyiPhone,iPodtouch,iPad,orAndroiddevice | page94 |
| AccessfilesontheMyBookLiveDuodeviceremotelyatwd2go.com | page103 |
| EnableordisableMyBookLiveDuoapplicationssuchasiTunes | page71 |
| PlayandstreammediafromtheMyBookLiveDuodevice | page112 |
BackingUpandRetrievingFiles
UsingtheWDSmartWare™Software(WindowsOnly)
UsingWindows7/WindowsVistaBackup
UsingAppleTimeMachine
UsingtheWDSmartWare™Software(WindowsOnly)
WDSmartWaresoftwareisaneasy-to-usetoolthatgivesyouthepowerto:
- Protectyourdataautomatically — Automatic, continuousbackupinstantly makes a copywheneveryouaddorchangeafile.
Note: Automaticbackupprotectioniscontinuousaslongasbothyour MyBookLiveDuodeviceandcomputerareconnectedtoyour network.Ifyoudisconnectfromyournetwork,backuptemporarily stops.Onceyoureconnect,theWDSmartWaresoftware automaticallyscansyourcomputerforneworchangedfilesand resumesbackupprotection.
- Seeyourbackupasithappens — Visualbackuporganizesyourcontentinto categoriesandshowstheprogressofyourbackup.
- Retrievelostfileseffortlessly — Bringbackyourvaluabledatatoitsoriginal locationwhetheryouhavelostallyourdataorjustoverwrittenanimportantfile.
•Takecontrol—Customizeyourbackups.
ViewingtheInfo/OnlineHelpTopics
TheWDSmartWaresoftwareprovidestwokindsofHelp:
- Help icon i — Each WD SmartWare screen provides easy access to online help informationtoquicklyguideyouthroughyourbackup, retrieve, andsettingstasks. Whenever you are uncertain about what todo, just click the info/onlineHelpiconin the upper-right corner of anyscreen.
Toclosetheinfo/helpscreenafterreadingtheonlineHelp, click the Xbuttoninthe upper-rightcornerofthescreen.
- Help tab — This tab on the WD SmartWare screens provides more detailed Help. For informationonusingtheHelptab,see"WDSmartWareHomeScreen"onpage27.
InstallingWDSmartWareSoftware
InstallingWDSmartWareUsingtheCD
- On the CD's Next Steps screen, click the Backup Options button to display the BackupOptionsscreen:

text_image
My BOOK LIVE Duo Welcome Discover Install Next Steps My Book Live Duo Backup Options Choose backup options for Windows or Mac to create copies of your photos, music, videos, documents, and more. 1 WD SmartWare Automatically backs up all or selected files, and keeps working in the background while you do other things. 2 Time Machine Automatically saves up-to-date copies of everything on your Mac. 3 Windows Backup Automatically backs up all your content, or lets you choose just the files you want. Start Install Learn More Learn More Back to Next Steps Exit- ClicktheStartInstallbuttontodisplaythelnstallWDSmartWarescreen:

text_image
WD MY BOOK® LIVE® DUO Welcome Discover Install Next Steps Installation Complete WD SmartWare has been successfully installed. To use WD SmartWare to access your drive, click WD SmartWare from the system tray. Skip to Next Steps Launch WD SmartWare-
Click the License Agreement link to read the agreement, then select the I accept checkbox.
-
ClicktheStartInstallbutton.Wheninstallationiscomplete, theInstallationComplete screendisplays:
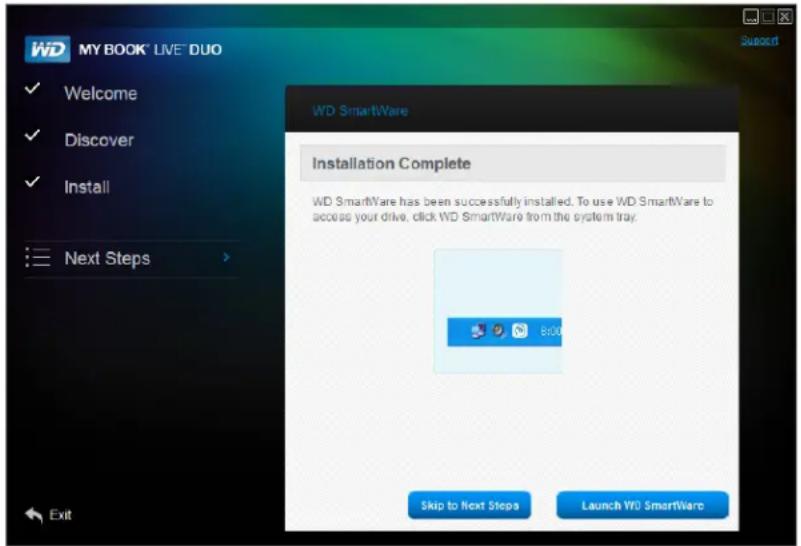
text_image
WD MY BOOK® LIVE® DUO Welcome Discover Install Next Steps Installation Complete WD SmartWare has been successfully installed. To use WD SmartWare to access your drive, click WD SmartWare from the system tray. Skip to Next Steps Launch WD SmartWare- Click the Launch WD SmartWare button to display the WD SmartWare Home screen. (See "WDSmartWareHomeScreen" on page 27.)
UsingaRallyDrivertoInstallWDSmartWare
YoucanuseaRallydriverasanalternativewaytoinstallWDSmartWaresoftwareonWindowsVista/Windows7systems.
The very first time you connect the My Book Live Duode vicetoy our network and open Windows Vista/Windows7, you are prompted to allow the system to locate our Rally driver. If you allow it, the system looks on the Windows updates it forth the driver. If I cannot find the driver, (fore example, if you are not connected to the Internet), am message informs you of this. You may cancel them message and continue.
Whenproperlyinstalled, RallyputsalargeMyBookLiveDuoiconunderNetwork.ToinstallWDSmartWaresoftwareusingthedriver,right-clicktheiconandselectInstallWDSmartWare.
LaunchingtheWDSmartWareSoftwareAfterInstallation
UseoneofthefollowingoptionsfortheWDSmartWareSoftwareonceyouhaveinstalleddit:
- WD SmartWare icon 📋 —In the Windows system tray, left- or right-click the WD Quick View icon to display the main menu, and then select WD SmartWare.
- Windows Explorer—Click Start or 📋, and then click Programs >WDSmartWare>WDSmartWare.
WDSmartWareHomeScreen
The HomescreenisthefirstscreenyouseeafteryoulaunchtheWDSmartWaresoftware:
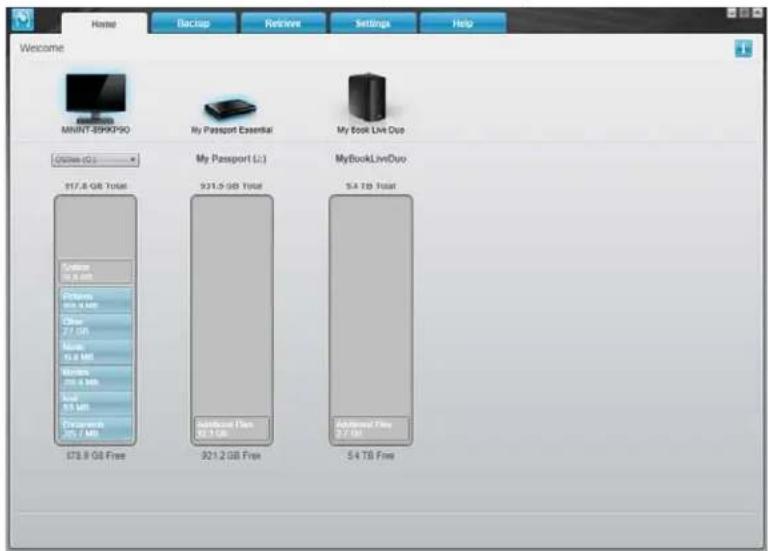
text_image
Home Backup Retrieve Settings Help Welcome MNNT-399K9PQ My Passport Essential My Book Live Duo COSIN (C:) 917.8 GB Total My Passport (L:) 931.5 GB Total MyBookLiveDuo 5.4 TB Total System: 76.6 GB Systems 84.6 MB Other 7.7 GB None 5.0 MB Windows 256.6 MB Total 8.5 MB Transcens 25.7 MB ST3.8 GB Free Subtanned Plus 82.1 GB Additional Plus 8.7 GB 921.2 GB Free 5.4 TB FreeTheWDSmartWareHomescreenprovidesthefollowingtabs:
■ Home—Provides a Content Gauge showing the capacity of each drive on your network.
■ Backup—Manages existing backups or creates new backups of your important data, including movies, music, documents, email, and photos.
■ Retrieve—Brings back valuable data that has been lost or overwritten.
■ Settings—Manages backup parameters, searches for updates, and provides a link totheMyBookLiveDuodashboard.whereyoucanconfigurethedrive.
- Help—Provides quick access to Learning Center topics and links to online support services. The Learning Centertopics provide more detail than the info/online help for each screen, but not as much as the WDSmartWareSoftwareUserManual.
IntheContentGaugeforyourcomputer'sharddrive,allofyourfilesthatareavailablefor backupdisplayagainstabluebackgroundinthefollowingcategories:
| ThisfilecategoryIncludesfileswiththeseextensions | |
| Documents | .doc,.txt,.htm,.html,.ppt,.xls,.xml,andotherdocument extensions |
| .mail,.msg,.pst,.andothermailextensions | |
| Music | .mp3,.wav,.wma,andothermusicextensions |
| Movies | .avi,.mov,.mp4,andothermovieextensions |
| Pictures | .gif,.jpg,.png,andotherpictureextensions |
| Other | Othersthatdonotbelonginthefivemaincategories |
Foralistofincludedfileextensions, searchforAnswerID3644intheWDKnowledgeBase athttp://support.wdc.com.
Notethat:
- Movingthepointeroveracategorydisplaysthenumberoffilesinthecategory.
- TheSystemcategory, shownagainstadarkgraybackground, includesallof your operatingsystemfilesthatarenotavailableforbackup.Filesthatarenotbackedup includesystemfiles, programfiles, applications, andworkingfileslike.tmpand.log files.
- TheRetrievedcategory,alsoshownagainstadarkgraybackground,includesthe filesthatyouhaverretrievedfromapriorbackup.Thesefilesarenotavailablefor backup.
Note: AdditionalFilesarefilesoutsideofthecurrentbackup.
HowtheBackupFunctionWorks
TheWDSmartWaresoftwareautomaticallyandcontinuouslybacksupallofyourimportant datafilestotheMyBookLivedrive—music,movies,photos,documents,email,andother files.
AftertheWDSmartWaresoftwarecategorizedifferenttypesoffilesontheselected harddrive, clickingtheStartBackupbuttonbacksallofthemup.Oryoucanselect specificfiles,folders,orcategoriesoffilestobackup.
If your computer has more than one internal hard drive, you must select and backup each on top to protect all of the data files on your computer.
Afterperformingabackup,theWDSmartWaresoftwareprotectsyourfilesbybackingup:
- Newfilesthatarecreatedonorcopiedtoyourharddrive
- Existingfilesthatarechangedinanyway.
Thisprotectionisautomatic — theWDSmartWaresoftwaresdoesitforyouwithoutanyaction onyourpart — justmakesuretoleaveyourMyBookLiveDuodeviceconnectedtoyour network.
Note: Should you disconnect and reconnect the driveto thenetwork, the WDSmartWaresoftwarer escans your computer for new or changed files and resumes automatic, continuous backup as before.
BackingUpFiles
Tobackupsomeorallofyourfiles:
- OntheHomescreen:
a. If your PChasmorethanoneinternalharddriveordrivepartition, select the one that you want to backup first from the internal drives selector box under your computer icon:

b. If you have more than one My Book Live Duodevice, WDNAS drive, or SmartWare-compatible devices connected to your network, select the on that you want to backup filesto:
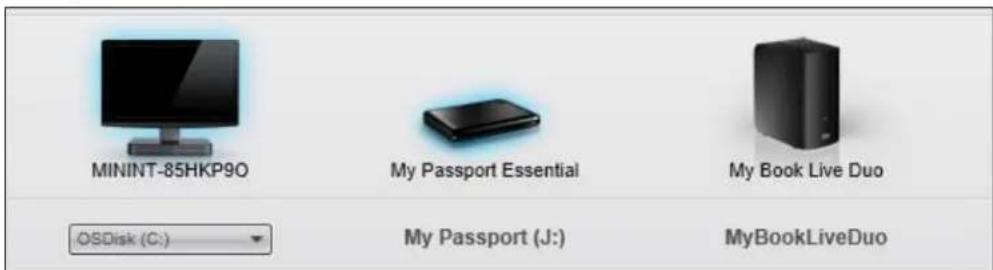
text_image
MININT-85HKP90 My Passport Essential My Book Live Duo OSDisk (C:) My Passport (J:) MyBookLiveDuo2. ClicktheBackuptabtodisplaytheBackupscreen:

text_image
Ready to perform category backup MSNIT-85HPVIO O&Disk (C:) My Book Live Duo 017.8 GB Total Advanced Vps MyBookLiveCDO 0.4 TBD Total Data For Backup Free 2.4 MB Size 6.1 GB Backup 3.0 GB Features 40.9 MB Other 27 GB Mines 18.0 MB Mines 226.5 MB Size 52 MB Documents 275.7 MB Address/Free 0.2 MB Platforms 153.8 MB Other 2.7 GB Mines 10.0 MB Mines 235.0 MB Size 9.5 MB Documents 225.7 MB Data Checked Up Free 0 Size 0.4MB Switch to File Backup 5.4TB Free Start Backup3. OntheBackupscreen:
| IFyouwanttobackup... ontheinternalharddrive, | THEN... |
| AllofthecategoriesoffilesProceedtostep4onpage30. | |
| Selectedcategoriesoffiles | Skiptosteponpage30. |
| AllofthefilesandfoldersSkiptostep8onpage31. | |
| Selectedfilesorfolders | Skiptostep9onpage32. |
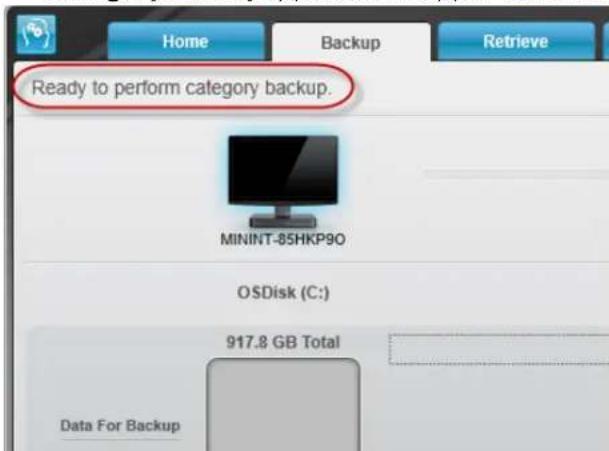
- TobackupallofthecategoriesoffilesontheMyBookLiveDuodevice:
a. Verify that the backup mode is category by ensuring that Ready to perform categorybackupappearsattheupper-leftcorneroftheBackupdialog.
text_image
Home Backup Retrieve Ready to perform category backup. MININT-85HKP90 OSDisk (C:) 917.8 GB Total Data For BackupIf the backup mode is file backup and Ready to perform file backup appears at the top of the screen, then click the Switch to File Backup button in the lower left corner and OK at the Switching Backup Plan prompt.
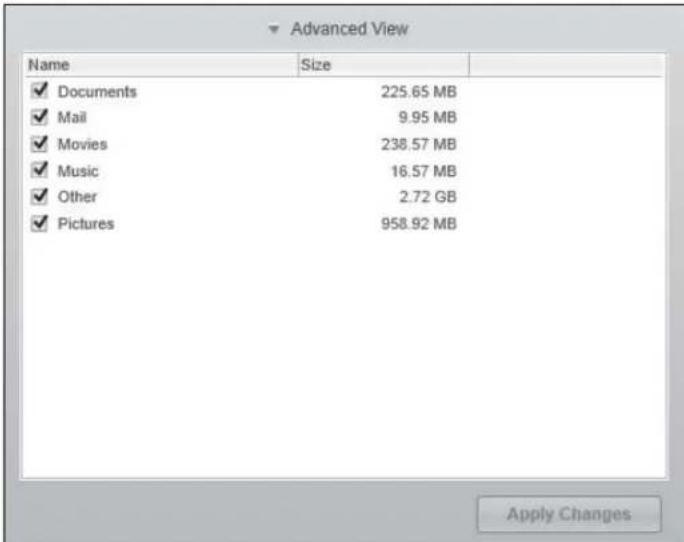
b.ClickAdvancedViewinthemiddleofthescreentoopenthebackupbycategories boxandverifythatthecheckboxesforallsixcategoriesareselected.
text_image
Advanced View Name Size ✓ Documents 225.65 MB ✓ Mail 9.95 MB ✓ Movies 238.57 MB ✓ Music 16.57 MB ✓ Other 2.72 GB ✓ Pictures 958.92 MB Apply Changesc. Asrequired, selectanyclearedcheckboxesandthenclickApplyChangesto createacustombackupplanandrefreshthecontentgaugeforyour MyBookLiveDuodrive.
d.ClickStartBackuptobeginbackingupallcategoriesoffilesandskiptostep10on page32.
5.Tobackupselectedcategoriesoffiles:
a. Verify that the backup mode is category by ensuring that Ready to perform categorybackupappearsattheupper-leftcorneroftheBackupdialog.
b. If the backup mode is file backup and Ready to perform file backup appears at the top of the screen, click the Switch to Category Backup button, then click OK ontheSwitchingBackupPlanprompt.
6.ClickAdvancedViewinthemiddleofthescreen,toopenthebackupbycategories selectionbox.
- Inthebackupbycategoriesselectionbox:
a. Select the checkboxes for the categories off file that you want to include in the backup.
b.Clearthecheckboxesforthecategoriesoffilesthatyouwanttoexcludefromthe backup.

text_image
Advanced View Name Size ✓ Documents 225.65 MB □ Mail 9.95 MB □ Movies 238.57 MB □ Music 16.57 MB □ Other 2.72 GB ✓ Pictures 958.92 MB Apply Changesc. ClicktheApplyChangesbuttontorefreshtheContentGaugeforyour MyBookLiveDuodrive.
d.ClicktheStartBackupbuttontobeginbackinguptheselectedcategoriesoffiles andskiptostep10onpage32.
- Tobackupallofthefilesandfoldersontheinternalharddrive:
a. Verify that the backup mode is file and that Ready to perform file backup appears at the upper-left corner of the Backupdialog.
b. If the backup mode is category and Ready to perform category backup appears at the top of the screen, click the Switch to File Backup button, then click OK at the Switching Backup Plan prompt.
c. Inthebackupbyfilesselectionbox, click the checkbox for your computer's internal hard drive:

d.ClickApplyChangestocreateacustombackupplanandrefreshthecontent gaugeforyourMyBookLiveDuodrive.
e.ClickStartBackuptobeginbackingupalloffilesandfoldersandskiptostep10 onpage32.
9.Tobackupselectedfilesorfolders:
a. Verify that the backup mode is file backup and that Ready to perform file backupappearsattheupper-leftcorneroftheBackupdialog.
b. If the backup mode is category and Ready to perform category backup appears there, click the Switch to File Backup button, then click OK at the Switching Backup Plan prompt.
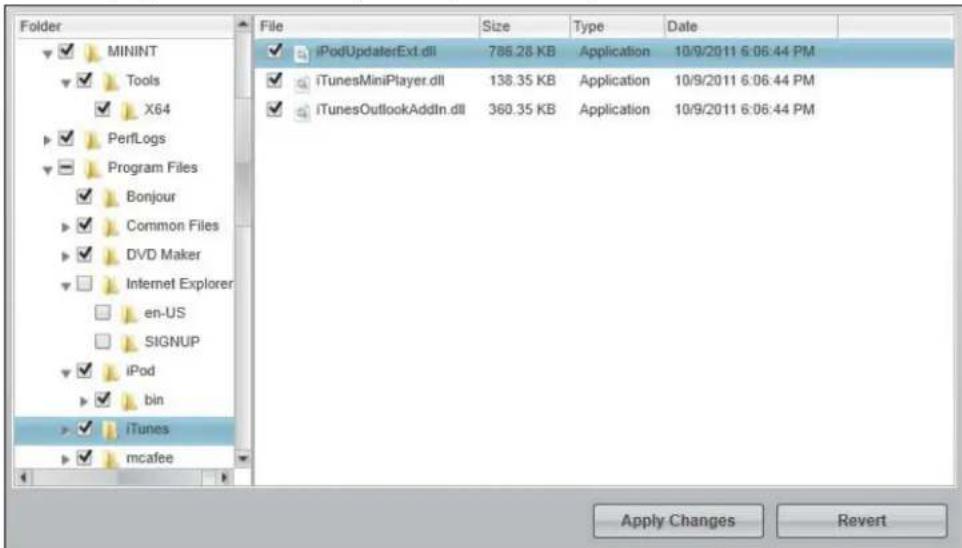
c.Inthebackupbyfilesselectionbox,clickthepointerstoopenthefolderstructure:
text_image
Folder ✓ MININT ✓ Tools ✓ X64 ✓ PerfLogs ✓ Program Files ✓ Bonjour ✓ Common Files ✓ DVD Maker ✓ Internet Explorer en-US SIGNUP ✓ iPod ✓ bin ✓ iTunes ✓ mcafee File Size Type Date ✓ iPodUpdaterExt.dll 788.28 KB Application 10/9/2011 6:06:44 PM ✓ iTunesMiniPlayer.dll 138.35 KB Application 10/9/2011 6:06:44 PM ✓ iTunesOutlookAddtn.dll 360.35 KB Application 10/9/2011 6:06:44 PM Apply Changes Revertd. Selectthecheckboxesfortheindividualfilesorfoldersthatyouwanttobackup. Notethatclickingafoldercheckboxautomaticallyselectsallofthesubfoldersand filesinthefolder.
e.ClickApplyChangestocreateacustombackupplanandupdatethecontent gaugeforyourMyBookLiveDuodrive.ClickingRevertclearsallofthecheck boxesanddisplaystheinitial/defaultconfiguration.
f.ClickStartBackuptobeginbackinguptheselectedfilesorfoldersandproceedto step10onpage32.
- During the backup:
- Aprogressbarandmessageatthetopofthescreenindicatetheamountofdata thathasbeenbackedup.
- Foracategorybackup,thebluebackgroundinthecontentgaugeforyour computer'sinternalharddrivechangestoyellow/amberforallofthefilesthathave notyetbeenbackedup.
- Thegraybackgroundforcategoriesorfilesinthecontentgaugeforyour MyBookLiveDuodrivechangestoblueasthebackupcompletes.
- Youcancontinuetosetupyourdriveorperformanyotherfunctionsbecause the WDSmartWaresoftwarebacksupyourfilesinthebackground.
- TheStartBackuptogglebuttonchangestoStopBackupforstoppingthebackup.
- Appearanceofabackupsuccessfullyfinishedmessagemeansthatthebackup completednormally.
- Ifanyfilescouldnotbebackedup,theWDSmartWaresoftwaresdisplaysa:
-Cautionmessageindicatingthenumberoffilesinvolved
-Viewlinkthatyoucanclicktoseealistofthefilesandthereasonstheywerenotbackedup
Some applications and running processes can keep files from being backed up. If you cannot determine why some of your files were not backed up, try:
-Saving and closing allof your open files
-Closingallrunningapplications—includingyouremailprogramandwebbrowser
Important: The appearance of a Caution message, indicating that your drive is full, mean that there is not enough freespace on the drivet o completing the backup.
Thebestlong-termsolutionistorelegatethedrivetolong-termarchive storageand: a.ClicktheHelptab.
b. ClicktheWDStorelinktoviewtheWesternDigitalOnlineStorewebsite. c. ClickExternalHardDrivesandselectthebestdrivetosuityourfuture requirements.
-
If you clicked Stop Backup at step 10, the Stop backup? confirmation prompt remindsyouthattheWDSmartWaresoftwarerunsyourbackupjobinthebackground soyoucancontinueusingyoucomputerforotherthingsduringthebackup.To continue,clickeither:
-
ContinueBackuptodisregardyourrequestandresumethebackup
-
StopBackuptofollowthroughwithyourrequestandstopthebackup
-
If your computer has more than one internal hard drive, repeat the backup procedure foreach one.
RetrievingBackups
TheWDSmartWaresoftwaremakesiteasyforyoutoretrievefilesthatyour MyBookLiveDuodrivehasbackedupandeither:
- Restorethemtotheiroriginalallocationsonyourcomputer.
• Copythemtoaspecialretrievefolder.
Retrievalisgenerallyafour-stepprocess:
- OntheHomescreen, choosethedrivetoretrievecontentfrom.
- Choose whether to retrieve content to as special retrieval folder or to the original allocation.
3.Choosewhatcontenttoretrieve:files,folders,oreverything. - Retrievethecontent.
RetrievingaFile
AfterselectingthedriveontheHomescreen,youcanretrievefilesorcompletefoldersfrom yourMyBookLiveDuodrive.(Forinformationonretrievingfolders,see"RetrievingaFolder" onpage36.)
Toretrieveafilefromyourdrive:
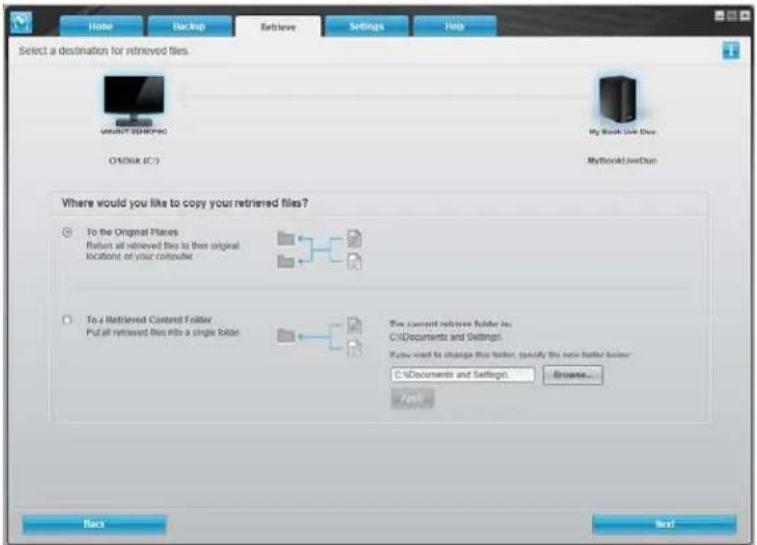
- Click the Retrieve tab to display the Select a destination for retrieved files screen:
text_image
Home Backup Retrieve Settings Help Select a destination for retrieved files. OK/SHK (C:) My Book Line Data MyBookd JetDue Where would you like to copy your retrieved files? To the Original Places Button all retrieved files to then original location of your computer To a Retrieved Content Folder Put all retrieved files into a single folder The current retrieved folder is: C:\Documents and Settings. If you want to change this folder, specify the new folder folder: C:\Documents and Settings... Create... Back Next- Thedrivemaycontainbackupsfromothercomputers. Toretrievefilesfromaspecific computer(volume):
a.ClicktheBackbuttontodisplaytheSelectavolumetoretrievefromscreen:
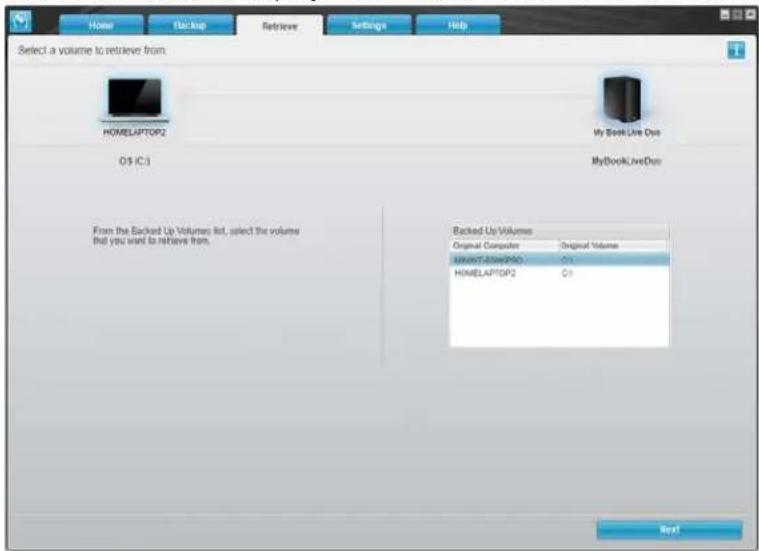
text_image
Home Backup Retriever Settings Help Select a volume to retrieve from HOMELAPTOP2 My Book Live Out OS IC3 MyBookLiveOut Backed Up Volumes Original Computer Original Volume HOMELAPTOP2 C3 From the Backed Up Volumes list, select the volume that you want to retrieve from. Nextb.SelectthedesiredvolumeandclicktheNextbutton.
- OntheSelectadestinationforretrievedfilesscreen:
| IFyouwanttocopyyour retrievedcontentto... | THEN... |
| Itsoriginalallocation,Note:Notavailablewhen retrievingabackupofadifferent computer. | a.SelecttheTotheOriginalPlacesoption.b.ClicktheNextbuttontodisplaytheSelectcontentto retrieve...screen. |
| Aretrievedcontentfolder,Note:Ifyouchangetheretrieval contentlocationfromwhereithas been,thepreviouslocationwillbe backedup. | a.SelecttheInaRetrievedContentFolderoption.b.Ifyouwanttospecifyadifferentretrievefolder,clickBrowseandidentifythenewretrievefolder.c.ClicktheApplybuttontosaveandimplementthenewretrievefolder.d.ClicktheNextbuttontodisplaytheSelectcontentto retrieve...screen. |
- On the Selectcontent to retrieve... screen, select Retrieve Some Filest to display the retrieve files selection box:

text_image
Retrieve All Files Retrieve Some Files ✓ Show older files ✓ Show deleted files View Search Name Size Date Hotfix LocalPack Users Leslie D Lawson Public WDC Original File Location: C:\5. Navigate through the folder structure to find the files you want.
- Clicktheappropriatefilecategorybuttonontolistthefilesbycategory:
-Pictures
-Music
-Movies
-Documents
-Other
- SelecttheViewicontolistindividualfiles.
- TypeallorpartofthefilenameinthesearchboxtolocatethefileandpressEnterto startthesearch.Toeliminatethesearchfilter,deleteallofthetextinthesearchbox andpressEnter.
- Selectthecheckboxforthefilethatyouwanttoretrieve.
6. ClicktheStartRetrievingbutton.
7. Duringtheretrieval:
- TheRetrievescreendisplaysaprogressbarandamessageindicatingtheamountof datathathasbeencopiedtothespecifiedretrievallocation.
- A Cancel Retrieving button is available for you to stop the retrieval.
- A"Retrievalaccomplished" messagesignifiescompletionofthefileretrieval.
- A "Partial retrieve accomplished" message mean the file you selected for retrieval was not copied to the specified retrieval allocation. In this case, either:
-A "FilesNotRetrieved" messagedisplays, providingthenumberoffilesthatwere notretrievedandalinktoafailed-to-retrieveinformationscreen.ClicktheView fileslinktoseethelistoffilesandthereasonstheywerenotretrieved,or
-A "Destinationisfull" messagedisplays, which mean that your computer does not have sufficient disk spacing to complete the filer retrieval.
RetrievingaFolder
Toretrievea folder from your drive, that includes allof the content within a folder, and may includemultiple categories, in theretrievefiles selection, select the checkbox next to the folder.
RetrievinganEarlierVersionofaFileorDeletedFiles
Intheretrievefilesselectionbox, checktheShowdeletedfilescheckboxand/orthe Showolderfilescheckbox.Now,whenselectingcontenttoretrieve,youcanselect individualfilesthatwereoverwrittenordeleted.Likewise,retrievingentirefoldersinthis modewillalsoretrieveolderversionsanddeletedfiles.
Note: You can only retrieve one version of a file per retrieval.
RetrievingAllofYourContent
OntheSelectcontenttoretrieve...screen,choosetheRetrieveAllFilesoption,which retrievesfilesacrossallcategoriesandcopiesthemtoeithertheiroriginallocationsortheRetrievedContentsfolder.
Duringtheretrieval:
- TheRetrievescreendisplaysaprogressbarandamessageindicatingtheamountof datathathasbeencopiedtothespecifiedretrievallocation.
- A Cancel Retrieving button is available for you to stop the retrieval.
- A"Retrievalaccomplished" messagesignifiescompletionoftheretrieval.
- A "Partial retrieve accomplished" messagedisplays, which mean the file you selected for retrieval was not copied to the specified retrieval allocation. In this case, either:
-A "FilesNotRetrieved" messagedisplays, providingthenumberoffilesthatwere notretrievedandalinktoafailed-to-retrieveinformationscreen.ClicktheView fileslinktoseethelistoffilesandthereasonstheywerenotretrieved.
-A "Destinationisfull" messagedisplays, which mean that your computer does not have sufficient disk spacing to complete the retrieval.
CustomizingWDSmartWareSoftware
TheWDSmartWaresoftwaremakesiteasyforyoutoquicklycustomizeitsettingsforthe bestpossibledriveperformanceby:
- Specifyingthenumberofbackupversionsthatyouwanttokeepforeachfile
- Specifyingauniquefoldertostorefilesretrievedfromyourdrive
•AutomaticallycheckingforWDSmartWaresoftwareupdates - AccessWDQuickViewtomanageyourdrive.
ClicktheSettingstabtodisplaytheMainSettingsscreen:

text_image
Home Backup Retrieve Settings Help MINIT-SBHP200 My Disk Drive Duo Software Settings Software Settings options let you enter the number of backup reminders you want to retain, delete backup until your computer is able, select a factor to retrieve your backed updates in, and set preferences for automating software updates and starting the VCI. SmartWare software. Set Up Software Drive Settings The drive type (Desktop or Network) connected to your computer definiere the available drive settings, for example, naming your drive, engraging security (for encrypted drive only), setting a sleep timer, and more. Set Up DriveOntheMainSettingstabyoucan:
- CreateandeditthesoftwaresettingsforMyBookLiveDuo
- SetupdrivesettingsforyourMyBookLiveDuo
CreatingSoftwareSettings
ClicktheSetUpSoftwarebuttonontoopentheSoftwareSettingsScreen.
IFyouwantto...THENclick...ANDsee...
| Changethenumberofbackup versionstokeepforeachfile, | FileHistory"SpecifyingtheNumberof BackupVersions"onpage38. |
| Pausebackupsuntilthecomputeris idle, | BackupSpeed"PausingBackupsUntilYour ComputerisIdle"onpage38. |
| Specifyapathtoadifferentretrieve folder, | RetrieveFolder"SpecifyingaDifferentRetrieve Folder"onpage39. |
| Changetheoptionthatchecksfor softwareupdateswheneveryou reconnectyourMyBookLiveDuo drivetoyournetwork, | Preferences"SettingthePreferences(Auto Update)Option"onpage39. |
SpecifyingtheNumberofBackupVersions
TheWDSmartWaresoftwarecankeepupto25olderversionsofeachfile.Ifyouoverwrite ordeleteafilebymistake,orwanttoseeanearlierversionofthefile,theWDSmartWare softwarehasacopyforyou.
Keepingmoreversions:
- Improvesyourabilitytosave/retrievemoreversionsofafile
• Consumesmorediskspace.
Tospecifythenumberofbackupversionsthatyouwanttokeepforeachfile:
- On the Software Settings screen, click the File History button to display the Set File Historyscreen:

text_image
File History Backup Speed Retrieve Folder Preferences Set File History Enter the number of backup versions to keep for each file. 5 Apply- Specify then number of file version that you want to keep (from 1 to 25) in the Enter the number of backup version to keep foreach filebox.
3.ClickApplytosaveandimplementthenewnumberofbackupversions.
PausingBackupsUntilYourComputerisIdle
Alargebackupcantakealoftimeandconsumealotofyoursystemprocessing resources.TheWDSmartWaresoftwaresinthebackgroundusingminimalcomputer resourceswhileyouareworkingonyourcomputer.Ifyouwanttopauseallbackupactivity untilyourcomputerisidle,youcanbyenablingtheBackupSpeedoption.
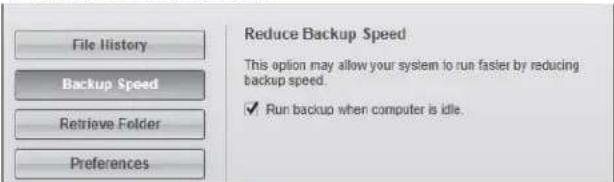
- On the Software Settings screen, click the Backup Speed button to display the Reduce BackupSpeedscreen:
text_image
File History Backup Speed Retrieve Folder Preferences Reduce Backup Speed This option may allow your system to run faster by reducing backup speed. ✓ Run backup when computer is idle.- Selector clear the Runbackup when computer is idle checkbox to enable or disable the Backup Speedoption.
SpecifyingaDifferentRetrieveFolder
When you start a retrieval, you can choose whether you want to store a better retrieval file in either:
• Their original allocations on your computer
•ARetrievedContentfolder.
Bydefault, theWDSmartWaresoftwarecreatesandusesaRetrievedContentsubfolderin yourMyDocumentsfolder.Tospecifyadifferentfolder:
- Either create anew folder or determin which existing foldery you want to use.
- OntheSoftwareSettingsscreen, clicktheRetrieveFolderbuttontodisplaytheSet RetrieveFolderscreen:

text_image
File History Backup Speed Retrieve Folder Preferences Set Retrieve Folder The current retrieve folder is: C:\Documents and Settings\ If you want to change this folder, specify the new folder below: C:\Documents and Settings! Browse... Apply- Click the Browse button and use the browse function to identify the new retrieval folder.
Note: If you don't want your previously retrieved contents folder to be backed up, delete the folder before you apply changes.
- ClicktheApplybuttontosaveandimplementthenewretrievalfolder.
SettingthePreferences(AutoUpdate)Option
When enabled, each time you are connect your My Book Lived to your own network, the Preferences option checks for software updates. This ensure that you are always using the most recent software version.
ToenableordisablethePreferencesoption:
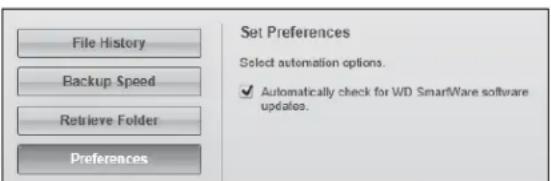
- On the Software Settings screen, click the Preferences button to display the Set Preferencescreen:
text_image
File History Backup Speed Retrieve Folder Preferences Set Preferences Select automation options. ✓ Automatically check for WD SmartWare software updates.- Selector clear the Automatically check for WDSmartWaresoftware updates checkbox to enable order disable the Preferences option. If selected, the WDSmartWare software links you to the WDWebpagewherethedownload is available.
CreatingDriveSettings
ClicktheSetUpDrivebuttontoopenWDQuickViewfordetailsonhowtomanageyourMyBookLiveDuodrivesettings.(See"UsingtheMyBookLiveDuoDashboard"onpage55.)
UsingWindows7/WindowsVistaBackup
If you choosenottouse WDSmartWaresoftware for backing up file to the MyBookLiveDuo, you can use Windows Backup.
WindowsBackup
TheWindowsBackupfeaturesofWindowsVista(Business,Ultimate,HomePremium,and Enterprise)andWindows7(ProfessionalandUltimateversions)enableyoutobackup mediafiles,documents,email,andotherpersonalfilestoyourMyBookLiveDuodrive.If youlosefilesoryoursystemcrashes,youcaneasilyrestorethefilestoyourPC.Formore informationonWindowsBackup,consultMicrosoft'sdocumentation.
WindowsVistaBackup
- ClickandthenControlPanel.
- IfaFoundNewHardwarescreendisplays, clicktheCancelbutton.
- ClickControlPanel>SystemMaintenance>Backupyourcomputerandfollowthestepsinthewizard.
- When prompted to select where you want to save your backup, click Onanetwork.
- ClicktheBrowsebuttonandselecttheMyBookLiveDuodrive.
- SelectasharewhereyouwantthebackupobecreatedandclicktheOKbutton.
6.Entertheusernameandpasswordassignedtoyourusernameonthe MyBookLiveDuo.Ifnousernamehasbeenassigned,entereveryoneastheusername andanypassword(e.g.,1234).ClicktheOKbutton. - Followtheremaininginstructionsaspromptedbythewizard.
Windows7Backup
- Click > Control Panel > System and Security.
- ClickBackupandRestore.
- ClicktheSetupBackupbuttonandfollowthestepsinthewizard.
- When prompted to select where you want to save your backup, click Saveona network.
- ClicktheBrowsebuttonandselecttheMyBookLiveDuodriveasthebackup destination.
- SelectasharewhereyouwantthebackuptobecreatedandclicktheOKbutton.
7.Entertheusernameandpasswordassignedtoyourusernameonthe MyBookLiveDuodrive.(Seepage78.) - MakesurethebackupdestinationiscorrectandclicktheNextbutton
- When prompted for the content you want to backup, select LetWindows choose or select desired content and then click the Next button.
- On the Review your backup setting screen, click the Savesettings and run backup button.
UsingAppleTimeMachine
Backingup
TheAppleTimeMachineisabuilt-infeatureonMacOSXLeopard, SnowLeopard, and Lion computersthatcanbackupeverythingonyourcomputer:music, photos, documents, applications, emails, and systemfiles. TheMyBookLiveDuodrivecanstorethesebacks, so thatifyourharddriveoroperatingsystemshouldcrash, oryouloseafile, youcaneasily restoreittoyourcomputer.
SettingUpTimeMachine
TosetupTimeMachinetobackupfilestoyourMyBookLiveDuodrive:
- UseoneofthefollowingmethodstoopenTimeMachine.

text_image
ClicktheTimeMachineiconintheDock: Time Machine WARNIT 17:23:56- Click the Apple menu > System Preferences and select Time Machine.
-
ClickGo>ApplicationsandselectTimeMachine.
-
If this is your first time creating a backup, the following screen displays:
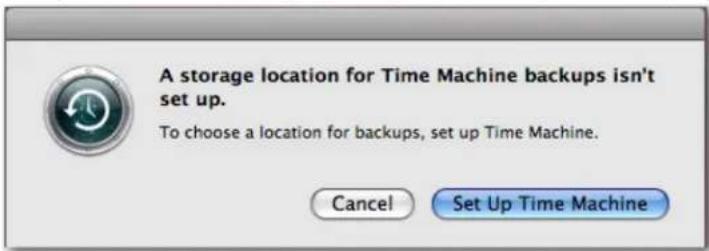
text_image
A storage location for Time Machine backups isn't set up. To choose a location for backups, set up Time Machine. Cancel Set Up Time MachineClickSetUpTimeMachinedisplaytheTimeMachinePreferencescreen:
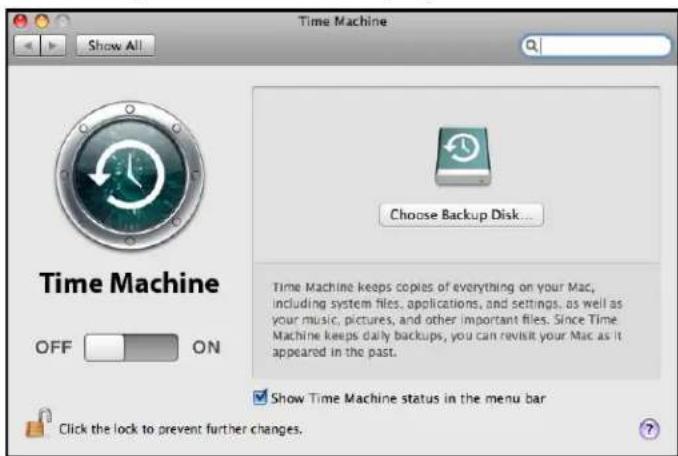
text_image
Time Machine Show All Choose Backup Disk... Time Machine keeps copies of everything on your Mac, including system files, applications, and settings, as well as your music, pictures, and other important files. Since Time Machine keeps daily backups, you can revisit your Mac as it appeared in the past. Show Time Machine status in the menu bar Click the lock to prevent further changes.- Click Choose Backup Disk and select the My Book Live Duodrivewhere you want the backups stored:
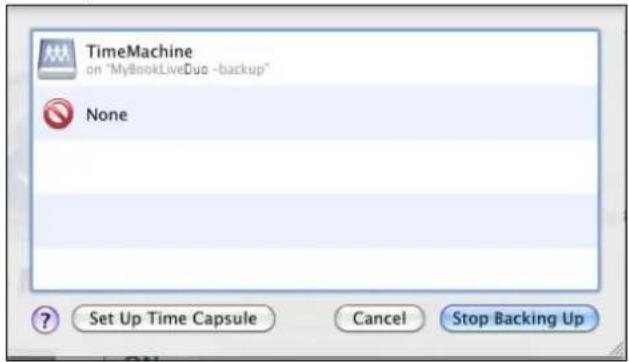
text_image
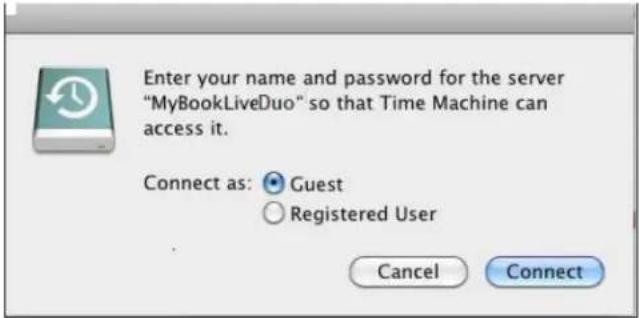
TimeMachine on "MyBookLiveDuo -backup" None Set Up Time Capsule Cancel Stop Backing Up- ClickUseforBackup.Ascreen prompts for your username and password.
SelectGuest(defaultsetting)andclickConnect:
text_image
Enter your name and password for the server "MyBookLiveDuo" so that Time Machine can access it. Connect as: Guest Registered User Cancel ConnectThePreferencesscreenreturns:

text_image
Time Machine Show All Name: TimeMachine MyBookLiveDoc Available: $17.26 GB of 941.89 GB Oldest Backup: June 28, 2010 Latest Backup: July 23, 2010 Options... Backing Up: Making backup disk available... Time Machine keeps: • Hourly backups for the past 24 hours • Daily backups for the past month • Weekly backups for all previous months The oldest backups are deleted when your disk becomes full... Show Time Machine status in the menu bar Click the lock to prevent further changes.- Tostartautomaticbackups, movetheslidertoON.
ToaddaTimeMachinedrop-downmenuicontothemenubaratthetopofthe screen,selecttheShowtheTimeMachinestatusinthemenubarcheckbox.This menu enables youtostartabackup,enterTimeMachinetorestorefiles,oropenthe TimeMachinePreferencesscreen:
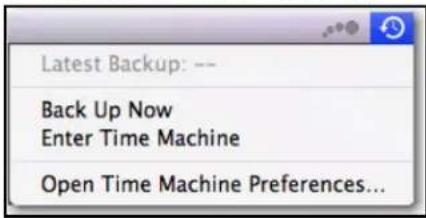
text_image
Latest Backup: -- Back Up Now Enter Time Machine Open Time Machine Preferences...TimeMachinebeginsbackingupyourfiles.Thefirstbackupmaytakesometime,but subsequentbackupsarefasterbecauseTimeMachineonlybacksupneworchanged items.Astatusbardisplaystheprogressofthebackup:

text_image
Time Machine Backup Backing up 1,675,826 items 2.5 MB of 44.95 GBTimeMachinebacksupyourcomputereveryhourandkeepsthefollowingbackupsets:
•Everyhourfor24hours
• Everydayforthepastmonth
•WeeklyuntiltheMyBookLiveDuodriveisfull.
Note: If a backup is interrupted, for example, if the computer goes into sleep mode, or the My Book Live Duo is disconnected, it will resume automatically once the computer is available.
If you chan get h en a name of the My Book Live Duo, previously set Time Machine backups delay or fail. T ofix the problem, resume backing up by re-selecting the drive in the Time Machine Preferences screen.
Toseeinformationsuchasavailablecapacityandthedateandtimeoftheoldest,latest, and next backup, select Open Time Machine Preferences on the Time Machine drop-downmenu:
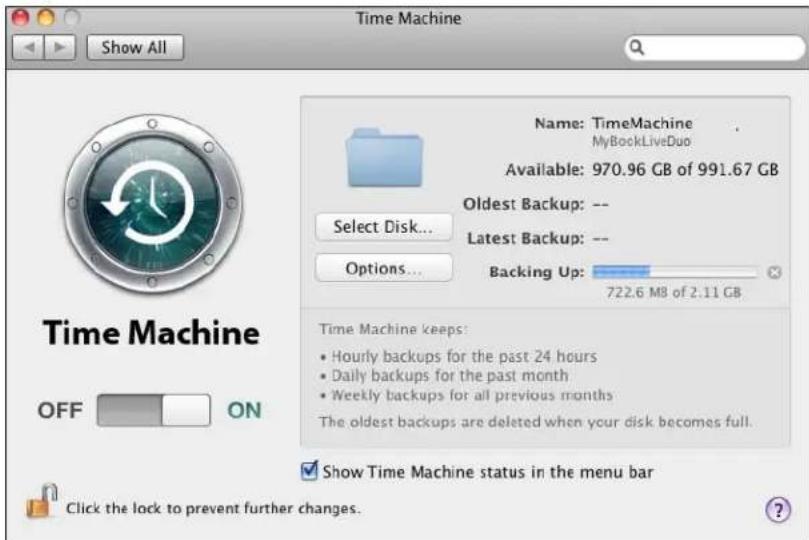
text_image
Time Machine Show All Name: TimeMachine MyBookLiveDuo Available: 970.96 GB of 991.67 GB Oldest Backup: -- Latest Backup: -- Options... Backing Up: 722.6 MB of 2.11 GB Time Machine keeps: • Hourly backups for the past 24 hours • Daily backups for the past month • Weekly backups for all previous months The oldest backups are deleted when your disk becomes full. Show Time Machine status in the menu bar Click the lock to prevent further changes.StartingaBackup
Tostartabackupatanytime,selectBackUpNowonthedrop-downmenu:

text_image
Latest Backup: Today, 10:49 AM Back Up Now Enter Time Machine Open Time Machine Preferences...Note: TodeleteTimeMachinebackups, usetheMyBookLiveDuodashboard. (See "ManagingComputerBackupsandSafepoints" onpage86.)
RetrievingBacked-UPltems
Youmightsometimeswanttoretrievefilesandotheritemsbackeduponthe MyBookLiveDuodrive. Forexample,youmighthavelostafile,oryouwanttoseefiles fromaweekago.Youcanretrieveindividualitems,multipleitems,shares,orifyoursystem crashes,yourentireharddrive.
Toretrievebacked-upitemstoyourharddrive:
- Openthewindowonyourcomputerwhereyouwanttheitemrestored. Forexample, if youareretriyingadocument, opentheDocumentsfolder. (If youarerestoringanitem onyourdesktop, youdonotneedtoopenawindow.)
- ClicktheTimeMachineiconintheDock, orselectEnterTimeMachinefromthedrop-downmenu:

text_image
Latest Backup: -- Back Up Now Enter Time Machine Open Time Machine Preferences...Allofyourbackupsdisplayinacascade,withthemostrecentinfront.
- Click the arrows ortheto the timeline on the right of the screen to browse through all the backups Time Machine has created:

text_image
Backups DEVICE1 Macintosh HD IDyk Remote Disk Mac OS X Install DVP Backup of MOC User's Mac mini SHAR2D lc285b1 InfDev71 LumReda lm98c1 lynnk1 Zmktvg1 MyBlockLine All... PLACES Desktop 37 items, 35.00 GB products mac_select_mbi MB_L Safari Error_connecting.png Finder 3.txt Finder finder_guest.png Today (Now) Restorebutton Arrows TimeLine- Selecttheitemyouwanttorestore, and click theRestorebuttonatthebottomright to display theCopymessage:

text_image
Copy An item named "Picture 3" with extension ".png" already exists in this location. Do you want to replace it with the one you're restoring? Keep Original Keep Both Replace- Click the button for the desired option:
- KeepOriginal—Doesnotrestoretheitemfromthebackupdrive.
- KeepBoth — Theoriginalitemremainsandthebacked-upitemisaddedtothe selectedlocationonyourcomputer.
-Replace — Thebacked-upitemreplacetheoriginalitem.
Note: In Finder, you will see a folder that corresponds to your backup drivethat include the word "backup." This is protected folder that is automatically created and where all of your backups reside. It serves no purpose for users other than to store Time Machine backups. Infact, if you try to connect to it, you will get a Connection Failed message.
ManagingYourDriveWith WDQuickView
AccessingWDQuickViewShortcutOptions CheckingDriveStatus LaunchingWDSmartWare(Windowsonly) ExitingWDSmartWareSafely(Windowsonly) OpeningShares LaunchingtheMyBookLiveDuoDashboard MappingtheDrive(Windowsonly) CreatingaShortcuttothePublicShare(Windowsonly) ViewingDriveProperties MonitoringStorage SafelyShuttingDown MonitoringAlerts AccessingtheLearningCenter EjectingAUSBStorageDeviceUsingQuickView UninstallingtheWDQuickViewIcon
AfteryouinstallWDQuickView(see"Step2:InstallWDQuickView"onpage15),theWD
QuickViewicondisplaysinaWindowssystemtrayandtheicondisplayaMac menubar.Youcanquicklyandconvenientlyperformthetaskslistedaboveanddescribedin thischapter.
AccessingWDQuickViewShortcutOptions
Windows
- Right-orleft-clicktheWDQuickViewiconinthesystemtraytodisplayamenu.
2.MovethepointeroverorclicktoselectyourMyBookLiveDuodriveanddisplaya submenu:

text_image
Open Dashboard Learning Center Map Create Shortcut Shut Down Alerts... Properties About WD Quick View MyBookLiveDuo [MyBookLiveDuo] WD SmartWare Exit WD SmartWare Exit- Select the desired option.
MacOSX
- ClicktheWDQuickViewiconinthen@ubartodisplayamenu.
2.MovethepointeroverthenameofyourMyBookLiveDuotodisplayasubmenu:

text_image
About WD Quick View Open Dashboard Learning Center Shut Down... Alerts... Properties... S/N: WCAZA0452753 Space Available: 98% Temperature Condition:OK Drive SMART Status:OK MyBookLiveDuo- Select the desired option.
CheckingDriveStatus
Windows
MovethepointerovertheWDQuickViewiconinthesystemtraytoseethedrive capacityusedanddrivetemperature:
| WD Quick View | ||||
| Drive Name [Volumes] | Used | Locked | Temperature | RAID Status |
| My Passport Essential USB HDD [G:] | 3% | No | OK | n/a |
| MyBookLiveDuo [MyBookLiveDuo] | 1% | n/a | OK | Healthy |
| PI-178 Travel Drive HDD [External USB] | 60% | n/a | n/a | n/a |
- Agreendotbesidethedrivenamemeansthedriveisbehavingnormally.
- Areddotbesidethedrivenamemeansthedriveisexperiencingaproblem, such as anabnormallyhightemperature.
MacOSX
ClicktheWDQuickViewiconinthe#nubarandmovethecursoroverthenameof yourMyBookLiveDuodrivetodisplaydrivestatusbelowthesubmenu:

text_image
Open Dashboard Learning Center Shut Down... Alerts... Properties... S/N: WCAZA0452753 Space Available: 98% Temperature Condition:OK Drive SMART Status:OK About WD Quick View MyBookLiveDuoLaunchingWDSmartWare(Windowsonly)
If WD SmartWare is installed, select the WD SmartWare option on the WD Quick View menutodisplaytheWDSmartWarehomescreen.
ExitingWDSmartWareSafely(Windowsonly)
Select Exit WD SmartWare on the WD Quick View menu to close the application. (This optiononlyappearsifyouarerunningWDSmartWare.)
OpeningShares
YoucanuseWDQuickViewtoopenthedrive'sPublicshareandanyprivatesharesto whichyouhaveaccesspermission.
- SelectOpenontheWDQuickViewsubmenu.
- SelectPublic.
Windows: ThesharesdisplayinWindowsExplorer:
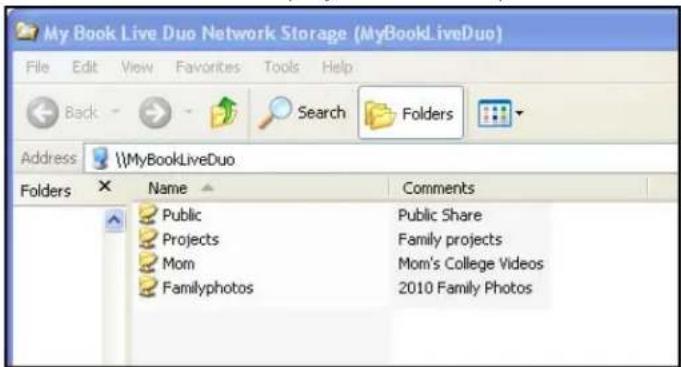
text_image
My Book Live Duo Network Storage (MyBookLiveDuo) File Edit View Favorites Tools Help Back Search Folders Address \\MyBookLiveDuo Folders Name Comments Public Public Share Projects Family projects Mom Mom's College Videos Familyphotos 2010 Family PhotosMacOSX:ThecontentsofthePublicsharedisplayinFinder:

text_image
DEVICES Macintosh HD iDisk Remote Disc SHARED MyBookLiveDuo Name Shared Music Shared Pictures Shared Videos SoftwareNote: Toviewallofthesharesonthedrive, clickthenameofyour MyBookLiveDuounderShared.
- Select the share you want to view:
Windows:Foraprivateshare,ifpromptedforausernameandpassword,enterthose associatedwithyouruseraccountontheMyBookLiveDuodashboard(see"Creatinga User"onpage78).Ifyoumaketheusernameandpasswordforthedashboardthe sameasthoseforloggingintothecomputer,nousernameorpasswordarerequired here.
MacOSX:Foraprivateshare,ifpromptedforausernameandpassword,enterthose associatedwithyouruseraccountontheMyBookLiveDuodashboard(see"Creatinga User"onpage78).ForaPublicshare,ifpromptedforausernameandpassword,select Guest.
LaunchingtheMyBookLiveDuoDashboard
SelectDashboardontheWDQuickViewsubmenutolaunchtheapplication.TheWelcome screendisplays.(See"UsingtheMyBookLiveDuoDashboard"onpage55.)
MappingtheDrive(Windowsonly)
- SelectMap[MyBookLiveDuoname] ontheWDQuickViewsubmenu. TheMap NetworkDrivescreendisplays:
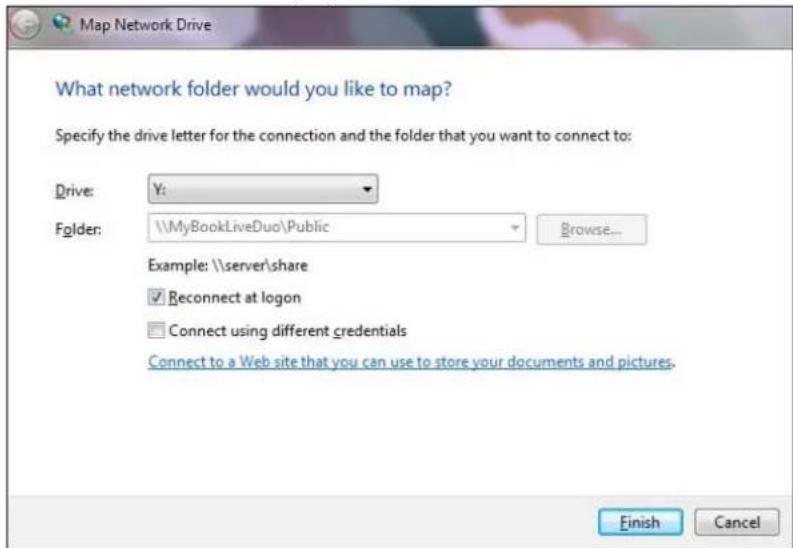
text_image
Map Network Drive What network folder would you like to map? Specify the drive letter for the connection and the folder that you want to connect to: Drive: Y: Folder: \\MyBookLiveDuo\Public Browse... Example: \\server\share Reconnect at logon Connect using different credentials Connect to a Web site that you can use to store your documents and pictures. Finish Cancel- Select the desired letter from the Drivedrop-downlist.
- ClicktheFinishbutton.
Note: When Windows attempt store connect a mapped Network Drive after a restart, the "Unabletoreconnectmapped network drives" errormay appear. This can occur if the username and password of the My Book Live Duodrive do not match the current Window's username and password information.
During the automaticreconnection process, Windows may attempt to send the current Windows username and password instead of the MyBookLiveDuousername and passwords specified during setup. Attempting to open themapped network drive prompts anew login window. Enter the My Book Live Duouser name and password to reconnect the share, allowing it to be accessible again (until then next reboot). Form more information on this problem, see Knowledge Base Answer ID 6745.
CreatingaShortcuttothePublicShare(Windowsonly)
Note:MacOSXautomaticallydisplaysaPublicshareicononthedesktop, and youcancreatealiasesforanysubshares.(See"UsingMacLeopard/Snow Leopard/Lion"onpage12.)
SelectCreateShortcutontheWDQuickViewsubmenu.AniconrepresentingthePublic sharedisplaysonthedesktop.
ViewingDriveProperties
SelectPropertiesontheWDQuickViewsubmenutodisplaythePropertiesscreen:

text_image
Network Device MyBookLiveDuo Device Details Description: My Book Live Duo Network Storage Manufacturer: Western Digital Corporation Model Name: MyBookLiveDuo Model Number: AP2NC Device webpage: http://mybookliveduo/ Troubleshooting Information Serial Number: WCM000000000 Type: urn:schemas-upnp-org:device:WdNAS-AP2NC Unique Device Name: uuid:73656761-7465-7375-636b-0090a9f63c5b Product Code: IP Address: 192.168.1.101 OK Cancel ApplyMyBookLiveDuoPropertiesonWindows
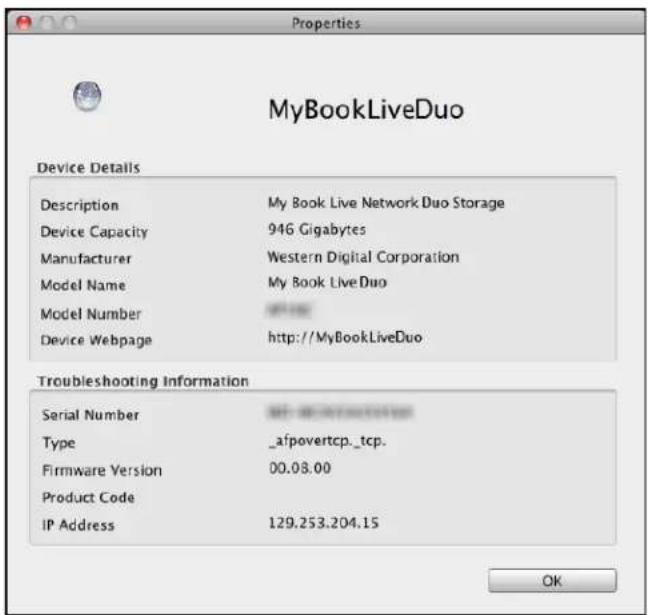
text_image
MyBookLiveDuo Device Details Description My Book Live Network Duo Storage Device Capacity 946 Gigabytes Manufacturer Western Digital Corporation Model Name My Book Live Duo Model Number http://MyBookLiveDuo Device Webpage Troubleshooting Information Serial Number 00.08.00 Type _afpovertcp._tcp. Firmware Version 00.08.00 Product Code IP Address 129.253.204.15 OKMyBookLiveDuoPropertiesonMacOSX
MonitoringStorage
HoveryourcursorovertheWDQuickViewicontodisplaytheDrivename,storagecapacity used,temperaturewithinthedrive,andRAIDstatus(Healthy,Failed,Rebuilding).
If you have a USB Drive attached to My Book Live Duo, the drive information alsodisplays in this area.
| WD Quick View | ||||
| Drive Name [Volumes] | Used | Locked | Temperature | RAID Status |
| My Passport Essential USB HDD [J:] | 3% | No | OK | n/a |
| MyBookLiveDuo [MyBookLiveDuo] | 2% | n/a | OK | Healthy |
| Western Digital External HDD [External USB] | 32% | n/a | n/a | n/a |
SafelyShuttingDown
OneoftherecommendedwaystosafelyrebootandshutdownyourMyBookLiveDuo driveistousetheWDQuickViewicon.
Note: Another preferred method is the dashboard. (See "Reboot/Shutdown" on page 68.) If the unit does not shutdown using either recommended method, see "lam having troubles safely shutting down the My Book Live Duo?" on page 130.
Important: Beforeshuttingdown, ensure that no files are being transferred to from the device. Check the LED on the front of the drivetomakesureitis not blinking. Blinking indicates that the unitis processing information (for example, backing up or transferring files).
WARNING!Donotunplugthedriveduringshutdown.
- SelectShutDownontheWDQuickViewsubmenutodisplaytheWDSmartWareShut Downscreen.
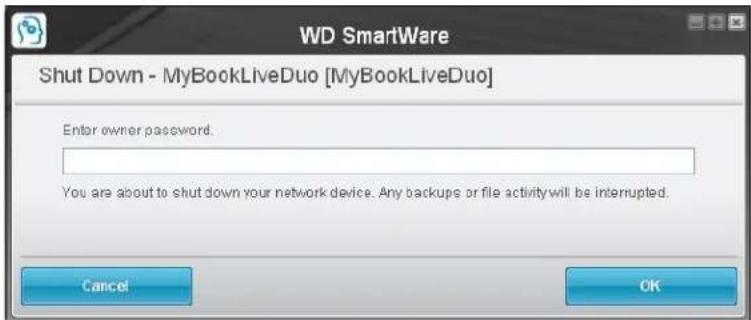
text_image
WD SmartWare Shut Down - MyBookLiveDuo [MyBookLiveDuo] Enter owner password. You are about to shut down your network device. Any backups or file activity will be interrupted. Cancel OK2.Entertheadministrator'spasswordorleaveblankandthenclicktheOKbutton.The driveshutsdown.
MonitoringAlerts
FlashingIconandBalloonAlert
OnbothWindowsandMacsystems,theWDQuickViewiconflashestoindicatethedrive maybeoverheatedorabouttofail.InWindows,aballoonalertdisplaysaswell.
Note: If the drive overheats, poweritdownandletitcoolfor60minutes. Powerit backon, and if the problem persists, contact WDSupport.
WDQuickViewAlertsOption
AnoptionontheWDQuickViewsubmenudisplaysalertssuchas:
- Driveisreachingmaximumcapacity.
- Driveisfullandsubsequentbackupscannottakeplace.Displayseveryfiveminutes untilspaceismadeavailable.
- Updates are available.
Toviewdrivealerts:
- Todisplayoneormorealerts, selectAlertsontheWDQuickViewsubmenu. Multiple alerts are arranged chronologically.
- Toclosethealertpanel, clicktheExitbutton.
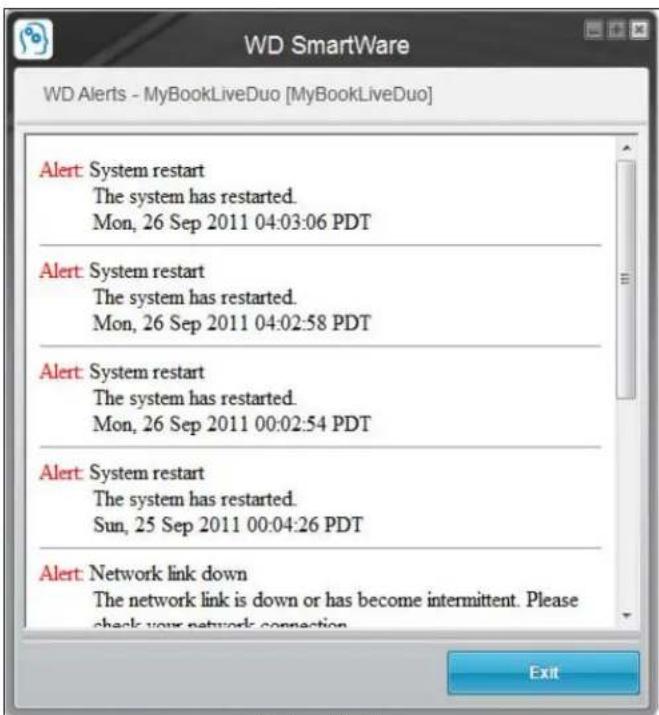
text_image
WD SmartWare WD Alerts - MyBookLiveDuo [MyBookLiveDuo] Alert: System restart The system has restarted. Mon, 26 Sep 2011 04:03:06 PDT Alert: System restart The system has restarted. Mon, 26 Sep 2011 04:02:58 PDT Alert: System restart The system has restarted. Mon, 26 Sep 2011 00:02:54 PDT Alert: System restart The system has restarted. Sun, 25 Sep 2011 00:04:26 PDT Alert: Network link down The network link is down or has become intermittent. Please check your network connection ExitAlertsonWindows
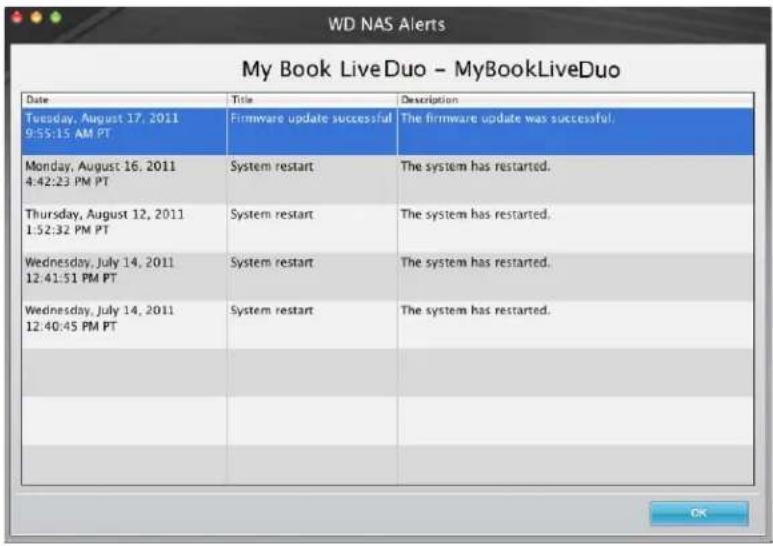
text_image
WD NAS Alerts My Book LiveDuo - MyBookLiveDuo Date Title Description Tuesday, August 17, 2011 9:55:15 AM PT Firmware update successful The firmware update was successful. Monday, August 16, 2011 4:42:23 PM PT System restart The system has restarted. Thursday, August 12, 2011 1:52:32 PM PT System restart The system has restarted. Wednesday, July 14, 2011 12:41:51 PM PT System restart The system has restarted. Wednesday, July 14, 2011 12:40:45 PM PT System restart The system has restarted.AlertsonMacOSX
- ClicktheOKbuttontoclose.
AccessingtheLearningCenter
TheLearningCenterprovidesinformationaboutusingmanyaspectsofthe MyBookLiveDuosoftware.SelectLearningCenterontheWDQuickViewsubmenuto displaytheLearningCentermainmenu.
EjectingAUSBStorageDeviceUsingQuickView
- Left-orRight-clicktheWDQuickViewiconinyoursystemtray.
- Select your USB Storage Devicethen Eject from the Quick View menu. Your USB will eject from your system.

text_image
About WD Quick View Safely remove My Passport Essential USB HDD [G:] MyBookLiveDuo [MyBookLiveDuo] PI-178 Travel Drive HDD [External USB] Exit Map Create Shortcut EjectUninstallingtheWDQuickViewIcon
Windows
On Windows XP, click Start > Control Panel > Add or Remove Programs, then uninstall WDSmartWare.
OnWindowsVista/Windows7, click>ControlPanel>Programs>Programsand Features, then uninstallWDSmartWare.
TheSystemTraynolongcontainstheWDQuickViewicon.

FormoreinformationonuninstallingQDQuickView,seeKnowledgeBaseAnswerID5373.
MacOSX
- Double-click the My Book Live Duo CDicononthedesktop.
- Open the Extras folder and select WD SmartWare Uninstaller to display the WDSmartWareUninstallwindow.
- ClicktheUninstallbutton.AloginwindowdisplaysyourMacusername.
- EnteryourMacpasswordandclicktheOKbutton.
- OntheWDSmartWareUninstallwindow, clicktheUninstallbutton.
- When a confirmation messaged displays, click the Exit button.
ThemenubarnolongercontainstheWDQuickViewicon.

UsingtheMyBookLiveDuoDashboard
LaunchingtheMyBookLiveDuoDashboard StartingtheMyBookLiveDuoDashboard UnderstandingDashboardComponents ObtainingCustomerSupport WhatCanIDoNow?
UsetheMyBookLiveDuodashboardtoconfiguresettingsandtomanagethe MyBookLiveDuodeviceasyouprefer.Forexample,youcansetupuseraccountsand restrictaccesstothefilesonyourMyBookLiveDuodrive,setupfoldersforstoringfiles, andcustomizethedrivetosuityourneeds.
ThischapterintroducesyoutotheMyBookLiveDuodashboardandgetsyoustarted.
LaunchingtheMyBookLiveDuoDashboard
Useoneofthefollowingmethodstolaunchthedashboard:
| IFyouwanttolaunchfrom...THEN... | |
| MyBookLiveDuoCD,1.Discoverthedrive.(See“DiscoveringandConnecting toYourDrive”onpage13.)2.ClickNextStepsandthentheStartsetupbutton. | |
| WDQuickViewicon,1.Left-orright-clicktheWDQuickViewicon.2.SelectyourMyBookLiveDuodeviceandthen Dashboard. | |
| WDSmartWare,1.OntheHomescreen,selectyourMyBookLiveDuo drive.2.ClicktheSettingstabtodisplaytheMainSettings screen.3.ClickSetupDrivebutton. | |
| Windows XP, | 1. Click Start > My Network Places.2.LocateyourMyBookLiveDuodrive.3.Double-clickthedriveorright-clickandselectInvoke. |
| Windows 7/Vista/XP, | 1. Click > Network.2.LocateyourMyBookLiveDuodrive.3.Double-clickthedrive,orright-clickandselectView devicewebpagefrom the resultingmenu. |
| Mac OS X, | 1. Click the Safari icon Bonjour.2.Double-click theMyBookLiveDuodriveonthe network. |
| A browser or Windows Explorer, | 1. Use the name or IP address of your My Book Live Duo device astheaddress (orURL):http://mybookliveduo.local2.Click Go. |
StartingtheMyBookLiveDuoDashboard
The first time you access the My Book Live Duodashboard, the Default Language page displays:
text_image
WD MY BOOK® LIVE® DUO Default Language English Power License Support Start >- Select the default language from the drop-downlist.
- Click the License Agreement link, and after reading the agreement, click I Accept.
3.ClickStart.TheHomePagedisplays:

text_image
WD MY BOOK® LIVE Settings > Users > Shares > Backups > Support > Let us help you Create Users Add new users and assign their access levels. MyBookLive Start: Next Music Print Audio Image 2017/16TBAfteryouselectanoption, thenavigationpanelslidestotheleftandtheselectedpage appears.
UnderstandingDashboardComponents
ThetypicalMyBookLiveDuodashboardpageoffersoptionsforviewingandentering informationandprovidesassistanceandnotifications:
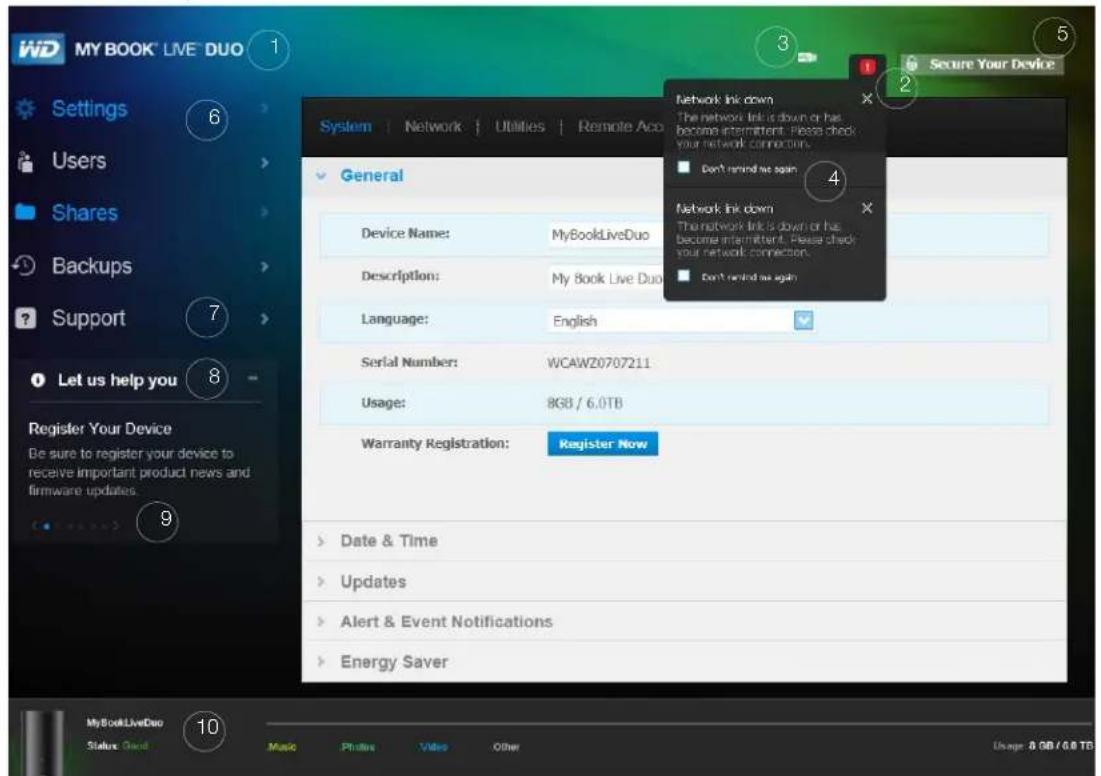
text_image
WD MYBOOK LIVE DUO Settings Users Shares Backups Support Let us help you Register Your Device Be sure to register your device to receive important product news and firmware updates. General Device Name: MyBookLiveDuo Description: My Book Live Duo Language: English Serial Number: WCAWZ0707211 Usage: 8GB / 6.0TB Warranty Registration: Register Now Date & Time Updates Alert & Event Notifications Energy Saver Secure Your Device Network link down The network link is down or has become intermittent. Please check your network connection. Don't remind me again Network link down The network link is down or has become intermittent. Please check your network connection. Don't remind me again MyBookLiveDuo Status: Cloud Music Photos Video Other Usage: 8 GB / 6.0 TB| No.ItemDescription | ||
| 1DeviceNameThenameoftheMyBookLiveDuodrive.Youcan changethedefaultnametooneofyourownchoosing. (See"General"onpage61.) | ||
| 2 | Alertsicon | Displaysorhidesadrop-downlistofallmessagesand alerts. |
| 3 | USBicon | Displaysacapacitybarshowinghowmuchstorage spaceonanattachedUSBstoragedevicehasbeen used. |
| 4Alerts&EventslistDisplaysallmessagesandalerts.Ifdesired,closean individualalertbyclickingtheXinitsrightcorner.To preventanalertfromappearingagain,selectitsDon't remindmeagaincheckboxbeforeclosingit. | ||
| 5SecureYourDevice/LogoutEnablesyoutoenterausernameandpassword,if desired.Alogoutlinkdisplaysifyouuseapasswordto accesstheMyBookLiveDuodashboard.Thesystemis notsecureifyouhavenotsetapassword. | ||
| 6NavigationpanelRollthemouseoveralinktodisplayinformationabouta page.Clicktodisplaytheassociatedpage. | ||
| 7SupportProvideslinkstoproductdocumentation,auserforum, FAQs,andacustomersupportcontactform. | ||
| No.Item | Description |
| 8LetushelpyouDisplaysinformationaboutperformingthetasksnotedinthescrollinglistbelow.The+or-signenablesyoutoshoworhidethescrollingdisplay.Navigatethroughthetasksbyclickingtheback<andnext>arrowsbesidethebluedotsbelowthetask. | |
| 9>or√buttonsDisplaysandhidesscreensections. | |
| 10DeviceusagedockDisplaysthedevicename,informationaboutthetypeoffilesstored,andcurrentlyusedcapacity. | |
| * | Processingicon  |
| * | Tooltipsicon 📄 |
*Notshowninscreenexample.
ObtainingCustomerSupport
ToopentheSupportpage:
- Click the Support option in the navigation panel to display the Support page:

text_image
Support Automated Customer Support If you experience difficulty, click Request Support to automatically generate a diagnostic report. After completion, you will be directed to our customer support form with your network device's diagnostic report automatically attached. Please complete the required fields; then submit your request to route it to the appropriate support team. Request Support Privacy Policy Create and Save System Report Create a system report and save it to your drive to help identify and resolve network problems. Create & Save Support Resources Product Documentation FAQs Forum Contact Info GNU General Public License Copyright InfoSendingYourLogFilestoCustomerSupport
If you have a problem with the My Book Live Duodrive, complete the online form the Supportpagetogeneratealogandsenditto WD's CustomerSupportteam. Another optionistomanually generate a system log and save email it.
- TorunasystemreportandsendittoWDCustomerSupportautomatically:
-ClickthePrivacyPolicylinktoreviewWD'sprivacypolicy.
-ClicktheRequestSupportbutton.
- Sign into the WD Knowledge Base (http://support.wdc.com), if you have not previouslydoneso.
-Completeandsendyourrequest.
- Torunandsaveasystemreportmanually, clicktheCreate&Savebutton. Then saveittoyourcomputer.lfdesired, emailittoWDCustomerSupport.
ObtainingOtherSupport
• To obtain them most recently updated user manual, click the Product Documentation link.
• To see answers to frequently asked questions and instructions, click the FAQs link.
- TodiscussyourMyBookLiveDuodevicewithotherusers,clicktheForumlink.
- ToseeWDphonenumbersandothercontactinformation, clicktheContactInfo link.
WhatCanIDoNow?
ThenextfewchaptersstepyouthroughtheproceduresforusingtheMyBookLiveDuo dashboard. Thefollowingtableprovidesshortcutstoinstructionsforsomecommontasks.
| Howdol... See... | |
| RequestassistancefromCustomerSupport,page58 | |
| Setupthedriveonmynetwork,page65 | |
| Configuredrivesettings,page61 | |
| UpdateMyBookLiveDuofirmware,page63 | |
| Createusers,page78 | |
| Changeauser'spassword,page80 | |
| Createshares,page82 | |
| Accessprivateshares,page82 | |
| Viewalistofcomputerbackupsanddelete backups, | page86 |
| BackuptheMyBookLiveDuodeviceby creatingandrestoringsafepoints, | page87 |
| ShutdownorreboottheMyBookLiveDuo device, | page68 |
| Enableordisableremoteaccess(WDPhotos andWD2go), | page94 |
| Enable,disable,andusemediaservers, | page112 |
7
ConfiguringBasicSettings
SystemSettings
NetworkSettings
UtilitiesSettings
RemoteAccessSettings
MediaServerSettings
StorageSettings
TheSettingsoptionenablestheAdministratorortoviewandcustomizethedrive'ssystem, network, utilities, remoteaccess, and mediasettings.
SystemSettings
ToselecttheSettingsoptions:
- On the navigation panel, click Settings to display the tabbed pages: System, Network, Utilities, Remote Access, Media, and Storage. Note that Settings is highlighted in blue:

text_image
WD MY BOOK® LIVE® DUO Settings Users Shares Backups Support Let us help you Protect your data Manage capacity and protection for your My Book Live. System | Network | Utilities | Remote Access | Media | Storage General Device Name: MyBookLiveDuo Description: My Book Live Duo Personal Cloud St Language: English Serial Number: wd_nas_model_number Usage: 129 GB / 4 TB Warranty Registration: Register Now Date & Time- The Settingshomepage contains the following expandable sections: General, Date & Time, Updates, Alert & Event Notifications, and Energy Saver. To display or hide a section, click the arrow besides these section name or click these section name itself.
General
Use the General section of the page to view and modify the driven name and description, select the language in which the web pages should display, view usage of storagespace, and register the drive.
WARNING!RenamingtheMyBookLiveDuodeviceforcesallthenetworkcomputers toremaptheirsharednetworkresources.Changethedevicenameonly whennecessary.
1.Viewormodifythefollowingsettings:
| DeviceNameEnterauniquenameforyourdrivetoidentifyitonthe network. | |
| DeviceDescriptionThedefaultdescriptionisMyBookLiveDuodevice.If desired,enteradifferentdescription. | |
| LanguageFromthedrop-downlist,selectthelanguageinwhichyou wanttheMyBookLiveDuowebpagestodisplay.The defaultlanguageisEnglish. | |
| SerialNumberDisplaystheWD-assignednumberthatidentifiesthe specificunit. | |
| UsageDisplaysthestoragecapacityusedandthetotalstorage capacity. | |
| Warranty Registration | ClickRegisterNowandfollowthepromptstoregister yourdrive. |
- If you made any changes, click the Save button that appears below these section.
Note: Throughout the My Book Live Duodashboard, the Save and Cancel buttons display only if you make changes.
Date&Time
ThedateandtimearesynchronizedtotheNTP(networktimeprotocol)serverbydefault. YouhavetheoptionofsettingthedateandtimemanuallyorallowingtheNTPtoaccessthe Internetandautomaticallysetthetime.IfyouarenotconnectedtotheInternet,youmust enterthedateandtimemanually.

text_image
Date & Time Time Zone: (GMT-08:00) Pacific Time (US & Canada) NTP Service: Server Date & Time: Tue 08 Nov 2011 07:28:26 AM PST Primary NTP Server: time.windows.com Add New Primary pool.ntp.org1.Viewormodifythefollowingsettings:
| TimeZone | Fromthedrop-downlist,selectthetimezonewhereyourdriveislocated. |
| NTPService | SelectthecheckboxtoenableNTPservice,which automaticallysynchronizesyourdrivetoupdatethetimeanddate.IfyouwanttochangetoanotherprimaryNTPserver,clickAddNewPrimary,andthenentertheURLaddressofthenewprimaryserver. |
| Date | ThisfieldappearsiftheNTPServicecheckboxisnotselected.Fromthedrop-downlist,selectthecurrentmonth,day,andyear |
TimeThisfieldappearsiftheNTPServicecheckboxisnot selected.
Fromthedrop-downlist,selectthecurrenthour,minutes, andtimeperiod(i.e.,AM,PM).
- If you have made any changes, click the Save button.
Updates
Thissectionofthepageenablesyoutosetupthedrivetoupdatethefirmwareautomatically ortomanuallycheckforanupdatefile:
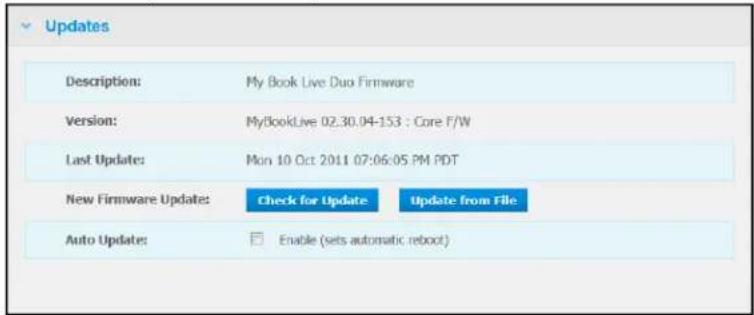
text_image
Updates Description: My Book Live Duo Firmware Version: MyBookLive 02.30.04-153 : Core F/W Last Update: Mon 10 Oct 2011 07:06:05 PM PDT New Firmware Updates: Check for Update Update from File Auto Update: Enable (sets automatic reboot)Adescription, currentversionnumber, and dateoflastupdateoftheMyBookLiveDuo Firmwaredisplay.
Important: WaitfortheMyBookLiveDuodrivetofinishpoweringup (approximatelythreeminutes) beforeconfiguringthedrive. You will knowitisreadywhentheLEDturnssolidorblinkinggreen(normal) or blue(standby).
CheckforUpdate
Tomanuallycheckfornewfirmwareavailabilityandtooptionallyinstallnewfirmware:
- ClicktheCheckforUpdatebutton. The "Checking" messagedisplays. Ifanupdateis found, clickOK.
- If desired, click the Install & Reboot button. A progress bard displays. When the process is complete, then network drivere boots.
UpdatefromFile
Toupdatethefirmwaremanually:
- GototheWDTechSupportDownloadspageathttp://s upport.wdc.com/product/ download.asp.
- OntheDownloadspage, selectNetworkStorage.
- SelectMyBookLiveDuo.
4.Afirmwarefileisprovided.Downloadthefileandsaveittoyourdesktop. - OntheUpdatestab.clicktheUpdatefromfilebutton.
-
Select the files saved on your hard drive and click the Open button. Am message prompts for confirmation that you want to update dates now. Click OK.
-
An "InstallingUpdate" progressbardisplays, and when installation is complete, the drive reboots.
AutoUpdate
Toautomaticallycheckforandupdatethefirmware:
- For AutoUpdate, select the Enabled checkbox.
- From the drop-down lists, specify the frequency and time at which the drives should look for an update on the WD website, and if one is available, to automatically install it and reboot.
- ClicktheSavebutton.
Alert&EventNotifications
TheAlert&EventNotificationsectionofthepageenablesyoutoaddordelete emailaddressesofuptofiveuserswhowillreceivenotifications. Thenotificationmay concernsystemconditions, suchasovertemperature, orharddrive, volume, and network status. ThesealertshelptheAdministratormanageanddetecteventsorerrors.
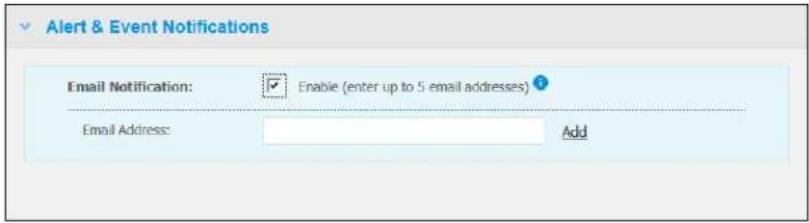
text_image
Alert & Event Notifications Email Notification: ✓ Enable (enter up to 5 email addresses) ? Email Address: AddToaddordeleteanemailaddress:
- SelecttheEnablecheckbox.
- EntertheemailaddressofarecipientandclicktheAddlink.
- ClicktheSaveandSendTestemailbutton.
The followingmessagedisplays:

text_image
Send Test email ■ Test email sent. If you did not receive the test email, please ensure you entered an accurate email address. Close- Todeleteanemailaddress, clicktheRemovelinktoitsright.

text_image
Alert & Event Notifications Email Notifications: ✓ Enable (enter up to 5 email addresses) ? Email Address: my.email@gmail.com Remove Email Address: Add Save Save and Send Test emailEnergySaver
If the HardDiskSleepfunctionisenabled, the harddrive goes intostand by modetosave power after a designated period of inactivity. HardDiskSleepisenabled by default.

text_image
Energy Saver Enable to specify system idle time before entering sleep mode. Drag the slider to set the idle time. Hard Disk Sleep: ✓ Enable Idle Times 10 Min 30 Min 1 HrToenableHardDiskSleep:
- SelecttheEnablecheckboxnexttoHardDiskSleep.
- With your cursor, movetheslidertothenumberofidleminutesthatwilltriggerstandby mode. Standbymustfallbetween10minutesand1hour.
- ClicktheSavebutton.
TheNetworktabdisplaysthedrive'sMACandlPaddresses.Youcansetnetworkoptions suchasnetworkmode,enableFTPprotocolforsecurefiletransfer,andcreateaworkgroup:

text_image
System | Network | Utilities | Remote Access | Media | Storage LAN Configuration Internet Access: Good ? MAC Address: 00:90:a9:f6:3c:5b IP Address: 192.168.1.12 Network Mode: Static DHCP ? > Workgroup > FTPLANConfiguration
1.ViewormodifythefollowingLAN(homeorofficenetwork)settings:
| InternetAccess | Thecurrentstatusofinternetconnectivityfornetwork functionssuchasNTP,firmwareupdatechecks,and remoteaccessconnections. |
| MACAddress | Uniquelyidentifiesthedrive. |
| IPAddress | IdentifiesthecurrentIPaddress. |
| NetworkMode | Selectthemethodofassigningthedrive'suniqueIP address:DHCPClientcausestheMyBookLiveDuodeviceto obtainanIPaddressandassociatedsettings automaticallyfromthelocalDHCPserver,orStaticIPletsyousetanIPaddressmanually.Youwillbe promptedforIPAddress,Netmask,Gateway,andDNS Server.(Ifyoudon'tknowthisinformation,pleasecheck yourroutersettings.) |
2. ClicktheSavebutton.
Workgroup
Aworkgroupisanameyouassigntoeachmemberofagroupofcomputernetworkdevices inanetworkenvironment. The device sthathavethesameworkgroupnamecaneasily exchange information through thenetwork. Aworkgroup does not require a central server:
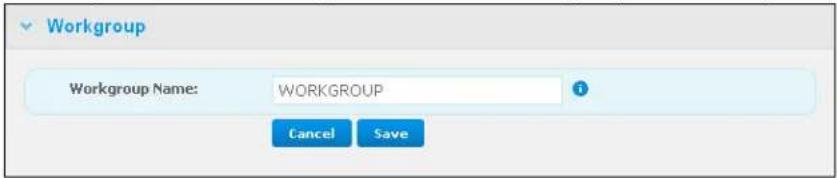
text_image
Workgroup Workgroup Name: WORKGROUP i Cancel SaveTonameorrenameaworkgroup:
- Enteranamefortheworkgroup.
- ClicktheSavebutton.
- Repeatsteps 1 - 2 for each device in your workgroup.
FTP
FileTransferProtocolenablesthetransferofdatafromonecomputertoanotherthrougha network.FTPisdisabledbydefault.
Note: AnFTPrequiresausernameandpassword.AnonymousFTPsarenotallowed. See "CreatingaUser" on page 78 for information on creating a username and password.
- SelecttheAllowFTPcheckboxtoenableit.
- ClicktheSavebutton.

text_image
FTP Allow FTP: ? Cancel SaveUtilitiesSettings
OntheUtiliestab,youcantestthenetworkdriveandgetdiagnosticinformation,restore thedrivetofactorydefaults,rebootorshutdownthedrive,andimportorexporta configurationfile:

text_image
System | Network | Utilities | Remote Access | Media | Storage Diagnostic Diagnostic Test: ● Short Test ⚠ ○ Full Test ⚡ Run > Factory Restore > Reboot / Shut Down > Import / Export Current ConfigurationDiagnostic
Rundiagnostictestsifyouarehavingproblemswithyourdrive.Theshorttestchecksthe driveformajorperformanceproblems.Theresultofashortdrivetestisapassorfail evaluationofthedrive'scondition.Theshortdrivetestcantakeseveralminutesto complete.
Themorecomprehensivedrivediagnosticisthefulltest.Itmethodicallytestseachand everysectorofyourdrive.Youwillbepromptedastotheconditionofthedriveoncethetest isperformed.Thefulldrivetestmaytakehourstocomplete,dependingonthesizeanddata configurationofyourdrive.
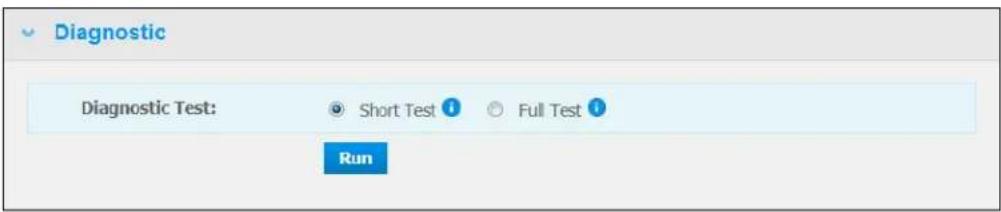
text_image
Diagnostic Diagnostic Test: Short Test Full Test RunTorunatest:
- Select Short Test (default setting) or Full Test, and then click the Run button. A progressbardisplays.
Messages indicate that the test is running and whether the drive passed or failed the test.
- If the drive passed the test, click the Close button to return to the Utilities page, if the drive fails the test, click the Customer Support button to get assistance.
FactoryRestore
Note: For information about using the Reset button to return the password and networkmodetofactorysettings, see "ResettingtheMyBookLiveDuo Device" on page 128.
WARNING! The steps detailed below will result in loss of all data. This data cannot be recovered.
In this area of the Settings page, the Administrator can choose a short factory restore a full one. The drive loses all information, and the Administrator password return on one.

text_image
Factory Restore Restore Type: Quick Factory Restore Full Factory Restore StartNote:AQuickFactoryRestoreformatsthedrive,whileaFullFactoryRestoresecurelyerasesthedrive.
Important: You might want to export and save the drive 's current configuration before restoring factory default settings so that you can import it afterwards. Note that importing a configuration in this case does not restore shares or users.
If you want to restore the complete contents of a My Book Live Duodevice including user settings, backups, and data, usethesafepoint feature described on page 87.
Torestorefactorydefaults:
- For Restore Type, select Quick Factory Restore (default setting) or Full Factory RestoreandclicktheStartbutton.
- When asked to confirm the action, click the Yes button to continue or the No button to returntotheUtilitiespage.
- Whentheprogressbardisplays, if you selected FullFactoryRestoreinstep1, but you change your mind, click the ChangetoQuickRestorebutton to start a Quick Factory Restore from the beginning.
WARNING!Interruptingthefactoryrestoreprocessmaydamagethe MyBookLiveDuodrive.Waituntilafterthereboottousethedrive again.
Attheendoftherestore,the"CompleteRestoreFinished"messagedisplays,andthe systemreboots.
Reboot/Shutdown
YoucansafelyrebootandshutdownyourMyBookLiveDuodriveusingtwomethods.
- Reboot/ShutDownsectionoftheUtilitiesscreen(discussedinthissection),
- WDQuickViewicon(see "SafelyShuttingDown" on page 51).
If you are unable to shutdown by either method, see "I am having troubles safely shutting down the My Book Live Duo?" on page 130
Important: Before rebooting or shutting down, makes sure that there are no file transfers in progress. Check the LED on the front of the drivetomakes sure it is not blinking. Blinking indicates that the unitis processing information (for example, backing uportransferring files).
WARNING!Donotunplugthedriveduringrebootorshutdown.
Torebootyourdrive:
- ClicktheRebootDevicebutton.

text_image
Reboot / Shut Down Reboot: Reboot Device Shut Down: Shut Down DeviceThe followingmessagedisplays:
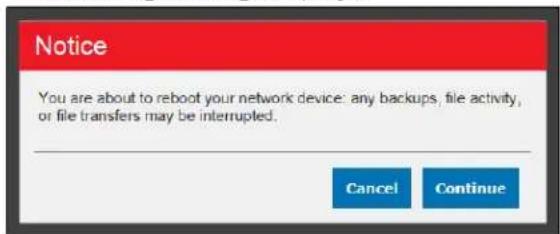
text_image
Notice You are about to reboot your network device: any backups, file activity, or file transfers may be interrupted. Cancel Continue- If the drive is not processing information, or its but you choose to proceed, click the Continue button. The following message displays:
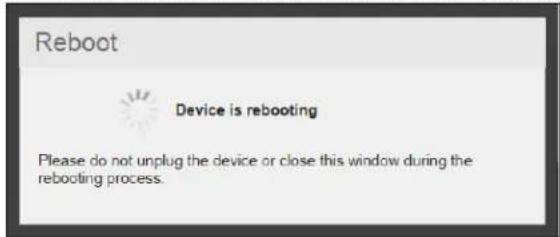
text_image
Reboot Device is rebooting Please do not unplug the device or close this window during the rebooting process.The driveshutsdownandthenrestarts.WaituntilthegreenLEDissolidbeforeresuming workwiththeMyBookLiveDuodrive.
Toshutdownthedrive:
- ClicktheShutdownDevicebutton.

text_image
Reboot / Shut Down Reboot: Reboot Device Shut Down: Shut Down Device2.Amessageremindsyouthatshuttingdownmayinterruptimportantprocesses.

text_image
Notice You are about to shut down your network device: any backups, file activity, or file transfers may be interrupted. Cancel Continue- If the drive is not processing information, or its but you choose to proceed, click the Continue button. The following messaged displays:
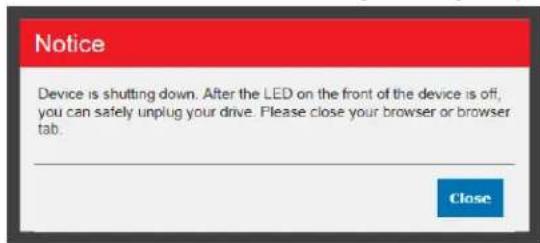
text_image
Notice Device is shutting down. After the LED on the front of the device is off, you can safely unplug your drive. Please close your browser or browser tab. Close-
ClicktheClosebuttontoclosethemessage.
-
When the LED on the front of the device is off, you can safely plug your drive.
6.Closethebrowser.
Import/ExportCurrentConfiguration

text_image
Import / Export Current Configuration Export: Save Config File i Import: Choose File iImportant: Before doing a factory restore or as system update, you may choose to save your drive's current configuration. At a later time, you can import a previously saved configuration. Keep in mind that importing a configuration after restoring factory defaults does not restore shares or users.
Tosavethecurrentconfiguration:
- IntheExportsection, clicktheSaveConfigFilebutton.
2.Browse to the location where you want to save the file and click the Save button.
Toreplacethecurrentconfiguration:
-
In the Import section, click the Choose File button and browse to locate the replacementfile.
-
Click the Import button, and when the confirmation message displays, click OK. The MyBookLiveDuodevicereboots.
RemoteAccessSettings
TheRemoteAccesspageenablesyouandotheruserstoaccessyourfilesonthego.You canaccessphotosandfilesstoredintheMyBookLiveDuodeviceusingtheWDPhotos andWD2gomobileappsandsetupremoteandsecurewebaccesstostoredfilesby meansoftheWD2go.comwebsite.
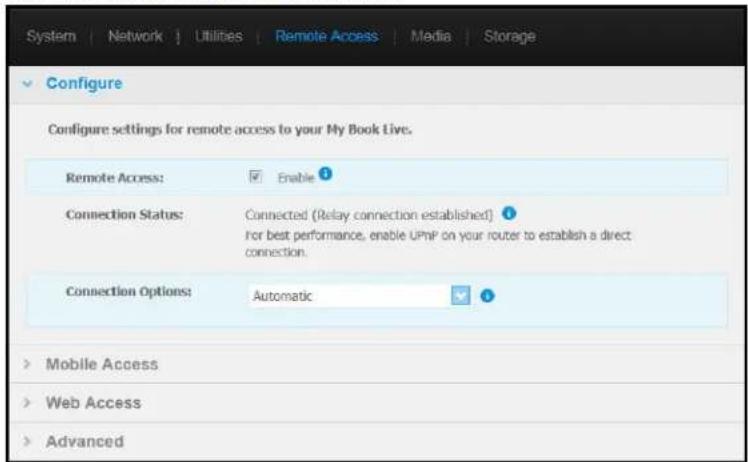
text_image
System | Network | Utilities | Remote Access | Media | Storage Configure Configure settings for remote access to your My Book Live. Remote Access: ✓ Enable ? Connection Status: Connected (Relay connection established) for best performance, enable UPnP on your router to establish a direct connection. Connection Options: Automatic > Mobile Access > Web Access > AdvancedForinstructionsonsettingupremoteaccessonthispageandthenusingthe WDPhotosandWD2go,see"AccessingYourMyBookLiveDuoRemotely"onpage94.
MediaServerSettings
TheMediapageenablesyoutodefineDLNA(DigitalLivingNetworkAlliance)accesssothat youcanenjoymediaineveryroominyourhouse.
Note: DLNA and iTunes only works on your network.

text_image
System | Network | Utilities | Remote Access | Media | Storage DLNA Media Server dlna* Streams music, photos, and videos to any compatible device throughout your home. Media Streaming: Enable Status: iTunesForinstructionsonconfiguringyourDLNAMediaServerandITunessettingsonthispage andthendisplayingorstreamingmedia,see"Playing/StreamingVideos,Photos,&Music" onpage112.
StorageSettings
TheStoragepageenablesyoutospecifyhowyourMyBookLiveDuodevicewillstoreyour dataandtomonitorthestoragestatus.Youcanconfiguretheinternaldrivestoactasone bigfastdrive,orsetthemupsothatonedriveautomaticallyandinstantaneouslyduplicates (ormirrors)yourdataforreal-timebackup.Youcanalsoviewthedetailsofyourexternal USBdrive.
Todeterminewhichstoragetypetouse,considertheattributesofeach:
•MaximumCapacity(Spanning) — MaximumCapacity(Spanning) combines all the drives in a system into one big volumes that they act like one giant drive.
•MaximumProtection(RAID1)—Setsthesystemtodataprotectionmode(also knownasmirroredmode)andthecapacityisdividedinhalf.Halfofthecapacityis usedtostoreyourdataandhalfisusedforaduplicatecopy.Ifonedrivegoesdown yourdataisprotectedbecauseitisduplicated.
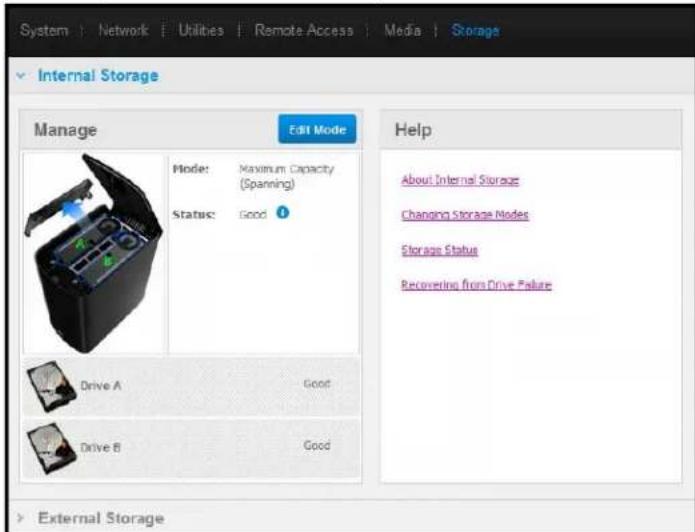
text_image
System | Network | Utilities | Remote Access | Media | Storage Internal Storage Manage Edit Mode Mode: Maximum Capacity (Spanning) Status: Good ? Drive A Good Drive B Good Help About Internal Storage Changing Storage Nodes Storage Status Recovering from Drive Failure External StorageNote: PuttingyourdriveintoRaid1isnotthesameasbackingupyourdrive.Althoughhit doesstoreyourdata,itcannotbeusedtorecoveryyourdatafromacriticalloss.
MonitoringStorageStatus
- ClicktheStoragetab.TheMonitorscreenappears,showingthetypeofconfiguration yourMyBookLiveDuodeviceissetto.ThedefaultisMaximumCapacity(Spanning). Thisscreenalsodisplaysthestatusofyourdrives.
Forthemaximumcapacitystoragetype,thedrivestatusmaybe:
•Good
- Failed — If a drive has failed, you cannot access your data.
Forthemaximumprotectionstoragetype,thedrivestatusmaybe:
•Good
- Failed — Indicates which drive failed. Once you're placethedrive, you can access your data.
- Building — When you replace faulty drive or after converting fromonestoragetype to another, the system is rebuilding the configuration.
-
Toviewdetailsaboutthedrive, clickitsicon.Detailsinclude:
-
ModelNumber
•Manufacturer
-SerialNumber - Size(e.g.,1TB)
•SelfAssessmentTestresult.
Note: Another way to monitor storage is the Quick View menu, which displays the status of the storage drives and an attached external USB device (if applicable). Form more information, see "Monitoring Storage" on page 51.
| WD Quick View | ||||
| Drive Name [Volumes] | Used | Locked | Temperature | RAID Status |
| My Passport Essential USB HDD [J:] | 3% | No | OK | n/a |
| MyBookLiveDuo [MyBookLiveDuo] | 2% | n/a | OK | Healthy |
| Western Digital External HDD [External USB] | 32% | n/a | n/a | n/a |
ChangingtheStorageType
Toswitchfromonestoragetypetoanother:
Important: Beforechangingthestoragetype(MaximumCapacitytoMaximumProtectionandviceversa), were recommend that you first create a safepointtobackupyourdata. See "CreatingaSafepoint" on page 87.
- ClicktheEditModebuttontodisplaytheEditModescreen.
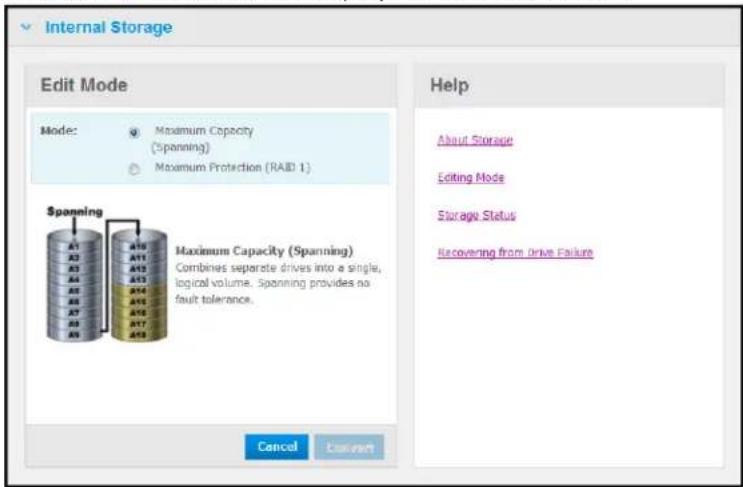
text_image
Internal Storage Edit Mode Mode: ○ Maximum Capacity (Spanning) ○ Maximum Protection (RAID 1) Spanning A11 A12 A13 A14 A15 A16 A17 A18 A19 A20 A21 A22 A23 A24 A25 A26 A27 A28 A29 A30 A31 A32 A33 A34 A35 A36 A37 A38 A39 A40 A41 A42 A43 A44 A45 A46 A47 A48 A49 A50 A51 A52 A53 A54 A55 A56 A57 A58 A59 A60 A61 A62 A63 A64 A65 A66 A67 A68 A69 A70 A71 A72 A73 A74 A75 A76 A77 A78 A79 A80 Maximum Capacity (Spanning) Combines separate drives into a single, logical volume. Spanning provides no fault tolerance. Help About Storage Editing Mode Storage Status Recovering from Drive Failure Cancel Cancel- Select the desired storage type and click the Convert button. The "Convert Storage Mode" message box displays, informing you that the conversion will take a few hours, depending on the amount of data contained by your drives), that you cannot undo the process once it starts, and that you should not plug the unit while the conversion is taking place. Conversion rates depend on the type of configuration and the amount of data on the My Book Live Duo. After a conversion, the My Book Live Duodevice reboots.
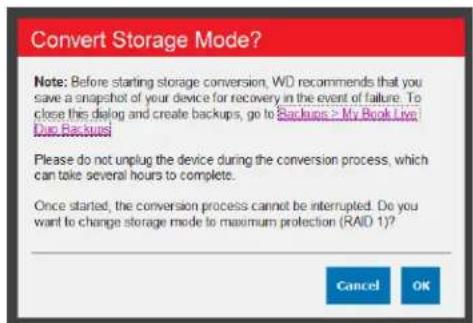
text_image
Convert Storage Mode? Note: Before starting storage conversion, WD recommends that you save a snapshot of your device for recovery in the event of failure. To close this dialog and create backups, go to Backups > My Book Live One Backups Please do not unplug the device during the conversion process, which can take several hours to complete. Once started, the conversion process cannot be interrupted. Do you want to change storage mode to maximum protection (RAID 1)? Cancel OKIfa"DiskSpaceInsufficient"appears,youdon'thaveenoughroomleftonthedrivesfor maximumprotection.Remove(deleteorcopyelsewhere)filesuntilthestoredtotalisless than1Tb(fora2TBdrive).
Note: The actual required stored total depends on the MyBook Live Duodrivesize.
- Thedrivestartstherebuildprocessautomatically. Therebuildmaytakeupto15hours dependingondrivecapacityandactivity, buttypicallywillcompletein7to12hours. AllowtheRAIDrebuildtocomplete.
Important: Donotattempttousethedevideduringtherebuildprocess.
- Oncetherebuildiscomplete, theLEDswillglowsteadilytoindicatepower-onstate.
Alerts
Youmayreceivethefollowingalertsrelatedtostoragestatus:
•Conversionsuccessful
- ConversionFailed — Theconversionprocesshasstoppedbecauseofanerror.
- FailedDrive — Adrivehasstoppedoperating, andyouneedtoreplaceit.
USBStorage
Note: The My Book Live Duodevicework with both USB2.0 and 3.0 storage devices; however, USB3.0 storage devices may not perform maximum performances when used with the My Book Live Duodevice.
WhenaUSBstoragedriveisconnectedtotheMyBookLiveDuodevice,theUSBicon

appearsatthetoprightofthescreen.ClickthisicontoviewthenameassignedtoanhedUSB,capacityused,andtoejecttheUSB,ifdesired.
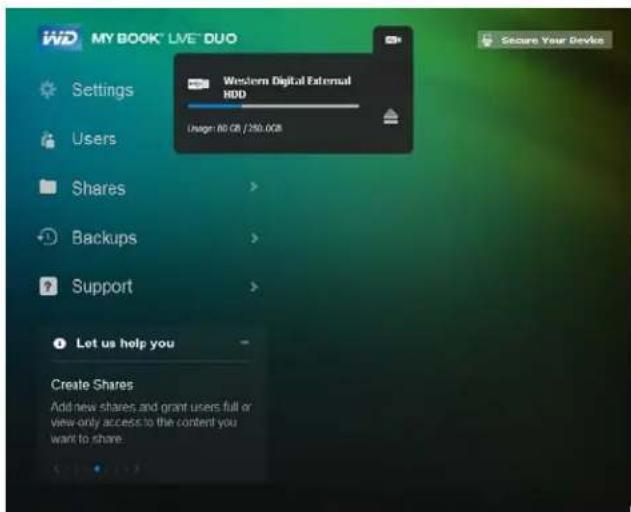
text_image
MY BOOK® LIVE® DUO Settings Users Shares Backups Support Western Digital External HDD Design: 80 GB / 250.0GB Let us help you Create Shares Add new shares and grant users full or view-only access to the content you want to share. Secure Your DeviceExternalStorage
TheExternalStoragesectionenablesyoutoviewthestatusoftheUSBstoragedevice connectedtotheMyBookLiveDuoandtodisconnectthedevice,ifdesired.

text_image
External Storage USB Storage Western Digital External HDD Usage 100 GB / 256 GB Help About USB Supported Devices USB Shares Safe Removal Encrypted USB DrivesMonitoringUSBStorageSettings
- Click ExternalStorage.
-
ToviewdetailsabouttheUSBStoragedevice, clickitsicon.Detailsinclude:
-
USBDeviceName
- Manufacturer
•Model - SerialNumber
•Size(e.g.,1TB)

text_image
External Storage USB Storage Western Digital External HDD Usage: 80 GB / 250GB USB Device Details USB Device Name Western Digital Manufacturer: Western Digital Model: External HDD Serial Number: 57442D574D414E4E363 03435303136 Size: 250GBEjectingaUSBStorage
TherearethreewaystodisconnectyourUSBdevice:
EjectingviaUSBIcon:
-
SelecttheUSBIconatthetopofthescreen,thenclicktheejectbuttonfortheUSB device.The"EjectUSBDrive?"messagedisplays,informingyouthatejectingthedevice willremoveassociatedshares,backuptasksforthedrivewillbeinterrupted,andthat youwon'tbeabletoremotelyaccessthedriveonceitisejected.
-
ClickOKtoejecttheUSBdrive.
EjectingviaUSBStorageSection:
-
IntheExternalStoragesection, clicktheejectbuttonfortheUSBDevice. The "Eject USBDrive?" messagedisplays, informingyouthatejectingthedevicewillremove associatedshares, backuptasksforthedrivewillbeinterrupted, andthatyouwon'tbe abletoremotelyaccessthedriveonceitisejected.
-
ClickOKtoejecttheUSBdrive.
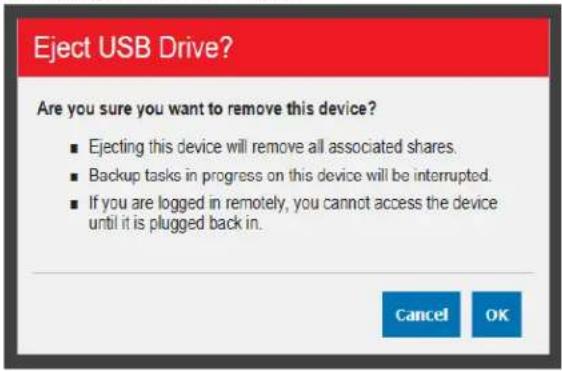
text_image
Eject USB Drive? Are you sure you want to remove this device? ■ Ejecting this device will remove all associated shares. ■ Backup tasks in progress on this device will be interrupted. ■ If you are logged in remotely, you cannot access the device until it is plugged back in. Cancel OKEjectingviaQuickView:
-
Left-orRight-clicktheWDQuickViewiconinyoursystemtray.
-
Select your USB Storage Device then Eject from the Quick View menu. Your USB will ejectfromyoursystem.
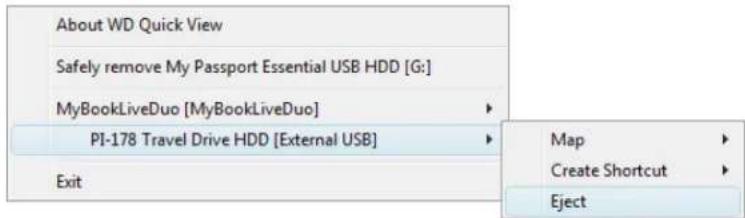
text_image
About WD Quick View Safely remove My Passport Essential USB HDD [G:] MyBookLiveDuo [MyBookLiveDuo] PI-178 Travel Drive HDD [External USB] Exit Map Create Shortcut Eject
ManagingUsers
ViewingUsers
CreatingaUser
CreatingaPrivateShareforaUser
ChangingaUser'sPassword
EditingUserSettings
DeletingaUser
TheAdministratorcreatesaccountsforotherswhowillhaveaccesstothe MyBookLiveDuodrive. Theseaccountsarereferredtoasusers. Usershavefullaccessto theirownprivateshares,topublicshares,andlimitedaccesstothesharesofotherusers.
Note: TheAdministrator, normally the owner, isthe person in charge of setting up computerson then network.
TheUsersoptiononthenavigationpanellistscurrentusersandenablestheAdministrator accounttoviewuserdetails,createnewusers,grantauseraccesstoexistingshares,and createshares.
ViewingUsers
- On the navigation panel, click Users to view a list of current users on the panel on the left, and link that display online Help in anpanel on the right:

text_image
Users User List Create New User admit Users Add new uses and assign permissions to access shares. About Users Creating Users Assigning User Privileges Deleting Users- Toviewuserdetails, clicktheusername.UserDetailandShareAccessdisplayina panelontheright.

text_image
Users User List Create New User admin User Detail User Names* admin Full Name System Admin Password Update Password Share Access Create New Share + Share Name ✓ ✗ ✓ Public ✓ ○ ✓ My_Dox ✓ ○ *RequiredCreatingaUser
TheAdministratorcancreateusersandlimitwhatsharestheycanaccess.

Fullaccess—Allowstheusertoread,write,anddeletefilesontheshare.

Read-onlyaccess—Restrictstheusertoonlyviewingfilesontheshare.
- Click the Create New User button. The Create New User panel slides down over the UserList:
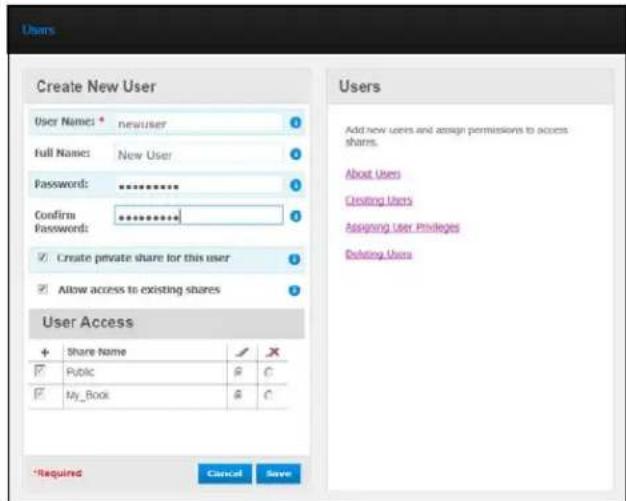
text_image
Users Create New User User Names: * newuser Full Names: New User Password: ********** Confirm ********** Password: ✓ Create private share for this user ✓ Allow access to existing shares User Access + Share Name ✓ ✗ ✓ Public ⓐ C ✓ My_Book ⓐ C *Required Cancel Save Users Add new users and assign permissions to access shares. About Users Creating Users Assigning User Privileges Deleting Users- Enter all required information (indicated by redasterisk).
- If desired, enter these optional settings:
| UserPassword/Confirm Password | Ifyouwanttosetupapasswordfortheusertoprevent othersfromaccessingtheuser'sprivateshare,entera passwordfortheuser. |
| Createaprivateshareforthis user | Selectthisoptiontocreateaprivatesharewithfullaccess rightsforthenewuser. |
Allowaccesstoexisting shares
Selectthisoptiontograntthenewuseraccesstoother shares.Selectthecheckboxnexttoeachsharetheusercan access,andthenspecifythelevelofaccessbyselectingthe fullaccessortheread-onlyaccessicon.
Forexample, thenewusermaybegivenread-onlyaccessto thefamily'sphotosorMom'svideos(sohecan'tchange, delete, oraddtothem), butfullaccesstoProjects, sohecan add, edit, ordeleteprojectfiles.
- ClicktheSavebutton. ThenewuserislistedintheUserList, and the ShareAccess sectionmovestotherightpanel:
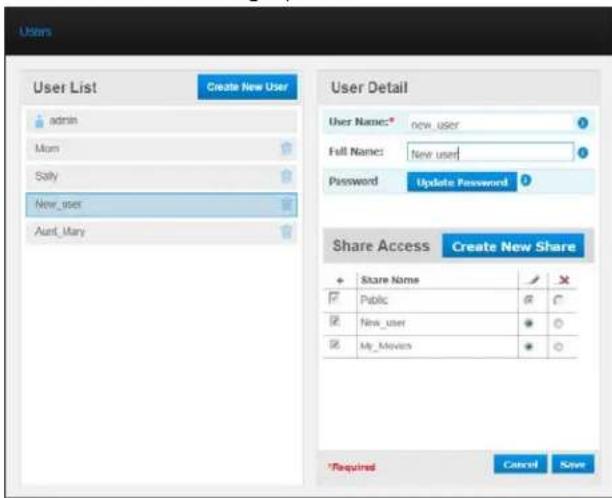
text_image
Users User List Create New User admin Mom Sally New_user Aunt_Mary User Detail User Name: new_user Full Name: New_user Password Update Password Share Access Create New Share + Share Name ✓ ✗ ✓ Public @ C ✓ New_user ● ○ ✓ My_Movies ● ○ *Required Cancel SaveCreatingaPrivateShareforaUser
- If you want to create a private share for the user, in the Share Access section on the right panel, click the Create New Share button. A Create New Share box display so over the page:
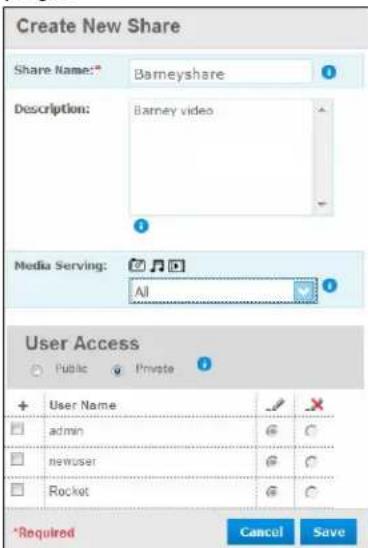
text_image
Create New Share Share Name: Barneyshare Description: Barney video Media Serving: All User Access Public Private + User Name admin newuser Rocket *Required Cancel Save2.Completeallrequiredsettings(indicatedbyredasterisk)andanyoptionalsettings,as follows:
| ShareNameAssignanametothesharethatclearlyindicatesthetypeof filesitwillcontain. |
| ShareDescriptionEnterabriefdescriptionofthecontentintheshare.Notethat sharedescriptionmustbeginwithanalphanumericvalue andcancontainupto256characters. |
| MediaServingFromthedrop-downlist,selectAll(formusic,photos,and video)orNone(excludesallmedia). |
| UserAccessSelectPrivatelolimittheuser'saccesstotheshare. |
- ClicktheSavebutton. ThenewsharedplaysintheShareAccesspanelwiththe Privateindicatordisplaying.Fullaccessisautomaticallygrantedtotheuser.
ChangingaUser'sPassword
Whenviewingdetailsaboutauser,theAdministratorcanchangetheuser'spassword(no passwordisthedefaultsetting).
- Selecttheusertodisplayuserdetailsintherightcolumn.
- ClicktheUpdatePasswordbuttontodisplaythefollowing:

text_image
Update Password No Password: Password: Confirm Password: Cancel Save- Enter the same password in both Password and Confirm Password fields; otherwise select the NoPassword checkbox.
- ClicktheSavebutton.
EditingUserSettings
- Tomakechangestoauser'sprofile, select the user in the User List. The User Detail and ShareAccesspanels display.
- Modify there required and optional settings as desired. Toupdatetheuser's access to shares, makethenecessary changes in the Share Access panel.
- ClicktheSavebutton.
DeletingaUser
YoucandeleteallusersexcepttheAdministrator.
- IntheUserList, click the trash can account other right of the user's name.
- Inresponsetotheconfirmationmessage, clicktheDeletebutton.

ManagingShares
ViewingaListofShares CreatingaNewShare CreatingaNewUser MakingaSharePublic DeletingaShare OpeningaShare
AshareisanareaontheMyBookLiveDuodriveforstoringfiles(similartoafolderor directory).
Note: In this manual, we usetheterms share and folder interchangeably.
Asharecanbepublicsothatalluserscanaccessthecontentsorprivatetolimitaccessto selectedusers.TheSharesoptiononthenavigationpaneldisplaysalistofsharesonthe MyBookLiveDuodeviceandenablestheAdministratortomanagesharesanduser access.
ViewingaListofShares
On the navigation panel, click Shares to display a list of shares on the My Book Live Duo drive. Foreachsharename, theusage, typeofmediabeingshared(served), andremote accessstatusdisplay.
Iftheshareisprivate,alockicondisplaystotheleft.Thismeansthatonlyuserswith specialaccessrightsmayviewormodifyit.TherightpanelcontainslinkstoonlineHelp.
IftheshareisaUSBdrive,theUSBicondisplaystotheleft.
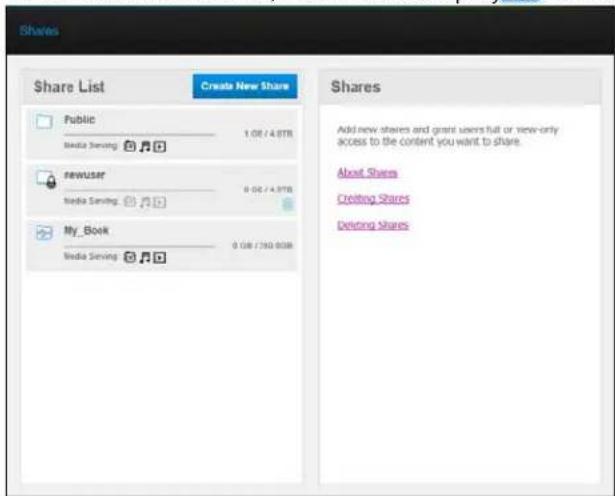
text_image
Shares Share List Create New Share Public 1.08 / 4.87B Media Serving newuser 0.06 / 4.97B Media Serving My_Book 0.08 / 360.00B Shares Add new shares and grant users full or view-only access to the content you want to share. About Shares Creating Shares Deleting SharesClickasharetodisplaysharedetailanduseraccessinformationintherightpanel.
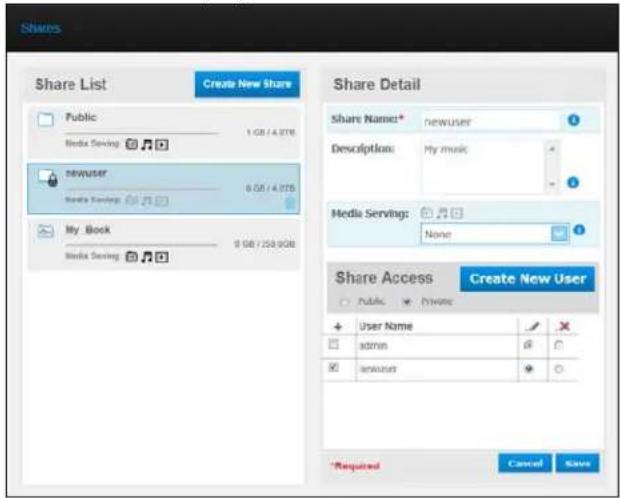
text_image
Share List Create New Share Public Media Serving newuser Media Serving My Book Media Serving Share Detail Share Name* newuser Description: My music Media Serving: None Share Access Create New User Public Private + User Name ✓ □ admin ✓ ✓ newuser ✓ *Required Cancel SaveCreatingaNewShare
Youcancreateashareanddesignateitaspublicorprivate. Forexample,iftheshare containsfinancialinformation,youmaywanttomaketheshareprivate.Or,ifthereare photosyouwouldlikeafriendtosee,youcanmakethesharepublictocertainusers.
- Click the Create New Share button above the Share Access list to display:
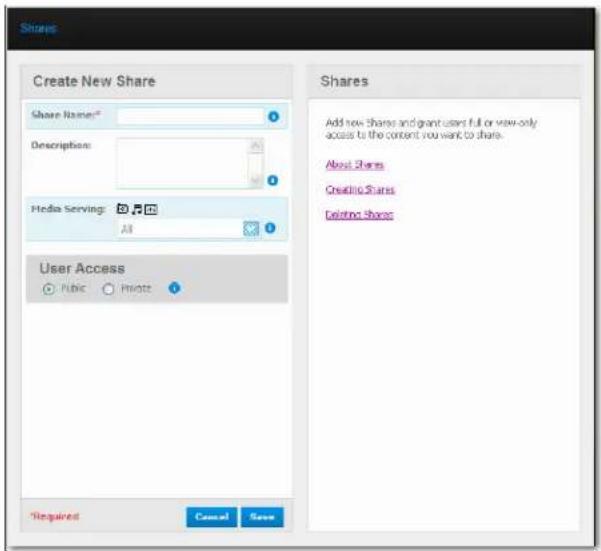
text_image
Shares Create New Share Share Name: Description: Media Serving: All User Access Public Prints Required Cancel Save Shares Add how Shares and grant users full or view-only access to the content you want to share. About Shares Creating Shares Delining Shares- Complete all required settings (indicated by redasterisk) and any optional settings, as follows:
ShareNameAssignanametotheshare.
ShareDescriptionEnterabriefdescriptionofthesharetoremindyourselfof whatitcontains.Notethatsharedescriptionsmustbeginwith analphanumericvalueandcancontainupto256characters.
MediaServingFromthedrop-downlist,selectNone,whichexcludesall media types, or All, for Photos, Music, and Videos.
UserAccessSelectPublicifyuwantalluserstohaveaccesstothis share,orselectPrivatetolimituseraccesstothisshare.
- If you selected Private, the User Access panel displays.
- Tospecifyaccesstothenewshare, selectthe+(Add)checkboxnexttotheuser's name, andthenselecteitherfullaccessorread-onlyaccess.Fullaccessmeanstheuser canmakechangestotheshare, forexample, byaddingordeletingfiles. Read-only accessmeanstheusercanonlylookatthefiles. If you donotwanttheusertohaveany accesstotheshare, makesurethe+checkboxisblank.
Forexample, theAdministrator(Dad) and Mom have full access to the family videos, but Sally can only view the videos.
5.ClicktheSavebutton.
CreatingaNewUser
While working with the Shares option, you may want to create a new user and assign share accessprivilegesatthesametime.
- Selectasharefromthelisttodisplaysharedetail:

text_image
Shares Share List Create New Share Public 1.0 GB / 4.0 GB Media Serving newuser 8.0 GB / 4.0 GB Media Serving My_Book 9 GB / 250.0 GB Media Serving Share Detail Share Name* newuser Descriptions My music Media Serving: Name Share Access Create New User Public Private + User Name admin newuser *Required Cancel Save- ClicktheCreatenewuserbuttonintheShareAccesssectionontheright.ACreateNewUserboxdisplaysoverthescreen:
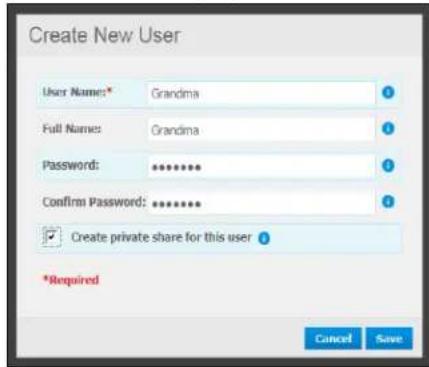
text_image
Create New User User Name: Grandma Full Names: Grandma Password: ******** Confirm Password: ******** ✓ Create private share for this user *Required Cancel Save- Complete the information as you did in "CreatingaUser" on page 78.
4.ClicktheSavebutton.
MakingaSharePublic
If you decide there is no reason to limit access to private share, convert to public share.
- SelecttheprivateshareintheShareslistandselectthePublicoptioninsteadofthe PrivateoptionintheShareAccesssectionoftherightpanel.Thefollowingwarning messagedisplays:

text_image
Warning! Setting Share Access to Public provides all users full access to the selected share. Are you sure you want to allow Public access to all users for this share? Close Make Public- Select Make Public to make the selected share public; click Close to keep the settings the samewithoutchangingthem.
3.ClicktheSavebutton.
DeletingaShare
- IntheShareList, click the trash can account other right of the share's name.
WARNING! Deletingashareerasesallfilesandfoldersontheshare.
2.Inresponsetotheconfirmationmessage,clicktheDeletebutton.
OpeningaShare
YouhaveseveraloptionsforopeningMyBookLiveDuodevice'spublicandprivateshares towhichyouhaveaccess.
Toopenaprivateshare,youmusthave:
■ Ausernameandpasswordassignedtoyoursharename
■ Read-onlyorfullaccesstotheshare
| IFyouwanttoopena shareusing... | THENfor... |
| WDQuickViewinthesystem tray(Windows), | PublicandPrivateShares1.Left-orright-clicktheWDQuickViewicontodisplaythe mainmenu.2.ClicktheMyBookLiveDuodevicename,andthenclickOpen.ThesharesdisplayinWindowsExplorer.3.Foraprivateshare,ifpromptedforausenameand password,enterthoseassociatedwithyouruseraccounton theMyBookLiveDuodashboard.OnWindowsXP,foraprivateshare,iftheuser'snameand passwordarethesameasforloggingintothecomputer,a usernameandpasswordarenotrequired.Iftheyarenotthe same,visithttp://support.wdc.comandseeKnowledgeBase AnswerID5681. |
| WDQuickViewinthemenubar (MacOSX), | PublicandPrivateShares1.ClicktheWDQuickViewiconinthem,parandmove thecursoroverthenameofyourMyBookLiveDuodriveto displaythesubmenu.2.SelectOpenontheWDQuickViewsubmenu.Theshares displayinasecondsubmenu.3.Selectthedesiredshare.Foraprivateshare,ifpromptedfora usernameandpassword,enterthoseassociatedwithyour useraccountontheMyBookLiveDuodashboard(see “CreatingaUser”onpage78).ForaPublicshare,ifprompted forausernameandpassword,selectGuest. |
| WindowsXP,PublicShare | 1.ClickStart>MyComputer.2.UnderNetworkDrives,double-clickthePublicfolderonyour drive. |
| WindowsVista/Windows7,1.Click>Compute2.UnderNetworkLocation,double-clickthePublicfolderonyourdrive. | |
| MacOSX,PublicandPrivateShares | 1.OpenaFinderwindowandlocateyourMyBookLiveDuo driveundertheSharedheadinginthesidebar.2.Double-clickthedrivetodisplaythePublicshareandany privatesharestowwhichyouhaveaccess. |
ManagingComputerBackupsandSafepoints
ListingComputerBackups
ViewingtheListofComputerBackups
DeletingaBackup
BackingUpaMyBookLiveDuoDriveWithSafepoints
ListingComputerBackups
TheMyBookLiveDuodashboardBackupspagelistsandprovidesinformationabout computerbackupsstoredontheMyBookLiveDuoandenablesyoutodeletethem.
ViewingtheListofComputerBackups
Note: BackupscreatedusingWindowsVistaandWindows7proceduresdonotdisplay here.
- ClickBackupsonthenavigationpanel. The Backupspageopens:
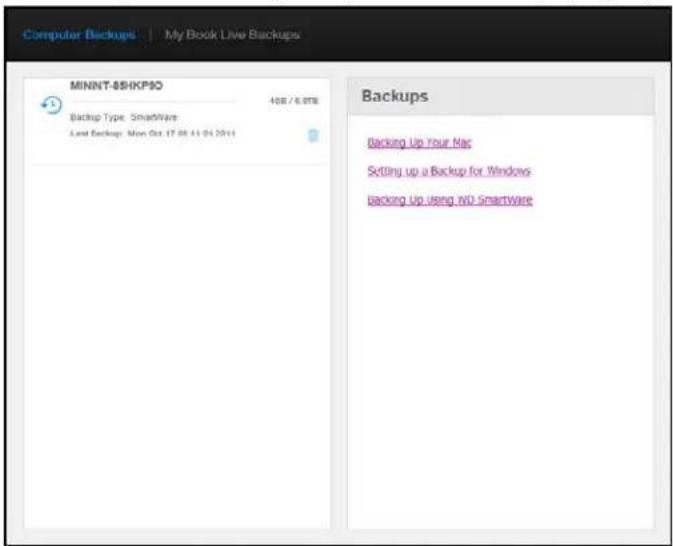
text_image
Computer Backups | My Book Live Backups MINNT-SHKPO 408 / 6.0TB Backup Type: SmartWare Last Backup: Mon Oct 17 06 11 04 2011 Backups Backing Up Your Nac Setting up a Backup for Windows backing Up Using iWU SmartWareAlistofbackupsonyourMyBookLiveDuodevicedisplays.Foreachbackup,thelist displaysthenetwork-attacheddevicestoringthebackup,backupsize,backuptype (WDSmartWareorTimeMachine),anddateoflastbackup.
- If you would like information about backing up your files using WDSmartWare, Time Machine, or Windows Backup, click the appropriate link in the panel on the right.
DeletingaBackup
WARNING! Whendeleting a backup, remember that you are erasing allof the files in the backup.
Important: Please besuretocancel the scheduled backup separately to prevent the recreation of this backup.
-
Clickthetrashcanicontotherightofthebackup.
-
Inresponsetotheconfirmationmessage, click the Delete button.
BackingUpaMyBookLiveDuoDriveWithSafepoints
Withtheincludedsafepointtechnology,youcanautomaticallymakeasecondcopyofyourMyBookLiveDuodatatostoreonanotherMyBookLiveDuodevice,anavailablenetworkshare,oraUSBdrive.Nowyouhavedouble-safeprotectionforallyourmediaandultimatepeaceofmind.
WhatisaSafepoint?
AsafepointisasnapshotofyourMyBookLiveDuodeviceataspecifictimestoredona compatiblenetwork-attacheddevicesuchasanotherMyBookLiveDuodevice.The safepointisacollectionofallofthedataonyourdrive,includingusers,shares,WD SmartWare,AppleTimeMachine,orWindows7/Vistabackups,andassociateddevice configurationdetails.IntheunlikelyeventthatyourMyBookLiveDuodevicefails,youcan completelyrecoveryourdatafromasafepointtoafactory-freshMyBookLiveDuodevice.
CreatingaSafepoint
TocreateasafepointforyourMyBookLiveDuodevice:
- Click Backups on the navigation pane and then the My Book Live Duo Backups tab.

text_image
Computer Backups | My Book Live Dox Backups Manage List There are currently no safepoints for your My Book Live Duo. Navigate to the Create tab and follow the instructions to create a new Safepoint. Help What is a safepoint? Creating safepoints Updating safepoints recovering from a safepoint; Managing safepoints Create- OpentheCreatesection.
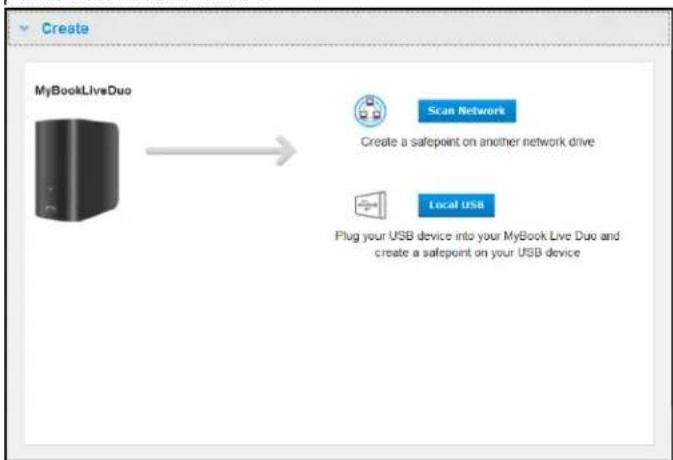
text_image
Create MyBookLiveDuo Scan Network Create a safepoint on another network drive Local USB Plug your USB device into your MyBook Live Duo and create a safepoint on your USB device- Click either the Network or Local button to display a list of available devices on your networkorlocalUSBdrive.Torescanthenetworkatanytime,clicktherefresh/rediscovericonintheupperright.Toreturntothepreviousscreen,clickthereturn iconintheupperright.

flowchart
graph LR
    A["MyBookLiveDuo"] --> B["HOMELAPTOP2"]
    A --> C["COCKS-TI"]
    A --> D["WORKGROUP"]
Networkdevices

flowchart
graph LR
    A["MyBookLiveDuo"] --> B["Western Digital Ex"]
Local(USB)device
- Select the target device and the share for the operation. If the share is password protected, enter appropriate credentials.
Important: If you create as a safepoint with shares you wish to keep private, create the safepoint on a privateshare.
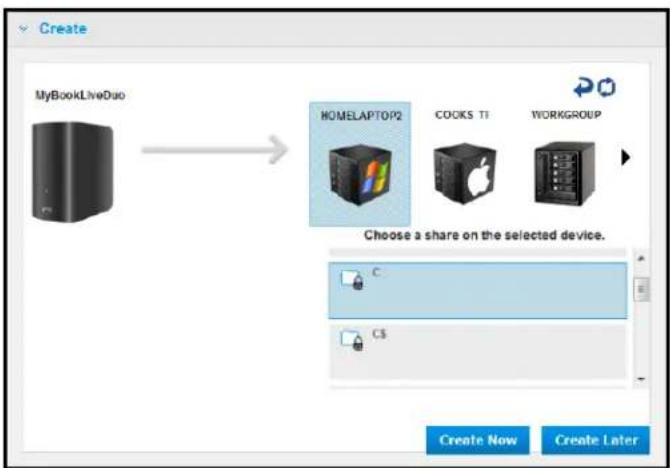
flowchart
graph LR
    A["MyBookLiveDuo"] --> B["HOMEALAPTOP2"]
    B --> C["COOKS TI"]
    B --> D["WORKGROUP"]
    E["Choose a share on the selected device."] --> F["C"]
    G["Create Now"] --> H["Create Later"]
- Tocreateasafepointontheshareimmediately, clicktheCreateNowbutton and completetherequiredfields. You may choose to enable auto-updates as well.

text_image
Create a safepoint Name* Safepoint1 Auto Update: Enable *Required Cancel CreateAprogressbardisplays.

text_image
Creating safepoint Copying share data to: Western Digital External HDD Currently copying /Public/Software/WD SmartWareLocaleics_CZ |proj/BCKP4A.html 1.71 GB / 65.21 GB (3%) Copied: Estimated time remaining: 3 hours 23 minutes 39 seconds Cancel Run in BackgroundNote: Thetimeittakestocreateasafepointvariesbasedonthespeedofyour network, and thenumberandsizeoffilesyouhavestoredonyour MyBookLiveDuodevice. Foragivenamountoftotaldata, fewerlargerfiles replicatequickerthanmanysmallerfiles. Otherfactorssuchaswhat processesarerunningontheMyBookLiveDuodeviceandonthespeed andavailabilityofyourtargethaveaneffectonthespeed.
- To havethe process run in the background, click the Run in Background button. A link to the progress bard displays below Let Us Help You in then navigation panel.
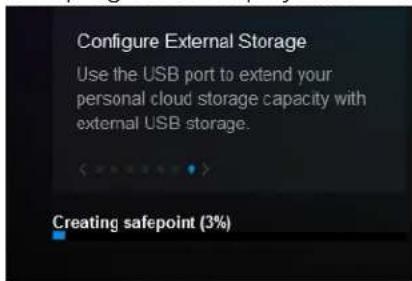
text_image
Configure External Storage Use the USB port to extend your personal cloud storage capacity with external USB storage. Creating safepoint (3%)Clickingtheprogressbarlinkinthestatusareadisplaysdetailedinformationaboutthe operationsuchasthefilesbeingcopiedandtheextentcompleted.A"Safepoint successfullycreated"messagedisplayswhentheyprocessiscomplete.
- If you want to schedule the creation of the safepoint, click the Create Later button and enteradateandtimeyouwouldlikethesafepointtobecreated.Youmaychooseto enableautoupdatesaswell.Autoupdateshelpkeepyoursafepointuptodatewiththe contentonyourMyBookLiveDuodevicebycopyingchangessincethelastupdate.
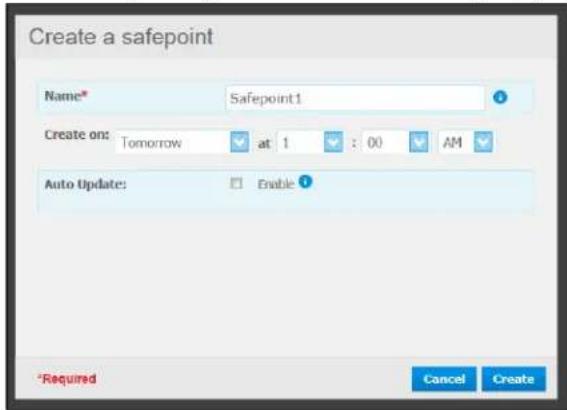
text_image
Create a safepoint Name* Safepoint1 Create on: Tomorrow at 1 : 00 AM Auto Update: Enable ? *Required Cancel CreateImportant: Changesmadewhilesafepointoperationsareinprogressarenotguaranteed tobebackedupimmediately.
- If the creation process was not successful, it was interrupted, the Managesection (top of page) displays the appropriate status. Clicking the safepoint's retry icon resumes the operation.

text_image
Computer Backups My Book Live Backups Manage List longname Created on: TARGETMA3 Updated: The 25 Jun 2011 05:45:40 PM sclrtcati Created on: TARGETMA3 Updated: 09/21/2011 04:43:08 PM Invalid safepoint operation. Safepoint Details Name* longname Auto Update: Enable *Required Cancel SaveNote: If you want to see the content of the safe point stored on another device, access the folder on the device where you are stored.
UpdatingSafepoints
YoucanupdateyourSafepointsintwoways:manuallyorautomatically.
- Touupdateyoursafepointmanually, gototheManagesectionatthetopofthepageand clicktheupdateicontothelowerrightofyoursafepoint.

text_image
Manage List Safepoints_5_17 Created on: MYBOOKLIVE2T Updated: 06/17/2011 03:52:19 PM Safepoints_5_17 Created on: MYBOOKLIVE2T Updated: 06/17/2011 04:05:03 PM Help What is a safepoint! Creating safepoints Updating safepoints Recovery from a safepoint Managing safepoints- To enable autoupdatesforyoursafepoint, gototheManagesection, select your safepoint, and click theAutoUpdateEnablebuttonintherightpane.
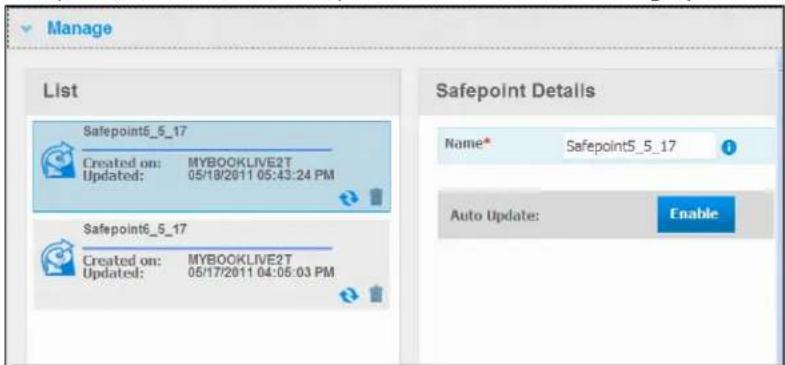
text_image
Manage List Safepoint6_5_17 Created on: MYBOOKLIVE2T Updated: 05/18/2011 05:43:24 PM Safepoint6_5_17 Created on: MYBOOKLIVE2T Updated: 05/17/2011 04:06:03 PM Safepoint Details Name* Safepoint5_5_17 Auto Update: Enable- If autoupdatesarealreadyenabled, you can edit the auto-up datesettings on the details paneordisable the feature altogether. You can set daily, weekly, or monthly update to your safepoint if you choose to us this feature.
Tohavetheprocessruninthebackgroundwhileyouperformothertasks, clicktheRun inBackgroundbutton.
Clickingtheprogressbarinthestatusareadisplaysdetailedinformationaboutthe operationsuchasthefilesbeingcopiedandtheextentcompleted.
Important: Changesmadetodatawhilesafepointoperationsareinprogressarenot guaranteedtobebackedupimmediately.
- If the update process was not successful, was interrupted, the Managesection display the appropriate status. Clicking the retry icon resume the operation.
RecoveringfromaSafepoint
TheRecoversectionenablesyoutorestoreyourdatafromasafepointtoafactory-fresh MyBookLiveDuorcompatibleWesternDigitaldevice.
1. OpentheRecoverysection:
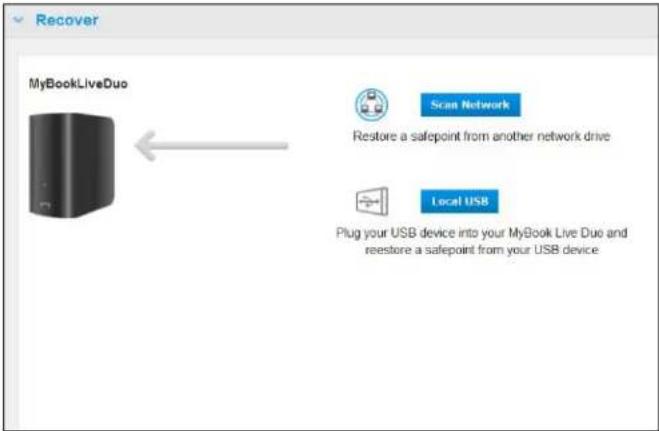
text_image
Recover MyBookLiveDuo Scan Network Restore a safepoint from another network drive Local USB Plug your USB device into your MyBook Live Duo and rerestore a safepoint from your USB device2. Click the Network or Local (for USB devices) button to display a list of available devices on your network:
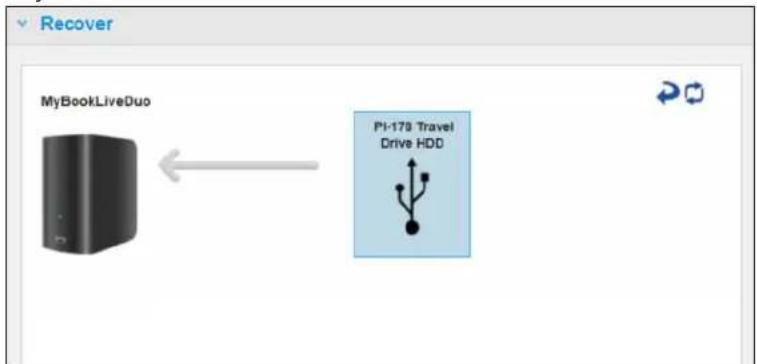
flowchart
graph LR
    A["MyBookLiveDuo"] <--> B["PI-178 Travel Drive HDD"]
- Selectadevicetodisplaythelistofitsavailableshares:
- Select the share that has a safety point and click the Continue button. If these are password protected, enter appropriate credentials:

text_image
MyBookLiveDuo PI-178 Travel Drive HDD Choose a share on the selected device. MINI_HDD Continue5.ChoosethesafepointyouwanttorecoverandclicktheRecoverbutton:

text_image
MyBookLiveDuo PI-178 Travel Drive HDD Safepoint Created from: MyBookLiveDuo Updated: 12/09/11 15:08:22 Size: 0.22 GB Back RecoverIf the device you are restoring to is not in a factory restored state, am message with instructions appears (See "FactoryRestore" on page 68).
- If there are no errors, there recovery operation begins and improves bar appears. Wait for the operation to finish. Your device restarts after there recovery operation and then can be used in place of your original My Book Live Duodevice.
ManagingSafepoints
TheManagesectionlistsallsafepointsforyourMyBookLiveDuodevice.Selectinga particularsafepointallowsyoutorename,update,ordeleteit.
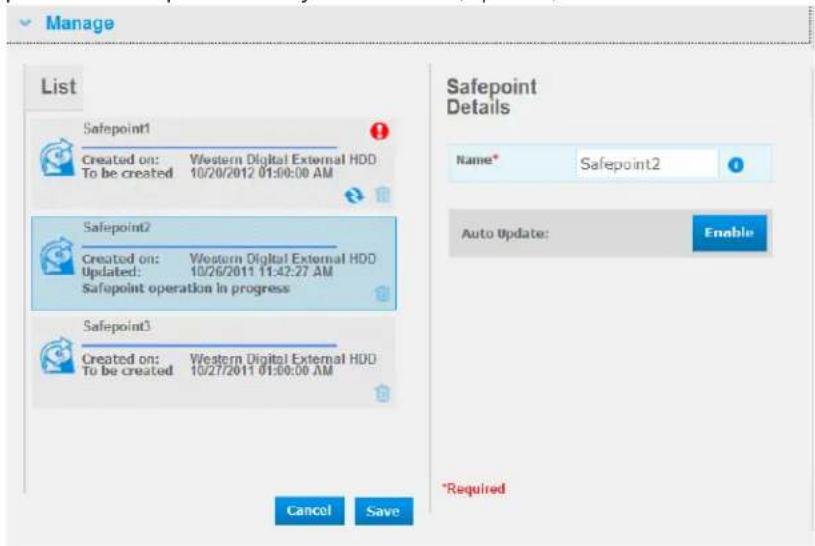
text_image
Manage List Safepoint1 Created on: Western Digital External HDD To be created 10/20/2012 01:00:00 AM Safepoint2 Created on: Western Digital External HDD Updated: 10/26/2011 11:42:27 AM Safepoint operation in progress Safepoint3 Created on: Western Digital External HDD To be created 10/27/2011 01:00:00 AM Cancel Save Safepoint Details Name* Safepoint2 Auto Update: Enable *RequiredToupdateasafepointwiththelatestchangesonyourMyBookLiveDuodevice,clicktheupdateiconforyoursafepoint.
- Todeleteasafepointandallofitscontents, clickthetrashiconforyoursafepoint.
- Ifasafepointdevelopserrors, warningiconsappeantheManagesection. Roll thecursorovertheiconsformoreinformation.
AccessingYourMyBookLiveDuoRemotely
WD2go:ThePathwaytoYourPersonalCloud EnablingRemoteAccess SettingUpMobileAccess SettingUpWebAccessThroughWD2go TroubleshootingYourWDPhotosDatabase AccessingYourPersonalCloud
ThischapterexplainshowtosetuptheMyBookLiveDuodriveforremoteaccessand describessomeofthewaysyoucantakeadvantageofitsmanycapabilities.
WD2go:ThePathwaytoYourPersonalCloud

Apersonalcloudisyourcontent,athome,secureandundryourcontrol.Unlikepublic clouds,apersonalcloudallowsyoutokepallyourcontentinonesafeplaceonyourhome network.Sharefiles,streammedia,andaccessyourcontentanywhere.Nomonthlyfees.Nomysteriouslocationforyourdata.Keepyourvideos,music,photos,andfilessafeat homeandalwayswithyou.
If you can access the Internet from a computer, you can securely access your media and files any where in the world. WD2 gowebaccess provides fee - freeremote access to your My Book Live Duopersonal cloud storage. Once you login, WD2 gomounts the My Book Live Duodevicetoyourcomputerlike alocaldrive and your remotefolders are available on your MacorPC. Seamlessly open, save as, and attach filesto emails from this virtual drive.
Note: Copyingorstreamingcontentfromyourhomewillikelybelimitedbyyour ISP'suploadbandwidth county, atypicalhomeInternetconnection (ADSLorCablemodem) may have an upload limitation of 500 Kb/s (0.063 MB/s), so that copyinga2GBmovie would take 8.8 hours and copyinga typical2MBMP3 music file would take just 32 seconds.
MobilizingYourFileswithWD2goMobileApps
WD2go,WD2goPro,andWDPhotosmobileappsbringyourphotosandfilestoyourfingertipsonyourAppleiPhone,iPodtouch,iPad,Androidtablet,orAndroidsmartphone.
Requirementsinclude:
•WesternDigitalMyBookLiveDuopersonalcloudstorageconnectedtotheInternet
- YourdeviceaccesscodegeneratedbyyourMyBookLiveDuodevice
- Androiddevices—MostsmartphonesandtabletswithOS2.1orlater
- Appledevices
-WDPhotos—iPhone,iPodtouch,oriPadwithOS3.2orlater
-WD2go/WD2goPro—iPhone,iPodtouch,oriPadwithOS4.xorlater
AboutWD2goMobileApp

Accessyourfiles,music,andphotoswithyourmobiledevice.Openandviewpresentations anddocuments,streammedia,andshowoffphotosstoredonyourMyBookLiveDuo personalcloudstorage.UseyouriPad,iPhone,iPodtouch,orAndroidmobiledeviceto viewstoredfilesandstreammusicinthepalmofyourhand.DownloadtheWD2gomobile appfromtheAndroidMarketortheAppleiTunesstoreandmakeyourmobiledevicethe centerofattention.
WiththeWD2gomobileapp,youcan:
- OpenandviewtheimportantfilesstoredonyourMyBookLiveDuodevicefrom anywherewithoutcopyingthemonyourmobiledevice.
• ShowoffyourphotosstoredonyourMyBookLiveDuodrive. - StreamandenjoymusicandvideofilesstoredonyourMyBookLiveDuodrive. Note: VideostreamingperformanceisbestovertheLAN.Wirelessconnectionsand WANstreamingperformancemaybelimitedbyuploadspeedsonyourhome Internetconnection.
- ShareyourpresentationsonyouriPadin1024x768resolution.WD2gosupports mostmajorfiletypes,suchasMicrosoftWorddocuments,MicrosoftExcel spreadsheets.andPowerPointpresentations.
FormorefeaturesandinstructionsonusingtheWD2gomobileapp,seeitsonlineGuideMe pageandFAQs,orgotohttp://wd2go.wdc.com.
Note:WD2gobringsyourdatafromtheMyBookLiveDuodevicetoyourtablet, handset,orotherportabledevicesusingGoogleAndroidorAppleiOS.WD 2goprovidesaconvenientfilelistoftheMyBookLiveDuodevicecontents andthenlaunchesyourfavoriteplayerorviewerforanyfilesyouwishto open.Forfiletypesyourmobiledevicesupports,seethedevice'smanual.
AboutWD2goProMobileApp

AccessyourfilesandphotosstoredonyourWesternDigitalMyBookLiveDuopersonal cloudstorage.Open,viewandsharepresentationsanddocuments,streammedia,and showoffphotos.
InadditiontoallthefeaturesfoundinthefreeversionofWD2go,withWD2goProyoucan also:
- Clipfoldersandfilesforofflineaccess
• Automatically sync folders and files from MyBookLiveDuodevicetoyourmobile device - Lockaccesswitha4-digitpasscode
- Emailfiles,sharefilesasalink,printandopenfileswiththirdpartyapps.
FormorefeaturesandinstructionsonusingtheWD2goPromobileapp,seeitsonlineGuideMepageandFAQs,orgotohttp://wd2go.wdc.com.
AboutWDPhotosMobileApp
Entertainmentishappeningallaroundyou.Nowyoucancaptureeverymomentofitand sendittoyourdriveforaccessonanyscreeninyourhome.TakeaphotoorvideoclipyoursmartphoneortabletanduploaditdirectlytoyourMyBookLiveDuopersonalcloud storage.Whenyougethome,youhavenewfileswaitingforyousoyoucanenjoytheminyourentertainmentcenter.
Important: WDPhotosenablesyoutoviewphotosin.jpgformatonly.
Showoffyourentirephotocollection, upto285,000photos, withouttakinguptons of spaceonyoursmartphone.
WDPhotosiscompatiblewithleadingApplemobiledevicesandmanypopularAndroids suchastheDROIDbyMotorola,DROIDIncrediblebyHTC,NexusOne,andHTCEVO4G. Photosareautomaticallyoptimizedforviewingonyourmobiledevice.
WDPhotosletsyouviewyourmostrecentlyaccessedphotosevenwhenyouareoffline. Displayyourphotosverticallyorviewthemhorizontallyandturnyourmobiledeviceintothe ultimatephotoalbum.
WithWDPhotos,youcan:
- InstantlypostphotostoFacebook.
- Createaslideshowwithtransitionstocreatedigitalart.
- Accesspreviouslyviewedphotosevenwhenyouareoffline.
•Viewyourphotosallatonceorfilterthembyfolderoralbum. - Searchbyfilename, foldername, ordateusingthebuilt-insearchoptions.
- Emailaphototoafriend.
- Assignaphototoacontact.
- Downloadaphotofromyourpersonalcloudstoragetothecamerarollonyourmobiledevice.
- Uploadphotosandvideosfromthecamerarollonyourmobiledevicedirectlytoyour personalcloudstorage,nomatterwhereyouare.
Note: WDPhotosautomatically creates asubfolder with themobiledevicename in the Public/SharedPicturesdirectory on the MyBookLiveDuoforuploaded photos. Similarly, the app creates asubfolder with themobiledevicename in the Public/SharedVideosdirectory for uploaded videos.
FormorefeaturesandinstructionsforusingWDPhotos,seeitsonlineGuideMepageandQuickTips,andgotohttp://wdphotos.wdc.com.
EnablingRemoteAccess
UsetheRemoteAccesspageoftheMyBookLiveDuodashboardtoenableyouandotherauthorizeduserstoaccessyourfilesonthego.
-
Onthenavigationpanel, clickSettings.
-
ClicktheRemoteAccesstab.TheConfiguresectionoftheRemoteAccesspage displays:

text_image
System | Network | Utilities | Remote Access | Media | Storage Configure Configure settings for remote access to your My Book Live. Remote Access: Enable ? Connection Status: Ready Your device is ready for Remote Access. Please navigate to the sections below to add mobile access or register for a web access account. Connection Options: Automatic ? > Mobile Access > Web Access > Advanced- Enableordisableeremoteaccessandchecktheconnectivitystatusofyour MyBookLiveDuodevice. Thepossibleconnectivitystatesinclude:
- Disabled — UserhasnotselectedtheEnableRemoteAccesscheckbox.
- Ready — Userhasnotaddedamobiledeviceorhasnotregisteredforawebaccess accountyet.
- RetrievingInformation—Retrievingremoteaccessconnectivitystatus.
- Failed — MyBookLiveDuodevicecouldnotestablishaeremoteaccessconnection withthemobiledeviceorwebaccessaccount.
- Connecting — MyBookLiveDuodeviceistryingtoconnecttoamobiledeviceora registeredwebaccessaccount.Pleaseawait.
- Connected — This is a direct, peer-to-peer connection, the desired state for better performance.
- Connected(Relayconnectionestablished) — TheMyBookLiveDuodriveattempts toconfigurethenetworktoallowdirectconnectionswheneverpossible.Some networksdonotsupporttheUPnPprotocol,whichtheMyBookLiveDuodevice usesforthoseconfigurations.Ifyoudesireadirectconnectioninsteadofarelay, consultyourrouteroperatingguidetodetermineUPnPcompatibility.
Additionally, someISPsimplement"double-NATing,"whichrendersyourrouter'sIP addressunreachablefordirectconnection(portforwarding).Inthissituation,consult yourISPforalternativestoenableport-forwardedconnections.
- Selectaconnectionoptionfromthedrop-downmenu.Thepossibleconnectionoptions include:
- Automatic — Establishesadirectconnectionbetweenyourdeviceandtherouter usingUpnP.Iftheconnectioncannotopentheportsontherouter,arelay connectionisestablished.

text_image
Connection Options: Automatic Save- Manual—Establishesaconnectionthroughthetwoselectedports.Ifetherportis unavailable,arelayconnectionisestablished.IfyouselecttheManualconnection option,identifytheExternalPortforPort1andPort2.OptionsforPort1are80or 1024-65535.OptionsforPort2are443or1024-65535.Foradditional informationaboutcreatingaManualconnection,seeKnowledgeBaseAnswerID 8526.
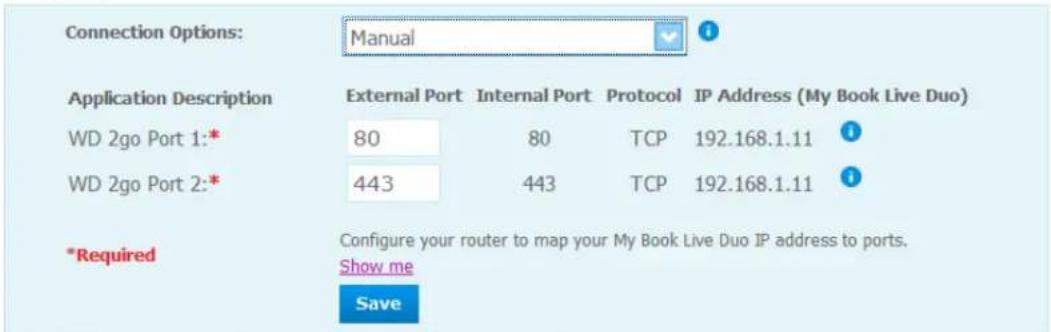
text_image
Connection Options: Manual Application Description External Port Internal Port Protocol IP Address (My Book Live Duo) WD 2go Port 1:* 80 80 TCP 192.168.1.11 WD 2go Port 2:* 443 443 TCP 192.168.1.11 *Required Configure your router to map your My Book Live Duo IP address to ports. Show me Save- WindowsXPcompatibility—Establishesaconnectionthroughports80and443. Iftheseportsareunavailable,arelayconnectionisestablished. Thisoptionis requiredifyouhaveaWindowsXPOS.

text_image
Connection Options: Windows XP compatibility SaveSettingUpMobileAccess
Setupandmanagemobileaccesstoyourphotos,music,documents,andvideosonthe MyBookLiveDuodevicethroughanAppleorAndroiddevice.IntheMobileAccesssection oftheRemoteAccesspage,generateactivationcodesfortheWDPhotosorWD2goapps installedonyourmobiledevicefromtheAppleAppStoreorAndroidMarket.
AddingaMobileDeviceConnection
ToaddamobiledeviceconnectiontotheMyBookLiveDuodevice:
- In the Configuresection of the page, makes sure that the Enable checkbox remains selected and Connection Status is Ready or Connected.
- In the Mobile Access section of the page, click the Add Access button.

text_image
Mobile Access Add Access Select User: admin Help Access your files on the go! About Mobile Access Adding a Vioole Device WD Photos WD Zoo Steps: 1. Select a user from the drop-down list and click Get Code to generate an activation code. 2. Install WD Photos and/or WD Zoo on your tablet or mobile device. 3. Launch app and tap Connect Now. 4. Select your product. 5. Enter Activation Code. Cancel Get Code- From the drop-downlist, select a user. Listed users are those who have access right to My Book Live Duodeviceshares. (See "CreatingaUser" on page 78.)
Note: When you add access to a mobile device applications such as WD photos, the specified userid retains its share access privileges.
- ClicktheGetCodebuttontoautomaticallygenerateanactivationcodeforthemobile device. You must generate one code to foreach happy you want to activate. Codes are valid for 48 hours from the time of request and can be used on time only.

text_image
Mobile Access Mobile Devices Add Access New Device Waiting 0257 6774 4135 Code expires Thu 20 Oct 2011 11:41:46 AM PDT Help Access your files on the go! Mobile Access to Your Personal Cloud Enabling Remote Access Adding a Mobile Access Connection Activating the WD Photos Mobile App Activating the WD 2go Mobile App- ClicktheContinuebutton(youmayhavetoscrolltothebottomofthepagetoseeit).A newdevicewithastatusof"Waiting"displays.
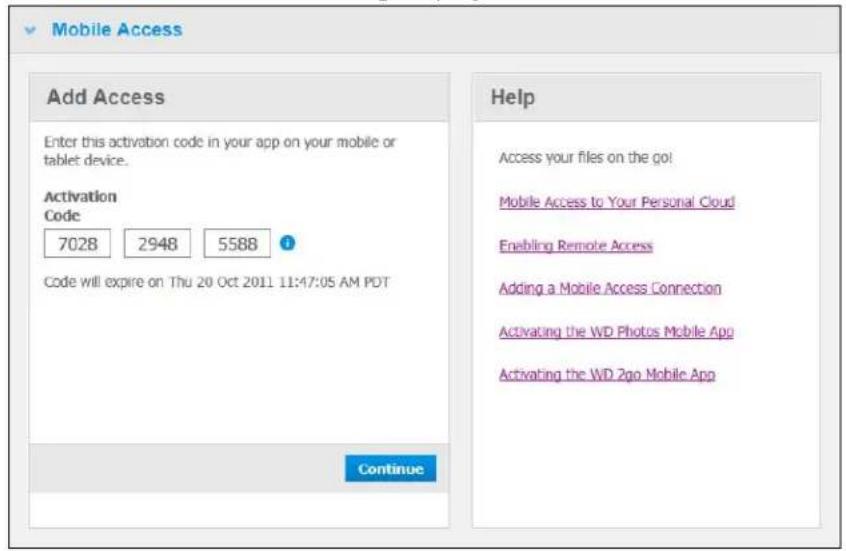
text_image
Mobile Access Add Access Enter this activation code in your app on your mobile or tablet device. Activation Code 7028 2948 5588 ? Code will expire on Thu 20 Oct 2011 11:47:05 AM PDT Continue Help Access your files on the go! Mobile Access to Your Personal Cloud Enabling Remote Access Adding a Mobile Access Connection Activating the WD Photos Mobile App Activating the WD 2go Mobile App- Once you have entered the code on your mobile device, the device and app name display.
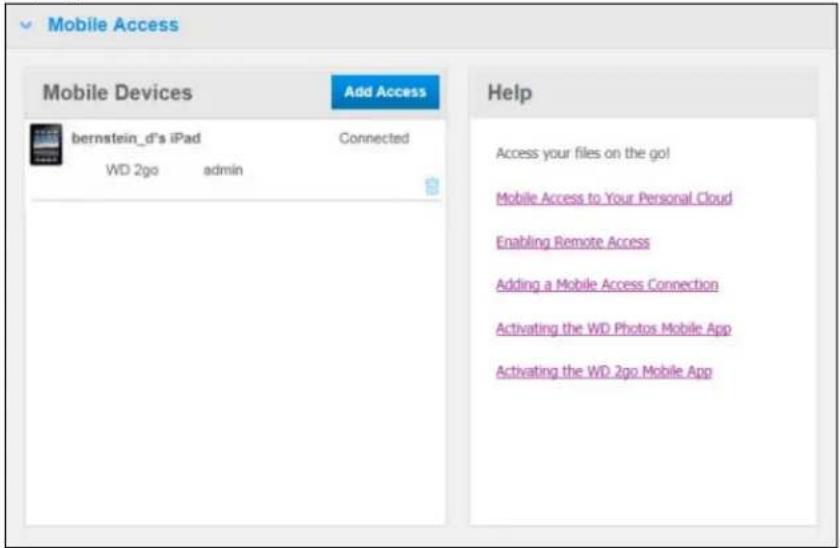
text_image
Mobile Access Mobile Devices Add Access bernstein_d's iPad Connected WD 2go admin Help Access your files on the go! Mobile Access to Your Personal Cloud Enabling Remote Access Adding a Mobile Access Connection Activating the WD Photos Mobile App Activating the WD 2go Mobile App- Continue with "Installing WDPhotoson Your Mobile Device" on page 100 or "Installing the WD2goMobileApp" on page 103.
Note: Toremoveaccesstoamobiledeviceordeleteanunusedcode, clickitstrash canicon.
InstallingWDPhotosonYourMobileDevice
Important: Makesurethepotosyouwanttoviewonthemobiledevicearestoredinthe SharedPicturesubfolderinthePublicshareofyourMyBookLiveDuodrive.WDPhotosletsyouviewphotosin.jpgformatonly.
ToinstallWDPhotosonyourmobiledevice:
- Download WDPhotos from the Apple App Store or Android Market and install it on your mobile device.
- LaunchWDPhotosonyourmobiledevicetodisplaytheWelcomescreen.

text_image
Welcome WD Photos™ Connect Now Live Demo Drive 1:57 PM WiD- TapConnectNowtodisplaytheSelectDevicescreen, whichshowsthetypesofNAS devicesyoucanhave.
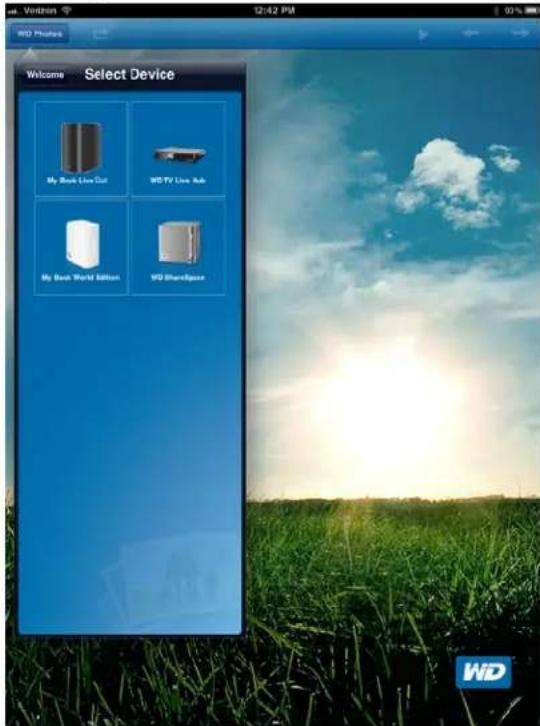
text_image
Welcome Select Device My Book LiveDot WD TV Live Sub My Book World Edition WD SharedBox WD4.TaptheMyBookLiveDuodrive.
5.EntertheactivationcodeyougeneratedonyourMyBookLiveDuo'sdashboard(see "AddingaMobileDeviceConnection" onpage98)andtaptheActivatebutton.You mustgenerateonecodeforeachappyouwanttoactivate.Codesarevalidfor48hours fromthetimeofrequestandcanbeusedonetimeonly.
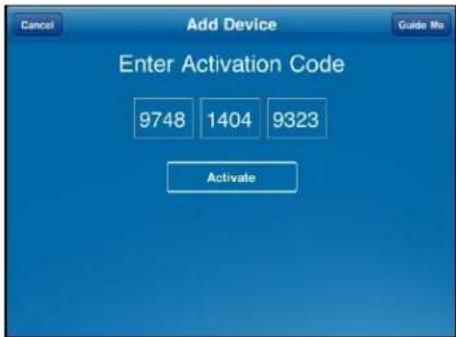
text_image
Add Device Enter Activation Code 9748 1404 9323 Activate- Tap your My Book Live Duodrivetodisplay your album(s), and thentapanalbum to display its photos.

text_image
Back MyBookLiveDuodb Photos in MyBookLiveDuodb 13 Photos 14
text_image
Back MyBookLiveDuodbNote: If you have problems installing WDPhotos, please visit http://websupport.wdc.com/rn/wdphotos.asp. Formorefeatures and instructions, seetheapp'sonlineGuideMepageandtips, and goto http://wdphotos.wdc.com.
InstallingtheWD2goMobileApp
-
Download the WD2 go app from the Apple App Store or Android Market and install it on your mobile device.
-
LaunchtheWD2goapptodisplaytheWelcomescreen.
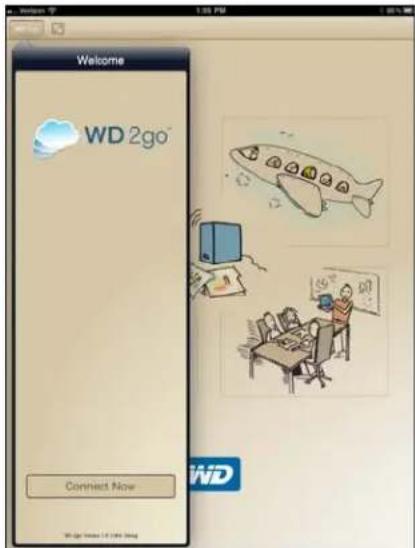
text_image
Welcome WD 2go Connect Now WD- TapConnectNowtodisplayaMyBookLiveDuodrive.

text_image
Welcome Select Device My Home is Free WD- TaptheMyBookLiveDuodrivetodisplaytheAddDevicescreen.
5.EntertheactivationcodeyougeneratedonyourMyBookLiveDuo'sdashboard(see "AddingaMobileDeviceConnection"onpage98)andtaptheActivatebutton.Codes arevalidfor48hoursfromthetimeofrequestandcanbeusedonetimeonly.

text_image
Add Device Activation Code: 1111 2222 3333 Activate- TapyourMyBookLiveDuodrivetodisplayitsshare(s).
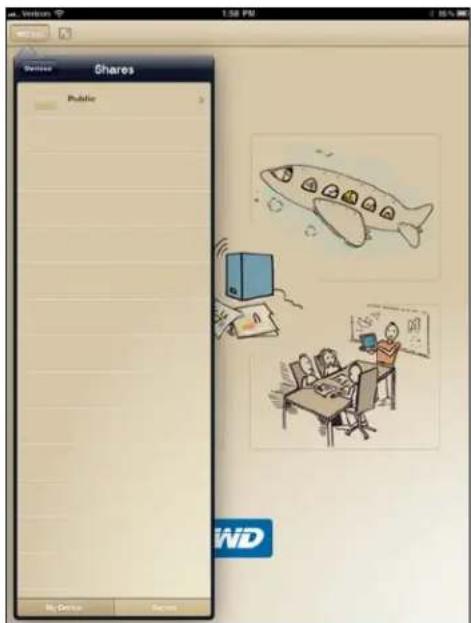
text_image
Shares Public My Device Return 1:50 PM WD- Tapasharetodisplayitsfiles.
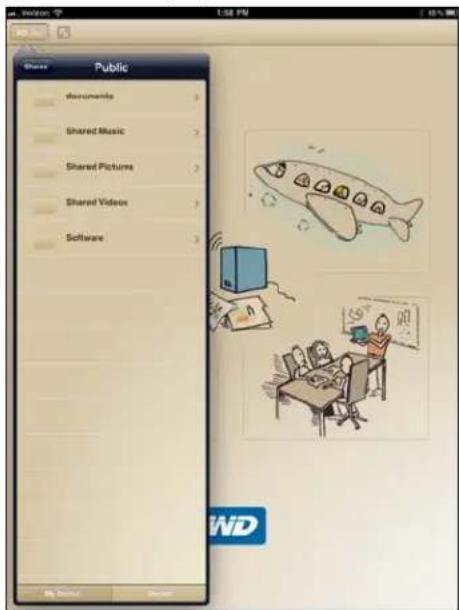
text_image
Public Documents Shared Music Shared Pictures Shared Videos Software- Tapafiletodisplayitscontents.
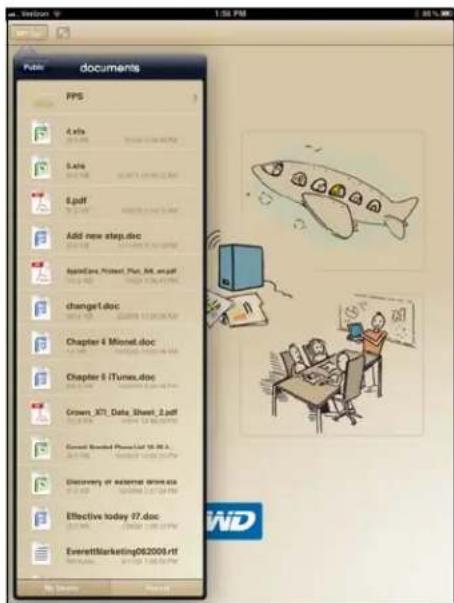
text_image
Futsi documents PPS 4.x/a 5.x/a 8.pdf Add new step.doc appCare, Protect, Plant, Web.pdf change1.doc Chapter 6 Minnet.doc Chapter 6 iTunes.doc Crown, X71, Data, Sheet, 2.pdf E-mail: E-mail PhoneList 10.96.1. Discovery of external drive.asp Effective today 17.doc EverettMarketing062000s.rtfNote: If you have problems installing WD 2go, visit http://websupport.wdc.com/rn/wd2go.asp.Formorefeaturesandinstructions,seetheapp'sonlineGuideMepage,FAQs,andtips,orgotohttp://wd2go.wdc.com.
SettingUpWebAccessThroughWD2go
WD2gogivesyouaccesstoallthefilesinyourpersonalcloudnomatterwhereyouareas longasyouhaveaccesstothelInternetfromyourcomputer.
RegisteringaWebAccessAccount
Create, view, and manage your web access accounts from the Web Access section of the RemoteAccess page.
Toregisterawebaccessaccount:
- To enable Web Access, makes sure that the Enable Remote Access checkbox is checked in the Configure section of the Remote Access Page. The Connectivity Status must be Ready or Connected.
- NavigatetotheWebAccesssectionoftheRemoteAccesspage.

text_image
Web Access Account List Register Help Access your files from a PC or a Mac anywhere, anytime. About Web Access Registering a Web Access Account WD 200™- ClicktheRegisterbuttontodisplaytheRegisterNewAccountpanel.
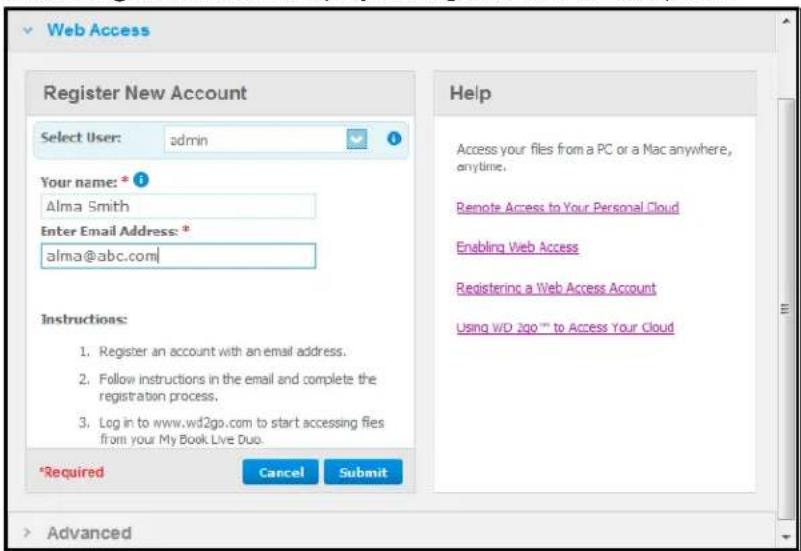
text_image
Web Access Register New Account Select User: admin Your name: * Alma Smith Enter Email Address: * alma@abc.com Instructions: 1. Register an account with an email address. 2. Follow instructions in the email and complete the registration process. 3. Log in to www.wd2go.com to start accessing files from your My Book Live Duo. *Required Cancel Submit Help Access your files from a PC or a Mac anywhere, anytime. Remote Access to Your Personal Cloud Enabling Web Access Registering a Web Access Account Using WD 2go™ to Access Your Cloud Advanced- Enteryournameandemailaddressoftheuserforwhomyouareregisteringanaccount andclicktheSubmitbutton.
Note: When you specify the device user for whom you are requesting the web access account, the account retains that user's share access privileges. (For information on creating users, see "CreatingaUser" on page 78.)
5.A"RegistrationE-MailSent"messagedisplays.ClicktheClosebutton. Theuser receivesanemailwithfurtherinstructions.
6. ClicktheContinuebuttontodisplayyournewaccountontheAccountList.

text_image
Web Access Account List Register Help alma@abc.com admin Access your files from a PC or a Mac anywhere, anytime. Remote Access to Your Personal Cloud Enabling Web Access Registering a Web Access Account Using WD 2go™ to Access Your Cloud AdvancedNote: If you need to send the registration email, click resend emailicon.
Note: Toremoveauser'swebaccess, clickthetrashcanicontotherightofthe accountname.
TroubleshootingYourWDPhotosDatabase
If you suspect that your WDPhotosDatabase has been corrupted:
- NavigatetotheAdvancedsectionoftheRemoteAccesspage.
- ClickRebuild.YourWDPhotosDatabaseisrebuilt.
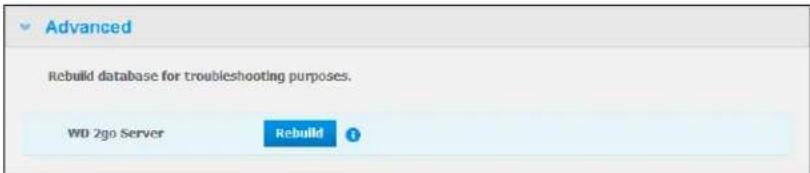
text_image
Advanced Rebuild database for troubleshooting purposes. WD 2go Server RebuildAccessingYourPersonalCloud
Note:WD2gowebaccessisnotcompatiblewith64-bitWindowsXP.
- Registerthewebaccessaccountasdescribedonpage106.
- In a browser, sign in to http://www.wd2go.com using the associated email address and passwordfromstep1.
Note: When you initially access WD2go, you're required to create a password. Entery your password in the NewPassword field, then re-enter the exact password in the Confirm Password field. Click Submit.
- ThescreendisplaysyourWDNASdevice(s).
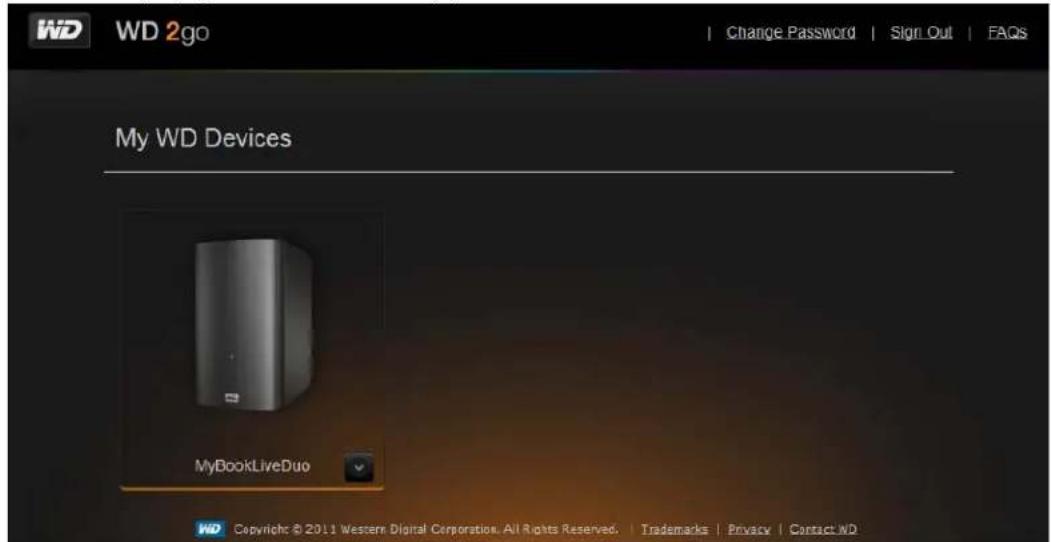
text_image
WD 2go Change Password | Sign_Out | FAQs My WD Devices MyBookLiveDuo WD Copyright © 2011 Western Digital Corporation. All Rights Reserved. | Trademarks | Privacy | Contact ND- SelecttheMyBookLiveDuodeviceyouwouldliketoaccess.
-IfyourMyBookLiveDuodeviceispasswordprotected,enteryourpasswordin theNetworkDrivePasswordfield.
Dependingonwhetheryouhaveremotelyaccessedasharebefore,aJavaapplicationrunrequestmayappear.
- In Windows, the following messaged displays. If you donot want to seethism message in the future, select the Always trust content from this publisher check box. Click the Runbutton:
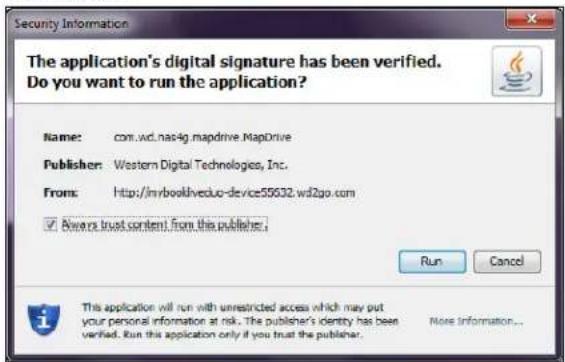
text_image
The application's digital signature has been verified. Do you want to run the application? Name: com.wd.nas4g.mapdrive.MapDrive Publisher: Western Digital Technologies, Inc. From: http://mrbooklveduo-device55632.wd2go.com ✓ Allows trust content from this publisher: Run Cancel This application will run with unrestricted access which may put your personal information at risk. The publisher's identity has been verified. Run this application only if you trust the publisher.OnaMac, if the following message appears, click the Allow button.
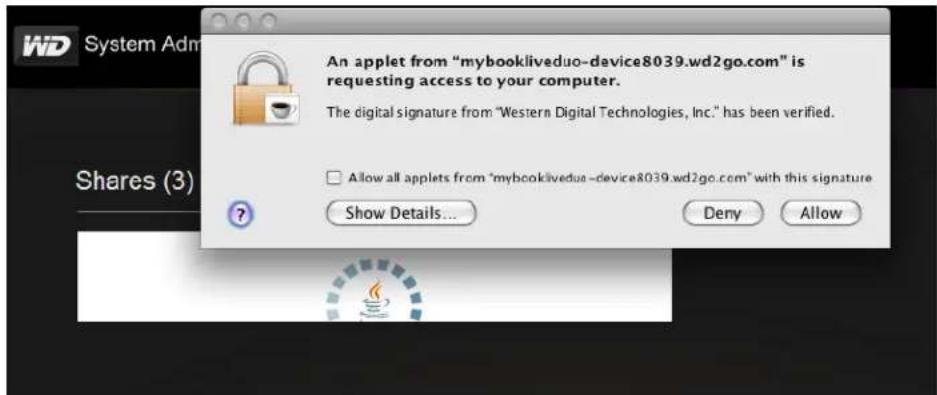
text_image
An applet from "mybookliveduo-device8039.wd2go.com" is requesting access to your computer. The digital signature from "Western Digital Technologies, Inc." has been verified. Allow all applets from "mybookliveduo-device8039.wd2go.com" with this signature Show Details... Deny AllowNote: For Lion, you will need to install the Javaruntime client. For additional information, visit http://support.apple.com/kb/dl1421
6.OnceJavahassuccessfullyrun,youraccessiblesharesdisplay.
7. Because Windows XP does not support encryption of amounted drive, the following messaged displays. If you don't want to set them message again, select the checkbox. Click the OK button.

text_image
Message Windows XP does not support encryption of your data from a mounted drive. To ensure your communications with WD 2go are encrypted, you must use Windows Vista or higher operating system. □ Do not show this again OKNote: If you connect to a My Book Live Duodevice from a PC running Windows XP, data being transferred between the devices is not secure.
- OnWindows7, the following messaged display.
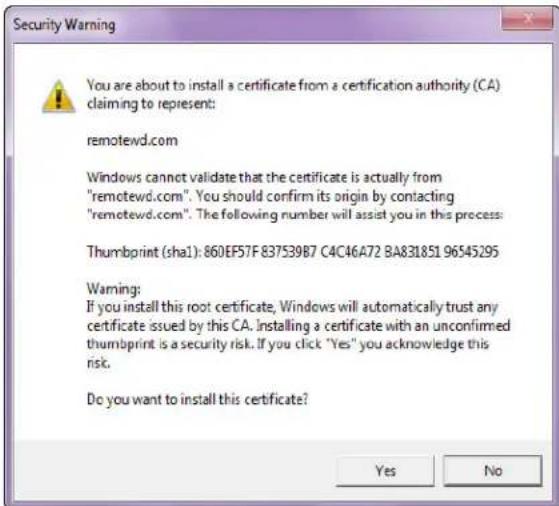
text_image
Security Warning You are about to install a certificate from a certification authority (CA) claiming to represent: remotewd.com Windows cannot validate that the certificate is actually from "remotewd.com". You should confirm its origin by contacting "remotewd.com". The following number will assist you in this process: Thumbprint (sha1): 860EF57F 837539B7 C4C46A72 BA831851 96545295 Warning: If you install this root certificate, Windows will automatically trust any certificate issued by this CA. Installing a certificate with an unconfirmed thumbprint is a security risk. If you click "Yes" you acknowledge this risk. Do you want to install this certificate? Yes No-
ClicktheYesbutton.
-
In Windows, click the + Openin Explorer button next to the share you want to access.
Note: For Windows XP, if a reboot message displays, click the Reboot Now button.
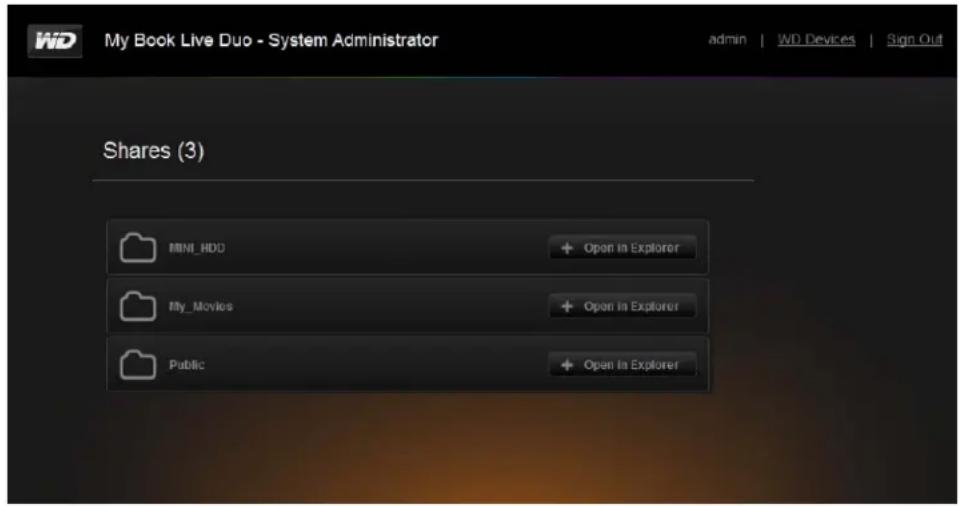
text_image
My Book Live Duo - System Administrator admin | WD Devices | Sign Out Shares (3) MINI_HDD + Open In Explorer My_Movies + Open In Explorer Public + Open In ExplorerOnaMac, clickthe+OpeninFinderbuttonnexttotheshareyouwanttoaccess.
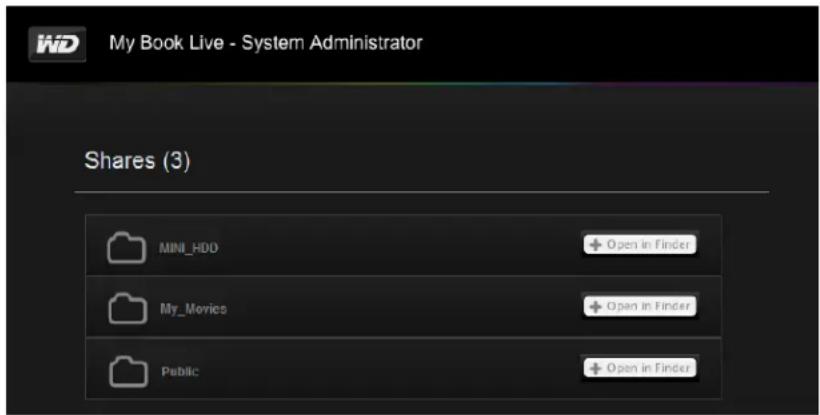
text_image
My Book Live - System Administrator Shares (3) MINI_HDD + Open in Finder My_Movies + Open in Finder Public + Open in Finder- IfaJavamessageasksyoutoAlloworDenytheconnection, clicktheAllowbutton.
- You can now access your files. Depending on your operating system settings, your share may not appear automatically.
- OnWindows, onceyoursharehasmountedsuccessfully, adriveletterfortheshare displaysunderMyComputer(Vista)orComputer(Windows7). Youcanusethedrive letterlikeanyothermappednetworkdrive. Openingthedrivedisplaysallofthe foldersandfilesintheshare.

text_image
Computer Organize Properties System properties Uninstall or change a program Map network drive Favorites Desktop Downloads Recent Places Libraries Documents Music My Book (K) Pictures Videos Homegroup Computer OSDisk (C:) Recovery (D:) DVD RW Drive (E:) My Book Live Duo My Passport (U:) My Book Live Duo (K:) Public (\MyBookLiveDuo) (Y:) Hard Disk Drives (4) OSDisk (C:) 857 GB free of 917 GB Recovery (D:) 6.79 GB free of 13.6 GB My Passport (J:) 916 GB free of 921 GB My Book Live Duo (K:) 132 GB free of 232 GB Devices with Removable Storage (1) DVD RW Drive (G:) My Book Live Duo 0 bytes free of 63.6 MB Network Location (2) Public (\MyBookLiveDuo) (Y:) 5.41 TB free of 5.42 TB Public (\MyBookLiveDuo) (Y:) Space used: Total size: 5.42 TB Network Drive Space free: 5.41 TB File system: NTFS- OnaMac, the Finder window openson its own nonceth drive has successfully connected to the WDMyBookLiveDuodevice and displays your share.

text_image
Public PLACES Desktop admin Applications Documents Public SEARCH FOR Today Yesterday Past Week All Images All Movies All Documents dev etc home Library mach_kernel mach_kernel.ctfsys MacPod_0...arsebundle net Network private sbin System TimeMachine tmp Macintosh HD ▶ Volumes ▶ Public .DS_Store Macintosh HD ▶ Public .DAV .DS_Store .tickle My Book Live Duo Network Trash Folder Shared Music Shared Pictures Shared Videos snagit.txt SnagltNe.exe Software Temporary Items 0 items, 54.73 GB available- Select the file(s) you want to access.
Youcanview,edit,delete,orcopyfilesjustasyouwouldwithanynetworkdrive.
SharingYourFilesRemotely
Tosharefilesremotelywithafamilymemberorfriend,createanewuseronyour MyBookLiveDuodeviceandthencreateaseparateWebaccessaccountforthatparticular user.OnlythesharestowwhichtheuserhasaccessandthePublicdirectorydisplay.
- If the person is not already a user of the My Book Live Duodrive, create anewuser (see "CreatingaUser" on page 78).
- Createawebaccessaccountfortheuser(seepage106). Theuserreceivesanemail providinginstructionsforusingWD2go.
Playing/StreamingVideos,Photos,&Music
MediaServerOverview
MediaServerSettings
MediaTypesSupported
MediaStorage
AccessingMyBookLiveDuofromMediaPlayers
AccessingMyBookLiveDuoUsingiTunes
MediaServerOverview
MyBookLiveDuoPersonalCloudStoragedeviceisdesignedtoserveasyourhome's centralmediahub.ltenablesyoutostreamphotos,music,andvideostoyourhome entertainmentcenterand/orothercomputersonyourhomenetwork.
TheDLNAServersearchesforallthemediastoredinallsharesontheMyBookLiveDuo connectedtoyourhomenetwork.IfyoudonotwantDLNAtodisplayspecificfiles,place theminaprivatesharethatissettomediasharing.
Theserverispre-set,soyoucanjusttransferyourmultimediacontenttotherespective sharedfoldersonyourMyBookLiveDuodeviceandyouarereadytostreamandview contentonyourhomeentertainmentcenter,gameconsoles(forexample,Xbox360™, PlayStation® 3,orDLNA® 1.5DigitalMediaAdapters)andmediaservicessuchaslTunes. Formoreinformation,visithttp://www.dlna.org.
MediaServerSettings
The MediatabontheMyBookLiveDuodashboarddenablesyoutodefineDLNAandiTunes mediaserversettingssothatyoucanenjoymediaineveryroominyourhouse.
Note: DLNA and iTunes mediaservices only work on your network.
DLNAMediaServer
DLN streams your music, photos, and videoostocompatible devices in your home. Playing media on a compatible device is easy.
TheDLNAserversearchesforallthemediastoredontheMyBookLiveDuodevice connectedtoyourhomenetwork. Theserverispre-set,soyoucanjusttransferyour multimediacontenttothePublicshareonyourMyBookLiveDuodevice,andyouareready tostreamandviewcontentonyourhomeentertainmentcenter,gameconsoles(for example,Xbox360orPlayStation3),WDTVLiveHDmediaplayer,orDLNA1.5Digital Media Adapters), and other PCs on your home network. Visit http://www.dlna.org for further informationonDLNA.
ToenableayourMyBookLiveDuodevicetostreamcontenttoyourmediaplayer(s):
- On the Navigation panel of the My Book Live Duo dashboard, click Settings and then clicktheMediatab.
-
ClickDLNAMediaServertoopentesection.
-
Select the Enable checkbox for DLNA (enabled by default).

text_image
DLNA Media Server • dlna• Streams music, photos, and videos to any compatible device throughout your home. ➤ Media Streaming: ✓ Enable ? ➤ Status: ➤ iTunes- Toviewalistofyourmediaservers, clickthedownarrowtoexpandtheMedia Streamingsection.
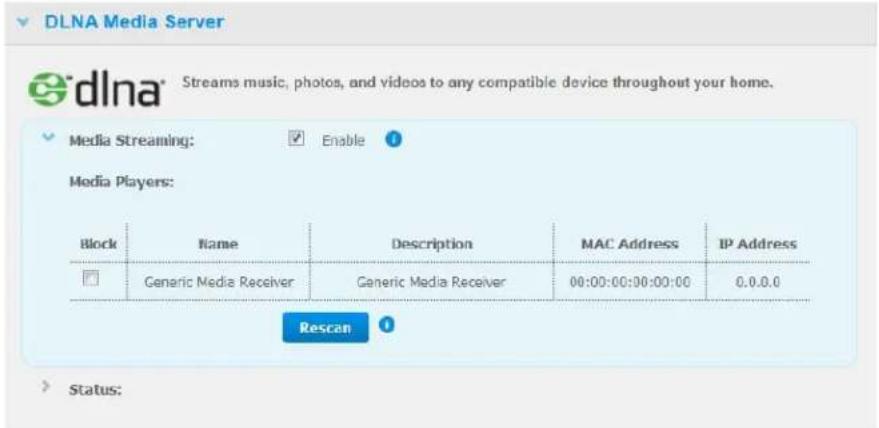
text_image
DLNA Media Server Streams music, photos, and videos to any compatible device throughout your home. Media Streaming: Enable Media Players: Block Name Description MAC Address IP Address Generic Media Receiver Generic Media Receiver 00:00:00:00:00:00 0.0.0.0 Rescan Status:- Toblockamediaplayerfromreceivingthedatastream(forexample,parentalcontrol),in theMediaPlayerslist,selecttheBlockcheckboxnexttotherowforthemediaplayer you'dliketoblock.Clearthecheckboxifyoudonotwanttoblocktheplayer.Whenyou changethesettings,thedriveautomaticallysavesyourchange.
- To scan for new media players, click the Rescan button. The "Rescan in Progress" messagedisplays.Whentherescaniscomplete,thenewlistofmediaplayersdisplaysinthemediaservertable.
Note: Thesystemrescansthemediaplayersautomatically.
- Toreviewstatusinformation, clickthe>besideStatus:
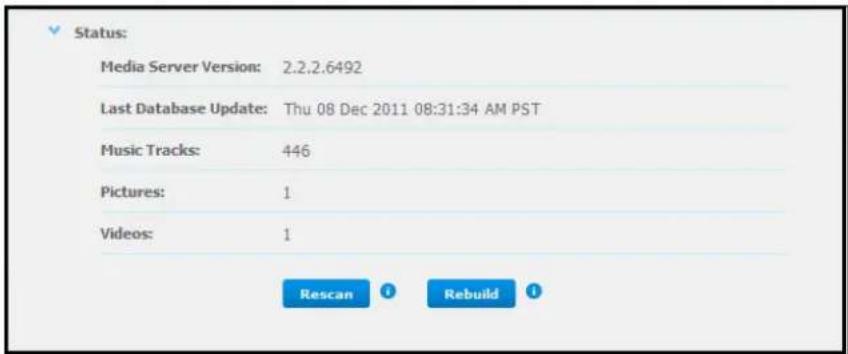
text_image
Status: Media Server Version: 2.2.2.6492 Last Database Update: Thu 08 Dec 2011 08:31:34 AM PST Music Tracks: 446 Pictures: 1 Videos: 1 Rescan RebuildStatusinformationincludestheversionoftheDLNAsoftware,thedateandtimeyour settingswereupdated,andthenumberofmusictracks,pictures,andvideosthatwere streamed.
-
For DLNA to look for only updated music and picture files on your drive, click the Rescan button below the table.
-
For DLNAtoreadalofthemusicandpicturefilesonyourdrive, clicktheRebuild buttonbelowthetable.Rebuildingismorethoroughthanre-scanningbutcantakemore time.
Note: Re-scanningandrebuildingtakeplaceautomatically. You only need to set the buttons if you are having a problem.
MediaTypesSupported
| AudiofilesVideofilesImageFiles | ||
| 3GP | 3GP | BMP |
| AAC | AVI | GIF |
| AC3 | DivX | JPEG |
| AIF | DVR-MS | PNG |
| ASF | FLV | TIF |
| FLAC | M1V | TIFF |
| LPCM | M4V | |
| M4A | MKV | |
| M4B | MOV | |
| MP1 | MP1 | |
| MP2 | MP4 | |
| MP3 | MPE | |
| MP4 | MTS | |
| MPA | MPV | |
| OGG | MPG | |
| WAV | MPEG2 | |
| WMA | SPTS | |
| VDR | ||
| VOB | ||
| WMV | ||
| Xvid | ||
Note: SomedeVICESmaynotsupportplaybackofallthesefiles.Pleaserefertoyour device'susermanualtoseewhichformatsaresupported.
MediaStorage
YoucanaccessandstoremediacontentonMyBookLiveDuodrivebymeansofnetwork shares.Shares,similartofoldersordirectories,areareassetuptoorganizemediaand accessthemfromyournetwork.Sharescanbesharedwitheveryone(public)orwith selectedusersonyournetwork(private).
The drive comes pre-configured with the Public network share, which contains the following folders formed by a storage:
- SharedMusic — Storesmusicfilesyouwanttosharewithotherusers
- SharedPictures—Storesimagefilesyouwanttosharewithotherusers
- SharedVideos — Storesvideofilesyouwanttosharewithotherusers
Important: DonotdeleteorchangethenameoftheSharedPicturesfolder, which is required by the WDPhotosapplication.
AddingMediaContenttotheFolders
1.OpenWindowsExplorerorMacFinder:
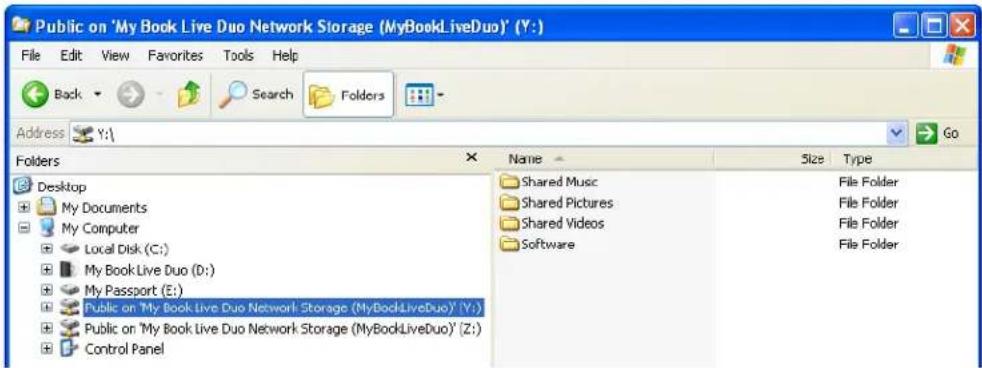
text_image
Public on 'My Book Live Duo Network Storage (MyBookLiveDuo)' (Y:) File Edit View Favorites Tools Help Back Search Folders Address Y:\ Folders Desktop My Documents My Computer Local Disk (C:) My Book Live Duo (D:) My Passport (E:) Public on 'My Book Live Duo Network Storage (MyBookLiveDuo)' (Y:) Public on 'My Book Live Duo Network Storage (MyBookLiveDuo)' (Z:) Control Panel Name Size Type Shared Music File Folder Shared Pictures File Folder Shared Videos File Folder Software File Folder-
Copy your music file to the Shared Music folder.
-
FollowthesameprocesstoplaceyourvideosandpicturesintotheirrespectivePictures andVideofolders.
Important: Makesuretosortandaddyourmediacontenttothecorresponding sharedfolders.(e.g.,musicfilesmustgointotheSharedMusicfolder). Ifyoudonotdothis,yourcontentwillnotdisplaycorrectlythroughyour digitalmediaadapter.
AccessingMyBookLiveDuofromMediaPlayers
Nowthatyouhavecopiedyourfilestotheircorrespondingfolders,youcanusevarietyofmediaplayerstostreammedia.Thefollowingtypesarediscussedinthissection:
- WindowsMediaPlayer12(comeswithWindows7)onpage115
•WDTVLive/LivePlusHDMediaPlayerpage120
•Xbox360onpage120 - PlayStation3onpage120
•Othermediaplayerpage120:
-BluRayPlayers
-NetworkConnectedTVs
-DigitalPictureFrames
-NetworkMusicPlayer
•DigitalMediaAdaptersonpage121
•DLNADevicesonpage121
WindowsMediaPlayer11(WindowsVista)
Note: Please goto the Microsoft MediaPlayers supports site form more information on using and updating your media player. Tostreammedia using Windows MediaPlayer11 Library:
- Click Control Panel > Network and Internet>Network and Sharing Center.
2.ClickCustomize:
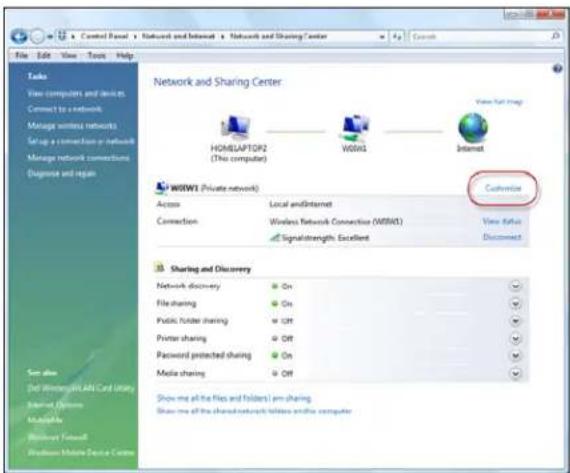
text_image
Network and Sharing Center HOME/LAPTOP2 (This computer) W001 Internet W001 (Private network) Access Local and Internet Connection Wireless Network Connection (W001) Signalstrength, Excellent Customize View Alert Disconnect Sharing and Discovery Network discovery On File sharing On Public folder sharing Off Printer sharing Off Password protected sharing On Media sharing Off Show me all the files and folders I am sharing. Show me all the shared network folders and the computer- SelectPrivate, andthenclickNext:
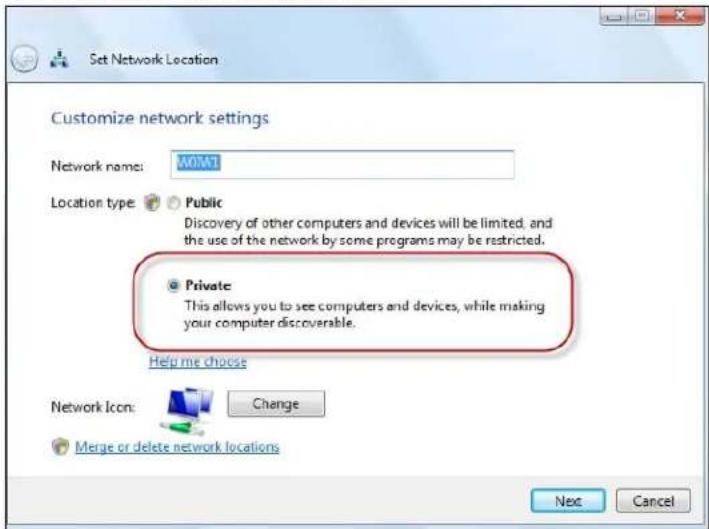
text_image
Set Network Location Customize network settings Network name: WOMAT Location type: Public Discovery of other computers and devices will be limited, and the use of the network by some programs may be restricted. Private This allows you to see computers and devices, while making your computer discoverable. Help me choose Network Icon: Change Merge or delete network locations Next Cancel- LaunchWindowsMediaPlayer(Start>AllPrograms>WindowsMediaPlayer):
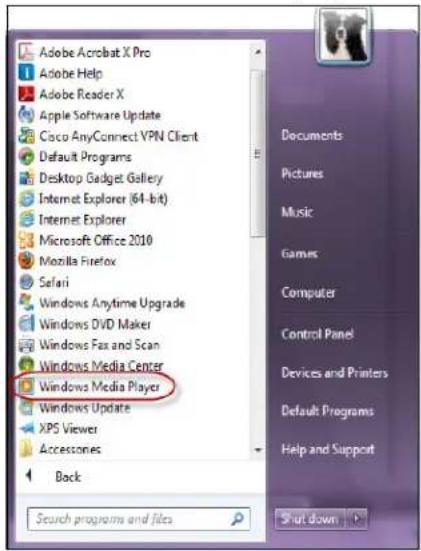
text_image
Adobe Acrobat X Pro Adobe Help Adobe Reader X Apple Software Update Cisco AnyConnect YPN Client Default Programs Desktop Gadget Gallery Internet Explorer (64-bit) Internet Explorer Microsoft Office 2010 Mozilla Firefox Safari Windows Anytime Upgrade Windows DVD Maker Windows Fax and Scan Windows Media Center Windows Media Player Windows Update XPS Viewer Accessories Back Scurch programs and files Documents Pictures Music Games Computer Control Panel Devices and Printers Default Programs Help and Support Shut down- ClickLibrary>MediaSharing:

text_image
Windows Media Player File View Play Tools Help Now Playing Library Rip Burn Sync Media Guide Music Library Songs Create Playlist Ctrl+N Create Auto Playlist Music Pictures 4:26 Aaron Goldberg Video Recorded TV Other Add to Library... Media Sharing... Apply Media Information Changes 5:07 Aisha Duo Add Favorites to List When Dragging 4:06 Aisha Duo More Options... Help with Using the Library The Amazing Spider-Man The Amazing Spider-... 0 The Amazing Spider-Mo... 35:47 The Amazing S... The Amazing Spider-... Vocal 1972- ClickFindmediathatothersaresharing, and then click OK:
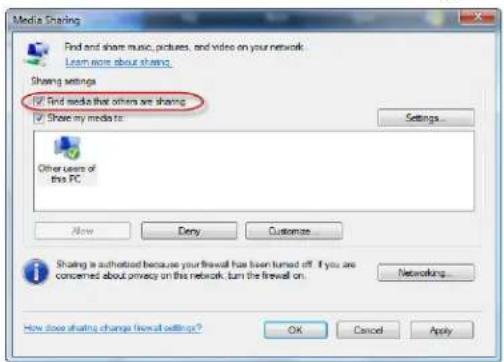
text_image
Media Sharing Find and share music, pictures, and video on your network: Learn more about sharing Sharing settings ✓ Find media that others are sharing ✓ Show my mediator: Settings Other users of this PC Now Deny Customize Sharing is authorized because your firewall has been turned off. If you are concerned about privacy on this network, turn the firewall on... Networking... How close sharing changes firewall settings? OK Cancel Apply- Select a media type (Music, Pictures, or Video) and click MyBookLiveDuo:
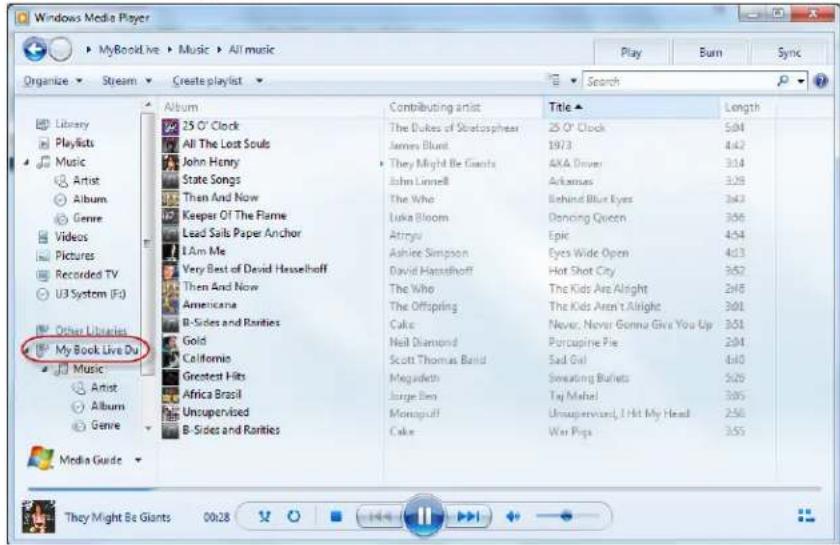
text_image
Windows Media Player MyBookLive > Music > All music Organize Stream Create playlist Search Library Playlists Music Artist Album Genre Videos Pictures Recorded TV U3 System (E:) Other Libraries My Book Live Du Music Artist Album Genre Album 25 O' Clock All The Lost Souls John Henry State Songs Then And Now Keeper Of The Flame Lead Sails Paper Anchor I Am Me Very Best of David Hasselhoff Then And Now Americana B-Sides and Ranities Gold California Greatest Hits Africa Brasil Unsupervised B-Sides and Ranities Contributing artist The Dukes of Skiotosphere James Blunt They Might Be Giants John Lonnell The Who Luka Bloom Atrigu Ashire Simpson David Hasselhoff The Who The Offspring Cake Neil Diamond Scott Thomas Bald Megadleth Jorge Ben Monopruff Cake 25 O' Clock 1973 4KA Driver Arkansas Behind Blue Eyes Dancing Queen Epic Eyes Wide Open Hot Shot City The Kids Are Alright The Kids Aren't Alright Never, Never Gonna Give You Go Up Portcupine Pie Sad Girl Sweating Bullets Taj Mahel Unsupervised, I Hit My Head War Pigs 504 442 314 328 343 356 454 413 352 248 301 301 204 410 529 305 250 355- Double-clickthemediafileyouwanttoplay.
WindowsMediaPlayer12(Windows7)
Note: Please goto the Microsoft MediaPlayers supports site form more information on using and updating your media player. Tostreammedia using Windows MediaPlayer12 Library:
- Click Control Panel > Network and Internet>Network and Sharing Center.
- In the View your activenetworks area, click your network (Home, Office or Public):
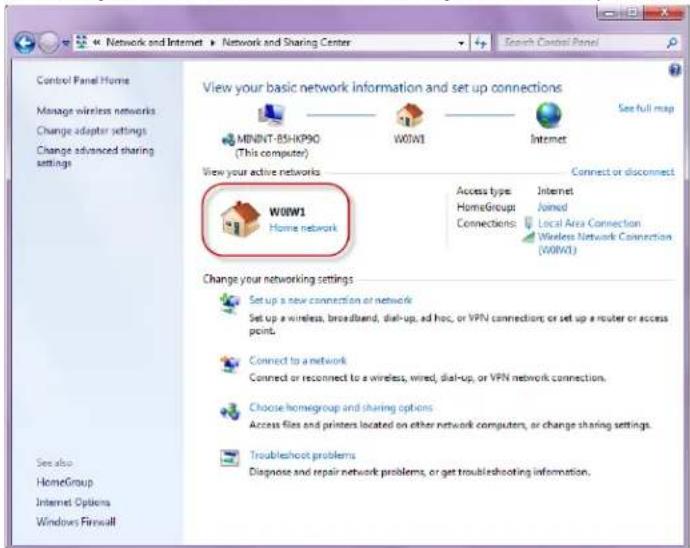
text_image
Control Panel Home Manage wireless networks Change adapter settings Change advanced sharing settings See also HomeGroup Internet Options Windows Firewall Network and Internet ▶ Network and Sharing Center View your basic network information and set up connections MENINT-B5HK90 (This computer) W01W1 Internet View your active networks W01W1 Home network Connect or disconnect Access type: Internet HomeGroup: Joined Connections: Local Area Connection Wireless Network Connection (W01W1) Change your networking settings Set up a new connection or network Set up a wireless, broadband, dial-up, ad hoc, or VPN connection; or set up a router or access point. Connect to a network Connect or reconnect to a wireless, wired, dial-up, or VPN network connection. Choose homegroup and sharing options Access files and printers located on other network computers, or change sharing settings. Troubleshoot problems Diagnose and repair network problems, or get troubleshooting information.3. SelectHomenetwork, and then click Close:
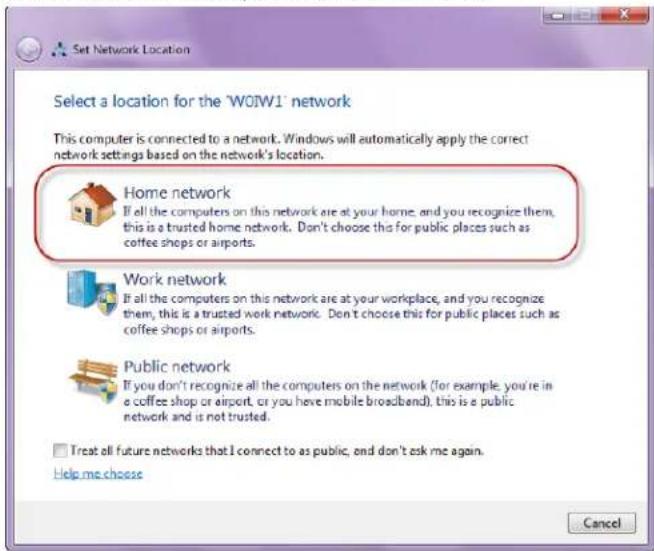
text_image
Set Network Location Select a location for the 'WOW1' network This computer is connected to a network. Windows will automatically apply the correct network settings based on the network's location. Home network If all the computers on this network are at your home, and you recognize them, this is a trusted home network. Don't choose this for public places such as coffee shops or airports. Work network If all the computers on this network are at your workplace, and you recognize them, this is a trusted work network. Don't choose this for public places such as coffee shops or airports. Public network If you don't recognize all the computers on the network (for example, you're in a coffee shop or airport, or you have mobile broadband), this is a public network and is not trusted. I treat all future networks that I connect to as public, and don't ask me again. Help me choose Cancel4. LaunchWindowsMediaPlayer(Start>AllPrograms>WindowsMediaPlayer):

text_image
Adobe Acrobat X Pro Adobe Help Adobe Reader X Apple Software Update Coco AnyConnect YPIN Client Default Programs Desktop Gadget Gallery Internet Explorer (64-bit) Internet Explorer Microsoft Office 2010 Mozilla Firefox Safari Windows Anytime Upgrade Windows DVD Maker Windows Fax and Scan Windows Media Center Windows Media Player Windows Update XPS Viewer Accessories Back Search programs and files Documents Pictures Music Games Computer Control Panel Devices and Printers Default Programs Help and Support Shut down5.ClickLibrary>MediaSharing:
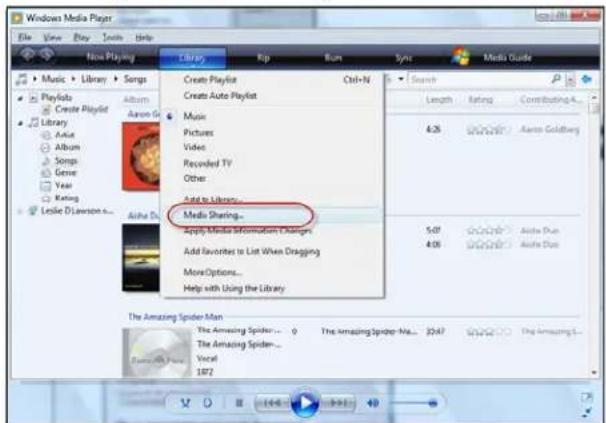
text_image
Windows Media Player File View Play Tools Help Now Playing Library Music > Library > Songs PlayKob Create Playlist Library Album Audio Album Songs Genre Year Koning Leslie D'Lawson... Audio Dr. Create Playlist Ctrl+N Create Auto Playlist Music Pictures Video Recorded TV Other: Add to library... Media Sharing... Apply Media Information Changes Add favorites to List When Dragging More Options... Help with Using the Library Search Length Rating Contributing... 4:28 0.000000000000000000000000000000000000000000000000000000000000000000000000000000000000000000000000 5:47 Audio Due 4:38 Audio Due The Amazing Spider Man The Amazing Spider... 1 The Amazing Spider-Man... 2:47 The Amazing Spider-1 The Amazing Spider- The Amazing Spider... Vocal 1972- Click Find media that others are sharing, and then click OK:

text_image
Media Sharing Find and share music, pictures, and video on your network Learn about sharing Online Sharing settings ✓ End media that others are sharing ✓ Share my media Your network (W30W1) is a private network. Devices that you allow can find your shared media. Networking... How does sharing change firewall settings? OK Cancel- Select a media type (Music, Pictures, or Video) and click MyBookLiveDuo:
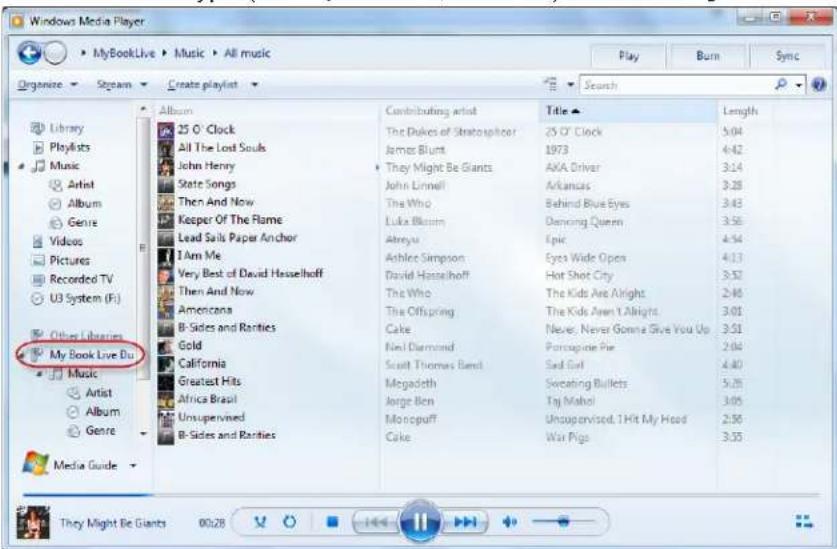
text_image
Windows Media Player MyBookLive Music All music Organize Steam Create playlist Search Library Playlists Music Artist Album Genre Videos Pictures Recorded TV U3 System (F:) Other Libraries My Book Live Du Music Artist Album Genre Album 25 O'Clock All The Lost Souls John Henry State Songs Then And Now Keeper Of The Flame Lead Sails Paper Anchor I Am Me Very Best of David Hasselhoff Then And Now Americana B-Sides and Ranties Gold California Greatest Hits Africa Brasil Unsupervised B-Sides and Ranties Contributing artist Title Length The Dukes of Stratosplicer 25 O'Clock 5.04 James Blunt 1973 4.42 They Might Be Giants AKA Driver 3.14 John Linnell Arkansas 3.28 The Who Behind Blue Eyes 3.43 Luka Bloom Dancing Queen 3.56 Abreyu Epic 4.54 Ashlee Simpson Eyes Wide Open 4.13 David Hasselhoff Hot Shot City 3.52 The Who The Kids Are Alright 2.46 The Offspring The Kids Aren't Alright 3.01 Cake Never, Never Gonna Give You Up 3.51 Neil Diamond Porcupine Pie 2.04 Scott Thomas Band Sad Girl 4.40 Megadeth Sweating Bullets 5.26 Jorge Ben Taj Mahol 3.05 Monopuff Unsupervised, 1 Hit My Head 2.50 Cake War Pigs 3.53 Media Guide They Might Be Giants 00:288.Double-clickthemediafileyouwanttoplay.
WDMediaPlayers
YoucanconnectthevariousWDMediaPlayerstoyourhomenetworkforaccesstomedia contentstoredinanetworkdrivesuchastheMyBookLiveDuodevice.Fordetailsonusing aWDMediaPlayertoaccessfilesonyourMyBookLiveDuodrive,seeKnowledgeBase AnswerID8676orrefertoyourWDMediaPlayeruserguide.
Xbox360
FordetailsonusinganXbox360devicetoaccessfilesonyourMyBookLiveDuodrive,see yourXBox369productmanual.
PlayStation3
FordetailsonusingaPlayStation3toaccessfilesonyourMyBookLiveDuodrive,seeyourPlayStation3instructionmanual.
OtherMediaPlayers
Followingaregeneralstepsforsettingupdevicessuchasdigitalpictureframes,BluRay players,networkconnectedTVs,anddigitalmediaadapters:
- MakesurethatyourMyBookLiveDuodeviceisconnectedtoyourhome'slocal networkandispoweredon.
- Follow the user instructions provided with your media player to proceed through any initial setup or installation of drivers.
- Using thenavigation feature on your player, scan and detect your MyBook Live Duo device on your network.
- Depending on the playery you have, you may need to access a Settings / Network Setup page in the user interface to establish connections so that your player can link to your My Book Live Device. Please refer to your player's user guide for specific instructions.
DLNADevices
SeespecificDLNAmediadeviceusermanualsforinstructionsonconnectingaDLNA devicetoyourlocalareanetworksoyoucanaccesscontentontheMyBookLiveDuo device. Go to http://www.dlna.org for a list of DLNA-certified devices and for further information.
AccessingMyBookLiveDuoUsingiTunes
iTunesOverview
YouoranyoneconnectedtotheMyBookLiveDuodevicecanuseiTunestoplaystored musicfiles.ThisservicecreatesavirtualmusiclibraryonthedeviceandtreatsitasaniTunes repository,makingitpossibletostreammusicfilesfromtheMyBookLiveDuodeviceto WindowsorMaccomputersrunningiTunes.
Note: iTunes10.4orlateronlysupportsmusicfiles.Toaccessyourvideofiles,use iTunesversion10.2orearlier.SeeKnowledgeBaseAnswerID8412for additionalinformationoniTunessupportedversions.
TheiTunesMediaServersupportsthefollowingfiletypes:
• AAC
• MP3
• WAV
•MPEG-4
Note: TunesscansanysharesthathavetheMediaServingsettingenabled, includingthePublicsharebydefault.
SeeKnowledgeBaseAnswerID8665foradditionalinformationoniTunesServersupported mediatypes.
ToenableiTunes:
-
On the Navigation panel of the My Book Live Duo dashboard, click Settings, and then clicktheMediatab.
-
Click the > beside iTunes to expand the iTunes section of the page:
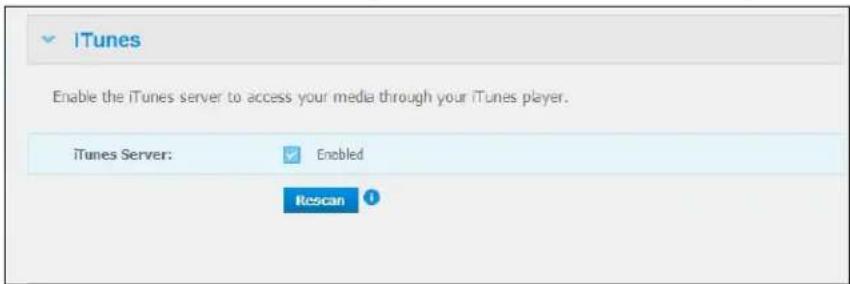
text_image
iTunes Enable the iTunes server to access your media through your iTunes player. iTunes Server: Enabled Rescan- To enableiTunestoaccessyourmusicfilesthroughyouriTunesplayer, clicktheEnable checkbox.iTunesisenabledbydefault.
- ClicktheRescanbuttonoupdateyourmediafiles.Whenthe“iTunesrescanhasbeen initiated”messagedisplays, clicktheClosebutton.
StoringContent
YoucandraganddropmediafilesintothecorrespondingfoldersinthePublicshare(e.g., musicfilesintotheMyBookLiveDuos'/Public/SharedMusic'defaultfolder).
StreamingMediainiTunes
iTunesisenabledbydefaultinthedashboard.See"MediaServerSettings"onpage71for moreinformation.
- LaunchiTunesonyourcomputer.
- ClickMyBookLiveDuoundertheSharedsectionoftheleftpane.Ifyouhavecopied musictothe/Public/SharedMusicfolderoravideoto/Public/SharedVideos,anditisinaformatsupportedbyiTunes,itshouldbelistedintherightpane:

text_image
File Edit View Controls Store Advanced Help iTunes Show Etnis Costello - Notting Hill Search... Library Movie Movies TV Shows Podcasts Apps Radio STORT iTunes Store Ping SMARED MyBookLiveDuo GENMIS Genius PLAYLISTS iTunes DJ 90's Music Classical Music Music Videos My Top Rated Recently Added Recently Played Top 25 Most Played ✓ Name Time Artist Album Genre ✓ Hacket Man 4:42 Eton John Rock ✓ Crocodile Rock 3:55 Eton John Rock ✓ She 3:08 Chris Costello Nothing Hill Sound ✓ She 3:08 Elvis Costello Nottingham Hill Sound ✓ Still 2:28 Elvis Costello Still - Single Rock ✓ The Scarlet Tide 2:52 Elvis Costello & The L... The Delivery Man Rock ✓ I'll Never Fall In Love Again 3:20 Elvis Costello With B... Austin Powers The S... Soundb ✓ Mirror In The Bathroom 3:11 The English Boat Afterno-Dazze Origin... Rock ✓ I Sing the Body Electric 5:03 Eric Brockington Fame (Soundtrack fr... Soundb ✓ Some People 3:39 Ethel Merman Gypsy - 50th Anniver... Soundb ✓ Small World 2:16 Ethel Merman Gypsy - 50th Anniver... Soundb ✓ Mr. Goldstone, I Love You 2:21 Ethel Merman Gypsy - 50th Anniver... Soundb ✓ Everything's Coming Up Roses 3:06 Ethel Merman Gypsy - 50th Anniver... Soundb ✓ Rose's Turn 4:23 Ethel Merman Gypsy - 50th Anniver... Soundb ✓ Some People (Bonus Material) 4:07 Ethel Merman Gypsy - 50th Anniver... Soundb ✓ Mr. Goldstone / Little Lamb (Bonus ... 5:13 Ethel Merman Gypsy - 50th Anniver... Soundb ✓ Together Wherever We Go 2:45 Ethel Merman Jack K... Gypsy - 50th Anniver... Soundb ✓ Together, Wherever We Go from Gy... 2:50 Ethel Merman Jack KL... Greatest Hits of Brca... Classical ✓ At Last (Single) 3:02 Etta James At Last! Blues ✓ Going Under 3:35 Evanescence Fallen Metal ✓ Bring Me To Life 3:57 Evanescence Fallen Metal ✓ Everybody's Fool 3:16 Evanescence Fallen Metal ✓ My Immortal 4:24 Evanescence Fallen Metal ✓ Haunted 3:07 Evanescence Fallen Metal ✓ Tourniquet 4:38 Evanescence Fallen Metal ✓ Imaginary 4:18 Evanescence Fallen Metal ✓ Taking Over Me 3:50 Evanescence Fallen Metal ✓ Hello 3:40 Evanescence Fallen Metal ✓ My Last Breath 4:07 Evanescence Fallen Metal ✓ Whisper 5:30 Evanescence Fallen Metal- Double-clickamediafiletoplayit.
ConnectingaUSBHardDrive
ConnectingaUSBHardDriveOverview
ConnectingAUSBDrive
MappingAUSBDrive(WindowsOnly)
CreatingaShortcuttotheUSBDrive(Windowsonly)
ConnectingaUSBHardDriveOverview
WhenyouattachaUSBdrivetotheMyBookLiveDuodevice,youturnitintoanetwork drive.NowtheUSBdrivehasthefollowingcapabilities:
- WhenyouconnectanexternalUSBdrivesuchasaWDPassport,amemorystick, oracameratotheMyBookLiveDuodevice,youcanaccessitwithWindows ExplorerorMacFinder.
■ TheUSBdrivecanserveasatargetforbackupsinWDSmartWare,Windows,orTimeMachine.
■ Theoptiontomapthedriveasauersharedrive.
- IfaWDexternaldrivehasbeenlocked,whenitisattachedtotheMyBookLiveDuo device.itmaintainsthatsecurity.
■ YoucanattachapoweredUSBhubtotheexternalUSBportandattachuptoseven USBdevicestothehub.
ConnectingAUSBDrive
ConnectaUSBharddrivetotheUSBportontherearofyourMyBookLiveDuodevicefor additionalstorage.TheUSBdriveappearsasashareontheMyBookLiveDuodashboard. (See"ManagingShares"onpage81.)
TheMyBookLiveDuodevicesupportsthefollowingformatsforexternallyattachedUSB drives:
■ FAT32
■ NTFS(readandwritecapability)
■ HFS,HFS+J
■ LinuxExt2, Ext3/Ext4
■ XFS
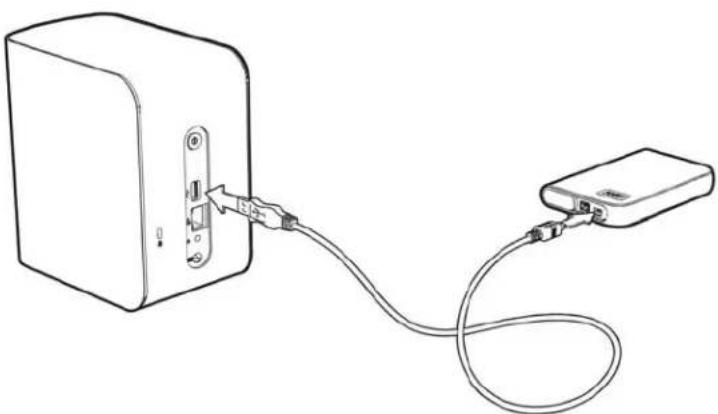
natural_image
Line drawing of a device with a cable and connector, no text or symbols presentMappingAUSBDrive(WindowsOnly)
1.Right-orleft-clicktheWDQuickViewiconinthesystemtraytodisplayamenu.
2.MovethepointeroverorclicktoselectyourUSBdriveanddisplayasubmenu:

text_image
Map Create Shortcut Eject About WD Quick View Safely remove My Passport Essential USB HDD [J:] MyBookLiveDuo [MyBookLiveDuo] Western Digital External HDD [External USB] WD SmartWare Exit- SelectMap[USBname]ontheWDQuickViewsubmenu.TheMapNetworkDrive screendisplays:

text_image
Map Network Drive What network folder would you like to map? Specify the drive letter for the connection and the folder that you want to connect to: Drive: Y: Folder: \\MyBookLiveDuo\My_Book Browse... Example: \\server\share ✓ Reconnect at logon ☐ Connect using different credentials Connect to a Web site that you can use to store your documents and pictures. Finish Cancel- Select the desired letter from the Drivedrop-downlist.
- ClicktheFinishbutton.
Note: When Windows attempt store connect a Mapped Network Drive after a restart, the "Unable to reconnect mapped network drives" errorm may appear. This can occur if the username and password of the My Book Live Duodrive do not match the current Window's username and password information.
During the automaticreconnection process, Windows may attempt to send the current Windows username and password instead of the MyBook Live Duodevice username and passwords specified during setup. Attempting to open themapped network drive prompts anew login window. Enter the MyBook Live Duodevice username and password to reconnect the share, allowing it to be accessible again (until then next reboot). For more information on this problem, see Knowledge Base Answer ID 6745.
CreatingaShortcuttotheUSBDrive(Windowsonly)
SelectCreateShortcutontheWDQuickViewsubmenuforyourUSBDrive.Anicon representingtheUSBdrivedisplaysonthedesktop.
ReplacingaDrive
TheMyBookLiveDuodeviceisalimiteduser-serviceableproductthatallowsforreplacing theharddrivesintheenclosure.
Important: OnlyWDlargecapacityharddriveassembliescanbeinsertedintothe MyBookLiveDuodriveenclosure. Visithttp://support.wdc.comand searchtheKnowledgeBaseAnswer8644fordetailedinstructionson obtainingareplacementdriveforthproduct.UseonlyWDharddrive assembliesoryourwarrantywillbevoided.
If the LED son the unit are flashing or you have received an alert, then network drivem maybe faulty. Todetermin which drive is faulty, do the following:
- On the dashboard's navigation panel, click Settings, then click the Storage tab. Review DriveAandDriveBtodeterminewhichdriveisfaulty.
- If one of the drives has Failed or Storage Failed?, and not the letter of the drive (for example, DriveA).
Intheeventafaultoccursandyouwouldliketoservicethedeviceyourself,visit WD Technical Support at http://support.wdc.com and search the Knowledge Base Answer ID8644fordetailedinstructionsonobtainingareplacementdrive.Whencontacting TechnicalSupport,havethefollowingitemsready:TheMyBookLiveDuodeviceserial number,dateofpurchase,andtheserialnumberoftheinternalharddrive(s)requiring replacement.Onceyouhavereceivedthereplacementdrive(s),followthestepsbelowto replacethefaultydrive.
Important: To avoidelectrostaticdischarge(ESD)problems,groundyourselfby touchingmetalbeforehandlingthedevice.
- Beforegettingstarted, powerofftheunitanddisconnectallofitscables.
- Placetheunitonacleanandstablesurface.
- Using your thumb, firmly pushdown on the top front panel of the unit to release the latch and open the recover.
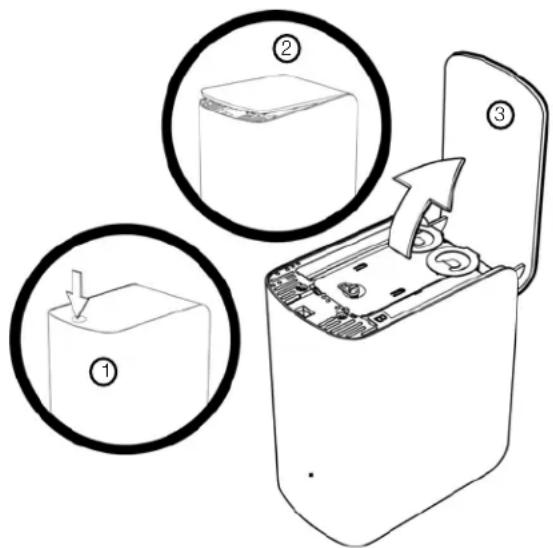
text_image
Diagram showing three steps of a device's internal components: opening, inserting into a box, and exiting with a scroll.- Loosenthethumbscrewthatsecuresthedrivecoverplate.Removethedrivecover plateandsetaside.
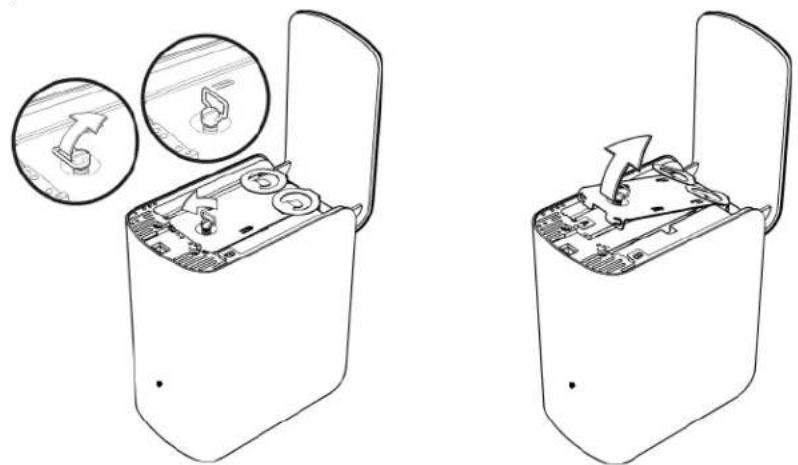
natural_image
Two technical line drawings of a device with open lid and internal components, showing internal mechanism (no text or symbols)Note: Each drive is designated A or B by acolor coded decal.
- LocatethedrivelabelthatcorrespondswiththeoneonthedashboardStoragetab.
- Using the pull tab, carefully and slowly pull the drive out of the enclosure.
- Removethescrewandpulltabfromdriveandsetthedriveaside.
- Screw the pull tab into your replacement drive.
9.Gentlyslidethereplacementdriveassemblyintothedriveslotuntilisfullyinserted.

text_image
DriveA DriveB- Replacethecoverplate and secure it with the thumbscrew.
Note: Donotover-tightenthethumbscrew.
- Closethedoorandfirmlypushinuntilillocksintoplace.
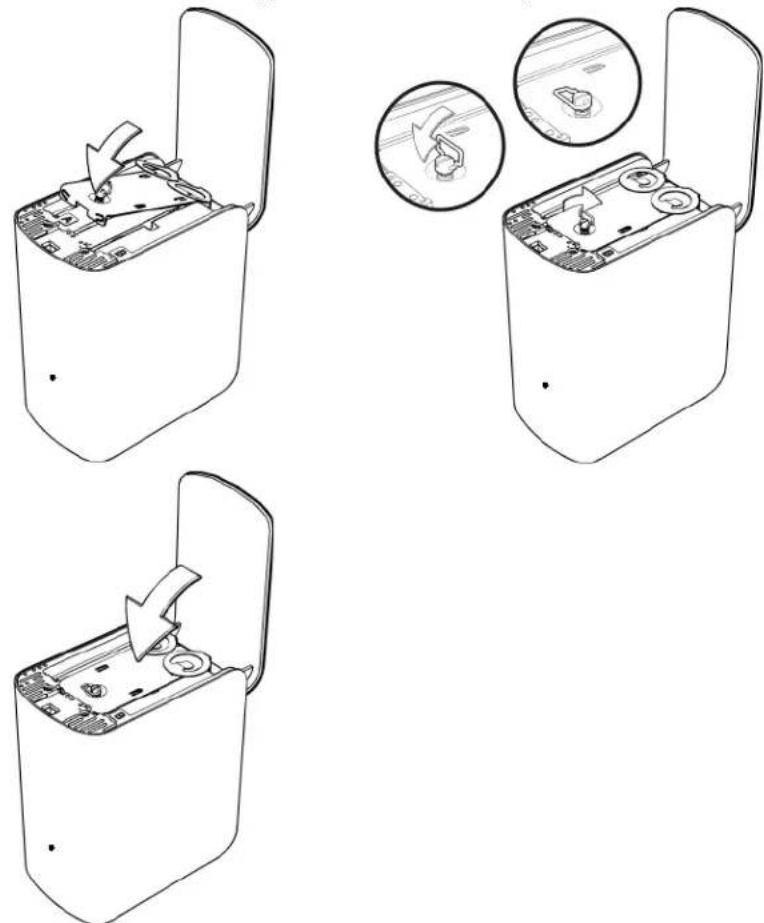
- Reconnectallofthecablesforthedevice.
- Thedrivestartstherebuildprocessautomatically. TheRAIDrebuildmaytakeupto15 hoursdependingondrivecapacityandactivity, buttypicallywillcompletein7to12 hours. AllowtheRAIDrebuildtocomplete.
Important: Donotattempttousethedevideduringtherebuildprocess.
- OncetheRAIDrebuilddiscomplete, theLEDswillglowsteadilytoindicatepower-on state.
- ReturnthereplacementdrivefollowingtheinstructionsprovidedinKnowledgeBaseAnswerID8.
Important: Donotdisassembletheinternaldriveandattachedassemblycomponents. Return the entire internal drive assembly intact to WD.
Troubleshooting
FirstStepsChecklist ResettingtheMyBookLiveDuoDevice SpecificProblemsandCorrectiveActions
Foranyissue,firstensurethatyouareusingthelatestfirmwarefortheMyBookLiveDuo device.See"Updates"onpage63forupdateinstructions.
FirstStepsChecklist
■ Isthepowersupplypluggedintothewalloutletandthedrive?
■ Areallcablescorrectlyconnectedandsecured?
- Isthestatusindicatorgreen?Ifnot,referto"CheckingtheFrontPanelLED"onpage 11.
ResettingtheMyBookLiveDuoDevice
If you have a password or an automatic IP address on the My Book Live Duodashboard and have forgotten it, pressing the reset button while the device is powered up to set the password to the default value of none and to default IP settings. Resetting does not erase your files.
Followtheinstructionsbelowtoresetthedeviceusingtheresetbutton:
WARNING!Donotmovetheunitwhileitisturnedon.Ifyoudonothaveaccess to thebackoftheunit,unplugthedrivefromthepowersource,turnthe drivearoundsoyoudohaveaccess,andthenplugthedriveinagain.
- With the device powered on, insert a paper clip or a row of a row with a row of a row of a row with a row of a row of a row with a row of a row with a row of a row with a row of a row with a row of a row with a row of a row with a row of a row with a row of a row with a row of a row with a row of a row with a row of a row with a row of a row with a row of a row with a row of a row with a row of a row with a row of a row with a row of a row with a row of
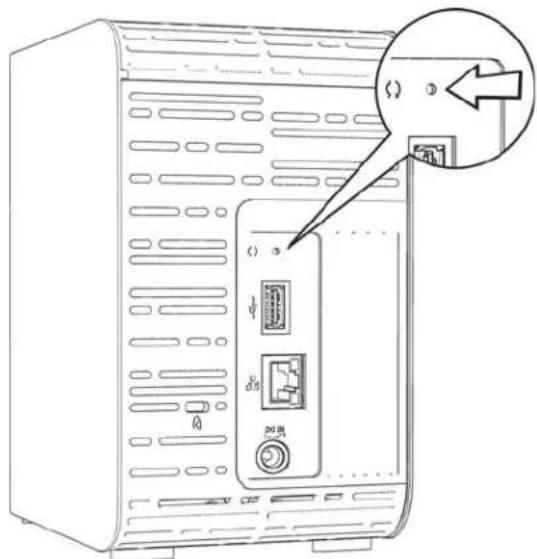
text_image
Diagram of a computer tower rear panel with labeled ports and a magnified inset showing a close-up of the port's internal structure.- Pressandholddowntheresetbuttonforfourseconds. Thedevicereboots(thismay takeuptothreeminutes).
SpecificProblemsandCorrectiveActions
The following containsspecificproblemsthatmayariseduringtheuseofthe MyBookLiveDuodevice.Possiblesolutionsarelistedforeachproblem.
LEDsdonotlightup.
■ Makesurethepowercordisconnectedcorrectly.
■ Makesurethatthewalloutlethaspower.Testitbyplugginginanotherdevice.
TheMyBookLiveDuofrontpanellightisyellowandtheunit'sNetworkAdapter LEDsdonotlight.
- ConfirmthenetworkcableisproperlyconnectedtotheMyBookLiveDuodeviceand thenetworkswitchorrouter.
- Makesurethenetworkswitchorrouterhaspower.
- Useadifferentnetworkcableandportonthenetworkswitchorrouter. Temporarily swappingtheMyBookLiveDuo'scableportwithaworkingnetworkdevicemayidentify anyfailingcablesandports.
Myrouterhasfailed.Howdoyoumanuallymapthedriveletter?
- Connect the device directly to the computer's Ethernet port.
- ClickStart>(My)Computer.
- Click My Network Places (Windows XP) or Network (Windows Vista/Windows 7).
- OntheToolsmenu, selectMapNetworkDrive.
5.Leavethedrivesettothedefaultletter.
6.IntheFolderdrop-downlist,select\devicename\public:

text_image
Map Network Drive What network folder would you like to map? Specify the drive letter for the connection and the folder that you want to connect to: Drive: Z: Folder: \MyBookLiveDuo: Public Example: \server\share Reconnect at logon Connect using a different user name. Connect to a Web site that you can use to store your documents and pictures. Finish Cancel- ClicktheFinishbutton.
- Gobacktotheopeningwindowof(My)ComputertoviewthePublicfolderofyour deviceunderNetworkDrives.
SetuporWDSmartWareisunabletodetectaMyBookLiveDuo.
IfSetuporWDSmartWareisunabletodetectaMyBookLiveDuodevice,thencertain networkprotocolsmaybeblockedonthenetworkorthecomputer.Inthosecases,theMy BookLiveDuodeviceisavailablethroughadirectIPornetworknameconnection.For example, you can open the My Book Live Duo dashboard using http://
■ Ifthecomputerisonawirelessnetwork,connectusinganaEthernetcableandtry again.
■ Temporarily disable an any computer firewalls or security software and retry.
- Checkyourlocalrouterforanyfirewallsorsecuritysoftware.Ifpresent,pleasecheck yourrouterdocumentationontemporarilydisablingthesoftwareorconfiguringthe softwaretoallowUPnPorUDPtraffic.
Important: Disabling your firewalls or security software may leave you vulnerable to security threat on your computer. Remember to store your firewall/security settings after you perform the abovesteps.
lamunabletoplaymusic, videos and/or view picture through my digital media adapter.
- Therearemanykindsoffileformatsforpictures,videosandmusic,yourparticulardigitalmediaadaptermaynotsupportaformattoplayordisplayit.Dependingonthedigitalmediaadapterdevicethatyouhave(forexample,Xbox360orPlayStation3),youmayneedtoupdateyourdevicetosupportthemediaformatthatyouwanttoplay.Refertoyourdigitalmediaadapter'susermanualforfurtherinformation.
■ Makesurethesharecontainingyourmediacontentisenabledtoservethattypeofmedia.See“CreatingaNewShare”onpage82.
IamhavingtroublesafelyshuttingdowntheMyBookLiveDuo?
If you are unable to shutdown the drive using the My Book Live Duodashboard or the WD QuickView icon, check the LED on the front of the drivet omakes sure it is not blinking. Blinking indicate that the unit is processing information (forexample, backing up or transferring files).
If the LED is blinking green, data is being read from or written to the drive. Follow these steps:
- If possible, wait for the LED to stop blinking.
- Double-check every computer on thenetwork to ensure no files are open or transfers are in progress.
- DisconnecttheEthernetcable.
- Wait60 seconds.
- Unplugthepowercable.
IamhavingtroublesafelyshuttingdowntheMyBookLiveDuo?(continued)
If the LED dissolid green (indicating the drive is idle) or blue (indicating the drive is on standby), the drive is ready to shutdown.
-
DisconnecttheEthernetcable.
-
Unplugthepowercable.
- If the LED is white (may look somewhat violet), the firmware is being updated. DO NOT ALLOW POWER TO BELOST TO YOUR DEVICE. This could corrupt the firmware in the drive and caused data loss. Loss of power may also cause the device to become unaccessible.
- IftheLEDisanyothercolor, waitforittoturngreen. Ifitdoesnotturngreen, consult "CheckingtheFrontPanelLED" on page 11.
RegulatoryandWarrantyInformation
RegulatoryCompliance
WarrantyInformation(AllRegionsExceptAustralia/NewZealand)
WarrantyInformation(Australia/NewZealandonly)
RegulatoryCompliance
FCCClassBInformation
This device has been tested and found to comply with the limit of a Class B digital device, pursuant to Part 15 of the FCC Rules. These limits are designed to provide reasonable protection against harmful interference in residential installation. This unit generates, uses, and can radiate radio frequency energy and, if not installed and used in accordance with the instructions, may cause harmful interference or radio television reception. However, there is no guarantee that interference will not occur in particular installation. Any changes or modifications not expressly approved by WD could void the user's authority to operate this equipment.
The following booklet, prepared by the Federal Communications Commission, may be helpful: How to Identify and Resolve Radio/TV Interference Problems. This booklet is Stock No. 004-000-00345-4 available from the US GovernmentPrintingOffice, Washington, DC20402.
The provided Ethernet cable must be used between the unit and network connection to comply with FCC Part 15 Class Band EN-55022 Class B.
ICES/NMB-003Compliance
CetappareildelacasseBestconformeàlanormeNMB-003duCanada.
This device complies with Canadian ICES-003 Class B.
SafetyCompliance
Approved for US and Canada. CAN/CSA-C22.2 No. 60950-1, UL 60950-1: Safety of Information Technology Equipment.
VerifiedtocomplywithEN55022forRFemission;EN-55024forGenericImmunity,asapplicable;andEN-60950 forSafety.
GSMark(Germanyonly)
KCNotice(RepublicofKoreaonly)
ClassBDevice1 Pleases notethat this device has been approved for non-business purposes and maybe used in any environment, including residential areas.
EnvironmentalCompliance(China)
WDvaluesyourbusinessandalwaysattemptstoprovideyoutheverybestofservice.IfthisProductrequires maintenance,eithercontactthedealerfromwhomyouoriginallypurchasedtheProductorvisitourproduct support Web site at http://support.wdc.com for information on how to obtain service or a Return Material Authorization(RMA).IfitisdeterminedthattheProductmaybedefective,youwillbegivenanRMAnumberand instructionsforProductreturn.Anunauthorizedreturn(i.e.,oneforwhichanRMAnumberhasnotbeenissued) willbereturnedtoyouatyoureexpense.Authorizedreturnsmustbeshippedinanapprovedshippingcontainer, prepaidandinsured,totheaddressprovidedonyourreturnpaperwork.Youroriginalboxandpackaging materialsshouldbekeptforstoringorshippingyourWDproduct.Toconclusivelyestablishtheperiodof warranty, check the warranty expiration (serial number required) via http://support.wdc.com. WD shall have no liabilityforlostdataregardlessofthecause,recoveryoflostdata,ordatacontainedinanyProductplacedinits possession.
LimitedWarranty
WDwarrantsthattheProduct,inthecourseofitsnormaluse,willforthetermdefinedbelow,befreefrom defects in material and workmanship and will conform to WD's specification therefor. The term of your limited warrantydependsonthecountryinwhichyourProductwaspurchased.Thetermofyourlimitedwarrantyisfor 2yearsintheNorth,SouthandCentralAmericaregion,2yearsintheEurope,theMiddleEastandAfricaregion, and3yearsintheAsiaPacificregion,unlessotherwiserequiredbylaw.Thetermofyourlimitedwarrantyperiod shallcommenceonthepurchasedateappearingonyourpurchasereceipt.WDmayatitsdiscretionmake extendedwarrantiesavailableforpurchase.WDshallhavenoliabilityforanyProductreturnedifWDdetermines thattheProductwasstolenfromWDorthattheasserteddefecta)isnotpresent,b)cannotreasonablybe rectifiedbecauseofdamageoccurringbeforeWDreceivestheProduct,orc)isattributabletomisuse,improper installation,alteration(includingremovingorobliteratinglabelsandopeningorremovingexternalenclosures, unlesstheproductisonthelistoflimiteduser-serviceableproductsandthespecificalterationiswithinthescope of the applicable instructions, as found at http://support.wdc.com), accident or mishandling while in the possessionofsomeoneotherthanWD.Subjectttothelimitationsspecifiedabove,yoursoleandexclusive warranty shall be, during the period of warranty specified above and at WD's option, the repair or replacement of theProductwithanequivalentorbetterProduct.TheforegoingwarrantyofWDshallextendtorepairedor replacedProductsforthebalanceoftheapplicableperiodoftheoriginalwarrantyorninety(90)daysfromthe dateofshipmentofarepairedorreplacedProduct,whicheverislonger.
The foregoing limited warranty is WD's sole warranty and applicable only to product sold as new. The remedies provided herein are in lieu of any and all other remedies and warranties, whether expressed, implied or statutory, including but not limited to, any implied warranty of merchantability or fitness for a particular purpose, and by and all obligations and liabilities of WD for damages including, but not limited to accidental, consequential, or special damages, or any financial loss, lost profits or expenses, or lost data arising out ofor in connection with the purchase, use, or performance of the Product, even if WD has been advised of the possibility of such damages. In the United States, some states donotallow exclusion or limitations of incidental or consequential damages, so the limitations above may not apply to you. This warranty gives you specific legal rights, and you may also have other rights which vary from state to state.
WarrantyInformation(Australia/NewZealandonly)
ForconsumerspurchasingproductsinAustraliaandNewZealand, pleaserefertothis warrantyinformation.
NothinginthiswarrantymodifiesorexcludesyourlegalrightsundertheAustralianCompetitionandConsumerActortheNewZealandConsumerGuaranteesAct. ThiswarrantyidentifiesWD'spreferredapproachto resolvingwarrantyclaimswhichislikelytobequickandsimpleforallparties.
Nootherwarrantieseitherexpressorimpliedbylaw,includingbutnotlimitedtothosecontainedintheSaleof GoodsAct,aremadewithrespecttotheProduct.IfyoupurchasedyourProductinNewZealandforthe purposesofabusiness,youacknowledgeandagreethattheNewZealandConsumerGuaranteesActdoesnot apply.
In Australia, our goods comewith guarantee that cannot be excluded under the Australian Consumer Law. You are entitled to a replacement or refund for a major failure and compensation for any other reasonably foreseeable loss or damage. You are also entitled to have the goods repaired or replaced if goods fail to be of acceptable quality and the failure does not amount to a major failure. What constitutes a major failure is set out in the Australian Consumer Law.
Warranty
WDwarrantsthattheProduct,inthecourseofitsnormaluse,willforthetermdefinedbelow,befreefrom defectsinmaterialandworkmanshipandwillconformtoWD'sspecifications. Thetermofyourwarrantyis3 yearsinAustraliaandNewZealand,unlessotherwiserequiredbylaw. Thetermofyourwarrantyperiodshall commenceonthepurchasedateappearingonyourpurchasereiceptfromanauthorizeddistributoror authorizedreseller. Proofofpurchaseshallberequiredtobeeligibleforthiswarrantyandtoestablishthe commencementdateofthiswarranty.WarrantyservicewillnotbeprovidedunlesstheProductisreturnedtoan authorizeddistributor,authorizedresellerorregionalWDreturncenterwheretheProductwasfirstshippedby WD.WDmayatitsdiscretionmakeextendedwarrantiesavailableforpurchase. WDshallhavenoliabilityforany ProductreturnedifWDdeterminesthattheProductwas(i)notpurchasedfromanauthorizeddistributoror authorizedreseller, (ii)notusedinaccordancewithWDspecificationsandinstructions, (iii)notusedforits intendedfunction,or(iv)stolenfromWD,orthattheasserteddefecta)isnotpresent, b)cannotreasonably be rectifiedbecauseofdamageoccurringbeforeWDreceivestheProduct,orc)isattributabletomisuse,improper installation,alteration(includingremovingorobliteratinglabelsandopeningorremovingexternalenclosures, includingthemountingframe,unlesstheproductisonthelistoflimiteduser-serviceableproductsandthe specificalterationiswithinthescopeoftheapplicableinstructions,asfoundathttp://support.wdc.com), accidentormishandlingwhileinthepossessionofsomeoneotherthanWD.
PRODUCTSARECOMPLEXANDFRAGILEITEMSTHATMAYOCCASSIONALYFAILDUETO(A) EXTERNALCAUSES, INCLUDINGWITHOUTLIMITATION,MISHANDLING,EXPOSURETOHEAT, COLD,ANDHUMIDITY,ANDPOWERFAILURES,OR(B)INTERNALFAULTS.SUCHFAILURESCAN RESULTINTHELOSS,CORRUPTION,DELETIONORALTERATIONOFDATA.NOTETHATYOUSHALL BERESPONSIBLEFORTHELOSS,CORRUPTION,DELETIONORALTERATIONOFDATA HOWSOEVERCAUSED,ANDFORBACKINGUPANDPROTECTINGDATAAGAINSTLOSS, CORRUPTION,DELETIONORALTERATION.YOUAGREETOCONTINUALLYBACKUPALLDATAON THEPRODUCT,ANDTOCOMPLETEABACKUPPRIORTOSEEKINGANYGENERALSERVICEAND TECHNICALSUPPORTFROMWD.
In Australia, if the Product is not of a kind ordinarily acquired for personal, domestic or household use or consumption, provided it is fair and reasonable to do so, WD limits its liability to replacement of the Product supply of equivalent or better product.
ThiswarrantyshallextendtorepairedorreplacedProductsforthebalanceoftheapplicableperiodoftheoriginal warrantyorninety(90)daysfromthedateofshipmentofarepairedorreplacedProduct,whicheverislonger. ThiswarrantyisWD'ssolemanufacturer'swarrantyandisapplicableonlytoProductssoldasnew.
ObtainingService
WDvaluesyourbusinessandalwaysattemptstoprovideyoutheverybestofservice.Shouldyouencounterany problem,pleasegiveusanopportunitytoaddressitbeforereturningthisProduct.Mosttechnicalsupport questionscanbeansweredthroughourknowledgebaseore-mailsupportserviceathttp://support.wdc.com.If theanswerisnotavailableor,ifyouprefer,pleasecontactWDattheapplicabletelephonenumbershowninthe frontofthisdocument.
If you wishtomake acclaim, you should initially contact the dealer from whom you originally purchased the Product. If you are unable to contact the dealer from whom you originally purchased the Product, please visit our product support Website at http://support.wdc.com for information on how to obtain service a Return Material Authorization (RMA). If it is determined that the Product may be defective, you will begin an RMA number and instructions for Product return. An unauthorized return (i.e., one for which an RMA number has not been issued) will be returned to you at your expense. Authorized returns must be shipped in an approved shipping container, prepaid and insured, to the address provided with your RMA number. If following receipt of qualifying claim under this warranty, WD orthedealer from whom you originally purchased the Product
determinesthatyourclaimisvalid,WDorsuchdealershall,atitsdiscretion,eitherrepairorreplacetheProduct withanequivalentorbetterProductorrefundthecostoftheProducttyou.Youareresponsibleforany expensesassociatedwithaclaimunderthiswarranty.Thebenefitsprovidedtoyouunderthiswarrantyarein additiontootherrightsandremediesavailabletoyouundertheAustralianCompetitionandConsumerActorthe NewZealandConsumerGuaranteesAct.
YouroriginalboxandpackagingmaterialsshouldbekeptforstoringorshippingyourWDproduct.To conclusivelyestablishtheperiodofwarranty,checkthewarrantyexpiration(serialnumberrequired)viahttp://support.wdc.com.
WesternDigitalTechnologies, Inc.
3355MichelsonDrive, Suite100
Irvine, California92612
Phone:949-672-7000
E-mail:support@wdc.com
Index
A
ACadapters6
AccessingLearningCenter53
Accessories7
Alert&EventNotifications64
Alerts
dashboardicon57
list57
monitoringwithWDQuickView51
AudiostreaminginiTunes122
B
Backingup
allfilecategories30
AppleTimeMachine41
files28
selectedfilesorfolders32
Windows7/WindowsVista40
Backupfunction28
Backups
deleting86
listing86
retrieving33
starting44
Bonjour, finding and setting up drive 22
Boxcontents5
C
CD
gettingstartedwith12
ChinaRoHS133
Compliance,regulatory132
Connectingthedrive10
Creatingaprivateshare79
CustomerSupport58
D
Diagnostics67
Disconnectingsafely130 ,131
DLNAdevices121
DLNA, enabling71
Drive
components9
configurations70
replacement125
usage62
DriveProperties
viewing50
E
Emailaddress
adding64
deleting64
Enablingremoteaccess96
EnergySaver65
disablingHardDisksleep65
enablingHardDisksleep65
Environmentalcompliance(China)133
Eventslist57
F
Failedrouter, troubleshooting129
FCCClassBinformation132
Features3
FiletypesforWDSmartWarebackup27
FTPsetting66
G
GettingstartedwithCD12
H
HardDiskSleep
disabling65
enabling65
Howdol?260
|
ICES/NMB-003compliance132
Installing
connectingandtroubleshooting18
WD2gomobileapp103
WDPhotos100
WDQuickView15
WDSmartWaresoftware25
iTunes
storingmediacontent122
iTunes
overview121
streamingaudio122
L
LAN
configuration65
requirements7
Launching
MyBookLiveDuoDashboard20 ,49
WDSmartWare26
LearningCenter, accessing53
LEDs11
Logfiles59
M
Mac
AppleTimeMachine41
findingandsettingupdrive22
gettingstartedwithCD12
openingapublicshare21
softwarefolder21
Mailfiles27
Managing
shares81
users77
usingQuickView46
Mapping
duringsetup14
USBdrive(WindowsOnly)124
usingWDQuickView49
Mediaplayers
accessingMyBookLiveDuo115
generalsetupsteps120
Mediaservers
mediatypes114
overview112
settings71,112
Mediastorage114
Mobileaccess
addingaconnection98
settingup98
Mobileapps94
installingWD2go103
installingWDPhotos100
MonitoringStorage51
MyBookLiveDuo
backupslist86
changinguserpassword80
configurationsettings70
creatingashare82
dateandtime62
deletingashare84
deletingbackups86
diagnostics67
factoryrestore68
ftpsetting66
logfiles59
managingusers77
mediaserversettings71 ,112
networksettings65
privateshares79
remoteaccesssettings71
sharesettings81
systemsettings61
updating63
usersettings77
utilitiessettings67
workgroups66
MyBookLiveDuoDashboard
launching20,49
screencomponents57
Welcomescreen13
N
Network
connection10
settings65
Nextstepsscreen17
Non-administratoraccess13
O
OnlineHelpforWDSmartWare24
Operatingsystemrequirements7
P
Packagecontents5
Password
changing80
Pausingbackups38
Personalcloud
defined94
PlayStation3120
Precautions8
Preferences,WDSmartWare39
Pre-installationrequirements8
Privateshare
creating79
creatingforauser79
makingpublic84
opening48,84
product
obtainingservice133
warranty133,134
Productregistrationii
Publicshare
convertingfromaprivateshare84
openingonaMac21
openingonNextStepsscreen17
openingonWindowsVista/Windows7
19
R
Rallydriver
WDSmartWareinstallation26
Rebootingsafely68
Registeringawebaccessaccount106
Registration
onlineii
Regulatorycompliance132
Remoteaccess
enabling96
requirements94
settings71
sharingfiles111
Replacingadrive125
Requirements
mobileapps94
operatingsystems7
ResettingtheMyBookLiveDuoDevice128
Restoringtofactorydefaults68
Retrievefolder39
Retrievingbackups33
RoHS133
S
Safelyshuttingdown130,131
Safepoint
creating87
forbackingupMyBookLiveDuo87
managing93
recovering92
updating91
Safety
compliance132
instructions1
Settingup
mobileaccess98
webaccess105
Share
creating82
creatinganewuserfor83
deleting84
managing81
openingwithWDSmartWare48
usernameandpassword78
Sharingfilesremotely111
Shortcut
toamappeddrive15
toapublicshare49
toaUSBdrive124
Shuttingdownsafely
troubleshooting130,131
usingdashboard68
usingtheWDQuickViewicon51
Softwaresettings38 ,39
Settings
SeeDriveSettings
StorageSettings71
Streaming
DLNA71
iTunessettings71
mediainiTunes122
videos,photos,andmusic112
Systemrequirements7
Systemsettings61
T
Troubleshooting
cannotdetectmydrive130
cannotplaymediathroughdigitalmedia adapter130
checklist128
drivenotconnectingtonetwork129
failedrouter129
LEDsdon'tlightup129
manuallymappingthedriveletter129
resettingthesystem128
WDQuickViewinstallation18
U
UnderwritersLaboratoriesInc.(UL)132
UninstallingWDQuickView54
UpdatingMyBookLiveDuo63
USBharddrive
connectandmanage123
creatingashortcut(WindowsOnly)124
mapping124
User
creating78
creatingprivatesharefor79
password80
settings77
viewinglistof77
W
WAN7
Warning
deletingabackup86
deletingashare84
donotmovedrive128
donnotunplugdrive51
interruptingthefactoryrestore68
renamingthedrive61
unpluggingdriveduringrebootorshut-down51,69
useshieldedEthernetcableprovided11
warrantyinformation
allregionsexceptAustralia/NewZealand 133
Australia/NewZealand134
WD2go94
personalcloud94
registeringawebaccessaccount106
settingup105
WD2gomobileapp
features95
installing103
WDMediaPlayers120
WDPhotos
features95
installing100
WDQuickView
accessingLearningCenter53
alertsoption52
installing15
managing46
mappingthedrive49
monitoringstorage51
openingshares48
safelyshuttingdown51
shortcuttopublicshare49
shortcuts46
uninstalling54
viewingdriveproperties50
WDSmartWare
exitingsafely48
Homescreen27
launching26
overview24
pausingbackups38
settingautoupdatepreferences39
settingnumberofbackupversions38
settingretrievefolder39
softwaresettings37
systemfiles28
Webbrowsercompatibility7
WindowsMediaPlayer
version11116
version12118
WindowsVista/Windows7
backups40
gettingstartedwithoutCD19
publicshare19
softwarefolder20
Windows,gettingstartedwithCD12
Workgroups66
X
Xbox360120
Information furnished by WD is believed to be accurate and reliable; however, no responsibility is assumed by WD for its use nor for any infringement of patents or other rights of third parties which may result from its use. No license is granted by implication or otherwise under any patent or patent rights of WD. WD reserves the right to change specifications at any time without notice.
Western Digital, WD, the WD logo, My Book, My Passport, and WD TV are registered trademarks in the U.S. and other countries; and My Book Live Duo, WDSmartWare, WD Green Power, WD2go, WD Photos, WDTVLive, WDTVLivePlusare trademark of Western Digital Technologies, Inc. Other marksmaybementioned herein that belong to other companies.
©2012WesternDigitalTechnologies, Inc. All rights reserved.
WesternDigital
3355MichelsonDrive, Suite100
Irvine, California92612U.S.A.
4779-705065-A02Jan2012