LabelWriter Print Server - Printer DYMO - Free user manual and instructions
Find the device manual for free LabelWriter Print Server DYMO in PDF.

User questions about LabelWriter Print Server DYMO
0 question about this device. Answer the ones you know or ask your own.
Ask a new question about this device
Download the instructions for your Printer in PDF format for free! Find your manual LabelWriter Print Server - DYMO and take your electronic device back in hand. On this page are published all the documents necessary for the use of your device. LabelWriter Print Server by DYMO.
USER MANUAL LabelWriter Print Server DYMO
© 2011 Sanford, L.P. All rights reserved. 04/11
No part of this document or the software may be reproduced or transmitted in any form or by any means or translated into another language without the prior written consent of Sanford, L.P.
Trademarks
DYMO and LabelWriter are registered trademarks of Sanford, L.P. All other trademarks are the property of their respective holders.
Contents
About the LabelWriter Print Server .... 1
Print Server Features .... 1
System Requirements. 2
Using this Guide....2
Installing the LabelWriter Print Server 3
Getting Started....3
Connecting the Cables 4
Installing the Software 4
Installing the Software in Windows.... 4
Installing the Software in Mac OS 5
Configuring the Print Server 5
Adding a Printer 7
Adding a Printer in Windows XP 7
Adding a Printer in Windows Vista.... 11
Adding a Printer in Mac OS.... 15
Adding a Printer in Linux 16
Printing a Test Label 18
Managing the LabelWriter Print Server....19
About the Control Center.... 19
Viewing the Print Server Information (Windows only).... 19
Changing the Control Center Language.... 20
About the Print Server Web Pages. 21
Viewing the Print Server Status 22
Configuring the Server.... 22
Changing the Server Name and Description 22
Changing the TCP/IP Configuration 23
Changing the Administrator Name and Password 23
Upgrading the Firmware 24
Getting Help 25
Troubleshooting.... 25
Status Lights.... 25
Restoring the Print Server to the Factory Default Settings 25
Limited Warranty.... 26
Obtaining Technical Support.... 27
Technical and Certification Information 29
Technical Specifications 29
Device Certification 29
Declaration of Conformity 29
Documentation Feedback 30
Chapter 1
About the LabelWriter Print Server
Congratulations on purchasing a DYMO LabelWriter print server. Your print server will give you years of reliable service. We encourage you to take a few minutes to review how to use and care for your print server.
Using the print server, you can connect your LabelWriter 400 or later series printer directly to your network, without dedicating a computer to printer sharing. Now everyone connected to your network can print to a single LabelWriter printer. We have no doubt that the LabelWriter print server will make your job easier and more efficient.
Print Server Features
Your LabelWriter print server can be used to share any LabelWriter 400 or later series printer, including the LabelWriter Twin Turbo and LabelWriter Duo.
The print server connects to your network using a standard Ethernet connection.
Become familiar with the major components of the print server.

text_image
Power connector Init/Reset button USB CAN USB connector (to printer) Ethernet connector (to network) DYSMO® LabelWriter® Print Server P0621 LINK ACTIVE USG Status lightsThe status lights visually show the current state of the print server. See "Status Lights" on page 25 for a description of the status lights.
System Requirements
The print server requires a standard Ethernet connection and one of the following:
- Windows ^ XP 32-bit
- Windows Vista ^ 32 or 64-bit
- Windows ^® 7
- Mac OS ^ X v10.3.9 or later (LabelWriter Duo requires Mac OS X v10.5 or later)
- Linux (Linux is not officially supported. See "Adding a Printer in Linux" on page 16 for more information)
Using this Guide
This User Guide provides instructions for the DYMO LabelWriter print server on the Windows, Macintosh, and Linux platforms. For the most part, the software operates in the same way on all platforms. Any differences in features, procedures, or commands are noted within the text.
This User Guide includes information for installing and using the print server with a DYMO LabelWriter printer. Depending on the model of DYMO printer you are using, some sections of this User Guide may not apply to you. The following table provides a summary of the contents.
| User Guide Chapter Description | |
| About the LabelWriter Print Server | This chapter gives an overview of the print server. |
| Installing the LabelWriter Print Server | This chapter describes how to install and configure the print server, install the Print Server Control Center software, and add a LabelWriter printer to your computer. |
| Managing the LabelWriter Print Server | This chapter includes information about the Print Server Control Center software. This includes information on changing the server configuration and upgrading the firmware. |
| Getting Help | This chapter offers suggestions for resolving problems that can occur when using the print server. If you are unable to solve a problem, this chapter also describes how to contact DYMO Technical Support. |
| Technical and Certification Information | This chapter contains technical and certification information for the print server. |
Chapter 2
Installing the LabelWriter Print Server
This chapter describes how to install and configure the print server.
To install the print server
1 Make sure that you have everything you need to get started.
2 Connect the cables.
3 Install the LabelWriter Control Center software.
4 Configure the print server.
5 Add the printer to your computer.
See Chapter 3, Adding a Printer for instructions on adding a printer on your specific operating system.
Getting Started
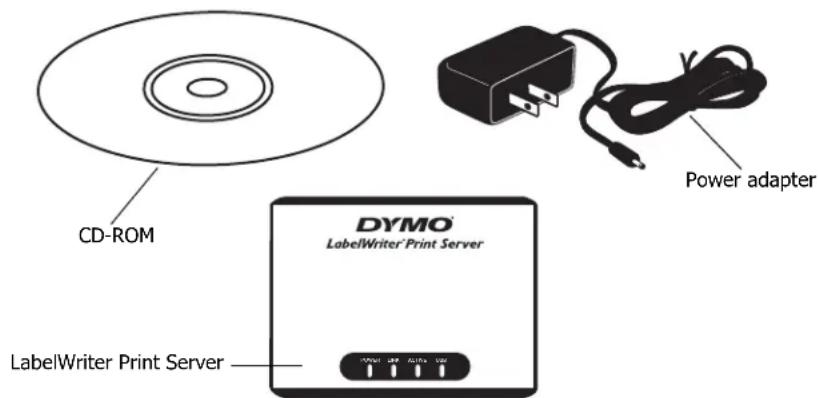
Once you have unpacked your print server, make sure that you have all of the items shown here.
text_image
CD-ROM Power adapter DYMO LabelWriter Print Server LabelWriter Print ServerIn addition to the items that come with the print server, you will need the following:
- A LabelWriter 400 or later series printer, with power adapter and USB cable
- Installed LabelWriter printer drivers (included in the DYMO Label Software installation)
- A standard Ethernet cable (available from your local office supply and other retailers)
- A working Ethernet connection to your Local Area Network
Connecting the Cables
The print server connects directly to your network using a standard Ethernet connection.
To connect the cables
1 Plug the Ethernet cable into the right side of the print server.
2 Plug the other end of the Ethernet cable into an available Ethernet connection on your network.
3 Plug the USB cable from your LabelWriter printer into the right side of the print server. Make sure that the USB cable is connected to your printer and that your printer is plugged in.
4 Plug the print server power adapter into the left side of the print server.
5 Plug the other end of the power adapter into a power outlet.
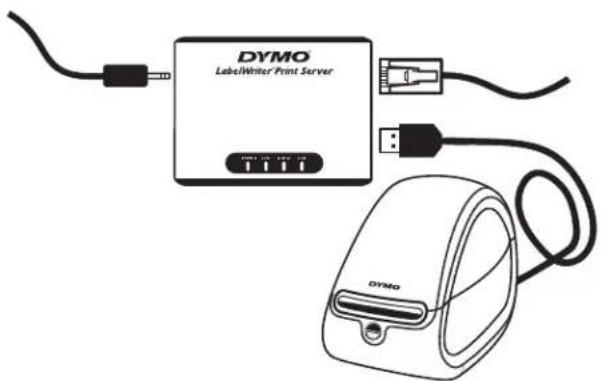
text_image
DYSMO LabelWinter Print Server DYSMOInstalling the Software
The Control Center software included with your print server gives you quick access to everything that you need to configure and manage your print server. You can install the software on any computer that is connected to your network.
Installing the Software in Windows
You can install the Control Center software in Windows.
To install the software in Windows
1 Insert the LabelWriter Print Server CD into your CD-ROM drive. After a few seconds, the installation screen appears.
If the installation screen does not appear:
a. Click Start, then Run on the Windows taskbar. The Run dialog box appears.
b. Enter D:\install.exe (where D is the letter assigned to the CD-ROM drive) and click OK.
2 Click Install Application and follow the instructions in the installer.
3 On the final page of the installer, make sure that the Launch LabelWriter Print Server Control Center check box is selected, and then click Finish.
The LabelWriter Control Center starts.
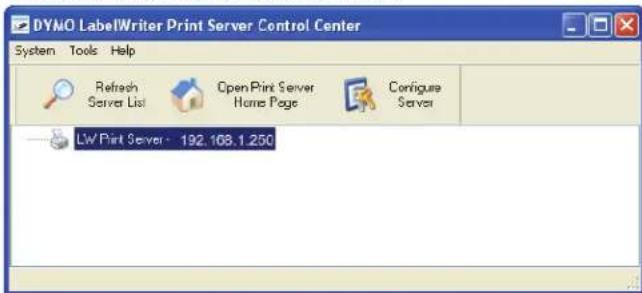
text_image
DYNO LabelWriter Print Server Control Center System Tools Help Refresh Server List Open Print Server Home Page Configure Server LW Print Server: 192.168.1.250Installing the Software in Mac OS
To install the software in Mac OS
1 Insert the LabelWriter Print Server CD into your CD-ROM drive. The CD icon appears on your desktop.
2 Double-click the CD icon, and then double-click the Mac folder.
3 Double-click Dymo LabelWriter Print Server Control Center.dmg. The DYMO LabelWriter Print Server Control Center folder opens.
4 Drag the DYMO LabelWriter Print Server Control Center icon into the Applications folder on your computer.
5 Double-click DYMO LabelWriter Print Server Control Center in the Applications folder to open the Print Server Control Center.

text_image
DYMO LabelWriter Print Server Control Center LW Print Server - 10.216.2.154Configuring the Print Server
When you first install the print server, the server is automatically assigned an IP address. Every time the software is launched, the IP address is displayed next to the server name in the Control Center window.
By default, the server is configured to automatically get an IP address. If you are using the print server on a small office or home network, we recommend that you configure the server to use a static IP address. This will ensure that the computers connected to your network will always be able to locate the print server.
By default, the static IP address for the print server is 192.168.1.100. You only need to change the last three numbers. When assigning a static IP address, check your router to be sure that the IP address you choose is not already in use. Refer to your router documentation for information on how to do this. A good practice when adding a print server or other shared network device to a network is to start with a number toward the top of the range, for example 192.168.1.250, and work down from there.
Note If you do not set a static IP address, write down the IP address that appears next to the server name in the Control Center window. You will need this IP address to add the printer to your computer.
To set a static IP address
1 If the Control Center is not already open, double-click on your desktop (Windows) or in the Applications folder (Mac OS).
2 Select a print server from the list, and click Configure Server on the toolbar. The Login to LW Print Server dialog box appears.
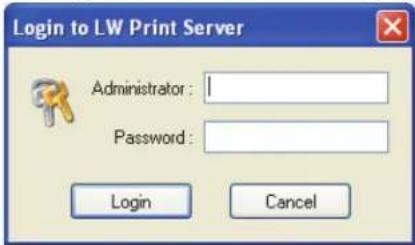
text_image
Login to LW Print Server Administrator : Password : Login Cancel3 Enter the following in the Administrator and Password fields.
Administrator: admin
Password: admin
Note These are the default settings. See "Changing the Administrator Name and Password" on page 23 for information on how to change the administrator name and password.
4 Click Login.
The Set TCP/IP Configuration dialog box appears.

text_image
DYMO LabelWriter Print Server Control Center TCP/IP Set TCP/IP Configuration Current IP: 192.168.1.250 Automatically get IP by DHCP Static IP IP Address 192 168 1 250 Subnet Mask 255 255 255 0 Reset Apply Close5 Select Static IP.
6 Enter the IP address you want to use in the IP Address field, and then click Apply.
7 Click Yes when prompted to save the TCP/IP configuration
8 After the server restarts, click Close to close the TCP/IP Configuration dialog box. The IP address is now displayed next to the server name in the Control Center window.
Note Write down this IP address; you will need this IP address to add the printer to your computer.
Next, you need to add the printer to your computer. See Chapter 3, Adding a Printer for information on adding the printer in your specific operating system.
Chapter 3
Adding a Printer
In order to print to the LabelWriter printer that is connected to the print server, you must first add the printer to your computer. You can add the printer to any or all of the computers connected to your network.
You must have the LabelWriter printer drivers installed on your local computer to add a printer. The printer drivers are included in the DYMO Label Software installation.
Note Because the LabelWriter Duo printer is actually two printers in one, you need to add both the label printer and the tape printer to your computer. These two printers show up separately in the printer list.
This chapter describes how to add a printer in Windows XP, Windows Vista, Mac, and Linux.
Adding a Printer in Windows XP
This section describes how to add a LabelWriter printer in Windows XP.
When adding a LabelWriter Duo printer, you will need to create separate ports for the Label printer and the Tape printer. Each port must have a unique name.
To add a LabelWriter printer
1 Click Start, and then click Printers and Faxes.
2 Click Add a Printer.
The Add Printer Wizard starts.
3 Click Next.
4 On the Local or Network Printer page, do the following:
a. Select Local printer attached to this computer.
b. Make sure the Automatically detect and install my Plug and Play printer check box is cleared.
c. Click Next.
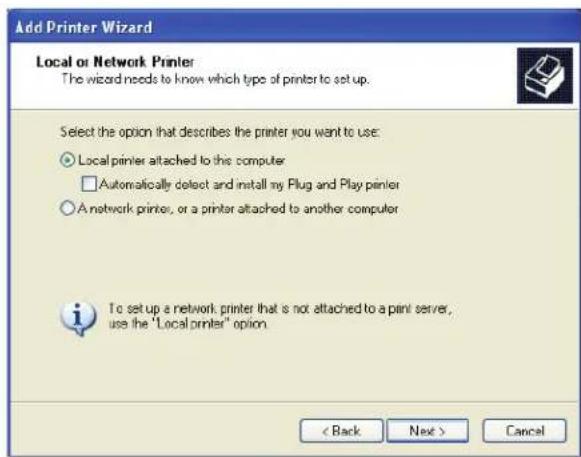
text_image
Add Printer Wizard Local or Network Printer The wizard needs to know which type of printer to set up. Select the option that describes the printer you want to use: ○ Local printer attached to this computer □ Automatically select and install my Plug and Play printer ○ A network printer, or a printer attached to another computer To set up a network printer that is not attached to a print server, use the "Local printer" option. < Back Next > Cancel5 On the Select a Printer Port page, do the following:
a. Select Create a new port.
b. Choose Standard TCP/IP Port from the Type of port list.
c. Click Next.
The Add Standard TCP/IP Printer Port Wizard starts.
6 Click Next.

text_image
Add Printer Wizard Select a Printer Port Computers communicate with printers through ports. Select the port you want your printer to use. If the port is not listed, you can create a new port. Use the following port: LPT1 (Recommended Printer Port) Note: Not computers use the LPT1 port to communicate with a local printer. The connector for this port should look something like this. Create a new port: Type of port: Standard TCP/IP Port < Back Next > Cancel7 On the Add Port page, do the following:
a. In the Printer Name or IP Address field, enter the IP address that you wrote down when configuring the print server. The port name is filled in automatically.
b. (Optional) Enter a new name for the port in the Port Name field. When adding a LabelWriter Duo printer, you must give the Label printer port and the Tape printer port different names.
c. Click Next.
8 On the Additional Port Information Required page, select Custom, and then click Settings.
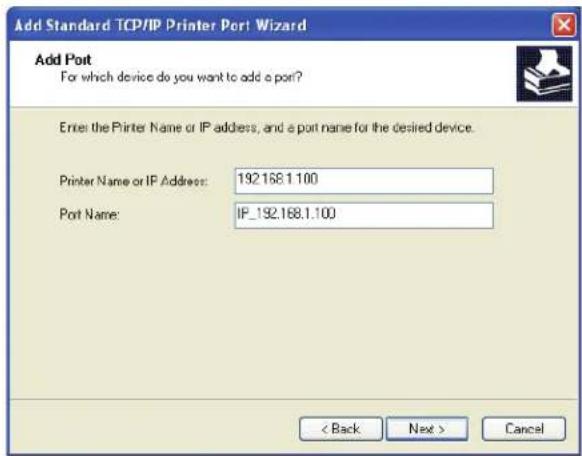
text_image
Add Standard TCP/IP Printer Port Wizard Add Port For which device do you want to add a port? Enter the Printer Name or IP address, and a port name for the desired device. Printer Name or IP Address: 192.168.1.100 Port Name: IP_192.168.1.100 < Back Next > Cancel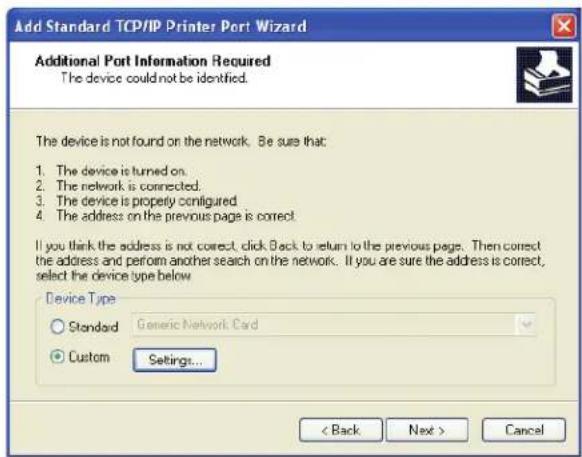
text_image
Add Standard TCP/IP Printer Port Wizard Additional Port Information Required The device could not be identified. The device is not found on the network. Be sure that: 1. The device is turned on. 2. The network is connected. 3. The device is properly configured. 4. The address on the previous page is correct. If you think the address is not correct, click Back to return to the previous page. Then correct the address and perform another search on the network. If you are sure the address is correct, select the device type below. Device Type Standard Generic Network Card Custom Settings... < Back Next > Cancel9 In the Configure Standard TCP/IP Port Monitor dialog box, do the following:
a. Under Protocol, select Raw.
b. Under Raw Settings, make sure the Port Number is 9100. This is the default value.
c. Click OK.
10 On the Additional Port Information Required page, click Next.
11 On the last page of the Add Standard TCP/IP Printer Port Wizard, click Finish.

text_image
Configure Standard TCP/IP Port Monitor Port Settings Port Name: IP 132.158.1.100 Printer Name or IP Address: 192.169.1.100 Protocol Raw LPR Raw Settings Port Number: 9100 LPR Settings Quasue Name: LPR Byte Counting Enabled SNMP Status Enabled Community Name: public SNMP Device Index: 1 OK Cancel12 On the Install Printer Software page of the Add Printer Wizard, do the following:
a. Choose DYMO from the Manufacturer list.
b. Choose the LabelWriter printer that you are adding from the Printers list.
To add the LabelWriter Duo, choose DYMO LabelWriter DUO Label.
c. Click Next.
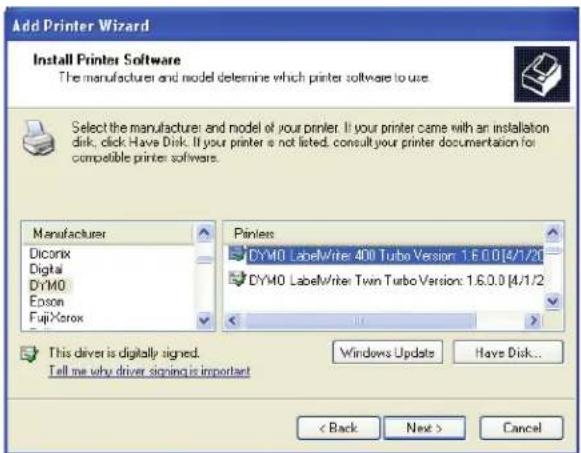
text_image
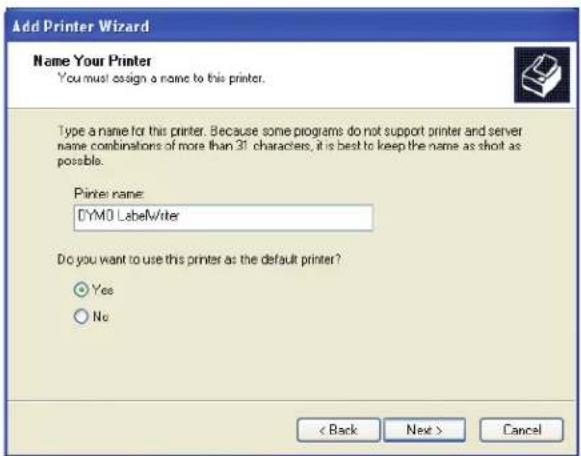
Add Printer Wizard Install Printer Software The manufacturers and model determine which printer software to use. Select the manufacturers and model of your printer. If your printer came with an installation disk, click Have Disk. If your printer is not listed, consult your printer documentation for compatible printer softwares. Manufacturer Dicomix Digital DYM0 Edson FujXerox Printer CYM0 LabelWriter 400 Turbo Version: 1.6.0.0 [4/1/2] CYM0 LabelWriter Twin Turbo Version: 1.6.0.0 [4/1/2] This driver is digitally signed. Tell me why driver signing is important Windows Update Have Disk... < Back Next > Cancel13 On the Name Your Printer page, do the following:
a. Enter a name for your printer in the Printer name field.
b. Select whether or not you want to use this printer as the default printer.
c. Click Next.
14 On the Printer Sharing page, select Do not share this printer, and then click Next.
15 To print a test label, select Yes, and then click Next.
16 Click Finish.
The printer is now available in the printer list. For the LabelWriter Duo, you now need to add the tape portion of the printer.
text_image
Add Printer Wizard Name Your Printer You must assign a name to this printer. Type a name for this printer. Because some programs do not support printer and server name combinations of more than 31 characters, it is best to keep the name as shot as possible. Printer name: CYMO LabelWriter Do you want to use this printer as the default printer? Yes No < Back Next > CancelTo add the Tape printer portion of the LabelWriter Duo printer
1 Repeat steps 1-8 in "To add a LabelWriter printer" on page 7.
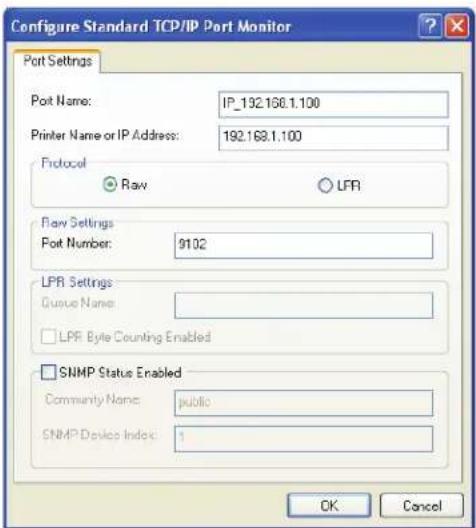
2 In the Configure Standard TCP/IP Port Monitor dialog box, do the following:
a. Under Protocol, select Raw.
b. Under Raw Settings, enter 9102 in the Port Number field.
c. Click OK.
3 On the Additional Port Information Required page, click Next.
4 On the last page of the Add Standard TCP/IP Printer Port Wizard, click Finish.
5 On the Install Printer Software page of the Add Printer Wizard, do the following:
a. Choose DYMO from the Manufacturer list.
b. Choose DYMO LabelWriter
Duo Tape from the
Printers list.
c. Click Next.
text_image
Configure Standard TCP/IP Port Monitor Port Settings Port Name: IP_192.168.1.100 Printer Name or IP Address: 192.168.1.100 Protocol Raw LPR Flow Settings Port Number: 9102 LPR Settings Guaue Name: LPF Byte Counting Enabled SNMP Status Enabled Community Name: public SNMP Devices Index: 1 OK Cancel
text_image
Add Printer Wizard Install Printer Software The manufacturer and model determine which printer software to use. Select the manufacturer and model of your printer. If your printer came with an installation disk, click Have Disk. If your printer is not listed, consult your printer documentation for compatible printer software. Manufacturer Dicorix Digital DYM0 Epson FujiXerox Printers DYM0 LabelWriter: DUD Label Version: 1.5.0.0 [4/1/2] DYM0 LabelWriter: DUD Tape Version: 1.5.0.0 [4/1/2] This driver is digitally signed. Tell me why driver signing is important Windows Update Have Disk... < Back Next > Cancel6 On the Name Your Printer page, do the following:
a. Enter a name for your printer in the Printer name field.
This name must be different than the LabelWriter Duo Label printer name.
b. Select whether or not you want to use this printer as the default printer.
c. Click Next.
7 On the Printer Sharing page, select Do not share this printer, and then click Next.
8 To print a test label, select Yes, and then click Next.
9 Click Finish.
The LabelWriter Duo Tape printer is now available in the printer list along with the Label printer.

text_image
Add Printer Wizard Name Your Printer You must assign a name to this printer. Type a name for this printer. Because some programs do not support printer and server name combinations of more than 31 characters, it is best to keep the name as shot as possible. Printer name: DYMO LabelWriter Duo Tape Do you want to use this printer as the default printer? Yes No < Back Next > CancelAdding a Printer in Windows Vista
This section describes how to add a LabelWriter printer in Windows Vista.
When adding a LabelWriter Duo printer, you will need to create separate ports for the Label printer and the Tape printer. Each port must have a unique name.
To add a LabelWriter printer
1 Click Start, and then click Control Panel.
2 Under Hardware and Sound, click Printer.
3 Click Add a Printer. The Add Printer dialog box appears.
4 Click Add a local printer.
5 On the Choose a printer port page, do the following:
a. Select Create a new port.
b. Choose Standard TCP/IP Port from the Type of port list.
c. Click Next.

text_image
Add Printer Choose a printer port A printer port is a type of connection that allows your computer to exchange information with a printer. Use an existing port: LPT1: (Printer Port) Create a new port: Type of port: Standard TCP/IP Port Next Cancel6 On the Type a printer hostname or IP address page, do the following:
a. Enter the IP address that you obtained when configuring the print server in the Hostname or IP Address field. The port name is filled in automatically.
b. (Optional) Enter a new name for the port in the Port name field.
When adding a LabelWriter Duo printer,
you must give the Label printer port and the Tape printer port different names.
c. Click Next.

text_image
Add Printer Type a printer hostname or IP address Device type: Autodetect Hostname or IP address: 192.168.1.250 Port name: 192.168.1.250 □ Query the printer and automatically select the driver to use Next Cancel7 On the Additional Port Information Required page, select Custom, and then click Settings.

text_image
Add Printer Additional Port Information Required The detected device is of unknown type. Be sure that: 1. The device is properly configured. 2. The address on the previous page is correct. Either correct the address and perform another search on the network by returning to the previous wizard page or select the device type if you are sure the address is correct. Device Type Standard Genetic Network Card Custom Settings... Next Cancel8 In the Configure Standard TCP/IP Port Monitor dialog box, do the following:
a. Under Protocol, select Raw.
b. Under Raw Settings, make sure the Port Number is 9100.
This is the default value.
c. Click OK.
9 On the Additional Port Information Required page, click Next.

text_image
Configure Standard TCP/IP Port Monitor Port Settings Port Name: 192.168.1.250 Printer Name or IP Address: 192.168.1.250 Protocol ● Row ○ LPR Raw Settings Port Number: 9100 LFR Settings Queue Name: □ LPR Byte Counting Enabled □ SNMP Status Enabled Community Name: public SNMP Device Index: 1 OK Cancel10 On the Install the printer driver page, do the following:
a. Choose DYMO from the Manufacturer list.
b. Choose the LabelWriter printer that you are adding from the Printers list. To add the LabelWriter Duo, choose DYMO LabelWriter DUO Label.
c. Click Next.

text_image
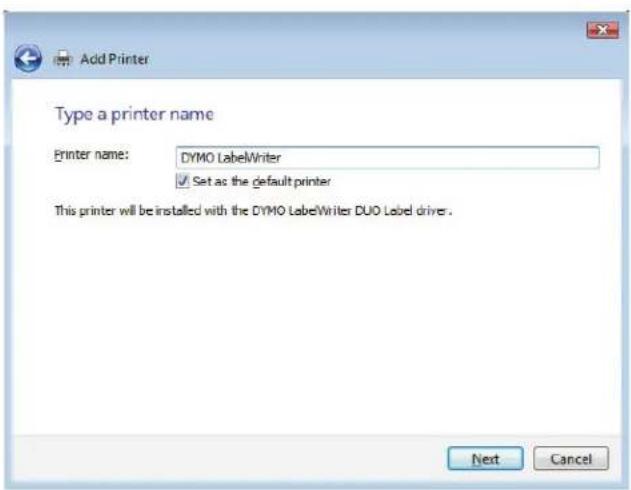
Add Printer Install the printer driver Select the manufacturer and model of your printer. If your printer came with an installation disk, click Have Disk. If your printer is not listed, consult your printer documentation for compatible printer software. Manufacturer DYMO Epson Fuji Xerox Fujitsu Printers DYMO LabelWriter 400 Version: 2.0.0.4 [03/09/2006] DYMO LabelWriter 400 Version: 2.0.2.1001 [01/10/20] DYMO LabelWriter 400 Turbo Version: 2.0.0.4 [03/09/ This driver is digitally signed. Tell me why driver signing is important Windows Update Have Disk... Next Cancel11 On the Type a printer name page, do the following:
a. Enter a name for your printer in the Printer name field.
b. Select whether or not you want to use this printer as the default printer.
c. Click Next.
12 To print a test label, click Print a test page.
13 Click Finish.
The printer is now available in the printer list. For the
text_image
Add Printer Type a printer name Printer name: DYMO LabelWriter ✓ Set as the default printer This printer will be installed with the DYMO LabelWriter DUO Label driver. Next CancelLabelWriter Duo, you now need to add the tape portion of the printer.
To add the Tape printer portion of the LabelWriter Duo printer
1 Repeat steps 1-7 in "To add a LabelWriter printer" on page 11.
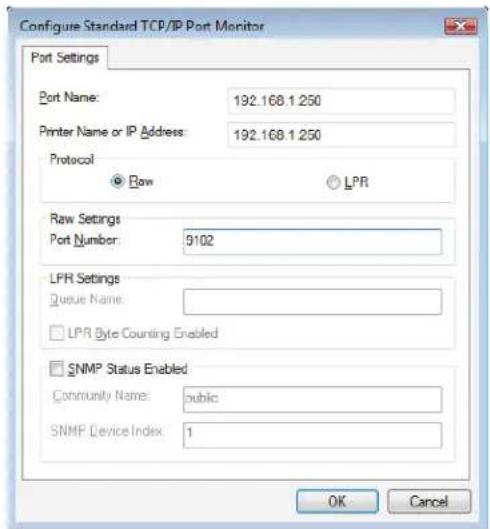
2 In the Configure Standard TCP/IP Port Monitor dialog box, do the following:
a. Under Protocol, select Raw.
b. Under Raw Settings, enter 9102 in the Port Number field.
c. Click OK.
3 On the Additional Port Information Required page, click Next.
text_image
Configure Standard TCP/IP Port Monitor Port Settings Port Name: 192.168.1.250 Printer Name or IP Address: 192.168.1.250 Protocol ● Row ○ LPR Raw Settings Port Number: 9102 LPR Settings Queue Name: □ LPR Byte Counting Enabled □ SNMP Status Enabled Community Name: public SNMP Device Index: 1 OK Cancel4 On the Install the printer driver page, do the following:
a. Choose DYMO from the Manufacturer list.
b. Choose DYMO LabelWriter Duo Tape from the Printers list.
c. Click Next.

text_image
Add Printer Install the printer driver Select the manufacturer and model of your printer. If your printer came with an installation disk, click Have Disk. If your printer is not listed, consult your printer documentation for compatible printer software. Manufacturer DYMO Epson Fuji Xerox Fujitsu Printers DYMO LabelWriter DUO Tape 128 Version: 2.0.0.4 [03] DYMO LabelWriter DUO Tape 128 Version: 2.0.2.100 DYMO LabelWriter Twin Turbo Version: 2.0.0.4 [03/05] This driver is digitally signed. Tell me why driver signing is important Windows Update Have Disk... Next Cancel5 On the Type a printer name page, do the following:
a. Enter a name for your printer in the Printer name field.
This name must be different than the LabelWriter Duo Label printer name.
b. Select whether or not you want to use this printer as the default printer.
c. Click Next.
6 To print a test label, click Print a test page.

text_image
Add Printer Type a printer name Printer name: DYMO LabelWriter DUO Tape ✓ Set as the default printer This printer will be installed with the DYMO LabelWriter DUO Label driver. Next Cancel7 Click Finish.
The LabelWriter Duo Tape printer is now available in the printer list along with the Label printer.
Adding a Printer in Mac OS
When adding a printer in Mac OS, the printer appears in the Printer Name list as lw print server-nnn-usb1, where nnn represents the last three numbers of the IP address assigned to the print server.
Note You must be running Mac OS 10.5 or later to add a LabelWriter Duo printer connected to the print server.
To add a LabelWriter printer
1 Choose System Preferences from the Apple menu.
2 Click Print & Fax.
3 Click at the bottom of the Printers list.
4 Click Default on the toolbar.
5 Select lw print server-nnn-usb1 from the Printer Name list.
Note If you are adding a LabelWriter Duo printer, you will also see lw print server-nnn-usb1-2 in the list. You will add this printer later.
The Print Using field is filled in automatically.

text_image
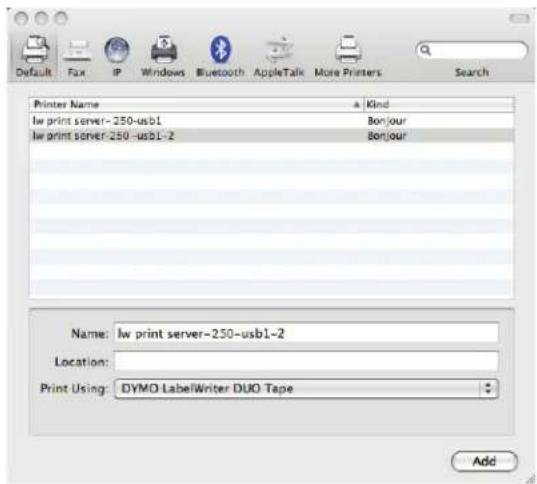
Default Fax IP Windows Bluetooth AppleTalk More Printers Search Printer Name Kind lw print server-250-usb1 Bonjour Name: lw print server-250-usb1 Location: Print Using: DYMO LabelWriter Add6 (Optional) Enter a name for the printer.
7 Click Add.
The printer is now available in the Printers list. For the LabelWriter Duo, you now need to add the tape portion of the printer.
To add the Tape printer portion of the LabelWriter Duo printer
1 Click at the bottom of the Printers list.
2 Click Default on the toolbar.
3 Select lw print server-nnn-usb1-2 from the Printer Name list. The Print Using field is filled in automatically.
4 (Optional) Enter a name for the printer.
5 Click Add.
The LabelWriter Tape printer is now available in the Printers list along with the Label printer.
text_image
Default Fax IP Windows Bluetooth AppleTalk More Printers Search Printer Name Kind lw print server-250-usb1 Bonjour lw print server-250-usb1-2 Bonjour Name: lw print server-250-usb1-2 Location: Print Using: DYMO LabelWriter DUO Tape AddAdding a Printer in Linux
DYMO does not officially support installing the print server on a Linux system. However, the steps in this section describe how to add a printer on Ubuntu 8.04 (CUPS version 1.3.7).
Note DYMO LabelWriter drivers for CUPS must be installed prior to installing the print server.
To add a LabelWriter printer
1 Open any Web browser and go to the CUPS Home Page, http://localhost:631.
2 Select the Administration tab, and then click Find New Printers.
3 Locate the DYMO LabelWriter printer that is connected to the print server in the Available Printers list and click Add This Printer.

text_image
Administration Home Administration Classes Documentation/Help Printers Server Add Printer Find New Printers Manage Printers Edit Configuration Help List Available Printers Home Administration Classes Documentation/Help Available Printers • Add This Printer DYMO LabelWriter (DYMO LabelWriter 192.168.1.260)Note If you are adding the DYMO LabelWriter Duo printer, make sure that you select DYMO LabelWriter Duo Label from the list. If you see the Tape printer and not the Label printer in the Available Printers list, click Reload until the Label printer is displayed in the list.
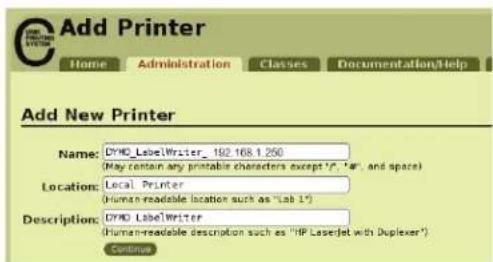
4 Make any changes you want to the name, location, or description of the printer and then click Continue.
text_image
Add Printer Home Administration Classes Documentation/Help Add New Printer Name: DYND_LabelWriter_ 192.168.1.250 (May contain any printable characters except 'f', 'a'f', and space) Location: Local Printer (Human-readable location such as "Lab 1") Description: DYND LabelWriter (Human-readable description such as "HP Laserjet with Duplexer") Continue5 Choose the DYMO LabelWriter printer that you are adding from the Model list, and then click Add Printer. The printer is now available.
6 Print a test label. See "Printing a Test Label" on page 18 for information on how to print a test label. For the LabelWriter Duo, you now need to add the tape portio
text_image
Add Printer Home Administration Classes Documentation/Help jobs Printers Model/Driver for DYMO_LabelWriter_192.168.1.250 Model: DYMO LabelWriter 315 (en) DYMO LabelWriter 320 (en) DYMO LabelWriter 330 (en) DYMO LabelWriter 335 Turbs (en) DYMO LabelWriter 400 (en) DYMO LabelWriter 400 Turbs (en) DYMO LabelWriter DUO Label (en) DYMO LabelWriter DUO Tape (en) DYMO LabelWriter DUO Tape 128 (en) DYMO LabelWriter Two Turbo (en) Or Provide a PPD File: Browse... Add PrinterTo add the Tape printer portion of the LabelWriter Duo printer
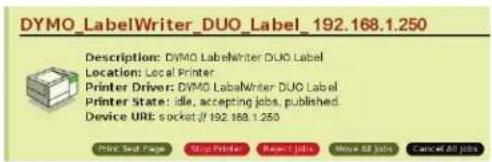
1 Select the Printers tab.
2 Write down the Device URI for the LabelWriter Duo Label printer.
3 Select the Administration tab, and then click Add Printer.
text_image
DYS0 LabelWriter_DUO Label_192.168.1.250 Description: DYS0 LabelWriter DUO Label Location: Local Printer Printer Driver: DYS0 LabelWriter DUO Label Printer State: idle, accepting jobs, published. Device URI socket (if 192.168.1.250) Print Text Page Stop Printer Reset Jobs Move All Jobs Cancel All Jobs
text_image
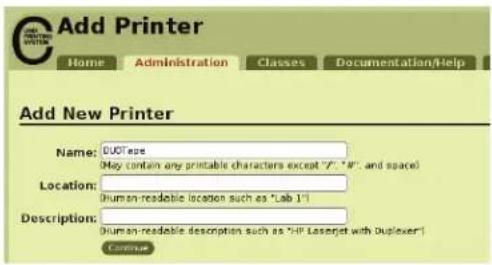
Administration Home Administration Classes Documentation/Help Printers Server Add Printer Find New Printers Manage Printers Edit Configuration File4 On the Add New Printer page, do the following:
a. Enter a name for the printer, such as Duo Tape, in the Name field.
b. (Optional) Enter a location and description for the printer.
c. Click Continue.
text_image
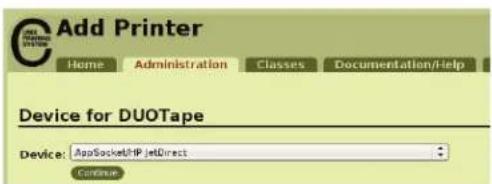
Add Printer Home Administration Classes Documentation/Help Add New Printer Name: DUSTare May contain any printable characters except "F", "N", and space) Location: Human-readable location such as "Lab 1" Description: Human-readable desorption such as "HP Laserjet with Duplexer" Continue5 Choose AppSocket/HP Jetdirect from the Device list, and then click Continue.
text_image
Add Printer Home Administration Classes Documentation/Help Device for DUOTape Device: AppSocketPHPJetDirect Continue6 On the Device URI page, do the following:
a. Enter the Label printer Device URI in the Device URI field.
b. Enter :9102 at the end of the Label printer Device URI.
c. Click Continue.

text_image
Add Printer Home Administration Classes Documentation/Help jobs Printers Device URI for DUOTape Device URI: socket://192.168.1.250.9102 Examples: http://hostname: 631/ipp/ http://hostname: 631/ipp/port1 ipp://hostname/ipp/ ipp://hostname/ipp/port1 lpp://hostname/pcp# socket://hostname socket://hostname: 9100 See "Network Printers" for the correct URI to use with your printer. Continue7 Select DYMO from the Make list, and then click Continue.

text_image
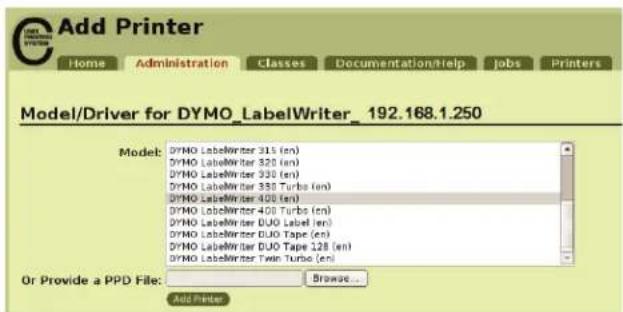
Add Printer Home Administration Classes Documentation/Help Make/Manufacturer for DUOTape Make: UCC Dell Bonn Epson Fujifilm Fujitsu Genenc Holdingberg Hillsch HP Continues8 Select the DYMO LabelWriter DUO Tape printer that you are adding from the Model list, and then click Add Printer. The printer is now available.

text_image
Add Printer Home Administration Classes Documentation/Help jobs Printers Model/Driver for DUOTape Model: DYM0 LabelWriter 315 (en) DYM0 LabelWinter 320 (en) DYM0 LabelWinter 330 (en) DYM0 LabelWinter 330 Turbo (en) DYM0 LabelWriter 400 (en) DYM0 LabelWinter 400 Turbo (en) DYM0 LabelWriter DUD Label (en) DYM0 LabelWinter DUD Tape (en) DYM0 LabelWriter DUD Tape 2.8 (en) DYM0 LabelWinter Twin Turbo (en) Or Provide a PPD File: Browse... Add PrinterPrinting a Test Label
Make sure that the printer is connected and working properly by printing a test label after you have added a printer.
To print a test label
1 Select the Printers tab on the CUPS Home Page.
2 Locate the printer that you want to use to print the test label and click Print Test Page.
Chapter 4
Managing the LabelWriter Print Server
With the Print Server Control Center software, you can quickly view server information and configure the IP address. The print server also has an internal set of web pages that can be accessed from the Control Center for even more management options.
About the Control Center
From the Print Server Control Center you can:
• View server information. (Windows only)
- Access the server home page.
- Configure the server.
- Change the Control Center language.
If you have more than one LabelWriter Print Server connected to your network, you can access all of the print servers from the Control Center.
Viewing the Print Server Information (Windows only)
On Windows systems, you can display all of the information for a print server.
To view print server information
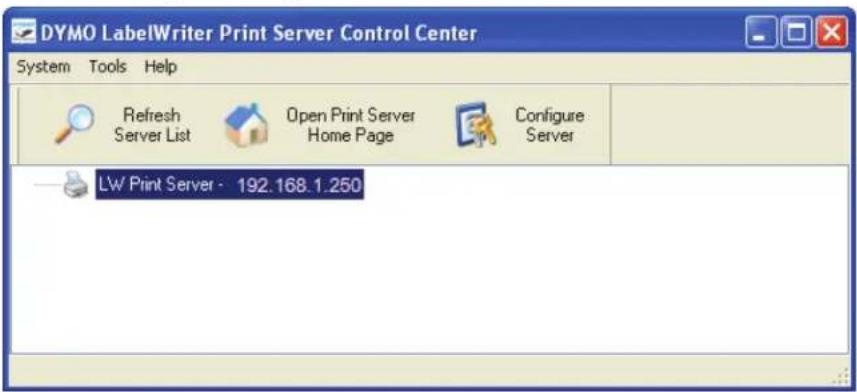
1 Double-click on your desktop.

text_image
DYMO LabelWriter Print Server Control Center System Tools Help Refresh Server List Open Print Server Home Page Configure Server LW Print Server - 192.168.1.2502 Select the server you want to view information for from the servers list.
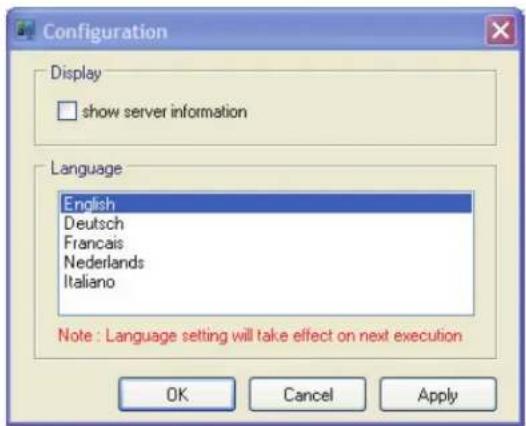
3 Choose Configuration from the Tools menu.

text_image
Configuration Display ✓ show server information Language English Deutsch Francais Nederlands Italiano Note : Language setting will take effect on next execution OK Cancel Apply4 Select the show server information check box, and then click OK.
The server information is now displayed in a separate pane under the servers list.

text_image
DYMO LabelWriter Print Server Control Center System Tools Help Refresh Server List Open Print Server Home Page Configure Server LW Print Server - 192.168.1.250 LW Print Server Server Information Server Name: LW Print Server Description: LabelWriter Print Server TCP/IP Status IP Address: 192.168.1.250 (DHCP) Subnet Mask: 255.255.255.0 Gateway: 192.168.1.2 DNS Server: 192.168.1.2 DHCP Server: 192.168.1.2 Lease Time: 431367 secondChanging the Control Center Language
You can change the language for the Control Center. When you change the language setting, it will take effect the next time you open the Control Center.
To change the language
1 Double-click

text_image
DYMO LabelWriter Print Server Control Center System Tools Help Refresh Server List Open Print Server Home Page Configure Server LW Print Server - 192.168.1.2502 Choose Configuration from the Tools menu.
text_image
Configuration Display □ show server information Language English Deutsch Francais Nederlands Italiano Note : Language setting will take effect on next execution OK Cancel Apply3 Select your desired language, and then click OK.
4 Close and restart the Control Center.
About the Print Server Web Pages
From the Print Server Web pages, you can:
• View server status.
- Change the configuration.
- Change the administrator name and password.
- Upgrade the firmware.
- Restart the server.
- Reset the server to factory default settings.
Note The Print Server Web pages are only available in English.
To access the Print Server Home Page
1 Open the Print Server Control Center.
2 Select the print server you want to access from the servers list.
3 Click 📋 Open Print Server Home Page (Windows) or 📋 Go to Home Page (Mac OS) on the toolbar.
Note You can also access the print server home page by entering the IP address for the print server in the address bar of your Web browser.
Viewing the Print Server Status
The print server status page displays the print server status and TCP/IP configuration.
To view print server status
- Click Status at the top of the Print Server home page.
Configuring the Server
From the Print Server Configuration page, you can change the server name and description, configure the IP address, change the administrator name and password, and perform maintenance on the print server.
To access the print server Configuration page
1 Click Config at the top of the Print Server home page.
2 Enter the following in the Administrator and Password fields, and then click Login.
Administrator: admin
Password: admin
Note These are the default settings. See "Changing the Administrator Name and Password" on page 23 for information on how to change the administrator name and password.
Changing the Server Name and Description
You can change the name and description of the print server. If you have more that one print server connected to your network, giving each server a distinct name or description makes it easy to distinguish between servers.
To change the server name and description
1 Click General Configuration on the left side of the Configuration page.
2 Enter a new name for the server in the Server Name field.
3 Enter a new description for the server in the Server Description field.
4 Click Submit.
The print server name and description are updated.
Changing the TCP/IP Configuration
You can configure the print server to obtain an IP address automatically or assign a static IP address that you choose.
If you are using the print server on a small office or home network, we recommend that you configure the server to use a static IP address. This will ensure that the computers connected to your network will always be able to locate the print server.
By default, the static IP address for the print server is 192.168.1.100. You only need to change the last three numbers. When assigning a static IP address, check your router to be sure that the IP address you choose is not already in use. Refer to your router documentation for information on how to do this. A good practice when adding a print server or other shared network device to a network is to start with a number toward the top of the range, for example 192.168.1.250, and work down from there.
To obtain an IP address automatically
1 Click General Configuration on the left side of the Configuration page.
2 Select Automatically get IP by DHCP.
3 Click Submit.
To assign a static IP address
1 Click General Configuration on the Configuration page.
2 Select Static IP.
3 Enter the IP address you want to use in the IP Address field.
4 Click Submit.
Changing the Administrator Name and Password
You can change the administrator name or password at any time. The administrator name and password are set to the following by default.
Administrator: admin
Password: admin
To change the administrator name and password
1 Click User Accounts on the left side of the Configuration page.
2 Enter a new administrator name in the New Administrator field.
3 Enter a new password in the New Password field.
4 Enter the password again in the Retype Password field, and then click Submit. The administrator name and password are now updated.
Upgrading the Firmware
You can upgrade your print server whenever new firmware becomes available.
We recommend that you only upgrade the firmware if you are instructed to do so by a DYMO Technical Support representative or if you are experiencing a problem that has been identified as a firmware issue.
This section describes how to upgrade the firmware for your print server.
To upgrade the server firmware
1 Click Maintenance on the left side of the Configuration page.
2 Click Download New Firmware.
The Support page of the DYMO Web site opens in your default Web browser.
3 Locate the print server firmware upgrade on the downloads page and follow the on-screen instructions to download the new firmware to your computer.
4 On the Maintenance page, click Upgrade Firmware, and then click Browse.
5 Navigate to and select the firmware file that you downloaded, and then click Open.
6 Click Upload.
When the Print Server home page appears, the print server has been restarted and is upgraded with the new firmware.
Chapter 5
Getting Help
Your LabelWriter Print Server should offer years of trouble-free service with very little maintenance. However, in the event that you encounter a problem, this chapter offers suggestions for resolving problems that can occur when using the print server. If you are unable to solve a problem, this chapter also describes how to contact DYMO Technical Support.
Troubleshooting
This section provides information on how to detect and correct problems you might encounter while using your print server.
Status Lights
The status lights visually show the current state of the print server.

| Power | Solid - power is connected.Off - no power is connected. |
| Link | Solid - server is connected to the network.Off - no Ethernet connection. |
| Active | Flashing - the network is active. |
| USB | Solid- printer is connected to the server.Flashing - USB error.Off - printer is not connected. |
Restoring the Print Server to the Factory Default Settings
You can restore the print server to the factory default settings either from the Print Server Web pages or manually from the print server.
To restore the print server from the Web pages
1 Click 📋 Open Print Server Home Page (Windows) or 📋 Go to Home Page (Mac OS) on the Control Center toolbar.
2 Click Configuration at the top of the page.
3 Enter your administrator name and password, and then click Login.
4 Click Maintenance on the left side of the page.
5 Click Reset to Factory Default.
6 Click Yes when prompted to load the factory default settings.
When the Print Server home page appears, the print server has been restored to the factory default settings.
To restore the print server manually
1 Unplug the print server power adapter.
2 Press and hold the Init/Reset button on the side of the print server and plug in the print server power adapter.
3 Continue to hold the Init/Reset button until the Power and USB status lights flash.
4 Unplug the print server power adapter, and then plug the print server power adapter in again. The print server is now restored to the factory default settings.
Limited Warranty
TWO-YEAR LIMITED WARRANTY
Dymo scales are sold with a two-year warranty from the date of purchase against defects in design, materials and workmanship. If this product is found to be defective within that time, we will promptly repair or replace it at our cost. This warranty does not cover accidental damage, wear and tear or consequential or incidental loss.
WHAT IS COVERED
This warranty covers this product only and only against defects in design, materials or workmanship. If, after inspection of your returned product, we find that the product is defective in design, materials or workmanship, we shall at no charge to you repair or replace the product at our discretion, and return the product to you. You are responsible for the full cost of shipping the product to Dymo, but there is no charge for the inspection or the return postage.
WHAT IS NOT COVERED
This warranty does not cover loss of or damage to a computer or other devices connected directly or indirectly to this Dymo product. This warranty also does not cover any loss of or damage to data, programs, records or other information.
This warranty does not cover any defect or loss which would not have occurred if instructions in the owner's manual had been followed. This warranty does not cover other incidental or consequential damages even if Dymo has been informed of the possibility of such damages. This warranty is in lieu of all other warranties, express or implied. This warranty gives you specific rights and you may also have other rights, which may vary from state to state or country to country.
HOW TO MAKE A WARRANTY CLAIM
To make a warranty claim, please contact customer support: www.dymo.com
Obtaining Technical Support
If you experience problems with the setup or use of your print server, carefully read this manual to make sure you have not missed something that is covered in the documentation.
If you cannot resolve your problem by consulting the documentation, you can obtain additional information and assistance from DYMO.
DYMO maintains an Internet Web site at www.dymo.com that includes the latest support information for your LabelWriter Print Server.
Visit the Support area of our Web site at www.dymo.com to contact us by email.
Chapter 6
Technical and
Certification Information
This chapter contains technical and certification information for the LabelWriter Print Server.
Technical Specifications
| LabelWriter Print Server | |
| Dimensions (WHD) | 3.07 in (78 mm) by 2.31 in (59 mm) by 0.88 in (22 mm) |
| Weight | 2.1 ounces (58 g) |
| Power | DC IN 5V/2A adaptor |
| Interface | USB 1.1/2.0 Low, Full, and Hi-Speed compliant |
Device Certification
This product is CE compliant and has an NRTL certificate (cTUVus : US and Canada) and a GS certification.
This product is RoHS compliant.
Declaration of Conformity
This equipment has been tested and found to comply with the limits for a Class B digital device, pursuant to part 15 of the FCC Rules. These limits are designed to provide reasonable protection against harmful interference in a residential installation. This equipment generates, uses and can radiate radio frequency energy and, if not installed and used in accordance with the instructions, may cause harmful interference to radio communications. However, there is no guarantee that interference will not occur in a particular installation. If this equipment does cause harmful interference to radio or television reception, which can be determined by turning the equipment off and on, the user is encouraged to try to correct the interference by one or more of the following measures:
- Reorient or relocate the receiving antenna.
- Increase the separation between the equipment and receiver.
- Connect the equipment into an outlet on a circuit different from that to which the receiver is connected.
- Consult the dealer or an experienced radio/TV technician for help.
Documentation Feedback
We are constantly working to produce the highest quality documentation for our products. We welcome your feedback. Send us your comments or suggestions about our online Help, printed, or PDF manuals.
Please include the following information with your feedback:
• Product name and version number
- Type of document: printed manual, PDF, or online Help
- Topic title (for online Help) or page number (for printed or PDF manuals)
- Brief description of content (for example, step-by-step instructions that are inaccurate, information that requires clarification, areas where more detail is needed, and so on)
- Suggestions for how to correct or improve the documentation
We also welcome your suggestions for additional topics you would like to see covered in the documentation.
Send email feedback to:
documentation@dymo.com
Please keep in mind that this email address is only for documentation feedback. If you have a technical question, please contact Customer Service.