
VVX 1460, VVX 1465, VVX 1470GA EX1, VVX1420, VVX1420EX1, VVX1460 EX1, VVX1465, VVX1470 GA - Steam iron DELONGHI - Free user manual and instructions
Find the device manual for free VVX 1460, VVX 1465, VVX 1470GA EX1, VVX1420, VVX1420EX1, VVX1460 EX1, VVX1465, VVX1470 GA DELONGHI in PDF.
| Product type | Steam iron with steam generator |
| Brand | Delonghi |
| Compatible models | VVX 1460, VVX 1465, VVX 1470GA EX1, VVX1420, VVX1420EX1, VVX1460 EX1, VVX1465, VVX1470 GA |
| Power supply | 230-240 V ~ 50-60 Hz, min. 10 A current |
| Power | Approx. 2400 W (estimate) |
| Tank capacity | Approx. 1.2 L (depending on model) |
| Steam pressure | Up to 5 bars (estimate) |
| Continuous steam flow | Up to 100 g/min (estimate) |
| Soleplate | Professional or domestic soleplate depending on model |
| Heating type | Quick heating with ready indicator |
| Steam functions | Continuous steam, steam boost, steam adjustment (on some models) |
| Safety | Auto shut-off (some models), continuous lock, overheat protection |
| Auto shut-off | 30 seconds horizontal position, 8 minutes vertical (domestic models) |
| Recommended water type | Tap water (if hardness < 27°F, otherwise mix 50% distilled water) |
| Maintenance | Clean soleplate with damp cloth, no descaling agent |
| Storage | Tube compartment, cord storage, heel rest |
| Weight | Approx. 4-5 kg (estimate) |
| Dimensions (L x W x H) | Approx. 30 x 25 x 35 cm (estimate) |
| Cord length | Approx. 2 m (estimate) |
| Repairability | Delonghi after-sales service, original parts |
| Warranty | 2 years (according to legislation) |
| Included accessories | Funnel (on some models), iron rest |
Frequently Asked Questions - VVX 1460, VVX 1465, VVX 1470GA EX1, VVX1420, VVX1420EX1, VVX1460 EX1, VVX1465, VVX1470 GA DELONGHI
User questions about VVX 1460, VVX 1465, VVX 1470GA EX1, VVX1420, VVX1420EX1, VVX1460 EX1, VVX1465, VVX1470 GA DELONGHI
0 question about this device. Answer the ones you know or ask your own.
Ask a new question about this device
Download the instructions for your Steam iron in PDF format for free! Find your manual VVX 1460, VVX 1465, VVX 1470GA EX1, VVX1420, VVX1420EX1, VVX1460 EX1, VVX1465, VVX1470 GA - DELONGHI and take your electronic device back in hand. On this page are published all the documents necessary for the use of your device. VVX 1460, VVX 1465, VVX 1470GA EX1, VVX1420, VVX1420EX1, VVX1460 EX1, VVX1465, VVX1470 GA by DELONGHI.
USER MANUAL VVX 1460, VVX 1465, VVX 1470GA EX1, VVX1420, VVX1420EX1, VVX1460 EX1, VVX1465, VVX1470 GA DELONGHI
Fundamental safety warnings 10
DISPOSAL 11
DESIGNATED USE 12
DESCRIPTION OF THE APPLIANCE 12
Control panel (varies according to model) 12
"Professional" iron 12
"Domestic" iron 12
PREPARATIONS FOR USE 12
What water to use 12
Filling the steam generator 12
Steam ironing 12
Using the "domestic" iron 13
Adjusting the thermostat 13
Steam regulation knob J (* certain models only) 13
Topping up the steam generator with water ....13
Dry ironing 14
CLEANING 14
AFTER IRONING 14
IRONING TIPS 14
ELECTRICAL REQUIREMENTS (UK ONLY) .. 14
PROBLEMS RESOLVABLE WITHOUT CONTACTING CUSTOMER SERVICES 15
SAFETY
Fundamental safety warnings

Danger!
This is an electrical appliance and may therefore cause electric shock.
You should therefore respect the following safety warnings:
- Never touch the appliance with damp hands.
- Never use the appliance with bare or wet feet.
- Never immerse the appliance in water.
- Never unplug the appliance by pulling the power cable or the appliance itself.
- If the socket and power cable plug are incompatible, the socket should be changed for a suitable type by a qualified professional only who should ensure that the cross-section of the wires leading to the socket is suitable for the power absorbed by the appliance.
- To add water, turn the ironing system off using the switch, then unplug from the mains. Never fill the appliance under running water.
Always unplug the appliance from the mains socket before filling the steam generator with water. - If the power cable is damaged, it must be replaced by the manufacturer or the manufacturer's Customer Services in order to avoid all risk.
- Adapters, multiple sockets and/or extensions should not be used. If their use is necessary, only adapters, multiple sockets and extensions complying with current safety standards and regulations should be used, taking care not to exceed the power limit indicated on the adapter.
- Never leave the appliance filled with water in a room where it will be subject to a temperature below 0^ .
- Never unscrew the cap while the appliance is plugged in.
- The safety of this appliance is guaranteed only if correctly connected to a proper and effective earth connection as specified by current electrical safety standards and regulations.
This fundamental safety requisite should be verified. If in doubt, ask a qualified electrician to check the mains system thoroughly. Failure to earth the appliance absolves the manufacturer of all liability for damage.
- When the appliance is to be discarded, after unplugging from the mains, the lead should be cut as close as possible to the iron to make the appliance unusable.
- Before cleaning or servicing, disconnect the appliance by unplugging from the mains.
- In the event of malfunction and/or faulty operation, switch off the appliance and take it to Customer Services.
- Before using the appliance, check that the mains supply voltage corresponds to the voltage indicated on the rating plate.
Connect the appliance to an efficiently earthed power supply and sockets with a minimum current rating of 10 A only.
Danger of burns!
- Do not open the cap while the appliance is in use and before all the water has been used up.
This occurs when steam is no longer discharged by the iron.
To add water, unplug from the mains and wait about 15 minutes to avoid sudden temperature changes.
Place a cloth over the cap and unscrew slowly to allow residual steam to escape gradually.
- Never aim the steam at persons or animals.
- The iron must not be left unattended while it is connected to the mains.
During use, the steam generator should not be moved.
IMPORTANT: the tube connecting the iron to the steam generator may become hot.
IMPORTANT: the metal iron rest may become hot. Take care to avoid burns.
- All contact between the hot base and cables must be rigorously avoided.
Important!
After removing the packaging, make sure the appliance is complete and undamaged. If in doubt, do not use the appliance and contact qualified personnel only.
- Do not leave packaging (plastic bags, polystyrene foam, etc.) within reach of children as it could be dangerous.
- The appliance is not intended for use by persons (including children) with reduced physical, sensory or mental capabilities, or lack of experience and knowledge, unless they have been given supervision or instruction concerning use of the appliance by a person responsible for their safety.
Children must be supervised to ensure they do not play with the appliance.
- NEVER mix the water in the steam generator with stain removers, additives or perfumed oils.
This reduces the safety of the appliance and irreparably damages the steam generator which would have to be replaced. - When placing the iron on the iron rest, ensure that the surface on which the iron rest is placed is stable.
Use the iron rest ONLY. If it is damaged, use an original replacement only. - The appliance must be used and rested on a stable surface.
- Do not use the appliance if it has been dropped and there are visible signs of damage or leaks.
If the ironing system is dropped causing visible damage to the appliance (steam generator or iron), do not use. Take to Customer Services.
- The steam generator should be placed on a flat surface extremely resistant to high temperatures.
DISPOSAL
Important information for correct disposal of the product in accordance with EC Directive 2002/96/EC. At the end of its working life, the product must not be disposed of as urban waste. It must be taken to a special local authority differentiated waste collection centre or to a dealer providing this service. Disposing of a household appliance separately avoids possible negative consequences for the environment and health deriving from inappropriate disposal and enables the constituent materials to be recovered to obtain significant savings in energy and resources. As a reminder of the need to dispose
of household appliances separately, the product is marked with a crossed-out wheeled dustbin
DESIGNATED USE
- This appliance must be used exclusively for the purpose for which it was expressly conceived.
Any other use is considered improper and thus dangerous. - The manufacturer is not liable for damage caused by inappropriate, incorrect or irresponsible use or for damage resulting from repairs carried out by unqualified personnel.
DESCRIPTION OF THE APPLIANCE
(see page 3)
A Funnel with water level control ( certain models only)
B Iron rest
C Control panel (varies according to model)
D Steam/cable tube compartment
E Cable tidy
F Funnel ( certain models only)
6 Steam generator cap
Control panel (varies according to model)
H "Steam ready" light
Steam generator button with light
J Steam regulation knob (* certain models only)
K Iron button with light
L ON/OFF button with light
"Professional" iron
M Continuous steam lock
N "Iron at temperature" light
0 Steam button
P Steam trigger
Q Thermostat knob
"Domestic" iron
M Continuous steam lock
N "Iron at temperature" light
0 Steam button
P Steam trigger
Q Thermostat knob
R "On" light (steady) or auto-off light (flashing) (* certain models only)
PREPARATIONS FOR USE
What water to use
The machine works with normal tap water. In case of very hard water (hardness above 27^ ) we suggest using 50% distilled water diluted with tap water.
Important!
Never use other types of water, chemical substances or detergents (e.g. perfumed water, essences, descaling solution, etc).
Filling the steam generator
Danger!
Make sure the cable is unplugged from the mains socket.
- Unscrew the steam generator cap G and fill the tank with water using the funnel F (fig. 1).
Some models are provided with a special funnel A providing an indication of the water level in the steam generator. When the indicator at the centre of the funnel rises, the steam generator is full (fig. 2). - Screw up the cap G fully and plug the iron into the mains socket.
Each time you turn the system on, always FILL the steam generator completely.
Danger of burns!
Never unscrew the cap G with the steam generator under pressure.
Steam ironing
- Two-button models: press th button K (iron on) and th button I (steam generator on). The lights on the corresponding buttons come on (fig. 3A).
- Single-button models: press the button L: The light on the button comes on (fig. 3B).
- Wait until the "steam ready" light H and "iron at temperature" light N go out.
- Proceed by pressing the steam button 0 or P.
i Please note:
- When used for the first time, the appliance
may give off smoke and an odour for several minutes. This is caused by heating and subsequent drying of the sealers used in assembling the steam generator and iron.
You are recommended to ventilate the room.
- The lights H and N will go on and off during ironing, according to the temperature reached by the steam generator and iron.
It is part of normal operation and not a cause for concern.
Using the "professional" iron
After turning the appliance on as described above, wait for the "iron at temperature" light N to go off.
To deliver steam, press the steam button 0 on the iron.
You can use either the top button 0 or the bottom trigger P as you prefer.
- To discharge steam continuously, move the steam lock M backwards.
To release the button, slide the lock forwards. - The iron can be rested in an upright position (fig. 4). However, make sure the surface is flat to avoid the iron falling over.
Using the "domestic" iron
After turning the appliance on as described above, wait for the "iron at temperature" light N to go off.
- To deliver steam, press the steam button O on the iron.
You can use either the top button O or the bottom trigger P as you prefer.
Some models have an "auto-off" safety device which turns the iron off if left unused for 30 seconds in the horizontal position or 8 minutes in the upright position (fig. 5).
When the device is active, the light R flashes. This light is on steadily during normal use and indicates that the iron is plugged into the mains.
To resume ironing, shake the iron slightly forwards until the light R comes on steadily. Wait for the light N to go off before discharging steam.
- The iron can be rested in an upright position.
Make sure the surface is flat to avoid the iron
falling over accidentally. To rest the iron correctly, fix the steam/cable tube on the right or left by pushing it as far as it will go until it clicks into place.
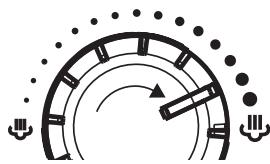
Adjusting the thermostat
Turn the thermostat knob to set the most suitable temperature for the type of fabric to be ironed.
For steam ironing, the temperature must be within the steam sector shown alongside.

Below is a brief guide to help you choose the best temperature for the type of fabric to be ironed.
Acetate, acrylic, nylon, polyester, rayon
Silk, wool
Linen, cotton
Steam regulation knob J (* certain models only)
The steam regulation knob J enables the quantity of steam to be increased or decreased according to the fabric being ironed.
When you turn the iron on, you are recommended to turn the steam regulation knob to the maximum steam position.
Topping up the steam generator with water
When the water in the steam generator runs out, the iron no longer delivers steam.
To fill again, proceed as follows:
- Turn the steam generator off using the steam generator button I.
Release any steam left using the O or P control.
- Turn the appliance off using the ON/OFF button L.
Unplug from the mains socket and wait 15 minutes for the appliance to cool down. - Unscrew the cap slowly and fill as described
in the paragraph "filling the steam generator".
Dry ironing
To dry iron, turn the appliance on by pressing the button K (certain models only). In models with a single button, press the button L and do not press the steam button.
- Turn the thermostat knob to select the most suitable temperature for the garments being ironed and wait for the "iron at temperature" light to go off.
CLEANING
- The surface of the plate must be kept clean. To clean, just wipe the cold surface with a damp cloth.
- The iron must never be treated with descending solutions.
AFTER IRONING
When you have finished ironing, you are recommended to put the ironing system away.
Place the iron on the iron rest and wait for the system to cool down before putting it away.
To put the appliance away tidily, place the steam/ cable tube in the compartment D, wrap the power cable around the cable tidy E (fig. 6) and place the funnel on the cap (certain models only). Store the iron in a dry place.

Please note:
After ironing, the water remaining in the steam generator need not be drained.
However, the appliance should be drained of water if left unused for long periods.
IRONING TIPS
- The original appearance and softness of fabrics such as velvet or wool, or gloves, bags etc. can be restored by passing the iron a short distance away with the steam jet in operation.
- Do not rest or use the iron on zips, hooks, rings etc. to avoid scratching the sole plate.
- Separate clothes according to the recommended ironing temperature and begin ironing with items requiring the lowest temperatures.
-
Silk may be dry-pressed on the reverse.
-
Wool, cotton and fine linen can either be steam-ironed on the reverse or on the right side, interposing a thin cloth between the iron and the fabric to avoid "shine".
- Starched fabrics require greater moisture.
- Iron whites and light colours on the right side and dark colours on the reverse. Embroidery should also be ironed on the reverse to make it stand out.
Each time the iron is used (including for the first time) or if you have not used steam for several minutes, press the steam button a number of times away from the ironing board.
This will eliminate condensation from the steam circuit.
ELECTRICAL REQUIREMENTS (UK ONLY)
Before using this appliance ensure that the voltage indicated on the product corresponds with the main voltage in your home, if you are in any doubt about your supply contact your local electricity company. The flexible mains lead is supplied connected to a B.S. 1363 fused plug having a fuse of 13amp capacity. Should this plug not fit the socket outlets in your home, it should be cut off and replaced with a suitable plug, following the procedure outlined below.
Note: Such a plug cannot be used for any other appliance and should therefore be properly disposed of and not left where children might find it and plug it into a supply socket - with the obvious consequent danger.
N.B. We recommend the use of good quality plugs and wall sockets that can be switched off when the machine is not in use.
IMPORTANT: the wires in the mains lead fitted to this appliance are coloured in accordance with the following code: Green and Yellow to Earth
GREEN AND YELLOW BLUE BROWN
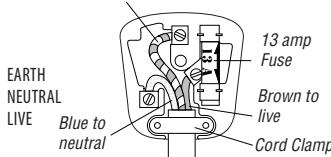
As the colours of the wires in the mains lead of this appliance may not correspond with the coloured markings identifying the terminals in your plug, proceed as follows:
- The wire which is coloured green and yellow must be connected to the terminal in the plug which is marked with the letter E or by the earth symbol or coloured green or green and yellow.
- The wire which is coloured blue must be connected to the terminal which is marked with the letter N or coloured black.
- The wire which is coloured brown must be connected to the terminal which is marked with the letter L or coloured red.
When wiring the plug, ensure that all strands of wire are securely retained in each terminal. Do not forget to tighten the mains lead clamp on the plug. If your electricity supply point has only two pin socket outlets, or if you are in doubt, consult a qualified electrician. Should the mains lead ever require replacement, it is essential that this operation be carried out by a qualified electrician and should only be replaced with a flexible cord of the same size. After replacement of a fuse in the plug, the fuse cover must be refitted. If the fuse cover is lost, the plug must not be used until a replacement cover is obtained. The colour of the correct replacement fuse cover is that of the coloured insert in the base of the fuse recess or elsewhere on the plug. Always state this colour when ordering a replacement fuse cover.
Only 13amp replacement fuses which are asta approved to B.S. 1362 should be fitted.
Warning - this appliance must be earthed
| PROBLEM | CAUSE | SOLUTION |
| The appliance does not come on. | · The appliance is not plugged into a mains socket. | · Make sure the appliance is correctly connected and press the iron and steam generator buttons. |
| Water leaks from the holes in the bottom of the sole plate. | · The temperature of the sole plate is too low. | · Adjust the iron temperature as described in the section “Adjusting the thermostat” |
| · Water has condensed inside the tubes because steam is being used for the first time, or has not been used for some time. | · Press the steam button several times away from the ironing board. This will eliminate cold water from the steam circuit. | |
| · The ironing system is posi- tioned on an unstable and/or sloping surface. | · Rest the ironing system on a stable flat surface. | |
| Brown coloured fluid leaks from the sole plate | · Chemical water softeners or additives have been poured into the steam generator. | · - Never pour products into the steam generator (see our tips in the quick guide). Clean the sole plate with a damp cloth. |
| The first time the appliance is turned on, you notice smoke | · Some parts have been treated with sealer/lubricant which evaporates the first time the iron heats up. | · This is normal and will stop when you have used the iron a few times. |
| Steam leaks from the bottom of the steam generator. | · The steam generator has not been filled before commen- cing ironing. | · Each time you turn the system on, always FILL the steam ge- nerator completely. |
| · The ironing system is posi- tioned on an unstable and/or sloping surface. | · Rest the ironing system on a stable flat surface. | |
| While heating up, the appliance vibrates | · The steam generator was not filled before turning the system on | · Turn the appliance off, leave it to cool completely, unscrew the cap and fill the steam generator with water |
| After filling the steam generator, steam leaks from the cap. | · The cap is not screwed up tightly. | · Screw the cap up completely. |
| · The cap gasket is worn. | · Contact the manufacturer's customer services. |
GB
- SAFETY
- Fundamental safety warnings
- Danger!
- Danger of burns!
- Important!
- DISPOSAL
- DESIGNATED USE
- DESCRIPTION OF THE APPLIANCE
- Control panel (varies according to model)
- "Professional" iron
- "Domestic" iron
- PREPARATIONS FOR USE
- What water to use
- Filling the steam generator
- Steam ironing
- i Please note:
- Using the "professional" iron
- Using the "domestic" iron
- Adjusting the thermostat
- Steam regulation knob J (* certain models only)
- Topping up the steam generator with water
- Dry ironing
- CLEANING
- AFTER IRONING
- Please note:
- IRONING TIPS
- ELECTRICAL REQUIREMENTS (UK ONLY)
Brand : DELONGHI
Model : VVX 1460, VVX 1465, VVX 1470GA EX1, VVX1420, VVX1420EX1, VVX1460 EX1, VVX1465, VVX1470 GA
Category : Steam iron