
AGN1000-1/1 - Transport cart BARTSCHER - Free user manual and instructions
Find the device manual for free AGN1000-1/1 BARTSCHER in PDF.

| Product Type | Gastronorm Trolley (Transport Cart) |
| Brand | Bartscher |
| Model | AGN1000-1/1 |
| Article Number | 300186 |
| Material | Stainless Steel |
| Dimensions (W x D x H) | 580 x 685 x 1840 mm |
| Weight | 26.2 kg |
| Number of Guide Rail Pairs | 10 |
| Distance Between Guide Rails | 120 mm |
| Load Capacity per Guide Rail Pair | 10 kg |
| Total Load Capacity | 80 kg |
| Utility Surface Dimensions (W x D) | 480 x 540 mm |
| Utility Surface Load Capacity | 10 kg |
| Number of Swivel Casters | 4 |
| Locking Casters | 2 (with brakes) |
| Caster Diameter | 100 mm |
| Caster Dampers | 4, plastic |
| Assembly Required | Yes (self-building kit) |
| Intended Use | Clearing and transporting food in GN containers, grates, trays up to GN 1/1 |
| Cleaning Instructions | Use warm water and mild detergent; avoid abrasive or solvent-based cleaners |
| Safety Feature | Locking casters to prevent accidental movement or tipping |
Frequently Asked Questions - AGN1000-1/1 BARTSCHER
User questions about AGN1000-1/1 BARTSCHER
0 question about this device. Answer the ones you know or ask your own.
Ask a new question about this device
Download the instructions for your Transport cart in PDF format for free! Find your manual AGN1000-1/1 - BARTSCHER and take your electronic device back in hand. On this page are published all the documents necessary for the use of your device. AGN1000-1/1 by BARTSCHER.
USER MANUAL AGN1000-1/1 BARTSCHER
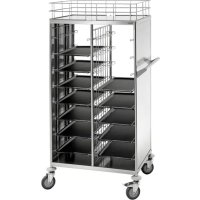
natural_image
Metal multi-rodial cleaning machine with wheels and rack, no visible text or symbols300186
Bartscher GmbH
Phone: +49 5258 971-0
Date of preparation: 2025-03-27
Original instruction manual
Technical Specifications
| Name: | Gastronorm trolley AGN1000-1/1 |
| Art. No.: | 300186 |
| Material: | stainless steel |
| Number of guide rail pairs: | 10 |
| Distance between guide rail pairs, in mm: | 120 |
| Load-bearing capacity per guide rail pair, max. in kg: | 10 |
| Dimensions of utility surface (W x D), in mm: | 480 x 540 |
| Load-bearing capacity of utility surface, max. in kg: | 10 |
| Total load-bearing capacity, max. in kg: | 80 |
| Number of swivel casters: | 4 |
| Locking swivel casters: | 2 |
| Diameter of casters, in mm: | 100 |
| Number of caster dampers: | 4 |
| Material of caster dampers: | plastic |
| Dimensions (W x D x H), in mm: | 580 x 685 x 1840 |
| Weight, in kg: | 26,2 |
We reserve the right to implement technical modifications.
Version / Characteristics
- Version: GN guides
• Area of application: clearing - May be loaded from both sides
- Utility surface
• Delivery condition: Self-building kit, easy assembly
• The set does not include: - GN containers
- sheets
- grates
Intended Use
This appliance is only intended for use described in the operating instructions, with the supplied and approved components.
Any other use is considered against the intended purpose. The manufacturer shall not be liable for any damage due to unintended use. In such cases the responsible party shall only be the user/operator.
The following is an intended purpose:
- Clearing and transporting food in GN containers, on grates and trays up to GN 1/1 size.
- Storage of dishes in suitable containers.
Scope of Delivery / Part Name
- Unpack the Gastronorm trolley and remove the packing material pursuant to environmental regulations.
- Check completeness of delivery according to the list below:
| Component | Number | Name |
 | 2 | Lateral section with 10 preinstalled guide rails and a lateral wall |
 | 1 | Display area |
 | 2 | Lateral railing |
 | 2 | Front and rear railings |

 | 4 | Crossbar |
 | 1 | Allen wrench |
 | 8 | M8*55 bolt |
 | 8 | Square washer |
 | 4 | Damper for swivel caster |
 | 2 | Locking swivel caster |
| [BHCD] | 2 | Non-locking swivel caster |
| [443] | 4 | M5 nut |
Assembly


natural_image
Three technical line drawings of structural framework components, showing different arrangements and cross-sections (no text or symbols)Fig. 1
- First, use locking bolts (Fig. 1) to assemble railings for the upper shelf.
- Insert the assembled railings on the shelf. Fix the railings to the shelf using M5 bolts.

natural_image
Technical line drawing of a modular wall panel with coiled and rectangular components (no text or symbols)Fig. 2
-
Assemble 2 crossbars (at the bottom) to the lateral section of the Gastronorm trolley.
-
Place one square washer between the bottom crossbar and the lateral section, and between the lateral section and each M8*55 bolt; tighten with Allen wrench.

natural_image
Close-up of a metallic mechanical component with a circular outline highlighting its edge (no visible text or symbols)- Connect crossbars (at the bottom) with the second lateral section, using washers and nuts, as described above.


natural_image
Technical line drawing of a modular storage or rack system with structural components (no text or symbols)Fig. 3
-
Assemble two crossbars (at the top) over to side sections, following the description.
-
Insert folded shelves with railing (point 1, 2) on the Gastronorm trolley frame.
-
Screw the shelf with railing to the Gastronorm trolley with M5 nuts.
-
Tighten with a suitable wrench.

natural_image
Technical line drawing of a mechanical component with internal channels and mounting holes (no text or symbols)Fig. 4
- Place the Gastronorm trolley on its side.
- Mount 4 swivel caster dampers onto square tubing of lateral sections.
- Finally, screw swivel casters into square tubing of lateral sections.
Setting

natural_image
Isometric line drawing of a multi-tiered rack-mounted device with wheels and a central cabinet (no text or symbols)Fig. 5
- Set the Gastronorm trolley on swivel casters.
- Check the stability of the Gastronorm trolley.
- Level the Gastronorm trolley through screwing in and out swivel casters.
- After setting the Gastronorm trolley in a designated place, lock 2 swivel casters with lockings to prevent accidental relocation or overturn of the Gastronorm trolley.
Gastronorm Trolley Loading

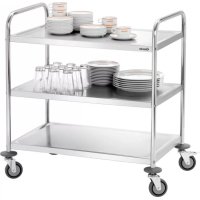
natural_image
Exterior view of a modern office building (no signage)Fig. 6
The Gastronorm trolley can be loaded from both sides.
- Place the required number of suitable trays, GN containers, etc. in guides.
- Place jugs, cups, glasses, etc. on the top shelf. The shelf railings prevent dishware from falling down.

Cleaning
ATTENTION!
Scrubbing agents, washing agents with solvents or caustic substances may damage the surface.
For cleaning, use only agents suitable for stainless steel.
- Clean the Gastronorm trolley regularly with warm water and a soft, damp cloth. Use a mild cleaning agent if required.
- Dry the Gastronorm trolley with a soft cloth.

Brand : BARTSCHER
Model : AGN1000-1/1
Category : Transport cart