
500770 - Audio/video switch MuxLab - Free user manual and instructions
Find the device manual for free 500770 MuxLab in PDF.

| Product Type | KVM HDMI over IP PoE Extender Kit |
| Brand | MuxLab |
| Model | 500770 (Kit), 500770-TX (Transmitter), 500770-RX (Receiver) |
| Video Resolution | Up to 1920x1200 and 1080p @ 60Hz |
| Video Interface | HDMI 1.4, HDCP 1.4 |
| Maximum Distance | 330 ft (100 m) over Cat5e/6 at 1080p |
| USB Support | Receiver: 4-port USB hub (2x USB 1.1, 2x USB 2.0) |
| Audio | Audio insert (TX) and audio extract (RX) via 3.5mm jacks |
| Network Interface | 1x RJ45, 1000BaseT with PoE |
| Power Source | PoE (PD) IEEE 802.3af; Optional external power supply 5VDC/2.6A (model 500993, sold separately) |
| Power Consumption | Transmitter: 2.85W; Receiver: 2.55W |
| Switching Methods | Direct (hotkey) and On Screen Display (OSD) with password protection |
| Number of Supported Workstations | Up to 16 via Direct Switching; 100s via OSD |
| Configuration | Point-to-point, point-to-multipoint, multiple transmitters/receivers |
| Latency | Typical 1 frame (16ms), max 2 frames (33ms) |
| Compression | JPEG 2000 |
| Operating Temperature | 0° to 40°C |
| Storage Temperature | -20° to 85°C |
| Humidity | Up to 95% non-condensing |
| Dimensions | 4.40 x 5.08 x 1.00 inches (112 x 129 x 25 mm) |
| Weight | 1.5 lbs (0.68 kg) |
| Compliance | FCC, CE, RoHS |
| Warranty | 3 years |
| Maintenance | Keep clean, avoid moisture, use in ventilated area |
| Safety | Use only with PoE switches or approved power supply; disconnect before servicing |
| Spare Parts / Repairability | Contact MuxLab for spare parts or repairs; RMA required |
Frequently Asked Questions - 500770 MuxLab
User questions about 500770 MuxLab
0 question about this device. Answer the ones you know or ask your own.
Ask a new question about this device
Download the instructions for your Audio/video switch in PDF format for free! Find your manual 500770 - MuxLab and take your electronic device back in hand. On this page are published all the documents necessary for the use of your device. 500770 by MuxLab.
USER MANUAL 500770 MuxLab
1 Introducon .... 3
Key Features: 3
2 Direct Switching Method .... 5
3 On Screen Display (OSD) Switching Method....6
3.1 Login to the KVM Device....7
3.2 Logout from the KVM Device....7
3.3 Bring up the KVM OSD Menu....8
3.4 Selecng a Workstaon to control 8
3.5 Returning....9
3.6 Refresh....9
4 KVM Transmier/Receiver Sengs....10
4.1 Firmware Version Informaon....10
4.2 Upgrading Firmware 10
4.3 Changing the OSD Login Password 11
4.4 KVM Device Stascs....12
4.5 Network Sengs....13
4.6 Seng the KVM Transmier/Receiver Name 14
4.7 Selectng the OSD HotKey Sequence 15
5 Specicaons 17
6 Warranty Policy....19
6.1 Warranty Period....19
1 Introduction
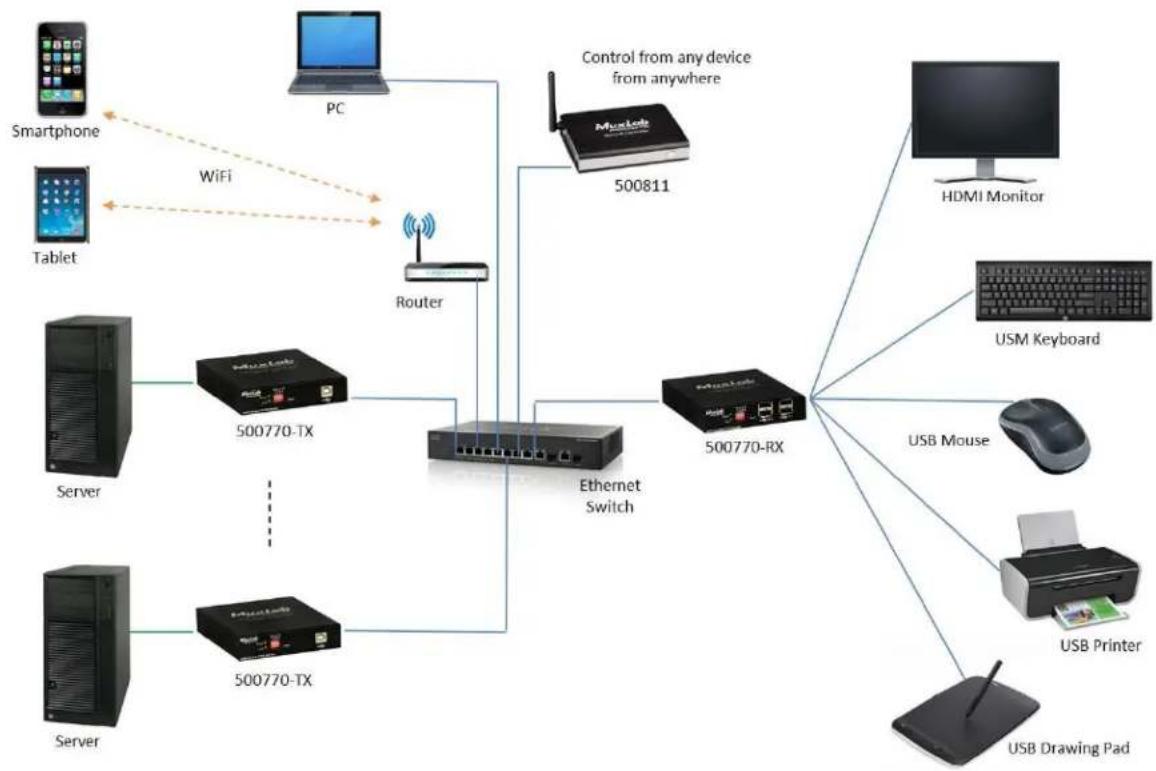
The KVM HDMI over IP PoE Extender Kit allows HDMI & USB equipment to be connected up to 330 (100m) over an Ethernet LAN, supporting 1920x1200 and 1080p resoluon @ 60Hz via Cat5e/6 cable in multiple point-to-point and point-to-mulpoint conguraons. The Transmier (500770-TX) and Receiver (500770-RX) support PoE (PD) if used with a PoE (PSE) Ethernet Switch.
The Transmier terminates to a computer server/workstaon via a HDMI & USB port, The Receiver terminates to a HDMI display and up to 4 USB devices such as a keyboard, mouse, printer, drawing pad, storage device, camera, etc., via a 4 port USB hub. A single Receiver can be switched via hotkey sequences to any Transmier on the network, allowing a single operator to manage numerous servers/workstaons, in a distributed KVM applicaon.
flowchart
graph TD
    A["Smartphone"] -->|WiFi| B["Router"]
    C["Tablet"] -->|WiFi| B
    D["PC"] -->|Control from any device from anywhere| E["500811"]
    F["Server"] --> G["500770-TX"]
    H["Server"] --> I["500770-TX"]
    G --> J["Ethernet Switch"]
    I --> J
    J --> K["500770-RX"]
    L["USB Printer"] --> M["USB Mouse"]
    N["USB Drawing Pad"] --> O["USM Keyboard"]
    P["HDMI Monitor"] --> Q["500811"]
There are two hotkey methods to switch from one workstaon to another. There is a Direct Switching Method and an On Screen Display (OSD) Switching Method. This manual explains how to control the switching from one workstaon to another, as detailed below.
Key Features:
• One operator can manage mulple servers/workstaons
• Supports HDMI up to 1920x1200 and 1080p @ 60Hz
- Receiver side includes a 4-port USB hub, for KVM applicaons
- Up to 330 (100m) over Cat5e/6
- Supports 100's of Transmiers & Receivers depending on network bandwidth
• Supports mulple point-to-point, and point-to-mulpoint applicaons
• Supports audio insert & mic-out (TX), and audio extract & mic-in (RX)
Please reference the 500770 Installaon Guide for instrucons on how to connect Transmiers to workstaons and the Receiver to an HDMI display, USB keyboard and USB mouse (plus two additional USB devices, if required). Note that the USB keyboard and USD mouse should be connected to the USB 1.1 ports. The remaining two USB 2.0 ports may be connected to other USB devices, such as an external hard disk, USB memory sck, USB printer, USB drawing pad, etc.
2 Direct Switching Method
This method of switching from one workstaon to another supports up to 16 workstaons. It supports a quick and simple method of switching to dierent workstaons. If more than 16 workstaons is required, then the On Screen Display (OSD) Switching Method must be used.
Each Transmier must have a unique Dip Switch seng (ranging from 0 to 15) which will automacally correspond to the workstaon ID. The Dip Switch represents a binary count as follows:
| ID 0 | ID1 | ID 2 | ID 3 | ID 4 | ID 5 | ID 6 | ID 7 | ID 8 | ID 9 | ID 10 | ID 11 | ID 12 | ID 13 | ID 14 | ID 15 |
| 0000 | 0001 | 0010 | 0011 | 0100 | 0101 | 0110 | 0111 | 1000 | 1001 | 1010 | 1011 | 1100 | 1101 | 1110 | 1111 |
To quickly switch from one workstaon to another, say to switch from workstaon ID 1 to workstaon ID 4, press and hold the "CTRL" key and while doing so quickly press "4" three mes.
This will automatically switch the client operator to the workstaon with ID 4.
Note that the hotkey keyboard mapping for ID 0 to ID 15 is as follows:
| ID 0 | ID1 | ID 2 | ID 3 | ID 4 | ID 5 | ID 6 | ID 7 | ID 8 | ID 9 | ID 10 | ID 11 | ID 12 | ID 13 | ID 14 | ID 15 |
| CTRL+0 | CTRL+1 | CTRL+2 | CTRL+3 | CTRL+4 | CTRL+5 | CTRL+6 | CTRL+7 | CTRL+8 | CTRL+9 | CTRL+Q | CTRL+W | CTRL+E | CTRL+R | CTRL+T | CTRL+Y |
3 On Screen Display (OSD) Switching Method
The OSD Switching Method does not rely on the Dip Switch seng and thus is not limited to only 16 workstaons. This method supports 100's of workstaons.
To acvate the OSD, quickly press “Scroll Lock” three mes. This brings up the KVM OSD Menu, with a pulldown tab to select from many workstaons (scroll through the pulldown menu to select the desired workstaon). In addition, each KVM Transmier can have a user dened alpha numeric name that is representave of the aached workstaon. For example the KVM Transmier that is connected to the main email server can have the name “Email Server 1” or “Main Email Server”.
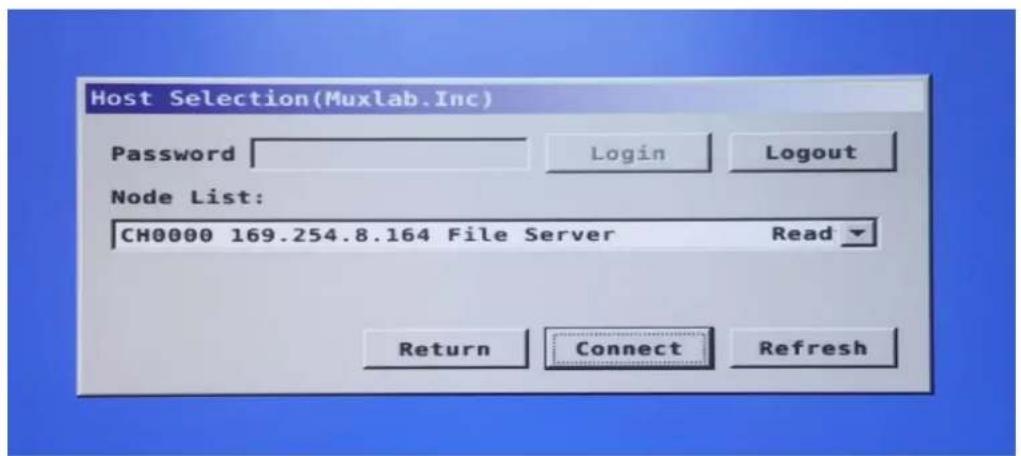
The main KVM OSD Menu oers the operator a simple and clean menu selecon as shown below. Note that while the OSD is acve, the operator is not connected to any workstaon.
- Password Field: The user must enter his or her password in this eld in order to login and be provided system access. The default password is "admin".
- Login: Type in a valid password and click on "Login". If accepted, then access is granted.
- Logout: Click on "Logout", to log out of the system. Access is denied while logged out.
- Node List: This eld shows the previous workstaon selected. When clicking on the pulldown arrow, a lisng of all workstaons that may be selected for control is presented. Use the scroll bar to view all workstaons.
-
Return: Returns control of the previous workstaon (prior to bringing up the OSD).
-
Connect: Aer selecng a workstaon in the Node List, then pressing "Connect" provides control over the selected workstaon (assuming it is not already under the control of another client).
- Refresh: Pressing "Refresh" updates the Node List of available workstaons.
3.1 Login to the KVM Device
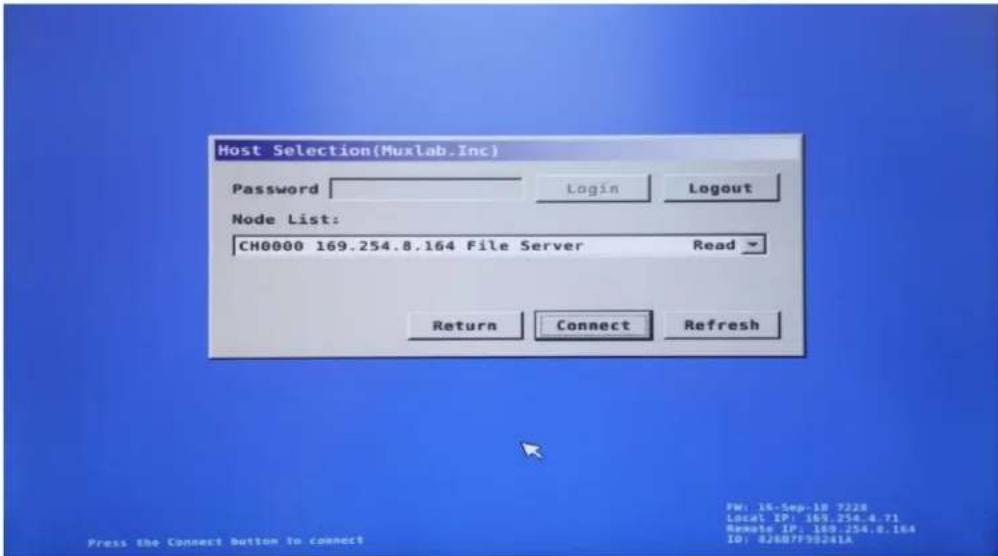
Once the KVM Receiver is powered up it will present the operator with a Login screen as shown below, as an On Screen Display (OSD), which is originang from the aached KVM Receiver, and not from the computer.

Type in your password and click on Login with your mouse. The default password is "admin".
The following screen will be displayed and is ready for you to select a workstaon to connect with. Note that the previously connected workstaon is displayed by default in the Node List eld.
3.2 Logout from the KVM Device
To Logout, simple click on "Logout", and the login screen will be displayed. You will be required to login, should you wish to take control of the KVM device and connect with available workstaons.
3.3 Bring up the KVM OSD Menu
To bring up the KVM OSD Menu at any me, quickly press "Scroll Lock" three mes. The OSD will be displayed.
Note that this display is generated directly from the KVM Receiver, and is not being generated by any workstaon.
3.4 Selecting a Workstation to control
If the KVM OSD Menu is not currently being displayed, then do so at this me.
Before selecng a workstation to control, it is a good pracce to click on "Refresh" rst, just in case a new workstaon was recently added since the last me "Refresh" was executed.
To select a workstaon, click on the dropdown arrow, as shown below, to list the workstaons which are controllable via the KVM device.

Note that the list includes the following informaon respectively:
- The Dip Switch setng selected on a given KVM Transmier, where "CH0000" means Dip Switch seng "0000".
• The IP address of the KVM Transmier.
The given name for the KVM Transmier, which is generally a name that is representave of the aached workstaon.
Note: The KVM Transmier name can be set via the web interface of the said KVM Transmier. To do so, follow the procedure in the secon "Seng the Transmier/Receiver Name".
Click on the "Funcon" Tab and scroll down to the bottom. Enter the KVM Transmier name in the "KVM unit name" eld as shown below, and click on "Apply". It is best to select a name that is representave of the aached workstaon, such as File Server, Email Server, etc.
To actually select a workstaon to control, use the mouse to click on the desired workstaon from the provided "Node List". Workstaons that indicate a status of "Ready" are available for control, while workstaons that have a status of "Busy" are already being controlled by another client and are not available to you at this me. Click on a free workstaon to highlight it and then click on "Connect" to connect with that workstaon.

Once connected, the workstaon screen will be displayed and the mouse and keyboard will funcon normally, just as if you were directly connected and located next to the workstaon.
Note: If you accidentally try to connect to a workstaon with a "Busy" status (meaning that it is already connected to another client), then the KVM OSD Menu will return within a few seconds, rather than presenting the operator with the workstaon screen.
3.5 Returning
Clicking on “Return”, will return you to the previous workstaon you were controlling. Note that if another client connected to your previous workstaon, while your OSD KVM Menu was acve, then you will not have access to this workstaon until it is free, or instead you can simply connect with another workstaon that is currently free (in “Ready” state). Note that when you acve the OSD, you lose control of the workstaon you were controlling.
3.6 Refresh
Pressing "Refresh" updates the Node List of available workstaons. Note that during power up, a refresh is automatically performed by the system.
4 KVM Transmitter/Receiver Settings
The following secon describes how to set and conjure the KVM Transmier and Receiver via their web interface. To access either the KVM Transmier or Receiver web interface, begin by entering the KVM Transmier/Receiver IP address into a computer web browser and press enter. Make sure the computer is connected to the same subnet as the KVM Transmier/Receiver, and that it has an IP address that is within the same subnet range. Login, if required, with the appropriate password (the factory default password is “admin”).
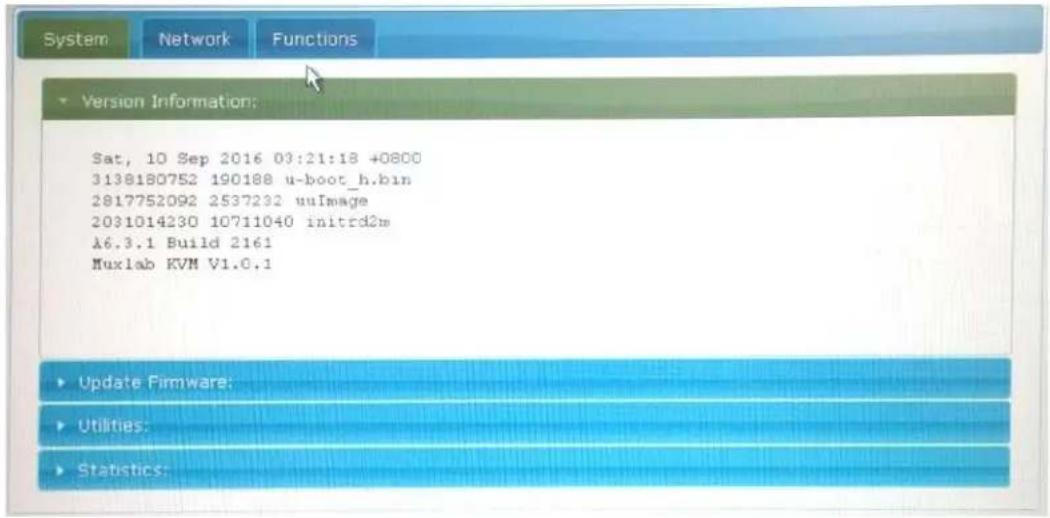
4.1 Firmware Version Information
To access the Firmware version informaon, press on the "System" tab, and then on the "Version Informaon" sub tab. This will bring up the rmware version informaon for the given KVM Transmier/Receiver. An example KVM Transmier version informaon screen is shown below.
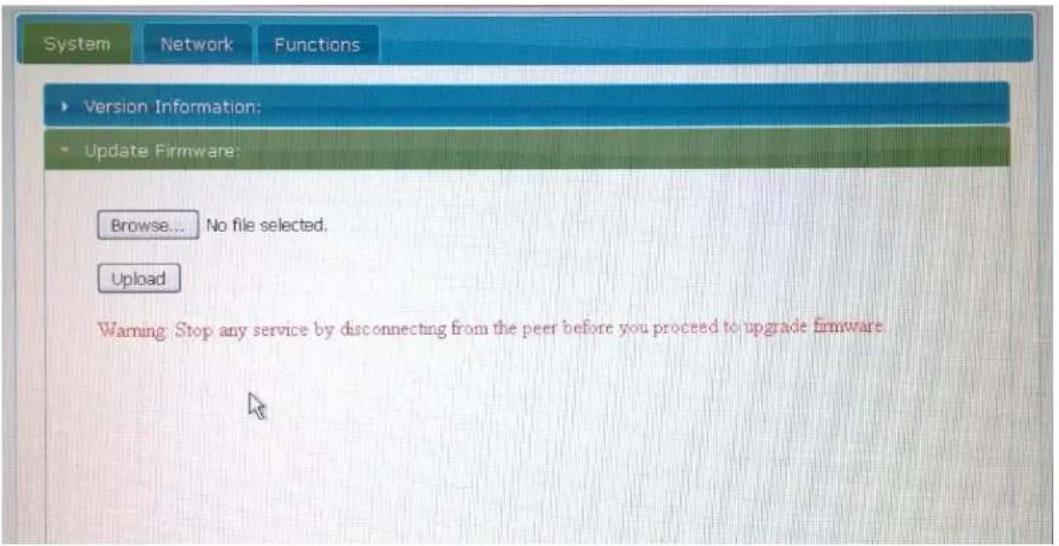
4.2 Upgrading Firmware
To upgrade the rmware, begin by verifying your current KVM Transmier and Receiver rmware versions. To do this, follow the steps in the "Firmware Version Informaon" secon. Then search for the latest version of the KVM Transmier and Receiver rmware on the MuxLab website in the "Support" page secon. If a newer version exists, then proceed to download it.
To upgrade the KVM Transmier/Receiver, from the device web interface click on the "System" tab and then on the "Upgrade Firmware" sub tab, see the example below. Press the "Browse" buon to browse for the le previously downloaded, and once selected, press the "Upload" buon to upgrade the KVM Transmier/Receiver.
4.3 Changing the OSD Login Password
The default OSD Login password is "admin", but may be changed via the KVM Receiver web interface. From within the "System" tab and then "Ulies" sub tab, scroll down to the "Console API Command" eld. This eld may be used to set the new password.
As an example to set the password to "12345", from within the "Console API Command" eld, type "astparam sui_password=12345", and then press "Apply", as shown below.

To save the new password, type "astparam save" in the "Console API Command" eld, and press "Apply", as shown below.
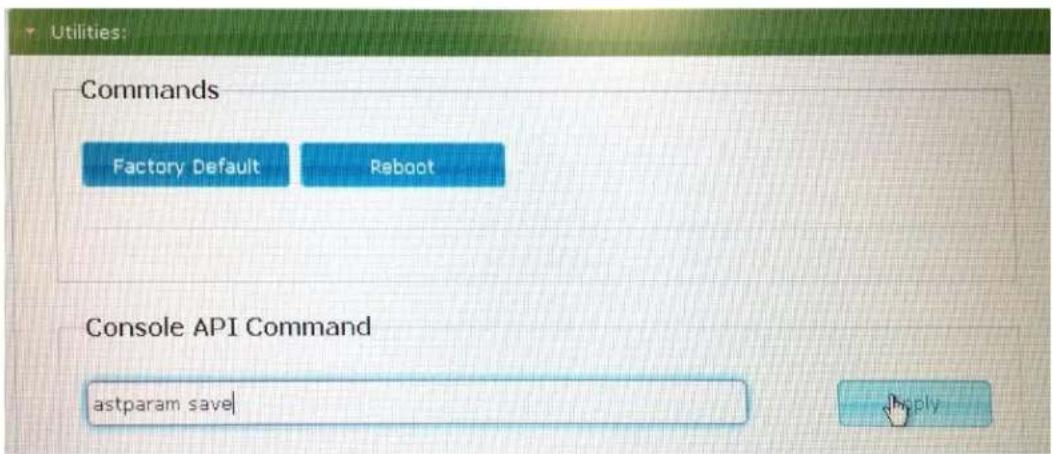
The Login password is now set to "12345". Record the new password in a safe place as a reference.
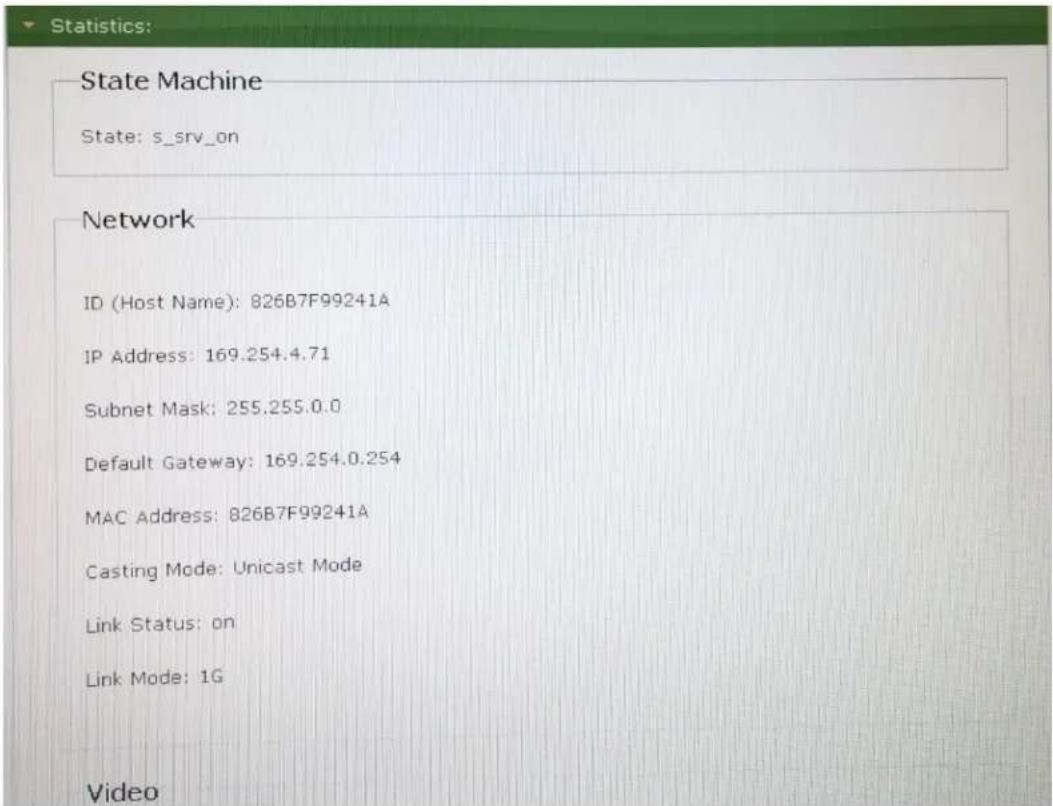
4.4 KVM Device Statistics
The KVM Transmier/Receiver stascs is available via the device web interface by clicking on the "System" tab and the "Stascs" Sub tab. See the example screens below.
| Local Video Output: |
| attached=y |
| Checksum: ok |
| CEA Ext: y |
| CEA Ext Checksum: ok |
| Input Signal: digital |
| Support Features: |
| yuv: y |
| hdr: n |
| Preferred Timing: |
| 1360x768@60Hz,Prog (idx 152, sn 16412) |
| EDID: |
| 00 ff ff ff | ff ff ff 00 | 1e 6d 01 00 | 01 01 01 01 | 01 15 01 03 | 80 73 41 78 | 0a cf 74 a3 | 57 4c b0 23 | 09 48 4c a1 | 08 00 81 c0 | 01 01 01 01 | 01 01 01 01 | 01 01 01 01 | 01 01 66 21 | 50 b0 51 00 | 1b 30 40 70 | 36 00 7e 8a | 42 00 00 1e | 01 1d 00 72 | 51 d0 1e 20 | 6e 28 55 00 | 7e 8a 42 00 | 00 1e 00 00 | 00 fd 00 39 | 3f 1f 3c 09 | 00 0a 20 20 | 20 20 20 20 | 00 00 00 fc | 00 4c 47 20 | 54 56 0a 20 | 20 20 20 20 | 20 20 01 1b | 02 03 1c f1 | 47 10 22 20 | 05 84 03 02 | 23 09 07 07 | 67 03 0c 00 | 10 00 80 2d | e3 o5 o3 o1 | o2 3a 80 18 | |
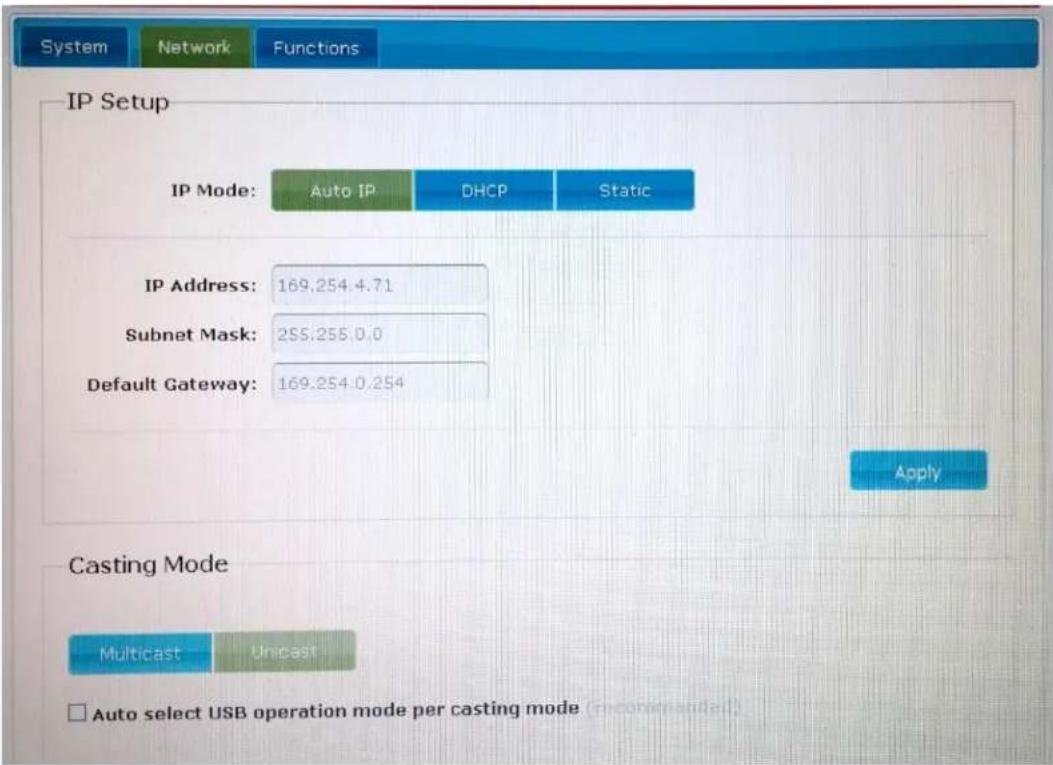
4.5 Network Settings
The KVM Transmier and Receiver network seng can be managed by pressing the "Network" tab. There are three sub tabs for additional control, "Auto IP", "DHCP" and "Stac". The default seng is "Auto IP", and it is recommended that this mode be set.
4.6 Setting the KVM Transmitter/Receiver Name
The following steps illustrate how to set the name for each KVM Transmier/Receiver. From the main web interface home page click on the "Funcon" Tab and scroll down to the boom. Enter the KVM Transmier/Receiver name in the "KVM unit name" eld as shown below, and click on "Apply". It is best to select a name for the KVM Transmier that is representave of the aached workstaon, such as File Server, Email Server, etc., or for the KVM Receiver that is representave of the client operator desktop. The below screen shows an example of the KVM Transmier screen.

4.7 Selecting the OSD HotKey Sequence
In order to set the OSD hotkey sequence, go to the KVM Receiver web interface and press the "Funcon" tab and scroll down to the boom. See the example screen below.
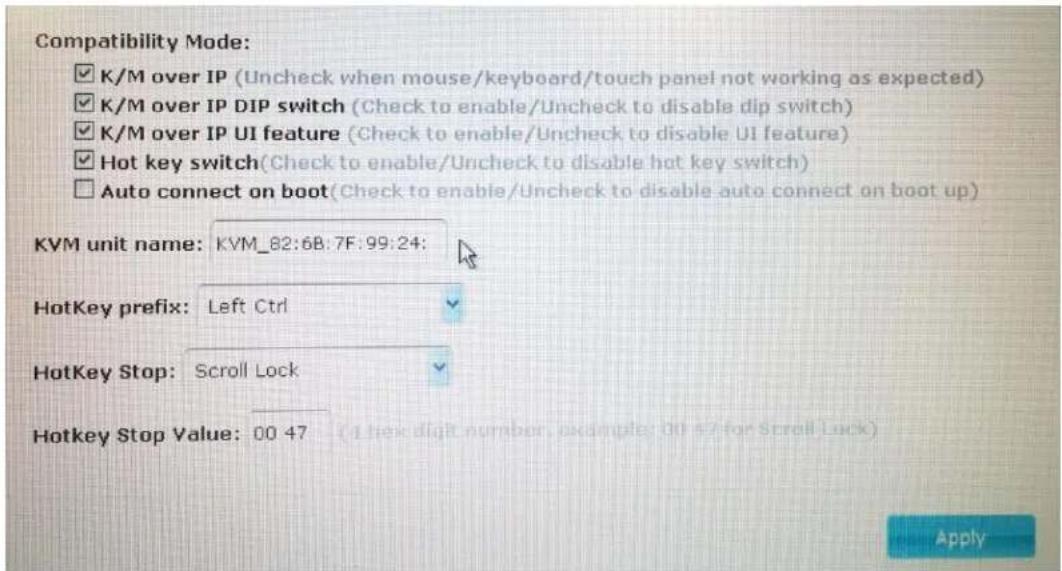
Click on the "HotKey prex" pull-down arrow to select the hotkey prex setng from the provided opons.

Click on the "HotKey Stop" pull-down arrow to select the hotkey stop seng from the provided opons.
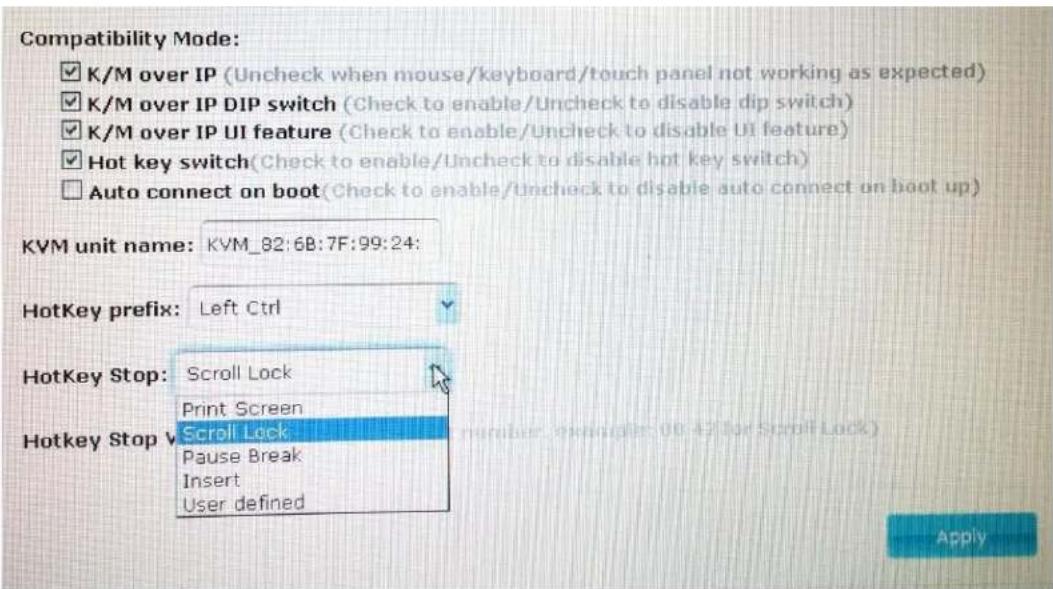
If the "User Dened" opon is selected, then enter the value for this hotkey stop in the "Hotkey Stop Value" eld, as "00xy", where "xy" is the hotkey stop key value.
5 Specifications
| Environment | HDMI 1.4 |
| Devices | Computers and servers with HDMI monitor ports. |
| Transmission | Transparent to the user |
| Bandwidth | 300MHz |
| Signals | HDMI 1.4 protocol, HDCP 1.4 |
| Connectors | One (1) HDMI receptacle.One (1) RJ45S for Cat 5e/6 unshielded or shielded twisted pair.Two (2) 3.5mm jacks for audio insert (on TX)/audio extract (on RX).One (1) 2.1mm locking barrel jack for powerOne (1) or Four (4) USB Connector(s) for Host (on TX)/Client (on RX)Four (4) DIP Switches for device ID addressing. |
| Note: Cables not included. | |
| Maximum DistanceBased on a maximum length of 6.6 (2m) of HDMI cable per end. | Cat5e/6: 330 (100m) up to 1080p @ 60HzNote: When installed in an electrically noisy environment, an STP cable must be used. Also, cross-conncon reduces the eecve distance depending on the grade of twisted cable used. |
| Latency | Typical one (1) Frame (16ms), maximum 2 frames (33ms) |
| Compression | JPEG 2000 |
| Bandwidth | Up to 315Mbps |
| Network Requirement | 1000BaseT with PoE |
| RJ45 Pin ConguraonReverse Polarity Sensitive. Use EIA/TIA 568A or 586B straight-through wiring. | RJ45 LinkPin 1 (R) Pin 2 (T)Pin 3 (R) Pin 6 (T)Pin 4 (R) Pin 5 (T)Pin 7 (R) Pin 8 (T)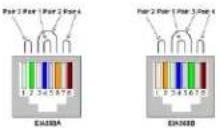 |
| Cable | One (1) Cat 5e/6 or beer twisted pair cables required |
| Power Source | This device supports PoE (PD), an external power supply is not included. It is intended to be powered via a PoE (PSE) Ethernet Switch. If required, an oponal power supply (500993) may be purchased separately. |
| PoE Standard | IEEE 802.3af |
| Power Consumpon | Transmier: 2.85Wa Receiver: 2.55Wa |
| Temperature | Operang: 0° to 40°C Storage: -20° to 85°CHumidity: Up to 95% non-condensing |
| Dimensions | 4.40" x 5.08" x 1.00" (112mm x 129mm x 25mm) |
| Weight | 1.5lbs (0.68kg) |
| Compliance | Regulatory: FCC, CE, RoHS Flammability: 94V0 |
| Warranty | 3 years |
| Order Informaon | 500770 KVM HDMI over IP PoE Extender Kit (UPC: 67699007709)500770-TX KVM HDMI over IP PoE Extender TX (UPC: 67699907702)500770-RX KVM HDMI over IP PoE Extender RX (UPC: 67699807705) |
| Accessories(These items are sold separately) | 500920 16-Port Rackmount Transceiver Chassis500917 Wall Mount Transceiver Bracket Kit500993 Univ. Locking Power Supply 5VDC/2.6A US/UK/EU Blade |
6 Warranty Policy
Items Under Warranty - Company Policy
MuxLab guarantees its products to be free of defects in manufacturing and workmanship for the warranty period from the date of purchase. If this product fails to give satisfactory performance during this warranty period, MuxLab will either repair or replace this product at no additional charge, except as set forth below. Repair and replacement parts will be furnished on an exchange basis and will be either reconditioned or new. All replaced parts and products become the property of MuxLab. This limited warranty does not include repair services for damage to the product resulting from accident, disaster, misuse, abuse, or unauthorized modicaons or normal decay of baery driven devices. Baeries, if included with the product, are not covered under this warranty.
Limited warranty service can be obtained by delivering the product during the warranty period to the authorized MuxLab dealer from whom you purchased the product, or by sending it to MuxLab. MuxLab will not accept any such product for repair without a Return Material Authorizaon number (RMA#) issued by its Customer Service Department and a proof of purchase date. If this product is delivered to MuxLab by mail, you agree to assume risk of loss or damage in transit, to prepay shipping charges to the warranty service locaon, and to use the original shipping container or equivalent.
THE ABOVE LIMITED WARRANTY IS THE ONLY WARRANTY COVERING YOUR MUXLAB PRODUCT. THERE ARE NO OTHER WARRANTIES, EXPRESSED OR IMPLIED, INCLUDING WARRANTIES OF MERCHANTABILITY OR FITNESS FOR A PARTICULAR PURPOSE. SOME STATES DO NOT ALLOW LIMITATIONS ON IMPLIED WARRANTIES, SO THE ABOVE LIMITATION MAY NOT APPLY TO YOU.
IF THIS PRODUCT IS NOT IN GOOD WORKING ORDER, YOUR SOLE REMEDY SHALL BE REPAIR OR REPLACEMENT AS PROVIDED FOR ABOVE. IN NO EVENT SHALL MUXLAB BE LIABLE TO YOU FOR ANY DAMAGES, INCLUDING ANY LOSS OF PROFITS, LOST SAVINGS, OR OTHER INCIDENTAL OR CONSEQUENTIAL DAMAGES ARISING OUT OF THE USE OF OR INABILITY TO USE THIS PRODUCT, EVEN IF MUXLAB OR AN AUTHORIZED MUXLAB DEALER HAS BEEN ADVISED OF THE POSSIBILITY OF SUCH DAMAGES; NOR WILL MUXLAB BE LIABLE FOR ANY CLAIM BY ANY OTHER PARTY. SOME STATES DO NOT ALLOW THE EXCLUSION OR LIMITATION OF INCIDENTAL OR CONSEQUENTIAL DAMAGES FOR CONSUMER PRODUCTS, SO THE ABOVE LIMITATIONS OR EXCLUSIONS MAY NOT APPLY TO YOU. THIS WARRANTY GIVES YOU SPECIFIC LEGAL RIGHTS. YOU MAY ALSO HAVE OTHER RIGHTS WHICH MAY VARY FROM STATE TO STATE.
6.1 Warranty Period
Any product found to be defective within three (3) months of invoice, including one (1) month shelf life, may be returned for replacement by a new unit or a sasfactory repair within one (1) month of receiving any returned product. The customer must provide MuxLab with the serial number and proof of purchase of the defective unit being returned. All RMA's issued are subject to inspecon by MuxLab, and will be returned to customer if not properly packaged – units must be returned in original container or equivalent. MuxLab will not accept any such product for repair without an authorizaon from its Technical Support department and without an RMA# issued by MuxLab Customer Service department. For a credit & replace RMA, the customer will be liable to pay replacement invoice if defective products are not returned.
For Product more than six months old, including shelf life. The defective unit must be returned prepaid to MuxLab and then the unit will be repaired or if repair is not possible, replaced by an equivalent unit and returned to the customer within one (1) month of receiving any returned product. There is no charge for repair (parts and labor) during the full warranty period.
Items Defective and not under Warranty
For products which are no longer under warranty the policy is repair and return. An amount of 25% of the products published list price at the me of purchase will be charged. Customer must issue a purchase order to cover the cost of repair.
Each unit will be returned to the customer within one (1) month from receipt of the unit by MuxLab. The defective unit must be returned prepaid to MuxLab. The repaired unit will be returned to the customer FOB MuxLab. The repaired unit includes a 90 day warranty.
MuxLab
PRODIGITAL
MuxLab Inc.
8495 Dalton Road
Mount Royal, Quebec
Canada H4T 1V5
Tel.: +1 (514) 905-0588 Fax: +1 (514) 905-0589
Toll Free (North America): 877 689-5228
URL: www.muxlab.com
E-mail: videoease@muxlab.com
- Introduction
- Key Features:
- Direct Switching Method
- On Screen Display (OSD) Switching Method
- Login to the KVM Device
- Logout from the KVM Device
- Bring up the KVM OSD Menu
- Selecting a Workstation to control
- Returning
- Refresh
- KVM Transmitter/Receiver Settings
- Firmware Version Information
- Upgrading Firmware
- Changing the OSD Login Password
- KVM Device Statistics
- Network Settings
- Setting the KVM Transmitter/Receiver Name
- Selecting the OSD HotKey Sequence
- Warranty Policy
- Items Under Warranty - Company Policy
- Warranty Period
- Items Defective and not under Warranty
- MuxLab
- PRODIGITAL
Brand : MuxLab
Model : 500770
Category : Audio/video switch