
ORC-CELLO-M2 - Lighting Luxli - Free user manual and instructions
Find the device manual for free ORC-CELLO-M2 Luxli in PDF.

| Product Type | Multicolor LED Light Panel |
| Model | ORC-CELLO-M2 |
| Brand | Luxli |
| LED Type | 5-Die RGBAW |
| Color Temperature Range | 2800 K to 10,000 K |
| Color Accuracy (CRI / TLCI) | CRI 96 / TLCI 97 |
| Beam Angle | 72° |
| Dimming | 0% to 100% (continuous) |
| Display | LCD |
| LED Count | 176 |
| Panel Size (W×H) | 8.6 × 3.1 in (22 × 8 cm) |
| Fixture Dimensions (W×H×D) | 9.5 × 3.6 × 0.8 in (24 × 9.3 × 2 cm) |
| Weight (without battery) | 12.5 oz (354.8 g) |
| Power Source | DC input 7-15V, USB PD 12V/2.5A or 15V/2A, Sony NP-F battery |
| Max Wattage | 30 W |
| Battery Mount | Sony NP-F style |
| Remote Connection | Bluetooth 5, up to 100 ft (30.5 m) |
| Mounting | 1/4-20 female socket |
| Cooling System | Passive |
| Expected Lamp Life | 50,000 hr |
| Light Intensity at 3 ft | 1500 lx |
| Operating Modes | CCT, HSL, Filter, Effects (10 effects) |
| Included Accessories | Shoe-mount ball head, USB Type-C cable (6.6 ft), NP-F750 battery, Quick start guide, USB Type-C wall charger |
| Maintenance | Clean with soft, dry cloth only |
| Safety Warnings | Keep away from water/flammable gases, use recommended voltage, do not disassemble |
Frequently Asked Questions - ORC-CELLO-M2 Luxli
User questions about ORC-CELLO-M2 Luxli
0 question about this device. Answer the ones you know or ask your own.
Ask a new question about this device
Download the instructions for your Lighting in PDF format for free! Find your manual ORC-CELLO-M2 - Luxli and take your electronic device back in hand. On this page are published all the documents necessary for the use of your device. ORC-CELLO-M2 by Luxli.
USER MANUAL ORC-CELLO-M2 Luxli
Conduct an orchestra of lights.
The Luxli Orchestra series can produce a dazzling symphony of light. Synchronize LED light units of all sizes, choose from millions of possible colors, apply lighting effects from three selectable modes, and control them instantly with the powerful Composer mobile app.
The Cello ^2 10-inch multicolor LED light features a highly accurate and remarkably versatile RGBAW LED panel. The light is equipped with Bluetooth 5, which pairs with Luxli's Composer mobile app from up to 100 feet away. Whether controlled via the app or the intuitive interface on the unit itself, the Cello ^2 will illuminate your creative vision with endless possibility.
For the latest version of the Composer mobile app, firmware updates, as well as videos and ideas for creative uses for the Cello ^2 , visit luxlilight.com.
Precautions
- Please read and follow these instructions, and keep this manual in a safe place.
- Keep this product away from water and flammable gases or liquids.
- Use only the correct, recommended voltage.
- Do not attempt to disassemble or repair this product.
- Clean this product with only a soft, dry cloth.
- To avoid damage to this product, be careful not to overtighten or improperly thread any of the threaded fittings.
- All images are for illustrative purposes only.
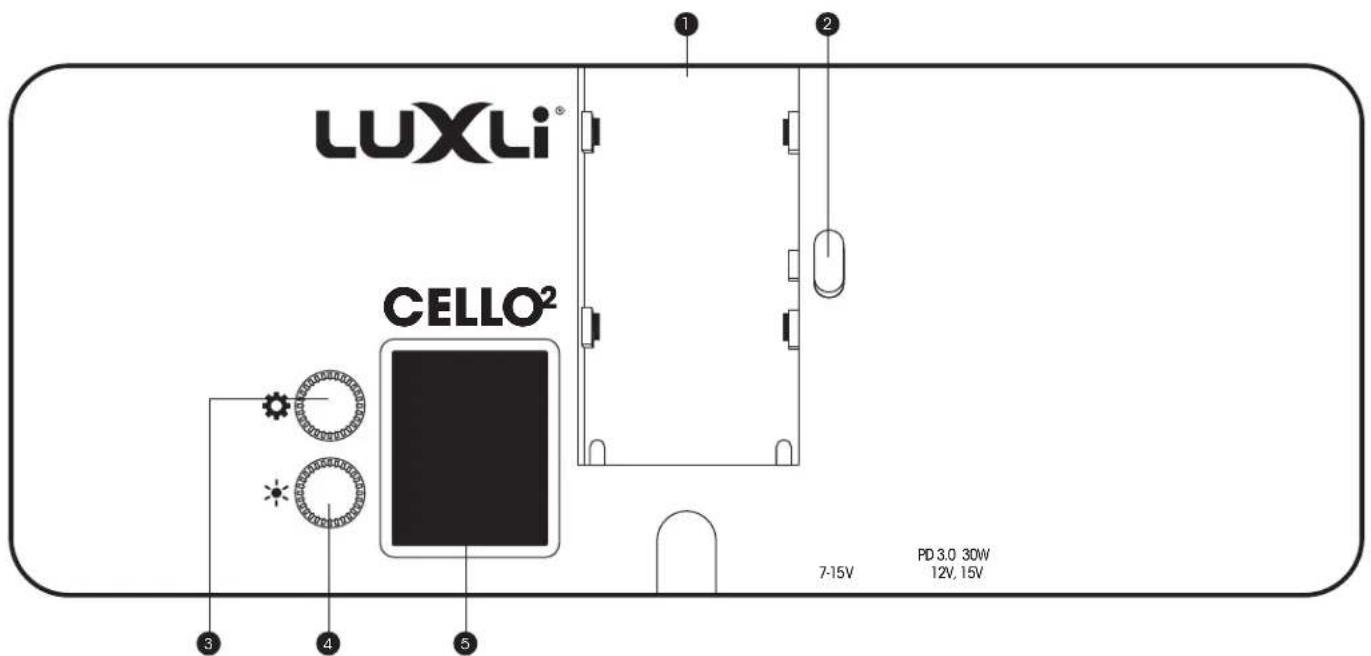
Overview
Back:
-
Battery slot
-
Brightness dial
-
Battery release button
-
LCD screen
-
Adjustment dial
Bottom:
-
Mode selector button
-
DC power input
-
Power button
-
USB Type-C™ port
-
1/4-20 socket

Also Included
- Shoe-mount ball head
• USB Type-C cable (6.6 ft. / 2 m)
- NP-F750 battery
- Quick start guide
• USB Type-C wall charger
Powering the Cello ^2
The Cello ^2 runs on either DC power, a Sony NP-F battery, or via the USB Type-C port.
DC Power
Connect a power cord with a 2.1 × 5.5 mm DC barrel (available separately) to the DC input and an external power source such as a battery or AC adapter.
Important! Make sure the DC power source can provide at least 30 W between 7 and 15 V. Using a power source outside of this voltage range may damage the Cello ^2 .
Battery
Align the contacts of a Sony NP-F style battery with the terminals in the battery plate, and slide the battery into the plate until it clicks into place.
USB Type-C
Connect the Cello ^2 's USB Type-C input with the USB Type-C wall charger. In order to power the Cello ^2 , the wall charger must have Power Delivery 3.0 and a minimum output of 30 W at either 12 or 15 V.
Recharging the Battery
While it's seated in the battery plate, the NP-F style battery can be recharged via the DC power input or the USB Type-C port.
Operation Modes
CCT Mode
Correlated Color Temperature (CCT) mode allows you to accurately adjust the color temperature from 2800 to 10,000 K. The ±Green feature allows you to set the green/magenta saturation level in 1% increments from 100% (full plus green) to -100% (full minus green).
Adjustment dial
- Scroll: Adjust the color temperature in 50 K increments.
- Press: Switches to ±Green adjustment. Turn the dial to adjust the green/magenta color shift between +100% (full plus green) and -100% (full minus green) in 1% increments.
Brightness dial
- Scroll: Adjusts the brightness from 0% to 100%.
- Press: Turns off the RGBAW LEDs without powering down.

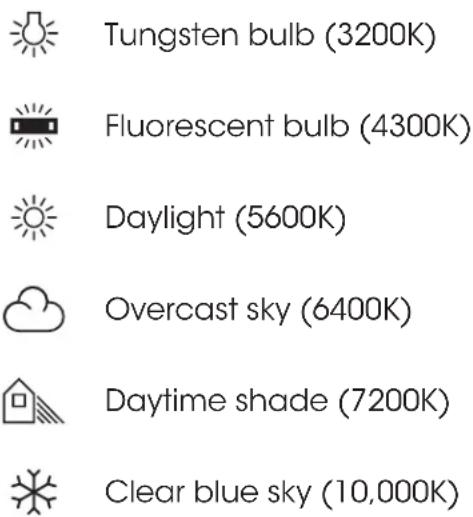
Icons
The icons along the top of the LCD screen indicate industry-standard color temperature settings.
As you adjust the color temperature, a bar will scroll below to indicate where the selected color temperature falls in relation to the icons. Each icon will highlight when the bar reaches the exact color temperature for that setting.
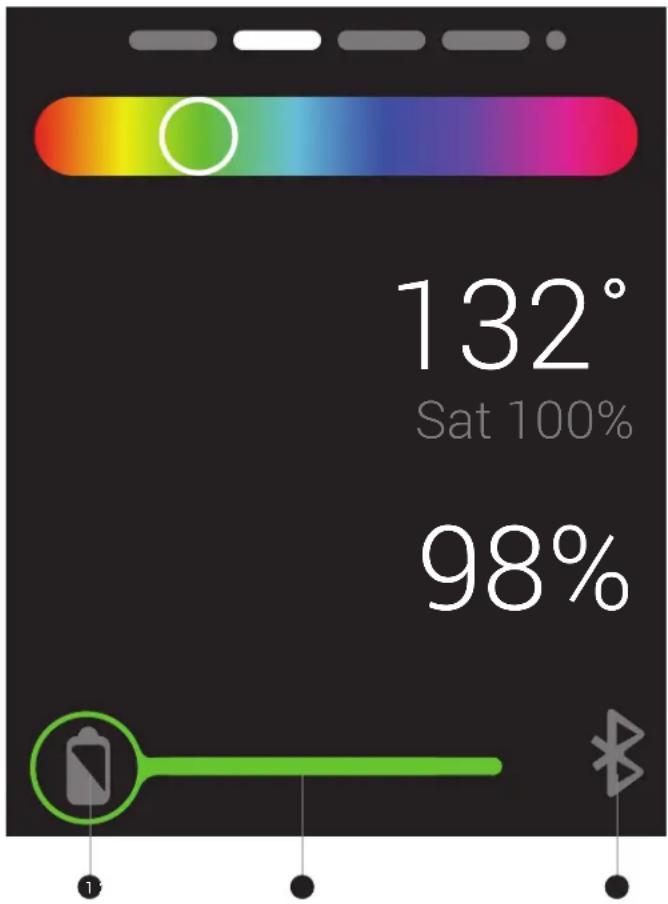
HSL Mode
Hue Saturation Level (HSL) mode lets you scroll through the entire color wheel and adjust the saturation level.
Every color of the visible spectrum is available. In HSL mode, you can create accent lighting as well as dramatic lighting effects for photography and video.
The LCD panel displays the position on the color wheel in degrees, along with a color bar indicator.
Color saturation can be adjusted from 100% to 0% in 2% increments.
Adjustment dial
- Scroll: Scrolls through the color spectrum in 1° increments.
- Press: Switches to saturation adjustment mode. Turn the dial to adjust the saturation level in 2% increments.
\* Brightness dial
- Scroll: Adjusts the brightness from 0% to 100%.
- Press: Turns off the RGBAW LEDs without powering down.
Note: HSL mode at 0% saturation is not designed as an alternative to CCT mode. When illuminating a subject in a light with 0% saturation, CCT mode is recommended.

Color Presets
Flicking the adjustment dial quickly in either direction will go to the nearest true primary or secondary color on the color wheel. The color will land on each of the true colors listed on the right
Red: 0°/360° Cyan: 180°
Yellow: 60° Blue: 240°
Green: 120° Magenta: 300°
Filter Mode
The Cello ^2 is loaded with 150 digital gel filters. Filter mode allows you to adjust the color temperature setting in 50 K increments and apply any of the colored gels.
This mode allows you to match the color temperature of your other lights, and then add a gel for a touch of color to a background or an accent light. The Cello ^2 uses the setting from CCT mode to calculate the precise color temperature of the gel as it would appear on the actual light.
Adjustment dial
- Scroll: Scrolls through all installed colored gels.
- Press: Switches to CCT mode. Turn the dial to adjust the base color temperature value in 50 K increments.
\* Brightness dial
- Scroll: Adjusts the brightness from 0% to 100%.
- Press: Turns off the RGBAW LEDs without powering down.
Important! The selected filter is active only in filter mode. The filter is removed upon exiting filter mode, and the Cello ^2 returns to its previous CCT setting.

bar
| Category | Value | | ------------ | ----- | | Chromakey Blue | 1 | | 3000k | 50% |Each numbered gel has a descriptive title, along with a preview of the selected base color of the filter, and exact color temperature.
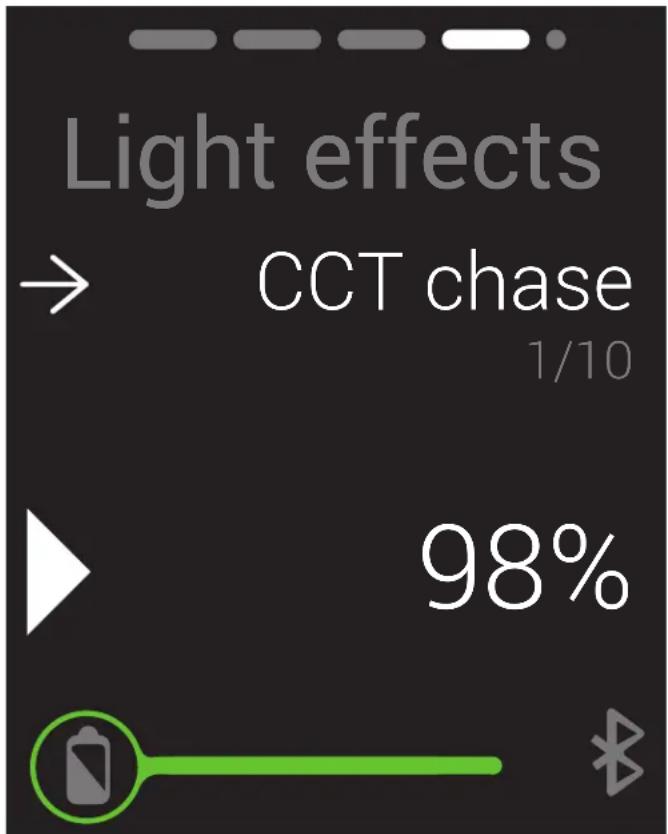
Effects Mode
The Cello ^2 is loaded with 10 animated effects. Each effect has multiple settings and parameters that can be adjusted in the Edit menu.
Press the top dial to enter or exit submenus.
Rotate the top dial to scroll through submenus.
Use bottom dial to adjust the value of theselected submenu.
Press bottom dial to start the effect.
Adjustment dial
- Scroll: Select between 10 animated effects.
- Press: Switches to effect edit mode.
- Turn the dial to scroll through the variable adjustment menus for the selected mode.
- Turn the Brightness dial to make value adjustments.
- Press the Adjustment dial to return to the effects menu.
\* Brightness dial
- Scroll: Adjusts the brightness from 0% to 100%.
- Press: Starts running the effect. Press again to stop running the effect.
As you modify the parameters, the Cello ^2 displays the changes in real time, so you can experiment with the settings while running the effect.
Description of the Effects
CCT Chase
A continuous look that changes between two preset color temperatures. Good for simulating a sunrise, sunset, or a change from cloudy to sunny weather in real time. Since the sequence loops, you can shoot multiple takes without reprogramming the light.
Color Chase
A continuous loop that moves through the color wheel between two selected colors. Since the sequence loops, you can shoot multiple takes without reprogramming the light.
Explosion
Simulates the light from explosions. The Cello ^2 generates random-length pulses and strobes within a range of programmed hues.
Fire
Simulates the light of a candle, campfire, or bonfire in various wind conditions.
Fireworks
Uses random bursts of color to simulate fireworks. Colors and timing of each flash are random.
Lightning
Simulates lightning by creating random short and long bursts of light.
Paparazzi
Simulates the random firing of multiple camera flashes.
Pulse
Creates a steady pulse at a programmable rate. This effect is similar to the strobe effect (below), but the light fades on and off.
Siren
Simulates emergency lights, like a police car or ambulance.
Strobe
Creates a steady flashing light at a programmable rate.
Warnings and Indicators
The Cello ^2 factors in the brightness and mode settings when it calculates the remaining battery life.
Warnings
- Battery Low: Battery bar indicator turns red when the battery is below 10%. Recharge the battery immediately.
- Battery Empty: The LEDs will shut off.
• Overheat: The LEDs will shut off, and brightness adjustment is disabled until the unit has cooled to a safe temperature.
Important! If the unit frequently overheats, contact Luxli customer support.
- Insufficient Voltage
- USB: Unable to charge
- USB PD: 12, 15 V 30W – Press power button to turn on.
- DC Power: (When the Cello ^2 is powered on) DC voltage error – Disconnect now
Indicators
1. Power mode icon
Battery: Running on battery power.
Plug: The Cello is fully charged and running on external power.
Lightning bolt: This icon will appear onscreen when the Cello is powered off.
2. Battery Indicator
- Green: 100% to 25%
• Yellow: 25% to 10%
• Red: Less than 10%
3. Bluetooth Indicators
Search mode
* Connected
bar
| Metric | Value | |--------|-------| | Sat | 132° | | 100% | 98% |Using the Cello ^2 with the Composer App
The Luxli Composer app lets you unlock the potential of the Cello ^2 . Control Luxli lights individually or globally by forming groups. Save and recall custom presets, edit effects parameters, and create a timeline for your effects, like a DMX controller.
Go to luxlilight.com for links to the App Store or Google Play to download and install the app, and to download a PDF of the user guide.
Connecting to the Composer App
- Enable Bluetooth on your device, and open the Composer app.
- Power on the Cello ^4 .
Note: If the Bluetooth icon is not visible, follow the instructions below to enable Bluetooth.
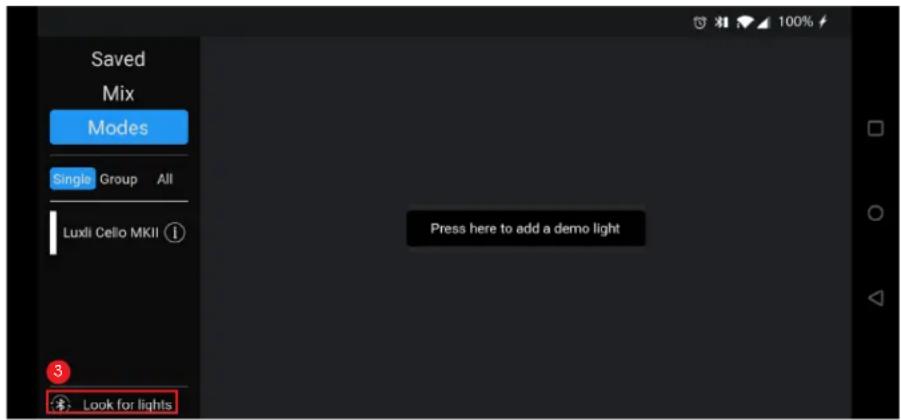
- Tap the Look for Lights icon in the Composer app.
- The app will prompt you to complete the connection with the Cello ^2 . Once you do, the Bluetooth icon on the Cello ^2 will change to connected, and the light will be ready to use with the app.
To disconnect, exit the app. The Cello ^2 will return to Bluetooth search mode.
To disable Bluetooth on the Cello ^2 , press and hold the mode button until the Bluetooth icon disappears.
To enable Bluetooth, press and hold the mode button until the Bluetooth search icon appears onscreen.
Updating the Firmware
Firmware updates are now available through the Composer app.
To update the firmware, follow these steps:
- Open the Composer app, and tap the Look for lights icon. Select how you would like your device to connect to the Cello ^2 .
Note: If you select Always connect, this screen will not appear again until the connection policy is reset. (See the Composer app use guide.)
-
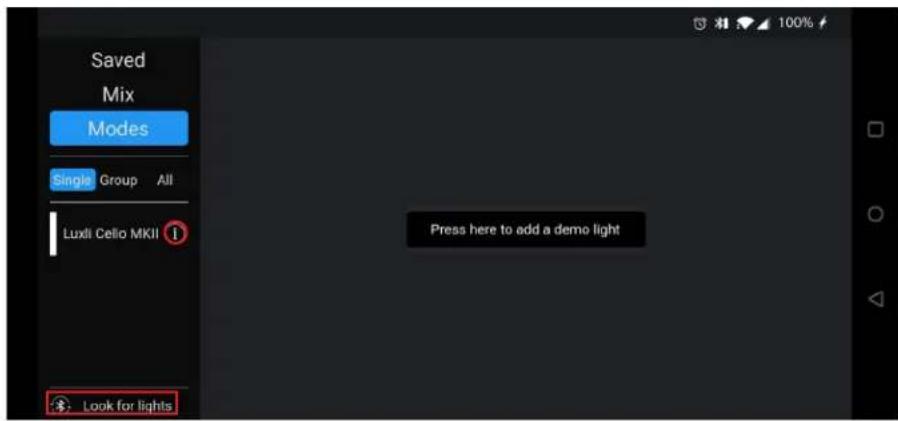
Once the Cello ^2 is connected to the Composer, tap on the icon next to its name to open the fixture window.
-
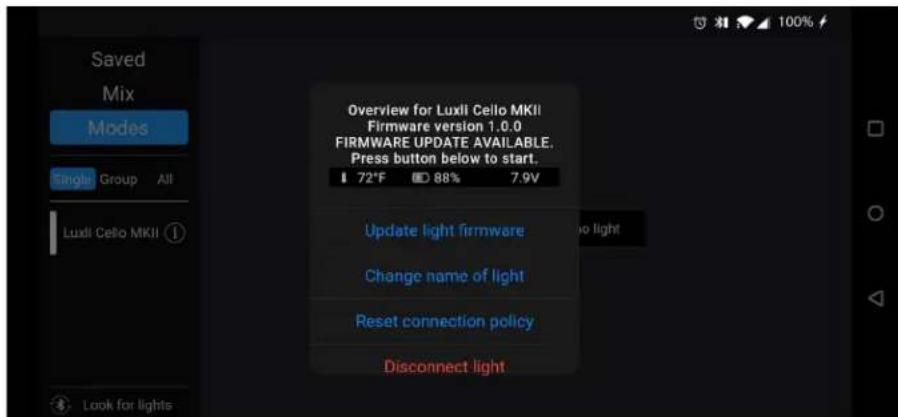
The fixture window will show the current firmware version, and it will display the version number of an available firmware update. Tap on Update light firmware.
-
The firmware update screen will list available firmware versions. Tap on the version number of the newest update to select it.
-
Tap the Load firmware button to begin loading the new firmware version.

-
The Cello's power will shut off, and the LCD screen will indicate an update is in progress. The Composer app will show a status bar of the update in progress.
-
Once the firmware is successfully loaded, the Cello ^2 will automatically power up in 15 seconds. It will open to the most recent settings.
-
Exit the firmware update screen by tapping the back button.
-
The Composer app will return to the main screen. Tap the Look for lights icon to reconnect to the Cello ^2 .
Specifications
Light Fixture
| LED Type | 5-Die RGBAW |
| Beam Angle | 72° |
| Color Temperature | 2800 to 10,000 K |
| Color Accuracy Average | CRI: 96, TLCI: 97 |
| Cooling System | Passive |
| Dimming | 0% to 100% (continuous) |
| Display | LCD |
| LED Count | 176 |
| Housing Material | Plastic |
| Light Intensity @ 3 ft. | 1500 lx |
| Expected Lamp Life | 50,000 hr. |
| Rectangular Panel Size (W × H) | 8.6 x 3.1 in. (22 x 8 cm) |
| Fixture Dimensions (W × H × D) | 9.5 × 3.6 × 0.8 in. (24 × 9.3 × 2 cm) |
| Fixture Weight (without battery) | 12.5 oz. (354.8 g) |
Connectors
| Battery Mount | Sony NP-F style |
| DC Connector | 2.1 × 5.5 mm DC barrel |
Mounting
| Fixture Mount | 1/4-20 female socket |
Remote Operation
| Remote Connection Type | Bluetooth 5 |
| Wireless Range | 100 ft. (30.5 m) |
Power
| DC Input Power | 7–15 V |
| USB PD Input | 12 V = 2.5 A, 15 V = 2 A |
| Power Source | AC adapter, external battery, USB Type-C wall charger |
| Max Wattage | 30 W |
Troubleshooting
If you encounter any problems, first try turning the device off and then on.
If the problem persists, remove the battery for 15 seconds, and then restart.
FCC Compliance Statement
This device complies with part 15 of the FCC rules. Operation is subject to the following two conditions:
- This device may not cause harmful interference
- This device must accept any interference received, including interference that may cause undesired operation.
Important: Changes or modifications to this product not authorized by Gradus Group could void the electromagnetic compatibility (ECM) and wireless compliance and negate your authority to operate the product. This product has demonstrated EMC compliance under conditions that included the use of compliant peripheral devices and shielded cables between system components. It is important that you use compliant peripheral devices and shielded cables between system components to reduce the possibility of causing interference to radios, televisions, and other electronic devices.
One-Year Limited Warranty
This Luxli product is warranted to the original purchaser to be free from defects in materials and workmanship under normal consumer use for a period of one (1) year from the original purchase date or thirty (30) days after replacement, whichever occurs later. The warranty provider's responsibility with respect to this limited warranty shall be limited solely to repair or replacement, at the provider's discretion, of any product that fails during normal use of this product in its intended manner and in its intended environment. Inoperability of the product or part(s) shall be determined by the warranty provider. If the product has been discontinued, the warranty provider reserves the right to replace it with a model of equivalent quality and function.
This warranty does not cover damage or defect caused by misuse, neglect, accident, alteration, abuse, improper installation or maintenance. EXCEPT AS PROVIDED HEREIN, THE WARRANTY PROVIDER MAKES NEITHER ANY EXPRESS WARRANTIES NOR ANY IMPLIED WARRANTIES, INCLUDING BUT NOT LIMITED TO ANY IMPLIED WARRANTY OF MERCHANTABILITY OR FITNESS FOR A PARTICULAR PURPOSE. This warranty provides you with specific legal rights, and you may also have additional rights that vary from state to state.
To obtain warranty coverage, contact the Luxli Customer Service Department to obtain a return merchandise authorization ("RMA") number, and return the defective product to Luxli along with the RMA number and proof of purchase. Shipment of the defective product is at the purchaser's own risk and expense.
For more information or to arrange service, visit www.luxlilight.com or call Customer Service at 212-594-2353.
Product warranty provided by the Gradus Group.
www.gradusgroup.com
LUXLI is a registered trademark of the Gradus Group.
© 2020 Gradus Group LLC. All Rights Reserved.

ORCHESTRA
MULTICOLOR LED SERIES
luxlilight.com


- Conduct an orchestra of lights.
- Precautions
- Overview
- Back:
- Bottom:
- Also Included
- Powering the Cello 2
- DC Power
- Battery
- USB Type-C
- Recharging the Battery
- Operation Modes
- CCT Mode
- Adjustment dial
- Brightness dial
- Icons
- HSL Mode
- \* Brightness dial
- Color Presets
- Filter Mode
- Effects Mode
- Description of the Effects
- CCT Chase
- Color Chase
- Explosion
- Fire
- Fireworks
- Lightning
- Paparazzi
- Pulse
- Siren
- Strobe
- Warnings and Indicators
- Warnings
- Indicators
- Power mode icon
- Battery Indicator
- Bluetooth Indicators
- Using the Cello 2 with the Composer App
- Connecting to the Composer App
- Updating the Firmware
- Specifications
- Troubleshooting
- FCC Compliance Statement
- One-Year Limited Warranty
- ORCHESTRA
- MULTICOLOR LED SERIES
Brand : Luxli
Model : ORC-CELLO-M2
Category : Lighting