ORC-TAIKO-2X1 - Lighting Luxli - Free user manual and instructions
Find the device manual for free ORC-TAIKO-2X1 Luxli in PDF.

User questions about ORC-TAIKO-2X1 Luxli
0 question about this device. Answer the ones you know or ask your own.
Ask a new question about this device
Download the instructions for your Lighting in PDF format for free! Find your manual ORC-TAIKO-2X1 - Luxli and take your electronic device back in hand. On this page are published all the documents necessary for the use of your device. ORC-TAIKO-2X1 by Luxli.
USER MANUAL ORC-TAIKO-2X1 Luxli
Conduct an orchestra of lights.
The Luxli Orchestra series can produce a dazzling symphony of light. Synchronize LED light units of all sizes, choose from millions of possible colors, apply lighting effect from four selectable modes, and control them instantly with the powerful Composer mobile app.
The Taiko is a true 2 x 1 multicolor LED light that features a highly accurate and versatile RGBAW LED panel. It offers CCT, Filter, RGB, and Special Effects operating modes that provide remarkable control over each variable with an easy-to-use interface. The light is equipped with Bluetooth 4.2 LE that pairs with your tablet or smartphone the moment you open Luxli's Composer mobile app. DMX 512 support features master/slave mode that allow you to attach up to 512 Taikos and other compatible Orchestra-series lights, and control all the operation modes from a single unit. Whether controlled via the app, the intuitive interface on the unit itself, or DMX, the Taiko will illuminate your creative vision with endless possibilities.
For the latest version of the Composer mobile app, firmware updates, as well as videos and ideas for creative uses for the Taiko, visit luxlilight.com.
Precautions
- Keep this product away from water and flammable gases or liquids.
- Use only the correct, recommended voltage.
- Do not attempt to disassemble or repair this product.
- Clean this product with only a soft, dry cloth.
- All images are for illustrative purposes only.
- To avoid damage to this product, be careful not to overtighten or improperly thread any of the threaded fittings.
Troubleshooting
- If you encounter any problems, first try turning the device off and then on.
- If the problem persists, remove the batteries or power supply for 15 seconds, and then restart.
- Go to luxlilight.com to make sure you have the most recent firmware update. If a new firmware version is available, follow the instructions on how to download it to your light.
Overview
text_image
Technical diagram of a server rack with labeled components and wiring connectionsBack:
- V-Mount battery plate
- Tilt control screw
- Power input
- Micro-USB port for firmware updates (visit luxilight.com for details)
-
5/8 in. receiver
-
Locking handle
- Outer mounting screw
- Center mounting screw
- 5-pin DMX in/out
- Tilt lock handle
- Adjust height hex screws
Also included:
- ORC-TAIKO-D90 Diffusion panel
• Power supply with power cord
• Photometric calibration results data sheet
- QuickStart guide
text_image
32% 14.4V 10.4V 32% 3900K CCT 0% +/+ GREEN MODE 12 13 14 15 16 17Control Panel:
- Brightness dial
- Power button
-
Mode selector
-
LCD screen
- Function buttons
- Adjustment dial

text_image
18 19 20 21Top:
- Diffuser flap
-
Thumb tab
-
Barndoor slot
- Diffuser slot
Setting up the Taiko
Attaching the Tilt Lock Handle
The tilt lock handle can be attached to either side of the Taiko. To attach the handle, follow these steps:
-
Place the Taiko and yoke down on a flat surface.
-
Use the included hex key to remove one of the tilt control screws, and replace it with the tilt lock handle. Screw in the handle so the threads are engaged, but don't tighten it.
-
Use the hex key to tighten the control screw on the other side of the yoke. Tighten it enough until there is some resistance while tilting the Taiko in the yoke.
-
Tighten the handle until the yoke is locked and secure.

natural_image
Technical line drawing of two door lockers with handle and valve (no text or symbols)Note: If the yoke seems too lose when the tilt lock handle is disengaged, use the hex key to slightly tighten the control screw opposite the handle.
Mounting the Taiko to a Light Stand
Loosen the mounting lock and place the receiver over the light stand's 5/8" pin. Tighten the handle until secure.
Note: If you're unable to turn the tilt lock handle 360^ , pull the handle out, reposition it, and push it back in until it reengages.
Reversing the Receiver's Locking Handle
For mounting and handling convenience, you can change the side the locking handle is on:
-
Remove the Taiko from the light stand and place it down on a flat surface.
-
Use a hex key to unscrew the center and outer mounting screws.
-
Turn the receiver so the handle is on the opposite side.
-
Replace the center and outer mounting screws. Make sure the mounting screw is in the center of the receiver, and the stabilizer screw is on the side. Tighten until firm.

natural_image
Technical line drawing of a mechanical assembly with rotating components and upward arrows indicating motion (no text or symbols)Install/Remove the Diffuser
The Taiko includes a medium-density diffuser. Light- and heavy-density diffusers are also available separately.
-
Press the thumb tabs, and lift up the diffuser flap.
-
Slide the diffuser in or out of the diffuser slot.
-
Close the diffuser flap so it's held in place by the thumb tabs.
natural_image
Technical line drawing of a mechanical assembly with three views showing internal components and directional arrows (no text or symbols)User Interface
Power Button
Press to power on or off.
The Taiko powers on to the last screen that was used.
The Taiko recalls the last settings in CCT, RGB, Filter, and Special Effects mode.
To use the factory presets, see Main Menu/Presets Menu below.
Mode Selector
Press the mode selector to cycle through the four operating modes: CCT, RGB, Filter, and Special Effects.
Brightness Dial
In all operation modes, the Brightness dial adjusts the brightness from 100% to 0% in 1% increments.
In all operation modes, press the Brightness dial to toggle between the set brightness and 0%.
Function Buttons
The function buttons implement the action or access the menu indicated on the LCD screen next to the button.
In each mode, the Adjustment and Brightness dials can change settings.
Adjustment Dial
In all operation modes, the Adjustment dial changes the value of the highlighted function.
For example, in CCT mode, press the Adjustment dial to toggle between 3200 and 5600 K color temperatures.
Voltage Display
Batteries with SMBUS data communication
The Taiko displays a battery indicator at the top of the screen.
Batteries without SMBUS data communication
The Taiko displays the actual voltage of the power source. This allows you to gauge the remaining battery power.
CCT Mode
Correlated color temperature (CCT) mode allows you to adjust the color temperature from 2800 to 10,000 K and set the green/magenta tint level.
CCT Screen
Use the Adjustment dial to adjust the color temperature between 2800 and 10,000 K in 50 K increments.
Press the Adjustment dial to toggle between 3200 and 5600 K color temperatures.
text_image
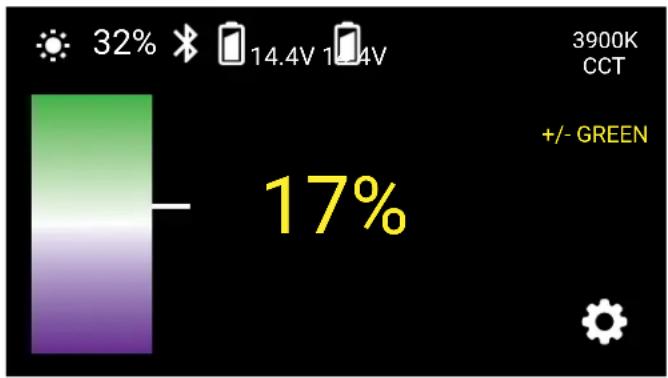
32% 14.4V 10.4V CCT 32% 3900K 0% +/- GREENTint (+/- Green) Screen
The +/- Green function lets you match the Taiko's color to an existing light source by adjusting the green/magenta saturation level. This is a particularly useful feature when shooting under fluorescent lights.
Tap the Function button next to "+/- Green" to access the Tint adjustment screen.
Use the Adjustment dial to set the green/magenta color shift between +100% (full plus green) to -100% (full minus green) in 1% increments.
Press the CCT button to exit the +/- Green submenu and return to CCT adjustment screen.
bar
| Metric | Value | |--------|-------| | Current (Battery) | 32% | | Power Supply (V) | 14.4V | | Power Supply (V) | 10.4V | | Percentage | 17% | 3900K CCT +/- GREENRGB Mode
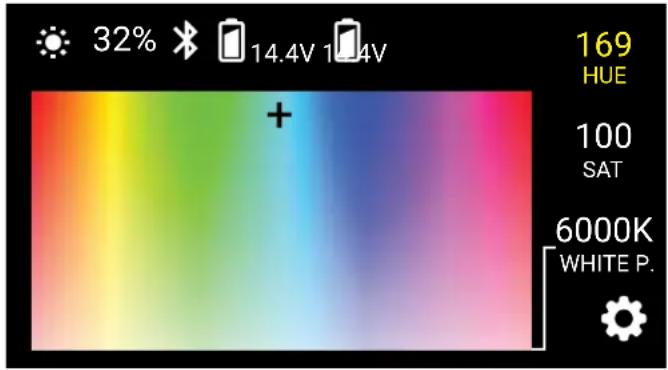
RGB mode lets you dial in any color by scrolling through the entire color wheel. This mode controls hue and saturation levels and has an adjustable base white point for complete control over color selection.
Hue Adjustment
Use the Adjustment dial to set the hue from 0^ to 360^ on the color wheel. The crosshair icon moves horizontally to represent the location of the hue on the color wheel.
The icon conveniently loops from 360^ to 0^ when scrolling through the color wheel.
text_image
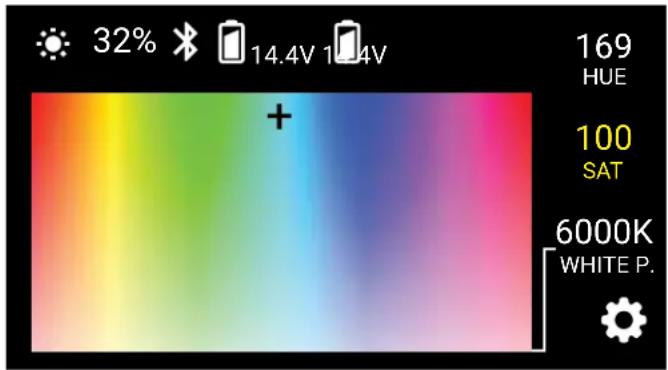
32% 14.4V 10.4V 169 HUE 100 SAT 6000K WHITE P.Saturation Adjustment
Tap the function button next to "SAT" to adjust saturation levels.
Use the Adjustment dial to set the saturation of the hue from 100% to 0% in 1% increments. The crosshair icon moves vertically to represent the level of saturation.
Press the Hue button to return to the hue adjustment screen.
text_image
32% 14.4V 14.4V 169 HUE 100 SAT 6000K WHITE P.Note: The dimmer function remains active, and you can independently adjust the Taiko's brightness while in Saturation mode.
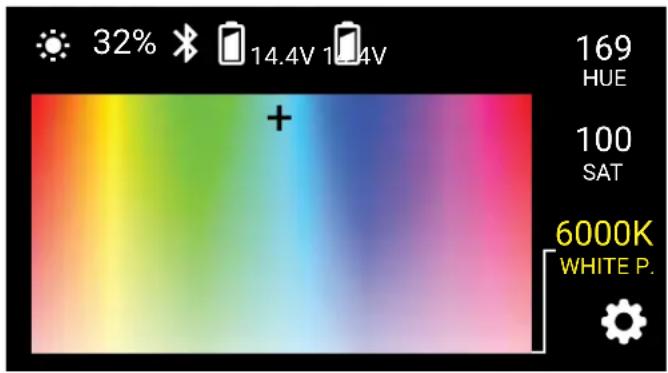
White Point
Adjusts the base white point of RGB mode in order to add a tint to a custom color temperature. The Taiko will calculate the resulting color as the saturation level and hue is adjusted.
Tap the function button next to "White P." and use the adjustment dial to set the base color temperature from 3000 K to 10,000 K in 50 K increments.
text_image
32% 14.4V 10.4V 169 HUE 100 SAT 6000K WHITE P.Press the Hue or Saturation buttons to resume operating in RGB mode.
Note: RGB mode at 0% saturation is not designed as an alternative to CCT mode. When illuminating a subject in a light with 0% saturation, CCT mode is recommended.
Filter Mode
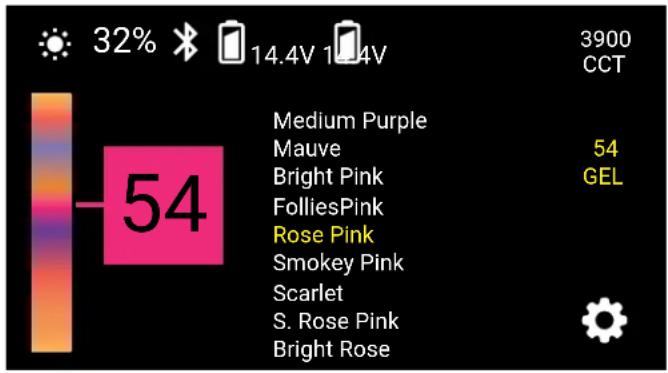
The Taiko is loaded with 150 digital gel filters. Filter mode allows you to apply colored gels to any CCT setting.
Filter Screen
When Filter mode is selected, the Taiko defaults to the gel selection screen. The LCD displays the filter number and name along with the color of the gel.
Use the Adjustment dial to scroll through the 150 digital gel filters.
text_image
32% 14.4V 10.4V 54 Medium Purple Mauve Bright Pink FolliesPink Rose Pink Smokey Pink Scarlet S. Rose Pink Bright Rose 54 GEL 3900 CCTImportant! The selected filter is active only in Filter mode. Leaving filter mode returns the Taiko to its previous CCT setting.
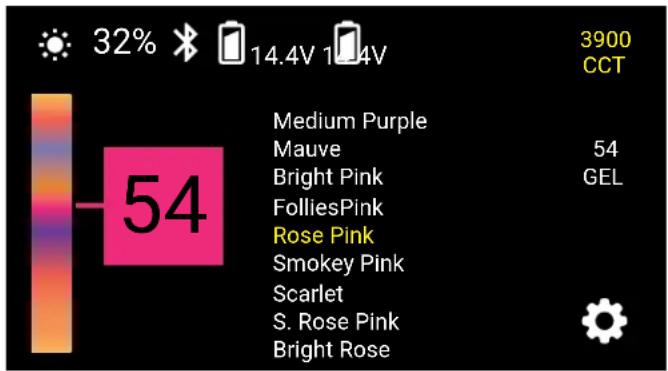
CCT Adjustment
Adjusts the base color temperature without leaving Filter mode. The LCD continues to display the current filter number.
When the white-balance temperature is changed in this mode, the temperature in CCT mode is also changed to this temperature setting. If the temperature setting is changed in CCT mode, the Taiko will set the same white-balance temperature here.
text_image
32% 14.4V 10.4V 3900 CCT 54 Medium Purple Mauve 54 Bright Pink GEL FolliesPink Rose Pink Smokey Pink Scarlet S. Rose Pink Bright RoseTap the CCT function button to adjust the base color temperature using the Adjustment dial.
Press the Gel function button to change the active filter.
Important! The selected filter is visible only in filter mode. The filter is removed when you exit filter mode.
Press the GEL function button to return to the filter selection screen.
Special Effect Mode
The Taiko is loaded with 10 animated special effects. Each effect has multiple settings that can be adjusted in the Edit menu.
Special Effect Screen
Use the Adjustment dial to select one of the ten preprogrammed effects by scrolling down the list and pressing the Play button. Pressing the Stop button ■ stops the effect.

text_image
32% CCT chase Color chase Explosion Fire Fireworks LightningEdit Menu
Each effect has several programmable settings. Pressing the Edit button opens the Edit menu, where the different programmable settings of each effect can be modified.
text_image
Fire type Candle Campfire Bonfire CONFIRM BACK- Scroll to the setting you want to edit, and press Select.
- A new screen will open where you can modify that setting.
- Tap the Confirm button to apply the new setting. The setting's screen will close, and the Edit menu will reappear.
To return to the Edit menu and the previous setting without saving the changes, press the Back button.
Press the Back button again to return to the Special Effect screen.
The Taiko displays the changes in real time as you modify them, so you can experiment with the settings while running the effect.
Split Panel Mode
Split-panel mode is accessible only when operating the Taiko from the Composer app. It splits select Taiko animated effects between the two panels and add depth and realism to the effect.
Description of the Special Effects
CCT Chase
A continuous loop that changes between two preset color temperatures. Good for simulating a sunrise, sunset, or a change from cloudy to sunny weather in real time. Since the sequence loops, you can shoot multiple takes without reprogramming the light.
CCT Start: Selects the color temperature at the beginning of the sequence (2400 to 10,000 K).
CCT Stop: Selects the final color temperature of the sequence (2400 to 10,000 K).
+/- Green: Sets the green/magenta (tint) saturation level in 1% increments from +100% (green) to -100% (magenta).
Time Unit: Select between seconds and minutes for the time loop.
Time/Loop: Select how many seconds or minutes the loop will last (1 to 160).
Color Chase
A continuous loop that moves through the color wheel between two selected colors. Since the sequence loops, you can shoot multiple takes without reprogramming the light.
Hue Start: Selects the color at the beginning of the sequence ( 0^ to 360^ ).
Hue Stop: Selects the final color of the sequence ( 0^ to 360^ ).
Saturation: Determines the color intensity from 100% (full color) to 0% (white light).
Time Unit: Select between seconds and minutes for the time loop.
Time/Loop: Select the duration in seconds or minutes for each loop (1 to 160).
Explosion
Simulates the light from explosions. The Taiko generates random-length pulses and strobes within a range of programmed hues.
Hue Min. (0-360): Set the bottom limit on the color wheel of usable hues.
Hue Max. (0-360): Set the top limit on the color wheel of usable hues.
Explosions/Minute: Sets how many separate explosions occur each minute (1 to 360).
Duration (%): Set the percentage of time the light is illuminated for each pulse or strobe (5% to 95%).
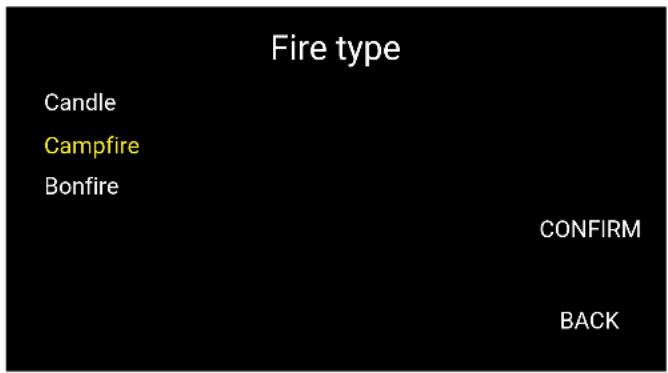
Fire
Simulates the light of a candle, campfire, or bonfire in various wind conditions.
Fire Type: Changes the color temperature to simulate a candle, campfire, or bonfire.
Wind Type: Changes the intensity and speed of flicker to simulate the light with no wind, or in a breeze, wind, or storm.
Fireworks
Uses random burst of colors to simulate fireworks. Colors and timing of each flash are random.
Explosions/Minute: Sets how many flashes will occur per minute (1 to 50).
Duration (%): Determines the percentage of time the light is illuminated in each cycle. Select from a range of 5% (shortest duration) to 95% (longest duration).
Lightning
Simulates lightning by creating random short and long bursts.
CCT: Selects the color temperature of the lightning flashes (3000 to 10,000 K) in 50 K increments.
Interval(s): Sets the interval of seconds between lightning flashes (1 to 60).
Paparazzi
Simulates the random firing of multiple camera flashes. Split panel mode is available for this effect via the Composer app.
Intensity: Higher intensity increases the number of random flashes per second (0 to 100).
Bulb Type: Determines the length of each flash. Slow is the longest duration. Modern is the shortest duration. Choose from Slow, Medium, Fast, and Modern.
CCT: Sets the color temperature of the flashes from 2800 to 10,000 K.
+/- Green: Sets the green/magenta (tint) saturation level in 1% increments from +100% (green) to -100% (magenta).
Pulse
Creates a steady pulse at a programmable rate. This effect is similar to the Strobe special effect (below), but the light fades on and off. Split panel mode is available for this effect via the Composer app.
Hue: Selects the light color (0 to 360).
Saturation: Determines the color intensity from 100% (full color) to 0% (white light).
Pulses/Minute: Sets how many times the light will pulse each minute (1 to 200).
Siren
Simulates emergency lights, like a police car or ambulance. Split panel mode is available for this effect via the Composer app.
Colors: Select the color combination of flashing lights. Choose red, blue, and white; red and blue; red and white; blue and white; blue; red; or SAE Amber.
Flash/Cycle: Set the number of times each individual color will flash within the cycle. Choose from 1 to 4 times per cycle.
Cycles/Minute: Determines how many repetitions of the cycle will occur each minute. Choose from 10 to 360.
Duration (%): Determines the percentage of time the light is illuminated in each cycle. Select from a range of 10% (shortest duration) to 90% (longest duration).
Strobe
Creates a steady flashing light at a programmable rate. Split panel mode is available for this effect via the Composer app.
Hue: Selects the light color (0 to 360).
Saturation: Determines the color intensity from 100% (full color) to 0% (white light).
Frequency: Changes the number of flashes per second (1 to 25).
Duration (%): Determines the percentage of time the light is illuminated in each cycle. Select from range of 10% (shortest duration) to 90% (longest duration).
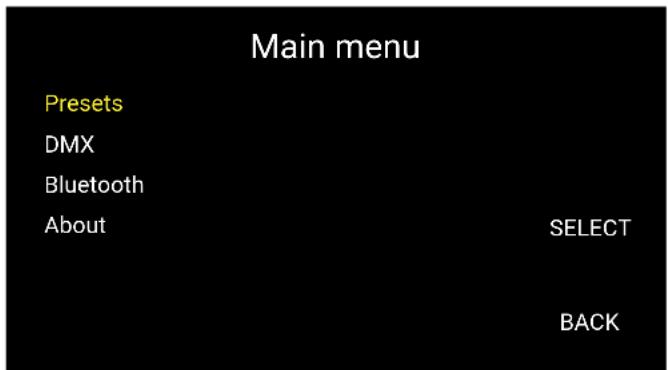
Main Menu
Use the Main menu to program presets, configure DMX settings, and turn Bluetooth on or off. The Main menu also displays the unit's serial number and current firmware version.
Press the function button ⚙ for the Main menu. The Main menu can be accessed in all operating modes.
text_image
Main menu Presets DMX Bluetooth About SELECT BACKUse the Adjustment dial to choose Presets, DMX, Bluetooth, or About, and press Select to access the menu.
The Presets Menu
Your CCT, RGB, Filter, and Special Effects mode settings can be saved as presets, and these settings can be recalled from the Presets menu. The Taiko allows you to save four presets per mode.
To save settings to a preset, do the following:
- Adjust the settings in CCT, RGB, Filter, and Special Effects modes.
- Press the function button 🔔 to access the Main menu.
- In the Main menu, use the Adjustment dial to select the Presets menu, and press Select.
- Use the Adjustment dial to select a preset group (A to D), and press Save.
- At the prompt, press Confirm.
- Use the Back button to scroll back to the operating modes.
| Presets | |
| Save | |
| Preset A | |
| Preset B | Load |
| Preset C | |
| Preset D | |
| Factory default | |
| BACK | |
To recall a preset:
-
In the Main menu, scroll to Presets and press Select.
-
In the Presets menu, select the preset with the Adjustment dial, and press Load.
-
At the prompt, press Confirm. The Taiko will load the saved settings.
Press Back to return to the Main menu.
Press Back again to return to the most recent operation mode.
Important! The Taiko will not display the preset setting until you access the appropriate operation mode.
Bluetooth Menu
To control the Taiko via the Composer mobile app, Bluetooth must be turned on.
To turn Bluetooth on and off:
-
Scroll to Bluetooth, and press Select. The Bluetooth Settings menu will open and indicate the Bluetooth status.
-
Press Select, and use the Adjustment dial to select Off or On, and then press Confirm.
Press Back to return to the Main menu.
Press Back again to return to the most recent operation mode.

text_image
Bluetooth Settings Bluetooth On SELECT BACK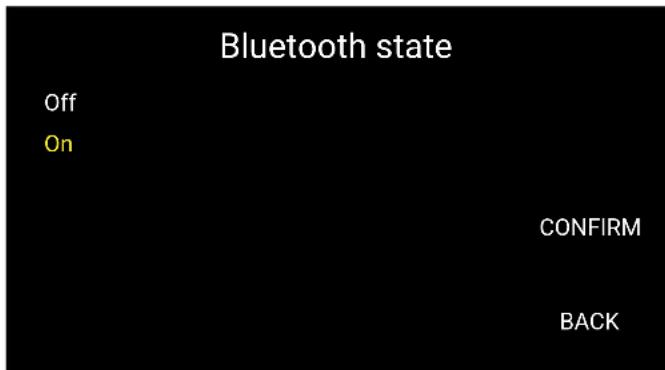
text_image
Bluetooth state Off On CONFIRM BACKThe About Menu
Select About to display the Taiko's serial number and the firmware version number.
Press Back to return to the Main menu.
Press Back again to return to the most recent operation mode.
| About | |
| Serial number | 12FFB0006 |
| Firmware version | 1.0.0 |
DMX Operation
Connecting the Taiko to a DMX Controller
Important! To connect the Taiko to a DMX controller, use a 5-pin DMX data cable. Do not use an XLR microphone cable. It will not transfer data to the Taiko.
To avoid interference that can be introduced into the data over long cable runs, use a cable rated at 24 AWG or lower. Copper shielding, PVC jacket, and a twisted-pair cable will also reduce interference that can affect data transmission reliability.
- Connect the output of the DMX controller to the Taiko's DMX input.
- If there are no additional lights connected to the Taiko, connect a 5-pin DMX terminator to the Taiko's DMX output.
- If additional lights are daisy-chained to the Taiko, use a DMX cable to attach the next light in the chain to the Taiko's DMX output. Be sure to attach a DMX terminator to the last light in the daisy chain.
Setting the DMX Address
The Taiko supports DMX 512 and has 512 channels available to receive DMX data from a controller. The DMX address is the first channel that will receive DMX data.
To determine how many channels will be used by a particular mode, see the channel assignment tables available at luxlilight.com, or click on the link below.
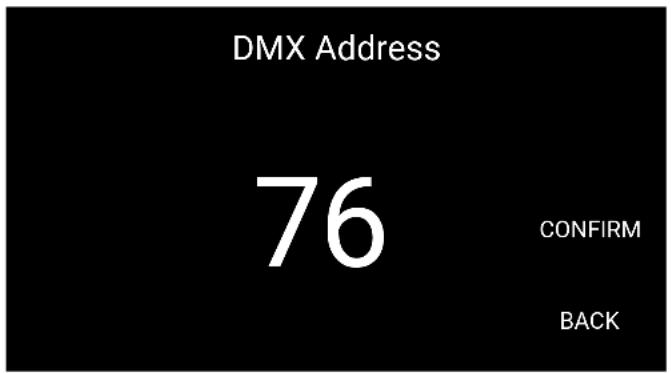
text_image
DMX Address 76 CONFIRM BACKLuxli Download Center
To set the DMX address:
- Scroll to the DMX Address menu with the Adjustment dial, and press the Select button.
- Use the Adjustment dial to select a channel from 1 to 512, and press Confirm.
Selecting DMX Modes
The Taiko offers 8-bit and 16-bit modes.
The 8-bit modes should be used with basic DMX controllers such as dimming consoles.
16-bit modes are best for use with virtual DMX control from a computer or advanced 16-bit DMX controllers.
| DMX Mode | |
| CCT 8 bit | |
| CCT 16 bit | |
| HSL 8 bit | |
| HSL 16 bit | CONFIRM |
| GEL 8 bit | |
| GEL 16 bit | BACK |
DMX modes for the Taiko include:
CCT mode: (8-bit and 16-bit) Corresponds to the Filter mode described above. The DMX controller can adjust the color temperature from 2800 to 10,000 K and set the green/magenta saturation level.
HSL mode: (8-bit and 16-bit) This mode controls hue and saturation levels. The DMX controller can scroll through the entire color wheel in 1% increments.
GEL mode: (8-bit and 16-bit) Corresponds to the Filter mode described above. GEL mode allows the DMX controller to apply any of the 150 preset colored gels to any CCT setting.
Effects mode: (16-bit only) Controls and triggers all the special effects described in the Special Effects Mode section of this manual.
Note: Details for each DMX mode can be viewed using RDM (Remote Device Management).
To set the DMX mode, follow these steps:
-
Use the Adjustment dial to scroll to the DMX Mode menu, and press Select.
-
Use the Adjustment dial to select a DMX mode, and press Confirm.
RGB mode: (8-bit only) This mode allows you to custom mix the levels of red, green, and blue on independent channels.
DMX Mode Channel Assignments
For DMX channel selection, refer to the DMX controller's user guide. For up-to-date DMX profiles and channel assignments, visit luxlilight.com or click on the link below.
Luxli Download Center
Upgrade Firmware
Information about firmware updates, along with update changelogs and version history, are available at luxlilight.com.
To update the Taiko's firmware, follow these steps:
- With the Taiko powered off, press and hold the top function button and the press the Power button. The Taiko will open the Bootloader running screen.

natural_image
Pure diagram of a device panel with circular and rectangular buttons, no text or symbols present-
Connect your Taiko to your computer with a USB Standard-A to USB Micro-B cable (not included).
-
Follow the instructions on your computer to complete the firmware upgrade.
Once the upgrade is complete, the Taiko will boot up.
For complete information about firmware upgrades, see the product notices at luxilight.com.
Specifications
Light Fixture
| Beam Angle (with diffuser) | 76° |
| Color Temperature | 2800 to 10,000 K |
| Color Accuracy Standard | CRI: 95 averageTLCI: 98 average |
| Cooling System | Passive |
| Dimming | Yes, 0% to 100% (continuous) |
| Display | LCD |
| Light Panel | RGBAW LED |
| Housing Material | Aluminum |
| Light Intensity @ 3 ft. | 9800 lx (with diffuser)15,500 lx (without diffuser) |
| Number of LEDs | 1,568 |
| Expected Lamp Life | 50,000 hr. |
| Rectangular Panel Size (H × W) | 12.1 × 23.5 in. (30.7 × 59.7 cm) |
| Fixture Dimensions (H × W × D) | 17.75 × 27 × 3 in. (45.1 × 68.6 × 7.6 cm) |
| Fixture Weight | 15.7 lb. (7.1 kg) with yoke |
Connectors
| Battery Plate | V-mount (×2) |
| Power Input Connector | 4-pin XLR |
| DMX Connector | 5-pin XLR (×2 in/out) |
| Service Connector | Micro-USB |
Mounting
| Fixture Mount | 5/8 in. receiver |
Yoke
| Yoke Material | Aluminum |
| Yoke Type | Yoke/bracket |
| Tilt | 180° |
Remote Operation
| Remote Control Type | Bluetooth 4.2 LE, DMX |
| DMX Protocol | 512 |
| Wireless Range | 30 ft. / 9.1 m |
Power
| AC Input Power | 100 to 240 V AC, 50/60 Hz |
| DC Input Power | 24 to 36 V DC |
| Power Source | AC adapter, 4-pin XLR, V-mount battery (×2) |
| Battery requirements | 14.4–14.8 V, 10 A minimum per battery |
| Max Power Consumption | 250 W |
| Power Pass-Thru | None |
FCC Compliance Statement
This device complies with part 15 of the FCC rules. Operation is subject to the following two conditions:
- This device may not cause harmful interference
- This device must accept any interference received, including interference that may cause undesired operation.
Important: Changes or modifications to this product not authorized by Gradus Group could void the electromagnetic compatibility (ECM) and wireless compliance and negate your authority to operate the product. This product has demonstrated EMC compliance under conditions that included the use of compliant peripheral devices and shielded cables between system components. It is important that you use compliant peripheral devices and shielded cables between system components to reduce the possibility of causing interference to radios, televisions, and other electronic devices.
One-Year Limited Warranty
This Luxli product is warranted to the original purchaser to be free from defects in materials and workmanship under normal consumer use for a period of one (1) year from the original purchase date or thirty (30) days after replacement, whichever occurs later. The warranty provider's responsibility with respect to this limited warranty shall be limited solely to repair or replacement, at the provider's discretion, of any product that fails during normal use of this product in its intended manner and in its intended environment. Inoperability of the product or part(s) shall be determined by the warranty provider. If the product has been discontinued, the warranty provider reserves the right to replace it with a model of equivalent quality and function.
This warranty does not cover damage or defect caused by misuse, neglect, accident, alteration, abuse, improper installation or maintenance. EXCEPT AS PROVIDED HEREIN, THE WARRANTY PROVIDER MAKES NEITHER ANY EXPRESS WARRANTIES NOR ANY IMPLIED WARRANTIES, INCLUDING BUT NOT LIMITED TO ANY IMPLIED WARRANTY OF MERCHANTABILITY OR FITNESS FOR A PARTICULAR PURPOSE. This warranty provides you with specific legal rights, and you may also have additional rights that vary from state to state.
To obtain warranty coverage, contact the Luxli Customer Service Department to obtain a return merchandise authorization ("RMA") number, and return the defective product to Luxli along with the RMA number and proof of purchase. Shipment of the defective product is at the purchaser's own risk and expense.
For more information or to arrange service, visit www.luxlilight.com or call Customer Service at 212-594-2353.
Product warranty provided by the Gradus Group.
www.gradusgroup.com
LUXLI is a registered trademark of the Gradus Group.
© 2019 Gradus Group LLC. All Rights Reserved.

ORCHESTRA
MULTICOLOR LED SERIES
luxlilight.com