9707CH - Bathroom Accessories Weslock - Free user manual and instructions
Find the device manual for free 9707CH Weslock in PDF.

User questions about 9707CH Weslock
0 question about this device. Answer the ones you know or ask your own.
Ask a new question about this device
Download the instructions for your Bathroom Accessories in PDF format for free! Find your manual 9707CH - Weslock and take your electronic device back in hand. On this page are published all the documents necessary for the use of your device. 9707CH by Weslock.
USER MANUAL 9707CH Weslock
text_image
Center to center 17 9/16" or 23 5/8"Instructions:
① Identify and mark center to center measurement for mounting plates and posts. Install both mounting plates and posts to wall with two wall anchors and screws.
② Slide decorative plates over mounting posts.
③ Slide one decorative post over mounting post.
④ Secure decorative post by tightening with Allen wrench.
⑤ Place plastic insert into decorative post
⑥ Slide towel bar into installed decorative post.
⑦ Place plastic insert into decorative post,
⑧ Slide uninstalled decorative post onto other end of towel bar.
⑨ Slide uninstalled decorative post over mounting post.
⑩ Secure decorative post by tightening with Allen wrench.
WESLOCK.
© 2011
Tulsa. Oklahoma
Double 24" Towel Bar
text_image
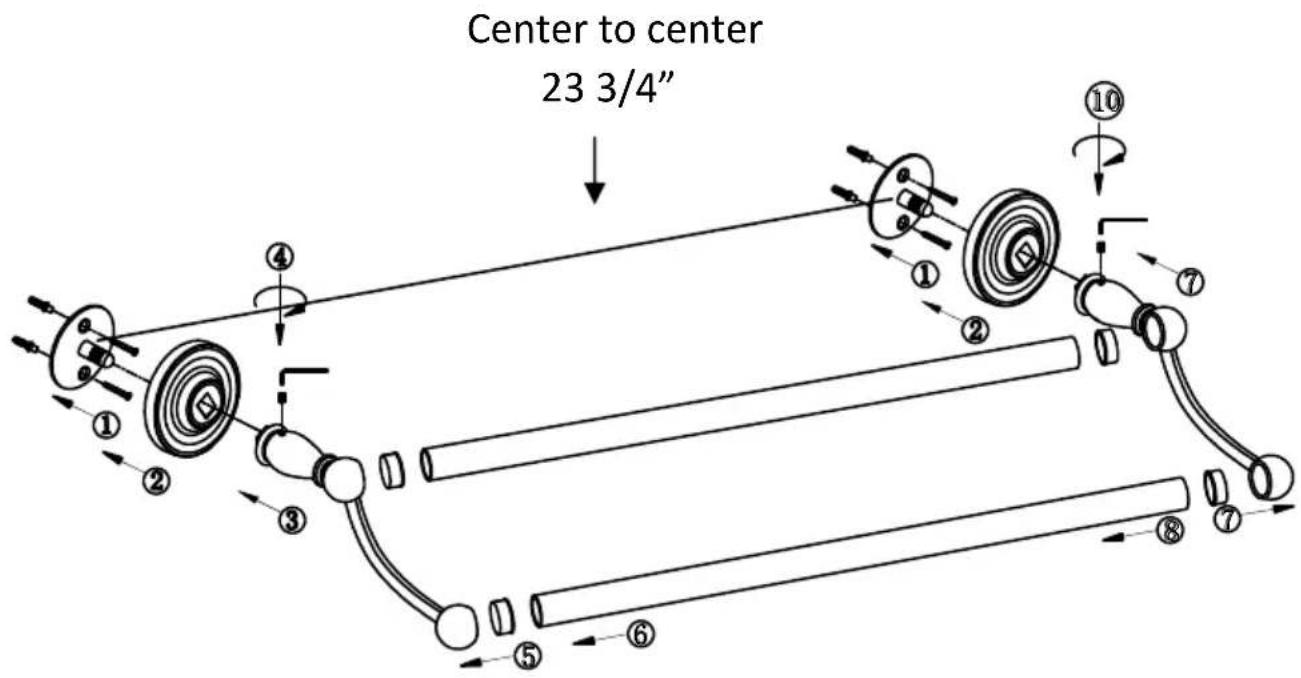
Center to center 23 3/4"Instructions:
① Identify and mark center to center measurement for mounting plates and posts. Install both mounting plates and posts to wall with two wall anchors and screws.
② Slide decorative plates over mounting posts.
③ Slide one decorative post over mounting post.
④ Secure decorative post by tightening with Allen wrench.
⑤ Place plastic insert into decorative post
⑥ Slide towel bars into installed decorative posts.
⑦ Place plastic insert into decorative posts,
⑧ Slide uninstalled decorative posts onto other end of towel bars.
⑨ Slide uninstalled decorative post over mounting post.
⑩ Secure decorative post by tightening with Allen wrench.
WESLOCK.
© 2011
Tulsa. Oklahoma
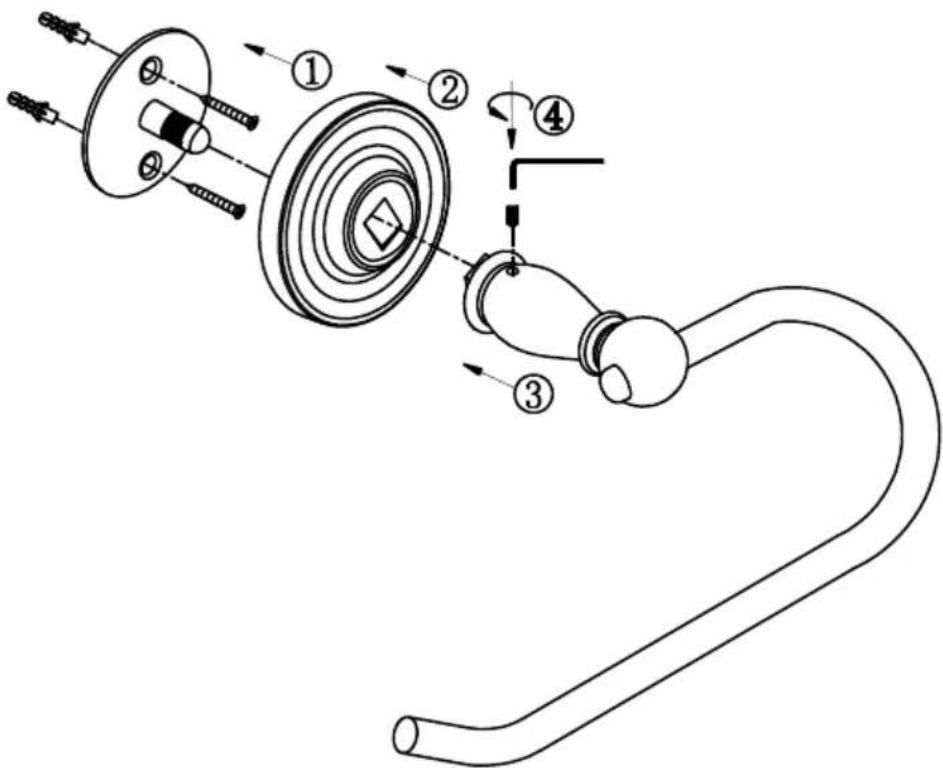
Euro Tissue Holder
text_image
Technical diagram of a mechanical assembly with numbered components and directional arrows indicating motion or assembly.Instructions:
① Install mounting plate and post to wall with two wall anchors and screws.
② Slide decorative plate over mounting post.
③ Slide euro tissue post onto mounting post.
④ Secure euro tissue post by tightening with Allen wrench.
WESLOCK.
© 2011
Tulsa. Oklahoma
Towel Ring

text_image
Technical diagram of a mechanical assembly with numbered components and directional arrows indicating motion or assembly steps.Instructions:
① Install mounting plate and post to wall with two wall anchors and screws.
② Slide decorative plate over mounting post.
③ Slide towel ring post onto mounting post.
④ Secure towel ring post by tightening with Allen wrench.
WESLOCK.
© 2011
Tulsa. Oklahoma
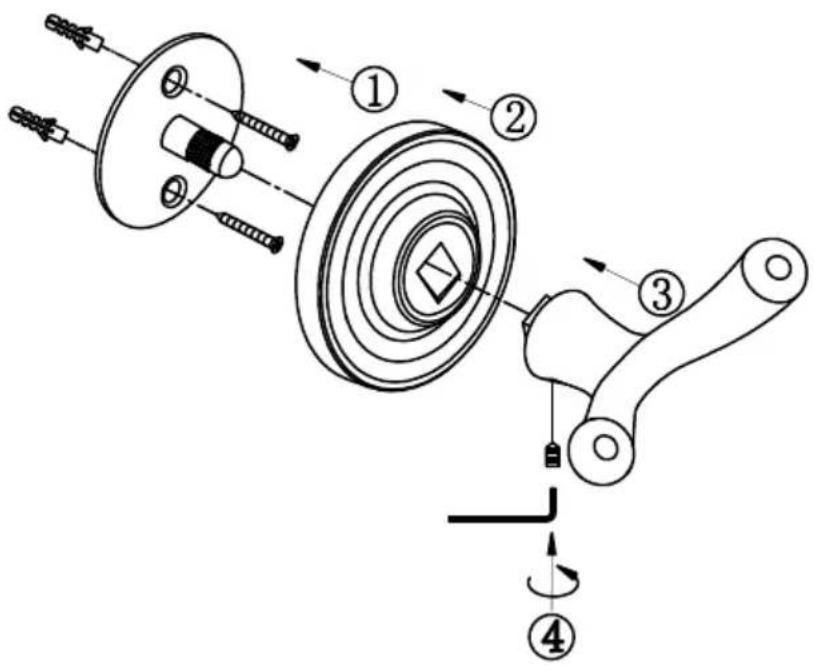
Robe Hook
text_image
Technical diagram of a mechanical assembly with numbered components and directional arrows indicating motion or assembly steps.Instructions:
① Install mounting plate and post to wall with two wall anchors and screws.
② Slide decorative plate over mounting post.
③ Slide robe hook post onto mounting post.
④ Secure robe hook post by tightening with Allen wrench.
WESLOCK.
© 2011
Tulsa. Oklahoma
Standard Tissue Holder

flowchart
graph TD
    A["Center to center"] --> B["Component 1"]
    B --> C["Component 2"]
    C --> D["Component 3"]
    D --> E["Component 4"]
    E --> F["Component 5"]
    F --> G["Component 6"]
    G --> H["Component 7"]
    H --> I["Component 8"]
    I --> J["Component 9"]
    J --> K["Component 10"]
    style A fill:#f9f,stroke:#333
    style K fill:#f9f,stroke:#333
Instructions:
① Identify and mark center to center measurement for mounting plates and posts. Install both mounting plates and posts to wall with two wall anchors and screws.
② Slide decorative plates over mounting posts.
③ Slide decorative post with fixed end onto mounting post.
④ Secure decorative post by tightening with Allen wrench.
⑤ Slide decorative post with pivoting end onto mounting post.
⑥ Secure decorative post by tightening with Allen wrench. However, ensure the tissue holder pivots in the upward direction, so toilet paper roll slides down when installed.