WV-S2136G - Security Camera i-PRO - Free user manual and instructions
Find the device manual for free WV-S2136G i-PRO in PDF.

User questions about WV-S2136G i-PRO
0 question about this device. Answer the ones you know or ask your own.
Ask a new question about this device
Download the instructions for your Security Camera in PDF format for free! Find your manual WV-S2136G - i-PRO and take your electronic device back in hand. On this page are published all the documents necessary for the use of your device. WV-S2136G by i-PRO.
USER MANUAL WV-S2136G i-PRO
natural_image
Technical line drawing of a mechanical component with internal cavities and mounting holes (no text or symbols)WV-S2236L

natural_image
Technical line drawing of a mechanical component with internal cavities and mounting features (no text or symbols)WV-S2136L
About the user manuals
Product documentation is composed of the following documents.
- Installation Guide (accessory): Provides information about “Precautions”, “Precautions for installation” and the installation method.
- Basic Information (this document): Provides information about “Precautions for use”, “Parts and functions” and “Detail specifications”.
- Operating Instructions (Refer to the link on the following support website): Explains how to perform the settings and how to operate this camera.
https://i-pro.com/global/en/surveillance/documentation_database
“
- microSDXC/ microSDHC/ microSD memory card is described as microSD memory card.
- The external appearance and other parts shown in this manual may differ from the actual product within the scope that will not interfere with normal use due to improvement of the product.
Contents
Limitation of liability....3
Disclaimer of warranty....3
About notations....4
System requirements for a PC 4
Network security 5
Precautions for use 6
Parts and functions 8
Insert / remove a microSD memory card 13
Troubleshooting....15
Detail specifications 17
Limitation of liability
THIS PUBLICATION IS PROVIDED "AS IS" WITHOUT WARRANTY OF ANY KIND, EITHER EXPRESS OR IMPLIED, INCLUDING BUT NOT LIMITED TO, THE IMPLIED WARRANTIES OF MERCHANTABILITY, FITNESS FOR ANY PARTICULAR PURPOSE, OR NON-INFRINGEMENT OF THE THIRD PARTY'S RIGHT.
THIS PUBLICATION COULD INCLUDE TECHNICAL INACCURACIES OR TYPOGRAPHICAL ERRORS. CHANGES ARE ADDED TO THE INFORMATION HEREIN, AT ANY TIME, FOR THE IMPROVEMENTS OF THIS PUBLICATION AND/OR THE CORRESPONDING PRODUCT (S).
Disclaimer of warranty
IN NO EVENT SHALL i-PRO Co., Ltd. BE LIABLE TO ANY PARTY OR ANY PERSON, EXCEPT FOR REPLACEMENT OR REASONABLE MAINTENANCE OF THE PRODUCT, FOR THE CASES, INCLUDING BUT NOT LIMITED TO BELOW:
(1) ANY LOSS OR DAMAGE, INCLUDING WITHOUT LIMITATION, DIRECT OR INDIRECT, SPECIAL, CONSEQUENTIAL OR EXEMPLARY, ARISING OUT OF OR RELATING TO THE PRODUCT;
(2) ANY INCONVENIENCE, LOSS, OR DAMAGE CAUSED BY INAPPROPRIATE USE OR NEGLIGENT OPERATION OF THE USER;
(3) ALL MALFUNCTIONS OR TROUBLES FROM UNAUTHORIZED DISASSEMBLE, REPAIR OR MODIFICATION OF THE PRODUCT BY THE USER, REGARDLESS OF THE CAUSE OF THE MALFUNCTION OR TROUBLE;
(4) INCONVENIENCE OR ANY LOSS ARISING WHEN IMAGES ARE NOT DISPLAYED, DUE TO ANY REASON OR CAUSE INCLUDING ANY FAILURE OR PROBLEM OF THE PRODUCT;
(5) ANY PROBLEM, CONSEQUENTIAL INCONVENIENCE, OR LOSS OR DAMAGE, ARISING OUT OF THE SYSTEM COMBINED BY THE DEVICES OF THIRD PARTY;
(6) ANY CLAIM OR ACTION FOR DAMAGES BROUGHT BY ANY PERSON OR ORGANIZATION AS A PHOTOGRAPHED SUBJECT DUE TO VIOLATION OF PRIVACY CONCERNING A SURVEILLANCE CAMERA'S PICTURE OR SAVED DATA, FOR SOME REASON (INCLUDING USE WHEN USER AUTHENTICATION ON THE AUTHENTICATION SETTING SCREEN IS SET TO OFF), BECOMING PUBLIC OR BEING USED FOR ANY PURPOSE;
(7) LOSS OF REGISTERED DATA CAUSED BY ANY FAILURE (INCLUDING INITIALIZATION OF THE PRODUCT DUE TO FORGOTTEN AUTHENTICATION INFORMATION SUCH AS A USER NAME AND PASSWORD).
About notations
The following notations are used when describing the functions limited for specified models.
The functions without the notations are supported by all models.

The functions with this notation are available when using the model WV-S2236L series.

ctions with this notation are available when using the model WV-S2136L series.

ctions with this notation are available when using the model WV-S2136 series.

The functions with this notation are available when using the model with the i-PRO white body.

The functions with this notation are available when using the model with the black body.

The functions with this notation are available when using the model with the clear dome cover.

The functions with this notation are available when using the model with the smoke dome cover.
System requirements for a PC
CPU:
Intel® Core™ Processor family
- Intel
® Core™ i5-6500 or faster
- Intel
® Core™ i7-6700 or faster recommended
Memory:
4 GB (2 GB x 2, Dual Channel) or more recommended.
Network interface: 10BASE-T/100BASE-TX 1 port
Audio interface: Sound card (when using the audio function)
Monitor: Image capture size: 1024 x 768 pixels or more
Color: 24-bit True color or better
OS: Microsoft Windows 11
Microsoft Windows 10
(It is necessary to view the PDF file.)
IMPORTANT:
- For information on the operation verification of the supported web browsers, refer to our technical information website
. - When using a PC that does not meet the above requirements, displaying of images may become slower or the web browser may become inoperable.
- Audio may not be heard if a sound card is not installed on a PC. Audio may be interrupted depending on the network environment.
Network security
As you will use this unit connected to a network, your attention is called to the following security risks.
① Leakage or theft of information through this unit
② Use of this unit for illegal operations by persons with malicious intent
③ Interference with or stoppage of this unit by persons with malicious intent
It is your responsibility to take precautions such as those described below to protect yourself against the above network security risks.
- Use this unit in a network secured by a firewall, etc.
- If this unit is connected to a network that includes PCs, make sure that the system is not infected by computer viruses or other malicious entities (using a regularly updated anti-virus program, anti-spyware program, etc.).
- To prevent unauthorized access, use user-authentication, set user names and passwords, and limit which users can log in.
- Apply measures such as user authentication to protect your network against leakage or theft of information, including image data, authentication information (user names and passwords), alarm mail information and DDNS server information.
- After the unit is accessed by the administrator, make sure to close the browser.
- Change the administrator password periodically. Additionally, save user authentication information (user names and passwords) in such a way that it is kept out of the hands of third parties.
- Do not install the camera in locations where the camera or the cables can be destroyed or damaged by persons with malicious intent.
Precautions for use
When the product is accessible from the Internet
To prevent unauthorized access, note the following.
- Leave user authentication turned on. - Periodically change passwords that are used to access the product.
Refer to the Operating Instructions for information about how to change passwords.
To keep on using with stable performance
Do not use this product in hot and humid conditions for a long time. Failure to observe this causes component degradation resulting in life shortening of this product. Do not expose this product to direct heat sources such as a heater.
Usage such as switching the power ON/OFF frequently could lead to failure of the camera.
Handle this product with care.
Do not drop this product, nor apply shock or vibration to the product. Failure to observe this may cause trouble.
Do not directly touch the lens and dome cover with your bare hands.
A dirty lens or dome cover causes deterioration of picture quality.
When an error is detected, this product will restart automatically.
This product will be inoperable for around 2 minutes after the restart just as when the power is turned on.
About the automatic status detection function
When this product malfunctions due to exogenous noise, etc. for 30 seconds or more, the product will automatically restart and will return to normal state. When the product is restart, initialization will be carried out as when the power of the product is turned on. When the product repeatedly resets, exogenous noise level around the product may be high and that may cause malfunction. Contact your dealer for instructions.
Periodically images on the screen appear to be distorted
When the camera is installed in a location where it is subject to small vibrations (for example, when it is installed near devices that vibrate), images may appear distorted and stretched lengthways. This phenomenon is a characteristic of image pickup devices that use CMOS sensors and is caused by the relationship between the periodic movements of the camera and the timing that the image sensor reads images. This is not a problem with the camera. To reduce the possibility of this phenomenon occurring, install the camera in a secure location.
We shall not be liable for content compensation, losses of recorded or edited content and any direct or indirect consequent damages caused by failure to record or edit due to faults with this unit or the microSD memory card. In addition, the same provisions apply after unit is repaired.
About the CMOS image sensor
- When continuously shooting a bright light source such as a spotlight, the color filter of the CMOS image sensor may become deteriorated and this may cause discoloration. Even when changing the fixed shooting direction after continuously shooting a spotlight for a certain period, the discoloration may remain.
- When shooting fast-moving subjects or objects crossing the shooting area may look to be bending askew.
Cleaning this product body
Be sure to turn off the power before cleaning. Failure to observe this may cause injury.
Do not use benzine, thinner, alcohol, or any other types of solvents or detergents. Otherwise, it may cause discoloration. When using a chemical cloth for cleaning, read the caution provided with the chemical cloth product.
- Do not loozen or remove screws unless instructed to do so in the product documentation.
Cleaning the lens
Use a lens cleaning paper (used to clean camera lenses or lenses of spectacles). When using solvent, use an alcohols solvent and do not use a glass cleaner or a thinner.
Cleaning of the dome cover
Use lens cleaning paper (used to clean camera or spectacles lenses) to remove any dirt on the dome cover.
The mark of light-shielding parts left inside the dome or dirt on the dome cover may influence the reflection of infrared rays. Therefore, likewise remove those marks and dirt using cleaning paper.
AVC Patent Portfolio License
THIS PRODUCT IS LICENSED UNDER THE AVC PATENT PORTFOLIO LICENSE FOR THE PERSONAL USE OF A CONSUMER OR OTHER USES IN WHICH IT DOES NOT RECEIVE REMUNERATION TO (i) ENCODE VIDEO IN COMPLIANCE WITH THE AVC STANDARD ("AVC VIDEO") AND/OR (ii) DECODE AVC VIDEO THAT WAS ENCODED BY A CONSUMER ENGAGED IN A PERSONAL ACTIVITY AND/ OR WAS OBTAINED FROM A VIDEO PROVIDER LICENSED TO PROVIDE AVC VIDEO. NO LICENSE IS GRANTED OR SHALL BE IMPLIED FOR ANY OTHER USE. ADDITIONAL INFORMATION MAY BE OBTAINED FROM MPEG LA, L.L.C.
SEE HTTPS://WWW.MPEGLA.COM/
Product disposal/transfer
Data saved on this product or a storage device used with this product may lead to personal information leakage. When it is necessary to dispose or give this product to someone, even when for repair, make sure that there is no data on this product.
When abandoning the memory media, it is recommended to destroy it physically after deleting data by PC.
Effects on images and image quality
Depending on the installation location, the dome cover or lens may become dirty, causing image quality to deteriorate or images may become difficult to see.
Router
When connecting this product to the Internet, use a broadband router with the port forwarding function (NAT, IP masquerade).
Refer to the Operating Instructions for further information about the port forwarding function.
Time & date setting
It is necessary to set the time & date before putting this product into operation. Refer to the Operating Instructions for descriptions of how to perform the settings.
Parts and functions
The following are descriptions when using the model S2136L.
Terminals

text_image
[5] [3] [4] [1] [2] [6][1] Network connector (RJ45)
[2] Power supply terminal (12 V DC)
[3] Audio input connector
[4] Audio output connector
[5] EXT I/O terminals
[6] MONITOR OUT terminal
[1] Network connector (RJ45)
Connect an Ethernet cable (category 5e or better, straight, 4 pairs (8 pins)) to the network connector.
IMPORTANT:
- Use all 4 pairs (8 pins) of the Ethernet cable.
• The maximum cable length is 100 m {328 feet}. - Make sure that the PoE device in use is compliant with IEEE802.3af standard.
- When connecting both the 12 V DC power supply and the PoE device for power supply, 12 V DC will be used for power supply.
- When the Ethernet cable is disconnected once, reconnect the cable after around 2 seconds. When the cable is quickly reconnected, the power may not be supplied from the PoE device.
[2] Power supply terminal (12 V DC) / Power cord plug (accessory)
Connect the output cable of the DC power supply to the power cord plug.
IMPORTANT:
- Be sure to use the power cord plug provided with this product.
- Be sure to fully insert the power cord plug into the power supply terminal (12 V DC). Otherwise, it may damage the camera or cause malfunction.
- When installing the camera, make sure that excessive force is not applied to the power cable.
- Be sure to use an AC adaptor compliant with the Specifications (written in the indication label on the bottom side of this unit) regarding power source and power consumption.
[3] Audio input connector
Connect a microphone or the line out of an external device using a stereo mini plug ( 3.5 mm).
- Recommended microphone (locally procured): Plug-in power type (Sensitivity of microphone: -48 dB ± 3 dB (0 dB=1 V/Pa, 1 kHz))
- Input impedance: Approx. 2 kΩ (unbalanced)
- Supply voltage: 2.5 V ±0.5 V
- Recommended cable length: Less than 1 m {3.28 feet}
- Input level for the line input: Approx. -10 dBV
- Recommended cable length: Less than 10 m {32.8 feet}
[4] Audio output connector
Connect an external speaker* using a stereo mini plug (ø3.5 mm). (Audio output is monaural.)
- Output impedance: Approx. 600 Ω (unbalanced)
- Recommended cable length: Less than 10 m {32.8 feet}
- Output level: -20 dBV *Use a powered speaker.
IMPORTANT:
- Connect/disconnect the audio cables and turn on the power of the camera after turning off the power of the audio output devices. Otherwise, loud noise may be heard from the speaker.
- Make sure that the stereo mini plug is connected to this cable. When a monaural mini plug is connected, audio may not be heard.
When connecting a monaural speaker with amplifier, use a locally procured conversion cable (mono-stereo).
Note:
- The audio output can be switched to the monitor output. Refer to the “Operating Instructions” on our support website for descriptions of how to switch the output.
[5] EXT I/O terminals / EXT I/O terminal plug (accessory)
Note:
- Off, input, and output of the ALARM IN2 and 3 can be switched by configuring the setting. Refer to the Operating Instructions for further information about the ALARM IN2 and 3 settings ("Off", "Alarm input", "Alarm output" or "AUX output").
- Alarm input1 / Black & white input / Auto time adjustment input, Alarm input2, Alarm input3 Input specification: No-voltage make contact input (4 V - 5 V DC, internally pulled up) OFF: Open or 4 V - 5 V DC ON: Make contact with GND (required drive current: 1 mA or more)
- Alarm output, AUX output Output specification: Open collector output (maximum applied voltage: 20 V DC) OPEN: 4 V - 5 V DC by internal pull-up CLOSE: Output voltage 1 V DC or less (maximum drive current: 50 mA)
EXT I/O terminal plug

text_image
ButtonGND
ALARM IN3 (Alarm input3 / AUX output)
ALARM IN2 (Alarm input2 / Alarm output)
ALARM IN1 (Alarm input1 / Black & white input / Auto time adjustment input)
IMPORTANT:
• Install external devices so that they do not exceed the rating of the network camera.
- When using the ALARM IN2 and/or 3 as the output terminals, ensure they do not cause signal collision with external signals.
[6] MONITOR OUT terminal (factory shipment: NTSC monitor)
Used to connect a monitor used for adjustments during installation or when performing service.
IMPORTANT:
- The adjustment monitor is used for checking the adjustment of the angular field of view when installing the camera or when servicing. It is not provided for recording/monitoring use.
- Depending on the monitor, some characters (date, time, camera title, etc.) may not be displayed on the screen.
- When [16:9 mode] is selected for “Image capture mode”, the top and bottom of the image on the monitor will be displayed in black.
Note:
- The monitor out is set to NTSC in the default settings of the camera. If you want to change the monitor out setting to PAL, refer to the “Operating Instructions” on the our support website.
■ Indicators and buttons
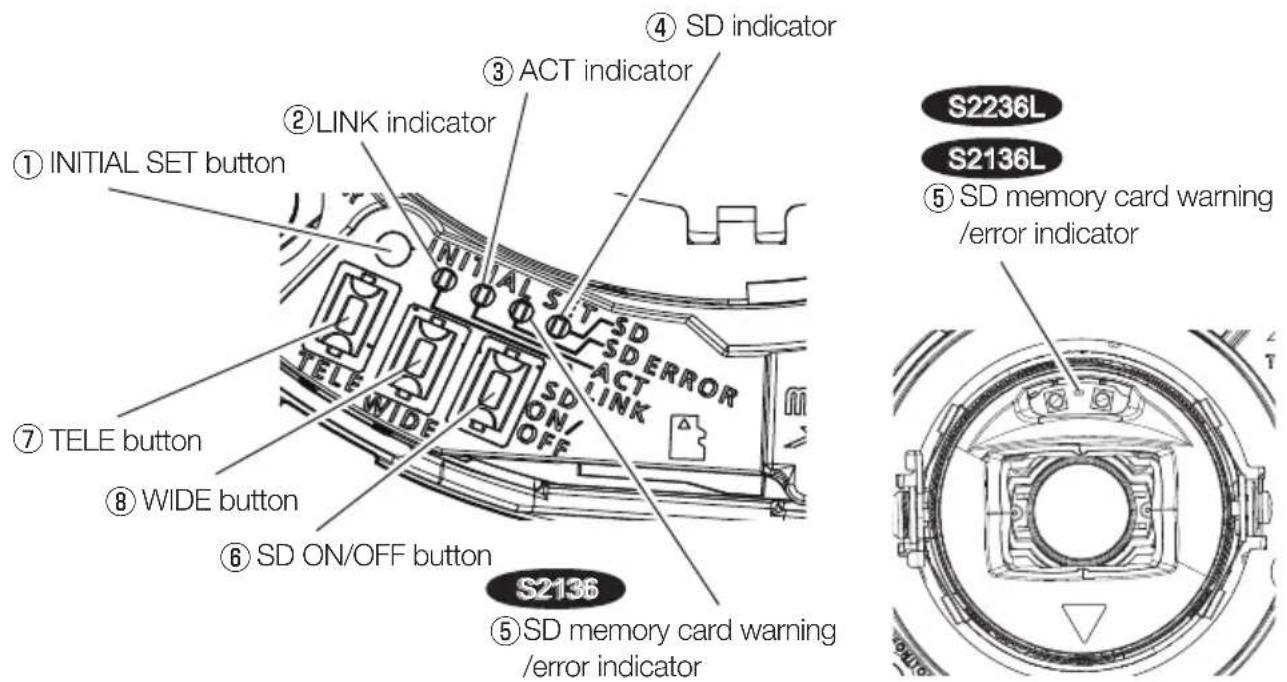
text_image
① INITIAL SET button ② LINK indicator ③ ACT indicator ④ SD indicator ⑤ SD memory card warning /error indicator S2236L S2136L ⑥ SD ON/OFF button ⑦ TELE button ⑧ WIDE button ⑨ S2136 ⑤ SD memory card warning /error indicatorThe above illustration represents WV-S2136.
①INITIAL SET button (Initializing / NTSC ⇔ PAL switch button)
Follow the steps below to initialize the network camera.
(1) Turn off the power of the camera.
When using a PoE hub, disconnect the Ethernet cable from the camera. When using an external power supply, disconnect the power cord plug (accessory) from the power supply terminal (12V DC).
(2)Turn on the power of the camera while pressing the INITIAL SET button, and make sure to release the button after approximately 15 seconds. In about 2 minutes later, the camera will start up and the settings including the network settings will be initialized. Retry if the camera does not start up normally.
IMPORTANT:
- When the camera is initialized, the settings including the network settings will be initialized. Before initializing the settings, it is recommended to write down the settings in advance.
- Do not turn off the power of the camera during the process of initialization. Otherwise, it may fail to initialize and may cause malfunction.
- When the INITIAL SET button is pressed (less than 1 second) to switch the output signal of the MONITOR OUT terminal, the MONITOR OUT terminal can be switched for the NTSC monitor PAL monitor.
②LINK indicator
- When the camera is able to communicate with Lights orange the connected device
③ACT indicator
- When data is being sent via the network camera Blinks green (accessing)
④SD indicator
- When a microSD memory card is inserted and could be recognized. Lights off → Blinks green →
- When data can be saved after the microSD memory Lights off → Lights green card is inserted and the SD ON/OFF button is pressed (less than 1 second)
- When data can be saved to the microSD memory card Lights green
- When the microSD memory card is removed after holding Lights green → Blinks green → down the SD ON/OFF button (about 2 seconds) Lights off (recording) Lightsgreen→Lights off (waiting for recording)
- When data cannot be saved to the microSD memory Lights off card because an abnormality was detected or the microSD memory card is configured not to be used
Note:
- Lighting/blinking LED can be turned off with the software settings at any time. (The initial state is lighting or blinking.) Set the LED to be solid off if necessary, depending on the installation conditions. (Operating instructions on our support website)
⑤SD memory card warning/error indicator
- When a warning status is detected *SD memory card warning detection conditions: After the total use time has exceeded 6 years and the number of overwrite times has exceeded 2000.
- When an error status is detected Blinks red *SD memory card error detection conditions: Write error, read error, etc.
Note:
- The default is off. According to the installation environment, set up with software as required. (Operating instructions on our support website)
⑥SD ON/OFF button
(1) When the SD ON/OFF button is pressed (less than 1 second), the SD indicator lights up in green and data can be saved to the microSD memory card.
(2) When the SD ON/OFF button is held down (about 2 seconds), the SD indicator lights off and the microSD memory card can be removed.
⑦TELE button
Click the TELE button to adjust the zoom ratio to the "Tele" side.
⑧WIDE button
Click the WIDE button to adjust the zoom ratio to the "Wide" side.
Insert / remove a microSD memory card
Note:
- Use a microSD memory card dedicated to i-PRO cameras.
- Refer to the Operating Instructions on our support website for further information about the microSD memory card settings.
■ Insert a microSD memory card
① Remove the enclosure from the camera.
② Insert the microSD memory card until it makes a clicking sound.
③ Take your fingers off the microSD memory card and check that its back end does not protrude over the side part of the camera.
④ After the microSD memory card has been inserted, press the SD ON/OFF button, and make sure the SD indicator is continually lit.
If you do not press the SD ON/OFF button after inserting the microSD memory card, the SD indicator is automatically lit approximately 5 minutes later.
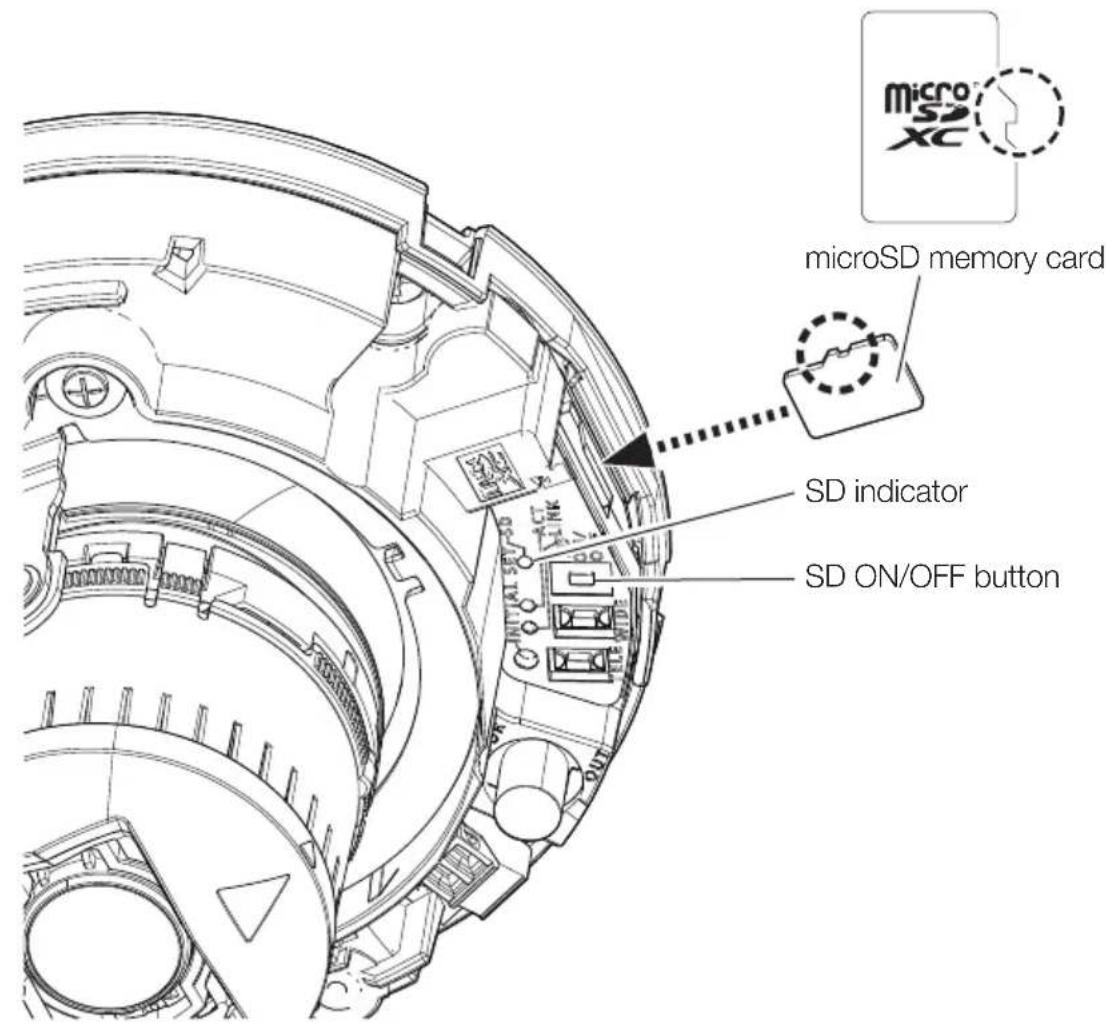
text_image
microSD XC microSD memory card SD indicator SD ON/OFF button⑤ Attach the enclosure to the camera.
■ Remove a microSD memory card
When removing a microSD memory card, reverse the procedure.
- To remove the microSD memory card, hold down the SD ON/OFF button for about 2 seconds. When the flashing SD indicator goes out, you can remove the microSD memory card.
IMPORTANT:
- Before turning off the camera power switch, make sure that the SD indicator is turned off. If you turn off the camera power switch while the SD indicator is lit or flashing, the recorded data may be corrupted or damaged.
Note:
- When using a microSD memory card, format it using this product. Recorded data on the microSD memory card will be deleted when formatted. If an unformatted microSD memory card or a microSD memory card formatted with other devices is used, this product may not work properly or performance deterioration may be caused. Refer to the Operating Instructions on our support website for how to format a microSD memory card.
- When some microSD memory cards are used with this product, the product may not work properly or performance deterioration may be caused. Use a microSD memory card dedicated to i-PRO cameras.
Troubleshooting
Before asking for repairs, check the symptoms with the following table.
Contact your dealer if a problem cannot be solved even after checking and trying the solution in the table or a problem is not described below.
| Symptom Cause/solution | Reference pages | |
| Power is not turned on. | When using a PoE device for power supplyAre the PoE device (IEEE802.3af compliant) and the RJ45 Network connector connected using an Ethernet cable?Check whether the connection is appropriately established.Depending on the PoE device, the power supply will stop when the demanded power exceeds its total power limit for all PoE ports.Refer to the operating instructions of the PoE device in use. | Installation Guide |
| When using DC power supplyIs the power cord plug (accessory) firmly inserted into the power supply terminal (12 V DC) of the camera?Confirm the power plug is firmly connected.Is the AC adaptor in use compliant with the Specifications?Check the Specifications regarding AC adaptor. | ||
| The LINK indicator does not light in orange even when the Ethernet cable is connected to the camera. | Is the Ethernet cable connected appropriately?Connect the Ethernet cable appropriately.Is the hub or router connected to the camera operating appropriately?Check if the hub or router in use is operating appropriately.Is the Ethernet cable connected to the camera broken?Replace the cable with another one. | 11 |
| The SD indicator does not light even when a microSD memory card is installed. | This indicator lights up green when the microSD memory card is recognized correctly and ready for use.Has the inserted microSD memory card been formatted on a PC?Use a microSD memory card formatted on the camera.Or install the software to format the microSD memory card on the PC.Refer to our technical information websitefor further information about the supported software.Is the inserted microSD memory card faulty?Replace the card with a normal one. | 12 |
| The SD memory card warning/error indicator blinks red | The read / write error on the microSD memory card has occurred. Is the inserted microSD memory card faulty?Replace the card with a normal one. | 12 |
| Audio input contains noise. | Check the following.Grounding of the camera, a switching hub or peripheral devices are not done.The camera is used near an electrical power line.The camera is used near a device which produces strong magnetic field or radio waves (such as near a TV/radio antenna, a motor of an air conditioning system, a transformer, etc.)When audio input still contains noise even after checking the above possibilities, use a powered microphone or connect audio output with low output impedance. | Installation Guide |
| The focus can not be automatically adjusted. | In the following locations or with the following subjects, the focus may not be able to be automatically adjusted.In this case, manually adjust the focus from the setup menu.When the subject moves a lotWhen there are large changes to the lighting intensityWhen the light level is lowWhen the subject or location is extremely bright or reflectiveWhen viewing through windowsWhen the dome cover is in a locations where it can easily become dirtyLocations where there is not much contrast such as a white wallWhen there is harsh flickering | Operating Instructions |
| After installing the enclosure, it may be out of focus. | Depending on the installation environment, the optimum focus position may change after the enclosure is installed. In that case, carry out the auto focus function from the setup menu. | Operating Instructions |
| When the enclosure is removed and the camera is checked on the screen, it appears that there are shadows in the four corners. | Depending on the position of the shading rubber on the lens, the shading rubber may appear in the viewing screen.When the enclosure is attached to the camera, the shading rubber returns to the correct position. This is not a fault with the camera. | - |
Detail specifications
- Basic
| Power source *1: DC 12 V | PoE (IEEE802.3af compliant) |
| Power consumption *1: | S2236L 3 V: 720 mA/ Approx. 8.6 W S2136L PoE DC 48 V: 180 mA/ Approx. 8.7 W (Class 0 device) |
| S2136 DC 12 V: 410 mA/ Approx. 4.9 W PoE DC 48 V: 110 mA/ Approx. 5.3 W (Class 2 device) | |
| Operating environment Ambient operating temperature: | -10 °C to +50 °C {14 °F to 122 °F} (Power on range: 0 °C to 50 °C {32 °F to 122 °F}) |
| Ambient operating humidity: | 10 % to 90 % (no condensation) |
| Storage environment Storage temperature: | -30 °C to +60 °C {-22 °F to +140 °F} |
| Storage humidity: | 10 % to 95 % (no condensation) |
| Monitor output (for adjustment): | VBS: 1.0 V [p-p]/75 Ω, composite, Pin jack An NTSC or PAL signal can be outputted from camera (either press the INITIAL SET button quickly (within 1 second) or use software to select NTSC or PAL signal). |
| EXT I/O terminals: | ALARM IN1 (Alarm input 1/ Black & white input/ Auto time adjustment input) (×1) ALARM IN2 (Alarm input 2/ ALARM OUT) (×1) ALARM IN3 (Alarm input 3/ AUX OUT) (×1) |
| Audio input: ø3.5 mm stereo mini jack For microphone input: Recommended applicable microphone: Plug-in power type (Sensitivity of microphone: -48 dB±3 dB (0 dB=1 V/Pa, 1 kHz)) Input impedance: Approx. 2 kΩ (unbalanced) Supply voltage: 2.5 V ±0.5 V Input level: Approx. -10 dBV | |
| For line input: | |
| Audio output *2: | ø3.5 mm stereo mini jack (Audio output is monaural.) Output impedance: Approx. 600 Ω (unbalanced) Output level: -20 dBV |
| Shock resistance: S2236L | IK10 (IEC 62262) |
| Dimensions: | S2236L ø129.5 mm × 102.5 mm (H) {ø5-3/32 inches × 4-1/32 inches (H)} Dome radius 41.5 mm {1-5/8 inches} |
| S2136L ø129.5 mm × 101 mm (H) {ø5-3/32 inches × 3-31/32 inches (H)} Dome radius 40 mm {1-9/16 inches} | |
| Mass: | S2236L Approx. 570 g {1.26 lbs} |
| S2136L Approx. 470 g {1.04 lbs} | |
| S2136 | |
| Finish: | Main body: | S2236L | Dome cover: | PC resin, | W | B |
| C | C | |||||
| S2136L | Main body: | ABS resin, | W | B | ||
| S2136 | Dome cover: | Acrylic resin, | C | C | ||
| Others: | Tamper-re | S2236L | Closure * | 3 | ||
*1 Refer to our technical information website
*2 The audio output can be switched to the monitor output. Refer to the "Operating Instructions" on our support website for descriptions of how to switch the output.
*3 Component that has a structure on which the screws that are accessible after installation cannot be screwed or unscrewed using an ordinary screwdriver.
- Camera
| Image sensor: Approx. 1/2.8 type CMOS image sensor | |
| Effective pixels: Approx. 2.1 megapixels | |
| Scanning area: 5.57 mm (H)×3.13 mm (V) {7/32 inches (H) × 1/8 inches (V)} | |
| Scanning system: Progressive | |
| Minimum illumination: | S2236LS2136LColor:0.007 lx {0.00065 footcandle}(30IRE, F1.3, Maximum shutter: Off (1/30 s), AGC: 11)*0.009 lx {0.00084 footcandle}(50IRE, F1.3, Maximum shutter: Off (1/30 s), AGC: 11)0.0006 lx {0.00006 footcandle}(50IRE, F1.3, Maximum shutter: max. 16/30 s, AGC: 11)*G0.018 lx {0.0019 footcandle}(30IRE, F1.3, Maximum shutter: Off (1/30 s), AGC: 11)*0.025 lx {0.0024 footcandle}(50IRE, F1.3, Maximum shutter: Off (1/30 s), AGC: 11)0.0016 lx {0.00015 footcandle}(50IRE, F1.3, Maximum shutter: max. 16/30 s, AGC: 11)*BW:0 lx {0 footcandle}(50IRE, F1.3, Maximum shutter: Off (1/30 s), AGC: 11, when the IR LED is lit)G0.006 lx {0.00056 footcandle}(50IRE, F1.3, Maximum shutter: Off (1/30 s), AGC: 11)0.0004 lx {0.00004 footcandle}(50IRE, F1.3, Maximum shutter: max. 16/30 s, AGC: 11)*G0.017 lx {0.0016 footcandle}(50IRE, F1.3, Maximum shutter: Off (1/30 s), AGC: 11)0.0011 lx {0.0001 footcandle}(50IRE, F1.3, Maximum shutter: max. 16/30 s, AGC: 11)* |
| S2136Color:0.007 lx {0.00065 footcandle}(30IRE, F1.3, Maximum shutter: Off (1/30 s), AGC: 11)*0.009 lx {0.00084 footcandle}(50IRE, F1.3, Maximum shutter: Off (1/30 s), AGC: 11)0.0006 lx{0.00006 footcandle}(50IRE, F1.3, Maximum shutter: max. 16/30 s, AGC: 11)*G0.018 lx {0.0019 footcandle}(30IRE, F1.3, Maximum shutter: Off (1/30 s), AGC: 11)*0.025 lx {0.0024 footcycle}(50IRE, F1.3, Maximum shutter: Off (1/30 s), AGC: 11)0.0016 lx {0.00015 footcandle}(50IRE, F1.3, Maximum shutter: max. 16/30 s, AGC: 11)*BW:0.006 lx {0.00056 footcandle}(50IRE, F1.3, Maximum shutter: Off (1/30 s), AGC: 11)0.0004 lx {0.00004 footcandle}(50IRE, F1.3, Maximum shutter: max. 16/30 s, AGC: 11)*G0.017 ix {0.0016 footcandle}(50IRE, F1.3, Maximum shutter: Off (1/30 s), AGC: 11)0.0011 lx {0.0001 footcandle}(50IRE, F1.3, Maximum shutter: max. 16/30 s, AGC: 11)** Converted value | |
| Intelligent Auto: On/ Off | |
| Super Dynamic *1: On/ Off | The level can be set in the range of 0 to 31. |
| Dynamic range: Max. 144 dB | (Super Dynamic: On, Level: 31) |
| Maximum gain: The level can be set in the range of 0 to 11. | |
| Adaptive black stretch: The level can be set in the range of 0 to 255. | |
| Back light compensation (BLC)/High light compensation (HLC): | BLC/ HLC/ OffThe level can be set in the range of 0 to 31.(only when Super Dynamic/ Intelligent Auto: Off) |
| Fog compensation: On/ Off | The level can be set in the range of 0 to 8.(only when Intelligent Auto / Auto contrast adjust: Off) |
| Light control mode setting: Outdoor scene/ Indoor scene (50 Hz)/ Indoor scene (60 Hz)/ Fix shutter | |
| Shutter speed: [60 fps mode] | 1/60 Fix, 1/100 Fix, 1/120 Fix, 1/250 Fix, 1/500 Fix, 1/1000 Fix,1/2000 Fix, 1/4000 Fix, 1/10000 Fix[30 fps/15 fps mode]1/30 Fix, 3/120 Fix, 2/100 Fix, 2/120 Fix, 1/100 Fix, 1/120 Fix,1/250 Fix, 1/500 Fix, 1/1000 Fix, 1/2000 Fix, 1/4000 Fix, 1/10000 Fix[50 fps mode]1/50 Fix, 1/100 Fix, 1/250 Fix, 1/500 Fix, 1/1000 Fix, 1/2000 Fix,1/4000 Fix, 1/10000 Fix[25 fps/12.5 fps mode]1/25 Fix, 3/100 Fix, 2/100 Fix, 1/100 Fix, 1/250 Fix, 1/500 Fix,1/1000 Fix, 1/2000 Fix, 1/4000 Fix, 1/10000 Fix |
| Maximum shutter: [60 fps mode] | Max. 1/4000 s, Max. 1/2000 s, Max. 1/1000 s, Max. 1/500 s,Max. 1/250 s, Max. 1/120 s, Max. 1/100 s, Max. 2/120 s, Max. 1/30 s,Max. 2/30 s, Max. 4/30 s, Max. 6/30 s, Max. 10/30 s, Max. 16/30 s[30 fps/15 fps mode]Max. 1/4000 s, Max. 1/2000 s, Max. 1/1000 s, Max. 1/500 s,Max. 1/250 s, Max. 1/120 s, Max. 1/100 s, Max. 2/120 s, Max. 2/100 s,Max. 3/120 s, Max. 1/30 s, Max. 2/30 s, Max. 4/30 s, Max. 6/30 s,Max. 10/30 s, Max. 16/30 s[50 fps mode]Max.1/4000 s, Max.1/2000 s, Max.1/1000 s, Max.1/500 s,Max.1/250 s, Max.1/100 s, Max.2/100 s, Max.1/25 s, Max.2/25 s,Max.4/25 s, Max.6/25 s, Max.10/25 s, Max.16/25 s[25 fps/12.5 fps mode]Max. 1/4000 s, Max. 1/2000 s, Max. 1/1000 s, Max. 1/500 s,Max. 1/250 s, Max. 1/100 s, Max. 2/100 s, Max. 3/100 s, Max. 1/25 s,Max. 2/25 s, Max. 4/25 s, Max. 6/25 s, Max. 10/25 s, Max. 16/25 s |
| Color/BW: | S2236L S2136LOff/ On(IR Light Off)/ On(IR Light On)/Auto1(IR Light Off)/ Auto2(IR Light On)/ Auto3(SCC)S2136Off/ On/ Auto1(Normal)/ Auto2(IR Light)/ Auto3(SCC) |
| IR LED Light: S2236L S2136L | High/ Middle/ Low/ OffMaximum irradiation distance: 70 m {Approx. 230 ft} (30IRE)*50 m {Approx. 164 ft} (50IRE)Maximum irradiation distance: 50 m {Approx. 164 ft} (30IRE)*35 m {Approx. 116 ft} (50IRE)* Converted value |
| White balance: ATW1/ ATW2/ AWC | |
| Digital noise reduction: The level can be set in the range of 0 to 255. | |
| Privacy zone: On/ Off | Up to 8 zones available |
| VIQS: On/ Off | up to 8 zones available |
| Camera title on screen: On/ Off | Up to 40 characters, Up to 2 lines (alphanumeric characters, marks) |
| Video Motion Detection (VMD): | On/ Off4 areas available |
| Scene Change Detection (SCD): | On/ Off1 area available |
| Audio Detection: On/ Off | |
| AI Sound classification: Selectable from Gunshot, Yell, Vehicle horn, Glass break | |
| Image rotation *2, *3, *4: 0° (Off)/ | 90°/ 180° (Upside-down)/ 270° |
*1 When 60 fps or 50 fps is selected, the Super Dynamic function is automatically set to off.
*2 When the 320x180 resolution is used, the "90°" and "270°" settings are not available.
*3 The analog output from the MONITOR OUT terminal will not rotate even when "90 °" or "270 °" is selected for [Image rotation].
*4 When [16:9 mode (30 fps mode)] or [16:9 mode (25 fps mode)] is used, the "90°" and "270°" settings are available.
- Lens
| Zoom ratio:Optical zoomExtra optical zoom | 3.1× (Motorized zoom / Motorized focus)Max 9.3×(3.1× - 9.3× when resolution is 640×360) |
| Focal length: 2.9 mm - 9 mm {1/8 inches - 11/32 inches} | |
| Maximum aperture ratio: 1:1.3 (WIDE) - 1:2.5 (TELE) | |
| Focus range: 0.3 m {11-13/16 inches} -∞ | |
| Aperture range: F1.3 - Close | |
| Angular field of view: | S2236L[16:9 mode]Horizontal: 36° (TELE) - 114° (WIDE)Vertical: 20° (TELE) - 60° (WIDE)[4:3 mode]Horizontal: 27° (TELE) - 82° (WIDE)Vertical: 20° (TELE) - 60° (WIDE)S2136L S2136[16:9 mode]Horizontal: 36° (TELE) - 115° (WIDE)Vertical: 20° (TELE) - 61° (WIDE)[4:3 mode]Horizontal: 28° (TELE) - 82° (WIDE)Vertical: 20° (TELE) - 61° (WIDE) |
| DORI *1:Detect (25 ppm / 8 ppf)Observe (62.5 ppm / 19 ppf)Recognize (125 ppm / 38 ppf)Identify (250 ppm / 76 ppf) | S2236L118.2 m {387.7 ft} (TELE) 24.9 m {81.8 ft} (WIDE)47.3 m {155.1 ft} (TELE) 10.0 m {32.7 ft} (WIDE)23.6 m {77.5 ft} (TELE) 5.0 m {16.4 ft} (WIDE)11.8 m {38.8 ft} (TELE) 2.5 m {8.2 ft} (WIDE)S2136L S2136 |
| Detect (25 ppm / 8 ppf)Observe (62.5 ppm / 19 ppf)Recognize (125 ppm / 38 ppf)Identify (250 ppm / 76 ppf) | 118.2 m {387.7 ft} (TELE) 24.5 m {80.3 ft} (WIDE)47.3 m {155.1 ft} (TELE) 9.8 m {32.1 ft} (WIDE)23.6 m {77.5 ft} (TELE) 4.9 m {16.1 ft} (WIDE)11.8 m {38.8 ft} (TELE) 2.4 m {8.0 ft} (WIDE) |
| Adjusting angle: Horizontal (PAN) angle: -240° to +120°Vertical (TILT) angle: -30° to +85°Azimuth (YAW) angle: ±100° | |
*1 Maximum distance at which a camera's tele and wide lens can meet DORI specifications. This value does not indicate the performance of the camera. Calculations made with the camera installed horizontally at resolution of maximum resolution.
- Network
| Network: 10BASE-T/100BASE-TX, RJ45 connector | |
| Resolution :H.265/ H.264 *1JPEG (MJPEG) | [16:9 mode (60 fps mode)][16:9 mode (30 fps mode)][16:9 mode (50 fps mode)][16:9 mode (25 fps mode)]1920×1080/ 1280×720/ 640×360/ 320×180[4:3 mode (30 fps mode)][4:3 mode (25 fps mode)]1280x960/ VGA/ QVGA[4:3 mode (15 fps mode)][4:3 mode (12.5 fps mode)]2048x1536 *2/ 1280x960/ VGA/ QVGA |
| Image compression method *3:H.265/ H.264 *1 | Transmission priority:Constant bit rate/ VBR/ Frame rate/ Best effortFrame rate:[60 fps mode]1 fps/ 3 fps/ 5 fps*/ 7.5 fps*/ 10 fps*/ 12 fps*/ 15 fps*/ 20 fps*/ 30 fps*/ 60 fps*[30 fps mode]1 fps/ 3 fps/ 5 fps*/ 7.5 fps*/ 10 fps*/ 12 fps*/ 15 fps*/ 20 fps*/ 30 fps*[15 fps mode]1 fps/ 3 fps/ 5 fps*/ 7.5 fps*/ 10 fps*/ 12 fps*/ 15 fps*[50 fps mode]1 fps/ 3.1 fps/ 4.2 fps*/ 6.25 fps*/ 8.3 fps*/ 12.5 fps*/ 20 fps*/ 25 fps*/ 50 fps*[25 fps mode]1 fps/ 3.1 fps/ 4.2 fps*/ 6.25 fps*/ 8.3 fps*/ 12.5 fps*/ 20 fps*/ 25 fps*[12.5 fps mode]1 fps/ 3.1 fps/ 4.2 fps*/ 6.25 fps*/ 8.3 fps*/ 12.5 fps*(The frame rate is limited to “bit rate”. When a value with an asterisk (*) is selected, the actual frame rate may be lower that the value selected.)Bit rate per client:64 kbps/ 128 kbps*/ 256 kbps*/ 384 kbps*/ 512 kbps*/768 kbps*/ 1024 kbps*/ 1536 kbps*/ 2048 kbps*/ 3072 kbps*/4096 kbps*/ 6144 kbps*/ 8192 kbps*/ 10240 kbps*/12288 kbps*/ 14336 kbps*/ 16384 kbps*/ 20480 kbps*/24576 kbps*/ --FREE ENTRY--* The available range of the bit rate varies depending on the setting selected for “image capture size”.Image quality:For “Constant bit rate”, “Frame rate”, and “Best effort”:Low(Motion priority)/ Normal/ Fine(Image quality priority)“VBR”:0 Super fine/ 1 Fine/ 2/ 3/ 4/ 5 Normal/ 6/ 7/ 8/ 9 LowTransmission type:Unicast port (AUTO)/ Unicast port (MANUAL)/ Multicast |
| JPEG (MJPEG) Image quality: | |
| 0 SUPER FINE/ 1 FINE/ 2/ 3/ 4/ 5 NORMAL/ 6/ 7/ 8/ 9 LOW(10 steps: 0-9)Transmission type: Pull (Refresh interval)/ Push (MJPEG)Refresh interval:[60 fps mode]0.1 fps/ 0.2 fps/ 0.33 fps/ 0.5 fps/ 1 fps/ 2 fps/ 3 fps/ 5 fps/ 6 fps/10 fps/ 12 fps/ 15 fps/ 30 fps/ 60 fps[30 fps mode]0.1 fps/ 0.2 fps/ 0.33 fps/ 0.5 fps/ 1 fps/ 2 fps/ 3 fps/ 5 fps/ 6 fps/10 fps/ 12 fps/ 15 fps/ 30 fps[15 fps mode]0.1 fps/ 0.2 fps/ 0.33 fps/ 0.5 fps/ 1 fps/ 2 fps/ 3 fps/ 5 fps/ 6 fps/10 fps/ 12 fps/ 15 fps[50 fps mode]0.08 fps/ 0.17 fps/ 0.28 fps/ 0.42 fps/ 1 fps/ 2.1 fps/ 3.1 fps/ 4.2 fps/5 fps/ 8.3 fps/ 12.5 fps/ 25 fps/ 50 fps[25 fps mode]0.08 fps/ 0.17 fps/ 0.28 fps/ 0.42 fps/ 1 fps/ 2.1 fps/ 3.1 fps/ 4.2 fps/5 fps/ 8.3 fps/ 12.5 fps/ 25 fps[12.5 fps mode]0.08 fps/ 0.17 fps/ 0.28 fps/ 0.42 fps/ 1 fps/ 2.1 fps/ 3.1 fps/ 4.2 fps/5 fps/ 8.3 fps/ 12.5 fps(JPEG frame rates are limited when using JPEG and H.265/H.264 simultaneously.) | |
| Smart coding: GOP(Group of pictures) control | |
| Off/ Low (Variable GOP 1s-8s)/ Mid (Variable GOP 4s-16s)/ Advanced (Fixed GOP 60 seconds with 1 second Key frame)/ Frame rate control (Variable GOP 4s-16s with frame rate control)*Advanced and Frame rate control are only available with H.265. Smart VIQSOn(High)/On(Low)/OffSmart P-picture controlOn/Off | |
| Audio compression method: G.726 (ADPCM): 16 kbps/ 32 kbpsG.711: 64 kbpsAAC-LC*4: 64 kbps/ 96 kbps/ 128 kbps | |
| Bandwidth control: Unlimited/ 64 kbps/ 128 kbps/ 256 kbps/ 384 kbps/ 512 kbps/768 kbps/ 1024 kbps/ 2048 kbps/ 4096 kbps/ 6144 kbps/8192 kbps/ 10240 kbps/ 15360 kbps/ 20480 kbps/ 25600 kbps/30720 kbps/ 35840 kbps/ 40960 kbps/ 51200 kbps | |
| Protocol: IPv6: TCP/IP, UDP/IP, HTTP, HTTPS, SSL/TLS, SMTP, DNS, NTP, SNMPv1/v2/v3, DHCPv6, RTP, MLD, ICMP, ARP, IEEE 802.1X, DiffServ, LLDP, FTP, SFTP, MQTTIPv4: TCP/IP, UDP/IP, HTTP, HTTPS, SSL/TLS, RTSP, RTP, RTP/RTCP, SMTP, DHCP, DNS, DDNS, NTP, SNMPv1/v2/v3, UPnP, IGMP, ICMP, ARP, IEEE 802.1X, DiffServ, SRTP, LLDP, FTP, SFTP, MQTT | |
| Security: User authentication, Host authentication, HTTPSFIPS 140-2 level3 *5 | |
| OS: Microsoft Windows 11 | Microsoft Windows 10 |
| Browser *6: Microsoft Edge | FirefoxGoogle Chrome |
| Maximum concurrent access number: | 14* (Number of sessions that can connect to cameras at the same time)* Depends on network conditions |
| Multi-screen: | Up to 16 camera images can be displayed simultaneously on a multi-screen. *7(Including the camera itself) |
| microSD memory card *8, *9, *10, *11, *12: | microSDXC memory card: 64 GB, 128 GB, 256 GB, 512 GBmicroSDHC memory card: 4 GB, 8 GB, 16 GB, 32 GBmicroSD memory card: 2 GB |
| Mobile terminal/Tablet terminal compatibility: | iPad / iPhone (iOS 8.0 or later), Android^TM terminals |
*1 H.265/H.264 can be selected for each stream.
*2 Used by super resolution techniques.
*3 Transmission for 4 streams can be individually set.
*4 When recording audio on a microSD memory card, only use AAC-LC (Advanced Audio Coding - Low Complexity).
*5 For the following model only: WV-S2236LA, WV-S2236LA-B, WV-S2236LGA, WV-S2236LGA-B, WV-S2136LA, WV-S2136LA-B, WV-S2136LGA, WV-S2136LGA-B, WV-S2136A, WV-S2136A-B, WV-S2136GA, WV-S2136GA-B
*6 For information on the operation verification of the supported web browsers, refer to our technical information website
*7 When using MJPEG/JPEG (Refresh interval) only.
*8 Use a microSD memory card dedicated to i-PRO cameras.
*9 For possible number of images and duration (an indication) that can be saved on the microSD memory card, refer to our technical information website below.
Possible number of JPEG images that can be saved:
*10 Use the microSD memory card with SD Speed Class 6 or higher. Use the microSD memory card that complies with UHS-1(Ultra High Speed-1) in the case of SD Speed Class 10.
*11 Refer to our technical information website
*12 When repeatedly recording images on a microSD memory card using the auto overwrite function, make sure to use a microSD memory card with high reliability and durability.
i-PRO Co., Ltd.
Tokyo, Japan
https://www.i-pro.com/
Authorised Representative in EU:
i-PRO EMEA B.V.
Amsterdam, Netherlands
i-PRO EMEA B.V. UK Branch
1010 Cambourne Business Park,
Cambridgeshire CB23 6DP
CE
UK CA