
TC-AG 100/750 - Angle Grinder EINHELL - Free user manual and instructions
Find the device manual for free TC-AG 100/750 EINHELL in PDF.

| Type | Angle grinder |
| Brand | Einhell |
| Model | TC-AG 100/750 |
| Power input | 750 W |
| Rated voltage | 220 V ~ 60 Hz |
| No-load speed | 12,000 rpm |
| Max. wheel diameter | 100 mm |
| Grinding wheel dimensions | 100 x 16 x 6 mm |
| Cutting wheel dimensions | 100 x 16 x 3 mm |
| Mounting spindle thread | M10 |
| Protection class | II (double insulated) |
| Weight | 1.71 kg |
| Guard | Adjustable safety guard |
| Additional handle | 2 positions (left/right) |
| Switch | Safety slide switch with lock-off |
| Spindle lock | Yes, for easy wheel change |
| Applications | Rough grinding and cutting of metal and stone |
| Includes | Angle grinder, additional handle, flange nut wrench, operating instructions, safety instructions |
| Noise level | Wear ear-muffs (typical 90 dB(A)) |
| Vibration | Hand-arm vibration (typical for angle grinder, use protection) |
| Warranty | 24 months from purchase date |
Frequently Asked Questions - TC-AG 100/750 EINHELL
User questions about TC-AG 100/750 EINHELL
0 question about this device. Answer the ones you know or ask your own.
Ask a new question about this device
Download the instructions for your Angle Grinder in PDF format for free! Find your manual TC-AG 100/750 - EINHELL and take your electronic device back in hand. On this page are published all the documents necessary for the use of your device. TC-AG 100/750 by EINHELL.
USER MANUAL TC-AG 100/750 EINHELL
GB Original operating instructions Angle grinder


-2-


10

GB
Danger!
When using the equipment, a few safety precautions must be observed to avoid injuries and damage. Please read the complete operating instructions and safety regulations with due care. Keep this manual in a safe place, so that the information is available at all times. If you give the equipment to any other person, hand over these operating instructions and safety regulations as well. We cannot accept any liability for damage or accidents which arise due to a failure to follow these instructions and the safety instructions.
Explanation of the symbols used (see Fig. 10)
- Danger! - Read the operating instructions to reduce the risk of injury.
- Caution! Wear ear-muffs. The impact of noise can cause damage to hearing.
- Caution! Wear a breathing mask. Dust which is injurious to health can be generated when working on wood and other materials. Never use the device to work on any materials containing asbestos!
- Caution! Wear safety goggles. Sparks generated during working or splinters, chips and dust emitted by the device can cause loss of sight.
1. Safety regulations
General safety instructions for electric tools
Danger!
Read all safety regulations and instructions.
Any errors made in following the safety regulations and instructions may result in an electric shock, fire and/or serious injury.
Keep all safety regulations and instructions in a safe place for future use.
The term “electric tool” used in the safety instructions refers to electric tools operated from the mains power supply (with a power cable) and to battery operated electric tools (without a power cable).
1. Workplace safety
a) Keep your work area clean and well illuminated. Untidy or unlit work areas can result in accidents.
b) Do not operate the electric tool in an environment where there is a risk of explosions and where there are infl ammable
liquids, gases or dust. Electric tools produce sparks which could set the dust or vapours alight.
c) Keep the electric tool out of the reach of children and other persons. If there is a distraction, you may lose control of the appliance.
2. Electrical safety
a) The connector plug from this electric tool must fit into the socket. The plug should never be altered in any way. Never use adapter plugs together with earthed electric tools. Unaltered plugs and correct sockets reduce the risk of an electric shock.
b) Avoid bodily contact with earthed surfaces such as pipes, heating, ovens and fridges. The risk of electric shock is increased if your body is earthed.
c) Keep the tool out of the rain and away from moisture. The ingress of water into an electric tool increases the risk of an electric shock.
d) Do not use the cable to carry the electric tool, to hang it up or to pull it out of the socket. Keep the cable away from heat, oil, sharp edges and moving parts of the appliance. Damaged or entangled cables increase the risk of an electric shock.
e) If you are working outdoors with an electric tool, only use extension cables which are designed specifically for this purpose. Using specially designed outdoor extension cables, the risk of electric shock is reduced.
f) If operation of the electric tool in a damp environment can not be avoided, use a earth-leakage circuit-breaker. The earth-leakage circuit-breaker reduces the risk of an electric shock.
3. Safety of persons
a) Be careful, watch what you are doing and use an electric tool sensibly. Do not use the tool if you are tired or under the influence of drugs, alcohol or medication. A moment of inattention when using the electric tool can result in serious injuries.
b) Wear personal protection equipment and always wear safety goggles. Wearing personal protection (such as dust masks, non-slip safety shoes, safety helmet or ear protection, depending upon the type and use of the electric tool) reduces the risk of injury.
c) Make sure that the appliance cannot start up accidentally. Ensure that the electric
GB
tool is switched off before you connect it to the power supply and/or insert the battery, or pick up or carry the tool. If your finger is on the switch whilst carrying the electric tool or if you connect the appliance to the mains when it is switched on, this can lead to accidents.
d) Remove keys and wrenches before switching on the electric tool. A tool or key which comes into contact with rotating parts of the appliance can lead to injuries.
e) Avoid abnormal working postures. Make sure you stand squarely and keep your balance at all times. In this way, you can control the electric tool better in unexpected circumstances.
f) Wear suitable work clothes. Do not wear loose clothing or jewellery. Keep hair, clothes and gloves away from moving parts. Loose clothing, jewellery or long hair can get trapped in moving parts.
g) If vacuuming devices and draining devices can be fi tted, make sure that these are correctly attached and correctly used. The use of a dust extraction system can reduce the danger posed by dust.
- Usage and treatment of the electric tool
a) Do not overload the appliance. Use the correct tool for your work. You will be able to work better and more safely within the given performance boundaries.
b) Do not use an electric tool with a defective switch. An electric tool that cannot be switched on or off is dangerous and must be repaired.
c) Pull the plug out of the socket and/or remove the battery before making any adjustments to the appliance, changing accessories or put the appliance down. This safety measure prevents starting the electric tool unintentionally.
d) Keep unused electric tools out of the reach of children. Do not allow people who are not familiar with the appliance or who have not read these instructions to use the appliance. Electric tools are dangerous if they are used by inexperienced people.
e) Clean your electric tool carefully. Check whether moving parts are functioning properly and not jamming, whether parts are broken or damaged enough that the functioning of this electric tool is affected. Have damaged parts repaired before using the appliance. Many accidents are
caused by badly maintained electric tools.
f) Keep your cutting tools sharp and clean. Carefully maintained cutting tools with sharp cutting edges will jam less and are easier to control.
g) Make sure to use electric tools, accessories, attachments, etc. in accordance with these instructions. Take the conditions in your work area and the job in hand into account. Using electric tools for any purpose other than the one for which they are intended can lead to dangerous situations.
5. Service
a) Have your electric tool repaired only by trained personnel using only genuine spare parts. This will ensure that your electric tool remains safe to use.
Safety Information for all Applications
a) This electric tool is designed for use as a grinder/sander and cutting-off machine. Obey all the safety instructions, general instructions, illustrations and data supplied with the tool. If you fail to obey the following instructions, you may suffer an electric shock, fire and/or serious injuries.
b) This electric tool is not designed for sanding, working with wire brushes or polishing. Use of the electric tool in ways it was not intended could lead to dangerous situations and injuries.
c) Do not use any accessories which have not been designed and recommended by the manufacturer specifi cally for this electric tool. Just because you can attach an accessory to your electric tool, this does not guarantee that you can use it safely.
d) The maximum speed of the plug-in tool must be at least as high as the maximum speed specified on the electric tool. Accessories which rotate faster than the maximum speed may break and be catapulted out of the tool.
e) The external diameter and thickness of the plug-in tool must comply with the dimension specifications of your electric tool. Plug-in tools of the wrong size cannot be adequately screened or checked.
f) Plug-in tools with thread must fi t exactly on the thread of the grinding spindle. In the case of plug-in tools that are fl ange-fi tted, the hole diameter of the plug-in tool must fi t the mounting diameter of the
GB
fl ange. Plug-in tools that are not exactly secured to the electric tool will rotate irregularly, vibrate a great deal and might result in you losing control.
g) Do not use damaged plug-in tools. Before use, check plug-in tools such as grinding/sanding wheels for splintering and cracks, grinding/sanding disks for cracks, wear or heavy wear, and wire brushes for loose or broken wires. If the electric tool or the plug-in tool is dropped, check whether it is damaged or use an undamaged plug-in tool. When you have checked and fitted the plug-in tool, make sure that you and other persons in the vicinity are not on a level with the rotating plug-in tool and allow the electric tool to run for one minute at maximum speed. Damaged plug-in tools will generally break during this test time.
h) Wear personal protection equipment. Use face guards, eye protection or goggles depending on the application. If reasonable, wear a dust mask, ear protection, safety gloves or special aprons to keep small grinding and material particles away from you. Protect your eyes from flying foreign bodies which may be created by a range of applications. Dust masks or respiration masks must filter the dust generated by the application. If you are exposed to loud noise for a lengthy period of time, you may suffer hearing loss.
i) Ensure that others keep a safe distance away from where you are working. Anybody who enters the area must wear personal protection equipment. Pieces of the workpiece or broken plug-in tools may be catapulted into the air and cause injuries even outside the immediate vicinity of where you are working.
j) Hold the tool only by the insulated handles when carrying out work during which the plug-in tool could strike concealed power cables or its own mains lead. Contact with a live cable will also make the metal parts of the tool live and will cause an electric shock.
k) Keep the power cable away from rotating plug-in tools. If you lose control of the machine, the mains lead may be cut or caught and your hand or arm might be pulled into the rotating plugin tool.
I) Never put the electric tool down until the plug-in tool has reached a complete
standstill. The rotating plug-in tool may come into contact with the surface on which you place it which could result in you losing control of the electric tool.
m) Never leave the electric tool running whilst you are carrying it. Your clothing can come into contact with the rotating plug-in tool and the plugin tool could thus bore into your body.
n) Clean the ventilation slots on your electric tool at regular intervals. The motor fan draws dust into the housing and a heavy accumulation of metal dust can pose electric risks.
o) Never use the electric tool in the vicinity of inflammable materials. Sparks may ignite these materials.
p) Do not use any plug-in tools which require liquid coolant. Use of water or other liquid coolants could result in electric shocks.
Other safety information for all applications
Recoil and related safety information
Recoil is the sudden reaction as a result of a jammed or blocked rotating plug-in-tool, such as a grinding wheel, grinding disks, wire brushes etc. Jamming or blocking leads to an abrupt stop of the rotating plugin-tool. This causes acceleration of any uncontrolled electric tools rotating in the opposite direction to the plug-in-tool at the point of blockage.
If for example a grinding wheel gets jammed or blocked by the workpiece, the edge of the grinding wheel could get stuck and the grinding wheel could break free or recoil, if it should come into contact with the workpiece. The grinding wheel moves toward or away from the operator, depending upon the direction of rotation of the disk at the point of blockage. Grinding wheels could also be broken if this occurs.
Recoil is the result of incorrect or wrong use of the electric tool. It can be prevented by suitable precautions, as described below.
a) Hold the electric tool securely and move your body and your arms into a position in which you can absorb the force created by the recoil. Always use the additional handle (if there is one) to give you the maximum possible control over recoil forces or reaction moments whilst the tool is operating at full speed. The opera-
GB
tor can manage the recoil and reaction forces by taking suitable precautions.
b) Never move your hand into the vicinity of rotating plug-in tools. The plug-in tool may catch your hand if it suffers recoil.
c) Keep your body out the area into which the electric tool will be moved if it suffers recoil.
Recoil will throw the electric tool into the direction opposite to the grinding/sanding wheel at the point at which it is blocked.
d) Work with particular care around corners, sharp edges, etc. Ensure that the plug-in tool does not bounce off or jam in the workpiece.
At corners, sharp edges or if it bounces, the rotating plug-in tool will tend to jam. This will result in loss of control or recoil.
e) Do not use chain saw blades or toothed saw blades. These plug-in tools often cause recoil or loss of control of the electric tool.
Special safety information for grinding/sanding and cutting-off
a) Use only grinding/sanding wheels that have been approved for your electric tool and the safety hood designed for these grinding/sanding wheels. Grinding/sanding wheels which are not designed for the electric tool cannot be shielded adequately and are unsafe.
b) Offset grinding wheels must be fitted such that their grinding face does not project beyond the level of the guard hood edge. An incorrectly fitted grinding wheel that projects beyond the level of the guard hood edge cannot be adequately shielded.
c) The safety hood must be securely fastened to the electric tool and adjusted for maximum safety, i.e. with the smallest possible part of the grinding/sanding wheel facing the operator. The safety hood helps to protect the operator from broken pieces, accidental contact with the cutting-off wheel, and sparks which could ignite clothing.
d) Grinding/sanding wheels may only be used for the applications for which they are recommended. For example: Never grind/sand a side surface area with a
cutting off wheel. Cutting-off wheels are designed for removing material with the edge of the wheel. Applying lateral force to these cutting-off wheels can cause them to break.
e) Always use undamaged clamping fl anges of the correct size and shape for the grinding/sanding wheel you have selected. Suitable flanges support the grinding/sanding wheel and thus reduce the risk of the grinding/sanding wheel breaking. Flanges for cutting-off wheels may differ from the flanges for other grinding/sanding wheels.
f) Do not used worn grinding/sanding wheels from larger electric tools. Grinding/sanding wheels for larger electric tools are not designed for the higher speeds of smaller electric tools and may break.
Other special safety information for cutting-off wheels
a) Avoid blocking the cutting-off wheel or applying excessive contact pressure. Do not make any excessively deep cuts. Overloading the cutting-off wheel will increase the stress on it and its susceptibility to jam or block and therefore the possibility of recoil or of the grinding wheel breaking.
b) Avoid the area in front of and behind the rotating cutting-off wheel. If you move the cutting-off wheel in the workpiece away from yourself, in the event of recoil the electric tool and the rotating wheel may be catapulted directly towards you.
c) If the cutting-off wheel jams or you interrupt your work, switch off the tool and hold it still until the wheel has reached a complete standstill. Never attempt to pull the cuttingoff wheel out of the cut whilst it is still rotating, otherwise it may suffer recoil. Find and rectify the cause of the jam.
d) Do not switch the electric tool on again whilst it is inside the workpiece. Allow the cuttingoff disk to reach its full speed before you continue the cut with care. Otherwise the wheel may catch, jump out of the workpiece or cause recoil.
e) Support panels or large workpieces to reduce the risk of recoil by a jammed cuttingoff wheel. Large workpieces may sag under their own weight. The workpiece must be supported on both sides of the wheel both near the cut and also at the edge.
f) Be particularly careful with "pocket cuts" in existing walls or in areas which you cannot see clearly. As the cutting-off disk enters the cut it may suffer recoil if it cuts into gas or water pipes, electric cables or other objects.
GB
2. Layout and items supplied
2.1 Layout (Fig. 1)
- Spindle lock
- ON/OFF switch
- Additional handle
- Guard
- Flange nut wrench
2.2 Items supplied
Please check that the article is complete as specified in the scope of delivery. If parts are missing, please contact our service center or the sales outlet where you made your purchase at the latest within 5 working days after purchasing the product and upon presentation of a valid bill of purchase. Also, refer to the warranty table in the service information at the end of the operating instructions.
- Open the packaging and take out the equipment with care.
- Remove the packaging material and any packaging and/or transportation braces (if available).
- Check to see if all items are supplied.
- Inspect the equipment and accessories for transport damage.
- If possible, please keep the packaging until the end of the guarantee period.
Danger!
The equipment and packaging material are not toys. Do not let children play with plastic bags, foils or small parts. There is a danger of swallowing or suff ocating!
Angle grinder
• Additional handle
- Flange nut wrench
• Original operating instructions
• Safetyinstructions
3. Proper use
The angle grinder is designed for grinding metal and stone when using the appropriate grinding wheel and guard.
Warning! To cut metal and stone the grinder/sander may only be used when the guard (available as an accessory) is mounted.
The equipment is to be used only for its prescribed purpose. Any other use is deemed to be a
case of misuse. The user / operator and not the manufacturer will be liable for any damage or injuries of any kind caused as a result of this.
Please note that our equipment has not been designed for use in commercial, trade or industrial applications. Our warranty will be voided if the machine is used in commercial, trade or industrial businesses or for equivalent purposes.
4. Technical data
Mains voltage: 220 V \~ 60 Hz
Power input: 750 W
Idling speed: 12.000 rpm
Max. wheel diameter: 100 mm
Grinding wheel: 100 x 16 x 6 mm
Cutting wheel: 100 x 16 x 3 mm
Mounting spindle thread: M10
Protection class: .....II /回
Weight: 1,71 kg
Wear ear-muff s.
The impact of noise can cause damage to hearing.
Additional information for electric power tools
Keep the noise emissions and vibrations to a minimum.
- Only use appliances which are in perfect working order.
• Service and clean the appliance regularly.
• Adapt your working style to suit the appliance.
• Do not overload the appliance. - Have the appliance serviced whenever necessary.
- Switch the appliance off when it is not in use.
• Wear protective gloves.
Caution!
Residual risks
Even if you use this electric power tool in accordance with instructions, certain residual risks cannot be rules out. The following hazards may arise in connection with the equipment's construction and layout:
- Lung damage if no suitable protective dust mask is used.
- Damage to hearing if no suitable ear protection is used.
GB
- Health damage caused by hand-arm vibrations if the equipment is used over a prolonged period or is not properly guided and maintained.
5. Before starting the equipment
Before you connect the equipment to the mains supply make sure that the data on the rating plate are identical to the mains data.
Warning!
Always pull the power plug before making adjustments to the equipment.
5.1 Fitting the additional handle (Fig. 2)
- The angle grinder must not be used without the additional handle (3).
- The additional handle can be secured in any of 2 positions (A, B).
| Tool side Suitable for | |
| Left (position A / as shown) | Right-handedusers |
| Right(positionB)Left-handedusers | |
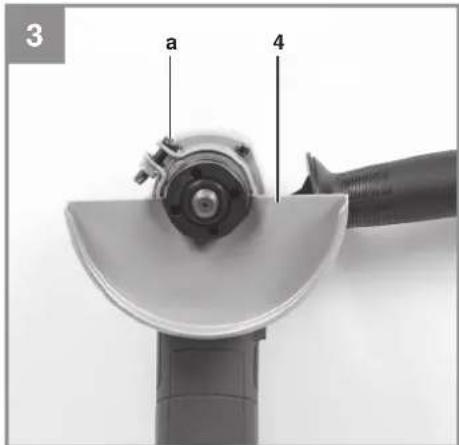
5.2 Setting the guard (Fig. 3) Warning!
• Switch off the tool. Pull the power plug.
- Adjust the guard (4) to protect your hands so that the material being ground is directed away from your body.
- The position of the guard (4) can be adjusted to any specific working conditions. Undo the screw (a) and turn the cover (4) into the required position.
- Ensure that the guard (4) correctly covers the gear wheel casing.
• Retighten the screw (a).
• Ensure that the guard (4) is secure.
⚠️ Take care that the safety device is secure.
⚠️ Never use the angle grinder without the guard.
5.3 Test run for new grinding Wheels
Allow the right-angle grinder to run in idle for at least 1 minute with the grinding or cutting wheel fitted in place. Vibrating wheels are to be replaced immediately.
6. Operation
6.1 Switch (Fig. 4)
The angle grinder comes with a safety switch which is designed to prevent accidents. To switch on, press down the On/Off switch (2) at the back, push it forwards and then press it down at the front. To switch off the angle grinder, depress the On/Off switch (2) at the back. The On/Off switch (2) will jump back into its starting position.
⚠ Wait until the machine has reached its top speed. You can then position the angle grinder on the workpiece and machine it.
6.2 Changing the grinding wheels (Fig. 5)
Use the face spanner (5) supplied to change the grinding wheels. The face spanner (5) is stored in the additional handle (3). Pull the face spanner (5) out of the additional handle (3) when you need it. Important! For safety reasons, the angle grinder must not be operated with the face spanner (5) inserted in it.
Warning!
Pull out the power plug.
• Simple wheel change by spindle lock:
- Press the spindle lock and allow the grinding wheel to latch in place.
- Open the flange nut with the face spanner.
• (Fig. 5)
- Change the grinding or cutting wheel and tighten the flange nut with the face spanner.
Notice!
Only ever press the spindle lock when the motor and grinding spindle are at a standstill! You must keep the spindle lock pressed while you change the wheel!
For grinding or cutting wheels up to approx. 3 mm thick, screw on the flange nut with the flat side facing the grinding or cutting wheel.
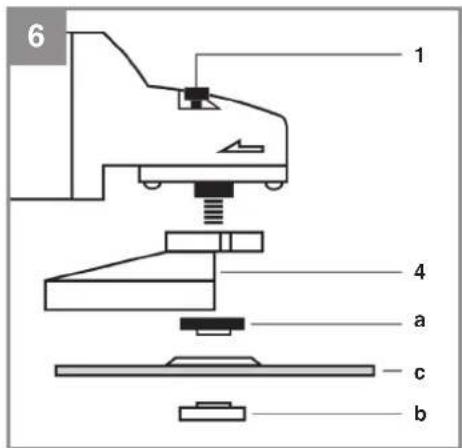
6.3 Flange arrangements when using grinding wheels and cutting wheels (Fig. 6-9)
- Flange arrangement when using a depressed-centre or straight grinding wheel (Fig. 7)
• a) Clamping flange
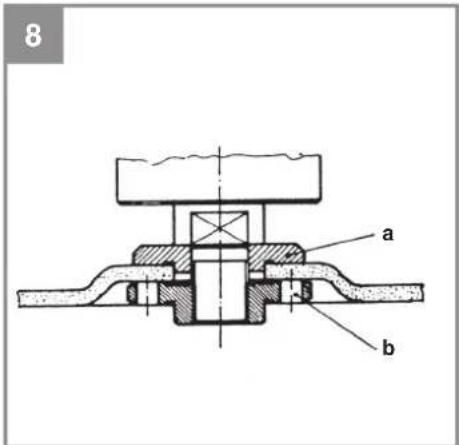
b) Flange nut - Flange arrangement when using a depressed-centre cutting wheel (Fig. 8)
a) Clamping flange
GB
b) Flange nut
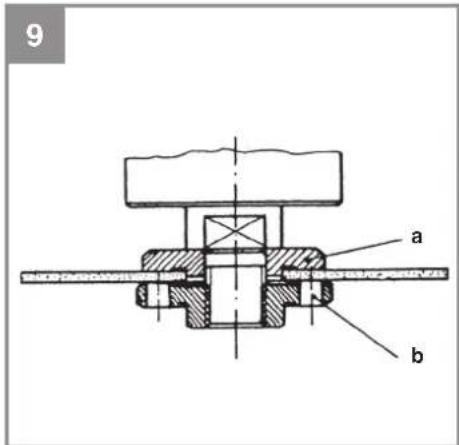
- Flange arrangement when using a straight cutting wheel (Fig. 9)
• a) Clamping flange
b) Flange nut
6.4 Motor
It is vital for the motor to be well ventilated during operation. Be sure, therefore, to keep the ventilation holes clean at all times.
6.5 Grinding Wheels
- Never use a grinding or cutting wheel bigger than the specified diameter.
- Before using a grinding or cutting wheel, check its rated speed.
- The maximum speed of the grinding or cutting wheel used must be higher than the idle speed of the angle grinder.
- Use only grinding and cutting wheels that are approved for a minimum speed of 12000 rpm and a peripheral speed of 67 m/sec.
- Check the direction of rotation when you use diamond cutting wheels. The directional arrow on the diamond cutting wheel must point in the direction in which the tool rotates.
Take special care that the grinding/sanding wheels are properly stored and transported. Ensure that the grinding/sanding wheels are never exposed to shock, jolts or sharp edges (for example during transport or storage in a toolbox). This could cause damage (such as cracks) to the grinding/sanding wheels and place the user in serious danger.
Warning!
6.6 Operating Modes
6.6.1 Rough grinding
For the best rough grinding results, hold the grinding wheel at an angle of between 30^ and 40^ to the workpiece surface and guide back and forth over the workpiece in steady movements.
6.6.2 Cutting
When you use the right-angle grinder for cutting purposes, avoid tilting it in the cutting plane. The cutting wheel must have a clean cutting edge. A diamond cutting wheel is best used to cut hard stone.
⚠ It is prohibited to use the machine on asbestos materials!
⚠️ Never use a cutting wheel for rough grinding.
7. Replacing the power cable
Danger!
If the power cable for this equipment is damaged, it must be replaced by the manufacturer or its after-sales service or similarly trained personnel to avoid danger.
8. Cleaning, maintenance and ordering of spare parts
Danger!
Always pull out the mains power plug before starting any cleaning work.
8.1 Cleaning
- Keep all safety devices, air vents and the motor housing free of dirt and dust as far as possible. Wipe the equipment with a clean cloth or blow it with compressed air at low pressure.
• We recommend that you clean the device immediately each time you have finished using it. - Clean the equipment regularly with a moist cloth and some soft soap. Do not use cleaning agents or solvents; these could attack the plastic parts of the equipment. Ensure that no water can seep into the device. The ingress of water into an electric tool increases the risk of an electric shock.
8.2 Carbon brushes
In case of excessive sparking, have the carbon brushes checked only by a qualified electrician. Danger! The carbon brushes should not be replaced by anyone but a qualified electrician.
8.3 Maintenance
There are no parts inside the equipment which require additional maintenance.
GB
8.4 Ordering replacement parts:
Please quote the following data when ordering replacement parts:
• Type of machine
• Article number of the machine
• Identification number of the machine
• Replacement part number of the part required
9. Disposal and recycling
The equipment is supplied in packaging to prevent it from being damaged in transit. The raw materials in this packaging can be reused or recycled. The equipment and its accessories are made of various types of material, such as metal and plastic. Never place defective equipment in your household refuse. The equipment should be taken to a suitable collection center for proper disposal. If you do not know the whereabouts of such a collection point, you should ask in your local council offices.
10. Storage
Store the equipment and accessories in a dark and dry place at above freezing temperature. The ideal storage temperature is between 5 and 30°C. Store the electric tool in its original packaging.
Subject to technical changes
GB
Warranty certifi cate
Dear Customer,
All of our products undergo strict quality checks to ensure that they reach you in perfect condition. In the unlikely event that your device develops a fault, please contact our service department at the address shown on this guarantee card. You can also contact us by telephone using the service number shown. Please note the following terms under which guarantee claims can be made:
- These guarantee terms apply to consumers only, i.e. natural persons intending to use this product neither for their commercial activities nor for any other self-employed activities. These warranty terms regulate additional warranty services, which the manufacturer mentioned below promises to buyers of its new products in addition to their statutory rights of guarantee. Your statutory guarantee claims are not affected by this guarantee. Our guarantee is free of charge to you.
- The warranty services cover only defects due to material or manufacturing faults on a product which you have bought from the manufacturer mentioned below and are limited to either the rectification of said defects on the product or the replacement of the product, whichever we prefer. Please note that our devices are not designed for use in commercial, trade or professional applications. A guarantee contract will not be created if the device has been used by commercial, trade or industrial business or has been exposed to similar stresses during the guarantee period.
-
The following are not covered by our guarantee:
-
Damage to the device caused by a failure to follow the assembly instructions or due to incorrect installation, a failure to follow the operating instructions (for example connecting it to an incorrect mains voltage or current type) or a failure to follow the maintenance and safety instructions or by exposing the device to abnormal environmental conditions or by lack of care and maintenance.
- Damage to the device caused by abuse or incorrect use (for example overloading the device or the use or unapproved tools or accessories), ingress of foreign bodies into the device (such as sand, stones or dust, transport damage), the use of force or damage caused by external forces (for example by dropping it).
-
Damage to the device or parts of the device caused by normal or natural wear or tear or by normal use of the device.
-
The guarantee is valid for a period of 24 months starting from the purchase date of the device. Guarantee claims should be submitted before the end of the guarantee period within two weeks of the defect being noticed. No guarantee claims will be accepted after the end of the guarantee period. The original guarantee period remains applicable to the device even if repairs are carried out or parts are replaced. In such cases, the work performed or parts fitted will not result in an extension of the guarantee period, and no new guarantee will become active for the work performed or parts fitted. This also applies if an on-site service is used.
-
To make a claim under the guarantee, please register the defective device at: www.Einhell-Service.com. Please keep your bill of purchase or other proof of purchase for the new device. Devices that are returned without proof of purchase or without a rating plate shall not be covered by the guarantee, because appropriate identification will not be possible. If the defect is covered by our guarantee, then the item in question will either be repaired immediately and returned to you or we will send you a new replacement.
Of course, we are also happy offer a chargeable repair service for any defects which are not covered by the scope of this guarantee or for units which are no longer covered. To take advantage of this service, please send the device to our service address.
Also refer to the restrictions of this warranty concerning wear parts, consumables and missing parts as set out in the service information in these operating instructions.
Davao Citihardware Inc. · Quimpo Boulevard, Matina · Davao City 8000 Philippines Tel: 02-85400889 · service-ph@einhell.com


EH 11/2020 (01)


- GB
- Danger!
- Explanation of the symbols used (see Fig. 10)
- Safety regulations
- Workplace safety
- Electrical safety
- Safety of persons
- Service
- Safety Information for all Applications
- Other safety information for all applications
- Recoil and related safety information
- Layout and items supplied
- Layout (Fig. 1)
- Items supplied
- Proper use
- Technical data
- Wear ear-muff s.
- Additional information for electric power tools
- Caution!
- Residual risks
- Before starting the equipment
- Warning!
- Fitting the additional handle (Fig. 2)
- Setting the guard (Fig. 3) Warning!
- Test run for new grinding Wheels
- Operation
- Switch (Fig. 4)
- ⚠ Wait until the machine has reached its top speed. You can then position the angle grinder on the workpiece and machine it.
- Changing the grinding wheels (Fig. 5)
- Pull out the power plug.
- Notice!
- Flange arrangements when using grinding wheels and cutting wheels (Fig. 6-9)
- Motor
- Grinding Wheels
- Operating Modes
- Rough grinding
- Cutting
- Replacing the power cable
- Cleaning, maintenance and ordering of spare parts
- Cleaning
- Carbon brushes
- Maintenance
- Ordering replacement parts:
- Disposal and recycling
- Storage
- Warranty certifi cate
Brand : EINHELL
Model : TC-AG 100/750
Category : Angle Grinder