TYTO-02 - Interface amplificateur AXESS - Free user manual and instructions
Find the device manual for free TYTO-02 AXESS in PDF.

User questions about TYTO-02 AXESS
0 question about this device. Answer the ones you know or ask your own.
Ask a new question about this device
Download the instructions for your Interface amplificateur in PDF format for free! Find your manual TYTO-02 - AXESS and take your electronic device back in hand. On this page are published all the documents necessary for the use of your device. TYTO-02 by AXESS.
USER MANUAL TYTO-02 AXESS
natural_image
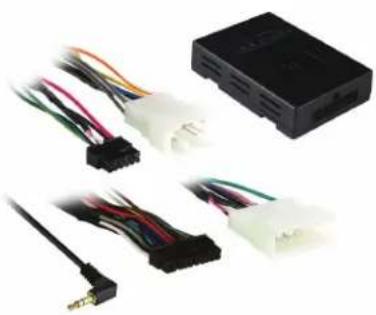
Electrical connector components including a black rectangular device and multiple white connectors with multicolored wires (no visible text or symbols)Toyota Amplifier Interface 2012-up
INTERFACE FEATURES
- Provides wires for multimedia radios (park brake, reverse)
- Designed for amplified systems
• High level speaker input - Retains balance and fade
- Prewired ASWC-1 harness (ASWC-1 sold separately)
• Pre-wired AX-CUSTOM-BT harness (AX-CUSTOM-BT sold separately) - Micro-B USB updatable
INTERFACE COMPONENTS
• TYTO-02 interface • TYTO-02 harness
• 16-pin harness with stripped leads
APPLICATIONS
Toyota
| 4Runner 2014-up | Prius PHV (with NAV) 2012-2015 | Sienna | 2015-2017 | |
| Avalon 2013-up | Prius V 2012-2017 | Tacoma | 2014-2015 | |
| Camry (with NAV) 2012-2017 | Rav-4 2014.5-2018 | Tundra | 2014-up | |
| Highlander 2014-up | Sequoia (with NAV) | 2013 | Venza (with HDD based NAV) | 2013-2014 |
| Prius 3rd gen. (with NAV) 2012-2015 | Sequoia | 2014-up | Venza | 2015 |
TABLE OF CONTENTS
Connections 2
Installation 3
Programming 3
OPTIONAL ACCESSORIES (sold separately)
Steering Wheel Control Interface: ASWC-1 Vehicle Customization Interface: AX-CUSTOM-BT
TOOLS REQUIRED
- Cutting tool • Crimping tool • Tape • Connectors (example: butt-connectors, bell caps, etc.)
Product Info

CONNECTIONS
From the 16-pin harness with stripped leads to the aftermarket radio:
- Connect the Blue/White wire to the amp turn on wire.
- Connect the Gray wire to the right front positive speaker output.
- Connect the Gray/Black wire to the right front negative speaker output.
- Connect the White wire to the left front positive speaker output.
- Connect the White/Black wire to the left front negative speaker output.
- Connect the Green wire to the radio's left rear positive speaker output.
- Connect the Green/Black wire to the radio's left rear negative speaker output.
- Connect the Purple wire to the radio's right rear positive speaker output.
- Connect the Purple/Black wire to the radio's right rear negative speaker output.
- Tape off and disregard the following (6) wires, they will not be used in this application: Brown, Light Green, Blue/Pink, Green/Purple, Orange/White, Red
From the TYTO-02 harness to the aftermarket radio:
- Connect the Black wire to the ground wire.
- Connect the Yellow wire to the battery wire.
- Connect the Red wire to the accessory wire.
- If the aftermarket radio has an illumination wire, connect the Orange/White wire to it.
The following (2) wires are only for multimedia/navigation radios that require these wires.
- Connect the Green/Purple wire to the reverse wire.
- Connect the Light Green wire to the parking brake wire
- Connect the Red and White RCA jacks to the audio AUX-IN jacks from the aftermarket radio.
12-pin pre-wired ASWC-1 harness & 3.5mm jack
This harness and 3.5mm jack are to be used with the ASWC-1 (sold separately) to retain steering wheel audio controls. If the ASWC-1 is not being used, disregard this harness & 3.5mm jack. If it will be used, please refer to the ASWC-1 instructions for radio connections and programming. Disregard the harness that comes with the ASWC-1.
16-pin pre-wired AX-CUSTOM-BT harness
This harness is to be used along with the AX-CUSTOM-BT (sold separately) to retain the personalization menu that is lost when removing the factory radio. If the AX-CUSTOM-BT is not being used, disregard this harness. If it will be used, refer to the AX-CUSTOM-BT manual for app instructions. Disregard the harness that comes with the AX-CUSTOM-BT.
INSTALLATIONPROGRAMMING
With the key in the off position:
- Locate the factory radio harness in the vehicle and complete all necessary connections to the aftermarket radio.
- Connect the 16-pin harness with stripped leads and the TYTO-02 harness into the TYTO-02 interface.
- Connect the TYTO-02 harness to the factory radio harness in the vehicle.
- Turn the key (or push-to-start button) to the ignition position and wait until the radio comes on. The factory amplifier should come on and you should hear sound at this point.
- Test all functions of the installation for proper operation, before reassembling the dash.

TYTO-02
INSTALLATION INSTRUCTIONS

Having difficulties? We're here to help.

our Tech Support line at:
1-800-253-TECH

mail at:
techsupport@metra-autosound.com
Tech Support Hours (Eastern Standard Time)
Monday - Friday: 9:00 AM - 7:00 PM
Saturday: 10:00 AM - 7:00 PM
Sunday: 10:00 AM - 4:00 PM

KNOWLEDGE IS POWER
Enhance your installation and fabrication skills b enselling in the most recognized and respected
mobile electronics school in our industry.
Log onto www.instellerinstitute.com or call
600-354-6782 for more information and take steps toward a better tomorrow.

Metra recommends MECP certified technicians
natural_image
Electrical connector components including a black I/O device and various colored wires (no visible text or symbols)COMPONENTES DE LA INTERFASE
Móvil (Mobile Electronics
Certification Program, MECP).