AXVI-1731 - Television AXESS - Free user manual and instructions
Find the device manual for free AXVI-1731 AXESS in PDF.

User questions about AXVI-1731 AXESS
0 question about this device. Answer the ones you know or ask your own.
Ask a new question about this device
Download the instructions for your Television in PDF format for free! Find your manual AXVI-1731 - AXESS and take your electronic device back in hand. On this page are published all the documents necessary for the use of your device. AXVI-1731 by AXESS.
USER MANUAL AXVI-1731 AXESS
natural_image
Black electronic device with various connectors and wiring, no visible text or symbolsHonda Civic LX Data Interface 2016-Up
Visit AxxessInterfaces.com for more detailed information about the product and up-to-date vehicle specific applications.
INTERFACE FEATURES
- Designed for Non-Amplified vehicles
- Provides NAV outputs (parking brake, reverse, and speed sense)
• Pre-wired AXSWC harness included (AXSWC sold separately)
• Retains the factory backup camera - Retains balance and fade
- Includes the AXCSD-6V 12-volt to 6-volt converter
- Micro-B USB updatable
INTERFACE COMPONENTS
• AXVI-1731 interface
• AXVI-1731 harness
- AXCSD-6V 12-volt to 6-volt converter
APPLICATIONS
HONDA
Civic LX....2016-Up
TABLE OF CONTENTS
Connections....2-3
Radio Feedback Legend & Diagram ....3
Installing the AXVI-1731....4
Initializing the AXVI-1731 4
TOOLS REQUIRED
• Wire cutter • Crimp tool • Solder gun • Tape
- Connectors (example: butt-connectors, bell caps, etc.)
ATTENTION: With the key out of the ignition, disconnect the negative battery terminal before installing this product. Ensure that all installation connections, especially the air bag indicator lights, are plugged in before reconnecting the battery or cycling the ignition to test this product.
NOTE: Refer also to the instructions included with the aftermarket accessory before installing this device.
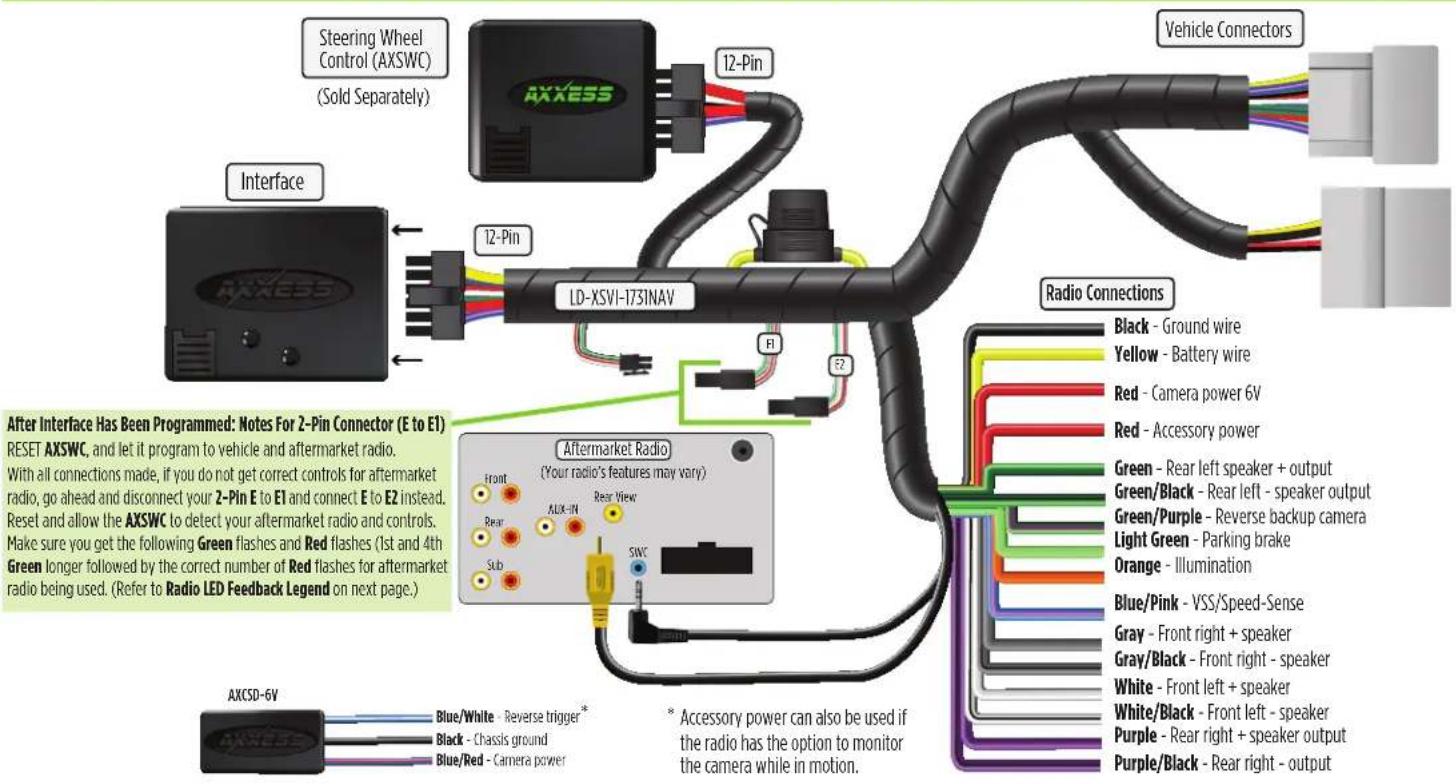
CONNECTIONS: LD-XSVI-1731-NAV HARNESS
text_image
Steering Wheel Control (AXSWC) (Sold Separately) 12-Pin Vehicle Connectors Interface 12-Pin LD-XSV1-1731NAV After Interface Has Been Programmed: Notes For 2-Pin Connector (E to E1) RESET AXSWC, and let it program to vehicle and aftermarket radio. With all connections made, if you do not get correct controls for aftermarket radio, go ahead and disconnect your 2-Pin E to E1 and connect E to E2 instead. Reset and allow the AXSWC to detect your aftermarket radio and controls. Make sure you get the following Green flashes and Red flashes (1st and 4th Green longer followed by the correct number of Red flashes for aftermarket radio being used. (Refer to Radio LED Feedback Legend on next page.) Aftermarket Radio (Your radio's features may vary) Front Rear Sub AUX-IN Rear View SWC Radio Connections Black - Ground wire Yellow - Battery wire Red - Camera power 6V Red - Accessory power Green - Rear left speaker + output Green/Black - Rear left - speaker output Green/Purple - Reverse backup camera Light Green - Parking brake Orange - Illumination Blue/Pink - VSS/Speed-Sense Gray - Front right + speaker Gray/Black - Front right - speaker White - Front left + speaker White/Black - Front left - speaker Purple - Rear right + speaker output Purple/Black - Rear right - output AXCSD-6V Blue/White - Reverse trigger* Black - Chassis ground Blue/Red - Camera power * Accessory power can also be used if the radio has the option to monitor the camera while in motion.CONNECTIONS CONT.
12-pin pre-wired AXSWC harness:
This harness is to be used along with the optional AXSWC (not included) to retain steering wheel audio controls. If the AXSWC is not being used, disregard this harness. If it will be used, please refer to the AXSWC instructions for radio connections and programming.
Note: Disregard the harness that comes with the AXSWC.
Connect the Red wire to the accessory wire.
2-pin connector ( E TO E1):
RESET AXSWC, and let it program to vehicle and aftermarket radio.
With all connections made, if you do not get correct controls for aftermarket radio, go ahead and disconnect your 2-pin E to E1 and connect E to E2 instead. (See diagram page 2)
Reset and allow the AXSWC to detect your aftermarket radio and controls. Make sure you get the following Green flashes and Red flashes (1st and 4th Green longer followed by the correct number of Red flashes for aftermarket radio being used (Refer to Radio LED Feedback Legend at right.)
RADIO FEEDBACK LEGEND & DIAGRAM
L.E.D. Feedback: The (23) Red
L.E.D. flashes represent a different radio manufacturer for the AXSWC interface to detect. For example, if you are installing a JVC radio, the AXSWC interface will flash Red (5) times, then stop. Following is the L.E.D Feedback Legend, which indicates the flash count of the radio manufacturer
text_image
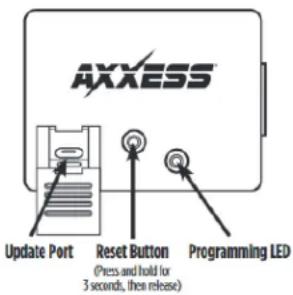
AXXESS Update Port Reset Button Programming LED (Press and hold for 3 seconds, then release)L.E.D FEEDBACK LEGEND
| Flash Count | Radio |
| 1 | Eclipse (type 1)† |
| 2 Kenwood ‡ | |
| 3 Clarion (type 1)† | |
| 4 Sony / Dual | |
| 5 JVC | |
| 6 Pioneer / Jensen | |
| 7 Alpine* | |
| 8 Visteon | |
| 9 Valor | |
| 10 Clarion (type 2)† | |
| 11 Metra OE | |
| 12 Eclipse (type 2)† | |
| 13 LG | |
| 14 Parrot** | |
| 15 XITE | |
| 16 Philips | |
| 17 TBA | |
| 18 JBL | |
| 19 Insane | |
| 20 Magnadyne | |
| 21 Boss | |
| 22 Axxora | |
| 23 Axxorra (type 2) | |
KEYNOTES
* If the AXSWC interface flashes Red (7) times, and an Alpine radio is not installed, that means there is an open connection not accounted for. Verify that the 3.5mm jack is connected to the correct steering wheel jack/wire in the radio.
** The AXSWCH-PAR is required (sold separately). Also, the software in the radio must be rev. 2.1.4 or higher.
† If a Clarion or Eclipse radio is installed and the steering wheel controls do not function, change the radio to Clarion (type 2) or Eclipse (type 2) respectively. If the steering wheel controls still do function, refer to the Changing Radio Type document available at axxessinterfaces.com.
‡ If a Kenwood radio is installed and the L.E.D. feedback flashes (5) times instead of (2), manually change the radio type to Kenwood. To do this, refer to the Changing Radio Type document available at axxessInterfaces.com.

AXVI-1731
INSTALLATION INSTRUCTIONS

INSTALLING THE AXVI-1731
With the key in the off position:
- Connect the AXVI-1731 harness into the interface, and then to the harness in the vehicle.
INITIALIZING THE AXVI-1731
Attention! If the interface loses power for any reason, the following steps will need to be performed again. Also, if installing an AXSWC connect it after you initialize and test the interface/radio, with the key in the off position.
- Turn the key (or push-to-start button) to the ignition position and wait until the radio comes on.
Note: If the radio does not come on within 60 seconds, turn the key to the off position, disconnect the interface, check all connections, reconnect the interface, and then try again.
- Turn the key to the off position, and then to the accessory position. Test all functions of the installation for proper operation, before reassembling the dash.
Having difficulties? We're here to help.
Contact our Tech Support line at:
386-257-1187
Or via email at: techs
techsupport@metra-autosound.com
Tech Support Hours (Eastern Standard Time)
Monday - Friday: 9:00 AM - 7:00 PM
Saturday: 10:00 AM -5:00 PM
Sunday: 10:00 AM - 4:00 PM

KNOWLEDGE IS POWER
Enhance your installation and fabrication skills by enrolling in the most recognised and respected
enrolling in the most recognized and resp mobile electronics school in our industry.
Log onto www.installerinstitute.com or call
800-354-6782 for more information and take steps

Metra recommends MECP certified technicians