AXAC-GM2 - Unspecified AXESS - Free user manual and instructions
Find the device manual for free AXAC-GM2 AXESS in PDF.

User questions about AXAC-GM2 AXESS
0 question about this device. Answer the ones you know or ask your own.
Ask a new question about this device
Download the instructions for your Unspecified in PDF format for free! Find your manual AXAC-GM2 - AXESS and take your electronic device back in hand. On this page are published all the documents necessary for the use of your device. AXAC-GM2 by AXESS.
USER MANUAL AXAC-GM2 AXESS
natural_image
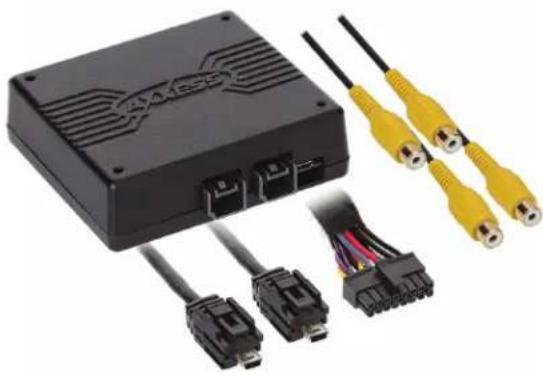
Black electronic device with attached connectors and two yellow USB cables (no visible text or symbols)INTERFACE FEATURES
- Required when adding cameras to an OEM screen
• (4) Camera inputs • Micro-B USB updatable • Retains backup camera - Programmable 12V, 5-amp switched output (configured through the Axxess Updater program)
- Reverse signal trigger generated via CAN bus communication of the vehicle
GM ^+ LVDS Camera 2014-2018
Intended for 7" inch screens, the GM LVDS2 interface will allow your factory screen to enable a Camera or add multiple cameras to your factory screen. It can also be used as a "Baby Monitor" or "Monitor for your Trailer Hitch"
Note: Only compatible with NTSC cameras. Visit AxxessInterfaces.com for more detailed information about the product and up-to-date vehicle specific applications.
APPLICATIONS (7" IOB MyLink screen)
Chevrolet
Colorado 2014-2018
Silverado 1500/2500/3500 2014-2018
GMC
Canyon 2014-2018
Sierra 1500/2500/3500 2014-2018
- Turn signal trigger generated via CAN bus communication of the vehicle
- Programmable camera control wire (configured through the Axxess Updater program)
- VSS (Vehicle Speed Sense) trigger generated via CAN bus communication of vehicle
TABLE OF CONTENTS
Connections 2-3
AXAC-GM2 Layout 4
Add Cam Configuration
from AXXESS Updater 5-6
REQUIRED ITEMS
Update Cable: AXUSB-MCBL (sold separately) AXXESS Updater Program
ATTENTION: With the key out of the ignition, disconnect the negative battery terminal before installing this product. Ensure that all installation connections, especially the air bag indicator lights, are plugged in before reconnecting the battery or cycling the ignition to test this product. NOTE: Refer also to the instructions included with the aftermarket accessory before installing this device.
CONNECTIONS
AXAC-GM2 CONNECTIONS

natural_image
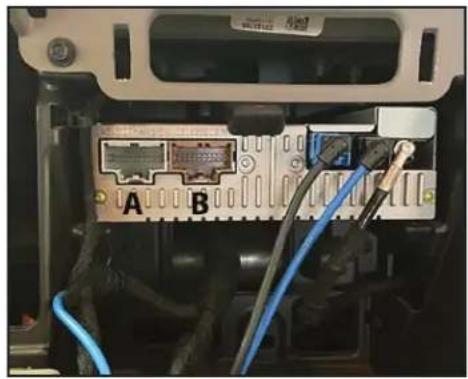
Interior view of a car dashboard displaying a vehicle's rear camera screen with a grid-patterned road scene (no visible text or symbols)- Disconnect the factory Gray 20-pin connector that plugs into the factory Radio Control Module.
- Connect the (A) LD-GMLVDS2-AC and (B) LD-GMLVDS3-AC into the factory connector that was removed and connect the other end into the Radio Control Module.

text_image
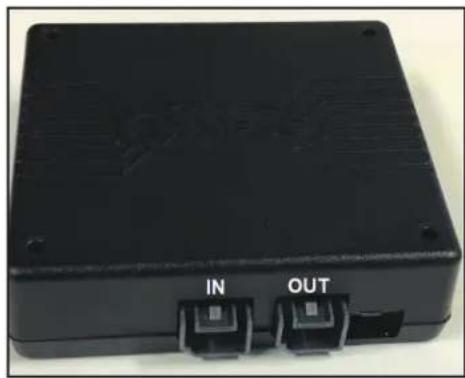
42578313 Z36000000000X 855343750 H11717500004408 MODEL: LC78 VEHICLE: LNGX BNAWVDS G/N: 704462591 Made in Vietnam. LG Electronics Inc.- Disconnect the LVDS connection from the factory screen, connect that cable into the LVDS input side of the board.
- Connect the LVDS output side of the interface into the factory screen.
natural_image
Interior view of a computer interface showing ports A and B connected to cables (no readable text or symbols)- Connect the 6-pin connector from the LD-GMLVDS-AC2 to the 6-pin from the (B) LD-GMLVDS3-AC harness.
- Connect the 4-pin connector from the LD-GMLVDS-AC2 to the 4-pin from the (A) LD-GMLVDS2-AC harness.
CONNECTIONS CONT.

text_image
16 PIN16-pin Connector: Plugs into interface
Gray/Blue wire: Is the control wire that can be configured to accept a Positive or Negative input, that can be used to trigger the video output.
Red wire*: Will provide 12v(5a) as long as the vehicle is awake for the aftermarket cameras.
natural_image
Black rectangular electronic device with two labeled buttons (IN and OUT) on its side, no visible text or symbols beyond labels
text_image
IN OUT USBAXAC-GM2 HARNESS LAYOUT
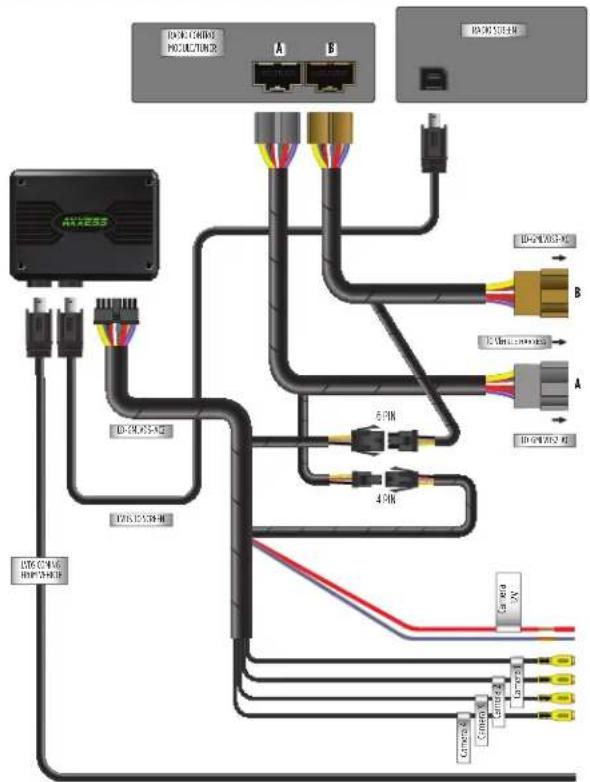
flowchart
graph TD
    A["Router Connection"] --> B["Switch"]
    A --> C["Switch"]
    A --> D["Switch"]
    A --> E["Switch"]
    A --> F["Switch"]
    B --> G["Port 1"]
    B --> H["Port 2"]
    B --> I["Port 3"]
    C --> J["Port 4"]
    C --> K["Port 5"]
    D --> L["Port 6"]
    D --> M["Port 7"]
    E --> N["Port 8"]
    E --> O["Port 9"]
    F --> P["Port 10"]
    F --> Q["Port 11"]
    G --> R["Terminal"]
    H --> S["Terminal"]
    I --> T["Terminal"]
    J --> U["Terminal"]
    K --> V["Terminal"]
    L --> W["Terminal"]
    M --> X["Terminal"]
    N --> Y["Terminal"]
    O --> Z["Terminal"]
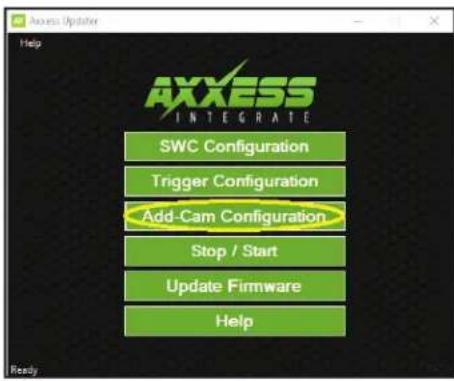
ADD-CAM CONFIGURATION FROM THE AXXESS UPDATER
text_image
Access Updates Help AXXESS INTEGRATE SWC Configuration Trigger Configuration Add-Cam Configuration Stop / Start Update Firmware Help Ready- Enter the ADD-CAM Configuration

text_image
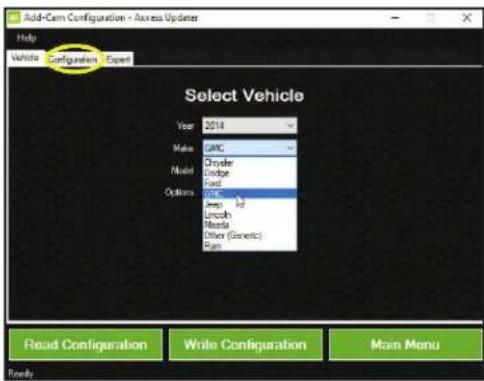
Add Cam Configuration - Access Update Help Vehicle Configuration Export Select Vehicle Year 2014 Make GMC Model Chrysler Model Dodge Model Ford Options GMC Jewp L Lincoln Maula Other (Generic) Run Read Configuration Write Configuration Main Menu Ready- Select the vehicle type the interface is being installed in
text_image
Add-Cam Configuration - Access Updates Help Vehicle Configuration Open Select Vehicle Year 2014 Make GMC Model Chrysler Codge Ford Options Ford Amp HD Lincoln Merola Other (Generic) Run Read Configuration Write Configuration Main Menu Toify- Once vehicle has been selected, select the configuration tab. You can now configure your cameras
https://axxessinterfaces.com/resources/updater-software
ADD-CAM CONFIGURATION-AXXESS UPDATER
4 Female Video inputs Here are the options that can be chosen for each input:
Camera 1
- Disable: Will turn off input
- Reverse: Will activate when the vehicle is in reverse (Reverse can only be configured on Camera 1)
- Left Blinker: Will activate Input when left turn signal is activated
- Right Blinker: Will activate input when right turn signal is activated
• Control 1 Positive*: Activates Camera 1 with 12v positive trigger - Control 1 Negative*: Activate Camera 1 with Negative Ground trigger
Camera 2
- Disable: Will turn off input
- Left Blinker: Will activate input when left turn signal is activated
- Right Blinker: Will activate input when right turn signal is activated
- Control 1 Positive*: Activates Camera 2 with 12v positive trigger
- Control 1 Negative*: Activate Camera 2 with Negative Ground trigger
Camera 3
- Disable: Will turn off input
- Left Blinker: Will activate input when left turn signal is activated
- Right Blinker: Will activate input when right turn signal is activated
• RVA (Rear Video Assistant) Positive or Negative trigger: Activates viewing of Trailer Cameras or Child monitoring
Camera 4
- Disable: Will turn off input
- Left Blinker: will activate input when left turn signal is activated
- Right Blinker: will activate input when right turn signal is activated
• Control 1 Positive*: Activates Camera 4 with 12v positive trigger
• Control 1 Negative*: Activates Camera 4 with Negative Ground trigger - Auto (Reverse to Drive): will activate once it sees a sequence of reverse then drive
text_image
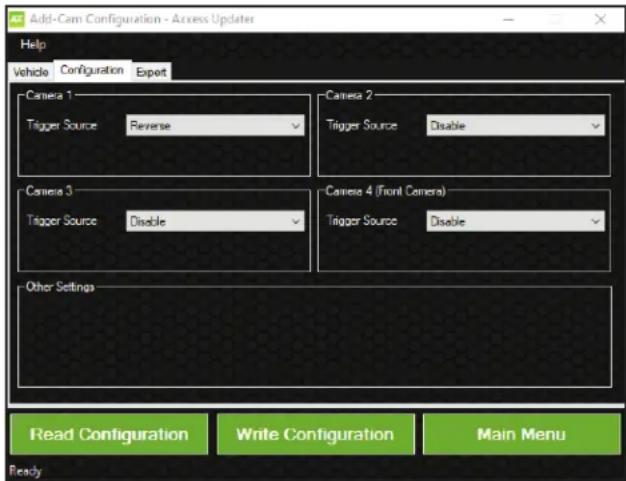
Add-Cam Configuration - Access Updater Help Vehicle Configuration Export Camera 1 Trigger Source Reverse Camera 2 Trigger SourceDisable Camera 3 Trigger SourceDisable Camera 4 (Front Camera) Trigger SourceDisable Other Settings Read Configuration.Write Configuration Main Menu ReadyLEGEND: * Not available if RVA is selected as a trigger source for input 3
Note: The AXAC-GM2 monitors the vehicle's speed, preventing the use of cameras while the vehicle is in motion. Example: When approaching a stop and the turn signal is activated, the camera will not display unless the vehicle is moving greater than 3MPH. (Cut off point is from 8-15mph)
NOTE: The Red wire provides 5 amps (it's recommended to use an SPDT automotive relay when using that line to power up multiple cameras). Use Metra part number E-123 (sold separately) for best results.

AXAC-GM2 INSTALLATION INSTRUCTIONS

Having difficulties? We're here to help.
Contact our Tech Support line at: 386-357-1187
Or via email at: techsupport@metra-autosound.com
Tech Support Hours (Eastern Standard Time)
Monday - Friday: 9:00 AM - 7:00 PM
Saturday: 10:00 AM - 7:00 PM
Sunday: 10:00 AM - 4:00 PM

KNOWLEDGE IS POWER
Enhance your installation and fabrication skills by enrolling in the most recognized and respected mobile electronics school in our industry. Log onto www.instellerinstitute.edu or call 386-672-5771 for more information and take steps toward a better tomorrow.

Metra recommends MECP certified technicians
natural_image
Black electronic device with USB connectors and two yellow USB cables, no visible text or symbolsCARACTERÍSTICAS DE LA INTERFAZ
natural_image
Interior view of a car dashboard displaying a vehicle's rearview camera and its side screen showing a grain field (no text or symbols visible)natural_image
Interior view of an electronic device showing a connector panel with labeled ports A and B, connected to cables (no readable text or symbols beyond labels)- Conecte el conector de 6 pins del LD-GMLVDS-AC2 a la entrada de 6 pins del (B) arnés LD-GMLVDS3-AC.
- Conecte el conector de 4 pins del LD-GMLVDS-AC2 a la entrada de 4 pins del (A) arnés LD-GMLVDS2-AC.
CONEXIONES CONT.

text_image
16 PINnatural_image
Black rectangular electronic device with two labeled ports (IN and OUT) on its side, no visible text or symbols beyond labels
text_image
IN OUT USBtext_image
Access Updater Help AXXESS INTEGRATE SWC Configuration Trigger Configuration Add-Cam Configuration Stop / Start Update Firmware Help Ready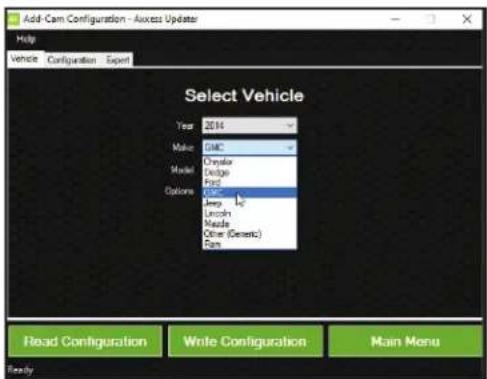
text_image
Add Cam Configuration - Access Update Help Vehicle Configuration Expert Select Vehicle Year 2014 Make GMC Model Chrysler Model Dodge Model Ford Options OJ Jump Lincoln Maxilla Other (Generic) Farm Read Configuration Write Configuration Main Menu Ready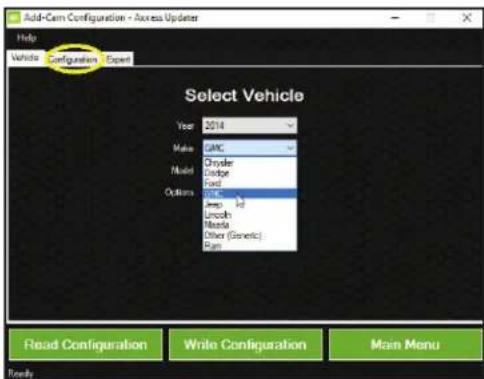
text_image
Add-Cam Configuration - Access Updates Help Vehicle Configuration Expert Select Vehicle Year 2014 Make GMC Model Chrysler Ludor Ford Options Ford Amp 1/2 Lincoln Mistral Other (Genetic) Run Read Configuration Write Configuration Main Menu Readyhttps://axxessinterfaces.com/resources/updater-software
text_image
Add-Cam Configuration - Access Updater Help Vehicle Configuration Export Camera 1 Trigger Source Reverse Camera 2 Trigger SourceDisable Camera 3 Trigger SourceDisable Camera 4 (Front Camera) Trigger SourceDisable Other Settings Read Configuration.Write Configuration Main Menu ReadyMóvil (Mobile Electronics
Certification Program, MECP).