RVCAD-81B - Rear Camera CRUX - Free user manual and instructions
Find the device manual for free RVCAD-81B CRUX in PDF.

User questions about RVCAD-81B CRUX
0 question about this device. Answer the ones you know or ask your own.
Ask a new question about this device
Download the instructions for your Rear Camera in PDF format for free! Find your manual RVCAD-81B - CRUX and take your electronic device back in hand. On this page are published all the documents necessary for the use of your device. RVCAD-81B by CRUX.
USER MANUAL RVCAD-81B CRUX
- Activates Reverse camera input in Non MMI Audi vehicles.
- Rear-view camera input.
- Provides three AV Inputs.
- With OE type Dynamic Parking Assistance + PDC.
- On-screen display and setup.
Vehicle Applications
AUDI
2008 - 2014 A4
2008 - 2014 A6
2008 - 2014 Q5
Navigation / Radio Compatibility
- Works on Audi vehicles with Non MMI systems (no MMI Control Knob behind the gear shifter).
Parts Included
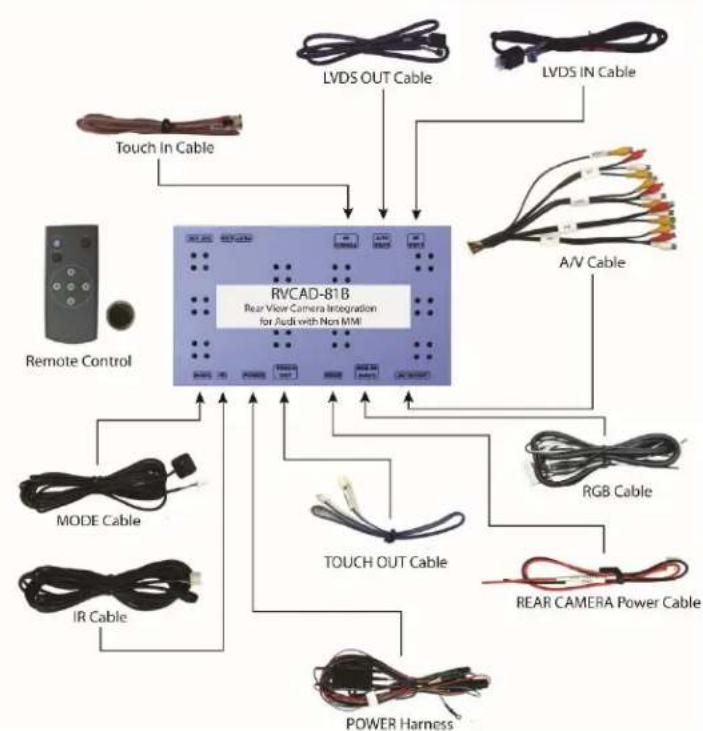
flowchart
graph TD
    A["RVCAD-81B\nRear View Camera Integration\nfor Audi with Non MMI"] --> B["LVDS OUT Cable"]
    A --> C["LVDS IN Cable"]
    A --> D["A/V Cable"]
    A --> E["RGB Cable"]
    A --> F["TOUCH OUT Cable"]
    A --> G["POWER Harness"]
    A --> H["REAR CAMERA Power Cable"]
    A --> I["MODE Cable"]
    A --> J["IR Cable"]
    A --> K["Remote Control"]
    A --> L["Touch in Cable"]
1/10
rev.011917
Crux Interfacing Solutions
www.cruxinterfacing.com

tel. #: (818) 609-9299
fax #: (818) 996-8188
Wiring Diagram
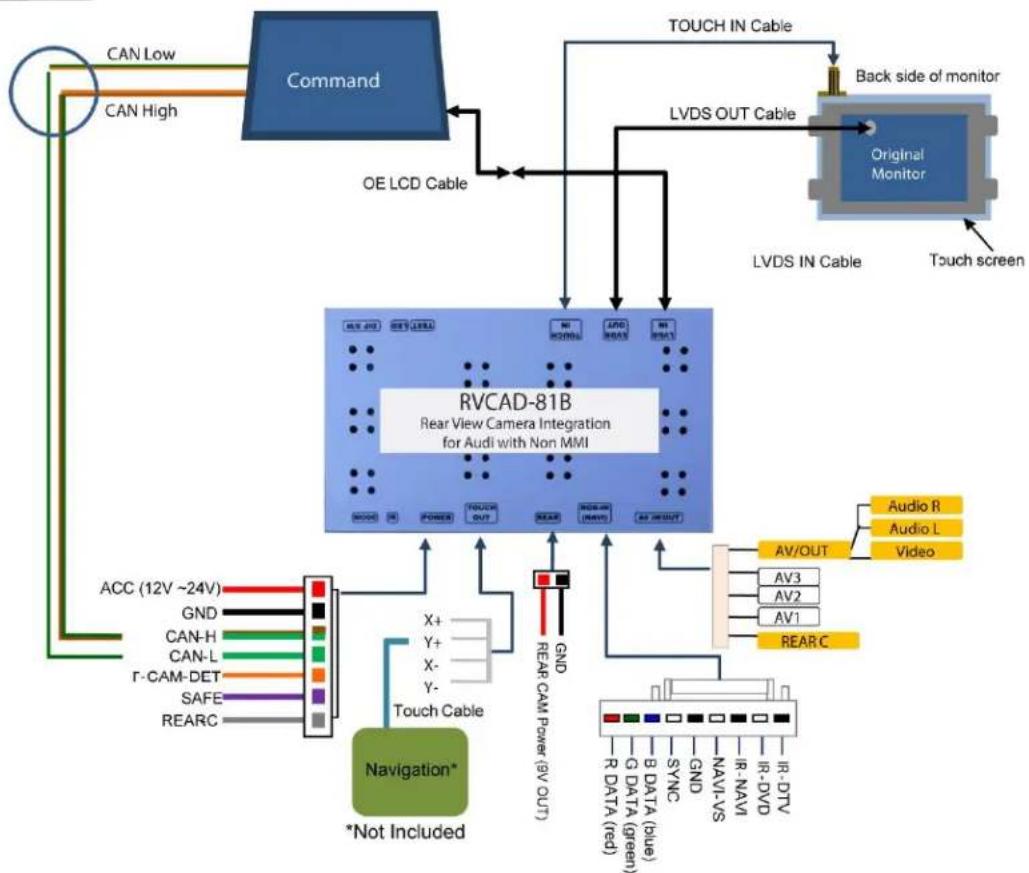
flowchart
graph TD
    A["CAN Low"] --> B["Command"]
    C["CAN High"] --> B
    B --> D["OE LCD Cable"]
    D --> E["RVCAD-81B Rear View Camera Integration for Audi with Non MMI"]
    E --> F["LVDS OUT Cable"]
    F --> G["Original Monitor"]
    G --> H["Back side of monitor"]
    E --> I["Touch screen"]
    E --> J["AV/OUT"]
    J --> K["Audio R"]
    J --> L["Audio L"]
    J --> M["Video"]
    E --> N["GND"]
    E --> O["X+"]
    E --> P["Y+"]
    E --> Q["X-"]
    E --> R["Y-"]
    E --> S["Touch Cable"]
    S --> T["ACC (12V ~24V)"]
    S --> U["GND"]
    S --> V["CAN-H"]
    S --> W["CAN-L"]
    S --> X["Γ-CAM-DET"]
    S --> Y["SAFE"]
    S --> Z["REARC"]
    E --> AA["X+"]
    E --> AB["Y+"]
    E --> AC["X-"]
    E --> AD["Y-"]
    E --> AE["Navigation* *Not Included"]
    E --> AF["GND"]
    E --> AG["REAR CAM Power (BV OUT)"]
    AG --> AH["R DATA (red)"]
    AG --> AI["G DATA (blue)"]
    AG --> AJ["G DATA (green)"]
    AG --> AK["SYNC"]
    AG --> AL["GND"]
    AG --> AM["NAV-VS"]
    AG --> AN["IR-NAV"]
    AG --> AO["IR-DVD"]
    AG --> AP["R-DTV"]
Connecting the CAN Wires
Connect CAN-H-HS (Brown+Green-3Pin) of the interface to CAN High (Orange + Brown) of the car Connect CAN-L-HS (Green-4pin) of the interface to CAN Low (Orange + Green) of the car
2 / 10
rev.011917
Installation Instructions
Connection of LCD Wires
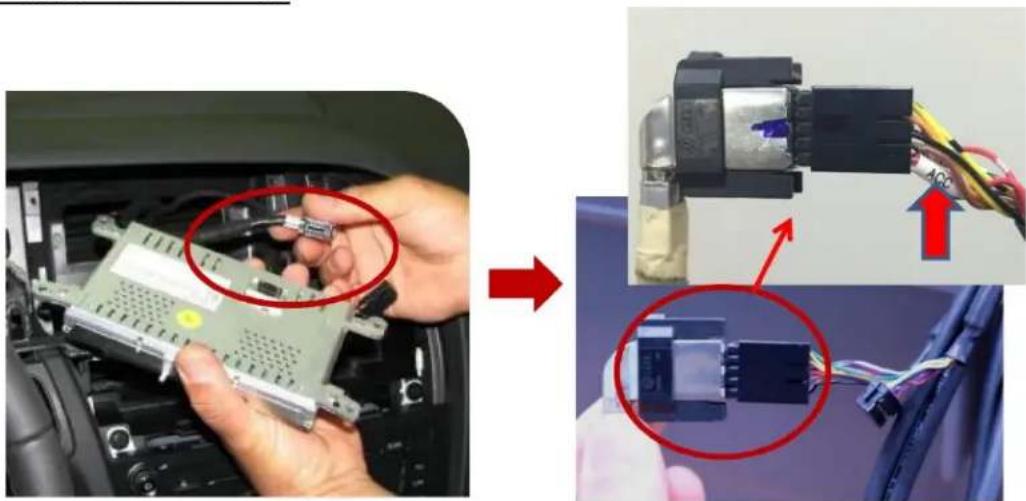
natural_image
Close-up of hands installing a computer motherboard into a car chassis, showing cable installation and wiring (no text or symbols visible)- Unplug the OE LCD cable from a monitor and connect to the supplied LVDS-IN cable. Please refer to the photo above. WARNING: The ACC wire should be at the bottom. (see arrow)
- Connect the other end of the original LVDS IN cable to LVDS IN port of the interface.

natural_image
Two-panel image showing a device with exposed internal wiring and connected to a device labeled 'WITH CAN' (no readable text or symbols beyond labels)- Connect the supplied LVDS-OUT cable to OEM Monitor and connect the other end to the LVDS OUT port of the interface.
3 / 10
rev.011917
Connecting the CAN Wires

text_image
RETURN A02524L15964 Vehicle CAN High Wire Vehicle CAN Low Wire- Tap the CAN High wire (green + brown) of the RVCAD-81B to the CAN High wire (orange + green) of the vehicle.
- Tap the CAN Low wire (green) of the RVCAD-81B to the CAN Low wire (orange + brown) of the vehicle.
DIP Switch Settings
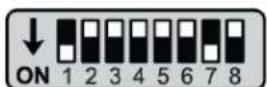
ON: DOWN / OFF: UP
Default : #8 OFF
DIP S/W : 1, 2 ON (hide INPUT MODE)
DIP S/W : 3 OFF (A/V2 display)
DIP S/W:4 OFF (A/V3 display)
DIP S/W : 5 OFF
DIP S/W : 6 OFF
DIP S/W : 7 ON (display external rear cam)
DIP S/W:8 OFF
| PIN | Function | Dip S/W Selection |
| 1 | Displaying RGB input | ON: RGB mode skipOFF: RGB mode display |
| 2 | Displaying A/V 1 | ON: A/V 1 mode skipOFF: A/V1 mode display |
| 3 | Displaying A/V 2 | ON: A/V 2 mode skipOFF: A/V2 mode display |
| 4 | Displaying A/V 3 | ON: A/V 3 mode skipOFF: A/V3 mode display |
| 5 | Not used: Set to OFF | |
| 6 | Not used: Set to OFF | |
| 7 | Setup of rear camera use | ON: CVBS4OFF: MAIN |
| 8 | Not used: Set to OFF | |
NOTE: Disconnect the Power Harness before changing the DIP Switch setting.
4 / 10
rev.011917
Crux Interfacing Solutions
www.cruxinterfacing.com

tel. #: (818) 609-9299
fax #: (818) 996-8188
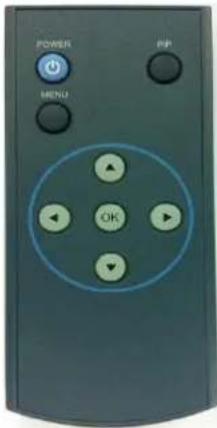
Remote Control
| Key | Function |
| POWER & PIP | Not available |
| MENU | Activating OSD menu |
| OK | Making a selection, changing image display |
| ▲ | UP |
| ▼ | DOWN |
| ◀ | LEFT(press for 2 seconds to access the factory mode) |
| ▶ | RIGHT(press for 2 seconds to reset all user settings) |
text_image
POWER MENU OK ✓OSD Settings
Press the ◀ of the remote control for 2 seconds to enter settings.
text_image
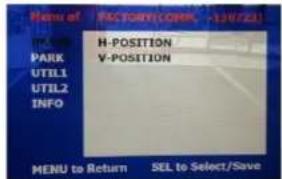
Menu of IND PARK UTIL1 UTIL2 INFO HACTORY.COMK -1307231 H-POSITION V-POSITION MENU to Return SEL to Select/Save□ IMAGE
Adjust navigation position and size
H-POSITION : Move display horizontally V-POSITION : Move display vertically
text_image
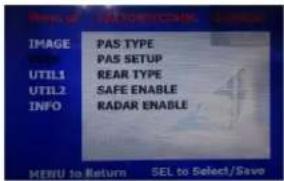
PAS TYPE PAS SETUP REAR TYPE SAFE ENABLE RADAR ENABLE MENU to Return SEL to Select/Save□ PARK
PAS TYPE Selecting Type of parking guide line - NOT USED : Not use Parking guide line
- PAS ON : Selecting Dynamic Parking guide line
- PAS OFF : Selecting fixed Parking guide line
PAS SETUP : Adjusting the position and Selecting type of the parking guide line
REAR TYPE : Choose rear camera recognition
* LAMP - Detecting the rear view camera via rear lamp (Installer must connect "Rear-C" cable of the power cable to the rear lamp of the car.)
*CAN - Detecting the rear view camera by CAN signal (Installer must connect "CAN" cable of the power cable to the "CAN" cable of the car.)
SAFE ENABLE : If your car is connected with CAN cable and it is in "ON" state, you can NOT watch DVD or A/V except original image or navigation while driving. At that time the screen get back to the main (default : OFF)
RADAR ENABLE: When set the gear to "R", Display PDC
NOTE:
In case the Rear camera does not work with "CAN", please connect the camera to the reverse light wire. (PAS and PDC will ot work in this situation)
5 / 10
rev.011917
Crux Interfacing Solutions
www.cruxinterfacing.com

tel. #: (818) 609-9299
fax #: (818) 996-8188
Parking Line Setting
Go to Factory Menu, choose PAS SETUP, press OK button change: H-POS → V-POS → TYPE
H-POS

text_image
H-POS: 0.25In H-POSITION, use ◀, ▶ on remote control, to adjust parking guideline left and right.
V-POS
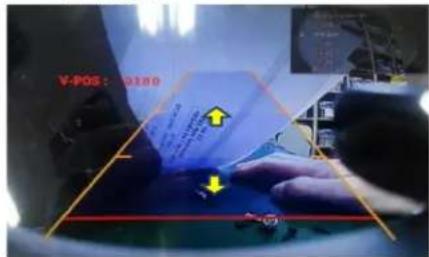
text_image
V-POS: 0380In V-POSITION, use ▲, ▼ on remote control, to adjust parking guideline up and down.
TYPE

text_image
TYRS : 1901In TYPE, use ▲, ▼ on remote control, to select parking guide line type for rear camera.
0001: wide parking guide line
0000: narrow parking guide line

text_image
TYPES : 100006 / 10
rev.011917
Crux Interfacing Solutions
www.cruxinterfacing.com

tel. #: (818) 609-9299
fax #: (818) 996-8188
UTIL1 Settings
Setup for navigation

text_image
Menu of FACTORY(COMM. -130723) IMAGE PARK UTIL1 UTIL2 INFO NAVI MODEL CAR MODEL AVOUT SELECT FACTORY RESET MENU to Return SEL to Select/SaveUTIL1- NAVI MODEL Definition of the navigation resolution
DEFAULT: default, 400 X 234, in low resolution
Setup for car model

text_image
Menu of FACTORY(COMM. -130723) IMAGE PARK UTIL3 UTIL2 INFO NAVI MODEL CAR MODEL AVOUT SELECT FACTORY RESET MFNU to Return SEL to Select/SaveUTIL1- CAR MODEL Selecting model of the car
A4L-NEW A4L-OLD

text_image
Menu of FACTORY(COMM. -130723) IMAGE PARK UTIL1 UTIL2 INFO NAVI MODEL CAR MODEL AVOUT SELECT FACTORY RESET MENU to Return SEL to Select/SaveUTIL1– AV OUT SELECT Selecting background sound After returning from navigation or original mode
DEFAULT: Selecting AV sound just before changing navigation or original mode from the AV mode
AV 1\~3: Sound of the selected AV source 1\~3
text_image
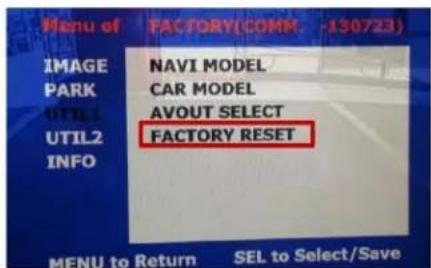
Menu of FAC TORY(COMM. -130723) IMAGE PARK UTIL1 UTIL2 INFO NAVI MODEL CAR MODEL AVOUT SELECT FACTORY RESET MENU to Return SEL to Select/SaveUTIL1 - FACTORY RESET
FACTORY MODE RESET
7/10
rev.011917
text_image
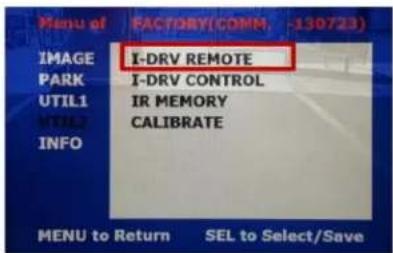
Menu of FACTORY(COMN -130723) IMAGE I-DRV REMOTE PARK I-DRV CONTROL UTIL1 IR MEMORY MTRL CALIBRATE INFO MENU to Return SEL to Select/SaveUTIL2- I_DRV REMOTE Choose DTV and DVD model to be control I_DRV function
LI-1DISC
NEC-6DISC
USER(when using IR MEMORY)
- Select DVD model: Setting on AV1 Mode
- Select DTV model: Setting on A/V2 mode
text_image
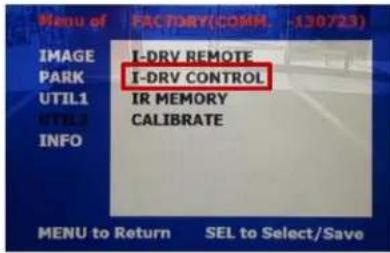
Menu of FACTORY(COMM. -130723) IMAGE I-DRV REMOTE PARK I-DRV CONTROL UTIL1 IR MEMORY BYTEL CALIBRATE INFO MENU to Return SEL to Select/SaveUTIL2- I_DRV CONTROL
Selecting whether to use I_DRV function or not
ON / OFF
A/V1 : Control DVD Remote control UI
A/V2 : Control DTV Remote control UI
text_image
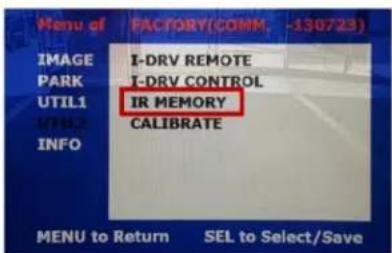
Menu of FACTORY(COMM. -130723) IMAGE I-DRV REMOTE PARK I-DRV CONTROL UTIL1 IR MEMORY INFO CALIBRATE MENU to Return SEL to Select/SaveUTIL2-IR MEMORY
To register DVD, DTV remote control, the remote control value must be registered and can be control with touch DVD (A/V1), DTV(A/V2)
To use this function, in UTIL2-I_DRV REMOTE select USER mode
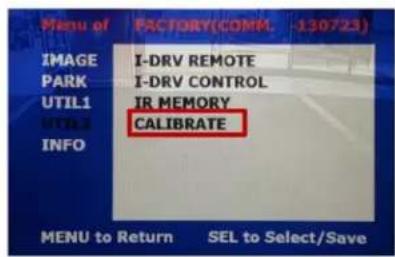
text_image
Menu of FACTORY(COMM. -130723) IMAGE I-DRV REMOTE PARK I-DRV CONTROL UTIL1 IR MEMORY HYBL CALIBRATE INFO MENU to Return SEL to Select/SaveUTIL2-CALIBRATE
Touch Calibration
YES / NO
8 / 10
rev.011917
Operation
User can switch mode using original button in steering wheel
* Long Press : Switching mode (RGB→A/V1\~3→Original mode)
* Short Press : Move to Original mode
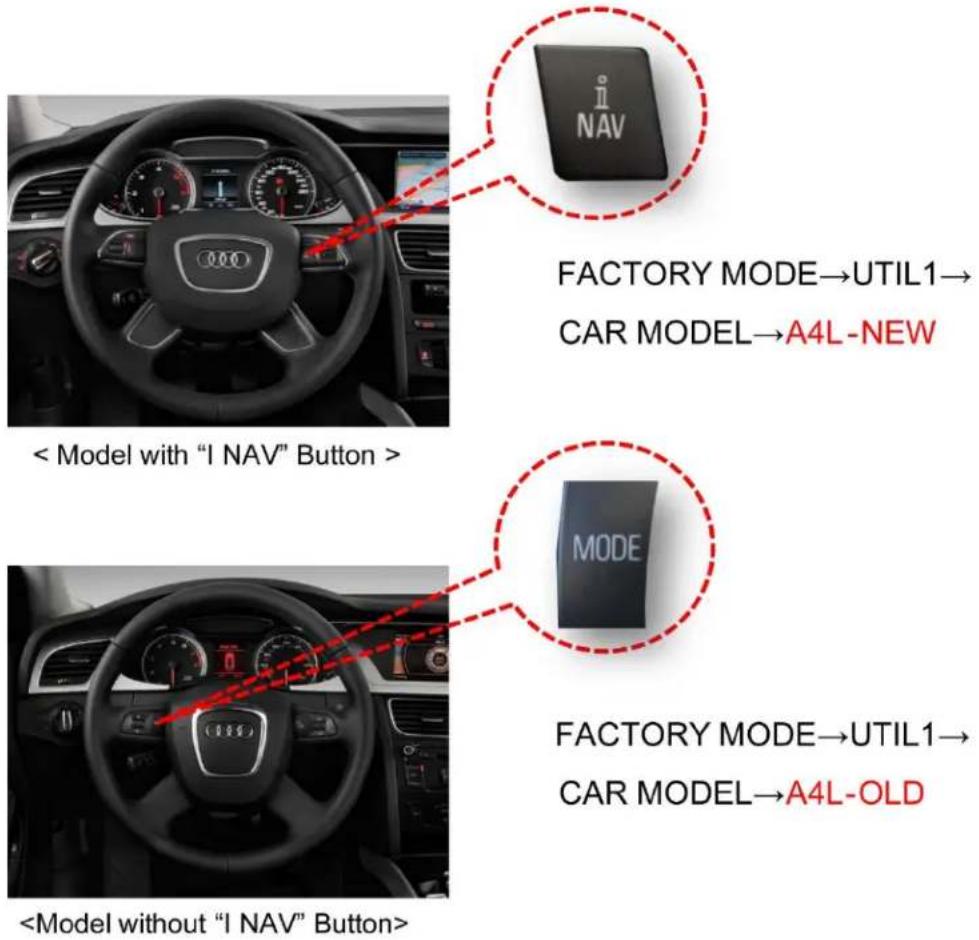
FACTORY MODE→UTIL1→
CAR MODEL→A4L-NEW
FACTORY MODE→UTIL1→
CAR MODEL→A4L-OLD
9 / 10
rev.011917
OSD (On Screen Display) Settings
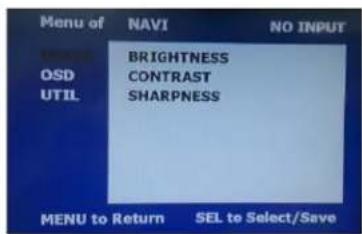
text_image
Menu of NAVI NO INPUT MOSD BRIGHTNESS OSD CONTRAST UTIL SHARPNESS MENU to Return SEL to Select/SaveIMAGE
* BRIGHTNESS
* CONTRAST
* SHARPNESS
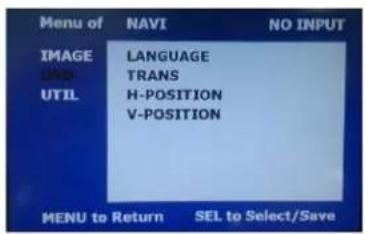
text_image
Menu of NAVI NO INPUT IMAGE LANGUAGE TRANS UTIL H-POSITION V-POSITION MENU to Return SEL to Select/SaveOSD
*LANGUAGE : Set OSD language (only support English and Chinese)
* TRANS : Adjust OSD transparency
*H-POSITION : Move OSD horizontally
* V-POSITION : Move OSD vertically

text_image
Menu of NAVI NO INPUT IMAGE OSD FACTORY RESET Run Time with play TIME MENU to Return SEL to Select/SaveUTIL
* FACTORY RESET
: Factory reset only for OSD function (unable reset video position)
10 / 10
rev.011917