
KAKIDCIPPLA - Camera Kogan - Free user manual and instructions
Find the device manual for free KAKIDCIPPLA Kogan in PDF.

| Product Type | Instant Print Camera |
| Brand | Kogan |
| Model | KAKIDCIPPLA |
| Color | Purple |
| Display | LCD screen |
| Storage | microSD card (max 32GB, Class 10, FAT32) |
| Photo Format | JPG |
| Video Format | AVI |
| Print Technology | ZINK (zero ink) with paper rolls |
| Print Paper | ZINK paper rolls (3 rolls included) |
| Power Source | Rechargeable battery via USB cable |
| Fill Light | Yes (LED) |
| Selfie Mirror | Yes |
| Games | Tetris, Sokoban, Power Pinball, Gluttonous Snake |
| MP3 Playback | Yes (via microSD card) |
| Connectivity | USB 2.0 |
| Safety Features | Do not look at fill light; use Class 10 SD card |
| What's in the Box | Camera, USB cable, 3 ZINK paper rolls, user manual |
Frequently Asked Questions - KAKIDCIPPLA Kogan
User questions about KAKIDCIPPLA Kogan
0 question about this device. Answer the ones you know or ask your own.
Ask a new question about this device
Download the instructions for your Camera in PDF format for free! Find your manual KAKIDCIPPLA - Kogan and take your electronic device back in hand. On this page are published all the documents necessary for the use of your device. KAKIDCIPPLA by Kogan.
USER MANUAL KAKIDCIPPLA Kogan
(PURPLE, WITH 3 ROLLS)
KAKIDCIPPLA
SAFETY & WARNINGS
- It is recommended to use a high quality, class 10 micro-SD card (max. 32GB, FAT32 format).
- Do not loosen or unplug the USB cable when downloading files from the camera.
- Do not use the camera when it is charging.
- Do not look into the camera fill light when it is turned on as this can damage your eyes.
- If the camera does not print, check that the paper is installed correctly, and the camera is in print mode.
OVERVIEW
Camera Interface


OPERATION
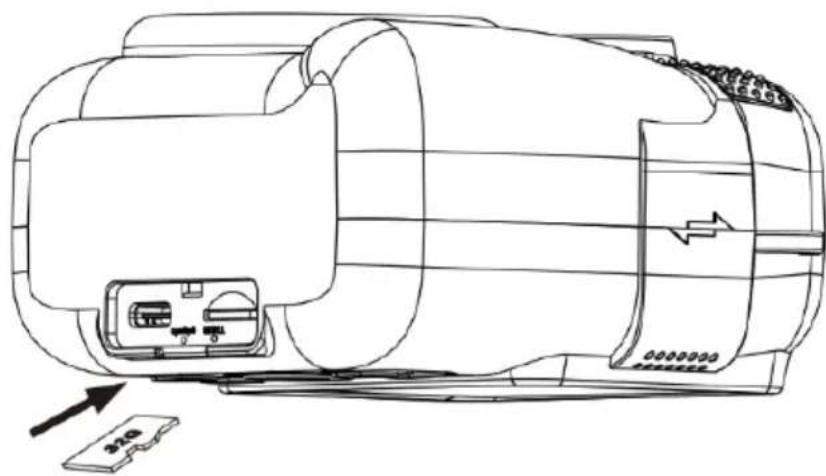
Inserting the SD Card
- Insert the SD card to record and store your videos and photos.
- When the battery is low, files stored on the SD card will not be erased.
-
Follow the steps below to correctly install the SD card:
-
Open the SD card slot cover.
- Ensure that the metal contacts are inserted first and push the SD card down into the slot until you hear an audible click. The SD card can only be inserted in one way. Do not force the card in if it will not go in smoothly.
- Close the SD card slot cover.
- To remove the SD card, push the SD card in and it will eject out.
natural_image
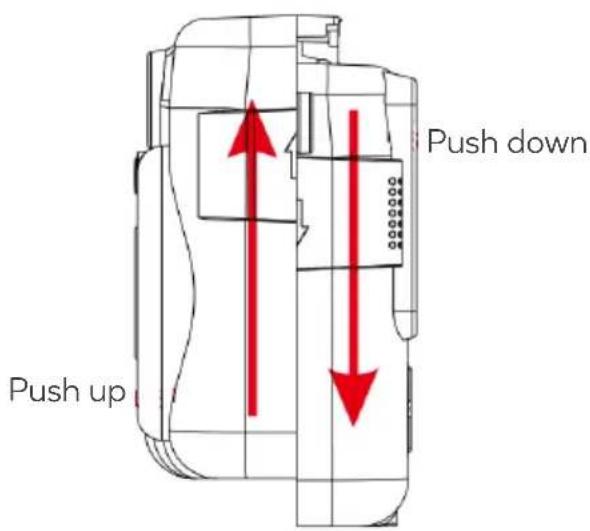
Technical line drawing of a cylindrical device with internal components and an external connector (no text or symbols)Installing the Print Paper
- Push the back of the camera (screen side) down and push the front (lens side) up to open the paper slot.
- Place the paper into the slot in the direction shown below.
- Push the back of the camera (screen side) up and push the front (lens side) down to reconnect the two parts of the camera. Ensure the end of the paper is coming through the paper slot.

natural_image
Technical line drawing of a mechanical device with a red arrow pointing to a component (no text or symbols present)Note:
Pay attention to the direction of the paper during installation. The picture will not print correctly if the paper is placed in the wrong direction.
Power On/Off
- Press and hold 📁 to power on/off.
- If the camera cannot be powered on, charge the camera for at least 30 minutes, and then power on.
- If the camera is frozen (due to wrong operation), put a pin into the reset slot to restart the camera.

Printing
Photo Mode
Press OK in Photo mode to turn on Print mode. The printer icon will illuminate in the top right corner of the screen. The camera will automatically print when a photo is taken.
Playback Mode
- Press OK in Playback mode to turn on Print mode. The printer icon will illuminate in the top right corner of the screen.
- Press Ⓞ to print the photo.
Notes:
- Choose a suitable print density and print mode for your situation in the Settings.
- If the photo doesn't print, check that the print paper is installed correctly.
Menu
- The camera will enter the main menu when powered on.
- Press △▽ to select a mode.
- Press OK to enter the selected mode.
- Press 🔍 to go back to the main menu.

Photo

Video

MP3

Playback

Games

Settings

Photo Mode
- Press △▽ to select a photo mode, photo frame, filter effect and special effect.
- Press and hold OK to turn the fill light on/off.
- Press and hold △ to zoom in.
- Press and hold ▼ to zoom out.
- Press OK to turn print mode on/off.
- Press Ⓞ to take a photo.
- Press 📁 to go back to the main menu.

Video Mode
- Press △▽ to change filters.
- Press 📷 to start/end taking a video.
- Press and hold OK to turn the fill light on/off.
- Press 📄 to go back to the main menu.
Tips for Photo Mode and Video Mode
- When taking a selfie, check the frame in the selfie mirror to judge whether you are in the correct position.
- The fill light can only be turned on/off in Photo and Video mode.
- Do not look into the camera fill light when it is turned on as this can damage your eyes.

MP3 Mode
- Press Ⓞ to open the music list window.
- Press △▽ to select a song.
- Press OK to play the selected song.
- Press Ⓜ to exit the Music List Window.
- After exiting the music list window, press △▽ to switch songs and press OK to play/pause music.
- Insert a SD card to download music in an MP3 folder in MP3 format.

Playback Mode
- Press △▽ to view videos and photos.
- Press OK to start or stop playing the video.
- Press and hold OK to enter the Delete window. Press △▽ to select OK/cancel, then press to confirm.
- To enter Print mode, press OK when viewing the photo and press 📂 to print.
• Video format: AVI:
• Photo format: JPG.

Game Mode
- Press △▽ to select a game and press OK to enter the selected game.
• 4 Games: Tetris/ Sokoban/ Power Pinball/ Gluttonous Snake. - Press 📷 to move left.
- Press OK to move right.
- Press △ to move upward or rotate in Tetris.
- Press ▼ to move downward.
- Press 📂 to exit the game and go back to the menu.

Settings
- Press △▽ to select a setting, press OK to enter the selected setting and press 🔊 to go back to the Settings menu.

natural_image
Purple square icon with a white laptop screen symbol (no text or numbers)
natural_image
Icon of a green file storage icon with 'SD' text, no additional symbols or text present.


- Press △▽ to select different configurations and press OK to confirm.
- Press △ to turn the volume up/down and press OK to confirm.
- Press Ⓜ to switch between year/month/day/hour etc. Press △▽ to adjust the value and press OK to confirm and exit.
- Press OK to enter the Version menu to check the camera version.

Connect to a Computer
- Ensure the SD card is compatible with this camera.
- Connect one end of the provided USB cable to the camera, and the other end to the USB port on the computer.
- When there is an SD card in the camera, the 📄 icon will illuminate on the camera screen when the computer has detected the SD card.
- If there is no SD card in the camera, the 🎩 icon will illuminate on the camera screen when the computer has detected the camera.
- When you open the SD card on the computer, there will be 3 folders:

VIDEO Videos you take will be stored here.

PHOTO Photos you take will be stored here.

MP3
Copy songs (MP3 format) to this folder to play them from the camera.
Disposal

This marking indicates that this appliance should not be disposed with other household wastes. To prevent possible harm to the environment or human health from uncontrolled waste disposal, recycle it responsibly to promote the sustainable reuse of material resources.
NOTES
Need more information?
We hope that this user guide has given you the assistance needed for a simple set-up.
For the most up-to-date guide for your product, as well as any additional assistance you may require, head online to help.kogan.com
kogan.com


Brand : Kogan
Model : KAKIDCIPPLA
Category : Camera