KABBCM1C1DA - Tracker pour enfant Kogan - Free user manual and instructions
Find the device manual for free KABBCM1C1DA Kogan in PDF.

User questions about KABBCM1C1DA Kogan
0 question about this device. Answer the ones you know or ask your own.
Ask a new question about this device
Download the instructions for your Tracker pour enfant in PDF format for free! Find your manual KABBCM1C1DA - Kogan and take your electronic device back in hand. On this page are published all the documents necessary for the use of your device. KABBCM1C1DA by Kogan.
USER MANUAL KABBCM1C1DA Kogan
natural_image
Line drawing of a stylized robot head with circular design and antenna (no text or symbols)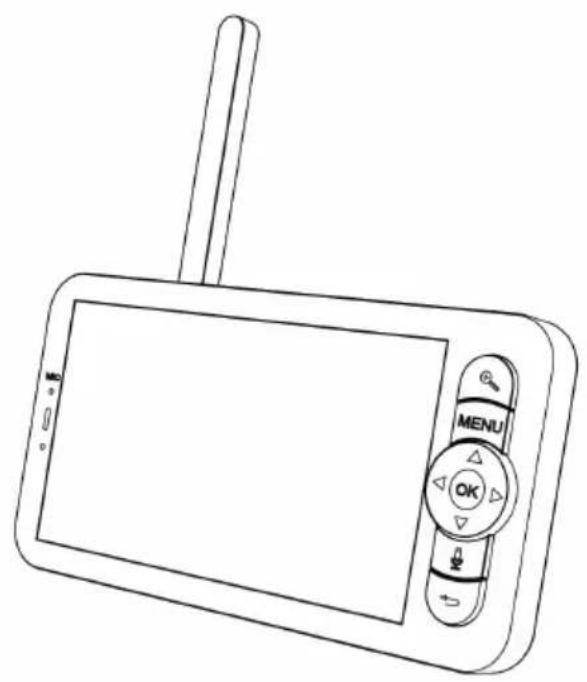
natural_image
Line drawing of a handheld electronic device with a screen and control buttons (no text or symbols)KOGAN SMARTERHOME™ PAN & TILT SMART BABY MONITOR
(CAMERA & DISPLAY)
KABBCM1C1DA
Components 3
Overview 4
Installation 7
Connect to SmarterHome™ App 9
Google Home Control 12
Amazon Alexa Control 15
Operation 18
FAQ 26
Notes 27
COMPONENTS

natural_image
Line drawing of a stylized robot or device with circular head and antenna (no text or symbols)Camera Monitor

natural_image
Line drawing of a handheld electronic device with a screen and antenna (no text or symbols)
Power adapter (x1)

natural_image
Line drawing of a cable with two connectors (no text or symbols)USB Cable (x2)
natural_image
Simple line drawing of a screw and nut on a flat surface (no text or symbols)Mounting hardware Bracket

text_image
UP

natural_image
Simple line drawing of a rectangular sheet or panel (no text or symbols)User Guide Reset pin
Camera
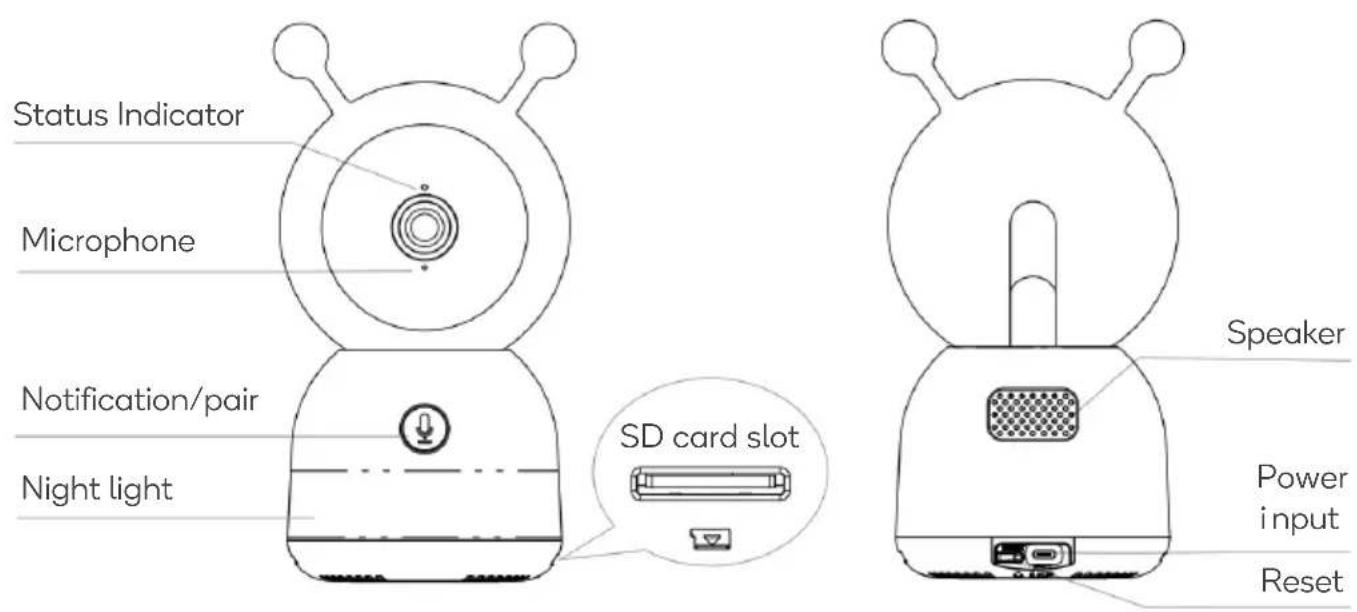
text_image
Status Indicator Microphone Notification/pair Night light SD card slot Speaker Power input ResetPower DC 5V/1A
Microphone Captures sound for your video
SD card slot Support local SD Card storage (Max.128G)
Solid RED: network is malfunctional
Status indicator Flashing RED: ready for network connection (fast blinking)
Solid BLUE: camera is working correctly
Notification/Pair Pressing this button will send a pop-up notification to your linked smartphone. Long press to pair with the monitor.
Reset Press and hold for 5 seconds to reset the camera (if you have modified settings, they will return to factory defaults) and place it in Wi-Fi pairing mode
Display

text_image
Microphone Charging indicator Status indicator MIC Menu OK Call Back Zoom Directional buttons Menu OK
text_image
Antenna Power button Speaker Kickstand SD card slot Reset Power inputPower DC 5V/1A
Charging indicator
Solid ORANGE: Charging
Solid GREEN: Fully charged
Status indicator
Solid YELOW: The monitor is on
Off: The monitor is Off
| Microphone | Captures sound for your video |
| Antenna | Adjust the angle to improve signal |
| Power button | Press and hold for 5 seconds to turn the monitor ON/OFF |
| Zoom button | Press this button to cycle through zoom options (x1, x2 & x4) |
| Menu button | Press to bring up the menuLong press to bring the settings menus |
| Directional buttons | Control the camera/navigate the menus |
| OK Confirm | |
| Call | Press to talk to your baby through the camera |
| SD card slot | Support local SD Card storage (Max.128G) |
| Reset | Press with pin to reset the monitor |
| Back | Press to return to previous menuOn the home screen, long press to stop playing music |
INSTALLATION
Connection preparation
Bring the camera and your phone within 30 - 100cm of the router.

Insert the microSD card
Insert a microSD card (not supplied) into the SD card slots on both the camera and the monitor.
Camera Power Connection
- Connect the USB cable to the power input port on the camera and connect the other end into the power adapter.
- Plug the power adapter into an electrical outlet and turn it on, the status indicator will turn blue.
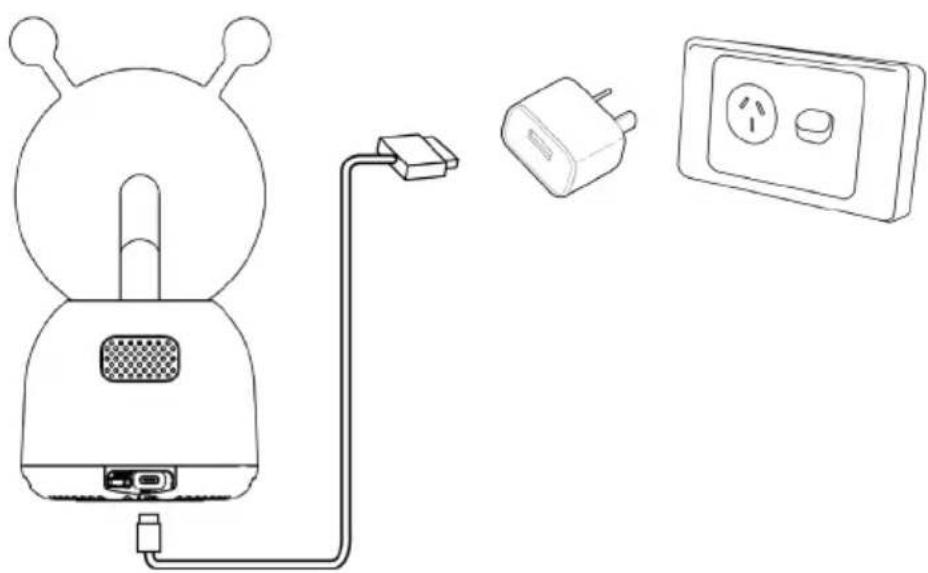
natural_image
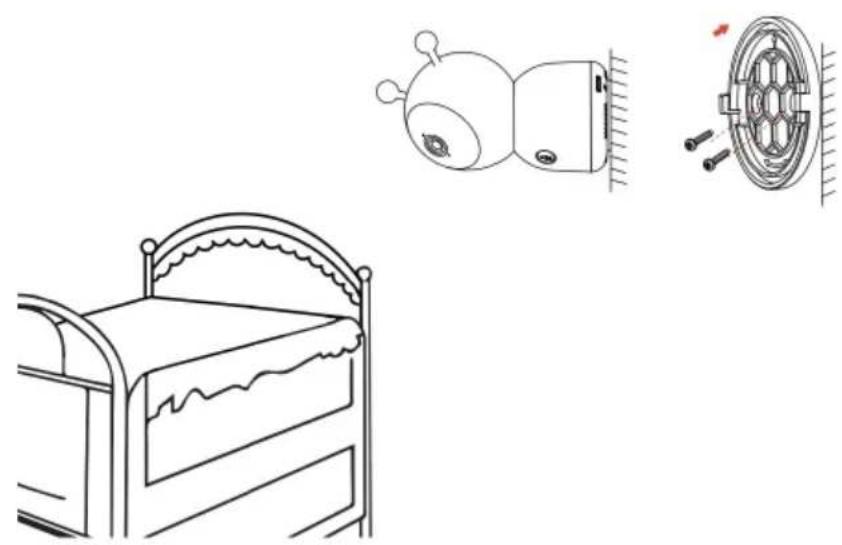
Line drawing of a cartoon character connected to a plug, with an open electrical outlet nearby (no text or symbols)Mounting to wall/ceiling (masonry):
- Drill pilot holes and insert the supplied wall anchors first.
- Place the bracket against the surface, in line with the wall anchors, and secure it in place with the supplied screws.
- Attach the camera to the bracket.
Mounting to wall/ceiling (timber / dry wall):
- If not drilling into timber studs, drill pilot holes and insert the supplied wall anchors first
- Place the bracket against the surface, in line with the wall anchors (if used) and secure it in place with the supplied screws.
- Attach the camera to the bracket.
natural_image
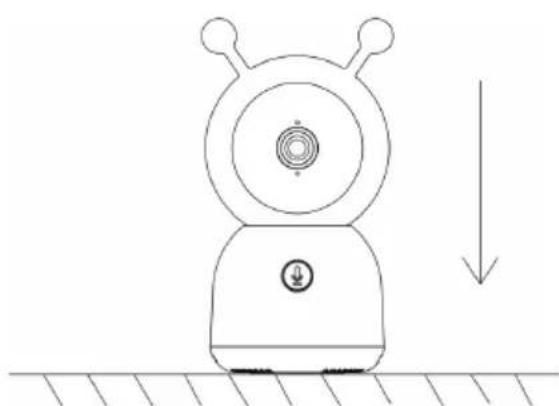
Line drawings of a bed, a small device with a bulb, and a wheel rim (no text or symbols)Alternatively, the camera can be placed on a clean, horizontal, flat surface.
natural_image
Simple line drawing of a snail-like robot with a circular head and antenna, connected to ground (no text or symbols)CONNECT TO SMARTERHOME™ APP
Install App
Download the “Kogan SmarterHome” app from the Play Store (Android) or App Store (iOS).

text_image
QR code image containing encoded data, no visible human-readable textPlay Store (Android)


text_image
QR code image containing encoded data, no visible human-readable textApp Store (iOS)

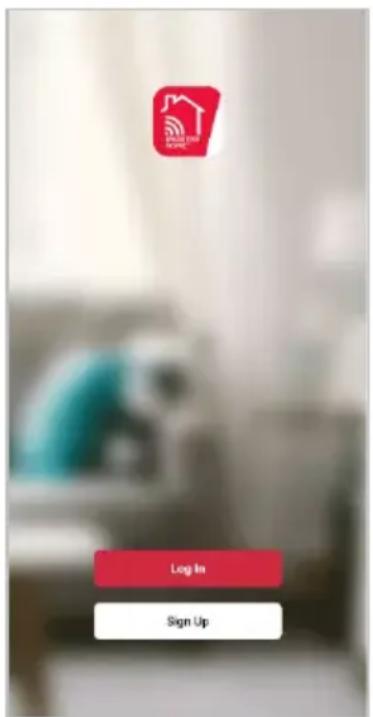
To register:
- If you already have a SmarterHome account, select 'Log In'. To register a new account, select 'Sign Up'.
- The system will automatically recognise your country. If needed, you can manually select your country from the drop-down box. Enter your email address and tap 'Get Verification Code' to continue.
- A 6-digit code will be sent to the submitted email address. Enter this code before the one-minute timer expires.
- Continue to the next page and complete your SmarterHome profile.
text_image
Log In Sign Up
text_image
Register Australia Email Address
text_image
Enter Verification Code ! A verification code has been sent to your email! Didn't get a code?Set device in pairing mode
When the device is first turned on, it may automatically enter pairing mode (prompt tone will be heard and the indicator will be rapidly flashing red).
If not automatically in pairing mode when powered on, you can manually set the device in pairing mode by pressing and holding the reset button for 5 seconds until a prompt tone is heard and the indicator begins rapidly flashing red.
Add device through network
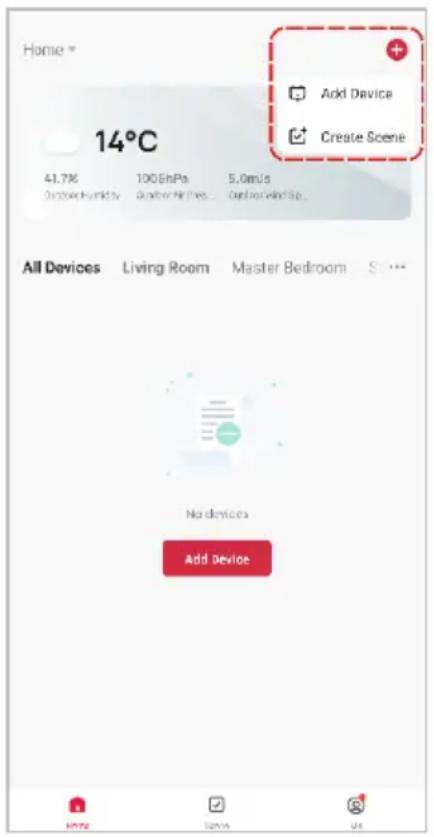
- Once registered, tap "Add Device" on the app's home page, or the "+" in the upper right corner, to add a new device through the network.
- Select the product type from the list of options in the app (Home Security > Baby Monitor).
- Ensure that the device is in pairing mode, with the prompt heard and light flashing, and tap "Next".
- Enter your Wi-Fi details. It is important that your SmarterHome™ device and the app are connected to the same Wi-Fi network during setup.
text_image
Home * 14°C 41.7% Discover Humidity 100.6hPa Quarter Air Lines... 5.0m/s Order Wind/Sp... Add Device Create Scene All Devices Living Room Master Bedroom S ... No devices Add Device
text_image
Add Device Lighting Electrical Home Security Heating & Cooling Air Treatment Cleaning Appliances Kitchen Appliances Other Temp & Humidity Sensor (Blu...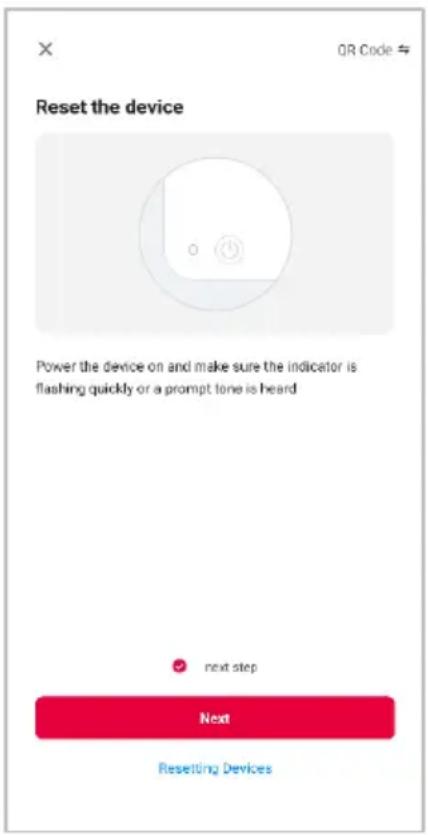
text_image
OR Code # Reset the device Power the device on and make sure the indicator is flashing quickly or a prompt tone is heard ✓ next step Next Resetting DevicesNotes:
• The device and the app have to use the same Wi-Fi network.
• The device is only compatible with 2.4Ghz networks.
• Depending on the product, Steps 3 and 4 may be in opposite order.
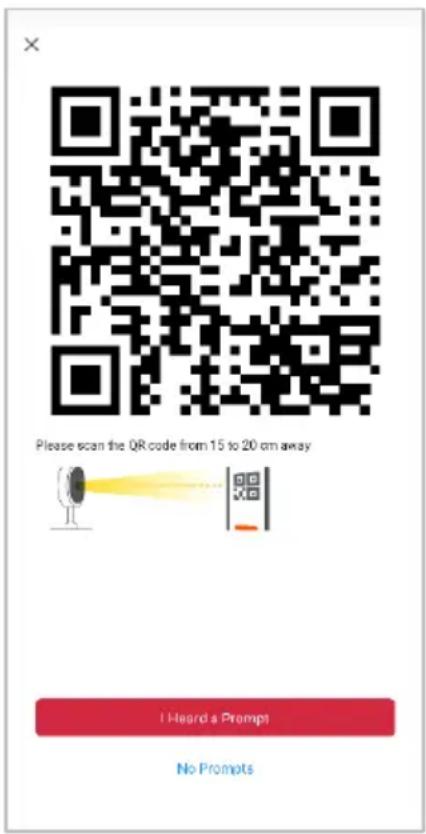
- Calibrate the smart camera by holding your smartphone 15-20cm away from the camera lens until it successfully scans the QR code shown on the following screen of the setup. The device will make a prompt sound to confirm, click "I heard a prompt" to proceed to the next screen.
- The device will commence the pairing process and connect to the app. Ensure your Wi-Fi router, mobile phone, and the SmarterHome™ device are kept close until connection is complete.
- After successfully being added, you will have the option to rename the device and assign it to a location. It will now be listed on the app's home page. Tap the device listing to enter its control page.
text_image
Please scan the QR code from 15 to 20 cm away I Heard a Prompt No Prompts
text_image
Cancel Adding device... Ensure that the Wi-Fi signal is good. 01:56 Scan devices Register users Users Wireless Devices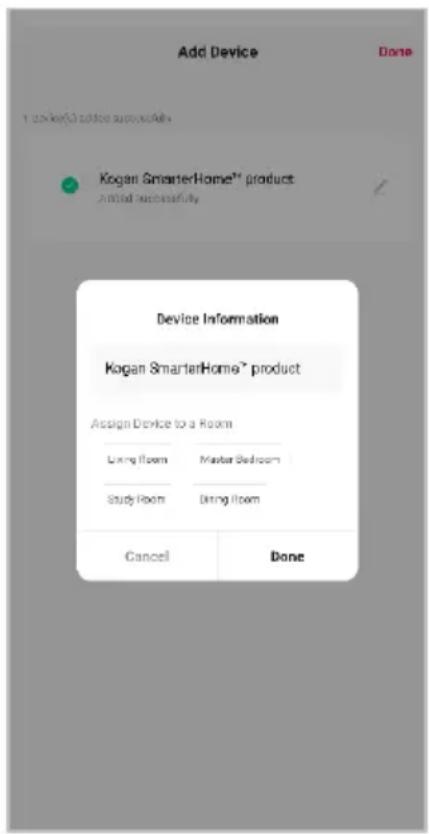
text_image
Add Device Done 1 order(s) added successfully Kogan SmarterHome™ product Initial successfully Device Information Kogan SmarterHome™ product Assign Device to a Room Living Room Master Bedroom Study Room Diring Room Cancel DoneNote:
Once connected, you can select Create Scene from the “+” in the upper right corner (or from the Scene tab) to group connected SmarterHome™ products and automate their functions.
GOOGLE HOME CONTROL
Note:
You will need to have set up a Google Home account prior to linking your Kogan SmarterHome™ device.
Adding "SmarterHome" to the Google Home app
- From the home page of the Google Home app, select the “+” icon (top left corner, see arrow in the below screenshot) to access the ‘Add and manage’ page.
- Select 'Set up device', then select the 'Works with Google' option.
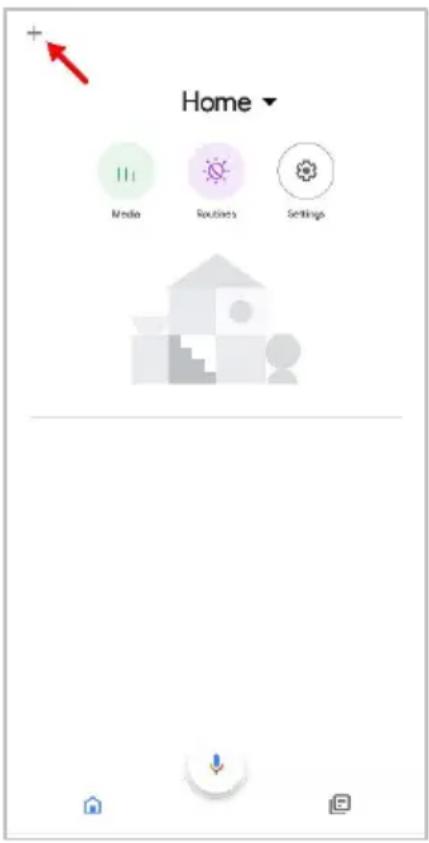
text_image
Home Media Routes Settings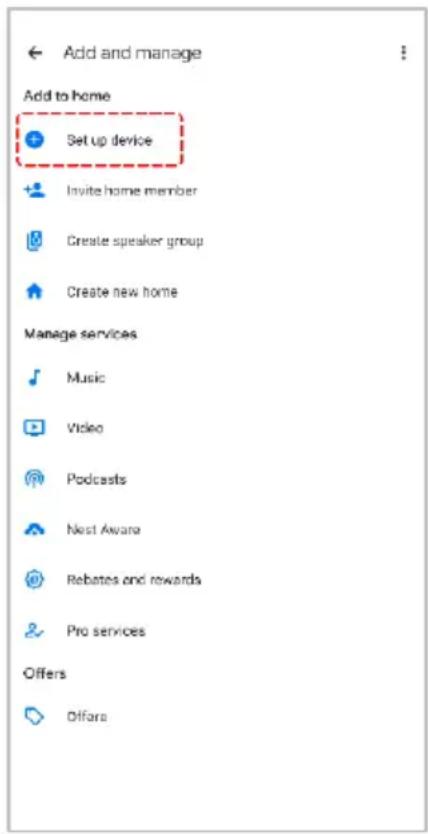
text_image
Add and manage Add to home Set up device Invite home member Create speaker group Create new home Manage services Music Video Podcasts Nest Aware Rebates and rewards Pro services Offers Difara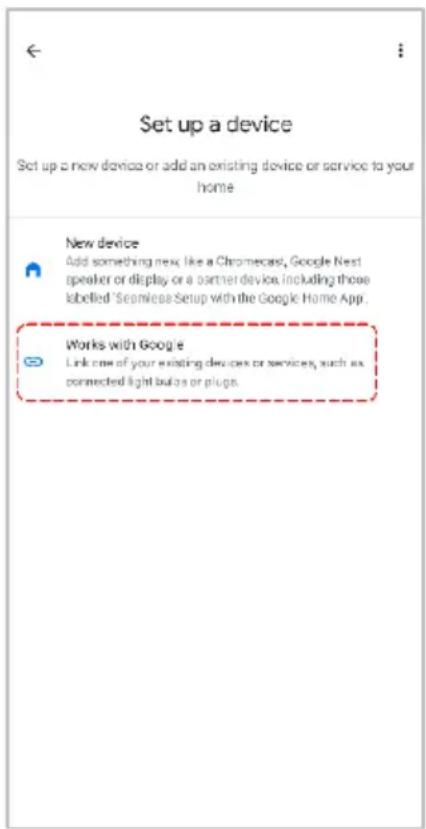
text_image
Set up a device Set up a new device or add an existing device or service to your home New device Add something new, like a Chromecast, Google Nest speaker or display or a partner device, including those labelled 'Seamless Setup with the Google Home App. Works with Google Link one of your existing devices or services, such as connected light buttons or plugs.- Select the search bar and type 'Smarter Home' to locate the Kogan SmarterHome™ service.
- From here, you will be prompted to sign into your SmarterHome™ account using either your email or mobile phone number, depending on which method you used to register your account.
- Select "Kogan SmarterHome™" from the app options.

text_image
smarter home Add new Smarter Home homes home homeless 1 2 3 4 5 6 7 8 9 0 q w e r t y u i o p a s d f g h j k l z x c v b n m 123 ,
text_image
Link an account to control Smarter Home on any device This link will be available on devices or services where you're signed in to your Google Account. You can change this link in your Google Account. Cancel Continue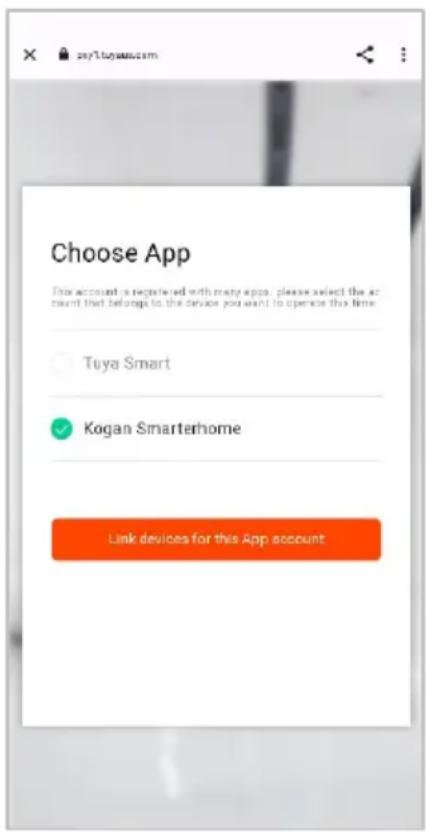
text_image
Choose App This account is registered with many apps, please select the account that belongs to the device you want to open this time. Tuya Smart Kogan Smarterhome Link devices for this App account- Tap 'Authorise' to grant Google permission to access the SmarterHome™ app and your devices.
- Once connected, the app will display any compatible devices linked to your SmarterHome™ account. From here you can assign them to rooms and set up any routines. Tap on any of the devices to view a list of available commands.

text_image
By signing in, you are authorizing Google to control your devices. Authorize You can make permission at any time.
text_image
Add smart home devices Select devices and add to a room Devices connected within the SmarterHome™ app will appear here if compatibleNote:
Please note that Google Home can only control the base/core functions of any compatible SmarterHome™ devices. To make full use of this product's smart functionality, please use the Kogan SmarterHome™ app.
AMAZON ALEXA CONTROL
Note:
You will need to have set up an Alexa account prior to linking your Kogan SmarterHome™ device.
Adding "SmarterHome" to the Alexa app
- From the home page of the Alexa app, select the “=” icon in the bottom-right and select “Skills & Games” from the sidebar.
- Select the search bar and type 'Smarter Home' to locate the Kogan SmarterHome™ skill.

text_image
Tops to talk to "Alexa" Link Music Services Stream your favorite music and more Create this routine "Strong your right" can turn off all your rights Start a Shopping List Add shopping items and share the list Add an alarm Set up daily alarm will be alarming Create a reminder Remember things at a time or place Start a timer Alexa can notify you after a set amount of time Alexa, announce I love you Tell that special person how you feel with Announcements
text_image
Add a Device Lists & Notes Reminders Alarms & Timers Routines Skills & Games See More Settings Activity Help & Feedback
text_image
SEARCH Search Keyword or skill name Kogan smarterhome Sort: Relevance Smarter Home "Aloxa, dim the bedroom light to 50%." Smart Home smarterhome 1 2 3 4 5 6 7 8 9 0 q w e r t y u i o p @ # & * - + = ( ) a s d f g h j k l - s : : : / z x c v b n m 123 !- Tap 'Enable to Use' to add the Kogan SmarterHome™ skill to Alexa.
- From here, you will be prompted to sign into your SmarterHome™ account using either your email or mobile phone number, depending on which method you used to register your account.
- Select "Kogan SmarterHome™" from the app options.

text_image
SMARTER HOME Smarter Home Kogan.com Rated Guidance Supplement ENABLE TO USE Account linking required If you have any problem when you use this skill, you can contact us with email: app-feedback@kogan.com.au You can simply ask Alexa to turn on, turn off or dim the light. There's no need to go to the switch to adjust you home light - Ju... See More Start By Saying "Alexa, set bedroom light to cool white." "Alexa, dim the bedroom light to 50%." "Alexa, turn on my livingroom heater." English (AU) About Note Smart Home This skill may share device information with Amazon Learn more. Rated Guidance Suggested This skill contains dynamic content I like Developer Privacy Policy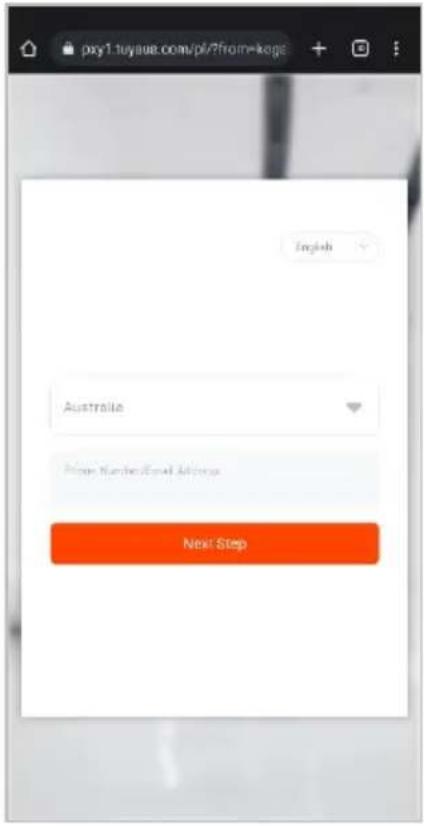
text_image
pxy1.tuyase.com/pl/?from=kega English Australia Price Number/Email Address Next Step
text_image
pxy1.tuyous.com/pl/select?from Choose App This account is registered with many apps, please select the account that belongs to the device you want to operate this time. Tuya Smart Kogan Smarterhome Link devices for this App account-
Tap 'Authorise' to grant Alexa permission to access the SmarterHome™ app and your devices.
-
Once connected, the app will perform a search and display the devices linked to your SmarterHome™ account. When your devices have successfully connected to the Alexa app, you will be able to control your Kogan SmarterHome™ devices via Alexa's voice commands.

text_image
Alexo by Amazon will be able to Receive your public profile Control your devices over internet Authorize You can receive permission at any time.
text_image
ACCOUNT LINKING Your Smarter Home account has been successfully linked. What to do next: Close this window to discover smart home devices you can control with Alexa. CLOSENote:
Please note that Alexa can only control the base/core functions of any compatible SmarterHome™ devices. To make full use of this product's smart functionality, please use the Kogan SmarterHome™ app.
OPERATION
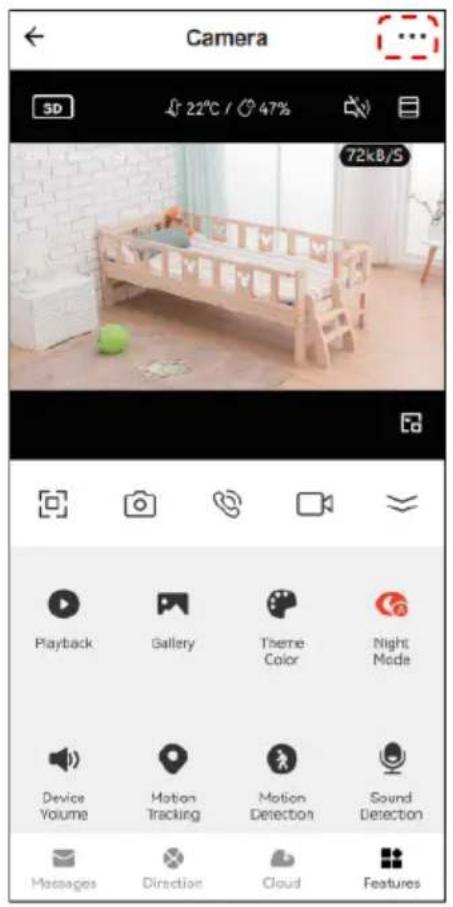
In the SmarterHome™ App Camera's interface, click "..." in the upper right corner to access the camera's settings
Press the down arrow to view all the camera settings.
text_image
Camera 5D 22°C / 47% 72kB/S Playback Gallery Theme Color Night Mode Device Volume Motion Tracking Motion Detection Sound Detection Messages Direction Cloud Features
text_image
Camera 50 21°C / 47% 72kB/S Device Volume Motion Tracking Motion Detection Sound Detection Light Lollaby Edit Messages Direction Cloud Features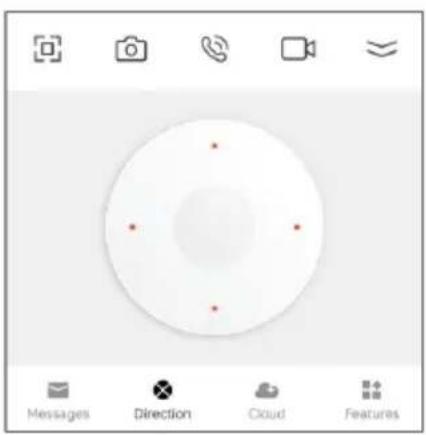
text_image
Messages Direction Cloud FeaturesDirection: Move the camera

text_image
Playback control babies music 10Lullaby: Select music to sooth your baby
text_image
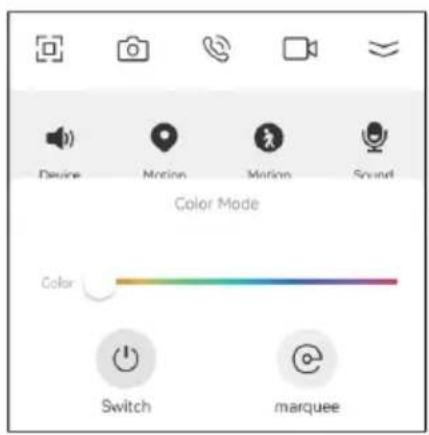
Device Motion Motion Sound Color Mode Color Switch marqueeLight: Toggle night light on/off and adjust the light settings
Pan/Tilt
Rotate the camera by sliding your finger on your smartphone's screen allowing you to have a greater field of vision. Alternatively, tapping "Direction" will bring up the directional pad.
Video Flip
If you've mounted the camera upside down, open the camera settings and select "Basic Function Settings Flip Screen" to flip the camera's feed 180^ .
Motion Detection
Smart motion detection will send push notifications to your smartphone when movement is detected.
Sound Detection
The camera can detect sounds such a crying baby and will send push notifications to your smartphone. The sensitivity of the audio detection can be adjusted in the setting menu.
Temperature & Humidity Detection
The camera can detect the temperature and humidity of the environment. These values can be monitored using the app.
Record
This function allows 24-hour continuous recording using high-capacity microSD card storage (max. 128GB).
Screenshot
Saves a screenshot of the current video feed to the microSD card.
Day & Night
Never miss a moment, even in complete darkness, with powerful night-vision technology.

natural_image
Modern living room interior with sofa, coffee table, lamp, and wall art (no visible text or symbols)Daytime

natural_image
Interior view of a modern living room with sofa, coffee table, lamp, and wall art (no visible text or symbols)Night
Auto-connect the Camera and Monitor
- Ensure the Camera is powered on (indicator is blue).
- Press and hold the power button on the monitor for 5 seconds. The monitor will turn on and the status (status indicator is yellow). To turn the monitor off, press and hold the power button for 5 seconds.
- The camera and monitor will automatically connect when they are first powered on.
- If the connection fails, follow the steps below to manually pair the camera and monitor. Ensure the distance between the camera and the monitor is no more than 200m.
Manually Connect the Camera and Monitor
- Press Menu button on the monitor screen and select ⚙ > Camera.
- Select from either Camera 1 or Camera 2.
- Press the OK button on the monitor to start pairing.
-
To pair a second camera, repeat step 2 - 4.
-
Long press the Notification/pair button on the camera until you hear the prompt tone.
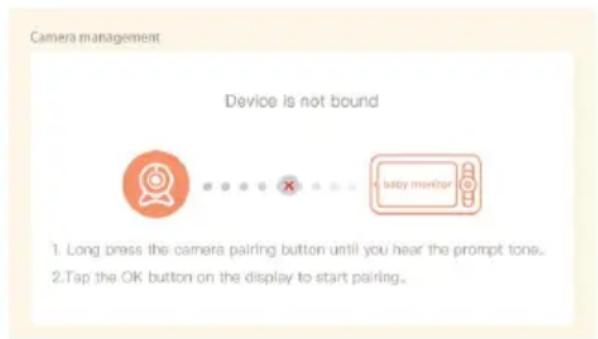
text_image
Camera management Device is not bound 1. Long press the camera pairing button until you hear the prompt tone. 2. Tap the OK button on the display to start pairing.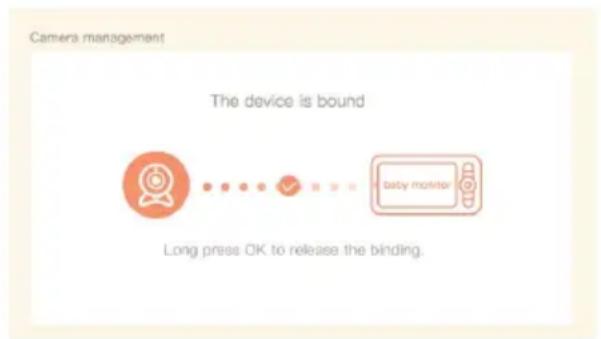
flowchart
graph LR
    A["Camera management"] --> B{The device is bound}
    B --> C["Long press OK to release the binding."]
    C --> D["Next step: baby monitor"]
Notes:
- If you have paired 2 cameras, the monitor screen will display 2 live views at the same time.
- If you want to set parameters or enable functions of one of the cameras, you need to select the camera first.
Disconnect the Monitor and Camera
- Press the Menu button on the monitor screen and select ⚙ > Camera.
- Select Camera 1 or Camera 2.
- Long press OK button to disconnect the camera from the monitor.
Camera Selection (2 Cameras Connected)
If you have two cameras connected to your monitor, if you want to change the settings or enable functions of one of the cameras, you first need to select it.
- To select a camera, on home screen, press the left/right directional buttons to switch between Camera 1 and Camera 2.
- The selected camera will have a camera icon in the upper left corner of the feed and the settings icon will display either a "1" or "2" respectively.

natural_image
Two side-by-side photos of a smiling baby sitting on a bed, captured in two different angles (no text or symbols visible)
natural_image
Two identical photos of a smiling baby sitting on a white surface, captured in a split semi-circle (no text or symbols visible)
natural_image
Two identical photos of a smiling baby sitting on a white pillow, with UI icons and camera settings visible (no readable text or symbols)
natural_image
Two identical photos of a smiling baby sitting on a bed, with UI icons and camera settings visible (no text or symbols in the image itself)Full Screen Mode
By default, both camera feeds will be displayed on the monitor, in split screen mode.
To view one camera feed in full screen:
- Select the desired camera and press the OK button on the monitor to enter full screen.
- Press the “+” button to zoom in and zoom out.

Capturing Photo & Video
Photo: To capture a photo, press the Menu button, select “ ” and then press OK. The photo will be saved to the SD Card.
Video: To record the video feed, press the Menu button, select “ ” and press OK to record.
View Captured Photo & Video
- Press Menu button on the monitor, select " " and press OK.
- Select the camera and date and then select the photo or video you wish to view.
- Press OK to enter preview mode. For video, press OK to play/pause while in preview mode.
- Press the Back button to exit the preview and again to return to home screen.
Play Music
You can play music to help sooth your baby.
- Press the Menu button, select and press OK to enter.
- Use the directional buttons to select the music, change the repeat mode and adjust the music volume.
Feeding Reminder
The feeding reminder on the baby monitor helps caregivers stay on schedule by providing timely notifications for feeding the baby.
- Press Menu button and select ⚙ > Feeding Reminder.
-
Use the directional buttons to setup up to 10 reminders and press OK to confirm.
-
Use the UP or DOWN directional buttons to toggle the saved feeding reminder ON/OFF.
-
When the feeding time arrives, a feeding alarm will be displayed on the monitor screen.
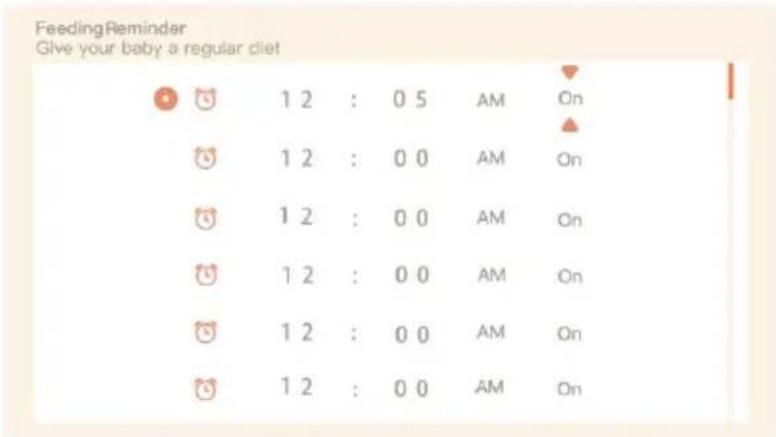
text_image
Feeding Reminder Give your baby a regular diet 1 2 : 0 5 AM On 1 2 : 0 0 AM On 1 2 : 0 0 AM On 1 2 : 0 0 AM On 1 2 : 0 0 AM On 1 2 : 0 0 AM OnNight Light
The night light feature on the baby monitor can be used to create a comforting environment for the baby during night-time.
-
Press Menu button on the monitor screen and select “💡” > Open or press the Menu button and select ⚙️ > Camera Light > Night light.
-
Use the directional buttons to turn the Smart Night Light ON/OFF, select the Lighting Mode and adjust the colour of the night light.

flowchart
graph TD
    A["Lighting management"] --> B["Status Light"]
    A --> C["Night Light"]
    D["Smart Night Light"] --> E["Lighting Mode"]
    F["Off"] --> G["Ligth Always"]
    H["Image Settings"] --> I["Red Target Icon"]
Temperature & Humidity Detection
You can monitor the real-time temperature and humidity of your baby's room and receive alarms when they exceed the set range, allowing you to take necessary measures.
- Press the Menu button on the monitor and select ⚙ > Temperature and humidity and navigate to the desired settings.
- Use the directional buttons to set the desired temperature and humidity ranges.
- Enable the "Out of Range Reminder" to receive alarms when the set ranges are exceeded.
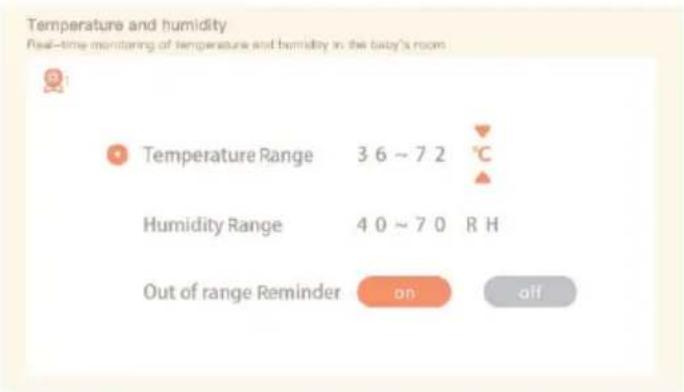
text_image
Temperature and humidity Real-time monitoring of temperature and humidity in the baby's room Temperature Range 3 6 ~ 7 2 °C Humidity Range 4 0 ~ 7 0 R H Out of range Reminder on offSmart Care
The baby monitor is equipped with motion detection, noise detection, and cry detection features, allowing you to promptly monitor your baby's status, even when you're sleeping, working, cooking, and more.
- Press the Menu button on the monitor screen and select > Smart Care.
- Use the directional buttons to select the desired option (motion detection, noise detection, cry detection and alarm volume) and press OK to save.
- Use the LEFT and RIGHT buttons to change options and the UP and DOWN direction buttons to adjust the sensitivity levels.
- Use LEFT and RIGHT buttons to adjust the alarm volume level.
- An alarm will sound when a detection is triggered, press OK to stop the alarm.
General Settings
Brightness:
- Press the Menu button, select 🔍 and press OK to enter the interface.
- Use the UP and DOWN directional buttons to adjust brightness.
Time:
- Press Menu button and select ⚙ > Date and Time.
- Use directional buttons to set the date, time and time displaying mode.
Language:
- Press Menu button and select ⚙ > Language.
- Use directional buttons to select the desired language.
Sleep mode:
This option controls the length of time before the monitor automatically turns off after no user input or notifications. The monitor will turn back on when a button is pressed or after an alarm is triggered.
- Press Menu button on the monitor and select ⚙ > Sleep Mode.
- Select between; 1, 5, 10, or 30 minutes.
Status indicator:
That status indicator on the camera can be turned off if you think it will disturb your baby. Press Menu button and select 🎨 > 🎽 Open or press the Menu button and select 🎻 > Camera Light > Status light.
SD card:
- Press the Menu button and select ⚙ > SD Card to view the total capacity and remaining capacity of your SD card.
- If desired, you can also format the SD card according to your needs. Note: Ensure to back up any important data beforehand.
Low battery:
When the monitor is low on battery, the low battery alarm will appear on the screen.
- Connect the USB cable to the power input port on the monitor and connect the other end into the power adapter.
- Plug the power adapter into an electrical outlet and turn it on, the charging indicator will turn orange.
- When the battery is fully charged the charging indicator will turn green.
FAQ
Q: Why is the monitor not displaying properly?
A: Check if the monitor is connected to the camera. If not, pair the camera and the monitor first.
Q: I cannot locate the pairing button. What should I do?
A: The pairing button is on the front of the camera. Press and hold the button for 3 seconds and follow the step-by-step instructions on the monitor. (To access the pairing interface on the monitor, press the Menu button on the monitor and select > Camera management.
Q: What should I do if the monitor screen is unresponsive and none of the buttons work?
A: Use a pin to press the reset button on the monitor, and then long-press the power button to restart it.
Q: Why is the camera or monitor unable to detect the SD card?
A: Make sure that the SD card is functioning properly and formatted in FAT32.
Q: Why am I not receiving notifications on my mobile app when the camera is connected to the monitor?
A: Please ensure that the app is running on your phone and that the relevant notification function is enabled. Also, check if message notifications and necessary permissions are enabled in your phone's system settings.
Q: Why can't I view video on the monitor after connecting the camera to the app?
A: After the camera is reset, the monitor may experience a 2-minute interruption before automatically resuming. If the video does not resume, try pairing the monitor and camera again.
NOTES
Need more information?
We hope that this user guide has given you the assistance needed for a simple set-up.
For the most up-to-date guide for your product, as well as any additional assistance you may require, head online to help.kogan.com
kogan.com