
RT-CD 18/1-2B Li - Drill EINHELL - Free user manual and instructions
Find the device manual for free RT-CD 18/1-2B Li EINHELL in PDF.


| Brand | Einhell |
| Model | RT-CD 18/1-2B Li |
| Product Type | Cordless Drill/Screwdriver |
| Battery Voltage | 18 V |
| Battery Type | Li-ion, 5 cells |
| Battery Capacity | 1500 mAh |
| Charger Input Voltage | 230 V ~ 50 Hz |
| Charger Output Voltage | 20 V DC |
| Charger Output Current | 550 mA |
| Idling Speed (Gear 1) | 0 – 320 rpm |
| Idling Speed (Gear 2) | 0 – 1350 rpm |
| Torque Settings | 1 – 32 (mechanical torque selector) |
| Drilling Mode | Yes (last step) |
| Chuck Type | Quick-change drill chuck with automatic spindle stop |
| Chuck Clamping Width | Max. 10 mm |
| Max. Screw Diameter | 6 mm |
| Weight | 1.6 kg |
| Sound Pressure Level (L_pA) | 68.9 dB(A) |
| Sound Power Level (L_WA) | 79.9 dB(A) |
| Vibration Emission (Drilling) | ≤ 2.5 m/s² |
| Forward/Reverse Rotation | Yes |
| LED Work Light | Yes (automatic) |
| Battery Capacity Indicator | Yes (3 LEDs) |
| Items Supplied | Cordless drill/screwdriver, 2 batteries, charger, operating instructions, safety instructions |
Frequently Asked Questions - RT-CD 18/1-2B Li EINHELL
User questions about RT-CD 18/1-2B Li EINHELL
0 question about this device. Answer the ones you know or ask your own.
Ask a new question about this device
Download the instructions for your Drill in PDF format for free! Find your manual RT-CD 18/1-2B Li - EINHELL and take your electronic device back in hand. On this page are published all the documents necessary for the use of your device. RT-CD 18/1-2B Li by EINHELL.
USER MANUAL RT-CD 18/1-2B Li EINHELL
Original operating instructions Cordless drill/screwdriver
Einhell®

natural_image
Silhouette of a handheld electric drill bit (no text or symbols)RT-CD 18/1-2B Li

"Caution - Read the operating instructions to reduce the risk of injury"

Wear ear-muffs.
The impact of noise can cause damage to hearing.

Wear a breathing mask.
Dust which is injurious to health can be generated when working on wood and other materials.
Never use the device to work on any materials containing asbestos!

Wear safety goggles.
Sparks generated during working or splinters, chips and dust emitted by the device can cause loss of sight.
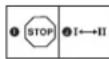
Change the gear only when the drill is at a standstill. If you fail to observe this point, the gearing may be damaged.

Store the battery only in dry rooms with an ambient temperature of +10°C to +40°C. Place only charged batteries in storage (charged at least 40%).
GB
⚠️ Important!
When using equipment, a few safety precautions must be observed to avoid injuries and damage. Please read the complete operating manual with due care. Keep this manual in a safe place, so that the information is available at all times. If you give the equipment to any other person, give them these operating instructions as well.
We accept no liability for damage or accidents which arise due to non-observance of these instructions and the safety information.
1. Safety information
Please refer to the booklet included in delivery for the safety instructions.
CAUTION!
Read all safety regulations and instructions.
Any errors made in following the safety regulations and instructions may result in an electric shock, fire and/or serious injury.
Keep all safety regulations and instructions in a safe place for future use.
2. Layout/Items supplied (Fig. 1)
2.1 Layout
- Torque selector
- Battery capacity indicator
- Changeover switch
- ON/OFF switch
- Battery pack
- Battery charger
- Selector switch for 1st/2nd gear
- Pushlock button
- Quick-change drill chuck
- LED lamp
- LED display for counter-clockwise/clockwise
2.2 Items supplied
- Open the packaging and take out the equipment with care.
- Remove the packaging material and any packaging and/or transportation braces (if available).
- Check to see if all items are supplied.
- Inspect the equipment and accessories for transport damage.
- If possible, please keep the packaging until the end of the guarantee period.
IMPORTANT
The equipment and packaging material are not toys. Do not let children play with plastic bags, foils or small parts. There is a danger of swallowing or suffocating!
- Cordless drill/screwdriver
- Battery charger
- 2 x Battery
● Original operating instructions - Safety instructions
3. Proper use
The cordless drill/screwdriver is designed for tightening and undoing screws, as well as for drilling in wood, metal and plastic.
The machine is to be used only for its prescribed purpose. Any other use is deemed to be a case of misuse. The user / operator and not the manufacturer will be liable for any damage or injuries of any kind caused as a result of this.
Please note that our equipment has not been designed for use in commercial, trade or industrial applications. Our warranty will be voided if the machine is used in commercial, trade or industrial businesses or for equivalent purposes.
4. Technical data
| Battery | 5 cells Li-ion; 1500 mAh |
| .c.d V 81ylppus egatloV | |
| Idling speed: 0-320/0-1350 rpm | |
| 1+32 :sgnittes eufq | |
| Forward and reverse rotation | yes |
| Chuck clamping width | max. 10 mm |
| Battery charging voltage | 20 V d.c. |
| Battery charging current | 550 mA |
| Mains voltage for charger | 230 V ~ 50 Hz |
| thyle | gk 6.1 |
| Max. screw diameter: | 6 mm |
The maximum screw diameter indicates the maximum diameter of the screw that can be screwed into wood. The screw diameter can vary depending on the type of wood.
Sound and vibration
Sound and vibration values were measured in accordance with EN 60745.
L_pA sound pressure level 68.9 dB(A)
K_pA Bd 3
L_WA sound power level 79.9 dB(A)
K_WA Bd 3
Wear ear-muffs.
The impact of noise can cause damage to hearing.
Total vibration values (vector sum of three directions) determined in accordance with EN 60745.
Drilling in concrete
Vibration emission value a_h ≤ 2,5 m/s ^2
K uncertainty = 1,5 m/s ^2
Screwing without hammer action
Vibration emission value a_h ≤ 2,5 m/s ^2
K uncertainty = 1,5 m/s²
Additional information for electric power tools
Warning!
The specified vibration value was established in accordance with a standardized testing method. It may change according to how the electric equipment is used and may exceed the specified value in exceptional circumstances.
The specified vibration value can be used to compare the equipment with other electric power tools.
The specified vibration value can be used for initial assessment of a harmful effect.
Keep the noise emissions and vibrations to a minimum.
- Only use appliances which are in perfect working order.
● Service and clean the appliance regularly.
● Adapt your working style to suit the appliance. - Do not overload the appliance.
● Have the appliance serviced whenever necessary. - Switch the appliance off when it is not in use.
- Wear protective gloves.
Residual risks
Even if you use this electric power tool in accordance with instructions, certain residual risks cannot be rules out. The following hazards may arise in connection with the equipment's construction and layout:
-
Lung damage if no suitable protective dust mask ytniaitresed.
-
Damage to hearing if no suitable ear protection is used.
- Health damage caused by hand-arm vibrations if the equipment is used over a prolonged period or is not properly guided and maintained.
Limit the operating time.
All stages of the operating cycle must be considered (for example, times in which the electric tools are switched off and times in which the tool is switched on but operates without load).
5. Before starting the equipment
Be sure to read the following information before you use your cordless screwdriver for the first time:
- Charge the battery pack with the charger supplied. An empty battery pack requires a charging period of approximately 3-5 hours.
- Only ever use sharp drill bits and screwdriver bits which are suitable for the purpose and in faultless condition.
- Always check for concealed electric cables and gas and water pipes when drilling and screwing in walls.
6. Operation
6.1 Charging the LI battery pack (Fig. 2-3)
- Remove the battery pack (5) from the handle, pressing the pushlock buttons (8) downwards to do so.
- Check that your mains voltage is the same as that marked on the rating plate of the battery charger. Plug the mains plug of the charger (6) into the mains socket outlet. The red and green LEDs will come on together for approximately 1 second.
- Push the battery into the battery charger. The flashing green LED will come on to indicate that the battery is being charged. When the charging process is finished, the green LED will be permanently lit. The time it takes to fully recharge an empty battery is approximately 3 to 5 hours. The temperature of the battery may rise slightly during the charging operation. This is normal. If
GB
the red LED flashes after the battery has been inserted, the battery is defective. In this case, pull out the mains plug of the charger immediately and remove the defective battery. Do not use the defective battery again. If the red LED on the charger lights up while the battery pack is inserted, the charging temperature is either too high or too low. In this case, pull out the mains plug of the charger and charge the battery in an environment in which the temperature is either warmer or colder.
If the battery pack fails to become charged, please check
● whether there is voltage at the socket-outlet
● whether there is proper contact at the charging contacts on the charger.
If the battery still fails to become charged, please return
the charger
• the battery pack
to our Customer Service Department.
To ensure that the LI battery pack provides long service you should take care to recharge it promptly. You must recharge the battery pack when you notice that the power of the cordless screwdriver drops.
6.2 Torque setting (Fig. 4 / Item 1) Important! The tool must be at a standstill when you set the torque with the setting ring.
The cordless screwdriver is fitted with a mechanical torque selector.
The torque for a specific size of screw is selected with the set-collar (1). The correct torque depends on several factors:
● on the type and hardness of material in question
● on the type and length screws used
- on the requirements needing to be met by the screwed joint.
The clutch disengages with a grating sound to indicate when the set torque is reached.
6.3 Drilling (Fig. 4 / Item 1)
For drilling purposes, move the set-collar to the last step „Drill“. In this setting the slip clutch is inactive. The maximum torque is available in drilling mode.
6.4 Forward/Reverse switch (Fig. 5 / Item 3)
With the slide switch above the On/Off switch you can select the direction of rotation of the battery-powered drill/screwdriver and secure it against being switched on accidentally. You can choose between clockwise and anticlockwise rotation. To avoid causing damage to the gearing it is advisable to change the direction of rotation only when the tool is at a standstill. The On/Off switch is blocked when the slide switch is in centre position.
6.5 On/Off switch (Fig. 5 / Item 4)
Infinitely variable speed control is possible with the On/Off switch. The further you press the switch, the higher the speed of the battery-powered drill/screwdriver.
6.6 Changing over from 1st gear to 2nd gear (Fig. 6 / Item 7)
You can work at a higher or lower speed depending on the position of the selector switch. To avoid damaging the gear unit you should only change over gears when the tool has stopped.
6.7 Battery capacity indicator (Fig. 7 - Item 2)
Press the battery capacity indicator switch (a). The battery capacity indicator (2) shows the charge status of the battery using 3 LEDs.
All 3 LEDs are lit:
The battery is fully charged.
2 LEDs are lit:
The battery has an adequate remaining charge.
1 LED is lit:
The battery is empty, recharge the battery.
6.8 LED lamp (Fig. 7 / Item 10)
The LED lamp (10) can be used in poor lighting conditions to illuminate the area where you want to drill or screw. The LED lamp (10) will be lit automatically as soon as you press the ON/OFF switch (4).
6.9 Changing the tool (Fig. 8)
Important. Set the changeover switch (3) to its centre position whenever you carry out any work (for example changing the tool, maintenance work, etc.) on the cordless screwdriver.
● The cordless screwdriver is fitted with a quick-action chuck (9) with an automatic spindle stop.
- Open the chuck (9). The chuck opening (a) must be large enough to hold the tool (drill bit or screwdriver bit).
- Select the suitable tool. Push the tool as far as
8. Disposal and recycling
GB
possible into the chuck opening (a).
● Tighten the chuck (9) and then check that the tool is secure.
6.10 Screwdriving
We recommend using self-centering screws (e.g. Torx screws, recessed head screws) designed for reliable working. Be sure to use a bit that matches the screw in shape and size. Set the torque, as described elsewhere in these operating instructions, to suit the size of screw.
6.11 LED display for clockwise/counter-clockwise operation (Figure 6/Item 11)
The LED display for counter-clockwise/clockwise (11) indicates the position of the changeover switch (3).
Green LED (11a) is lit: clockwise
Red LED (11b) is lit: counter-clockwise
The unit is supplied in packaging to prevent its being damaged in transit. This packaging is raw material and can therefore be reused or can be returned to the raw material system. The unit and its accessories are made of various types of material, such as metal and plastic. Defective components must be disposed of as special waste. Ask your dealer or your local council.
9. Storage
Store the equipment and accessories out of children's reach in a dark and dry place at above freezing temperature. The ideal storage temperature is between 5 and 30^ . Store the electric tool in its original packaging.
7. Cleaning, maintenance and ordering of spare parts
Always pull out the mains power plug before starting any cleaning work.
7.1 Cleaning
- Keep all safety devices, air vents and the motor housing free of dirt and dust as far as possible. Wipe the equipment with a clean cloth or blow it with compressed air at low pressure.
We recommend that you clean the device immediately each time you have finished using it. - Clean the equipment regularly with a moist cloth and some soft soap. Do not use cleaning agents or solvents; these could attack the plastic parts of the equipment. Ensure that no water can seep into the device.
7.2 Maintenance
There are no parts inside the equipment which require additional maintenance.
7.3 Ordering replacement parts
Please quote the following data when ordering replacement parts:
- Type of machine
• Article number of the machine - Identification number of the machine
● Replacement part number of the part required
The guarantee provided in this Guarantee Certificate is given by Einhell Australia Pty Limited ACN 134 632 858 of 6/166 Wellington Street, Collingwood, Victoria (Telephone number 1300 922 271) (Einhell Express Guarantee).
GB GUARANTEE CERTIFICATE
Dear Customer,
All of our products undergo strict quality checks. In the unlikely event that your device develops a fault, please contact our service department at the address shown on this guarantee certificate. Of course, if you would prefer to call us then we are also happy to offer our assistance under the service number printed below. Please note the following terms under which claims under the Einhell Express Guarantee can be made:
- The benefits conferred by the Einhell Express Guarantee are in addition to all rights and remedies which you may be entitled to under the Australian Consumer Law, and any other statutory rights you may have under other applicable laws. This Einhell Express Guarantee does not exclude, restrict or modify any such rights or remedies.
We do not charge you for the Einhell Express Guarantee. - Our goods come with guarantees that cannot be excluded under the Australian Consumer Law. You are entitled to a replacement or refund for a major failure and for compensation for any other reasonably foreseeable loss or damage. You are also entitled to have the goods repaired or replaced if the goods fail to be of acceptable quality and the failure does not amount to a major failure.
- The Einhell Express Guarantee only covers problems caused by material or manufacturing defects, and our liability under the Einhell Express Guarantee is limited, at our discretion, to the rectification of these defects or replacement of the product. Please note that the product has not been designed for use in commercial, trade or industrial applications. Consequently, the Einhell Express Guarantee will not apply if the product is used in commercial, trade or industrial applications or for other equivalent activities.
- The following are also excluded from the Einhell Express Guarantee: compensation for transport damage, damage caused by failure to comply with the installation/assembly instructions or damage caused by unprofessional installation, failure to comply with the operating instructions (e.g. connection to the wrong mains voltage or current type), misuse or inappropriate use (such as overloading of the product or use of non-approved tools or accessories), failure to comply with the maintenance and safety regulations, ingress of foreign bodies into the product (e.g. sand, stones or dust), effects of force or external influences (e.g. damage caused by the product being dropped) and normal wear resulting from proper operation of the product. The Einhell Express Guarantee will also not apply if any attempt is made to tamper with the product.
- The Einhell Express Guarantee is valid for a period of 2 years starting from the purchase date of the product. Claims made under the Einhell Express Guarantee should be submitted before the end of this guarantee period and within two weeks of the defect being noticed. No claims under the Einhell Express Guarantee will be accepted if submitted after the end of this guarantee period. The original guarantee period remains applicable to the device even if repairs are carried out or parts are replaced. In such cases, the work performed or parts fitted will not result in an extension of the guarantee period for the Einhell Express Guarantee, and the Einhell Express Guarantee will not apply for the work performed or parts fitted. This also applies when an on-site service is used.
- To make a claim under the Einhell Express Guarantee, please send the relevant product postage-free to the address shown below and enclose either the original or a copy of your sales receipt or another dated proof of purchase. It would help us if you could describe the nature of the problem in as much detail as possible. If the defect is covered by the Einhell Express Guarantee, your product will be repaired immediately and returned to you, or we will send you a new device (at our election).
Any costs incurred by you in making a claim under this Einhell Express Guarantee, unless specified otherwise in this guarantee certificate, must be borne by you.
Of course, we are also happy to offer a chargeable repair service for any defects which are not covered by the scope of the Einhell Express Guarantee or for products which are no longer covered by the Einhell Express Guarantee. To take advantage of this service, please send the product to our service address.
EINHELL AUSTRALIA PTY LTD
6/166 Wellington Street
Collingwood VIC 3066
Australia
Phone: 1300 922 271

natural_image
Pure geometric lines and markers without any text, numbers, or symbols
natural_image
Pure geometric lines and markers without any text, numbers, or symbols
natural_image
Pure geometric lines and markers without any text, numbers, or symbols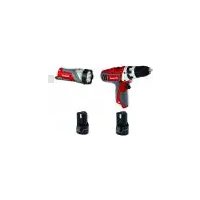
- GB
- ⚠️ Important!
- Safety information
- CAUTION!
- Layout/Items supplied (Fig. 1)
- Layout
- IMPORTANT
- Proper use
- Technical data
- Sound and vibration
- Wear ear-muffs.
- Drilling in concrete
- Screwing without hammer action
- Warning!
- Residual risks
- Before starting the equipment
- Operation
- Charging the LI battery pack (Fig. 2-3)
- Torque setting (Fig. 4 / Item 1) Important! The tool must be at a standstill when you set the torque with the setting ring.
- Drilling (Fig. 4 / Item 1)
- Forward/Reverse switch (Fig. 5 / Item 3)
- On/Off switch (Fig. 5 / Item 4)
- Changing over from 1st gear to 2nd gear (Fig. 6 / Item 7)
- Battery capacity indicator (Fig. 7 - Item 2)
- LED lamp (Fig. 7 / Item 10)
- Changing the tool (Fig. 8)
- Disposal and recycling
- Screwdriving
- Storage
- Cleaning, maintenance and ordering of spare parts
- Cleaning
- Maintenance
- Ordering replacement parts
- GB GUARANTEE CERTIFICATE
Brand : EINHELL
Model : RT-CD 18/1-2B Li
Category : Drill