GCS1322 - KVM Switch IOGEAR - Free user manual and instructions
Find the device manual for free GCS1322 IOGEAR in PDF.

User questions about GCS1322 IOGEAR
0 question about this device. Answer the ones you know or ask your own.
Ask a new question about this device
Download the instructions for your KVM Switch in PDF format for free! Find your manual GCS1322 - IOGEAR and take your electronic device back in hand. On this page are published all the documents necessary for the use of your device. GCS1322 by IOGEAR.
USER MANUAL GCS1322 IOGEAR
Single/Dual View Secure KVM Switch User Manual
2/4/8-Port USB DVI/HDMI/DisplayPort
| GCS1212TAA4 | - | GCS1214TAA4 | - | GCS1218TAA4 | - | GCS1222TAA4 | - | GCS1224TAA4 |
| GCS1228TAA4 | - | GCS1312TAA4 | - | GCS1314TAA4 | - | GCS1322TAA4 | - | GCS1324TAA4 |
| GCS1412TAA4 | - | GCS1414TAA4 | - | GCS1418TAA4 | - | GCS1422TAA4 | - | GCS1424TAA4 |
| GCS1428TAA4 | - | GCS1212TAA4C | - | GCS1214TAA4C | - | GCS1218TAA4C | - | GCS1222TAA4C |
| GCS1224TAA4C | - | GCS1228TAA4C | - | GCS1312TAA4C | - | GCS1314TAA4C | - | GCS1322TAA4C |
| GCS1324TAA4C | - | GCS1412TAA4C | - | GCS1414TAA4C | - | GCS1418TAA4C | - | GCS1422TAA4C |
| GCS1424TAA4C | - | GCS1428TAA4C |
Table of Contents
EMC Information 4
User Notice 5
Package Content 6
About This Manual 7
Chapter 1 - Introduction 8
Features 9
Requirements 10
Operating Systems 11
Overview 12
Chapter 2 - Hardware Setup 17
Chapter 3 - Operation 23
Appendix 26
Specification - DisplayPort Single View Secure KVM 27
Specification - DisplayPort Dual View Secure KVM 28
Specification - HDMI Single View Secure KVM 29
Specification - HDMI Dual View Secure KVM 30
Specification - DVI Single View Secure KVM 31
Specification - DVI Dual View Secure KVM 32
Limited Warranty 33
FEDERAL COMMUNICATIONS COMMISSION INTERFERENCE STATEMENT
This equipment has been tested and found to comply with the limits for a Class A digital service, pursuant to Part 15 of the FCC Rules. These limits are designed to provide reasonable protection against harmful interference in a residential installation. Any changes or modifications made to this equipment may void the user's authority to operate this equipment. This equipment generates and can radiate radio frequency energy. If not installed and used in accordance with the instructions, may cause harmful interference to radio communications. However, there is no guarantee that interference will not occur in a particular installation. If this equipment does cause harmful interference to radio or television reception, which can be determined by turning the equipment off and on, the user is encouraged to try to connect the interference by one or more of the following measure:
- Reorient or relocate the receiving antenna
- Increase the separation between the equipment and receiver
- Connect the equipment into an outlet on a circuit different from that to which the receiver is connected
- Consult the dealer or an experienced radio / TV technician for help
FCC Caution: Any changes or modifications not expressly approved by the party responsible for compliance could void the user's authority to operate this equipment.
This device complies with Part 15 of the FCC Rules. Operation is subject to the following two conditions:
- this device may not cause harmful interference, and
- this device must accept any interference received, including interference that may cause undesired operation
RoHS
This product is RoHS compliant.

Important. Before proceeding, download the Installation and Operation Manual by visiting the website, www.iogear.com and navigating to the product page. The manual includes important warnings, loading specifications and grounding instructions.
User Notice
User Information
All information, documentation, and specifications contained in this manual are subject to change without prior notification by the manufacturer. The manufacturer makes no representations or warranties, either expressed or implied, with respect to the contents hereof and specifically disclaims any warranties as to merchantability or fitness for any particular purpose. Any of the manufacturer's software described in this manual is sold or licensed as is. Should the programs prove defective following their purchase, the buyer (and not the manufacturer, its distributor, or its dealer) assumes the entire cost of all necessary servicing, repair and any incidental or consequential damages resulting from any defect in the software.
The manufacturer of this system is not responsible for any radio and / or TV interference caused by unauthorized modifications to this device. It is the responsibility of the user to correct such interference.
The manufacturer is not responsible for any damage incurred in the operation of this system if the correct operational voltage setting was not selected prior to operation. PLEASE VERIFY THAT THE VOLTAGE SETTING IS CORRECT BEFORE USE.
Warranty Information
This product carries a 4 Year Limited Warranty. For the terms and conditions of this warranty, please go to https://www.iogear.com/support/warranty
Online Registration
Please make sure to register your product online at https://www.iogear.com/registration
Contact
Please contact our support team for any assistance GovSupport@iogear.com
Package Content
IOGEAR Secure KVM package consists of:
1 x IOGEAR Secure KVM Switch
1 x Power Cord
1 x User Manual*
Please check to make sure that all of the components are present and are in good order. Please contact your dealer if anything was missing or damaged in shipping.
Please read this manual thoroughly and follow the installation and operation procedures carefully to prevent any damage to the switch or to any other devices on IOGEAR Secure KVM installation.
*Please visit our website to download the most up-to-date version of the manual
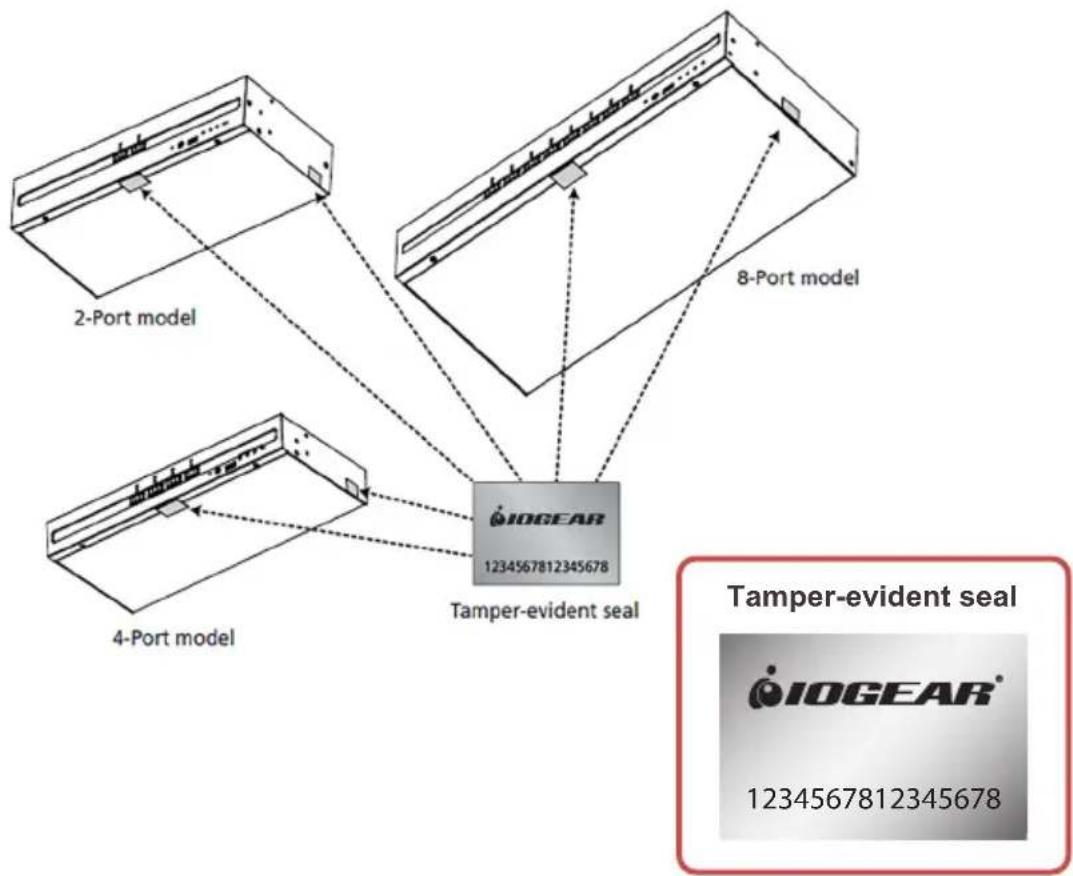
ATTENTION
If the tamper-evident seals are missing or peeled, avoid using the product and contact your IOGEAR dealer.
If all front panel LEDs on the Secure KVM Switch (except Power) flash continuously, all Remote Port Selector (RPS) LEDs flash, or the switch's enclosure appears to be breached, avoid using this product and contact your IOGEAR dealer.
This Secure KVM Switch and Remote Port Selector (RPS) are equipped with active always-on chassis intrusion detection security. Any attempt to open the enclosure will permanently damage, disable the switch and the RPS, and void the warranty.
To maximize security and to prevent unauthorized access to Secure KVM, please change default logon password after your first successful logon.
flowchart
graph TD
    A["2-Port model"] --> B["Tamper-evident seal"]
    C["4-Port model"] --> B
    D["8-Port model"] --> B
    B --> E["IOGEAR 1234567812345678"]
    style B fill:#f9f9f9,stroke:#333
    style E fill:#e6f7ff,stroke:#333
About This Manual
This User Manual is intended for System Administrators and end users
Please read this user manual thoroughly to help you get the most from your IOGEAR Secure KVM Switch system. This manual covers all aspects of installation, configuration, and operation. An overview of the information found in the manual is provided below.
This User Manual covers the following IOGEAR Secure KVM
| Configuration (without CAC function) 2-Port 4-Port 8-Port | |||||
| PC Video Connection Console | Video Connection Number of Displays | ||||
| DisplayPort DisplayPort Single GCS1412TAA4 GCS1414T | AA4 GCS1418TAA4 | ||||
| Dual GCS1422TAA4 GCS1424TAA4 GCS1428TAA4 | |||||
| HDMI HDMI Single GCS1312TAA4 GCS1314TAA4 N/A | |||||
| Dual GCS1322TAA4 GCS1324TAA4 N/A | |||||
| DVI DVI | Single GCS1212TAA4 | GCS1214TAA4 GCS1218TAA4 | |||
| Dual GCS1222TAA4 GCS1224TAA4 GCS1228TAA4 | |||||
| Configuration (with CAC function) | 2-Port 4-Port 8-Port | ||||
| PC Video Connection Console | Video Connection Number of Displays | ||||
| DisplayPort | DisplayPort | Single | GCS1412TAA4C | GCS1414TAA4C | GCS1418TAA4C |
| Dual GCS1422TAA4C | GCS1424TAA4C | GCS1428TAA4C | |||
| HDMI HDMI Single GCS1312TAA4C | GCS1314TAA4C | N/A | |||
| Dual GCS1322TAA4C | GCS1324TAA4C | N/A | |||
| DVI | DVI | Single | GCS1212TAA4C | GCS1214TAA4C | GCS1218TAA4C |
| Dual GCS1222TAA4C | GCS1224TAA4C | GCS1228TAA4C | |||
Conventions
This manual uses the following conventions:
| Monospaced | Indicates text that you should key in |
| [ ] | Indicates keys you should press. For example, [Enter] means to press the Enter key. If keys need to be pressed together, they appear together in the same bracket with a plus sign between them: [Ctrl+Alt] |
| 1. | Numbered lists represent procedures with sequential steps. |
| ♦Bullet lists provide information, but do not involve sequential steps. | |
| → | Indicates selecting the option (on a menu or dialog box, for example), that comes next. For example, Start → Run means to open the Start menu, and then select Run. |
 | Indicates critical information |
Product Information
For information about all IOGEAR products and how they can help you connect without limits, visit IOGEAR on the Web or contact an IOGEAR Authorized Reseller. Visit IOGEAR on the Web for a list of locations and telephone numbers:
Chapter 1 - Introduction
The IOGEAR Secure KVM Switch series is NIAP ^1 -certified and compliant with NIAP PP 4.0 (Protection Profile for Peripheral Sharing Device version 4.0) ^2 requirements, satisfying the latest security requisites set by the U.S. Department of Defense for peripheral sharing devices. Compliance ensures maximum information security while sharing a single set of keyboard, mouse, monitor, speakers, and CAC (Common Access Card) Reader ^3 between multiple computers. Conformity with Protection Profile v4.0 certifies that only a keyboard and a mouse are accommodated, other USB peripherals cannot be connected to the console ports of the Secure KVM; therefore, providing high-level security, protection and data safekeeping.
The IOGEAR Secure KVM Switch provides the utmost hardware and software security when switching port focus. Hardware security includes tamper-evident tapes, chassis intrusion detection, and tamper-proof hardware. Software security includes restricted USB connectivity, meaning non-HIDs (Human Interface Devices) or nonpredefined CAC/HIDs are ignored when switching. This security includes channel isolation per port and automatic clearing of the keyboard and mouse buffer when switching port focus, making it impossible for data to be leaked or transferred between secure and unsecure computers.
By combining physical security with controlled USB connectivity and controlled unidirectional data flow from devices to connected computers only, the IOGEAR Secure KVM Switch series offers the means to consolidate multiple workstations of various security classification levels with one keyboard, one video monitor, and one mouse (KVM) console.
Administrative Functions
To be compliant with Protection Profile 4.0 while providing higher deployment flexibility, wider product support for new authentication devices, and maximum security, the IOGEAR Secure KVM Switch offers Port Authentication Utility. IOGEAR Port Authentication Utility allows authorized administrators to configure IOGEAR Secure KVM Switch to either accept or reject specific USB devices. Through a secured access and authentication process, authorized administrators can perform log data auditing, the Secure KVM Switch configuration, and configurable device filtering through the Port Authentication Utility.
Note:
- The National Information Assurance Partnership (NIAP) is a United States government initiative to meet the security testing needs of IT consumers and manufacturers. NIAP is operated by the National Security Agency (NSA) and the National Institute of Standards and Technology (NIST).
- IOGEAR Secure KVM Switch series additionally satisfied Protection Profile version 4.0 for Peripheral Sharing Device (PSD).
- USB 1.1 for keyboard, mouse connections, and USB 2.0 for CAC reader connection.
Features
| Features Benefits | |
| 2/4/8-Port USB DVI/HDMI/DisplayPort Single/Dual View Secure KVM Switch* | Reduces the costs involved in controlling up to 8 Single/Dual View computers while offering data isolation between shared peripherals and computers. |
| Superior ultra-high video resolution- up to 4K UHD (3840 × 2160 @ 60Hz)** | Supports resolution up to 3840 x 2160 @ 60Hz** with crystal clear image quality. |
| Video DynaSyncTM - exclusive IOGEAR technology | IOGEAR Video DynaSyncTM eliminates boot-up display problems and optimizes resolution when switching between ports. |
| DisplayPort AUX channel filtering (DisplayPort Secure KVM Switch only) | Non-qualified auxiliary channel traffic such as MCCS and EDID write are rejected. |
| NIAP PP PSD v4.0 certified Provides the | most advanced security features required by the latest Protection Profile (PP) v4.0 for Peripheral Sharing Device (PSD). |
| Pushbutton / Remote Port Selector(RPS)*** port selection and secure port switching | Port selection by pushbutton / Remote Port Selector (RPS) only to enhance security. Keyboard, Mouse, Video, Audio and CAC reader switch together for secure switching. |
| Channel Isolation Isolated channel per port — making it impossible for data to be leaked or transferred between computers. | |
| Shared peripherals and computer isolation | The always-on Keyboard, Mouse, and Display EDID emulation ensures isolation between peripherals and connected computers. |
| Restricted USB connectivity Non-authorized HIDs (Human Interface Devices) or non-predefined CAC will be rejected / ignored. | |
| Unidirectional data flow Secure design enables unidirectional data flow between devices and connected computers. | |
| Administrative configuration and event log functions | Secure access for authorized Administrator to audit KVM operation logs and secure configuration. (Please refer to Administrator's Guide) |
| Supports analogue audio (Speaker only)**** | Only unidirectional speaker data is allowed preventing the passage of the analog audio by microphone input or line input. |
| Active always-on chassis intrusion detection | If physical tampering is detected, the switch or the Remote Port Selector becomes permanently inoperable. |
| Clears keyboard buffer when switching Keyboard data buffer is automatically purged when switching KVM port focus. | |
| Tamper-proof hardware All integrated circuits are soldered directly to the circuit board to prevent tampering with the components. | |
| Tamper-evident tape Provides a visual indication of any attempt to gain access to the switch (or RPS) internal components. | |
| Firmware non-reprogrammable Prevents tampering and attempts to reprogram the switch's firmware. | |
| Metal enclosure Rugged metal enclosure | |
Note:
* IOGEAR PP4.0 HDMI Secure KVM Switch only has 2/4-port models.
** IOGEAR PP4.0 HDMI Secure KVM Switches support console video output resolutions up to 3840 x 2160 @ 60Hz.
IOGEAR PP4.0 DisplayPort Secure KVM Switches support console video output resolution up to 3840 x 2160 @ 30Hz.
IOGEAR PP4.0 DVI Secure KVM Switches support 3840 x 2160 @ 30Hz on compatible HDMI-interfaced monitors/computers with IOGEAR DVI-to-HDMI KVM cables.
*** Remote Port Selector (RPS) is optional and requires a separate purchase.
**** Only analog speaker data input is allowed. The IOGEAR Secure KVM Switch doesn't convert digital audio to analog audio.
Requirements
Console
- DVI (for DVI-interfaced Secure KVM), HDMI (for HDMI interfaced Secure KVM), or DisplayPort (for DisplayPort-interfaced Secure KVM) monitor capable of the highest resolution that will be used on any computer in the installation
- Standard wired USB mouse
• Standard wired USB keyboard - Speaker (Optional)
- USB Smart card or CAC (Common Access Card) reader (Optional)*
- Remote Port Selector (Optional)**
Computers
• a DVI/HDMI/DisplayPort Video output connector
• a USB Type A port for keyboard and mouse
- a USB Type A port for Smart Card or CAC reader (Optional)*
• a 3.5 mm jack Audio port for speaker (Optional)
Cables
The KVM cable sets which are specifically designed to work with this switch are not supplied in the package and require a separate purchase.
For security, do not connect any cable that has a microphone audio input or line in audio input
Note:
* Only applicable on the models with CAC function
** Remote Port Selector is not supplied in the package and requires a separate purchase
Operating Systems
Suggested operating systems are shown in the table, below:
| OS Version | ||
| Windows 2000 / XP / Vista / 7 / 8 / | 8.1 / 10 | |
| Linux RedHat 6.0 and higher | ||
| SuSE 8.2 and higher | ||
| Mandriva (Mandrake) 9.0 and higher | ||
| UNIX AIX 4.3 and higher | ||
| FreeBSD 3.51 and higher | ||
| Sun Solaris 9 and higher | ||
| Novell Netware 5.0 and higher | ||
| Mac OS 9 and higher | ||
| DOS 6.2 and higher | ||
Note: Supports Linux Kernel 2.6 and higher
Overview
Front View
GCS1228TAA4C
text_image
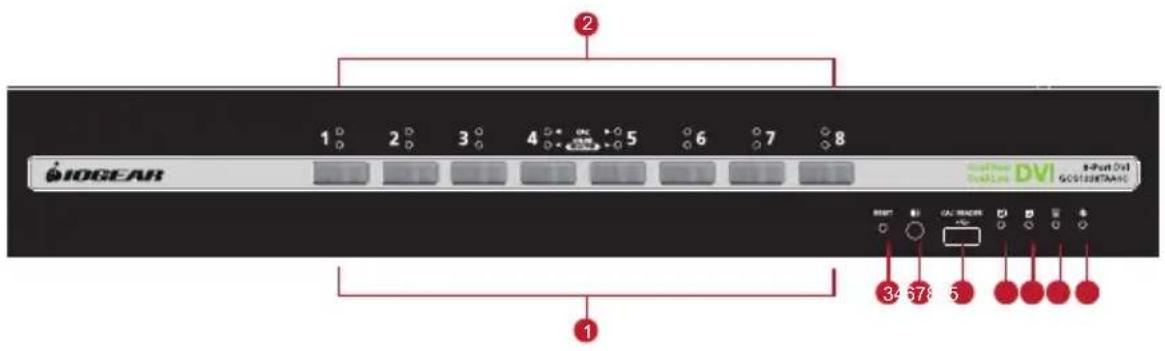
IOGEAR 1 2 3 4 5 6 7 8 34 678 6 +Input Out GOS100TAAC +Input Out DVIGCS1312TAA4
text_image
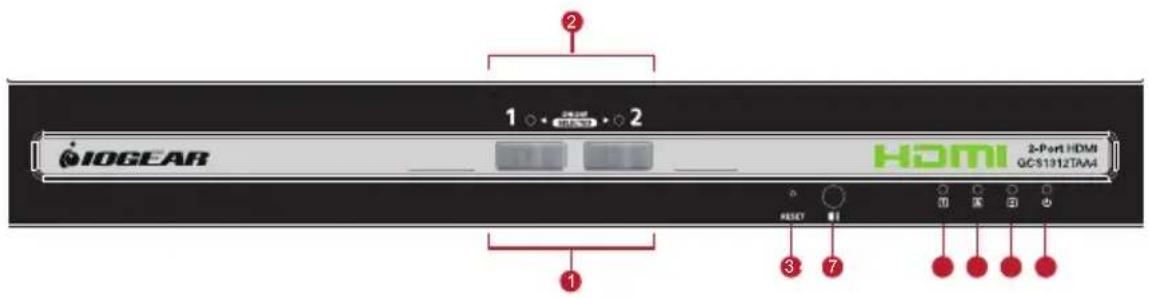
IOGEAR 1 ○ 2 HDMI 2-Port HDMI GC51912TAM RESET 3 7GCS1414TAA4C

text_image
IOGEAR 1 2 3 4 DP 4-Port DisplayPort GCS1414TAA4C 1 2 3 4 5 6 7 8 9 10 11 12 13 14 15 16 17 18Overview
Rear View
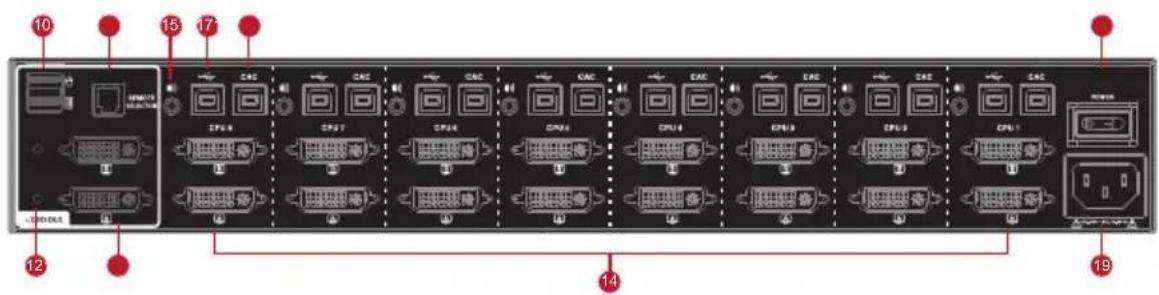
GCS1228TAA4C
text_image
10 15 17 12 14 19GCS1312TAA4

text_image
10 REMOTE SELECTOR COMSOLI 12 CPU 2 CPU 1 14 18 POWER 19GCS1414TAA4C
text_image
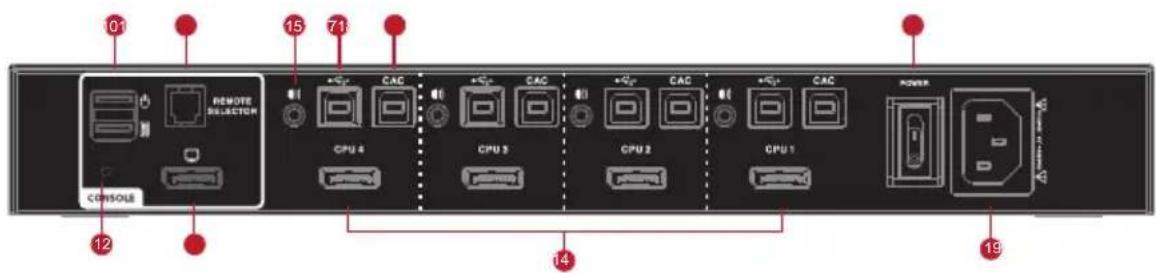
101 15 71 REMOTE SELECTOR CONSOLE CPU 4 CAC CPU 3 CAC CPU 2 CAC CPU 1 CACC POWER 12 14 19Note:
- This user manual uses GCS1228TAA4C, GCS1312TAA4, and GCS1414TAA4C to demonstrate each interface (DVI / HDMI / DisplayPort), port number (2/4/8- Port), CAC support (Yes/No), and number of displays (single/dual) included in IOGEAR Secure KVM Switch series.
| No. | Component Description | |
| 1 Port | SelectionPushbuttons | Pressing a Port Selection Pushbutton brings together the Keyboard, Mouse, Video, Audio,and CAC reader focus to the computer attached to the corresponding port |
| 2 | Port and CAC LEDs | The Port/CAC LEDs located on front panel are to indicate Port/CAC reader selection or connection status.Port LEDs (Bottom row; Orange LEDs)Online - Port LED lights dim orange to indicate that the computer attached to its corresponding port is connected and powered onSelected - Port LED lights bright orange to indicate that the computer attached to its corresponding port has the KVM focusWarning - Flashes to indicate that a non-qualified USB HID device is connected to console USB keyboard port or mouse port when the corresponding port has the focus.CAC LEDs (Upper row; Green LEDs, models with CAC function only)Online - CAC LED lights dim green to indicate that the computer attached to its corresponding port has a USB CAC reader cable connection up and running, and the CAC function is enabledSelected - CAC LED lights bright green to indicate that the CAC function is enabled and the computer attached to its corresponding port has the CAC focusNone - No lights indicate that the cable is not connected or the CAC function has been disabledWarning - CAC LED Flashes to indicate that a non-qualified USB Smart Card/ CAC reader is connected when the corresponding port has the focusNote:1. CAC function of each port can be enabled or disabled by pressing the port selec-tion pushbutton for more than 3 seconds (this is a toggle feature). Please refer to the Operation section of this user manual for more information.2. All front panel LEDs (except for Power LED) will flash continuously when a chassis intrusion or self-test failure (except for Pushbutton jam) is detected. See Chassis Intrusion Detection section for further details3. Port and CAC LEDs also indicate the status of the Secure KVM self-test. See Operation section for further details |
| 3 Reset | Button Press the Reset | Button to reset IOGEAR Secure KVM SwitchNote:1. When the Reset Button is pressed for more than 5 seconds, the Keyboard/Mouse buffer will be purged and KVM switch will reboot and perform a self-test. After a successful self-test, port focus will be switched to Port 1, and CAC function of each port will be set to factory default (enabled).2. If the Secure KVM fails to generate video on the monitor after a reset, please power off the installation, check the cables, and follow the instructions in this manual to power on the installation |
| 4 Audio | Ports Connect cables from your speakers to these audio portsNote:Only standard analog speaker connections are allowed. The use of analog microphones or line-in audio devices is strictly prohibited | |
| 5 | USB Smart Card/CAC Reader Port (Models with CAC function only) | Only qualified USB authentication devices (e.g., standard smart card and CAC reader) can be connected to this port.Note:USB Authentication device filter is configurable by authorized administrators for trusted authentication devices (e.g. USB token, USB Biometric reader). Please refer to Administrator's Guide for details. |
| 6 | Num Lock LED | Num Lock LED lights green to indicate that the Num Lock function has been turned on.Note:Num Lock LED on keyboard will be disabled due to security requirement |
| 7 | Caps Lock LED | Caps Lock LED lights green to indicate that the Caps Lock function has been turned onNote:Caps Lock LED on keyboard will be disabled due to security requirement |
| 8 | Scroll Lock LED | Scroll Lock LED lights green to indicate that the Scroll Lock function has been turned on.Note:Scroll Lock LED on keyboard will be disabled due to security requirement |
| 9 Power LED Power LED lights | green to indicate that the IOGEAR Secure KVM Switch is powered on | |
| 10 | USB Console Ports | Wired USB keyboard and mouse are connected into these ports. The USB console keyboard port (lower port) and mouse port (upper port) are only compatible with standard wired USB keyboards/mice, standard wired USB keyboards/mice via a USB hub, and the HID functions of a composite device.Note:1. The console USB keyboard and mouse ports are interchangeable. User can connect a keyboard to the mouse port and vice versa. However, for optimal operation, it is recommended that the USB keyboard connected to the console's USB keyboard port and the USB mouse connected to the console's USB mouse port.2. For security purposes, IOGEAR Secure KVM Switch series do not support wireless keyboards and mice. Do not attempt to connect a wireless keyboard and mouse to the switch in any case.3. Non-standard keyboards/mice with integrated USB hubs and/or other USB-integrated devices may not be fully supported due to the strict security standards and policy for IOGEAR Secure KVM Switch. If supported, only basic (HID) keyboard/ mouse operations will function.4. Multimedia keys on the keyboard will not function due to security policy.5. Num Lock, Caps Lock, and Scroll Lock LED on keyboards will not function due to security policy.6. USB HID device filter is configurable by authorized administrators for trusted devices (only the USB console mouse port is applicable for setting specific blocked devices). Please refer to the Administrator Guide for details. |
| 11 | Remote Port Selector (RPS) Port | Connect the Remote Port Selector (RPS). The RPS requires a separate purchase |
| 12 | Video LED(s) Video LED lights green when the video connection is establishedVideo LED flashes when a non-qualified monitor is connectedNote:With the Dual View (dual monitor) models, each console video connection has one Video LED | |
| 13 | Console Monitor Port(s) Console monitor's cables are connected into these portsNote:IOGEAR Secure KVM Switch Dual View models has two console monitor ports | |
| 14 | KVM Port Section Connect | IOGEAR proprietary KVM cables from the computers into these ports |
| 15 | KVM Audio Ports Connect | Audio cable from the connected computers into these portsNote:Only speaker connections are allowed. The use of analog microphones or line-in audio devices is strictly prohibited |
| 16 | KVM USB Ports | Connect the USB cable for keyboard/mouse from the connected computer into these ports |
| 17 | USB Smart Card / CAC (Common Access Card) Reader Port | Connect the cable for USB Smart Card/CAC reader from the connected computer into these ports |
| 18 | Power Switch | This is a standard rocker switch that powers the IOGEAR Secure KVM Switch on and off |
| 19 | Power Socket Connect the i included AC power cord into this socket | |
Front View (of IOGEAR Remote Port Selector)

text_image
3 5 6 1 2 3 4 5 6 7 8 IIOGEAR| No. | Component Description | |
| 1 | Port Selection Pushbuttons | Pressing a Port Selection Pushbutton brings together the keyboard, mouse, video, audio, and CAC reader focus to the computer attached to its corresponding port.Note:When attached to a 2-Port Secure KVM Switch, only pushbuttons numbered 1 and 2 will be detected and functional. When attached to a 4-Port Secure KVM Switch, only pushbuttons numbered 1, 2, 3, and 4 will be detected and functional. When attached to an 8-Port Secure KVM Switch, all eight pushbuttons will be detected and functional. |
| 2 | Port LEDs The Port/CAC LEDs | located on the upper-left side (of each pushbutton) to indicatePort selection and connection status.Port LEDs (Orange LEDs)☑ Online – Lights dim orange to indicate that the computer attached to its corresponding port is connected and powered on.☑ Selected – Lights bright orange to indicate that the computer attached to its corresponding port has the KVM focus.Warning - Flashes to indicate that a non-qualified USB HID device is connected to console USB keyboard port or mouse port when the corresponding port has the focus. |
| 3 | Num Lock LED Lights green to | indicate the Num Lock function has been turned on.Note:The Num Lock LED on the keyboard will be disabled due to security requirements. |
| 4 | Caps Lock LED Lights green to | indicate the Caps Lock function has been turned on.Note:The Caps Lock LED on the keyboard will be disabled due to security requirements. |
| 5 | Scroll Lock LED Lights green | to indicate the Scroll Lock function has been turned on.Note:The Scroll Lock LED on the keyboard will be disabled due to security requirements. |
| 6 | CAC LED The CAC LED is located | on the far right of the upper bar (on the panel) to indicateCAC reader selection status.CAC LED (Green LED, CAC models only)☑ Online/Selected – Lights bright green to indicate that the CAC function is enabled and the computer attached to its corresponding port has a USB CAC reader cable connection, and has the CAC focus☑ None – No lights indicate that the cable is not connected or CAC has been disabled.☑ Warning – Flashes to indicate that a non-qualified USB smart card / CAC reader is connected when the corresponding port has the focus.Note:All panel LEDs on the RPS will flash continuously when a chassis intrusion (except for Pushbutton jam) is detected. See Chassis Intrusion Detection section for further details. |
| 7 | Port Name Label Area | Port names can be written on labels and placed on these two areas covered with mylar panels for easier port identification. |
Before You Begin
If the tamper-evident seals are missing or peeled, avoid using the product and contact your IOGEAR dealer.
If all front panel LEDs on the Secure KVM Switch (except Power) flash continuously, all Remote Port Selector (RPS) LEDs flash, or the switch's enclosure appears to be breached, avoid using this product and contact your IOGEAR dealer.
This Secure KVM Switch and the Remote Port Selector (RPS) are equipped with active always-on chassis intrusion detection security. Any attempt to open the enclosure will permanently damage, disable the switch/RPS, and void the warranty.

text_image
IOGEAR 1234567812345678Tampering prevention and detection
- IOGEAR Secure KVM Switch and the optional Remote Port Selector (RPS) include tamper-evident tapes to provide visual indications of intrusion to the switch/RPS enclosure. If the tamper-evident seals are missing, peeled, or looks as if they have been adjusted, avoid using the product and contact your IOGEAR dealer.
- IOGEAR Secure KVM Switch and RPS are equipped with active always-on chassis intrusion detection. If a mechanical intrusion is detected on the switch, the switch (without RPS connected) will be permanently disabled and all the front panel LEDs (except the Power LED) will flash continuously. If a mechanical intrusion is detected by the RPS (connected with the switch and aligned), this will permanently disable both the RPS itself and the switch, and all LEDs (on RPS) and the front panel LEDs except the Power LED (on switch) will flash continuously. If the switch or RPS enclosure appears to be breached or all the LEDs are flashing continuously, stop using this product, remove it from service immediately, and contact your IOGEAR dealer.
- Any attempt to open the switche or RPS enclosure will activate the chassis intrusion detection security, which will render it inoperable and void the warranty.
- IOGEAR Secure KVM Switch cannot be upgraded, serviced, or repaired.
- IOGEAR Secure KVM Switch and RPS are equipped with active always-on chassis intrusion detection security. Never attempt to open the enclosure. Any attempt to open the enclosure will permanently damage and disable the switch.
- IOGEAR Secure KVM Switch and RPS contains an internal battery which is non-replaceable. Never attempt to replace the battery or open the switch or RPS enclosure.
Always use qualified and authorized peripheral devices
- For security, IOGEAR Secure KVM Switch supports only standard USB devices (or pointing device). Do not connect a wireless keyboard/mouse, or keyboard/mouse with an internal USB hub or composite functions to the switch.
- When connecting a non-qualified keyboard, the keyboard will not function. No keyboard keystrokes will be seen on the screen.
- When connecting a non-qualified mouse, the mouse will not function. No mouse cursor movement will be seen on the screen.
- For security, IOGEAR Secure KVM's USB console keyboard/mouse ports by default only support the following – standard USB keyboards/mice, standard USB keyboards/mice via a USB hub, and the HID functions of a composite device. Do not connect other USB devices to the USB console keyboard/mouse ports. Non-qualified or nonauthorized USB devices will be rejected. For administrative configuration, please refer to the Administrator Guide.
Hardware Setup
- Num Lock LED, Caps Lock LED, and Scroll Lock LED on the keyboard will be disabled due to security policy.
- Special multimedia keys on the keyboard will be disabled due to security policy.
- For security, IOGEAR Secure KVM Switch does not support analog microphones or line-in audio inputs. Never connect a microphone to the switch's audio output port, including that of a headset's. Only standard analog speakers and headsets are supported.
- For security, IOGEAR Secure KVM Switch's USB CAC ports (by default) only support authorized user authentication devices, such as USB Smartcards or CAC readers. Do not connect other USB devices to USB CAC Port. Non-qualified or non-authorized USB devices will be rejected. For administrative configuration, please refer to the Administrator's Guide and Port Authentication Utility Guide for details.
- For security, do not use any USB CAC authentication device or other peripherals that adopt an external power source.
- Always use qualified monitor(s). Non-qualified monitors will be rejected.
- Do not use wireless video transmitters or any docking device.
- Do not connect any Thunderbolt device to IOGEAR Secure KVM Switch.
- Any cable connector or non-IOGEAR remote controller plugged into the console RPS port will be ignored.
Secure Installation
- Do not attempt to connect or install the following devices to the computers connected to IOGEAR Secure KVM Switch:
• TEMPEST computers,
• Telecommunication equipment,
• Frame grabber video cards, or
• Special audio processing cards
- Important safety information regarding the placement of this device is provided on page 26. Please review it before proceeding.
- Before installation, please make sure that the power sources to all connected devices are turned off. You must unplug the power cords of any computers that have the Keyboard Power On function.
- Hot-swapping of the console monitor is not allowed. Power off the Secure KVM Switch and the monitor before changing the console monitor.
- A computer connected to IOGEAR Secure KVM Switch should only be powered on after all of the device (Video, USB, and audio) are securely connected
Secure Operation and Administration
Please refer to Administrator Guide for Secure KVM Switch configuration and event log auditing functions.
Stacking
IOGEAR Secure KVM Switch features a rugged, metal enclosure which provides stability and allows the unit to be stacked on a desktop. The unit can be placed on any leveled surface that can safely support its weight and the weight of the attached cables. Please ensure that the surface is clean and free of materials that can block the exhaust vents or otherwise interfere with normal operation of IOGEAR Secure KVM Switch
Rack-mount
IOGEAR Secure KVM Switch features a rack-mount design and offers rack-mount options. Rack-mount kits which are specifically designed to work with this switch are not supplied in the package and require a separate purchase.
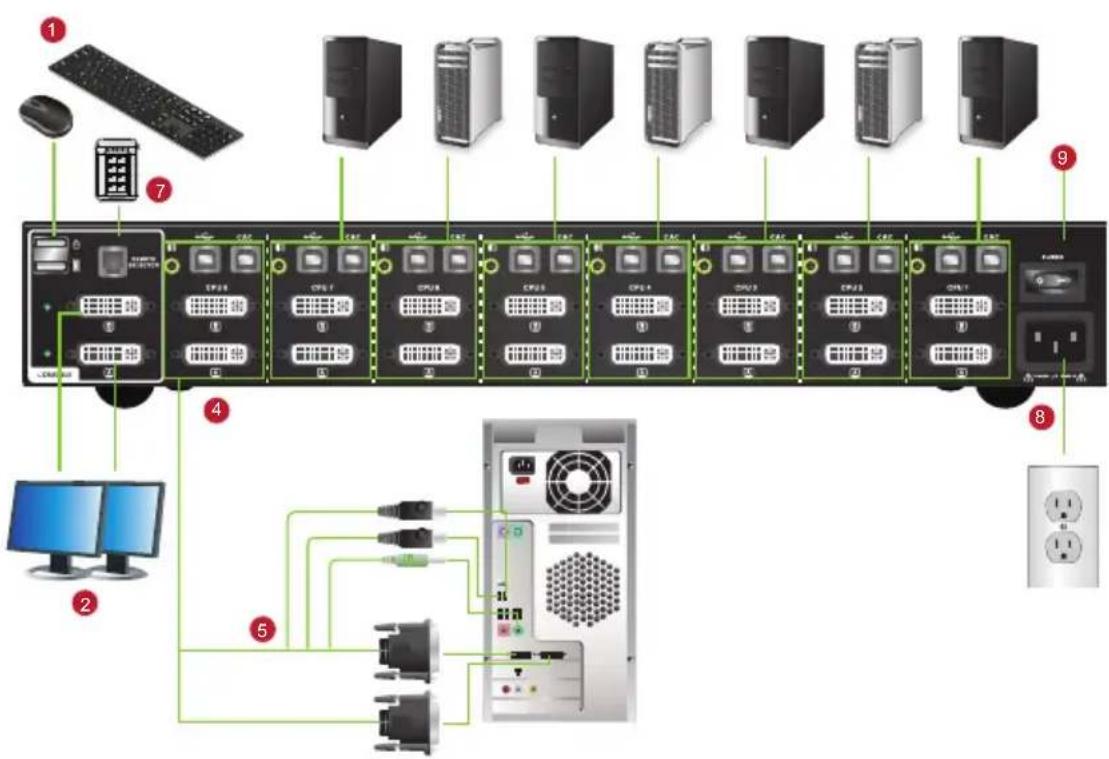
Cable Connection
To install IOGEAR Secure KVM Switch, please refer to the installation diagram on the following page. The numbers in the diagrams correspond to the steps below:
- Connect the wired USB keyboard and USB mouse into the USB console ports located on the unit's rear panel. The USB keyboard and mouse console ports are compatible only with standard wired USB keyboard/mice.
Note:
- The console USB keyboard and mouse ports are interchangeable. You can connect a keyboard to the mouse port and vice versa. However, for optimal operation, it is recommended that you connect the USB keyboard to the console's USB keyboard port and the USB mouse to the console's USB mouse port.
- For security purposes, IOGEAR Secure KVM Switch does not support wireless keyboards and mice. Do not attempt to connect a wireless keyboard/mouse to the switch.
- During IOGEAR Secure KVM Switch operation, non-standard keyboards with integrated USB hubs and/or other USB-integrated devices may not be fully supported, due to the strict security standards and policy for IOGEAR Secure KVM Switch. If supported, only basic (HID) keyboard operations will function.
-
When the IOGEAR Secure KVM Switch is powered on and the keyboard or mouse is rejected, the keyboard and mouse will be inoperable (i.e., mouse cursor freezes and/or no key strokes response on the connected computer)
-
Connect the console monitor(s) into the console Video port(s) located on the unit's rear panel. Then, power the monitor on.
Note:
- When the IOGEAR Secure KVM Switch is powered on, the Video LED lights green indicating that the video connection is established. The Video LED flashes when non-qualified monitors are connected
- Due to security policy, IOGEAR Secure KVM Switch does not support monitor hot-swap. If you would like to change the console monitor, you must first power off the entire installation.
-
Connected monitors will be filtered when IOGEAR Secure KVM Switch is powered on. Non-qualified monitor will be rejected (Video LED flashes). Please refer to the LED Display for detail visual identification.
-
Connect the speakers into the console's speaker jack located on the unit's front panel.
Note:
- Only speaker connections are allowed. The use of analog microphones or line-in audio connections is strictly prohibited.
Hardware Setup
- For Single View (single monitor) IOGEAR Secure KVM Switch
Using IOGEAR's proprietary KVM cable set (not supplied with this package and must be purchased separately), connect the Video connector into any available Video socket in the KVM port section of the switch, then connect the accompanying USB (Keyboard/Mouse or CAC) and speaker connectors into their corresponding USB and speaker ports.
For Dual View (dual monitors) IOGEAR Secure KVM Switch
Using IOGEAR's proprietary KVM cable set (not supplied with this package and must be purchased separately), connect the Video connector for primary monitor into any available Video socket A in the KVM port section of the switch. Connect a separate video cable for secondary monitor to corresponding Video socket B in the KVM Port section of the switch, then connect the accompanying USB (Keyboard/Mouse or CAC) and speaker connectors into their corresponding USB and speaker ports.
Note:
- Verify that all connectors are in the same or corresponding KVM Port sockets (all in Port 1, all in Port 2, etc.). Each socket is marked with appropriate icons
-
If the CAC reader function is to be disabled for certain PCs, it is advised not to connect the corresponding USB CAC cable in the installation
-
With the other end of the KVM cable set, connect the USB, video, and speaker cables into their respective ports on the computers.
Note:
- On Dual View (dual display) KVM installation, please verify that the second Video connection is in the same KVM Port sockets as the first Video connection (all in Port 1, all in Port 2, etc.) Each socket is marked with appropriate icons
- Repeat steps 4, and 5 for each PC system you are installing
-
On Dual View (dual display) KVM installation, you may also connect all of the primary Video connectors to Video Sockets B and all secondary Video connectors to Video Sockets A for easier cable connections. Please make sure your console primary and secondary monitors are connected the same way.
-
Connect the USB Smart Card / CAC reader to the CAC port on the front panel of IOGEAR Secure KVM Switch. (Optional)
Note:
- Only qualified USB Authentication devices (e.g., Smart Card and CAC readers by default) can be connected into this port. During KVM operation, non-qualified or non-authorized USB devices will be filtered and rejected (CAC LED that has the port focus will flash continuously). Please refer to LED Display for visual indications.
- CDF (Configurable Device Filtering) function can only be operated by authorized administrators.
- Please refer to Administrator's Guide and Port Authentication Utility Guide for more details
- An active session on the selected computer is immediately terminated upon removal of the CAC card.
Hardware Setup
- Connect the cable on the RPS to the switch RPS port. (Optional)
Note:
- Connect the RPS before the IOGEAR Secure KVM is powered on
-
Any connection of RPS after the IOGEAR Secure KVM is powered on will not be detected by the switch
-
Connect the female end of the power cord into the IOGEAR Secure KVM Switch's power socket. Then, connect the male end of the power cord into an AC power source.
-
Power on the IOGEAR Secure KVM Switch and check if the LEDs light up. IOGEAR Secure KVM Switch will begin KVM self-test momentarily.
Note:
IOGEAR Secure KVM Switch performs a security self-test at power-on and at each power cycle. Front panel LEDs will indicate the self-test status and test result. Please refer to the Operation section and the LED Display section for visual identification details.
Hardware Setup
Front View

text_image
IOGEAR 1 2 3 4 5 6 7 8 DVI 8-Port DVI DCST1219TRAC 3 6Rear View
text_image
Diagram showing network topology with labeled components including computer, monitor, keyboard, and server racks connected to a central computer tower.Powering On
When powering on, resetting, or power cycling IOGEAR Secure KVM Switch, the switch will perform a self-test to check the unit's integrity and security functions.
During the self-test
☒ All Port LEDs, all CAC LEDs (if supported), Num Lock LED, Caps Lock LED, and scroll lock LED on the IOGEAR Secure KVM will turn ON and then OFF
☒ The KVM Switch focus will be switched to Port 1 when the self-test completes successfully (Port 1 LED lights bright orange)
Self-test failure
In case of a self-test failure, IOGEAR Secure KVM Switch becomes inoperable. Front panel LED combinations light up, indicating the potential cause to the failure (such as button jam or KVM integrity compromise):
☒ A pre-defined combination of Port and CAC LED indicates the cause to the failure.
☒ If all front panel LEDs on IOGEAR Secure KVM Switch (except for Power LED) flash continuously, then either KVM tampering is detected or a self-test failure has occurred (except for Pushbutton jam; see below)
☒ If Pushbutton jam is detected, both the Port and CAC LEDs will flash
For security, IOGEAR Secure KVM Switch becomes inoperable if self-test fails. Please verify your KVM installation, pushbuttons, and power cycle the Secure KVM Switch again if this should happen. If the self-test failure remains, stop using the Secure KVM Switch immediately, remove it from service, and contact your IOGEAR dealer.
After the IOGEAR Secure KVM Switch is powered on and ready, power on your computers. By default, the IOGEAR Secure KVM Switch will switch to Port 1 after a successful self-test.
IOGEAR Secure KVM Switch filters and emulates both the mouse and keyboard on each port after the unit is powered on. If the keyboard, mouse, monitor, or Smart Card / CAC reader fails to operate properly, make sure that only qualified and authorized peripherals are connected. Next, power off IOGEAR Secure KVM Switch and check all cable connections. Then, power the unit back on again.
Manual Switching
For increased security, IOGEAR Secure KVM Switch offers manual port-switching only. This is achieved by pressing the port selection pushbuttons located on the Secure KVM switch's front panel or presing the port selection pushbuttons located on the RPS' panel(if RPS is connected and aligned). Press and release a port selection pushbutton to bring the KVM focus to the computer attached to its corresponding port (see Port ID Numbering below). To meet maximum security and channel isolation requirements, the keyboard, mouse, video monitor, audio, and USB CAC reader ports will be switched together. The Selected Port LED lights bright orange (on Switch and/or RPS) to indicate that the computer attached to its corresponding port has the KVM focus (keyboard, mouse, monitor, audio, and CAC reader).
The PC that has the port focus on should be able to detect the peripherals after port switching. If the PC fails to detect the keyboard, mouse, or CAC reader:
- Please verify if you are using qualified Keyboard, Mouse, or CAC reader
- Please verify if your keyboard, mouse, or CAC reader has failed
- For USB CAC Card readers (USB authentication devices), please make sure that the USB CAC cable has been securely connected and the CAC function on the Secure KVM switch is enabled.
- Please verify if the USB CAC reader has been authorized for the corresponding port
Port ID Numbering
Each KVM port on IOGEAR Secure KVM Switch is assigned a port number (1-2 for 2-Port models; 1-4 for 4-Port models; 1-8 for 8-Port models). The port numbers are marked on the rear side of the switch. See Rear View section in this manual. The port ID of a computer is derived from the KVM port number to which it is connected.
LED Display
In addition to the Power LED, IOGEAR Secure KVM Switch and RPS have Port LEDs (Online and Selected), keyboard lock (Num Lock / Caps Lock / Scroll Lock) LEDs and CAC LEDs that are built into the front panel to indicate Port / Keyboard / CAC reader operating status. A Video LED is located on rear panel (of the switch) to indicate the operating status of the video connection. These LEDs also serve as the alarm notification for KVM security issues.
| LED Indication | |
| Power LED (on the Secure KVM switch) | Power LED is located on the front panel☒ Power LED lights green to indicat that the KVM switch is powered on. |
| Video LED (on the Secure KVM switch) | Video LED is located on the rear panel next to each video connector.☒ Video LED lights green when the video connection is established.☒ Video LED flashes when a non-qualified monitor is connected. |
| Port LED (on the Secure KVM switch and the RPS) | Port LEDs located on the front panel of the switch and the upper-left side of each pushbutton of the RPS are to indicate the Port selection or connection status.☒ Online - Port LED lights dim orange to indicate that the computer attached to its corresponding port is connected and powered on.☒ Selected - Port LED lights bright orange to indicate that the computer attached to its corresponding port has the KVM focus.Warning - Flashes to indicate that a non-qualified USB HID device is connected to console USB keyboard port or mouse port when the corresponding port has the focus.Note:1. Port and CAC LEDs will flash constantly when a chassis intrusion is detected. See Chassis Intrusion Detection section for details.2. Port and CAC LEDs (on the Secure KVM switch) also indicate the Secure KVM self-test status. See Operation section for further details |
| CAC LED (on the Secure KVM switch and the RPS)Models with CAC function only | CAC LEDs located on front panel of the switch and the upper-right side of the RPS are to indicate CAC reader selection or connection status:Online – CAC LED lights dim green to indicate that the computer attached to the corresponding port has a USB CAC reader cable connection established and that CAC function is enabled.Selected – CAC LED lights bright green to indicate that the CAC function is enabled and the computer attached to the corresponding port has the CAC focus.None – No light indicates that the cable is not connected or CAC has been disabled.Warning – CAC LED flashes to indicate that a non-qualified USB Smart card / CAC reader is connected when the corresponding port has the focus.Note:1. CAC function of each port can be enabled or disabled by pressing the port selection button on the switch for more than 3 seconds (This is a toggle function). Please refer to Operation section for details.2. Port and CAC LEDs will flash constantly when a chassis intrusion is detected. See Chassis Intrusion Detection section for further details. |
Operation
| Num Lock LED (on the Secure KVM switch and the RPS) | Num Lock LED lights green to indicate Num Lock is enabled. |
| Caps Lock LED (on the Secure KVM switch and the RPS) | Caps Lock LED lights green to indicate Caps Lock is enabled. |
| Scroll Lock LED (on the Secure KVM switch and the RPS) | Scroll Lock LED lights green to indicate Scroll Lock is enabled. |
Chassis Intrusion Detection
The IOGEAR Secure KVM Switch or the RPS will become inoperable and the Front Panel LEDs on the Secure KVM switch (except for the Power LED) or all LEDs on the RPS will flash constantly when a chassis intrusion, such as the cover being removed, is detected. This is to prevent malicious tampering with IOGEAR Secure KVM Switch.
The Intrusion Detection is an active always-on function. If all of the front panel LEDs on the Secure KVM switch (except for Power LED) flash continuously, all Remote Port Selector(RPS) LEDs flash, or the switch's enclosure appears to be breached, avoid using this product and contact your IOGEAR dealer.
Smart Card and CAC Reader (Model with CAC function only)
The USB Smart Card / CAC reader function of each port can be enabled or disabled (enabled by default). Press the port selection pushbutton on the switch for more than 3 seconds and release it, and the CAC reader function of that port will be enabled/disabled (this is a toggle feature). The CAC LEDs are used to indicate the CAC reader operation status.
If the CAC reader function is to be disabled for certain PCs, it is advised not to connect a USB CAC cable in the installation.
Please refer to Administrator's Guide for details.
Safety Instructions
General
☒ This product is for indoor use only.
Read all of these instructions. Save them for future reference.
☒ Follow all warnings and instructions marked on the device
☒ Do not place the device on any unstable surface (cart, stand, table, etc.). If the device falls, serious damage will result.
☒ Do not use the device near water.
☒ Do not place the device near, or over, radiators or heat registers.
☒ The device cabinet is provided with slots and openings to allow for adequate ventilation*. To ensure reliable operation, and to protect against overheating, the cabinet must never be blocked or covered.
☒ The device should never be placed on a soft surface (bed, sofa, rug, etc.) as this will block its ventilation openings*. Placing the device without slots or openings on a soft surface will affect the heat dissipation.
☒ The device should be not placed in a built-in enclosure unless adequate ventilation has been provided. ☒ Never spill liquid of any kind on the device.
☒ Unplug the device from the wall outlet before cleaning. Do not use liquid or aerosol cleaners. Use a damp cloth for cleaning.
☒ The device should be operated from the type of power source indicated on the marking label. If you are not sure of the type of power available, consult your dealer or local power company.
☒ The device is designed for IT power distribution systems with 230V phase-to-phase voltage.
☒ To prevent damage to your installation, it is important that all devices be properly grounded.
☒ The device is equipped with a 3-wire grounding type plug. This is a safety feature. If you are unable to insert the plug into the outlet, contact your electrician to replace your obsolete outlet. Do not attempt to defeat the purpose of the grounding-type plug. Always follow your local / national wiring codes.
☒ Do not allow anything to rest on the power cord or cables. Route the power cord and cables so that they cannot be stepped on or tripped over.
☒ If an extension cord is used with this device, make sure that the total of the ampere ratings of all products used on this cord does not exceed the extension cord ampere rating. Make sure that the total of all products connected to the wall outlet does not exceed 15 amperes.
☒ To help protect your system from sudden, transient increases and decreases in electrical power, use a surge suppressor, line conditioner, or uninterruptible power supply (UPS).
☒ Position system cables and power cables carefully; Make sure that nothing rests on any cables.
☑ Never push objects of any kind into or through cabinet slots. They may touch dangerous voltage points or short out parts resulting in a risk of fire or electrical shock.
☒ Do not attempt to service the device yourself. Refer all servicing to qualified service personnel.
☒ If the following conditions occur, unplug the device from the wall outlet and take it to a qualified service personnel for repair:
- The power cord or plug has become damaged or fried
• Liquid has been spilled into the device - The device has been exposed to rain or water
- The device has been dropped, or the cabinet has been damaged
- The device exhibits a distinct change in performance, indicating a need for service
- The device does not operate normally when the operating instructions are followed
☑ Suitable for installation in Information Technology Rooms in accordance with Article 645 of the National Electrical Code and NFPA 75
CAUTION: Never attempt to replace the battery or open the switches' enclosure
*Note: Not all devices have slots or openings to allow for ventilation
IOGEAR DisplayPort Single View Secure KVM (CAC and non-CAC models)
| Function | GCS1412TAA4C | GCS1414TAA4C | GCS1418TAA4C | GCS1412TAA4 | GCS1414TAA4 | GCS1418TAA4 | ||
| Computer Connections | Direct 2 4 8 2 4 8 | |||||||
| Maximum 2 4 8 2 4 8 | ||||||||
| Console Connections 1 Direct 1 Direct | ||||||||
| Port Selection Pushbutton, Remote Port Selector Pushbutton, Remote Port Selector | ||||||||
| Connectors | Console Ports | Keyboard | 1 x USB Type A Female | 1 x USB Type A Female | ||||
| Video | 1 x DisplayPort Female (Black) | 1 x DisplayPort Female (Black) | ||||||
| Mouse | 1 x USB Type A Female | 1 x USB Type A Female | ||||||
| Speaker | 1 x Mini Stereo Jack Female (Green) | 1 x Mini Stereo Jack Female (Green) | ||||||
| Microphone | N/A | N/A | ||||||
| CAC | 1 x USB Type A Femal | N/A | ||||||
| KVM Ports | Keyboard/Mouse | 2 x USB Type-B Female | 4 x USB Type-B Female | 8 x USB Type-B Female | 2 x USB Type-B Female | 4 x USB Type-B Female | 8 x USB Type-B Female | |
| Video | 2 x DP Female | 4 x DP Female | 8 x DP Female | 2 x DP Female | 4 x DP Female | 8 x DP Female | ||
| CAC | 2 x USB Type-B Female | 4 x USB Type-B Female | 8 x USB Type-B Female | N/A | ||||
| Speaker | 2 x Mini Stereo Jack Female | 4 x Mini Stereo Jack Female | 8 x Mini Stereo Jack Female | 2 x Mini Stereo Jack Female | 4 x Mini Stereo Jack Female | 8 x Mini Stereo Jack Female | ||
| Microphone | N/A | N/A | ||||||
| Power 1 x 3-Prong AC | Socket 1 x 3-Prong AC | Socket | ||||||
| Remote Port Selector | 1 x RJ-11 | 1 x RJ-11 | ||||||
| Switches | Port | 2 x Pushbuttons | 4 x Pushbuttons | 8 x Pushbuttons | 2 x Pushbuttons | 4 x Pushbuttons | 8 x Pushbuttons | |
| Reset 1 x Semi-recessed Pushbutton 1 x Semi-recessed Pushbutton | ||||||||
| Power 1 x Rocker | 1 x Rocker | |||||||
| LEDs | On Line / Selected | 2 (Orange) | 4 (Orange) | 8 (Orange) | 2 (Orange) | 4 (Orange) | 8 (Orange) | |
| CAC activated | 2 (Green) | 4 (Green) | 8 (Green) | N/A | ||||
| Power 1 (Green) | 1 (Green) | |||||||
| Key Lock LED | 3 (Green; Num Lock, Caps Lock, Scroll Lock) | 3 (Green; Num Lock, Caps Lock, Scroll Lock) | ||||||
| Console Video | 1 (Green, on rear panel) | 1 (Green, on rear panel) | ||||||
| Emulation | Keyboard/Mouse | USB | USB | |||||
| Video | Max. 3840 x 2160 @30Hz (UHD) | Max. 3840 x 2160 @30Hz (UHD) | ||||||
| I/P Rating | 100-240V~; 50-60Hz; 1A | 100-240V~; 50-60Hz; 1A | ||||||
| Environment Physical Properties | Operating Temperature | 32 - 122F (0-50°C) | 32 - 122F (0-50°C) | |||||
| Storage Temperature 4 | -140F (-20 - 60°C) | -140F (-20 - 60°C) | ||||||
| Humidity | 0-80% RH, Non-condensing | 0-80% RH, Non-condensing | ||||||
| Physical Properties | Housing | Metal | Metal | |||||
| Weight 3.88lb (1.76kg) | (TBD) | 3.99lb (1.81kg) (TBD) | 7.28lb (3.30kg) (TBD) | 3.88lb (1.76kg) (TBD) | 3.99lb (1.81kg) (TBD) | 7.28lb (3.30kg) (TBD) | ||
| Dimension (L x W x H) | 13.1" x 6.42" x 1.73" (33.5cm x 16.3cm x 4.4cm) | 13.1" x 6.42" x 1.73" (33.5cm x 16.3cm x 4.4cm) | 17.0" x 8.0" x 2.58" (43.24cm x 20.4cm x 6.55cm) | 13.1" x 6.42" x 1.73" (33.5cm x 16.3cm x 4.4cm) | 13.1" x 6.42" x 1.73" (33.5cm x 16.3cm x 4.4cm) | 17.0" x 8.0" x 2.58" | ||
IOGEAR DisplayPort Dual View Secure KVM (CAC and non-CAC models)
| Function | GCS1422TAA4C | GCS1424TAA4C | GCS1428TAA4C | GCS1422TAA4 | GCS1424TAA4 | GCS1428TAA4 | ||
| Computer Connections | Direct 2 4 8 2 4 8 | |||||||
| Maximum 2 4 8 2 4 8 | ||||||||
| Console Connections 1 Direct 1 Direct | ||||||||
| Port Selection Pushbutton, Remote Port Selector Pushbutton, Remote Port Selector | ||||||||
| Connectors C | Console Ports | Keyboard 1 x USB Type A Female 1 x USB Type A Female | ||||||
| Video 2 x DisplayPort Female (Black) 2 x DisplayPort Female (Black) | ||||||||
| Mouse 1 x USB Type A Female 1 x USB Type A Female | ||||||||
| Speaker | 1 x Mini Stereo Jack Female (Green) 1 x Mini Stereo Jack Female (Green) | |||||||
| Microphone | N/A | N/A | ||||||
| CAC | 1 x USB Type A Female N/A | |||||||
| KVM Ports | Keyboard/Mouse | 2 x USB Type-B Female | 4 x USB Type-B Female | 8 x USB Type-B Female | 2 x USB Type-B Female | 4 x USB Type-B Female | 8 x USB Type-B Female | |
| Video | 4 x DP Female | 8 x DP Female | 16 x DP Female | 4 x DP Female | 8 x DP Female | 16 x DP Female | ||
| CAC | 2 x USB Type-B Female | 4 x USB Type-B Female | 8 x USB Type-B Female | N/A | ||||
| Speaker | 2 x Mini Stereo Jack Female | 4 x Mini Stereo Jack Female | 8 x Mini Stereo Jack Female | 2 x Mini Stereo Jack Female | 4 x Mini Stereo Jack Female | 8 x Mini Stereo Jack Female | ||
| Microphone | N/A | N/A | ||||||
| Power | 1 x 3-Prong AC Socket | 1 x 3-Prong AC Socket | ||||||
| Remote Port Selector | 1 x RJ-11 | 1 x RJ-11 | ||||||
| Switches | Port | 2 x Pushbuttons | 4 x Pushbuttons | 8 x Pushbuttons | 2 x Pushbuttons | 4 x Pushbuttons | 8 x Pushbuttons | |
| Reset 1 x Semi-recessed Pushbutton 1 x Semi-recessed Pushbutton | ||||||||
| Power | 1 x Rocker | 1 x Rocker | ||||||
| LEDs | On Line / Selected | 2 (Orange) | 4 (Orange) | 8 (Orange) | 2 (Orange) | 4 (Orange) | 8 (Orange) | |
| CAC activated | 2 (Green) | 4 (Green) | 8 (Green) | N/A | N/A | N/A | ||
| Power | 1 (Green) | 1 (Green) | ||||||
| Key Lock LED | 3 (Green; Num Lock, Caps Lock, Scroll Lock) | 3 (Green; Num Lock, Caps Lock, Scroll Lock) | ||||||
| Console Video | 2 (Green, on rear panel) | 2 (Green, on rear panel) | ||||||
| Emulation | Keyboard/Mouse | USB | USB | |||||
| Video | Max. 3840 x 2160 @30Hz (UHD) | Max. 3840 x 2160 @30Hz (UHD) | ||||||
| I/P Rating | 100-240V~; 50-60Hz; 1A 100-240V~; 50-60Hz; 1A | |||||||
| Environment Physical Properties | Operation Temperature | 32 - 122F (0-50°C) | 32 - 122F (0-50°C) | |||||
| Storage Temperature | 4 - 140F (-20 - 60°C) | 4 - 140F (-20 - 60°C) | ||||||
| Humidity | 0-80% RH, Non-condensing | 0-80% RH, Non-condensing | ||||||
| Physical Properties | Housing | Metal | Metal | |||||
| Weight | 4.70lb (2.13kg) (TBD) | 40.81lb (2.18kg) (TBD) | 7.10lb (3.22kg) (TBD) | 4.70lb (2.13kg) (TBD) | 40.81lb (2.18kg) (TBD) | 7.10lb (3.22kg) (TBD) | ||
| Dimension (L x W x H) | 13.2" x 6.42" x 2.58" (33.5cm x 16.3cm x 6.55cm) | 13.2" x 6.42" x 2.58" (33.5cm x 16.3cm x 6.55cm) | 17" x 8" x 2.58" (43.24cm x 20.4cm x 6.55cm) | 13.2" x 6.42" x 2.58" (33.5cm x 16.3cm x 6.55cm) | 13.2" x 6.42" x 2.58" (33.5cm x 16.3cm x 6.55cm) | 17"x8"x2.58" (43.24cm x 20.4cm x 6.55cm) | ||
IOGEAR HDMI Single View Secure KVM (CAC and non-CAC models)
| Function GCS1312TAA4C GCS1314TAA4C G | CS1312TAA4 GCS1314T | AA4 | ||||
| Computer Connections | Direct 2 4 2 4 | |||||
| Maximum 2 4 2 4 | ||||||
| Console Connections 1 Direct 1 Direct | ||||||
| Port Selection Pushbutton, Remote Port Selector | or Pushbutton, Remote Port Selector | |||||
| Connectors | Console Ports | Keyboard 1 x USB | Type A Female 1 x USB Type A Female | |||
| Video 1 x HDMI Female | Female (Black) 1 x HDMI Female (Black) | |||||
| Mouse 1 x USB Type A Female | 1 x USB Type A Female | |||||
| Speaker 1 x Mini Stereo Jack Female (Green) | 1 x Mini Stereo Jack Female (Green) | |||||
| Microphone | N/A | N/A | ||||
| CAC | 1 x USB Type A Female | N/A | ||||
| KVM Ports | Keyboard/Mouse | 2 x USB-B Female | 4 x USB-B Female | 2 x USB-B Female | 4 x USB-B Female | |
| Video | 2 x HDMI Female | 4 x HDMI Female | 2 x HDMI Female | 4 x HDMI Female | ||
| CAC | 2 x USB-B Female | 4 x USB-B Female | N/A | |||
| Speaker 2 x Mini Stereo Jack Female | Stereo Jack Female | 4 x Mini Stereo Jack Female | 2 x Mini Stereo Jack Female | 4 x Mini Stereo Jack Female | ||
| Microphone | N/A | N/A | ||||
| Power | 1 x 3-Prong AC Socket | 1 x 3-Prong AC Socket | ||||
| Remote Port Selector | 1 x RJ-11 | 1 x RJ-11 | ||||
| Switches | Port | 2 x Pushbuttons | 4 x Pushbuttons | 2 x Pushbuttons | 4 x Pushbuttons | |
| Reset 1 x Semi-recessed Pushbutton | 1 x Semi-recessed Pushbutton | |||||
| Power | 1 x Rocker | 1 x Rocker | ||||
| LEDs | On Line / Selected | 2 (Orange) | 4 (Orange) | 2 (Orange) | 4 (Orange) | |
| CAC activated | 2 (Green) | 4 (Green) | N/A | N/A | ||
| Power | 1 (Green) | 1 (Green) | ||||
| Key Lock LED | 3 (Green; Num Lock, Caps Lock, Scroll Lock) | 3 (Green; Num Lock, Caps Lock, Scroll Lock) | ||||
| Console Video | 1 (Green, on back panel) 1 (Green, on back panel) | |||||
| Emulation | Keyboard/Mouse | USB | USB | |||
| Video | Max. 3840 x 2160 @ 60 Hz (UHD) | Max. 3840 x 2160 @ 60 Hz (UHD) | ||||
| I/P Rating | 100–240V~ ; 50-60 Hz; 1A (TBD) | 100–240V~ ; 50-60 Hz; 1A (TBD) | ||||
| Environment Physical Properties | Operation Temperature | 32 - 122F (0-50°C) | 32 - 122F (0-50°C) | |||
| Storage Temperature | -4 - 140F (-20 – 60°C) | 4 - 140F (-20 – 60°C) | ||||
| Humidity | 0-80% RH, Non-condensing | 0-80% RH, Non-condensing | ||||
| Physical Properties | Housing | Metal | Metal | |||
| Weight | 3.88lb (1.76kg) (TBD) | 3.88lb (1.76kg) (TBD) | 3.88lb (1.76kg) (TBD) | 3.88lb (1.76kg) (TBD) | ||
| Dimension (L x W x H) | 13.1" x 6.42" x 1.73" (33.5cm x 16.3cm x 4.4cm) | 13.1" x 6.42" x 1.73" (33.5cm x 16.3cm x 4.4cm) | 13.1" x 6.42" x 1.73" (33.5cm x 16.3cm x 4.4cm) | 13.1" x 6.42" x 1.73"(33.5cm x 16.3cm x 4.4cm) | ||
IOGEAR HDMI Dual View Secure KVM (CAC and non-CAC models)
| Function GCS1322TAA4C GCS1324TAA4C GCS1322TAA4 GCS1324TAA4 | ||||||
| Computer Connections | Direct 2 4 2 4 | |||||
| Maximum 2 4 2 4 | ||||||
| Console Connections 1 Direct 1 Direct | ||||||
| Port Selection Pushbutton, Remote Port Selector Pushbutton, Remote Port Selector | ||||||
| Connectors Console | Ports Keyboard 1 x USB Type A Female | 1 x USB Type A Female | ||||
| Video 2 x HDMI Female (Black) 2 x HDMI Female (Black) | ||||||
| Mouse | 1 x USB Type A Female | 1 x USB Type A Female | ||||
| Speaker | 1 x Mini Stereo Jack Female (Green) | 1 x Mini Stereo Jack Female (Green) | ||||
| Microphone | N/A | N/A | ||||
| CAC | 1 x USB Type A Female | N/A | ||||
| KVM Ports | Keyboard/Mouse | 2 x USB-B Female | 4 x USB-B Female | 2 x USB-B Female | 4 x USB-B Female | |
| Video | 4 x HDMI Female | 8 x HDMI Female | 4 x HDMI Female | 8 x HDMI Female | ||
| CAC | 2 x USB-B Female | 4 x USB-B Female | N/A | |||
| Speaker | 2 x Mini Stereo Jack Female | 4 x Mini Stereo Jack Female | 2 x Mini Stereo Jack Female | 4 x Mini Stereo Jack Female | ||
| Microphone | N/A | N/A | ||||
| Power | 1 x 3-Prong AC Socket | 1 x 3-Prong AC Socket | ||||
| Remote Port Selector | 1 x RJ-11 | 1 x RJ-11 | ||||
| Switches | Port | 2 x Pushbuttons | 4 x Pushbuttons | 2 x Pushbuttons | 4 x Pushbuttons | |
| Reset 1 x Semi-recessed Pushbutton 1 x Semi-recessed Pushbutton | ||||||
| Power | 1 x Rocker | 1 x Rocker | ||||
| LEDs | On Line / Selected | 2 (Orange) | 4 (Orange) | 2 (Orange) | 4 (Orange) | |
| CAC activated | 2 (Green) 4 (Green) | N/A | N/A | |||
| Power | 1 (Green) | 1 (Green) | ||||
| Key Lock LED | 3 (Green; Num Lock, Caps Lock, Scroll Lock) | 3 (Green; Num Lock, Caps Lock, Scroll Lock) | ||||
| Console Video | 2 (Green, on rear panel) | 2 (Green, on rear panel) | ||||
| Emulation | Keyboard/Mouse | USB | USB | |||
| Video | Max. 3840 x 2160 @ 60 Hz (UHD) | Max. 3840 x 2160 @ 60 Hz (UHD) | ||||
| I/P Rating | 100–240V~ ; 50-60 Hz; 1A (TBD) | 100–240V~ ; 50-60 Hz; 1A (TBD) | ||||
| Environment Physical Properties | Operating Temperature | 32 - 122F (0-50°C) | 32 - 122F (0-50°C) | |||
| Storage Temperature | 4 - 140F (-20 – 60°C) | 4 - 140F (-20 – 60°C) | ||||
| Humidity | 0-80% RH, Non-condensing | 0-80% RH, Non-condensing | ||||
| Physical Properties | Housing | Metal | Metal | |||
| Weight | 4.54lb (2.06kg) (TBD) | 4.65 (2.11kg) (TBD) | 4.54lb (2.06kg) (TBD) | 4.65 (2.11kg) (TBD) | ||
| Dimension | 13.2" x 6.42" x 2.58" (33.5cm x 16.4cm x 6.6cm) | 13.2" x 6.42" x 2.58" (33.5cm x 16.4cm x 6.6cm) | 13.2" x 6.42" x 2.58" (33.5cm x 16.4cm x 6.6cm) | 13.2" x 6.42" x 2.58” (33.5cm x 16.4cm x 6.6cm) | ||
IOGEAR DVI Single View Secure KVM (CAC and non-CAC models)
| Function | GCS1212TAA4C | GCS1214TAA4C | GCS1218TAA4C | GCS1212TAA4 | GCS1214TAA4 | GCS1218TAA4 | ||
| Computer Connections | Direct 2 4 8 2 4 8 | |||||||
| Maximum 2 4 8 2 4 8 | ||||||||
| Console Connections 1 Direct 1 Direct | ||||||||
| Port Selection Pushbutton, Remote Port Selector | Selector Pushbutton, Remote Port Selector | |||||||
| Connectors | Console Ports Key | Keyboard 1 x USB Type A Female | USB Type A Female | |||||
| Video | 1 x DVI-I DL Female | 1 x DVI-I DL Female | ||||||
| Mouse | 1 x USB Type A Female | 1 x USB Type A Female | ||||||
| Speaker | 1 x Mini Stereo Jack Female (Green) | 1 x Mini Stereo Jack Female (Green) | ||||||
| Microphone | N/A | N/A | ||||||
| CAC | 1 x USB Type A Female | N/A | ||||||
| KVM Ports | Keyboard/Mouse | 2 x USB-B Female | 4 x USB-B Female | 8 x USB-B Female | 2 x USB-B Female | 4 x USB-B Female | 8 x USB-B Female | |
| Video | 2 x DVI-I DL Female | 4 x DVI-I DL Female | 8 x DVI-I DL Female | 2 x DVI-I DL Female | 4 x DVI-I DL Female | 8 x DVI-I DL Female | ||
| CAC | 2 x USB-B Female | 4 x USB-B Female | 8 x USB-B Female | N/A | ||||
| Speaker | 2 x Mini Stereo Jack Female | 4 x Mini Stereo Jack Female | 8 x Mini Stereo Jack Female | 2 x Mini Stereo Jack Female | 4 x Mini Stereo Jack Female | 8 x Mini Stereo Jack Female | ||
| Microphone | N/A | N/A | ||||||
| Power | 1 x 3-Prong AC Socket | 1 x 3-Prong AC Socket | ||||||
| Remote Port Selector | 1 x RJ-11 | 1 x RJ-11 | ||||||
| Switches | Port | 2 x Pushbuttons | 4 x Pushbuttons | 8 x Pushbuttons | 2 x Pushbuttons | 4 x Pushbuttons | 8 x Pushbuttons | |
| Reset 1 x Semi-recessed Pushbutton | Pushbutton | |||||||
| Power | 1 x Rocker | 1 x Rocker | ||||||
| LEDs | On Line / Selected | 2 (Orange) | 4 (Orange) | 8 (Orange) | 2 (Orange) | 4 (Orange) | 8 (Orange) | |
| CAC activated | 2 (Green) | 4 (Green) | 8 (Green) | N/A | N/A | N/A | ||
| Power | 1 (Green) | 1 (Green) | ||||||
| Key Lock LED | 3 (Green; Num Lock, Caps Lock, Scroll Lock) | 3 (Green; Num Lock, Caps Lock, Scroll Lock) | ||||||
| Console Video | 1 (Green, on rear panel) | 1 (Green, on rear panel) | ||||||
| Emulation | Keyboard/Mouse | USB | USB | |||||
| Video | DVI Dual Link: 2560 x 1600* | DVI Dual Link: 2560 x 1600* | ||||||
| I/P Rating | 100-240V~; 50-60 Hz; 1A (TBD) | 100-240V~; 50-60 Hz; 1A (TBD) | ||||||
| Environment Physical Properties | Operating Temperature | 32 - 122F (0-50°C) | 32 - 122F (0-50°C) | |||||
| Storage Temperature | 4 - 140F (-20 - 60°C) | 4 - 140F (-20 - 60°C) | ||||||
| Humidity | 0-80% RH, Non-condensing | 0-80% RH, Non-condensing | ||||||
| Physical Properties | Housing Metal | Metal | ||||||
| Weight 3.95lb (1.79kg) | (TBD) | 3.97lb (1.80kg) (TBD) | 7.39lb (3.35kg) (TBD) | 3.95lb (1.79kg) (TBD) | 3.97lb (1.80kg) (TBD) | 7.39lb (3.35kg) (TBD) | ||
| Dimension | 13.1" x 6.42" x 1.73" (33.5cm x 16.3cm x 4.4cm) | 13.2" x 6.42" x 1.73" (33.5cm x 16.3cm x 4.4cm) | 17" x 8" x 2.58" (43.24cm x 20.4cm x 6.55cm) | 13.1" x 6.42" x 1.73" (33.5cm x 16.3cm x 4.4cm) | 13.2" x 6.42" x 1.73" (33.5cm x 16.3cm x 4.4cm) | 17" x 8" x 2.58" (43.34cm x 20.4cm x 6.55cm) | ||
*IOGEAR Single / Dual View Dual-Link DVI Secure KVM Switches offer 3840 x 2160 @ 30Hz video output on compatible HDMI-interfaced monitors and / or computers used with IOGEAR DVI-to-HDMI KVM cables
IOGEAR DVI Dual View Secure KVM (CAC and Non-CAC models)
| Function | GCS1222TAA4C | GCS1224TAA4C | GCS1228TAA4C | GCS1222TAA4 | GCS1224TAA4 | GCS1228TAA4 | ||
| Computer Connections | Direct 2 4 8 2 4 8 | |||||||
| Maximum 2 4 8 2 4 8 | ||||||||
| Console Connections 1 Direct 1 Direct | ||||||||
| Port Selection Pushbutton, Remote Port Selector Pushbutton, Remote Port Selector | ||||||||
| Connectors | Console Ports | Keyboard 1 x USB Type A Female 1 x USB Type A Female | ||||||
| Video 2 x DVI-1 DL Female 2 x DVI-1 DL Female | ||||||||
| Mouse | 1 x USB Type A Female | 1 x USB Type A Female | ||||||
| Speaker | 1 x Mini Stereo Jack Female (Green) | 1 x Mini Stereo Jack Female (Green) | ||||||
| Microphone | N/A | N/A | ||||||
| CAC | 1 x USB Type A Female | N/A | ||||||
| KVM Ports | Keyboard/ Mouse | 2 x USB-B Female | 4 x USB-B Female | 8 x USB-B Female | 2 x USB-B Female | 4 x USB-B Female | 8 x USB-B Female | |
| Video 4 x DV | I-DI DL Female | 8 x DVI-I DL Female | 16 x DVI-I DL Female | 4 x DVI-I DL Female | 8 x DVI-I DL Female | 16 x DVI-I DL Female | ||
| CAC | 2 x USB-B Female | 4 x USB-B Female | 8 x USB-B Female | N/A | ||||
| Speaker | 2 x Mini Stereo Jack Female | 4 x Mini Stereo Jack Female | 8 x Mini Stereo Jack Female | 2 x Mini Stereo Jack Female | 4 x Mini Stereo Jack Female | 8 x Mini Stereo Jack Female | ||
| Microphone | N/A | N/A | ||||||
| Power | 1 x 3-Prong AC Socket | 1 x 3-Prong AC Socket | ||||||
| Remote Port Selector | 1 x RJ-11 | 1 x RJ-11 | ||||||
| Switches | Port | 2 x Pushbuttons | 4 x Pushbuttons | 8 x Pushbuttons | 2 x Pushbuttons | 4 x Pushbuttons | 8 x Pushbuttons | |
| Reset 1 x Semi-recessed Pushbutton 1 x Semi-recessed Pushbutton | ||||||||
| Power | 1 x Rocker | 1 x Rocker | ||||||
| LEDs | On Line / Selected | 2 (Orange) | 4 (Orange) | 8 (Orange) | 2 (Orange) | 4 (Orange) | 8 (Orange) | |
| CAC activated | 2 (Green) | 4 (Green) | 8 (Green) | N/A | N/A | N/A | ||
| Power | 1 (Green) | 1 (Green) | ||||||
| Key Lock LED | 3 (Green; Num Lock, Caps Lock, Scroll Lock) | 3 (Green; Num Lock, Caps Lock, Scroll Lock) | ||||||
| Console Video | 2 (Green, on rear panel) | 2 (Green, on rear panel) | ||||||
| Emulation Keyboard/Mouse USB USB | ||||||||
| Video | DVI Dual Link: 2560 x 1600* | DVI Dual Link: 2560 x 1600* | ||||||
| I/P Rating | 100-240V~; 50-60Hz; 1A (TBD) | 100-240V~; 50-60Hz; 1A (TBD) | ||||||
| Environment Physical Properties | Operation Temperature | 32 - 122F (0-50°C) | 32 - 122F (0-50°C) | |||||
| Storage Temperature | 4 - 140F (-20 - 60°C) | 4 - 140F (-20 - 60°C) | ||||||
| Humidity | 0-80% RH, Non-condensing | 0-80% RH, Non-condensing | ||||||
| Physical Properties | Housing | Metal | Metal | |||||
| Weight | 4.72lb (2.14kg) (TBD) | 4.81lb (2.18kg) (TBD) | 7.36lb (3.34kg) (TBD) | 4.72lb (2.14kg) (TBD) | 4.81lb (2.18kg) (TBD) | 7.36lb (3.34kg) (TBD) | ||
| Dimension | 13.19" x 6.42" x 2.58" (33.5cm x 16.3cm x 6.5cm) | 13.19" x 6.42" x 2.58" (33.5cm x 16.3cm x 6.5cm) | 17" x 9.27" x 2.58" (43.24cm x 20.4cm x 6.55cm) | 13.19" x 6.42" x 2.58" (33.5cm x 16.3cm x 6.5cm) | 13.19" x 6.42" x 2.58" (33.5cm x 16.3cm x 6.5cm) | 17" x 9.27" x 2.58” (43.24cm x 20.4cm x 6.55cm) | ||
*IOGEAR Single / Dual View Dual-Link DVI Secure KVM Switches offer 3840 x 2160 @ 30Hz video output on compatible HDMI-interfaced monitors and / or computers and used with IOGEAR DVI-to-HDMI KVM cables
Limited Warranty
IN NO EVENT SHALL THE DIRECT VENDOR'S LIABILITY EXCEED THE PRICE PAID FOR THE PRODUCT FROM DIRECT, INDIRECT, SPECIAL, INCIDENTAL, OR CONSEQUENTIAL DAMAGES RESULTING FROM THE USE OF THE PRODUCT, DISK, OR ITS DOCUMENTATION.
The direct vendor makes no warranty or representation, expressed, implied, or statutory with respect to the contents or use of this documentation, and especially disclaims its quality, performance, merchantability, or fitness for any particular purpose.
The direct vendor also reserves the right to revise or update the device or documentation without obligation to notify any individual or entity of such revisions, or update. For further inquiries, please contact your direct vendor.
This Secure KVM carries a 4 Year Limited Warranty. For the terms and conditions of this warranty, please visit https://www.iogear.com/support/warranty
Register your IOGEAR Secure KVM Switch online at https://www.iogear.com/register For further assistance with IOGEAR Secure KVM Switch series, please contact IOGEAR Technical Support department at GovSupport@iogear.com
NOTES:
IOGEAR®