PEMA 4125C - Amplifier Ashly - Free user manual and instructions
Find the device manual for free PEMA 4125C Ashly in PDF.

User questions about PEMA 4125C Ashly
0 question about this device. Answer the ones you know or ask your own.
Ask a new question about this device
Download the instructions for your Amplifier in PDF format for free! Find your manual PEMA 4125C - Ashly and take your electronic device back in hand. On this page are published all the documents necessary for the use of your device. PEMA 4125C by Ashly.
USER MANUAL PEMA 4125C Ashly
The lightning flash with arrowhead symbol, within an equilateral triangle, is intended to alert the user to the presence of uninsulated "dangerous voltage" within the product's enclosure that may be of sufficient magnitude to constitute a risk of electric shock to persons. The exclamation point within an equilateral triangle is intended to alert the user to the presence of important operating and maintenance instructions in the literature accompanying the device.
- Read these instructions.
- Keep these instructions.
- Heed all warnings.
- Follow all instructions.
- To reduce the risk of fire or electric shock, do not expose this apparatus to rain or moisture.
- Do not use this apparatus near water.
- Clean only with dry cloth.
- Do not block any ventilation openings. Install in accordance with the manufacturer's instructions.
- Do not install near any heat sources such as radiators, heat registers, stoves, or other apparatus.
- Do not defeat the safety purpose of the polarized or grounding-type plug. A polarized plug has two blades with one wider than the other. A grounding type plug has two blades and a third grounding prong. The wide blade or the third prong are provided for your safety. If the provided plug does not fit into your outlet, consult an electrician for replacement of the obsolete outlet.
- Protect the power cord from being walked on or pinched particularly at plugs, convenience receptacles, and the point where they exit from the apparatus.
- Only use attachments/accessories specified by the manufacturer.
- Use only with the cart, stand, tripod, bracket, or table specified by the manufacturer, or sold with the apparatus. When a cart is used, use caution when moving the cart/apparatus combination to avoid injury from tip-over.
- Unplug this apparatus during lightning storms or when unused for long periods of time.
- Refer all servicing to qualified service personnel. Servicing is required when the apparatus has been damaged in any way, such as power-supply cord or plug is damaged, liquid has been spilled or objects have fallen into the apparatus, the apparatus has been exposed to rain or moisture, does not operate normally, or has been dropped.
This device complies with part 15 of the FCC Rules. Operation is subject to the following two conditions:
- This device may not cause harmful interference
- This device must accept any interference received, including interference that may cause undesired operation
Note: This equipment has been tested and found to comply with the limits for a Class B digital device, pursuant to part 15 of the FCC Rules. These limits are designed to provide reasonable protection against harmful interference in both a commercial and residential installation. This equipment generates, uses and can radiate radio frequency energy and, if not installed and used in accordance with the instructions, may cause harmful interference to radio communications. However, there is no guarantee that interference will not occur in a particular installation. If this equipment does cause harmful interference to radio or television reception, which can be determined by turning the equipment off and on, the user is encouraged to try to correct the interference by one or more of the following measures:
- Reorient or relocate the receiving antenna.
- Increase the separation between the equipment and receiver.
- Connect the equipment into an outlet on a circuit different from that to which the receiver is connected.
- Consult the dealer or an experienced radio/TV technician for help..
Table Of Contents
1 Introduction and Unpacking 4
2 Pema Amplifier Models 5
2.1 Product Overview 5
2.2 Installation Requirements 5
2.3 Ethernet Communications Requirements 5
2.4 Front Panel Features....6
2.5 Rear Panel Features 7
2.6 Amplifier Protection 8
3 Protea ^ne Control Software 8
3.1 Installing Software 8
3.2 Device Options 10
3.3 Preset Options 10
3.4 Device Control Tabs 11
3.4a Control Surface.... 11
3.4b Security 13
3.4c Network Properties 13
3.4d DSP Controls 14
3.4e Input Source 16
3.4f Metering....16
3.4g Event Scheduler 16
3.4h Fault Log 16
4 Pema Remote Control 17
4.1 Remote Control Devices 17
4.1a WR-1 Level Control 17
4.1b WR-1.5 Level Control and Preset Recall Switch.... 17
4.1c WR-2 Preset Recall Switches.... 17
4.1d WR-5 Programmable Button Control (and RPS-18 Remote Power Supply) ..... 17
4.1e RD-8C or RW-8C Programmable Fader Controller 18
4.1f INA-1 Inline RS-232 Adapter.... 18
4.1g neWR-5 Networked Programmable Button Controller.... 18
4.1h FR-8 or FR-16 Programmable Fader Controller 18
4.1i Ashly Remote Application for iPad ^® ..... 18
4.2 Remote Control Functions 19
4.2a Power Switch Disable....19
4.2b On/Off Remote Standby.... 19
4.2c Remote Preset Recall 20
4.2d Remote Gain Control 20
4.2e Remote Channel Mute 21
4.2f Remote Zone Input Source Selection 21
5 Troubleshooting 22
6 Specifications 24
7 Warranty....27
8 Block Diagram....28
WARNING:
THIS APPARATUS MUST BE EARTHED
1. INTRODUCTION
Thank you for your purchase of this Pema ^™ series Protea ^™ Equipped Media Amplifier. This single audio solution combines state of the art, light weight, high efficiency switching amplifier technology, integrated Ethernet control, comprehensive Protea DSP processing and matrix mixing, optional Dante ^® or CobraNet ^® network audio, and remote control options. Please read this entire manual to fully understand the features and capabilities of this product.
Standard Pema Features:
- 8x8 DSP Matrix with 4 or 8 channel power amplifiers
• 250W/channel and 125W/channel models - Low Z output or constant voltage models available
- CobraNet or Dante available as a factory installed option
- Eight analog inputs use +4dBu balanced Euroblock and -10dBV unbalanced summed mono RCA connectors
- Mic preamps with switchable +15V phantom power on all Mic/Line inputs
- Switchable transformer isolated -20dBu TEL-PBX 600 Ohm input on Channel 1
- Protea ^nc software with comprehensive DSP tool set, matrix router/mixer, metering, event scheduler and event log
- DSP tools include auto-mixer, ambient noise compensation, feedback suppressor, autoleveler, and much more
- Balanced, post DSP analog preamp outputs for every amplifier output channel
- Compatible with Ashly network and serial data remote controllers, plus Ashly Remote app for iPad ^®
• Passive remote control options include remote standby, contact closure preset recall, and remote DC level control - Front panel attenuators and metering
- Five year warranty
About Ashly
Ashly Audio was founded in 1974 by a group of recording engineers, concert sound professionals, and electronics designers. The first products were elaborate custom consoles for friends and associates, but business quickly spread to new clients and the business grew. The philosophy we established from the very beginning holds true today: to offer only the highest quality audio tools at an affordable cost to the professional user – ensuring reliability and long life. Many years later, Ashly remains committed to these principles.
Unpacking
As a part of our system of quality control, every Ashly product is carefully inspected before leaving the factory to ensure flawless appearance. After unpacking, please inspect for any physical damage. Save the shipping carton and all packing materials, as they were carefully designed to reduce to a minimum the possibility of transportation damage should the unit again require packing and shipping. In the event that damage has occurred, immediately notify your dealer so that a written claim to cover the damages can be initiated.
The right to any claim against a public carrier can be forfeited if the carrier is not notified promptly and if the shipping carton and packing materials are not available for inspection by the carrier. Save all packing materials until the claim has been settled.
2. PEMA AMPLIFIER MODELS
2.1 Product Overview
The Pema series of amplifiers are available in the following 120 VAC or 230 VAC mains configurations. Each model can have an optional factory installed CobraNet or Dante network audio module. Constant voltage amplifiers can include 25V, 70V, and 100V output models.
Pema 4125 - Eight input, four 125W amp channels, low Z (speaker), or constant voltage (High Z) output models.
Pema 8125 - Eight input, eight 125W amp channels, low Z (speaker), or constant voltage (High Z) output models.
Pema 4250 - Eight input, four 250W amp channels, low Z (speaker), or constant voltage (High Z) output models.
Pema 8250 - Eight input, eight 250W amp channels, low Z (speaker), or constant voltage (High Z) output models.
2.2 Installation Requirements
Each Pema model is 2RU, and weighs <22 pounds (10kg). The model number, mains voltage, and power consumption are indicated on the back panel beneath the AC inlet.
Caution: Before mounting or wiring the unit, always disconnect it from the mains. Use four screws when mounting the amplifier to the front rack rails. Rear support is also recommended, especially for mobile or touring use. Air flow vents for cooling the amplifier require the front panel to have access to ambient room temperature air. Cool air is drawn in from the front and blown out the sides. It is not necessary to leave a space above or below the amplifier in the rack. To reduce the risk of fire or electric shock, do not expose this apparatus to rain or moisture. Before connecting to mains power, make sure that the controls, software, and wiring are all set to the configuration needed for your particular application. Failure to do so could result in damage to the unit or other components in the system.
Wiring: Always use high quality shielded cable for input signals, and use balanced input signal when possible. To avoid possible system noise or oscillation, avoid running low level signal wires parallel to speaker outputs or AC wiring, especially over long distance. Before testing the system, double check all connections and settings. Refer to the specifications section of this manual for input, output, Ethernet, and other amplifier properties to consider during installation.
2.3 Ethernet Communications Requirements
Ethernet communications with this amplifier is made by connecting it directly to a PC running Protea ^® control software, or connecting it to a networked PC through an Ethernet router, switch, hub, or patch panel. Networks using the Cat-5, Cat-5e, and Cat-6 standard will all work with Pema amplifiers. Maximum cable distance is 100 meters (328 ft) from the nearest router, hub, or switch. Ashly network amplifiers and remotes will auto detect their Ethernet connection, and adapt to either a straight through pin to pin or crossover Ethernet cable.
2.3a IP Address - There is no need to assign IP addresses to Pema products used with a PC or a network router. The router or Link Local Addressing will assign IP addresses to each product automatically.
When a router is not available, most current Pema and NE products have the capability to assign their own IP address based on Link Local Addressing. This allows the device to operate without the need to set up static IP address. If the only option is to use an Ethernet switch instead of a router, and communications problems remain which cannot be solved with the use of the link local standard, each Pema device must have a static IP address assigned from within Protea ^™ software. This is done by selecting “Manual Configuration” in the Network Properties tab of each device, where the system/network administrator must assign each product its’ own unique static IP address, each with the appropriate sub net if applicable.
2.3b Firewalls - If Proteca ^ae software does not detect the amplifier or show real time changes, the firewall in the host PC may need to have Proteca ^ae software added to its firewall exceptions, since firewalls may block the amplifier response to the PC. The current PC firewall status is found by clicking on the Windows Start button, then Control Panel, then double clicking on the security shield where firewall exceptions are configured.
2.3c Wi-Fi and LAN – For the initial device auto-configuration process, any secondary Wi-Fi connection should be disabled on the PC, and the LAN (Local Area Network) connection must be enabled on the PC. Secondary network connections may confuse the auto device discovery process. Go to the Windows Control Panel, then Network Connections, to disable any secondary network connections. Once communications with the device is established, secondary network connections can be enabled again.
2.3d Connecting Device(s) - Connect the Ethernet cable from the PC or network to the amplifier. If a successful Ethernet connection has been made, a solid green LED (Link) lights up on the amplifier's RJ-45 Ethernet port. If there is no green LED showing, there is either a problem with the cable or the network source which must be addressed before proceeding further. All RJ-45 Ethernet ports flash green when active, so backtrack through any other cables, routers, or switches to find the problem. The flashing yellow LED (Data) indicates that data is flowing to or from the amplifier.
2.4 Front Panel Features

text_image
1 2 3 10 4 pêma 8250 STATUS POWER STANLEY PROTECT DISABLE COM 6 5 7 8 9 SUPINUTS SUPINUTS -4 - -12 - -18 - BLOODS BLOODS TEMP TEMP CURRENT CURRENT 1 2 3 4 5 6 7 8- Mounting Holes – For rack mounting.
- Power Switch - Switches the unit on or off. Note: The power switch can be disabled from Protea ^ne Software.
- Status LEDs – Indicate status of: Power, Standby, Protect, Power Switch Disable, and Com activity.
- Air Inflow Vents - Cool air enters here and is vented out through the sides.
- Channel Controls - Channel control area.
- Signal LEDs - The lowest LED will begin to light when the output voltage reaches -18dBu below rated output. The Clip LEDs will begin to flash when output voltage is 1/2 volt below the output power supply voltage, or the front end is clipped.
- Bridge - This LED indicates that the channel pair is selected to BRIDGE mode from within Protea ^ne software, and that only the odd input channel level control is active.
- Temp and Current LEDs - The Temp LED indicates that the amplifier channel has reached an excessively high operating temperature and will gradually attenuate the signal to compensate. If unable to sufficiently cool the channel, the amplifier will eventually go into protect mode. The Current LED confirms that the amplifier output is delivered to a speaker load.
- Channel Attenuators - These control the input signal level to the amp, and can be disabled from software.
- Factory Reset – To reset all internal configurations (including presets and passwords) back to the original factory settings, press and hold this recessed front panel momentary switch during power up until all channel LEDs sequence from bottom to top. Upon reset completion, the LEDs will turn off and the amp will be in normal operating mode.
text_image
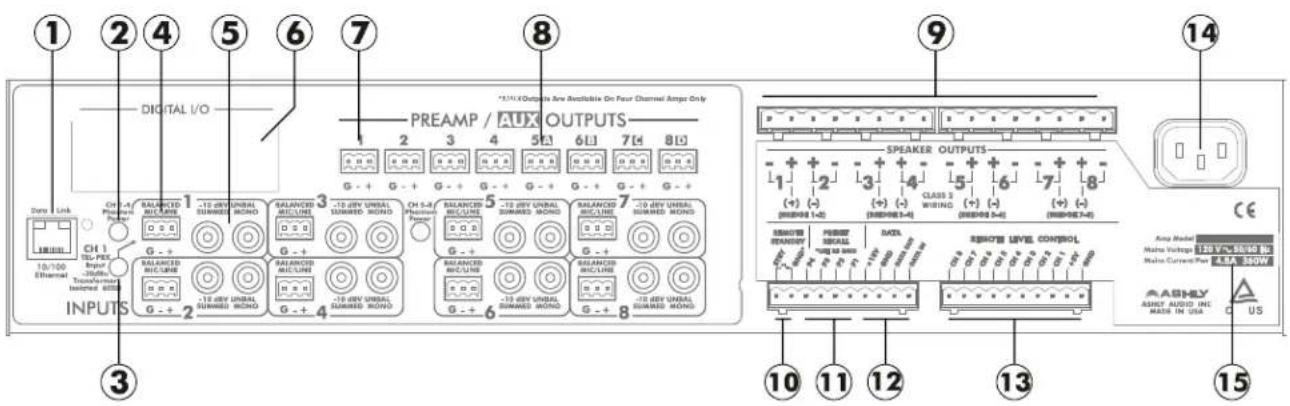
1 2 4 5 6 7 8 *3/4 Outputs Are Available On Four Channel Amps Only PREAM / AUX OUTPUTS 2 3 4 5 6 7 8 G - + G - + G - + G - + BALANCED REC/LINE SUMMARY ONION CH 1 Input TransAurora Isolated 60Hz G - + BALANCED REC/LINE SUMMARY ONION CH 1/4 BALANCED REC/LINE SUMMARY ONION G - + BALANCED REC/LINE SUMMARY ONION CH 1/4 BALANCED REC/LINE SUMMARY ONION G - + BALANCED REC/LINE SUMMARY ONION CH 1/4 BALANCED REC/LINE SUMMARY ONION G - + BALANCED REC/LINE SUMMARY ONION CH 1/4 BALANCED REC/LINE SUMMARY ONION G - + BALANCED REC/LINE SUMMARY ONION CH 1/42.5 Rear Panel Features
- Ethernet Port - This RJ-45 connector allows Ethernet control and monitoring of the amplifier using Protea ^ne software.
- Phantom Power Switch - This switch applies +15V phantom power to channel 1-4 balanced inputs. A separate switch is used for channels 5-8.
- TEL-PBX Switch - This switches between Mic/Line and PBX analog input for channel one only. When switched to TEL-PBX, a 600 Ohm isolation transformer is inserted into the channel one input signal path. This transformer is designed for limited bandwidth audio from a telephone paging system.
- Balanced Mic/Line Input - This is used for a three wire (G, +, -) balanced analog input, and uses Euroblock connectors. If an unbalanced input signal is to be connected here, wire the signal to (+), the input ground to (G), and connect (-) to (G).
- Unbalanced Summed Mono Input - This pair of RCA jacks is used for analog line level (-10dBv) input, and sums a stereo signal together for that input. Note: Unbalanced line level sources may reference their outputs to a different ground than the Pema amplifier, creating the potential for ground loop hum. Always use short cable lengths for unbalanced signals, routed away from AC, video, or data cables, and make every effort to use a common grounding point for all devices. In the event there is still ground loop hum, isolate the unbalanced input signal by using an in-line isolation transformer.
- Digital I/O Slot – Installation of this option allows this amplifier to be part of a CobraNet or Dante digital audio network.
- Preamp Outputs - These Euroblock connectors provide access to post-DSP preamp signals for each channel, and are used to drive other amplifiers or processors with the same signal that is driving the power amplifier. The preamp outputs are pseudo-balanced, meaning they use single ended signal with balanced impedance, and can be wire balanced or unbalanced.
- AUX Outputs - On four channel amplifiers only, the four AUX outputs offer additional and independent post-DSP signals for driving other amplifiers or processors. AUX outputs are pseudo-balanced.
- Euroblock Speaker Connectors - Used to connect the speakers or distributed line transformers, depending on model.
- Remote Standby - These two contact closure pins are wired to a switch to remotely place the amp in standby.
- Preset Recall - These four pins (using remote standby GND) can be wired to remote contact closure switches to recall one of the first four amplifier stored presets. Preset recall function is defined within Protea ^ne software.
- Data - These four pins offer serial data control and can be wired to Ashly remote control devices such as the WR-5 or RD-8C. Ashly also offers an in-line converter called the INA-1 that allows the Data port to be used with RS-232 controllers.
- Remote Level Control - These pins can be wired to remote 10k Ohm potentiometers such as the Ashly WR-1 for DC level control of individual channels.
- AC Inlet - Used for the detachable AC cord. Use only the Ashly Audio factory supplied AC cord.
- Model Information - This sticker tells the model name, mains voltage, and mains power/current consumption.
WARNING: Do not remove or lift the mains connector ground.
2.6 Amplifier Protection
Ashly Pema amplifiers have the following protection circuits:
Over Current Protection - When the output current exceeds the amplifier's safe operating limits. This occurs in the amplifier output stage.
Thermal Protection - When the internal temperature is below 40^ C the fan runs at its slowest speed. Above 40^ C the speed is increased until it reaches its maximum value. If the temperature exceeds 100^ C, the input on that channel is reduced. If the temperature exceeds 110^ C, the power supply is switched off.
Mains Protection – Protection within the power supply includes: In-rush Current Limitation during power up, Mains Over Voltage Detection, and internal Mains Fuse Protection. To protect the Mains fuse against AC overcurrent due to excessive audio output current, there is a protection scheme indicated on the amplifier front panel and in Protea® software which reduces audio output level until the overcurrent condition is no longer present.
3. PROTEA ^ne CONTROL SOFTWARE
3.1 Installing Software
Ashly Protea ^ne software is included on a CD with each unit. Software updates may become available on the Ashly web site. Autorun will launch the application
text_image
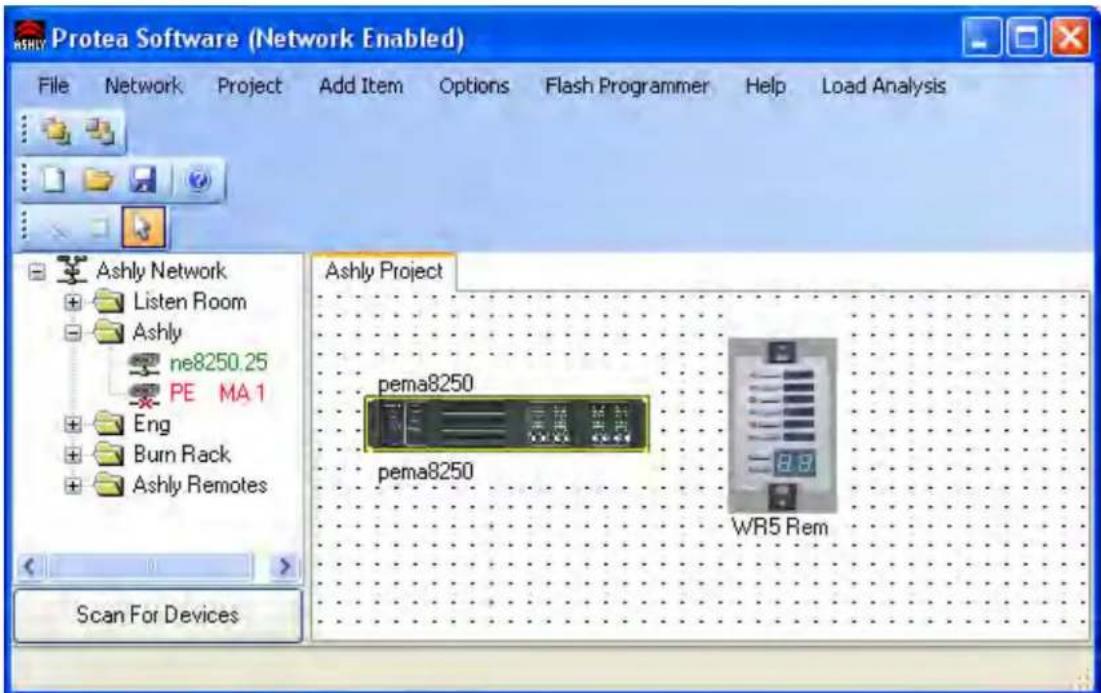
Protea Software (Network Enabled) File Network Project Add Item Options Flash Programmer Help Load Analysis Ashly Network Listen Room Ashly ne8250.25 PE MA 1 Eng Burn Rack Ashly Remotes Scan For Devices Ashly Project pema8250 pema8250 WR5 RemProted ^™ Software Main Menu, Menu Tree, and Project Canvas
Once the software has been installed on the computer and Ethernet connections with the amplifier have been made, launch the software. All available Ashly network enabled devices will be automatically detected and displayed in the Ashly Network device tree on the left side of the main software startup window.
Device icons can be dragged onto the project canvas from the device tree, or placed as virtual devices in "Design Mode". In other words, a device icon on the canvas is not necessarily a live product. It may be a virtual device, or a device that is currently off-line. In the device tree, all currently connected and active devices are highlighted in green. Ashly devices which have
been previously installed but are currently off-line or unavailable are highlighted in red. Individual devices can be dragged onto the project canvas to simulate physical rack installation groups. Editing a device can be done from the device tree or an icon on the canvas. All changes made in software are executed in real time on the device.
The software scans for active devices on start-up. The user can manually scan at any time as well with
In addition to detecting which models are currently online, any factory installed options within each amplifier are detected. Dante or CobraNet are the only options available for Pema. The software control surface for each device automatically displays available controls for installed options. Note: The user can find and verify a single physical device on the network by right clicking over the unit's name in the drop down menu or picture on the canvas, and then click
The project canvas is used to visually represent a sound system installation, and can display any of the networked Ashly processors, amplifiers, and remotes used in that system. The user can also place an assortment of isolated control objects such as level faders, single LEDs, meter bars, etc, and map them to specific device functions within that project. Once a control object is placed using
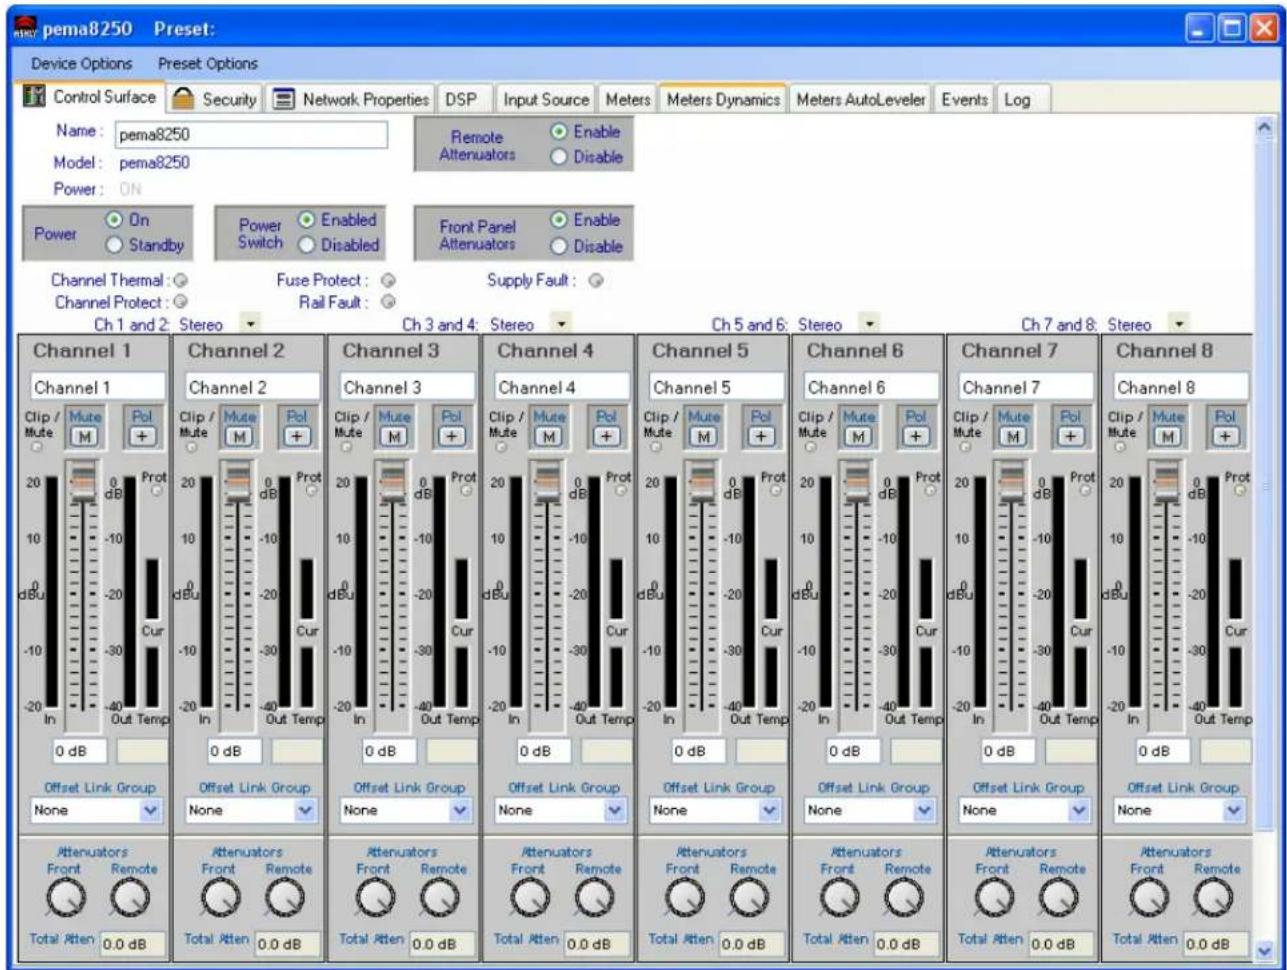
Once Protea ^nc software is installed and devices identified on the network, a new project can be created and saved. A project file represents the physical hardware installation via canvas items plus all device settings. Individual properties are edited in the control surface window (shown below) by double clicking on the specific Pema amplifier.
text_image
pema8250 Preset: Device Options Preset Options Control Surface Security Network Properties DSP Input Source Meters Meters Dynamics Meters AutoLeveler Events Log Name: pema8250 Model: pema8250 Power: ON Power On Standby Power Switch Enabled Disabled Front Panel Attenuators Enable Disable Channel Thermal Fuse Protect Supply Fault Channel Protect Rail Fault Ch 1 and 2 Stereo Ch 3 and 4 Stereo Ch 5 and 6 Stereo Ch 7 and 8 Stereo Channel 1 Channel 1 Clip / Mute Pol 0 dB Offset Link Group None Offset Link Group None Offset Link Group None Offset Link Group None Offset Link Group None Offset Link Group None Attenuators Front Remote Total Atten 0.0 dB Attenuators Front Remote Total Atten 0.0 dB Attenuators Front Remote Total Atten 0.0 dB Attenuators Front Remote Total Atten 0.0 dB Attenuators Front Remote Total Atten 0.0 dB Attenuators Front Remote Total Atten 0.0 dB Attenuators Front Remote Total Atten 0.0 dB Attenuators Front Remote Total Atten 0.0 dB Attenuators Front Remote Total Atten 1.00 Continuous Continuous Continuous Continuous Continuous Continuous Continuous Continuous Continuous Continuous Continuous Continuous Continuous Continuous Continuous Continuous Continuous Continuous Continuous Continuous Continuous Continuous Continuous Continuous Continuous Continuous Continuous Continuous Continuous Continuous Continuous Continuous Continuous Continuous Continuous Continuous Continuous Continuous Continuous Continuous Continuous Continuous Continuous Continuous Continuous Continuous Continuous Continuous Continuous Continuous Positive Positive Positive Positive Positive Positive Positive Positive Positive Positive Positive Positive Positive Positive Positive Positive Positive Positive Positive Positive Positive Positive Positive Positive Positive Positive Positive Positive Positive Positive Positive Positive Positive Positive Positive Positive Positive Positive Positive Positive Positive Positive Positive Positive Positive Positive Positive Positive Positive Positive NegativePema 8250 Main Control Surface
3.2 Device Options
1) Flash Reprogram Mode - The amplifier firmware can be updated by downloading a new firmware file to the amplifier over the network. Lates firmware updates, if available, can be found on the Ashly website. When the amplifier is put into flash reprogram mode, the power and standby LEDs both turn on and all audio function is suspended until flash reprogram is completed. Note that Flash Reprogram only appears in the device options menu when a live Pema device is connected.
2) Link Group Configuration - Link groups allow the controls for multiple DSP functions to track each other across channels or even across devices. For example - if two different channels or even different device graphic equalizer blocks are linked, any change made to a control within either of the equalizers will result in an identical change to the other. In other words, DSP blocks may be linked within a single device, or across multiple devices (assuming all devices share the network).

text_image
Device Options Preset Options Flash Reprogram Link Configuration Power On Delay Sample Rate and Master Clock Selection DVCA Control DSP Enable/Disable Control3.2 - Pema Device Options
Each device will support up to 16 Link Groups. DSP function blocks may be assigned to these groups in software. Once assigned to a group, all LIKE functions within DSP blocks assigned to a group will track DSP parameter changes. Note that more than one type of DSP function block can be assigned to the same link group. Each link group may be assigned a name by the user, and also be assigned a color for easy identification. For further details about linking, see the online help in Protea ^tes software.
3) Power On Delay - Use this feature to delay the amplifier turning on after power is provided, as well as after the amplifier is turned back on from software standby mode*. Delay is measured in mS, with the limit at 655,350 mS, or about 11 minutes. The power amplifier should always be the last device to power up, after other system components have turned on and stabilized. Note that the amplifier must first be on for this change to take effect. *Power On Delay does not work when standby mode is activated by contact closure.
4) Sample Rate and Master Clock Source Selection - Changes to both of these settings can be made by clicking the
5) DVCA Control - This feature is used in conjunction with the DSP tab gain tool called
6) DSP Enable/Disable - This removes from operation the input output, or matrix mixer DSP functions on any channel. When removed audio is passed directly through the stage that has been disabled.
3.3 Preset Options
1) Preset Options - The Preset Options menu in the main device window allows setups to be named, saved to, and recalled from the amplifier device as well as a computer on the network. Presets are a snapshot of all current settings on a given device.
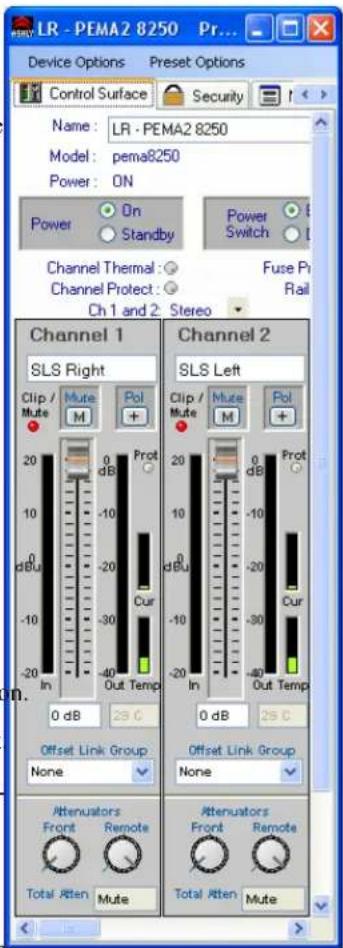
This device will store up to 31 named internal presets, each preset storing control data for all channels and audio functions. Preset names must be 20 characters or less. While working in Protea ^nc software, changes to an individual preset can be saved to the device using

text_image
LR - PEMA2 8250 Preset: Device Options Preset Options Control Surface Name: LR Model: pem Power: ON Power Or Sta Channel Them Channel Prote Ch 1 an Channel 1 SLS Right Clip / Mute Mute Po M +3.3 - Pema Preset Options
2) Sub Presets: Instead of saving or recalling an entire preset affecting all device functions, a sub-preset affecting only a user defined sub-set of DSP functions can be created. To create a sub-preset, first check the box labeled
A preset or sub preset can be loaded to the Pema amplifier by one of the following methods:
1) Use Proteca ^® software on a PC connected to the network to recall files saved on either the PC or on the device.
2) Use contact closures to load presets 1-4 from memory by wiring switches to the rear panel contact closure connector.
3) Use an Ashly WR-5 or ncWR-5 remote control.
4) Use the event scheduler
Note: A full preset recall event will overwrite any unsaved changes, so be sure the current configuration is saved before continuing or it will be lost. The device always loads the last working settings on power-up, so as to preserve any changes if the power is accidentally turned off prior to saving a preset. Caution: A new preset may have dramatically different settings capable of damaging sound system components, so be careful not to recall the wrong preset while the system is on.
3.4 Device Control Tabs
The following device control tabs are available for each Pema device. The tabs include Control Surface, Security, Network Properties, DSP, Input Source, Meters, Meter Dynamics, Meters AutoLeveler, Metering, Event Scheduler, and Fault Log.

text_image
LR - PEMA2 8250 Preset: Device Options Preset Options Control Surface Security Network Properties DSP Input Source Meters Meters Dynamics Meters AutoLeveler Events Log3.4 - Pema Device Control Tabs
3.4a Control Surface
This is the main user interface for the amplifier section of Pema amplifier. DSP and mixing functions are managed from within the DSP tab. The following amplifier functions are available for monitoring or changing in the control pane
Name - The user defined name for this specific amplifier. Up to 20 characters can be used.
Model - The model of amplifier being addressed on the network

text_image
LR - PEMA2 8250 Preset: Device Options Preset Options Control Surface Security Network Properties DSP Input Source M Name: LR - PEMA2 8250 Model: pema8250 Power: ON Power On Standby Power Switch Enabled Disabled Channel Thermal: Fuse Protect: Supply Fault: Channel Protect: Rail Fault:3.4a - Pema Control Surface Global Functions
Power - Shows power status as On, Off, or Standby
Power On/Standby - Shows power status, and allows user to set power to standby to use less power. Power standby can also be automatically controlled by the event scheduler.
Power Switch Enable/Disable - Disables the front panel power switch
Remote Attenuator Enable/Disable - Disables "Remote Level Control" Euroblock connections on back panel
Front Panel Attenuator Enable/Disable - Disables amplifier front panel attenuator controls. Note: The software attenuators will still reflect the physical position of the amplifier's front panel attenuators, even when they are disabled and not attenuating the signal.
Channel Thermal - This software LED indicator becomes lit when the channel is operating at an excessive and unsustainable temperature.
Channel Protect - This becomes lit when any amplifier channel is switched into protect mode, meaning one or more fault conditions are occurring. Fault conditions include overvoltage, overcurrent, and overtemperature.
Fuse Protect - This means that the amplifier has automatically attenuated the signal in order to prevent an internal non-user-serviceable fuse from blowing.
Rail Fault - This means that the output power supply has encountered a rail overvoltage fault.
Supply Fault - This means there is a general power supply fault. Fault conditions include fuse protect, overtemperature, and overcurrent.
Stereo/Bridged selection - The drop-down selection box above each pair of adjacent channels assigns stereo or bridge mode for that pair. In bridge mode, input signal is automatically taken from the odd channel input and inverted, then sent to the even channel. The even channel controls become disabled. Note that in bridge mode, the even channel software attenuators will still reflect the physical position of the amplifier's front panel attenuators, even though they are removed from control of bridged signal.
Channel Name - This user defined text box names the amplifier output channel. Up to 20 characters can be used.
Clip/Mute LED - This LED shows when the amplifier output is either muted or clipping. Clipping is indicated when the output level is 1/2 Volt below the output power supply rails, and accurately tracks AC line voltage sags. All outputs become muted when the unit is put in standby mode. This LED always shows the same status as the amplifier front panel clip/mute LED.
Mute Button - This button mutes the output channel. Output mute can be controlled by the event scheduler.
Polarity Button - This button inverts the polarity of the output channel signal.
Main Output Channel Fader - This controls the output attenuation. Output attenuation below -40dB mutes the output.
Input Meter - This indicates the signal level in dBu as in arrives at the amplifier section
Output Meter - This indicates the amplifier output level in dB below full rated output
Protect LED - This individual channel protect LED indicates an overvoltage, overcurrent, or overtemperature fault.
Current Meter - This shows that the amplifier is delivering current to a load, and is useful to determine if a speaker load is open or shorted.
Temperature Meter - This meter and temperature box show the current operating temperature of the output devices. Excess of 100°C will trigger overtemperature protection.
text_image
LR - PEMA2 8250 Pr... Device Options Preset Options Control Surface Security Name: LR - PEMA2 8250 Model: pema8250 Power: ON Power On Standby Power Switch Channel Thermal: Fuse Pr Channel Protect: Rail Ch 1 and 2 Stereo Channel 1 Channel 2 SLS Right SLS Left Clip / Mute Pol M M + 0 dB Prot dBu -20 -30 -40 Out Temp In In 0 dB 29 C Offset Link Group None Offset Link Group None Attenuators Front Remote Total Atten Mute Attenuators Front Remote Total Atten Mute3.4a - Pema Control Surface Channel Functions
Offset Link Group and Offset Faders - A group of output channels can be linked together to attenuate the group as a whole without changing the relative levels of each channel. If a channel is assigned to one of the 16 offset link groups, a colored triangular marker appears on the left side of the main fader graticule for secondary level control of all channels in that group. Left click and drag this marker up or down to adjust the link group level. The main level control faders can not be linked to a group. Note that more than 40dB of cumulative channel attenuation causes the channel to mute.
In addition to the control surface offset link group attenuator control (not the main fader), most DSP functions have a link group check box in their work window to assign a specific DSP parameter to one of 16 link groups if desired. Link groups can be renamed by clicking on any group name and entering the new name then pressing
Attenuators - These two dials indicate the physical position of hardware level controls on either the amp front panel or the remote DC level control (if present). Note that these will display the position of attenuators even when disabled in software.
Total Attenuation - This indicates the total amount of attenuation being applied to the channel in dB. This is the sum of the following attenuators: main fader, offset link group attenuation, front panel and remote attenuators (if enabled).
Note: The maximum dynamic range of the amplifier is only achieved when the amplifier's attenuators are set to the optimal value. The amplifier's cumulative attenuators (as listed in the above paragraph) are located in the signal path after all DSP processing but before the power amplifier section. The optimal setting is determined by the maximum input signal of +20 dBu (with the attenuators set far down), minus the input sensitivity of +6.2 dBu (with the attenuators set at 0 dB). This equates to approximately 14 dB of attenuation. The amplifier's specified dynamic range is measured with the attenuators set to this optimal setting of 14 dB
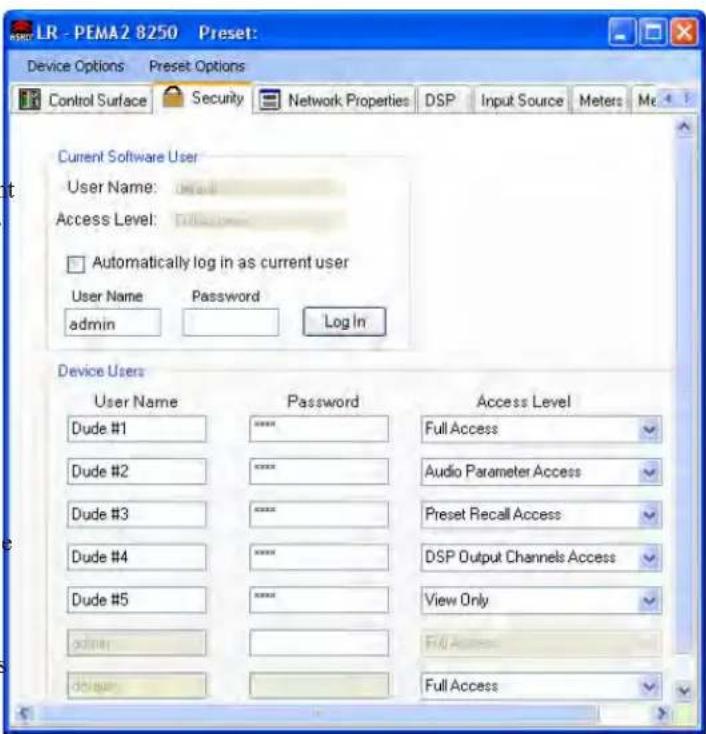
3.4b Security Tab
Password protected user access is set up in the security tab. User names and password are stored within the Pema amplifier. User access is defined by the primary user (admin or default). Available security levels are: View only, DSP Output Channels Access, DSP Input Channels Access, Preset Recall Access, Audio Parameter Access, Audio Only Access, IP only Access, and Full Access.
3.4c Network Properties Tab
In this tab, device information includes device type, MAC address, and network connect status. Device network configuration can be set to automatic DHCP (recommended) or Manual Static IP. Advanced Network Configuration allows the user to bypass corporate firewalls and assign a specific port to PEMA for remote setup and monitoring.
The user can visually identify the amplifier on a network by clicking the "Identify Device" button, which lights the COM LED on the amplifier's front panel for two seconds. The amplifier's firmware revision is shown in the hardware configuration section as well. From time to time Ashly may post updated firmware on our website which can be downloaded and then flash reprogrammed to the amplifier. Flash reprogram is found in the device options menu when connected to a live Pema device.
text_image
LR - PEMA2 8250 Preset: Device Options Preset Options Control Surface Security Network Properties DSP Input Source Meters Mr Current Software User User Name: d## Access Level: flll □ Automatically log in as current user User Name Password Log In admin Device Users User Name Password Access Level Dude #1 **** Full Access Dude #2 **** Audio Parameter Access Dude #3 **** Preset Recall Access Dude #4 **** DSP Output Channels Access Dude #5 **** View Only admin d#gus Full Access Full Access3.4b - Pema Security Tab

text_image
LR - PEMA2 8250 Preset: Device Options Preset Options Control Surface Security Network Properties DSP Input Source Meters Meters Dyn Device Information Device Type: NE Series Amplifier MAC Address: 00-14-AA-00-53-4D Status: Connected General Configuration Device Name: LR - PEMA2 8250 Device Group: Listen Room Identify Device Device Network Configuration IP Address: 1621681244 Subnet Mask: 255 255 255 0 Gateway Address: 16216871 Broadcast Address: 255 255 255 255 Automatic Configuration (DHCP) Manual Configuration (Static IP) Advanced Hardware Configuration Model: pema8250 Options: Firmware: 1.2 Advanced Network Configuration Access IP Address: 1621681244 :Access IP Enabled Device Server Port: 3100 Reset to Default3.4c - Pema Network Properties

flowchart
graph TD
    subgraph_Master_Dock_Source["Master Clock Source"]
        A1["Ashly Left Audio"] --> B1["Mute"]
        A2["Ashly Right Audio"] --> B2["Mute"]
        A3["DVD Left Audio"] --> B3["Mute"]
        A4["DVD Right Audio"] --> B4["Mute"]
    end

    subgraph_Sampling_Rate["Sampling Rate"]
        C1["SLS Right"] --> D1["MIX I++"]
        C2["SLS Left"] --> D2["MIX I++"]
        C3["EAW Right"] --> D3["MIX I++"]
        C4["EAW Left"] --> D4["MIX I++"]
    end

    subgraph_Input_5["Input 5"]
        E1["Mute"] --> F1["Mute"]
        E2["Input 6"] --> F2["Mute"]
        E3["Input 7"] --> F3["Mute"]
        E4["Microphone"] --> F4["Mute"]
    end

    subgraph_Input_6["Input 6"]
        G1["Mute"] --> H1["Mute"]
        G2["Input 7"] --> H2["Mute"]
        G3["Microphone"] --> H3["Mute"]
    end

    subgraph_Input_7["Input 7"]
        I1["Mute"] --> J1["Mute"]
        I2["Input 7"] --> J2["Mute"]
        I3["Microphone"] --> J3["Mute"]
    end

    subgraph_Microphone["Microphone"]
        K1["Mute"] --> L1["FBS V"]
        K2["GRIH b"]
        K3["SP"]
    end

    M1["SLS Right"] --> N1["MIX I++"]
        N1 --> N2["Mute"]
        N2 --> N3["SLS Left"]
        N3 --> N4["Mute"]
        N4 --> N5["EAW Right"]
        N5 --> N6["MIX I++"]
        N6 --> N7["Mute"]
        N7 --> N8["GRIH b"]
        N8 --> N9["Mute"]
        N9 --> N10["70V #4"]
        N10 --> N11["GRIH b"]
        N11 --> N12["Mute"]
        N12 --> N13["70V #3"]
        N13 --> N14["Mute"]
        N14 --> N15["70V #2"]
        N15 --> N16["MIX I++"]
        N16 --> N17["Mute"]
        N17 --> N18["70V #1"]
    end
3.4d DSP Control Tab
3.4d - Pema DSP Control Tab
The DSP tab includes an input side and an output side, with a cross linking matrix mixer in between. Key features of the DSP window include:
Input Channel Number - Right click on this to bring up Clear, Copy/Paste, Link, and Sub Preset functions for that input channel.
Input Channel Name - The user can name each input channel.
Input Mute Button - Mutes the input.
Pluggable DSP Tools - Six processing blocks are available on both inputs and outputs for custom configuration of pluggable DSP processing blocks. Total DSP usage for the four input and output channels is indicated as a percentage at the bottom of each input section in the DSP tab. Increasing the number and complexity of applied DSP tools increases the DSP usage. Total DSP usage per group of four channels cannot exceed 100%. Available DSP tools include:
1) Dynamics controls - Brick Wall Limiter, Compressor, Autoleveler, Ducker, and Noise Gate.
Ambient Noise Compensation is available on outputs only.
2) Gain functions - Gain, Gain with VCA, RD-8C Remote Control Gain, neWR-5 Remote Control Gain
3) Equalization - Graphic Equalizer, 10/6/4/2 Band Parametric Equalizers, Feedback Suppressor (input), FIR filter (output)
4) Crossover functions - Four Way, Three Way, and Two Way Crossovers are available on outputs only.
HPF and LPF filters are available on both inputs and outputs.
5) Delay - Speaker Delay at 48kHz sampling rate is ≤21mS, and Delay is ≤682mS. At 96kHz, ≤10mS and ≤341ms.
6) Metering - -60dBu to +20dBu display
7) Signal Generator - Pink noise, White Noise, Sine Wave
Extensive online help information is available for all DSP blocks within the software. From within any DSP tool, simply press
Input/Output Matrix Router - Any input can be routed to any or all outputs. Click and drag from the input to output to assign routing. For faster routing of a single input or output to multiple channels, highlight its node and then press Ctrl+Click over the desired nodes to connect to. To delete a route or clear the matrix, right click on the routing line or node. Also, right click anywhere in the matrix area to bring up a menu of common routing choices.
Output Matrix Mixer and Auto Mixer - For a given amplifier output, all inputs that have been routed to that channel in the matrix router are mixed together here.

bar
SLS Right Mixer 8 Input Input Levels Selected for sub-presets | Input Level | Sub-presets | Value Label | | :--- | :--- | :--- | | Input 1 | Route Enable | -70 dBu | | Input 1 | Auto | -50 dBu | | Input 2 | Route Enable | -70 dBu | | Input 2 | Auto | -50 dBu | | Input 3 | Route Enable | -70 dBu | | Input 3 | Auto | -50 dBu | | Input 4 | Route Enable | -70 dBu | | Input 4 | Auto | -50 dBu | | Input 5 | Route Enable | -70 dBu | | Input 5 | Auto | -50 dBu | | Input 6 | Route Enable | -70 dBu | | Input 6 | Auto | -50 dBu | | Input 7 | Route Enable | -70 dBu | | Input 7 | Auto | -50 dBu | | Input 8 | Route Enable | -70 dBu | | Input 8 | Auto | -50 dBu | Link Group: None Global Auto Mixer Response 0.10 s Enable Ducking At Mixer ASHLY3.4d - Pema DSP Output Channel Matrix Mixer and Automixer
This is also where individual channels can be selected as part of an automix group. The automixer function is a “gain-sharing” type automixer which automatically makes smooth gain transitions on all selected automixer input channels to achieve a constant total system gain. It is designed primarily to automate the mixing of multiple speech microphones to follow the dynamic nature of the speech dialog and attenuate idle microphones. The automixer may also be used in conjunction with the Autoleveler, Compressor or Gate on the input signal paths for more advanced control of varying input signal levels produced by different voices. A Feedback Suppressor function may also be used on the inputs to further help control feedback problems. For a full description of automixer features and setup, read the online help by pressing F1 when in the output mixer window.
Output Mute Button - Mutes the output.
Output Channel Name - The user can name each output channel.
Output Channel Number - Right click on this to bring up Clear, Copy, Link, and Sub Preset functions for that output channel.
3.4e Input Source Tab
Inputs are analog balanced mic/line, summed analog mono unbalanced RCA connectors, or digital audio input (optional). Analog mic/ line precamp gain of 0dB, +20dB, +40dB, or +60dB is selected in this window by clicking on the
icon. Setting the input source to Auto gives priority to digital audio inputs if they are installed.
flowchart
graph TD A["Input Source"] --> B["Master Clock"] B --> C["Sampling Rate: 48KHz"] B --> D["Sampling Rate: 96KHz"] C --> E["Mute Input 1"] D --> F["Mute Input 2"] E --> G["Input Src: Analog"] F --> H["Input Src: Analog"]3.4e - Pema DSP Input Source Tab
3.4f Metering Tabs (not shown)
There are three meter tabs, including general I/O Meters, Meter Dynamics for gate and compressor/limiter functions, and Autoleveler Meters. All meter tabs display both DSP input and DSP output level for each channel.
3.4g Event Scheduler Tab
The Events tab allows the user to program specific device actions to occur based on the time of day or day of the week. Scheduled events can include Preset Recall, Power Status Change, Channel Mute, Output Source Select, and certain remote control settings. Up to 100 events can be scheduled. The Pema date and time can be manually set by the user or linked to the host PC. All event schedule data is stored on the amplifier.
A common use of the event scheduler would be for programmable energy efficiency. Schedule the Pema to go idle or off during down times, and turn back on when the facility opens for business.
text_image
pema8250 Preset: Device Options Preset Options DSP Input Source Meters Meters Dynamics Meters AutoLeveler Events Log Current Amplifier Time Thursday, April 15, 2010 3:50:36 PM set to PC Time ✓ Automatically adjust for Daylight Savings Time (US and Canada Only) Events Click on a scheduled event to edit Event Num Name Event Type Event Parameter Time 1 Event 1 Preset Recall Preset 1 1:00 AM 2 Event 2 Power Change 2:00 AM 3 Event 3 Mute Change Input: Input 1 3:00 AM 4 Event 4 Source Change Output Channel 1 4:00 AM 5 Event 5 WR5 Level Ch... Output: Channel 1 5:00 AM 6 None 1:00 AM 7 None 1:00 AM 8 None 1:00 AM 9 None 1:00 AM 10 None 1:00 AM 11 None 1:00 AM Event Number: 2 Name: Event 2 Event Time: 02:00 AM Event Type: Power Change Channel: Event Parameter: Amplifier to Standby Event Parameter: Run only on Sun Mon Tue Wed Thu Fri Sat Update Delete3.4g - Pema Event Scheduler
3.4h Fault Log Tab (not shown)
The Fault Log is a register of amplifier events triggered by fault conditions and date/time changes. It is useful for diagnosing an amplifier/system problem by allowing the administrator to review events which may have led to a fault condition. The log can be saved as a XML text file.
4. PEMA REMOTE CONTROL
The following devices are currently available for remote control of Pema amplifier functions. Some devices control only one function, while others can control several different functions. Some remote control functions are also controlled by software. A complete listing of all Pema amplifier functions which can be remotely controlled, along with a listing of respective control devices for each function, is found following the hardware descriptions listed here:
4.1 Remote Control Devices
4.1a WR-1 Level Control - The WR-1 is a dual potentiometer remote volume control designed to fit in a standard wall electrical box, and is wired to the amplifier back panel Euroblock connector labeled "Remote Level Control" using four conductor wire. If wiring a custom potentiometer assembly other than the WR-1, connect +5V from the Remote Level Control Euroblock connector to the potentiometer's CW pin, GND to the CCW pin, and the channel under control to the wiper. Do not connect the WR-1 remote level control ground to any other external grounds.
text_image
k Electrical Box WR-1 Decora Plate
text_image
Remote Level Control on Amplifier Back Panel EUROBACK connector not shown Wire CV Leads to Any Two Control Pins Four Conductor Bell Wire No Shielding Required Do Not Connect G to External Grounds Ground and +5 Pins Are Connected on PCB WR-1 G CV-2 +5 G CV-1 +54.1a - WR-1 Assembly and Wiring
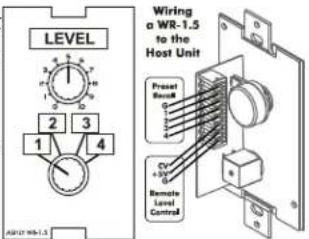
4.1b WR-1.5 Level Control and Preset Recall Switch - The WR-1.5 has a four position rotary switch for selection of stored amplifier presets 1-4, and a potentiometer for remote DC level control of one amplifier channel. Clear windows are provided for user generated labels.
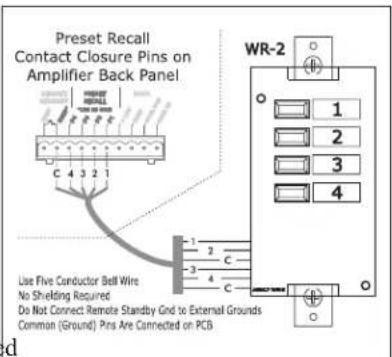
4.1c WR-2 Preset Recall Switches - The WR-2 allows selection of one of four presets via inter-locking pushbutton switches. Each pushbutton switch can be connected to a Preset Recall Pin on the back panel of the controlled Pema amplifier. The terminal numbers correspond to the first 4 Preset Memory locations in the controlled amplifier. Pressing a button will select the corresponding preset. Windows are provided for a user-generated label.
text_image
Wiring a WR-1.5 to the Host Unit Level 2 3 1 4 Preset Resist G Cy +/-V Remote Level Control A#F12 W#1.5
text_image
Preset Recall Contact Closure Pins on Amplifier Back Panel WR-2 1 2 3 4 C 4 3 2 1 1 2 C 3 4 Use Five Conductor Bell Wire No Shielding Required Do Not Connect Remote Standby Grid to External Grounds Common (Ground) Pins Are Connected on PCB4.1c - WR-2 Wiring
4.1d WR-5 Programmable Button Controller - The WR-5 is a programmable button remote control which mounts into a standard North America electrical wall box and connects to a Pema amplifier data port using four conductor wire. Maximum cable length is 1000 ft using #24 gauge twisted pair. A decora cover plate (not included) can be purchased at hardware stores to cover the WR-5 electrical box and satisfy the aesthetic needs of the installation. The WR-5 is phantom powered from the amplifier. Up to four different WR-5 remotes can be wired in series and phantom powered from a Pema amplifier, and more can be added by using an Ashly RPS-18 remote power supply.
text_image
WR-5 Programmable Remote Control Function Buttons Parameter Adjust Buttons WR-5 12 INPUT 33 LINK Jumper 4 1 3 4 3 2 1 +18 GND Dout Dout +18 GND Dout Dout WR-5 Data Connection on Amplifier Back Panel To next WR-5 (An additional +1RV power supply is needed for more than four WR-5 remotes) ★ Install this jumper on last WR-5 in series, even if using only one WR-54.1d - WR-5 Wiring
WR-5 buttons are programmed from Protea ^ne software after the WR-5 is wired to a Pema amplifier and assigned a
unique ID number in its WR-5 device window. Each button has a status LED. Controlled functions include preset recall/scroll, mute, zone source selection, individual channel and matrix point level control. A windowed mylar pocket is available to insert custom function button labels.
The Ashly RPS-18 remote power supply is required when more than four WR-5 remotes are connected to one Pema amplifier.
4.1e RD-8C or RW-8C Programmable Fader Controller - The RD-8C (RW-8C) are fader controllers which are connected to the Pema amplifier's Data port and phantom powered from the amplifier. Maximum cable length is 1000 ft using #24 gauge twisted pair. The RD-8C is a desktop controller, while the RW-8C is electronically the same but mounts as a wall plate using a standard North American 4-gang electrical box and connects using a Euroblock.. There are eight channels and a master, each with a fader control and an on/off button. Note: Only one RD-8C can be used per amplifier, and use of an RD-8C will exclude the use of the data port for a WR-5. One or the other remote control device may be connected, but not both.
4.1f INA-1 Inline RS-232 Adapter (not shown) - The Pema amplifier Data Port uses a proprietary serial communications protocol which can be converted to RS-232 using the Ashly INA-1 RS-232 adapter. This allows the use of custom designed third party RS-232 controllers.
text_image
RD-8C or RW-8C Data Connection on Amplifier Back Panel V+ G Data RD-8C Data Connector Pin 1 Pin 2 V+ Data RW-8C Data Connector NC Use Two Conductor Shielded Wire Do Not Connect Data GND To Any External Grounds4.1e-RD-8C or RW-8C-5 Wiring
4.1g neWR-5 Networked Programmable Button Controller - The neWR-5 is a networked version of the WR-5, using Ethernet to communicate with the amplifier. The neWR-5 is powered using an IEEE 802.3af Class 1 Power over Ethernet (PoE) switch, hub, or in-line PoE injector. If PoE is unavailable, the Ashly RPS-18 (sold separately) is a 15-48VDC power supply capable of at least 2 watts per neWR-5 and can be hard wired to the back of the neWR-5. PoE current draw is 38mA @48VDC and 80mA@15VDC. A decora cover plate (not included) can be purchased at hardware stores to cover the neWR-5 electrical box and satisfy the aesthetic needs of the installation.
text_image
Function Buttons Parameter Adjust Buttons Used Pocket LED Display External Power Supply Connector Lockout Switch Connector Ethernet Connector netHB-5 Wall Mountages Electrical Box Assembly4.1g - neWR-5 Networked Programmable Remote Control
The neWR-5 appears in the Protea ^™ software device menu tree and must be assigned, within its neWR-5 device window, to a specific Pema amplifier under control. The neWR-5 has six programmable function buttons which can light up green, red, or amber to display status. Further information on LED status is found in the neWR-5 owner's manual. To the right of the function buttons is a pocket in the mylar overlay for a printed function label to be inserted. The two other buttons are used to adjust function parameters such as gain or preset number, and are indicated by the LED display.
There is also a hard-wired Lock-Out feature on the neWR-5, where the closing of a switch wired to the lockout Euroblock renders all buttons inactive.
text_image
A-切线Y RL1
text_image
A285V 16-34.1h - FR-8 and FR-16 Programmable Fader
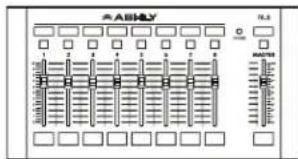
4.1h FR-8/FR-16 Programmable Fader Controller - The
FR-8 and FR-16 are Ethernet based programmable fader controllers for networked Ashly products that have Protea DSP. Using Protea ^™ software, faders and LED buttons can be programmed for individual or group channel level control, matrix point level control, signal level display, mute, and A/B source selection. The FR remotes can be wall mounted in an electrical box, panel mounted, or freestanding, and have a back panel contact closure for a user lockout switch.
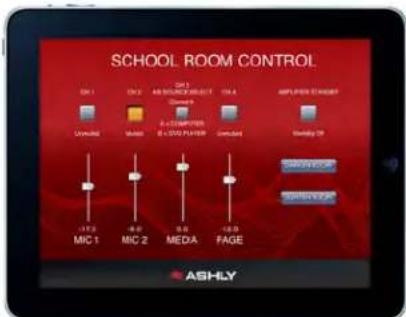
4.1i Ashly Remote App for iPad ^® - A custom and secure touch-screen control surface for the iPad can be designed using the
application, available free on iTunes or via the Ashly website. Controls, labels, and images are combined to manage key Pema functions over a wireless network connection.
text_image
SCHOOL ROOM CONTROL ON 1 ON 2 Connected Mode AC-3 COMPLEXER 0.5 DVD PLANN Connected Holding UP MCC 1 MIC 2 MEDIA FAGE ASHLY4.1i - Ashly Remote App for iPad®
4.2 Remote Control Functions:
The following functions within the Pema amplifier can be remotely controlled. A listing of the devices by which each function can be controlled is shown below and explained in the following paragraphs:
Pema Function Control Device(s)
• Power Switch Disable Protea ^ne Software
- On/Off Remote Standby Contact Closure, Protea ^ne Software, Event Scheduler, iPad ^
- Remote Preset Recall Protea ne Software, Contact Closure, WR-2, WR-5, neWR-5, Event Scheduler, iPad- Remote Gain Control WR-1 DC Level Control, WR-5, neWR-5,
RD-8C, FR-8/16, Event Scheduler, Protea
ne Software, iPad®
- Remote Channel Mute WR-5, neWR-5, FR-8/16, Event Scheduler, Protea ^ne Software, iPad
- Remote Zone Source Selection WR-5, neWR-5, Event Scheduler
4.2a Power Switch Disable
When the power switch is turned off the amplifier is completely off, UNLESS the power switch has been disabled from within Protea ^ne software (Control Surface Tab), in which case the power switch on the amplifier has no effect at all. If the power switch has been disabled from software, the Pema amplifier front panel DISABLE LED will be lit. Even if the AC power is removed, the amplifier's internal memory will maintain the
status until changed again from Protea ^ne software. Performing a factory reset will clear and restore all internal amplifier memory to factory settings. 4.2b On/Off/Remote Standby
Pema amplifiers have three possible power states, OFF, ON, and STANDBY, each with a status LED on the front panel. Control for these states is managed by the following:
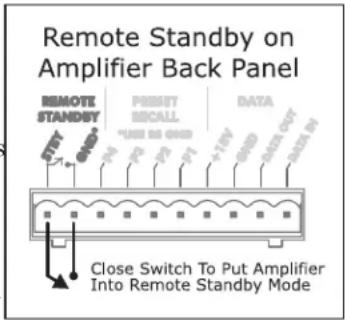
1) Remote Standby Contact Closure - When the two Euroblock pins labeled "Remote Standby" on the back of the amplifier are wired to a switch and connected, the amplifier goes into Standby mode, meaning the amplifier is active but not fully powered up. For remote standby to work, the power switch must be turned on OR be disabled through Protea ^nc software. Open the switch to remove the amp from remote standby mode.
2) Protea ^nc Software On/Standby - On/Standby in the Pcma amplifier software functions the same as the hardware based remote standby contact closure on the back panel. The software standby control does not override the Remote Standby contact closure control, they both remain active at all times. See Control Surface Tab descriptions on page 11.
text_image
Remote Standby on Amplifier Back Panel REMOTE STANDY PINIT SMALL DATA INT OUT Close Switch To Put Amplifier Into Remote Standby ModeRemote Standby Contact Closure Wiring
3) Event Scheduler - Protea ^ne software offers an event scheduler for key Pema functions including standby mode. With the event scheduler, the installer can assign one or more times of day or days of the week for the amplifier to automatically go into and come out of standby mode, disabling overall function and conserving power during those times when the amplifier is not being used. See the Event Scheduler Tab description on page 16.
4) iPad - A Standby On/Off control button can be part of an iPad design, behaving the same as software standby.
4.2c Remote Preset Recall
A preset file is created when the user has made all required software settings, DSP processing settings, source selection, signal routing, mixing, etc, for a given application using this device. A preset is essentially a snapshot of all current settings on a given amplifier. This Pema amplifier can internally store up to 31 named presets, each preset storing control data for all channels and audio functions. Individual preset files stored on a PC use the extension (*.pmc). While working in Protea ^ne software,
changes to an individual preset can be saved to the amplifier using
, or saved to the PC using . Sub Presets (collections of DSP parameters individually selected from software) are saved in a similar fashion. Presets can be recalled to the Pema amplifier using the following methods:
1) Protea ^nc Software - Use a direct or network Ethernet connection from the amplifier to a PC using Protea ^nc software. Click (Preset Options >Recall From Disk/Recall From Protea) to load a stored preset into the amplifier.
2) Contact Closure - The four contact closure connections on the amplifier back panel allow for amplifier presets #1-4 (presets already saved and stored in the amplifier memory) to be loaded into the Pema amplifier at the instant a remote switch connected to one of pins 1-4 is connected to its ground pin.
3) WR-5 - A WR-5 will appear in software as a captive device to its host amplifier. The six buttons on the WR-5 can be programmed to recall a specific amplifier preset, or scroll through a defined list of presets.
4) neWR-5 - A neWR-5 will appear in the software menu tree as a device on the network, and must be assigned to the Pema amplifier under control. Like the WR-5, the six buttons on the neWR-5 can be programmed to recall a specific amplifier preset, or scroll through a defined list of presets.
5) Event Scheduler - Protea ^ne software offers an event scheduler for several key Pema amplifier functions including preset recall. With the event scheduler, the installer can assign one or more times of day or days of the week for the Pema amplifier to automatically recall and load a new preset.
6) iPad - A Preset Recall function can be part of an iPad design.Caution: A new preset may have dramatically different settings capable of damaging sound system components, so be careful not to recall the wrong preset while the system is on.
4.2d Remote Gain Control
1) WR-1 DC Level Control - The WR-1 remote potentiometer functions as if it were a front panel attenuator but in a remote location. Attenuation from a remote DC level control attenuator is cumulative with all other attenuation for a given channel, including the front panel level control.
2) WR-5 - WR-5 buttons can be individually programmed to select single or multiple input or output channels for remote gain control. A gain range with a top and bottom limit can also be set for each gain button. Note: To use this feature, a (ne)WR-5 Remote Gain tool must be placed in one of the DSP processing blocks of the channels(s) to be controlled. Refer to section 3.4d, item #2.
3) neWR-5 - The neWR-5 uses an Ethernet network connection instead of the amplifier's data port. Buttons are assigned gain control function in the same manner as the WR-5.
4) RD-8C - RD-8C faders are programmed from Protea ^ne software once the RD-8C is wired to a Pema amplifier Data port. The RD-8C will appear in the software Ashly Network device tree as a captive device to the host Pema. Place a Remote Gain function in the Pema DSP tab's input or output to assign fader control for that channel or group of channels. The RD-8C also has a mute button for each fader which will mute all associated channels.
5) FR-8/FR-16 - FR-8/16 faders are programmed from Protea ^ne software after the remote is connected to the network shared with Pema. The FR-8/16 is found in the software Ashly Network>Ashly Remotes device tree. Assign individual fader control after selecting the targeted Pema amplifier, then select Mixer, I/O Level, or A/B Source Select mode for each fader. Fader Scaling is available to set upper and lower limits.
6) Event Scheduler - Protea ^ne software offers an event scheduler for several Pema amplifier functions including changes to WR-5 and neWR-5 remote control gain. With the event scheduler, the installer can assign one or more times of day or days of the week for the Pema amplifier to automatically change WR-5 and neWR-5 channel gain parameters.7) Protea ^nc Software - Real time gain control from software is available using a variety of tools. These include the main amplifier's software control surface using the channel main fader, a single fader gain control placed on an input or output channel, a digital VCA group gain control placed on an input or output, a WR-5 (or neWR-5) gain control, and the output channel matrix mixer function.
8) iPad - Gain controls can be part of an iPad design, including numeric readback labels that indicate current gain status.
4.2e Remote Channel Mute
1) WR-5/RD-8C - WR-5 buttons can be programmed to mute and unmute single or multiple inputs or outputs.
The RD-8C has a mute button associated with each fader which mutes those channels associated with that fader.
2) neWR-5 - The neWR-5 buttons can be programmed to mute and unmute single or multiple inputs or outputs.
3) FR-8/FR-16 - FR-8/16 buttons by default will mute their corresponding fader channel(s). When a fader is set to A/B Source Select mode however, the button toggles between two different sources and the mute function is disabled.
4) Event Scheduler - The event scheduler can be set to automatically mute single or multiple inputs or outputs at a predetermined day and time, and likewise can unmute at a different time.
5) Proteane Software - The user can mute inputs or outputs in real time from within the software control surface, the DSP section inputs and outputs, and the input source section.
6) iPad - A Mute button can be part of an iPad design.4.2f Remote Zone Source Selection
1) WR-5 - WR-5 buttons can be programmed to select different input sources for one zone. A zone is typically one or more amplifier output channels driving speakers in a single listening area. In the WR-5 software control surface, select the output channel(s) for the WR-5 zone by clicking
If Exclusive Source Selection is checked, only the currently pressed button and associated inputs will be active, otherwise multiple buttons will be active together and add or subtract input sources as defined.
To allow input source selection but not zone level changes, click the
. The output level can still be adjusted from software, but the WR-5 is locked out from making zone output level changes. 2) neWR-5 - The neWR-5 offers the same zone source selection capabilities as the WR-5, with the addition of programmable limits on output gain level.
3) Event Scheduler - Use the event scheduler5. TROUBLESHOOTING
No AC Power
1) Is the detachable AC power cord properly installed? Is it plugged into a known live outlet?
2) Has the Power switch been disabled in software? (sec 4.2a)
3) Is the amplifier in Standby Mode? (sec 4.2b)
4) Is the Power On Delay time set excessively high? (sec 3.2)Amplifier Not Recognized in Protea ^ne Control Software
1) Is the PC successfully communicating with the network? (sec 2.3)
2) Is the amplifier successfully communicating with the network? (sec 2.3d)
3) Does the device name appear as green text or red text in the left side menu tree? If red, the amplifier is unpowered or offline. (sec 3.1a)
4) Is the amplifier device icon placed on the software project canvas a virtual device instead of a live amp? Any virtual device MAC address will always read FF-FF-FF-FF-FF-FF. (sec 3.4c)
5) Was the amplifier IP address autodetected (recommended) or manually assigned? (sec 2.3a)
6) Is firewall software blocking communication from the device? (sec 2.3b)No Amplifier Output
1) Is the Amplifier in Protect Mode? (sec 2.6)
2) Is the input signal properly wired to either a mic/line input or summed mono RCA input?
3) Are front panel, remote control, or software control surface attenuators turned down?
4) Is the signal muted from within the control surface, DSP section, input source select, remote control, output mixer, or event scheduler?
5) Are dynamics and any gain tool settings in the DSP section allowing signal to pass properly?
6) Is the signal properly routed to the desired output in the DSP cross point matrix? (sec 3.4d)
7) Is the level fader set properly in the DSP output channel mixer?
8) Did the event scheduler change a preset or the output channel source? (sec 3.4g)Attenuators Don't Work
1) In the device software control surface, are the front panel or remote attenuators disabled?
Unable to Access All Software Features
1) Is desired level of access granted to the current user in the security tab?
Unable to Load Enough DSP Tools
1) Is the sample rate set to 96kHz? (sec 3.2)
2) Graphic Equalizers have a much greater DSP "cost" than Parametric Filters. Feedback Suppressor and FIR filters use even more DSP than the Graphic EQ. Use only as much EQ as is needed. Note that FIR filter and Feedback Suppressor are mutually exclusive for a given DSP channel I/O, meaning only one or the other can be plugged into that channel number.Can't Use Any DSP Tools On Input or Output Channels
1) Has Input, Mixer, or Output channel DSP been disabled under Device Options? (sec 3.2)
WR-5 Doesn't Work Properly
1) Is the WR-5 wired correctly to the amplifier Data connector? (sec 4.1c)
2) If the WR-5 is the last one in series, even if it is the only one used, is the two pin jumper properly placed on the circuit board header as shown? (sec 4.1c)
3) Is the WR-5 assigned its own unique device ID from within its device window?
4) If using WR-5 for gain control, be sure to install a (ne)WR-5 Remote Gain function in a DSP gain block on the channel to be controlledneWR-5 Doesn't Work Properly
1) Is the neWR-5 successfully communicating with the network? (sec 2.3d)
2) Is the neWR-5 connected to a switch, hub, router, or power injector providing sufficient Power Over Ethernet (PoE), or using an external power supply? (sec 4.1e)
3) Is the neWR-5 assigned within its device window to control the desired amplifier?
4) Is the neWR-5 hardware lockout switch being used, disabling all buttons? (sec 4.1e)
5) If using neWR-5 for gain control, be sure to install a (ne)WR-5 Remote Gain function in a DSP gain block on the channel to be controlled6. SPECIFICATIONS
6.1 General Power Amplifier Specifications 0dBu = 0.775V rms


| Pema Amplifier Model 4125 8125 4250 8250 | ||||||||
| 120VAC 230VAC 120VAC 230VAC 120VAC 230VAC 120VAC 230VAC | ||||||||
| Continuous Average Power Output Per Channel | ||||||||
| Low Z models, Stereo Mode, all channels driven | ||||||||
| 8Ω, 20Hz-20kHz 1%THD | 75W | 75W | 75W | 75W | 150W | 150W | 150W | 150W |
| 4Ω, 20Hz-20kHz 1%THD | 125W | 125W | 125W | 125W | 250W | 250W | 250W | 250W |
| Low Z models, Bridge Mode, all channels driven | ||||||||
| 8Ω, 20Hz-20kHz 1%THD | 250W | 250W | 250W | 250W | 500W | 500W | 500W | 500W |
| 70V, 100V distributed output models, | ||||||||
| 20Hz-20kHz 1%THD, per channel | 125W | 125W | 125W | 125W | 250W | 250W | 250W | 250W |
| Line Current Draw (all channels driven) | ||||||||
| Line Current, Standby mode | 190mA | 95mA | 290mA | 145mA | 190mA | 95mA | 290mA | 145mA |
| Line Current, Idle (no signal) | 540mA | 270mA | 565mA | 283mA | 540mA | 270mA | 565mA | 283mA |
| Line Current, Typical (1/8 power pink noise) | 1.70A | 0.85A | 2.78A | 1.39A | 2.85A | 1.43A | 5.00A | 2.50A |
| Line Current, Maximum (1/3 power sine wave) | 3.27A | 1.64A | 5.78A | 2.89A | 6.00A | 3.00A | 11.0A | 5.50A |
| Thermal Dissipation (all channels driven) | ||||||||
| BTU/hr, Standby mode, | 46.7 | 46.7 | 63.8 | 63.8 | 46.7 | 46.7 | 63.8 | 63.8 |
| BTU/hr, Idle (no signal) | 123 | 123 | 187 | 187 | 123 | 123 | 187 | 187 |
| BTU/hr, Typ (1/8 power pink noise) | 232 | 232 | 444 | 444 | 341 | 341 | 700 | 700 |
| BTU/hr, Max (1/3 power sine wave) | 251 | 251 | 481 | 481 | 378 | 378 | 775 | 775 |
| Input Sensitivity (low Z models 4Ω) | 3.2dBu | 3.2dBu | 3.2dBu | 3.2dBu | 6.2dBu | 6.2dBu | 6.2dBu | 6.2dBu |
| Input Sensitivity (70V and 100V models) | 7.2dBu (all 70V and 100V models) | |||||||
| Voltage Gain (low Z models) | 26dB (all low Z models) | |||||||
| Voltage Gain (70V models) | 32dB (all 70V models) | |||||||
| Voltage Gain (100V models) | 35dB (all 100V models) | |||||||
| Damping Factor (8 ohm load, <1kHz) | >250 (all models) | |||||||
| Distortion (SMPTE, typical) | <0.5% (all models) | |||||||
| Distortion (THD-N, typical) | ||||||||
| (8Ω, 10dB below rated power, 20Hz-20kHz) | <0.5% (all models) | |||||||
| Channel Separation (dB from full output, 1kHz) | -80dB (all models) | |||||||
| Signal to Noise (20Hz-20KHz, unweighted) | >102dB (all 125W/Ch models) | >105dB (all 250W/Ch models) | ||||||
| Frequency Response | 20Hz-20kHz, +/-1dB (all models) | |||||||
| Balanced Mic/Line Input Connector | Euroblock 3.5mm | |||||||
| Mic/Line Input Impedance | 4.8KΩ | |||||||
| Mic/Line Maximum Input Level | +21dBu | |||||||
| Mic/Line Phantom Power | +15V, channel 1-4 switchable, channel 5-8 switchable | |||||||
| Unbalanced Summed Mono Input Connector | Dual RCA | |||||||
| Summed Mono Input Impedance | 3.16KΩ | |||||||
| Summed Mono Maximum Input Level | +11dBu | |||||||
| Channel 1 TEL-PBX Input Connector | Euroblock 3.5mm | |||||||
| TEL-PBX Input Impedance | 3.9KΩ | |||||||
| TEL-PBX Maximum Input Level | +21dBu | |||||||
| Preamp/AUX Output Connector | Balanced Euroblock 3.5mm | |||||||
| Preamp Output Maximum Level | +8dBu | |||||||
| AUX Output Maximum Level (ch 5-8 on 4 channel amp) | +20dBu | |||||||
| Speaker Output Connector | Euroblock 7.62mm | |||||||
| Remote Standby Contact Closure | Euroblock 5.08mm - close contact for standby mode | |||||||
| Preset Recall Contact Closure | Euroblock 5.08mm - close contact to GND for preset 1-4 recall | |||||||
| Serial Data Connection for Remote Control | Euroblock 5.08mm - +18V, Gnd, Data Out, Data In | |||||||
| Remote DC Level Control | Euroblock 5.08mm - Channels 1-4 or 1-8, +5VDC, GND | |||||||
| Network Audio Options | Factory installed CobraNet ^ , Dante ^ | |||||||
| Front Panel Indicators | ||||||||
| Per Channel | Clip/Mute, -6dB, -12dB, -18dB, Temp, | |||||||
| Current, Bridge (per pair) | ||||||||
| Overall | Power, Standby, Protect, Power Switch Disable, Com | |||||||
| Control Surface and Amp Front Panel LEDs | Level meters are dB below RATED output | |||||||
| Attenuators | per channel: front panel, software, offset link group, and remote | |||||||
| Amplifier Protection | inrush current limitation, temperature monitoring, output over-current protection, internal mains fuse | |||||||
| Cooling | temperature controlled fan, air in the front and out the sides | |||||||
| Control Network | onboard, compatible with standard 100MB Ethernet hardware | |||||||
| Power Requirements | Factory set 120VAC or 240VAC ± 10% , 50/60Hz | |||||||
| Power Cable Connector | 15A Edison | |||||||
| Weight | Unit: <21 lbs (9.53kg) / Shipping: <28 lbs (13kg) | |||||||
| Dimensions | 19"W x 3.5"H x 15.5"D (483 x 89 x 394mm) | |||||||
| Environmental | 40-120 deg. F, (4-49 deg, C) noncondensing | |||||||
6.2 DSP Specifications
Input Source Selection
Mic/Line Preamp Gain .... 0, +20dB, +40dB, +60dB
Input Source Select Options ..... Analog, Auto(net, analog)
Dynamics
Brick Wall Limiter
| Threshold | -20dBu to +20dBu |
| Ratio | infinite |
| Attack | 0.2ms/dB to 50 ms/dB |
| Release | 5ms/dB to 1000ms/dB |
Compressor
| Threshold | -20dBu to +20dBu |
| Ratio | 1.2:1 to infinite |
| Attack | 0.2 to 50ms |
| Release | 5ms/dB to 1000ms/dB |
| Detector | Peak/Average |
| Attenuation Bus | 2 available |
| Metering | In, Out, Attenuation, superimpose on graph |
Autoleveler
| Target Level | -40dBu to +20dBu |
| Action | gentle, normal, aggressive, user defined |
| Maximum Gain | 0dB to +22dB |
| Metering | Input, Gain, Attenuation |
Advanced Autoleveler Controls
| Ratio | 1.2:1 to 10:1 |
| Threshold Below Target | -30dB to 0dB |
| Gain Increase Rate | 5ms/dB to 1000ms/dB |
| Gain Decrease Rate | 5ms/dB to 1000ms/dB |
| Hold Time | 0-6 sec |
Ambient Noise Compensation (Output Only)
| Max Gain | -20dB to +20dB |
| Min/Base Gain | -40dB to +20dB |
| Gain Change Rate | 0.2s/dB to 20s/dB |
| Link Group | 16 available |
| ANC Input Channel | 1-4 or 1-8 |
| Noise Threshold | -40dBu to +20dBu |
| Program/Ambient Gain Ratio | 0.3:1 to 3:1 |
| Metering | Input level, Attenuation,Average noise |
Ducker
| Ducking Type | high/low priority, trigger, filibuster, ducked prgrm |
| Trigger Threshold | -80dBu to +20 dBu |
| Ducking Release | 5ms/dB to 1000ms/dB |
| Ducking Depth | 0dB to -30dB, -∞ |
| Enable Ducking at Matrix Mixer | Yes |
| Metering | Input |
Gate
| Threshold | -80dBu to +20dBu |
| Range | off, 100dB to 0dB |
| Attack | 0.2ms/dB to 50 ms/dB |
| Release | 5ms/dB to 1000ms/dB |
| Metering | Key Signal, Gate LED superimpose on graph |
Advanced Gate Controls
Key Engage Enable.... Yes
Key Frequency 20Hz to 20kHz
Key Bandwidth 0.016 to 3.995 Octave
Gain
Gain . . . . . . . . . . . . . . . . -50dB to +12dB, off, polarity invert
Gain w/VCA....-50dB to +12dB, off, polarity invert
Digital VCA Groups ..... 4 available
Remote Gain
(Remote RD8C Level Control). . . Enable, Disable
Metering RD8C Active LED
WR-5 (neWR-5) Remote Gain ... 0 to -50dB, Mute
Equalization
31 Band Graphic
Filter Type . . . . . . . . . . . . . . constant Q or proportional
Bandwidth 0.499oct to 0.25oct
2, 4, 6, or 10 Band Parametric Equalizers
Filter Types:
Parametric:
Frequency..... 20-20kHz
Level -30dB to +15dB
Q Value. 0.016oct to 4oct
Hi/Low Shelf 6/12 dB
Frequency..... 20Hz-20kHz
Level -15dB to +15dB
All Pass
Frequency..... 20Hz-20kHz
Variable Q HP/LP
Frequency..... 20Hz-20kHz
Q Value. 3.047 to 0.267
Notch/Bandpass
Frequency..... 20Hz-20kHz
Q Value. 92.436 to 0.267
Feedback Suppressor
input only, 48kHz sampling rate only
Filters 12
In/Out per filter .... yes
Lock per filter and global lock...yes
Filter Modes.... Float, Restricted, Manual
Filter Type .... Notch, Parametric
Filter Frequency Range ..... 20Hz to 20kHz
Filter Level
Notch Filter .... -∞
Parametric Filter....+15dB to -30dB
Filter Bandwidth 0.016 to 3.995 Octave
Detector Sensitivity ..... five levels
Float Time 5 minutes to 24 hours
FIR Filter
Output only, 48kHz only
input FBS is disabled on channel using output FIR
File types ....*.csv, *.fir
Crossover
2 Way, 3 Way, 4 Way Crossover
High Pass/Low Pass Filters
Filter Types:
Bessel 12/18/24/48 dB/oct
Butterworth.... 12/18/24/48 dB/oct
Linkwitz-Riley 12/24/48 dB/oct
Frequency.... off, 20Hz-20KHz
Delay
@ 48kHz Sampling Rate
Speaker Delay: 0-21ms
Delay: 0-682 ms
@ 96kHz Sampling Rate
Speaker Delay: 0-10.6ms
Delay: 0-341 ms
Tools
Audio Meter
Range: -60dBu to +20dBu
Increments:.... 1dB
Peak Hold Indicator: .... yes
Signal Generator: ....pink noise, white noise, sine wave
Signal Level: .... off, -50dBu to +20dBu
Sine Wave Frequency: 20Hz-12kHz
Matrix Mixer
Gain: .... Off., -50 to +12dB, in 0.5dB increments
Enable Ducking at Mixer ..... yes
Ducking LED .... per channel if enabled
Metering .... level, automixer level
Linking
All functions can be linked to 1 of 16 link groups
Processors
Input A/D: 24 bit
Output D/A: 24 bit
DSP Processors: 32-bit floating point
Sample Rates: 48kHz, 96kHz
Propagation Delay @ 48kHz: . . . . 1.42 ms
Propagation Delay @ 96kHz: ... 0.71 ms
Other Software Specifications:
Security
Passworded User Names..... 5 ID slots available
Security Access Levels .... 8 levels available from full access to view only
Event Scheduler
Maximum Number of Events .... 100
Maximum Event Calendar ..... 1 week
Event Time Resolution ..... 1 minute
Event Time Reference..... User defined, Set to PC
Event Types:
Preset Recall, Power Change, Channel Mute, Output
Source Select, WR-5 Level Change
7. LIMITED WARRANTY (USA ONLY)
(Other countries please contact your respective distributor or dealer.)
For units purchased in the USA, warranty service for this unit shall be provided by ASHLY AUDIO, INC. in accordance with the following warranty statement.
ASHLY AUDIO, INC. warrants to the owner of this product that it will be free from defects in workmanship and materials for a period of FIVE years from the original-date-of-purchase. ASHLY AUDIO INC. will without charge, repair or replace at its discretion, any defective product or component parts upon prepaid delivery of the product to the ASHLY AUDIO, INC. factory service department, accompanied with a proof of original-date-of-purchase in the form of a valid sales receipt. This warranty gives you specific legal rights, and you may also have other rights, which vary from state to state.
EXCLUSIONS: This warranty does not apply in the event of misuse, neglect, or as a result of unauthorized alterations or repairs made to the product. This warranty is void if the serial number is altered, defaced, or removed. ASHLY AUDIO, INC. reserves the right to make changes in design, or make additions to, or improvements upon, this product without any obligation to install the same on products previously manufactured.
Any implied warranties, which may arise under the operation of state law, shall be effective only for FIVE years from the original-date-of-purchase of the product. ASHLY AUDIO, INC. shall be obligated to only correct defects in the product itself. ASHLY AUDIO, INC. is not liable for any damage or injury, which may result from, or be incidental to, or a consequence of, such defects. Some states do not allow limitations on how long an implied warranty lasts, or the exclusion, or limitation of incidental or consequential damages, so the above limitations or exclusions may not apply to you.
OBTAINING WARRANTY SERVICE:
For warranty service in the United States, please follow this procedure:
1) Return the product to ASHLY AUDIO, INC. freight prepaid, with a written statement describing the defect and application that the product is used in. ASHLY AUDIO, INC. will examine the product and perform any necessary service, including replacement of defective parts, at no further cost to you.
2) Ship your product to:
ASHLY AUDIO, INC.
Attention: Service Department
847 Holt Road
Webster, NY 14580-9103

text_image
DIGITAL I/O *12/10 Outputs Are Available On Your Channel Amps Only PREAM / AUX OUTPUTS 1 2 3 4 5 6 7 8 G - + G - + G - + G - + G - + CH 1.4 Balanced MIC/LINE 1 -10 EVY UNSAL SUMMED MONO BALANCED MIC/LINE 3 -10 EVY UNSAL SUMMED MONO CH 3.4 Balanced MIC/LINE 5 -10 EVY UNSAL SUMMED MONO BALANCED MIC/LINE 7 -10 EVY UNSAL SUMMED MONO G - + BALANCED MIC/LINE 6 -10 EVY UNSAL SUMMED MONO BALANCED MIC/LINE 8 -10 EVY UNSAL SUMMED MONO G - + BALANCED MIC/LINE 9 -10 EVY UNSAL SUMMED MONO BALANCED MIC/LINE 10 -10 EVY UNSAL SUMMED MONO BALANCED MIC/LINE 11 -10 EVY UNSAL SUMMED MONO BALANCED MIC/LINE 12 -10 EVY UNSAL SUMMED MONO BALANCED MIC/LINE 13 -10 EVY UNSAL SUMMED MONO BALANCED MIC/LINE 14 -10 EVY UNSAL SUMMED MONO BALANCED MIC/LINE 15 -10 EVY UNSAL SUMMED MONO BALANCED MIC/LINE 16 -10 EVY UNSAL SUMMED MONO BALANCED MIC/LINE 17 -10 EVY UNSAL SUMMED MONO BALANCED MIC/LINE 18 -10 EVY UNSAL SUMMED MONO BALANCED MIC/LINE 19 -10 EVY UNSAL SUMMED MONO BALANCED MIC/LINE 20 -10 EVY UNSAL SUMMED MONO BALANCED MIC/LINE 21 -10 EVY UNSAL SUMMED MONO BALANCED MIC/LINE 22 -10 EVY UNSAL SUMMED MONO BALANCED MIC/LINE 23 -10 EVY UNSAL SUMMED MONO BALANCED MIC/LINE 24 -10 EVY UNSAL SUMMED MONO BALANCED MIC/LINE 25 -10 EVY UNSAL SUMMED MONO BALANCED MIC/LINE 26 -10 EVY UNSAL SUMMED MONO BALANCED MIC/LINE 27 -10 EVY UNSAL SUMMED MONO BALANCED MIC/LINE 28 -10 EVY UNSAL SUMMED MONO BALANCED MIC/LINE 29 -10 EVY UNSAL SUMMED MONO BALANCED MIC/LINE 30 -10 EVY UNSAL SUMMED MONO BALANCED MIC/LINE 31 -10 EVY UNSAL SUMMED MONO BALANCED MIC/LINE 32 -10 EVY UNSAL SUMMED MONO BALANCED MIC/LINE 33 -10 EVY UNSAL SUMMED MONO BALANCED MIC/LINE 34 -10 EVY UNSAL SUMMED MONO BALANCED MIC/LINE 35 -10 EVY UNSAL SUMMED MONO BALANCED MIC/LINE 36 -10 EVY UNSAL SUMMED MONO BALANCED MIC/LINE 37 -10 EVY UNSAL SUMMED MONO
text_image
DIGITAL I/O PREAM / AUX OUTPUTS 1 2 3 4 5 6 7 8 G - + G - + G - + G - + G - + CH 1 TE-PEX Input -USB Balanced MOND BALANCED MICHLINE 10 GBV UNBAL SUMMED MOND BALANCED MICHLINE 10 GBV UNBAL SUMMED MOND BALANCED MICHLINE 10 GBV UNBAL SUMMED MOND BALANCED MICHLINE 10 GBV UNBAL SUMMED MOND BALANCED MICHLINE 10 GBV UNBAL SUMMED MOND BALANCED MICHLINE 10 GBV UNBAL SUMMED MOND BALANCED MICHLINE 10 GBV UNRAL SUMMED MOND BALANCED MICHLINE 10 GBV UNRAL SUMMED MOND BALANCED MICHLINE 10 GBV UNRAL SUMMED MOND BALANCED MICHLINE 10 GBV UNRAL SUMMED MOND BALANCED MICHLINE 10 GBV UNRAL SUMMED MOND BALANCED MICHLINE 10 GBV UNRAL SUMMED MOND BALANCED MICHLINE 10 GBM BALANCED MICHLINE 10 GBM BALANCED MICHLINE 10 GBM BALANCED MICHLINE 10 GBM BALANCED MICHLINE 10 GBM BALANCED MICHLINE 10 GBM BALANCED MICHLINE 10 GBM BALANCED MICHLINE 10 GBM BALANCED MICHLINE 10 GBM BALANCED MICHLINE 10 GBM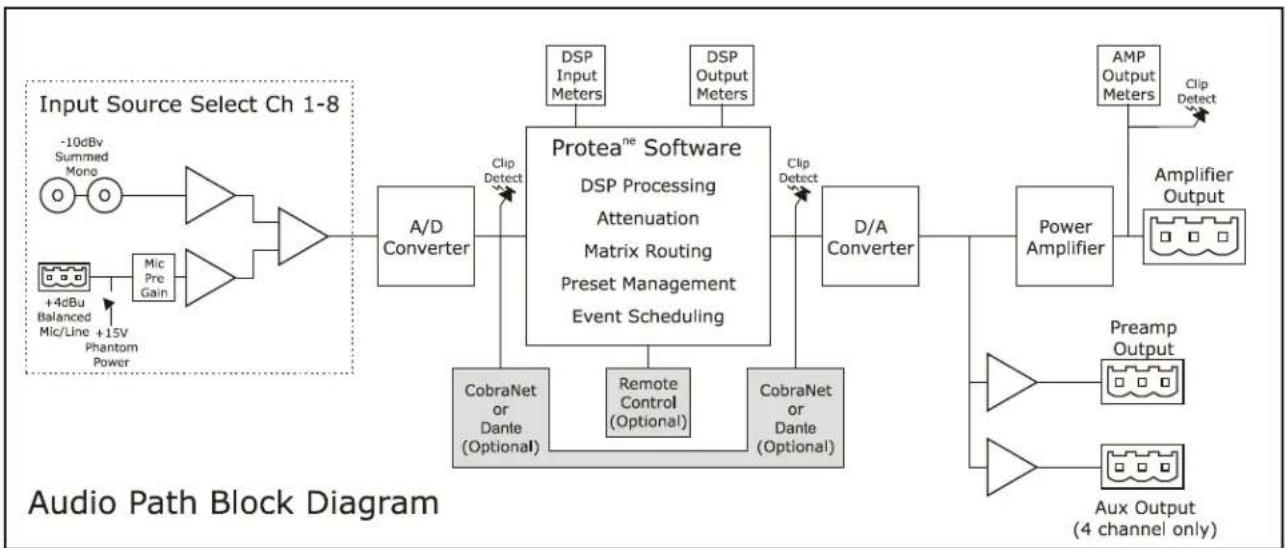
flowchart
graph LR
    A["Input Source Select Ch 1-8"] --> B["Summed Mono"]
    B --> C["Amplifier"]
    C --> D["DSP Input Meters"]
    C --> E["DSP Output Meters"]
    F["+4dBu Balanced Mic/Line Phantom Power"] --> G["Mic Pre Gain"]
    G --> H["A/D Converter"]
    H --> I["Protea™ Software DSP Processing Attenuation Matrix Routing Preset Management Event Scheduling"]
    I --> J["CobraNet or Dante (Optional)"]
    I --> K["Remote Control (Optional)"]
    I --> L["CobraNet or Dante (Optional)"]
    I --> M["D/A Converter"]
    M --> N["Power Amplifier"]
    N --> O["AMP Output Meters"]
    O --> P["Clip Detect"]
    I --> Q["Preamp Output"]
    I --> R["Aux Output (4 channel only)"]
    style A fill:#f9f,stroke:#333
    style F fill:#ccf,stroke:#333
    style F fill:#cfc,stroke:#333

ASHLY
ASHLY AUDIO INC. 847 Holt Road Webster, NY 14580-9103
Phone: (585) 872-0010 Fax: (585) 872-0739
Toll Free (800) 828-6308 ashly.com
© 2014 by Ashly Audio Corporation, a Division of Jam Industries, Ltd.
All rights reserved worldwide.
All features, specifications, and graphical representations are subject to change or improvement without notice.
All Trademarks referred to herein are the property of their respective owners.