С71-11 - Speaker Sven - Free user manual and instructions
Find the device manual for free С71-11 Sven in PDF.

User questions about С71-11 Sven
0 question about this device. Answer the ones you know or ask your own.
Ask a new question about this device
Download the instructions for your Speaker in PDF format for free! Find your manual С71-11 - Sven and take your electronic device back in hand. On this page are published all the documents necessary for the use of your device. С71-11 by Sven.
USER MANUAL С71-11 Sven
natural_image
3D mechanical assembly diagram showing a bracket and mounting plate assembly (no text or symbols)C71-11
www.sven.fi
Congratulations on your purchase of the Sven wall mount!
COPYRIGHT
© 2015. SVEN PTE. LTD. Version 1.0 (V 1.0).
This Manual and information contained in it are copyrighted. All rights reserved.
TRADEMARKS
All trademarks are the property of their legal holders.
NOTICE OF RESPONSIBILITY RESTRICTION
Despite the exerted efforts to make this Manual more exact, some discrepancies may occur. The information in this Manual is given on «as is» terms. The author and the publisher do not bear any liability to a person or an organization for loss or damage which has arisen from the information contained in this Manual.
CONTENTS
- BUYER RECOMMENDATIONS .... 1
- APPLICATION 2
- SAFETY PRECAUTIONS 2
- SPECIAL FEATURES ...... 2
- PACKAGE CONTENTS 2
- MOUNTING AND INSTALLATION.... 3
- TECHNICAL SPECIFICATIONS .... 5
1. BUYER RECOMMENDATIONS
- Unpack the device carefully. Make sure there are no accessories left in the box. Check up the device for damage; if the product was damaged during transportation, address the firm which carried out the delivery; if the product functions incorrectly, address the dealer at once.
- Check up the package contents and availability of the warranty card. Make sure the warranty card has a shop stamp, a legible signature or the seller's stamp and purchase date, and the number of the wall mount corresponds to that in the warranty card. Remember: in case of warranty card loss or discrepancy of numbers you forfeit the right for warranty repairs.
- Before installing and using the wall mount, read this Manual carefully.
2. APPLICATION
F41-44 is designed for wall-mounting LED/LCD/Plasma TV sets and monitors.
3. SAFETY PRECAUTIONS
- Do not exceed the maximum load specified in the Manual to avoid accidents or damage.
- Before installing the wall mount, read this Manual carefully and follow all the instructions when installing. To ensure safe and reliable mounting, it's recommended that installation be done by qualified specialists.
- Position your mount away from internal electric wires, water and gas pipes and other dangerous objects.
• Install the mount on walls of solid brick, concrete, wood or other material providing equivalent support. - When installing the mount on a wooden wall, drill the holes as close as possible to the center of the board to provide secure support.
- Fasten the screws until they are fixed. Do not use electric tools for this purpose.
- For safety reasons, do not install the wall mount alone.

4. SPECIAL FEATURES
• VESA: 100 × 100/200 × 200/300 × 300/400 × 400 mm
- Diagonal compatibility: 26" – 55"/66 – 140 cm
- Level included
• Space-saving slim design
- Easy installation and mounting
• High-strength polymer coating
- Security locks
5. PACKAGE CONTENTS
- Mount — 1 pc
- Mounting accessory kit — 1 pack
- User's Manual — 1 pc
• Warranty card — 1 pc
26" - 55"
66 - 140 cm

100×100mm
200×200mm
300×300mm
400×400mm

20 mm
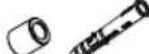
Components and Accessory Kit
| A | B | C | D | E | F | G | H | I | J | K | L |
text_image
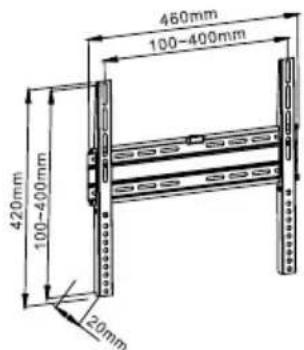
460mm 100-400mm 420mm 100-400mm 20mm
M5×12

M6×12

M8×18


4 pcs 4 pcs 4 pcs

M5×25

M6×25

M8×30


4 pcs 4 pcs 4 pcs


∅18×∅6.6∅5×∅6×∅8


ST6×50


4 pcs 4 pcs 4 pcs 4 pcs 4 pcs 1 pcs
User's Manual
C71-11

text_image
b a H = ? L = (3 ~ 5) a H = c + d c d L6. MOUNTING AND INSTALLATION
- Choose a wall to hang your mount on. It's recommended that the height H and the distance L from the viewer be calculated according to the formulas in the figures on the left.
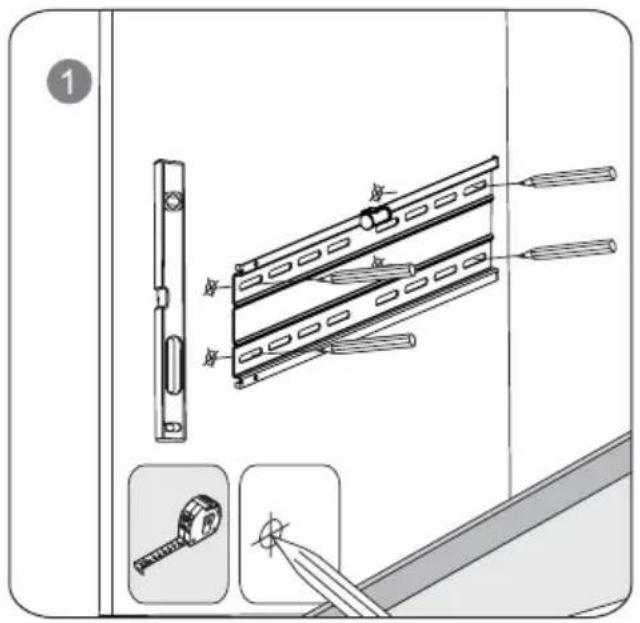
- Then, place the mount against the wall and mark the spots where the holes should be drilled (see Fig. ①). In a wooden wall, drill ∅ 4 mm and 30-40 mm deep holes; in a brick or concrete wall, drill ∅ 8 mm and 60 mm deep holes (Fig. ②).
text_image
Technical diagram showing a door lock assembly with labeled parts and close-up insets for measuring and cutting tools.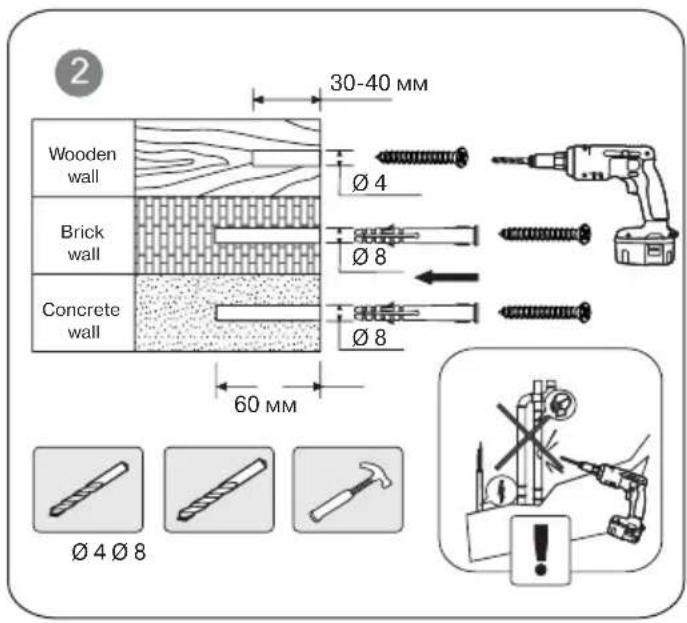
text_image
2 30-40 MM Wooden wall Ø 4 Brick wall Ø 8 Concrete wall Ø 8 60 MM Ø 4 Ø 8
text_image
3 Wood detector 13 mm- Fix the mount on the wall using dowels (see Fig. ③).
- Fix the mounting system on the rear panel of your TV, as shown in Fig. ④, using suitable screws and washers included in the package.
- Hang your TV on the wall mount, as shown in Fig. ⑤. The security locks will snap shut.
- For convenience, fasten the cables with ties from the package, as shown in Fig. ⑥.

text_image
4 TV IV Max 1,5N·M OPEN 10 mm A/B/C H D/E/F H I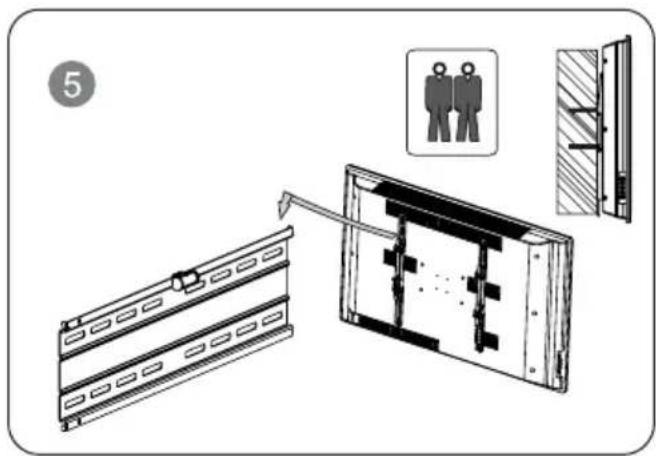
text_image
5
text_image
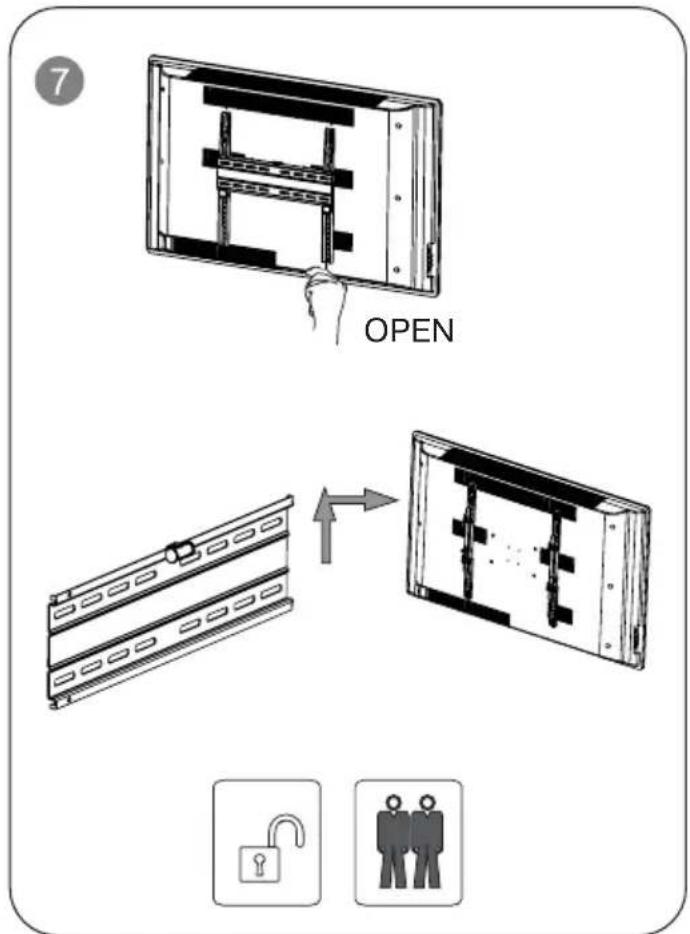
6 OK- To unmount your TV, release the security locks (see Fig. ⑦). Lift your TV slightly and take the mounting system out of the holes.
text_image
OPEN 7- TECHNICAL SPECIFICATIONS
| Parameter, measurement unit | Value |
| Diagonal compatibility, inch/cm | 26 – 55/66 – 140 |
| VESA range, mm | 100 × 100/200 × 200/300 × 300/400 × 400 |
| Maximum load, kg | 35 |
| Mounting type | fixed |
| Distance from wall, mm | 20 |
| Coating type | high-strength polymer |
Notes:
- Technical specifications given in this table are supplemental information and cannot give occasion to claims.
- Technical specifications are subject to change without notice due to the improvement of SVEN production.
Wall Mount for LED/LCD TVs and Monitors
SVEN®
YOU WANT - WE CAN
natural_image
3D rendering of a mechanical assembly with mounting bracket and housing (no text or symbols visible)Модель: C71-11
Manufacturer: SVEN PTE. LTD, 176 Joo Chiat Road, N° 02-02, Singapore, 427447. Produced under the control of Oy Sven Scandinavia Ltd. 15, Kotolahdentie, Kotka, Finland, 48310. Made in China.
® Registered Trademark of Oy SVEN Scandinavia Ltd. Finland.
C71-11