SureColor P50000Ce Plus - Printer EPSON - Free user manual and instructions
Find the device manual for free SureColor P50000Ce Plus EPSON in PDF.

User questions about SureColor P50000Ce Plus EPSON
0 question about this device. Answer the ones you know or ask your own.
Ask a new question about this device
Download the instructions for your Printer in PDF format for free! Find your manual SureColor P50000Ce Plus - EPSON and take your electronic device back in hand. On this page are published all the documents necessary for the use of your device. SureColor P50000Ce Plus by EPSON.
USER MANUAL SureColor P50000Ce Plus EPSON
Epson® SureColor® P5000User'sGuide
Contents
Epson SureColor P5000 User's Guide 9
Introduction to Your Printer.... 10
Printer Features 10
Optional Equipment and Replacement Parts 10
Notations Used in the Documentation 11
Printer Part Locations.... 11
Product Parts - Front 12
Product Parts - Top/Inside 13
Product Parts - Rear/Spindle 14
Control Panel Parts 15
Media Handling.... 19
Roll Paper Handling 19
Removing the Roll Media Adapter - 2-inch Core.... 19
Installing the Roll Media Adapter - 3-inch Core....20
Loading Roll Paper on the Spindle 21
Installing the Borderless Spacer 23
Loading Roll Paper 24
Cutting Roll Paper 28
Cutting Roll Paper Manually.... 29
Printing Trim Lines 29
Removing Roll Paper 30
Cut Sheet Handling 31
Loading Cut Sheets in the Paper Cassette 32
Loading Cut Sheets in the Rear Manual Feeder 39
Loading Cut Sheets in the Front Manual Feeder 42
Adjusting the Platen Gap 44
Creating Custom Paper Configurations.... 45
Printing a Custom Paper Configuration List 47
Selecting Custom Paper Configurations 47
Available Epson Papers 47
Borderless Paper Type Compatibility 54
Printing from a Computer 56
Printing with Windows 56
Selecting Basic Print Settings - Windows 56
Paper Configuration Options - Windows 60
Advanced B&W Photo Options - Windows.... 61
Print Quality Options - Windows 62
Color Management Options - Windows 62
Advanced Color Controls - Windows 64
Paper Source Options - Windows 64
Roll Paper Options - Windows 65
Using Layout Manager - Windows 68
Selecting Print Layout Options - Windows 74
Reduce/Enlarge Options - Windows 75
Multi-Page Printing Options - Windows.... 75
Selecting Additional Settings - Windows 76
Printing Your Document or Photo - Windows.... 78
Checking Print Status - Windows 80
Saving, Sharing, and Customizing the Printer Settings 80
Saving and Sharing Print Settings - Windows 80
SavingandSharingMediaSettings-Windows....82
Editing Print Setting Displays - Windows 83
Selecting Default Print Settings - Windows 85
ChangingtheLanguageofthePrinterSoftwareScreens....86
Changing Automatic Update Options 88
Printing on a Mac 88
Selecting Basic Print Settings - Mac 89
Advanced Color Settings - Mac.... 93
Output Resolution Settings - Mac 96
Print Options - Mac 96
Selecting Print Layout Options - Mac.... 97
Selecting Roll Paper Settings - Mac 97
Selecting Advanced Media Control Settings - Mac 100
Advanced Media Control Options - Mac.... 101
Managing Color - Mac 101
Color Matching Options - Mac.... 102
Sizing Printed Images - Mac 103
Selecting Printing Preferences - Mac 103
Printing Preferences - Mac.... 104
Printing Your Document or Photo - Mac 105
Checking Print Status - Mac.... 107
Using the Control Panel Menus.... 108
Accessing the Printer's Menus 108
Maintenance Menu Settings.... 108
Paper Menu Settings.... 110
Printer Setup Menu Settings 114
Printer Status Menu Settings.... 117
Network Setup Menu Settings 117
Preferences Menu Settings 118
Administrator Menu Settings 120
Replacing Ink Cartridges and Maintenance Tanks 121
CheckingInkandMaintenanceTankStatuswithWindows....121
Checking Ink and Maintenance Tank Status on a Mac.... 122
PurchaseEpsonInkCartridgesandMaintenanceTanks....123
InkCartridgeandMaintenanceTankPartNumbers....124
Removing and Installing Ink Cartridges 125
Replacing Maintenance Tanks 128
Replacing the Ink Maintenance Tank 128
Replacing the Borderless Maintenance Tank 131
Switch Black Ink Type 135
Switching the Black Ink Type 135
Black Ink Type Media List.... 135
Adjusting Print Quality 138
Print Head Maintenance.... 138
Print Head Nozzle Check 138
Printless Nozzle Check 138
CheckingtheNozzlesUsingtheProductControlPanel....139
CheckingtheNozzlesUsingaComputerUtility....140
Print Head Cleaning 142
CleaningthePrintHeadUsingtheProductControlPanel....142
CleaningthePrintHeadUsingaComputerUtility....144
Using the Powerful Cleaning Utility.... 146
Print Head Alignment 147
AligningthePrintHeadAutomaticallyUsingaComputerUtility....148
AligningthePrintHeadAutomaticallyUsingtheProductControlPanel....149
AligningthePrintHeadManuallyUsingtheProductControlPanel....149
Maintenance and Transportation.... 152
Cleaning Your Product 152
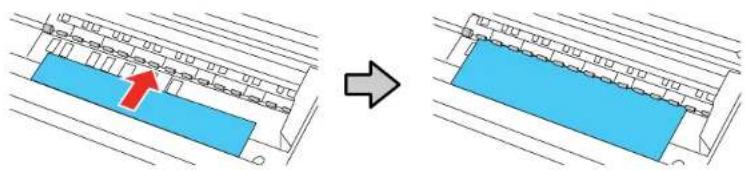
Cleaning the Roll Paper Feed Slot 154
Replacing the Cutter.... 156
Moving or Transporting Your Product.... 162
Solving Problems 164
Product Status Messages 164
Solving Printer Problems.... 171
Printer Does Not Turn On 172
LCD Screen Shuts Off 172
Solving Printing Problems 172
Nothing Prints 172
Cannot Print Over a Network 173
Print Head Moves But Nothing Prints 173
Solving Paper Problems.... 174
Paper Feeding Problems 174
Roll Paper Jam Problems 175
CutSheetPaperJamProblemsinthePaperCassette....177
CutSheetPaperJamProblemsintheFrontorRearManualFeeder....178
Solving Print Quality Problems.... 179
Nozzle Check Pattern Prints Incorrectly 179
Overall Print Quality is Poor 180
Lines Are Misaligned 181
Prints are Scuffed or Smeared 181
Margins Appear in Borderless Roll Prints 182
Too Much Ink is Consumed 183
Where to Get Help.... 183
Technical Specifications 185
Windows System Requirements 185
Mac System Requirements 186
Paper Specifications 186
Printable Area Specifications 188
Ink Cartridge Specifications.... 189
Dimension Specifications 190
Electrical Specifications 191
Environmental Specifications 191
Interface Specifications 192
Safety and Approvals Specifications 192
Notices 193
Important Safety Instructions.... 193
General Product Safety Instructions 193
Ink Cartridge Safety Instructions.... 195
FCC Compliance Statement.... 196
Trademarks 196
Copyright Notice.... 197
ANoteConcerningResponsibleUseofCopyrightedMaterials....197
Copyright Attribution 198
EpsonSureColorP5000User'sGuide
Welcome to the Epson SureColor P5000 User's Guide. For a printable PDF copy of this guide, click here.
IntroductiontoYourPrinter
Refertothesesectionstolearnmoreaboutyourprinterandthismanual.
PrinterFeatures
NotationsUsedintheDocumentation
PrinterPartLocations
PrinterFeatures
TheEpsonSureColorP5000printerincludesthesespecialfeatures:
Highproductivity
- PrecisionCoreprintheadcapableof10channelswith360nozzlesperinch
•Available200mlhigh-capacityinkcartridgeswithinincreasedblackdensity
•Auto-switchingbetweenrollpaperandhigh-capacitycutsheetcassette
Reliability
- Improveddustandstaticcontrolforreducedprintheadnozzlemaintenance
- Ink-repellentprintheadsurfaceforreducednozzleclogging
Highresolution
•Printsatresolutionsupto2880x1440dpi
•Supportsvariable-sizeddroplettechnologyassmallas3.5picoliter
Easy-to-usesetupandoperation
- Intuitive, easy-to-read, colorLCDdisplay
- Fourmediapaths, allfront-loadedforeasyaccess
- Easy-to-usesoftware
OptionalEquipmentandReplacementParts
Parenttopic: Introduction to Your Printer
OptionalEquipmentandReplacementParts
YoucanpurchasegenuineEpsonink,paper,andaccessoriesfromanEpsonauthorizedreseller.To find the nearest reseller, visit proimaging.epson.com (U.S.) or proimaging.epson.ca (Canada), select
your product series and product, and click the Where to Buy button. Or call 800-GO-EPSON (800-463-7766)intheU.S.or800-807-7766inCanada.
| OptionorpartPartnumber | |
| Replacementinkmaintenancetank(maintenancebox1)T6190 | |
| Replacementborderlessmaintenancetank(maintenancebox2)T6191 | |
| Additional2"/3"rollmediaspindleC12C811251 | |
| ReplacementprintcutterbladeC12C815351 | |
| CleaningsheetsC13S400045 | |
| SpectroProofer17"UVSSpectro17UVS | |
| 1-yearextendedEpsonPreferredPlusserviceplanfor SpectroProofer | EPPSPB1 |
| 1-yearextendedEpsonPreferredPlusserviceplanEPP49B1 | |
| 2-yearextendedEpsonPreferredPlusserviceplanEPP49B2 |
Parenttopic:PrinterFeatures
NotationsUsedintheDocumentation
Followtheguidelinesinthesenotationsasyoureadyourdocumentation:
- Warningsmustbefollowedcarefullytoavoidbodilyinjury .
- Cautionsmustbeobservedtoavoiddamagetoyourequipment.
- Notes contain important information about your printer.
- Tipscontainadditionalprintinginformation.
Parenttopic: Introduction to Your Printer
PrinterPartLocations
Checktheprinterpartillustrationstolearnaboutthepartsonyourprinter.
ProductParts-Front
ProductParts-Top/Inside
ProductParts-Rear/Spindle
ControlPanelParts
Parenttopic: Introduction to Your Printer
ProductParts-Front
text_image
Diagram of a printer with numbered parts labeled for identification1Frontcover
2Inkcartridgecover(left)
3Papercassette
4Outputtray
5Borderlessmaintenancetank(maintenancebox2)
6Paperejectsupport
7Frontmanualfeeder
8Inkcartridgecover(right)
9Controlpanel
10Alertlight
Parenttopic:PrinterPartLocations
ProductParts-Top/Inside

text_image
Technical diagram of a printer with numbered parts for identification and assembly reference.1Rollpaperspindleholders
2Rollpapercover
3Rollpaperfeeder
4Edgeguide
5Papersupport
6Rearmanualfeeder
7Printercover
8Printhead
9Inkcartridges
10Inkmaintenancetank(maintenancebox1)
Parenttopic:PrinterPartLocations
ProductParts-Rear/Spindle

text_image
Technical diagram of a printer internal structure with numbered components and labeled parts1Rearaccessunit
2Rollpaperholderunitconnector
3USBport
4Airflowvents
5Ethernet/LANport
6Statuslights
7ACinlet
8Removablepaperstop(black)
9Removablepaperstop(gray)
10Spindle
113-inchcoreadapters
12Borderlessprintingspacer
Parenttopic:PrinterPartLocations
ControlPanelParts

text_image
1 2 3 4 5 6 7 8 9 10 11 12 13 14 Check Menu1 ⏻ powerlight
2 ⏻ powerbutton
3LCDscreen
4pape feedanduparrowbutton
5 Black/A+A Blackink/maintenancebutton
6papersourceandleftarrowbutton
7papbfeedanddownarrowbutton
8Menuandrightarrowbutton
9paperCutbutton
10loadpaperbutton
11OKbutton
12 II·pause/cancelbutton
13 II·pause/cancellight
14Checkinklight
15 Checkpaperlight
LCDScreenDisplay
text_image
Ready 12 PG 35/15mm 30.0m GR V Y LC VLM OR MK VM LK C PK Matte Black1Statusmessages
2Papersource
Theiconindicate the current papers or sources settings. Then number appears when a Custom Paper setting is selected.
:RollpaperwithAutoCutenabled
:RollpaperwithAutoCutdisabled
Cutsheetpaper
3Inkcartridgestatus
:Amountofinkremaininginthecartridge
:Inklevelislow
:Inkcartridgeisexpended
Inkerror;checkthestatusmessageontheLCDscreen
4:Installedoptions:SpectroProofer(shown)istheonlysupportedoption
5PhotoBlackorMatteBlackinkselected
PresstheBlackink/maintenancebuttontoswitchcarridgetypes
6Maintenancetankstatus
:Amountofspaceremaininginthemaintenancetank
:Maintenancetankisnearingtheendofitsservicelife
:Maintenancetankisattheendofitsservicelife
7Rollpaperremaining
8Rollpapermarginsetting
9Platengapsetting

Narrow

:Standard

Wide

:Wider

:Widest
Parenttopic:PrinterPartLocations
MediaHandling
Seethesesectionstoloadandhandlemediaonyourproduct.
RollPaperHandling
CutSheetHandling
CreatingCustomPaperConfigurations
AvailableEpsonPapers
BorderlessPaperTypeCompatibility
RollPaperHandling
Seethesectionstoload, cut, and removerollpaperinyourproduct.
RemovingtheRollMediaAdapter-2-inchCore
InstallingtheRollMediaAdapter-3-inchCore
LoadingRollPaperontheSpindle
InstallingtheBorderlessSpacer
LoadingRollPaper
CuttingRollPaper
RemovingRollPaper
Parenttopic:MediaHandling
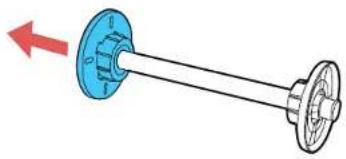
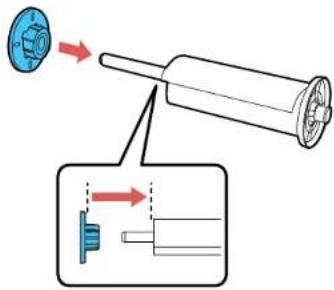
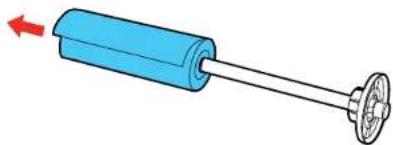
RemovingtheRollMediaAdapter-2-inchCore
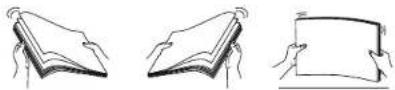
Forrollcanvasmediawitha2-inchcore,youneedtoremovetherollmediaadapterfromthepaperstoptomatchthecoresizeofyourrollcanvasmedia.
Note: Thinmedia(lessthan250gsm)isnotsupportedforthiscoresize.
- Removetheblackpaperstopfromthespindle.
natural_image
Diagram of a mechanical linkage with two components, one blue and one white, showing a red arrow indicating direction (no text or symbols)2.Pushoutthetwohooksontheblackpaperstopandremovethegrayadapterfromthepaperstop.
natural_image
Diagram of a mechanical or electrical component with blue components and red directional arrows indicating motion (no text or symbols)- Toremovethegrayadapterfromtheotherpaperstop, slideitoffthespindle.

Parenttopic:RollPaperHandling
InstallingtheRollMediaAdapter-3-inchCore
Forrollpaperwitha3-inchcore,youneedtoinstalltherollmediaadapterontothepaperstoptomatch thecoresizeofyourrollpaper.
- Removetheblackpaperstopfromthespindle.

natural_image
Diagram of a mechanical shaft with two wheels and a blue housing, showing a red arrow indicating direction (no text or symbols)- Align the triangles on the gray adapter with the triangles on the paper stop and press until the hooks click into place.

text_image
Diagram showing a mechanical component with red arrows and circular annotations, possibly indicating motion or control points.- Insert the other gray adapter onto the spindle and attach it to the other paper stop.

Parenttopic:RollPaperHandling
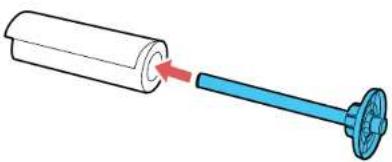
LoadingRollPaperontheSpindle
Loadrollcanvasmediaonthespindleincludedwiththerollpaperunit.
- Remove any tape and protective paper from the end of the roll. Makes sure the paper is cut straight across to avoid paper feeding problems.

Note: Avoid touching the surface of your paper or resting it on a dusty area. With canvas media that you have previously loaded, it's sagoodideatocuttheedgestraighteachtimeyoureloadit.
- Removetheblackpaperstopfromthespindle.
natural_image
Diagram of a mechanical linkage with two components, one blue and one black, showing a red arrow indicating direction (no text or symbols)- Insert the spindle into otherollpaper cores that the end of the roll paper is facing towards you.
natural_image
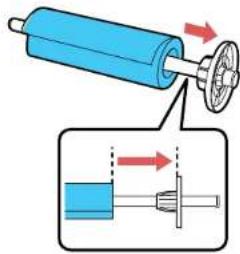
Diagram showing a cylindrical object being inserted into a blue plastic bottle with a red arrow indicating the insertion direction (no text or symbols present)- Presstherollpaperagainstthefixedpaperstopuntilthatthereisnogapbetweenthepaperstop andtherollpaper.
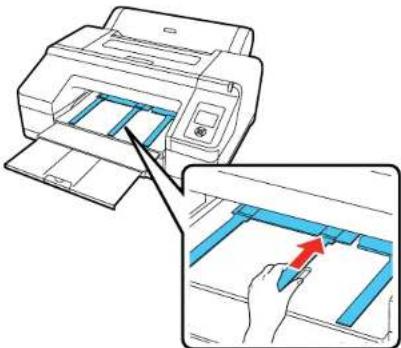
text_image
Diagram illustrating a mechanical assembly with labeled components and directional arrows indicating motion or force.- Insert the black paper stop onto the spindle and press in until there is no gap between the paper stop and the roll paper.
text_image
Diagram showing mechanical assembly with a blue component and a magnified view of a shaft assembly, labeled in Chinese.Parenttopic:RollPaperHandling
InstallingtheBorderlessSpacer
Whenyouperformborderlessprintingonrollpaper,youmayneedtoinstalltheborderlessspacer.
Note: Only2-inchcoremediaissupportedwhenusingtheborderlessspacer.
- Removetheblackpaperstopfromthespindle.

natural_image
Diagram of a mechanical shaft with two flanges and a central shaft, showing a red arrow indicating direction (no text or symbols)2.Slidethespacerallthewayontothespindleuntiltreachesthegraypaperstopontheotherend. Makesuretheholesinthespacerandpaperstoplineupexactly.
natural_image
Mechanical assembly diagram showing a shaft and gear mechanism with no visible text or symbolsParenttopic:RollPaperHandling
Relatedreferences
BorderlessPaperTypeCompatibility
LoadingRollPaper
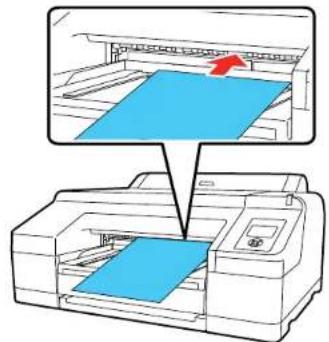
Youcanloadrollpaperwitha2-or3-inchcoreandawidthofupto17inches(43cm).
- Makesuretheprinteristurnedon.
- Onthecontrol panel, pressthepapersourcebutton.
- Press the down arrow button to select Roll Paper/Cut or Roll Paper/No Cut, and press the OK button.
- Opentherollpapercover.
natural_image
Line drawing of a printer with a blue cover and red arrow indicating compression (no text or symbols)- Placetherollpaperintheprinterasshown(theblackendofthespindlegoesontheleft).
natural_image
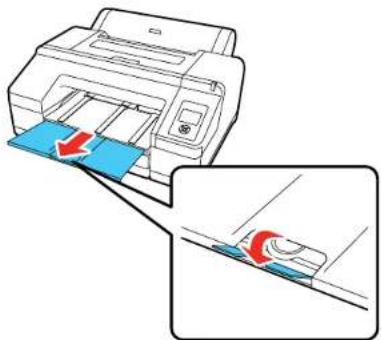
Diagram of a printer with a blue roller being inserted, showing paper roll and printer casing (no text or symbols)6.Presstheloadpaperbuttononthecontrolpanel.
- Insert the leading edge of the roll paper into therear manual paper feeder until a message on the LCD screen tells you to press the load paper button.

natural_image
Line drawing of a printer with hands holding a blue cover (no text or symbols)- Presstheloadpaperbuttononthecontrolpanel. Theprinterautomaticallyfeedsthepapertothe printingposition.
9.Closetherollpapercover.
natural_image
Line drawing of a printer with a blue cover and red arrow indicating compression (no text or symbols)Note: To prevent dust from accumulating inside the printer, always keep the roll paper cover closed unless you are loading or unloading media.
-
On the screen that appears, select one of the following settings:
-
Ifthepapersettingsarecorrect,selectYes.
- If you want to change the paper settings, select Nos you can adjust these settings.
11.PresstheOKbutton.
12.Slideouttheoutputtray.Donotraisethepaperstopperotherollpapermaynotejectcorrectly.

natural_image
Illustration of a printer with blue paper sheets being inserted, showing paper movement arrows (no text or symbols)Note: If you are printing on plain paper or thin mediatypes, or if you are using the optional Spectroproofer, raise the papereject support. This prevents paper from curling up in the output tray, which can cause paper jams and print head strikes.
text_image
Diagram showing printer printing process with blue plastic strips and a hand inserting a red arrow to a componentParenttopic:RollPaperHandling
Relatedreferences
AvailableEpsonPapers
RollPaperOptions-Windows
PaperSpecifications
Relatedtasks
RemovingRollPaper
SelectingRollPaperSettings-Mac
CuttingRollPaper
The printer has been built-in cutter that can automatically cut most paper types, or you can cut your prints manually. To switch between cutting methods, press the paper source button on the control panel or adjust the autocut settings in the printer driver. These settings selected in the printer driver over ridest the control panel setting.
Caution: Use of the built-in cutter is not recommended for the below paper types, as it may lead to dullingofthebladeandmorefrequentreplacement:
•Fineartpaper
- Canvas
Caution: Do not use the built-in cutter with these paper types or you may damage or dull the built-in cutter:
•Vinyl
•Matteposterboard
- Adhesivepaper
• Bannermedia
Whenyouprintonthesepapertypes,youneedtodisabletheAutoCutsettingandcuttheprintoffthe rollmanually.
CuttingRollPaperManually
PrintingTrimLines
Parenttopic:RollPaperHandling
Relatedreferences
RollPaperOptions-Windows
Relatedtasks
SelectingRollPaperSettings-Mac
CuttingRollPaperManually
Youcankeepyourprintsontherolluntilyoumanuallycutthem.
Note: The built-in cutter may not be able to cut some types of media. In addition, heavy or thick media types may damage our the cutter, requiring more frequent replacement.
- Pressthepapersourcebutton.
- Press the down arrow button to select Roll Paper/No Cut, and press the OK button.
- Runyourprintjob.
4.Pressthepapetcutbutton.
Note: If the paper cannot be cut by the built-in cutter, press the ↘ paper feed button until your print is clearoftheprinter,thencuttheprintbyhand.
Parenttopic: CuttingRollPaper
PrintingTrimLines
When you disable the Auto Cut setting, you can print a trim line (page line) between print jobs as a guide for manual cutting.
- Beforeyouprint, presstheMenubutton.
2.PressthedownarrowbuttontoselectPaperandpresstherightarrowbutton. - SelectRollPaperSetupandpresstherightarrowbutton.
- SelectPrintPageLineandpresstherightarrowbutton.
5.PresstheupordownarrowbuttontoselectOn.
6.PresstheOKbuttontosavethesetting.
Acheckmarkappearsnexttothesetting.
-
Pressthepaule cancelbuttontoexitthemenu.
-
Run your print job.
Parenttopic: CuttingRollPaper
Relatedreferences
PaperMenuSettings
RemovingRollPaper
When you finish printing on roll paper, you should remove it from the print to avoid indenting or creating the paper.
- Opentherollpapercover.

natural_image
Line drawing of a printer with paper feed and paper clip (no text or symbols)- Presstheload paperbuttontoreleasethepaper. Thepaperrewindsautomatically.
Note: Makesuretherollpaperisrewoundcompletelybeforeeremovingitfromtheprinter.
- Hold both end of the spindle and lift it up from the spindle holder.

natural_image
Line drawing of a printer with a blue paper roll and red arrows indicating motion (no text or symbols)- Removetheblackpaperstopfromthespindleasshown.

natural_image
Illustration of hands holding a blue circular device with red arrows indicating rotation or movement (no text or symbols)- Removetherollpaperfromthespindle.
natural_image
Illustration of a blue cylindrical device with a metallic shaft and red arrow indicating left motion (no text or symbols)- Placetherollpaperinitsoriginalpackage.
Note: Store roll paper on its end or horizontally (if the packaging end-caps are installed). Never store rollpaperonitsedge, asaflatspotcandevelopandleadtoimagingartifactsontheprints.
Note: Do not store roll paper in dusty areas. Print head maintenance and cleanings increase if dust accumulates on the paper.
- Closetherollpapercover.
Note: To prevent dust from accumulating inside the printer, always keep the roll paper cover closed unless you are loading or unloading media.
Parenttopic:RollPaperHandling
CutSheetHandling
Youcanloadavarietyoftypesandsizesofcutsheetpaperinyourproduct.
LoadingCutSheetsinthePaperCassette
LoadingCutSheetsintheRearManualFeeder
LoadingCutSheetsintheFrontManualFeeder
AdjustingthePlatenGap
Parenttopic:MediaHandling
LoadingCutSheetsinthePaperCassette
Youcanprintonavarietyofpapertypesandsizesupto17inches(43cm)wideand0.1inch(0.27mm) thickfromthepapercassette.
-
Makesuretheprinteristurnedon.
-
Onthecontrolpanel, pressthepaper sourcebutton.
-
Press the down arrow button to select Cut Sheet, and press the OK button.
-
Lifttheedgeoftheoutputtraytoremoveit.
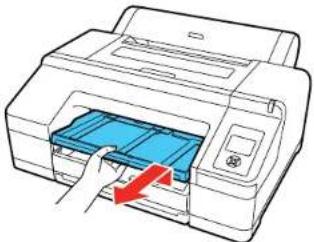
natural_image
Illustration of a printer with a hand inserting a blue plastic into the paper (no text or symbols visible)5.Slideoutthepapercassette,thenpullitallthewayout.

text_image
Diagram illustrating the process of printer printing and packaging, showing a printer being inserted into a blue plastic sheet.Note: If you are loading paper that is 13 × 19 inches ( 330 × 483 mm) or larger, pull the lever in the papercassettetoextenditasfaraspossibleandexpandthesliderallthewaytotheedgeofthe papercassette.
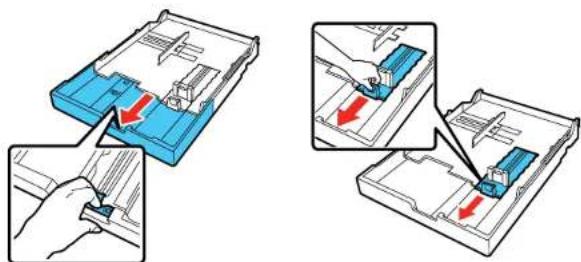
text_image
Diagram illustrating a mechanical assembly process with blue components and red arrows indicating direction of movement or force.6.Slidetheedgeguidesoutward.

text_image
Diagram illustrating a mechanical assembly process with labeled parts and directional arrows indicating movement or force.7.Fanthroughastackofpaper,thengentlytapitonaflatsurfacetoeventheedges.
8.Loadthepaperwiththeprintablesidefacedownandshortedgefirst.Placethepaperalltheway backinthepapercassetteandnexttotherightedge.Makesurethepaperfitsunderthearrowon theleftedgeguide.

natural_image
Diagram of a printer or printer holder with blue cover and paper tray, showing no text or symbols9.Slidetheedgeguidesagainstthepaper,butnottootightly.

text_image
Diagram illustrating a mechanical assembly process with labeled steps and directional arrows indicating movement or force.- Insert the papercassette and push it firmly into the printer.
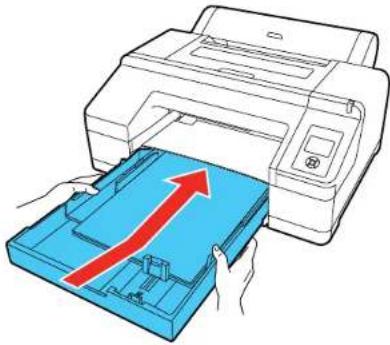
natural_image
Illustration of a printer being inserted into a blue plastic tray with a red upward arrow (no text or symbols)Note: If you loaded paper that is 13 × 19 inches (330 × 483 mm) or larger, install the paper cassette cover, aligning the earrowsasshown. This covers important to limit dust from accumulating oncut sheets in the papercassette and will help reduce print head maintenance and cleanings.

natural_image
Diagram of a printer with a blue plastic cover being inserted, showing internal structure and a close-up view of the printer's side panel (no text or symbols present)- Replacetheoutputtray.

natural_image
Line drawing of a printer with a blue cover and red arrow indicating print direction (no text or symbols)- Adjust the output tray to fit your paper size.
A4 paper: Slide out the third extension, raise the paper stopper, and push the extension back in.

text_image
Diagram illustrating printer operation with labeled parts and directional arrows indicating process flowA3paper: Pulloutthethirdextensionandraisethepaperstopper.
natural_image
Diagram showing a printer printing blue sheets with red arrows indicating compression or disassembly (no text or symbols present)SuperA3orlargerpaper: Pulloutthesecondandthirdextensionsandraisethepaperstopper.

natural_image
Illustration of a printer being inserted into a sheet of paper with arrows indicating process flow (no text or symbols present)Parenttopic: CutSheetHandling
Relatedreferences
AvailableEpsonPapers
PaperSpecifications
LoadingCutSheetsintheRearManualFeeder
Usetherearmanualfeedertoloadonecutsheetatatimeupto0.3inch(0.79mm)thick.
- Makesuretheprinteristurnedon.
- Onthecontrol panel, pressthepaper source button.
-
Press the down arrow button to select Cut Sheet, and press the OK button.
-
Openandextendthepapersupport.

text_image
Diagram showing printer printing process with blue paper being placed on top, labeled with red arrows indicating the process.- Adjust the edge guidet of the paper width.

natural_image
Diagram showing a printer with a blue component being inserted, with red arrows indicating direction (no text or symbols present)- Insertasinglcutsheetintotherearmanualfeeder,printablesideup,untiltreachesthegray rollersinsidetheprinter.
text_image
Diagram illustrating the process of printer printing and downloading a document, showing a printer being inserted into a printer with a blue arrow indicating the drop.- Extend the output tray as necessary to support the sheet as it comes out of the printer.

natural_image
Illustration of a printer with blue paper sheets and red arrows indicating flow or movement (no text or symbols)- Pressthepaper feedbutton on the control panel to feed the paper through the printer.
Parenttopic: CutSheetHandling
Relatedreferences
AvailableEpsonPapers
PaperSpecifications
LoadingCutSheetsintheFrontManualFeeder
Usethefrontmanualfeedertoloadonecutsheetatatimeupto0.06inch(1.5mm)thick.
- Makesuretheprinteristurnedon.
- On the control panel, pressthe paper source button.
- Press the down arrow button to select Cut Sheet, and press the OK button.
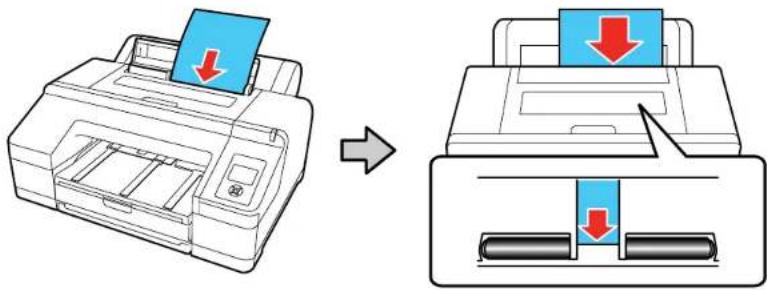
4.Presstheloadpaperbuttontoreleasethepressureroller. - Insertpaperwiththeprintablesideupovertheblackrollerinthefrontmanualfeederasshown.
natural_image
Diagram showing a printer being placed on top of its page with a blue sheet, no text or symbols present- Lookthrough the printer window and makes sure the paper is inserted under the gray roller inside the printer.
text_image
Diagram showing a blue rectangular object being rotated by an arrow, with a red arrow indicating the direction.- Align the edge of the paper with the guideline on the output tray.

text_image
Diagram showing printer printing process with red arrow indicating rotation direction-
Presstheloadpaperbuttontofeedthepaperthroughtheprinter.
-
Extend the output tray to support the paper as it comes out of the printer. Donot rais the paper stopper or paper may be ejected incorrectly.

natural_image
Illustration of a printer with blue paper being inserted, showing paper roll and red arrows indicating compression (no text or symbols)- Whenprintingisfinished, presstheloadpaperbuttontoreleasethepressurerollersoyoucan pulloutthepaper.

natural_image
Illustration of a printer with a blue cover being inserted, showing paper being placed (no text or symbols present)Parenttopic: CutSheetHandling
Relatedreferences
AvailableEpsonPapers
PaperSpecifications
AdjustingthePlatenGap
Iftheprintqualityisnotsatisfactorywhenprintingonverythinorverythickmedia,youmayneedto adjustthePlatenGapsettingtoadjustthegapbetweenthemediaandtheprinthead.Usethewidest gapthatmaintainshighqualityprinting.Selectinganarrowerthanrequiredgapcanleadtoincreased printheadmaintenanceandcleanings.
Note: If you notice scuffs on the first few inches of your prints, this is caused by paper curl and print head strikes. Make sure your paper is flat. You can also try changing the Platen Gap setting to Wide. If that doesn't solvetheproblem, try changing it to Wider.
1.PresstheMenubutton.
2.PressthedownarrowbuttontoselectPrinterSetupandpresstherightarrowbutton.
3.PresstherightarrowbuttontoselectPlatenGap.
- PresstheupordownarrowtoselectaplatengapsettingandpresstheOKbutton.
Note: To avoid damaging the printer, do not select the Narrow setting when loading thick media.
Acheckmarkappearsnexttotheselectedsetting.
5.Pressthepaule cancelbuttontoexitthemenu.
TheplatengapsymbolontheLCDscreenchangestomatchthenewsetting.
Parenttopic: CutSheetHandling
Relatedreferences
PrinterSetupMenuSettings
CreatingCustomPaperConfigurations
Youcancreateandstoreupto10custompaperconfigurationsforuseinprintingonnon-Epsonpaperor paperthatisnotsupportedbytheEpsonprinterdriver.
Note: Custom paper configurations are based on the existing Uni-D and Bi-D print head alignment. For bestresults, performtheprintheadalignmentusingEpsonDoubleweightMattePaper,EpsonEnhanced MattePaper,orEpsonUltraPremiumPhotoPaperLuster.
- Loadthetypeofpaperthatyouwanttoconfigureintheprinter.
2.PresstheMenubutton.
3.PresstheupordownarrowbuttontoselectPaperandpresstherightarrowbutton. - SelectCustomPaperandpresstherightarrowbutton.
- Selectanumberforthecustompaperconfigurationandpresstherightarrowbutton.
- SelectSelectReferencePaperandpresstherightarrowbutton.
- Selectapaperpresetthatissimilartothepaperthatyouloadedandpresstherightarrowbutton.
Note: Use the following guidelines when selecting the reference paper that is closest to the paper you are using:
•Glossypaper:PhotoPaperorProofingPaper
•Thickpaperthatisnotglossy:MattePaper
•Thin,softpaperthatisnotglossy:PlainPaper
• Cottonpaperwitharoughsurface: FineArtPaper
•Specialmediasuchasfilm,cloth,posterboard,ortracingpaper:Others
8.PresstheleftarrowbuttontoreturntotheCustomPapermenu.
9. SelectPlatenGapandpresstherightarrowbutton.
10. SelectaplatengapsettingandpresstheOKbutton.
11.PresstheleftarrowbuttontoreturntotheCustomPapermenu.
12. SelectThicknessPatternandpresstherightarrowbutton.
13.PresstheOKbutton.
Apaperthicknesspatternprints.
- Check the printed pattern and locate the pattern with them most evenly overlapping lines.

text_image
1 2 3 4 5 6 7 8 9 10 11 12 13 14 15Note: It is normal for twopatternstolookverysimilar. Select themostacceptable pattern.
- SelectthenumberofthemostevenpatternandpresstheOKbutton.
- SelectanyadditionalsettingsintheCustomPaperSettingsmenu, asnecessary.
- When you finish changing the custom paper configuration settings, press pause or cancel to exit themenu.
Afteryoucreatecustompaperconfigurations,youcanprintalistofthepresetsandthesettingsforeach one.
Note: You can also use the LFP Remote Panel Utility software to create custom paper configurations.
PrintingaCustomPaperConfigurationList
SelectingCustomPaperConfigurations
Parenttopic:MediaHandling
Relatedreferences
PaperMenuSettings
PrintingaCustomPaperConfigurationList
Youcanprintalistofthesettingsforallthecustompaperconfigurationsthatyouhavecreated.
- PresstheMenubutton.
2.PressthedownarrowbuttontoselectPaperandpresstherightarrowbutton. - SelectPrintPaperListandpresstherightarrowbutton.
- PresstheOKbuttontoprintthelistofyourcustompaperconfigurations.
Parenttopic: CreatingCustomPaperConfigurations
Relatedreferences
PaperMenuSettings
SelectingCustomPaperConfigurations
Once you have created a custom paper configuration, you can select the configuration whenever you print on the associated media.
- PresstheMenubutton.
2.PresstheupordownarrowbuttontoselectPaperandpresstherightarrowbutton. - SelectPaperType and press the right arrow button.
- SelectCustomPaperandpresstherightarrowbutton.
- Select the custom paper configuration you want to use and press the OK button.
6.Pressthepaule cancelbuttontoexitthemenu.
The custom paper configuration you selected this displayed on the LCD screen.
Parenttopic: CreatingCustomPaperConfigurations
Relatedreferences
PaperMenuSettings
AvailableEpsonPapers
YoucanpurchasegenuineEpsonink,paper,andaccessoriesfromanEpsonauthorizedreseller.To find the nearest reseller, visit proimaging.epson.com (U.S.) or proimaging.epson.ca (Canada), select
your product series and product, and click the Where to Buy button. Or call 800-GO-EPSON (800-463-7766)intheU.S.or800-807-7766inCanada.
Note: Paper/media availability varies by country.
| PaperTypeSizePartnumberSheetcount | |||
| EpsonLegacyPlatineLetter(8.5×11inches[216×279mm]) | S45007925 | ||
| 13×19inches(330×483mm)S45008025 | |||
| 17×22inches(432×559mm)S45008125 | |||
| 17inches(432mm)×50feet(15.2m) | S4500761roll | ||
| EpsonLegacyFibreLetter(8.5×11inches[216×279mm]) | S45008525 | ||
| 13×19inches(330×483mm)S45008625 | |||
| 17×22inches(432×559mm)S45008725 | |||
| 17inches(432mm)×50feet(15.2m) | S4500821roll | ||
| EpsonLegacyEtchingLetter(8.5×11inches[216×279mm]) | S45009125 | ||
| 13×19inches(330×483mm)S45009225 | |||
| 17×22inches(432×559mm)S45009325 | |||
| 17inches(432mm)×50feet(15.2m) | S4500881roll | ||
| EpsonLegacyBarytaLetter(8.5×11inches[216×279mm]) | S45009725 | ||
| 13×19inches(330×483mm)S45009825 | |||
| 17×22inches(432×559mm)S45009925 | |||
| 17inches(432mm)×50feet(15.2m) | S4500941roll | ||
| EpsonColdPressBrightLetter(8.5×1 inches[216×279mm]) | S04230725 | ||
| 13×19inches(330×483mm)S0423 | 1025 | ||
| 17×22inches(432×559mm)S0423 | 1125 | ||
| EpsonColdPressNaturalLetter(8.5×1 inches[216×279mm]) | S04229725 | ||
| 13×19inches(330×483mm)S0423 | 0025 | ||
| 17×22inches(432×559mm)S0423 | 0125 | ||
| EpsonVelvetFineArtPaperLetter(8.5×1 inches[216×279mm]) | S04163620 | ||
| 13×19inches(330×483mm)S0416 | 3720 | ||
| 17×22inches(432×559mm)S0420 | 9725 | ||
| EpsonExhibitionFiberPaperLetter(8.5×1 inches[216×279mm]) | S04503325 | ||
| 13×19inches(330×483mm)S0450 | 3725 | ||
| 17×22inches(432×559mm)S0450 | 3925 | ||
| EpsonHotPressBrightLetter(8.5×1 inches[216×279mm]) | S04232725 | ||
| 13×19inches(330×483mm)S0423 | 3025 | ||
| 17×22inches(432×559mm)S0423 | 3125 | ||
| EpsonHotPressNaturalLetter(8.5×1 inches[216×279mm]) | S04231725 | ||
| 13×19inches(330×483mm)S0423 | 2025 | ||
| 17×22inches(432×559mm)S0423 | 2125 | ||
| EpsonExhibitionWatercolorPaperTextured | Letter(8.5×11inches[216×279mm]) | S04548625 | |
| 13×19inches(330×483mm)S0454 | 8720 | ||
| 17×22inches(432×559mm)S0454 | 8825 | ||
| EpsonUltraPremiumPhotoPaper Glossy | Letter(8.5×11inches [216×279mm]) | S04217520 | |
| 8×10inches(203×254mm)S04194 | 620 | ||
| EpsonPremiumLusterPhoto Paper(260) | 8.3inches(211mm)×32feet (9.8m) | S0414081roll | |
| 13inches(330mm)×32feet (9.8m) | S0414091roll | ||
| 10inches(254mm)×100feet (30.5m) | S0420771roll | ||
| 16inches(406mm)×100feet (30.5m) | S0420791roll | ||
| EpsonMetallicPhotoPaper Glossy | Letter(8.5×11inches [216×279mm]) | S04558925 | |
| 13×19inches(330×483mm)S0455 | 9025 | ||
| 17×22inches(432×559mm)S0455 | 9125 | ||
| EpsonMetallicPhotoPaperLusterLetter | Letter(8.5×11inches [216×279mm]) | S04551625 | |
| 13×19inches(330×483mm)S0455 | 1725 | ||
| 17×22inches(432×559mm)S0455 | 9825 | ||
| EpsonPhotoPaperGlossyLetter(8.5×11inches [216×279mm]) | S04164950 | ||
| 11×17inches(279×432mm)S0411 | 5620 | ||
| 13×19inches(330×483mm)S0411 | 4320 | ||
| Letter(8.5×11inches [216×279mm]) | S041271100 | ||
| EpsonPremiumPhotoPaper Glossy | Letter(8.5×11inches [216×279mm]) | S04128620 | |
| A3(11.7×16.5inches [297×420mm]) | S04128820 | ||
| 13×19inches(330×483mm)S0412 | 8920 | ||
| Letter(8.5×11inches [216×279mm]) | S04166750 | ||
| 11×17inches(279×432mm)S0412 | 9020 | ||
| 8×10inches(203×254mm)S04146 | 520 | ||
| 11×14inches(279×356mm)S0414 | 6620 | ||
| 17×22inches(432×559mm)S0420 | 9225 | ||
| EpsonPremiumPhotoPaper Semi-gloss | Letter(8.5×11inches [216×279mm]) | S04133120 | |
| 13×19inches(330×483mm)S0413 | 2720 | ||
| 8×10inches(203×254mm)S04146 | 750 | ||
| Letter(8.5×11inches [216×279mm]) | S04125750 | ||
| 11×14inches(279×356mm)S0414 | 6850 | ||
| A3(11.7×16.5inches [297×420mm]) | S04126050 | ||
| 13×19inches(330×483mm)S0412 | 6350 | ||
| 17×22inches(432×559mm)S0421 | 2425 | ||
| EpsonPremiumPresentation PaperMatte | Letter(8.5×11inches [216×279mm]) | S041062100 | |
| Legal(8.5×14inches [216×356mm]) | S041067100 | ||
| 11×17inches(279×432mm)S0410 | 70100 | ||
| 13×19inches(330×483mm)S0410 | 69100 | ||
| 16.5×23.4 inches(420×594mm) | S04107930 | ||
| 17×22inches(432×559mm)S0411 | 71100 | ||
| EpsonProofingPaperWhite Semimatte | 13×19inches(330×483mm)S0451 | 15100 | |
| 13inches(300mm)×100feet (30.5m) | S0420021roll | ||
| 17inches(432mm)×100feet (30.5m) | S0420031roll | ||
| EpsonStandardProofingPaper Publication | 13inches(300mm)×100feet (30.5m) | S0419961roll | |
| 17inches(432mm)×100feet (30.5m) | S0419971roll | ||
| EpsonStandardProofingPaper Commercial | 13inches(300mm)×100feet (30.5m) | S0421441roll | |
| 17inches(432mm)×100feet (30.5m) | S0419971roll | ||
| EpsonStandardProofingPaper (240) | 13×19inches(330×483mm)S0451 | 15100 | |
| EpsonUltraPremiumPhotoPaper Luster | Letter(8.5×11inches [216×279mm]) | S04140550 | |
| A3(11.7×16.5inches [297×420mm]) | S04140650 | ||
| 13×19inches(330×483mm)S0414 | 0750 | ||
| 13×19inches(330×483mm)S0416 | 04100 | ||
| 17×22inches(432×559mm)S0420 | 8425 | ||
| 13inches(330mm)×32.8feet (10m) | S0414091roll | ||
| EpsonUltraPremiumPresentation PaperMatte | Letter(8.5×11inches [216×279mm]) | S04134150 | |
| A3(11.7×16.5inches [297×420mm]) | S04134350 | ||
| 13×19inches(330×483mm)S0413 | 3950 | ||
| 13×19inches(330×483mm)S0416 | 05100 | ||
| 17×22inches(432×559mm)S0419 | 08100 | ||
| EpsonUltraSmoothFineArtPaper13× | 19inches(330×483mm)S04189625 | ||
| 17×22inches(432×559mm)S0418 | 9725 | ||
| EpsonWatercolorPaperRadiant White | 13×19inches(330×483mm)S0413 | 5120 | |
| EpsonExhibitionCanvasMatte13inches | (330mm)×20feet (6.1m) | S0452551roll | |
| 17×22inches(432×559mm)S0452 | 5525 | ||
| EpsonExhibitionCanvasSatin13inches | (330mm)×20feet (6.1m) | S0452481roll | |
| EpsonExhibitionCanvasGloss13inches | (330mm)×20feet (6.1m) | S0452411roll | |
| EpsonExhibitionCanvasNatural Matte | 13inches(330mm)×20feet (6.1m) | S0452411roll | |
| EpsonExhibitionCanvasNatural Satin | 13inches(330mm)×20feet (6.1m) | S0453961roll | |
| EpsonExhibitionCanvasNatural Gloss | 13inches(330mm)×20feet (6.1m) | S0454101roll | |
| EpsonPremiumGlossyPhoto Paper(250) | 16inches(406mm)×100feet (30.5m) | S0417421roll | |
| EpsonPremiumSemimattePhoto Paper(250) | 16inches(406mm)×100feet (30.5m) | S0421491roll | |
| EpsonPremiumGlossyPhoto Paper(170) | 16.5inches(419mm)×100feet (30.5m) | S0420761roll | |
| EpsonEnhancedMattePaper16inches | (406mm)×100feet (30.5m) | S0417251roll | |
| EpsonSingleweightMattePaper17inches | (432mm)×132feet (40.2m) | S0417461roll | |
| 17inches(432mm)×132feet (40.2m) | S0418531roll | ||
Parenttopic:MediaHandling
BorderlessPaperTypeCompatibility
Youcanprintborderlessphotosoncompatiblepapertypesincompatiblepaperwidths:
ExamplesofBorderlessPaperTypes
•EpsonSingleweightMattePaper
•EpsonDoubleweightMattePaper
•EpsonPremiumGlossyPhotoPaper(250)
•EpsonPremiumGlossyPhotoPaper(170)
•EpsonPremiumSemimattePhotoPaper(250)
•EpsonPremiumLusterPhotoPaper(260)
BorderlessRollPaperWidths
- 10inches(254mm)
•11.8inches(300mm)
•13inches(330mm)
•14inches(356mm)
•16inches(406mm)
•17inches(432mm)
BorderlessRollPaperWidthsfor2-inchCoreMedia
(requireuseoftheborderlessspacer)
- 8inches(203mm)
•11inches(280mm)
•16.5inches(420mm)
Note: The printer software allows you to create and select custom page sizes. To print borderless on roll media, makesurethestandardorcustomsizeusesasupportedwidthoranerrorwilloccuronthe printer.
Parenttopic:MediaHandling
Relatedreferences
PrintableAreaSpecifications
RollPaperOptions-Windows
Relatedtasks
SelectingRollPaperSettings-Mac
PrintingfromaComputer
Note: If you have an Internet connection, it is a good idea to check for updates to your product software on Epson's support website. If you see a Software Update screen, select Enable automatic checking and click OK. The update scans your system to see if you have the latest product software. Follow the on-screen instructions.
PrintingwithWindows
PrintingonaMac
PrintingwithWindows
You can print with your product using any Windows application, as described in these sections.
SelectingBasicPrintSettings-Windows
SelectingPrintLayoutOptions-Windows
SelectingAdditionalSettings-Windows
PrintingYourDocumentorPhoto-Windows
Saving, Sharing, and Customizing the Printer Settings
SelectingDefaultPrintSettings-Windows
ChangingtheLanguageofthePrinterSoftwareScreens
ChangingAutomaticUpdateOptions
Parenttopic: PrintingfromaComputer
SelectingBasicPrintSettings-Windows
Selectthebasicsettingsforthephotoordocumentyouwanttoprint.
-
Openaphotoordocumentforprinting.
-
Selecttheprintcommandinyourapplication.
Note: You may need to select a print icon on your screen, the Print option in the File menu, or another command. See your application's help utility for details.
- If necessary, select your product name as the printery you want to use.
Note: You may also need to select Preferences, Properties, Print Settings, or Printer Properties to view your print settings.
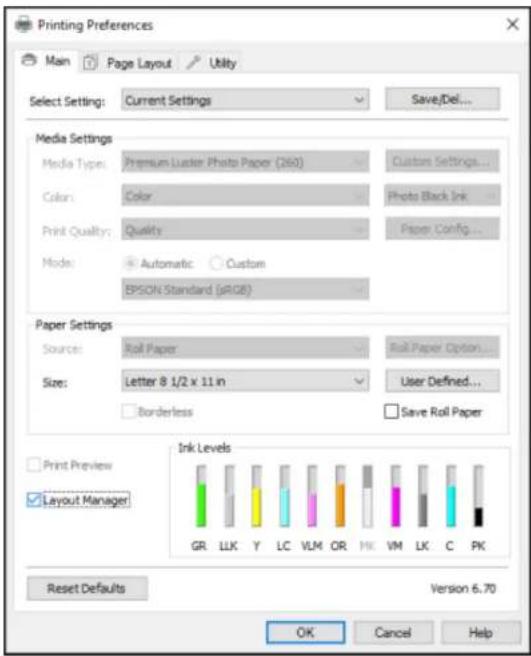
YouseetheMaintabofyourprintersettingswindow:

text_image
Printing Preferences Main Page Layout Utility Select Setting: Current Settings Save/Del... Media Settings Media Type: Premium Luster Photo Paper (260) Custom Settings... Color: Color Photo Block Ink Print Quality: Quality Paper Config... Mode: Automatic Custom EPSON Standard (sRGB) Paper Settings Source: Roll Paper Roll Paper Option... Size: Letter 8 1/2 x 11 in User Defined... Borderless Save Roll Paper Print Preview Layout Manager Ink Levels GR LLK Y LC VLM OR MK VM LK C PK Reset Defaults Show Settings... Version 6.70 OK Cancel Help- Select the MediaType setting that match the papery you loaded.
Note: You can click Custom Settings to select a custom paper configuration.
- If you are using non-Epson paper or media and you need to fine-tune performance, select the
Media Type setting that is closest to the paper you loaded, click the Paper Config button, and adjustthepaperconfigurationoptionsasnecessary.
- Select the Photo Black Ink or Matte Black Ink setting according to the media type you are using.
Note: If you set the Auto Black Ink Change option to On in the Printer Setup menu on the control panel, the blackink is automatically selected when you choose a mediatype.
- SelectaColoroption:
- Toprintacolordocumentorphoto,selecttheColorsetting.
- Toprinthighqualityblackandwhitephotos,selecttheAdvancedB&WPhotosetting.
Note: The Advanced B&W Photo setting is not available for Commerical Edition printers (configuredwithVioletink).
- To print text and graphics when plain paper is the selected media type, select the Black setting.
-
For the Print Quality setting, select Speed, Quality, or Max Quality (available with certain media types only), or select Quality Options and choose the quality option that matches the print quality youwanttouse.
-
Select the desired colormanagement option as the Modesetting.
-
Select the Sourcesetting that matches the paper feeding method you are using.
-
SelectthesizeofthepaperyouloadedastheSizesetting.
Note: You can also select the User-Defined setting to create a custom paper size.
-
If you are printing on roll paper, click the Roll Paper Option button and adjust the settings as necessary.
-
When Auto Cut is enabled, select the Save Roll Paper checkbox to have the printer cut the roll paperattheendoftheimageasitispositionedonthepage.
-
If you want to print a photowithout borders, select Borderless.
Note: You must select a compatible borderless paper type and size to print without borders. Check theborderlesspapercompatibilitylistfordetails.
- To see a preview of how your document or photo will print, select Print Preview. (The preview appears after you click Print but before printing starts.)
- Tolayoutmultipleprintjobsforprintingallatonce,selectLayoutManager.
PaperConfigurationOptions-Windows
AdvancedB&WPhotoOptions-Windows
PrintQualityOptions-Windows
ColorManagementOptions-Windows
AdvancedColorControls-Windows
PaperSourceOptions-Windows
RollPaperOptions-Windows
UsingLayoutManager-Windows
Parenttopic: PrintingwithWindows
Relatedreferences
BorderlessPaperTypeCompatibility
Relatedtasks
PrintingYourDocumentorPhoto-Windows
PaperConfigurationOptions-Windows
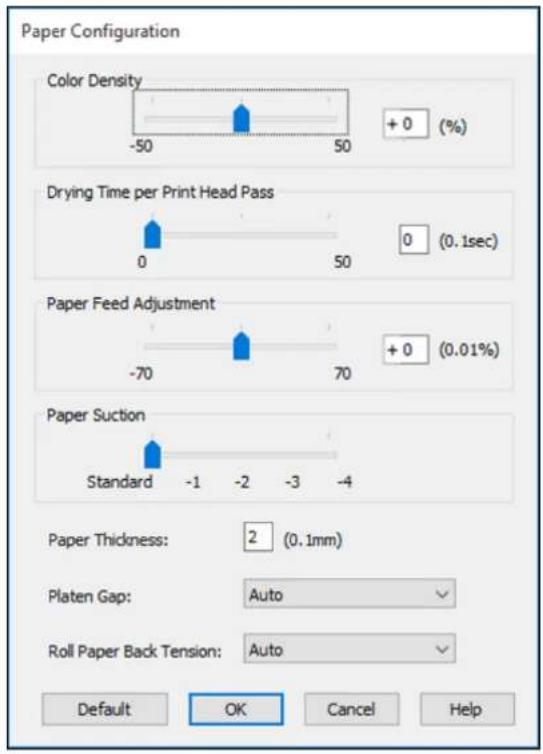
SelectanyoftheavailablePaperConfigurationoptionstofine-tunethequalityofyourprint.
text_image
Paper Configuration Color Density -50 50 + 0 (%) Drying Time per Print Head Pass 0 50 0 (0.1sec) Paper Feed Adjustment -70 70 + 0 (0.01%) Paper Suction Standard -1 -2 -3 -4 Paper Thickness: 2 (0.1mm) Platen Gap: Auto Roll Paper Back Tension: Auto Default OK Cancel HelpColorDensity
Adjuststheinksaturationlevel.
DryingTimeperPrintHeadPass
Pausesprintheadmovementforupto5secondsaftereachpasstoallowinktoday.Thisletsoyou printwithnon-Epsonmediaandavoidsmearingtheink.
PaperFeedAdjustment
Modifiesthespeedofthepaperfeedingtocompensateforbandinginthedirectionoftheprinthead.
PaperSuction
Decreases the papersuction when printing on thin media, such as drafting paper or backlight film.
PaperThickness
Adjuststheappearanceofdetailsinprintoutsbasedonpaperthickness.
Note: If you have high speed (bi-directional) printing enabled and small type or fine details appear too thick, you may need to adjust the paper thickness setting.
PlatenGap
Adjuststhedistancefromthepapertotheprinthead.(Useawidersettingifyouareseeingedge marksorscuffsonyourprints.)
RollPaperBackTension
Increasesorautomaticallycontrolsthetensionforclothorthinpaper,orifterollpaperwrinkles duringprinting.
Parenttopic: SelectingBasicPrintSettings-Windows
AdvancedB&WPhotoOptions-Windows
If you select Advanced B&W Photo as the Color option, you can easily produce neutral and toned black-and-whiteprints.Whetheryourphotoiscolororgrayscale,youcanusethisscreeningandcolor management technology to create stunning black-and-white prints. Select Custom as the Mode setting, thenclickAdvancedandselectanyoftheavailableoptions.
Note: Advanced B&W Photo mode is not available for Commercial Edition printers (configured with the Violetink).
ColorToning
Adds tone (hue) to your black-and-white output. The default is Neutral, which provides a neutral tonal scale print. You can also choose other popular presets such as Cool, Warm, and Sepia. Note that the presets affect the target in the toned color circle.
Tone
Changes the entire tonal scale of your black-and-white output. While Darker is the default setting, you may see better results if you choose Dark. The tone color circle adjusts the hue of your black-and-
whiteprint.Clickonanyportionofthecolorwheelorentercorrespondingvaluestocustomizethe tone(hue)toaddtoyourprint.Thecloseryouselecttotheedgeofthewheel,themorecoloryouadd.
Brightness
Adjuststheoveralllightnessanddarknessofyourimage.
Contrast
Adjuststhedifferencebetweenthelightanddarkareasofyourimage.
ShadowTonality
Controlstonalityonlyintheshadowareasofyourimage.
HighlightTonality
Controlstonalityonlyinthehighlightareasofyourimage.
MaxOpticalDensity
Adjuststheoveralldensityorfocusoftheprint.Createasoftfocusprintbyloweringthedensity setting.
HighlightPointShift
Helpsreduceglossdifferentialonglossymediabyaddingdensitytothehighlightsofyourimage.
Parenttopic: SelectingBasicPrintSettings-Windows
PrintQualityOptions-Windows
YoucanusetheSpeed/QualityslidertosetthedesiredqualitylevelandselectanyoftheavailablePrint Qualityoptionstofine-tunethequalityofyourprint.Somesettingsmaybeunavailable,dependingonthe papertypeandbordersettingyouhavechosen.
HighSpeed
Speedsupprintingbutmayreduceprintquality.
EdgeSmoothing
Smoothsjaggededgesinlow-resolutionimagessuchasscreencapturesorimagesfromtheWeb.
FinestDetail
Sharpensedgesonvector-baseddataincludingtext,graphics,andlineart.(Thissettingdoesnot affectphotographs.)
Note: Enabling FinestDetail may decrease the printspeed.
Parenttopic: SelectingBasicPrintSettings-Windows
ColorManagementOptions-Windows
You can adjust the Mode setting to fine-tune the colors in your printout or turn off color management in your printersoftware.
If you select Automatic as the Mode setting, you can choose from these options:
ChartsandGraphs
Intensifiescolorsandlightensthemidtonesandhighlightsofanimation.
EPSONStandard(sRGB)
Increasesthecontrastinimages.
Note: This is the standard mode for most photos and documents when not using an ICC profile.
AdobeRGB
MatchesimagecolorstotheAdobeRGBcolorstandard.Usethissettingifyoursourcefilewas capturedinAdobeRGB.
If you select Custom as the Mode setting, you can choose from these options:
ColorControls
Lets you select a Color Mode setting, individual settings for Brightness, Contrast, Saturation, and Density, and individual color tones. Depending on the selected color mode, you can also adjust the midtonedensityusingtheGammasetting.
PhotoEnhance
LetsyouchoosefromvariousSceneCorrectionsettingstoautomaticallyanalyzeyourphotos.
Note: PhotoEnhance uses a sophisticated face recognition technology to optimize photos that include faces. Forthistowork, both eyes and thenose must be visible in the subject's face. If your photo includes a face with an intentional color cast, such as a statue, you may want to turn off. PhotoEnhancetoretain the special colore effects.
ICM
Automatically adjusts colors based on the printer's ICC profile and the selected Media Type setting, using the Image Color Matching system. Click the Advanced button to choose the input profile and othersettings.
Note: In most cases, you get better results by applying color management in your application, rather than in the printer driver.
Off(NoColorAdjustment)
Turnsoffcolormanagementinyourprintersoftwaresoyoucanmanagecolorusingonlyyour applicationsoftware.
Note: AnICCprofileisrequiredifcolormanagementisturnedoff.
Parenttopic: SelectingBasicPrintSettings-Windows
AdvancedColorControls-Windows
If you selected Custom as the Mode setting and Color Controls from the dropdown menu, you can clicktheAdvancedbuttontoselectdetailedsettings.
text_image
Color Controls Printer Color Adjustment Model: EPSON Standard (pRGB) Gamma: 2.2 Color Adjustment Method ● Color Circle ○ Slide Bar Before After Brightness +0 + Contrast +0 + Saturation +0 + Default OK Cancel Help Y G R Horizontal C Vertical B Crash +0 + Magneto +0 + Yellow +0 + OK Cancel HelpTheColorControlsscreenletysouspecifyvaluesforadjustingbrightness,contrast,saturation,and individualCyan,Magenta,andYellowcolortones.YoucanchoosefromtwoPrinterColorAdjustment modesandtwoGammasettings,anduseeitheracolorcircleorslidebartoadjustcolor.
Parenttopic: SelectingBasicPrintSettings-Windows
PaperSourceOptions-Windows
YoucanselectanyoftheavailableoptionsinthepaperSourcemenutoprintonthepaperloadedinthat source.
RollPaper
Selectsrollpaperloadedintherollpaperholder.
RollPaper(Banner)
Selectsrollpaperloadedintherollpaperholderforaseriesofcontinuousimageswithoutanymargin spacebetweenthem.
PaperCassette
Selectsthepaperinthecassette.
ManualFeed
Selectsthepaperinthefrontorrearmanualfeeder.
Parenttopic: SelectingBasicPrintSettings-Windows
RollPaperOptions-Windows
Selectanyoftheavailablerollpaperoptions.
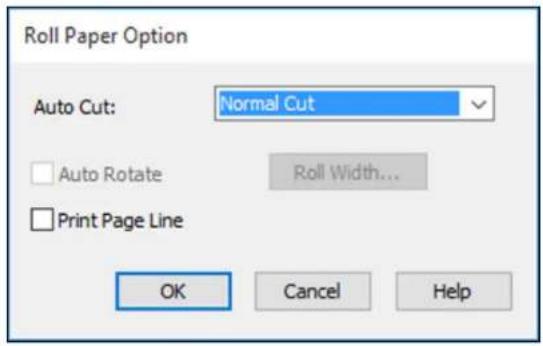
text_image
Roll Paper Option Auto Cut: Normal Cut Auto Rotate Roll Width... Print Page Line OK Cancel HelpNote: Some settings may not be available, depending on the Roll Paper Option you selected for your papersize.
AutoCutoptions:
- Off: Select this option to cut your prints manually.
- NormalCut: Createsamarginatthetopandbottomofyourimage. These margins vary by media type and may be changed from their defaults using custom mediasettings.
text_image
A B- Single Cut: Prints images within the same print job end-to-end with no gap between them. Borderless imagesmayoverlapslightly.

text_image
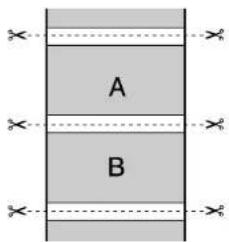
A B- Double Cut: Increases the space between each image and trims each print individually, providing the cleanestedgewithnoimageoverlapforborderlessprinting.

text_image
A BAutoRotate
Automaticallypositionstheimageorfiletofitherollpaper.WhenAutoRotateisselected,selectthe widthofthepaperastheRollWidthsetting.
PrintPageLine
Printslinesbetweenpagesasaguideformanualcutting.
Parenttopic: SelectingBasicPrintSettings-Windows
Relatedreferences
BorderlessPaperTypeCompatibility
UsingLayoutManager-Windows
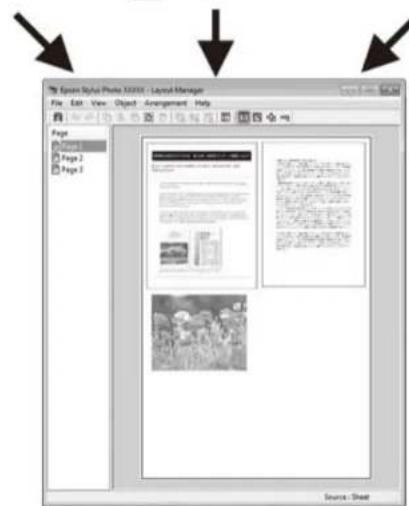
LayoutManagerletsoyoucreateaposterordisplaybydraggingmultiplepiecesofprintdatacreatedin differentapplicationsontoonesheetofpaperforprinting.
text_image
Scanned Chinese text document with numbered sections and bullet points, likely from a legal or administrative document.
.doc
.jpg
text_image
Epson Styles Photo 32000 - Layout Manager File Edit View Object Arrangement Help Page 1 Page 2 Page 3 Source: SheetYoucanalsoplacethesameprintdatamultipletimesasshownhere.

text_image
Epsilon Stylist Photo XXXXXG - Layout Manager File Edit View Object Arrangement Help Page Page 1 Page 2 Page 3 Source : SheetYoucanplaceprintdataindifferentsizesandorientationstomaximizemediausage,asshownhere.

text_image
Epsilon Stylist Photo XXXXXG - Layout Manager File Edit View Object Arrangement Help Page Page 1 Page 2 Page 3 Source : SheetYoucanplaceprintdataonrollpaperasshownhere.

text_image
Epson Stylus Photo XXXXX - Layout Manager File Edit View Object Arrangement Help Page Page 1 Page 2 Page 3 Source : Sheet- Openthefileyouwanttoprintinyourapplication.
-
Selecttheprintcommandinyourapplication.
-
Select Layout Manager on the Main tab and choose an option for the Size setting that matches the sizeofthedocumentinyourapplication.
text_image
Printing Preferences Main Page Layout Utility Select Setting: Current Settings Save/Del... Media Settings Media Types: Premium Luster Photo Paper (260) Custom Settings... Color: Color Photo Black Ink Print Quality: Quality Paper Config... Mode: Automatic Custom EPSON Standard (pRGB) Paper Settings Source: Roll Paper Roll Paper Option... Size: Letter 8 1/2 x 11 in User Defined... Borderless Save Roll Paper Print Preview Layout Manager Ink Levels GR LLK Y LC VLM OR HK VM LK C PK Reset Defaults Version 6.70 OK Cancel HelpNote: You select the sizeof the paperyou are printing on in alater step.
- ClickOKandthenclickPrint, if necessary.
TheLayoutManagerscreenopensanddisplaysonepageinthelayout.
5.LeavetheLayoutManagerscreenopenandrepeatsteps1to4toarrangeadditionalprintdata.The pagesareaddedtotheLayoutManagerscreen.
6.DothefollowingtoarrangeobjectsontheLayoutManagerscreen:
•Dragpagestomoveandresizethem.
- UsethetoolbuttonsandtheObjectmenutoalignandrotatepages.
- ResizeandreplacewholepagesinthePreferenceorArrangementSettingsscreens.
Note: SeetheLayoutManagerscreenhelpfordetails.
- Click File > Properties, then select your print settings, including the size of the paper you are printingon,ontheMaintab.
- ClicktheFilemenuontheLayoutManagerscreenandclickPrint.
Note: To save the current job to a file, click the File menu on the Layout Manager screen, save the file, and closet the Layout Managerscreen. To open the saved file later for editing or reprinting, right-click the printer icon in the Window task bar, click Layout Manager, and open the file.
Parenttopic: SelectingBasicPrintSettings-Windows
SelectingPrintLayoutOptions-Windows
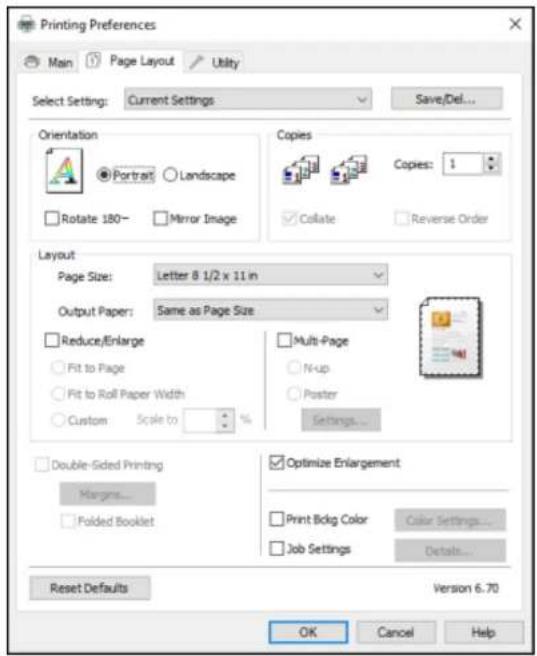
YoucanselectvarietyofsizingandlayoutoptionsforyourdocumentorphotoonthePageLayouttab.
text_image
Printing Preferences Main Page Layout Utility Select Setting: Current Settings Save/Def... Orientation Portrait Landscape Rotate 180 Mirror Image Copies Copies Collate Reverse Order Layout Page Size: Letter 8 1/2 x 11 in Output Paper: Same as Page Size Reduce/Enlarge Fit to Page Fit to Roll Paper Width Custom Scale to Multi-Page N-up Poster Settings... Double-Sided Printing Margins... Folded Booklet Optimize Enlargement Print Bldg Color Color Settings... Job Settings Details... Reset Defaults Version 6.70 OK Cancel Help- To change the orientation of your printed document or photo, select the Portrait or Landscape checkbox.
• To rotate or flip the printed image, select the Rotate 180° or Mirror Image checkbox.
• To select multiple copies and their print order, select the Copies, Collate, and Reverse Order options.
- Tochangethesizeofyourprinteddocumentorphoto,selecttheReduce/Enlargecheckboxand selectsizingoptions.
- Toprintmultiplepagesononesheetofpaper,orprintoneimageonmultiplesheetsofpaper,select theMulti-Pagecheckboxandselecttheoptionsyouwant.
- Toenlargeyourimagebeyondthelimitsofyourapplicationprogram,selecttheOptimize Enlargementcheckbox.
Note: The driver can increase the image size up to 650% and decrease the output resolution to stay within the pixel limitations. Depending on the resolution of the original image and the print size, you may be reduced print quality.
- To print a color background on the page, select the Print Bckg Color checkbox and click Color Settingstoselectthecoloryouwanttouse.
- Toprintthetime, date, and other information about your print job at the top or bottom of the page, select the Job Settings checkbox and click Details to select the settings you want to use.
- Toprintonbothsidesofthepaper,selecttheDouble-SidedPrintingcheckboxandselectthe optionsyouwant.
Reduce/EnlargeOptions-Windows
Multi-PagePrintingOptions-Windows
Parenttopic: PrintingwithWindows
Reduce/EnlargeOptions-Windows
YoucanselectanyoftheReduce/Enlargeoptionstosizeyourprintedimage.
FittoPage
SizesyourprintedimagetofitonthepaperyouloadedandselectedastheOutputPapersetting.
FittoRollPaperWidth
Sizesyourprintedimagetofitthewidthoftherollpaperyouloaded.
Custom
SizesyourprintedimagebythepercentageyouselectastheScaletosetting.
Parenttopic: SelectingPrintLayoutOptions-Windows
Multi-PagePrintingOptions-Windows
You can select these Multi-Page option to setup your multi-page print job.
N-up
Prints2(2-up)or4(4-up)pagesononesheetofpaper.
Poster
Printsoneimageonmultiplesheetsofpapertocreatealargeposterwithorwithoutborders.Clickthe Settingsbuttontoselectthelayoutandguidelineoptions.
Parenttopic: SelectingPrintLayoutOptions-Windows
SelectingAdditionalSettings-Windows
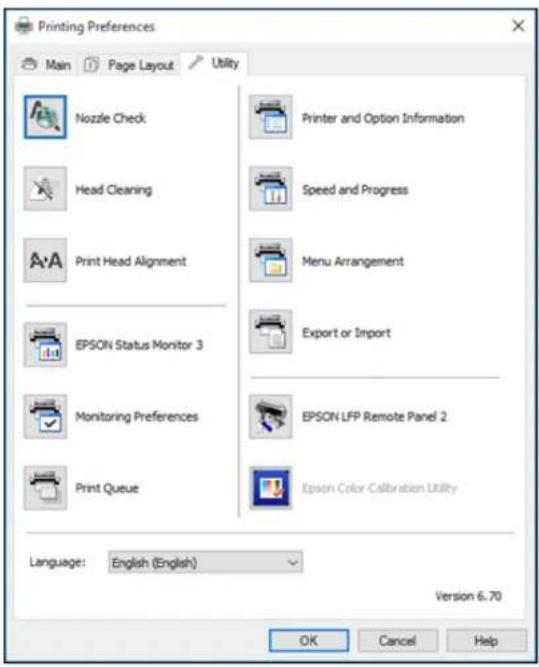
You can run maintenance utilities and select additional settings that apply to all the print jobs you send to your product.
- AccesstheWindowsDesktopandright-clicktheproducticonintheWindowstaskbar.
- SelectPrinterSettings.
- ClicktheUtilitytab.
Youseeawindowlikethis:
text_image
Printing Preferences Main Page Layout Utility Nozzle Check Head Cleaning Print Head Alignment EPSON Status Monitor 3 Monitoring Preferences Print Queue Printer and Option Information Speed and Progress Menu Arrangement Export or Import EPSON LFP Remote Panel 2 Epson Color Calibration Utility Language: English (English) Version 6.70 OK Cancel Help-
Selectanyofthefollowingoptions, asnecessary:
-
NozzleChecktoprintanozzlecheckpatterntocheckwhethertheprintheadnozzlesare clogged.
- HeadCleaningtocleantheprintheadifyounoticebandingorgapsinyourprintouts.
- PrintHeadAlignmenttoaligntheprintheadifprintoutsappeargrainyoroutoffocus.
-
EpsonStatusMonitor3tochecktheprinter'sstatus.
-
Monitoring Preferences to select the error notifications displayed on the Epson Status Monitor 3 screen,oraddashortcuttotheutilityintheWindowstaskbar.
- Print Queue to display a list of all waiting print jobs, view information on the data waiting to be printed, and delete or reprint the jobs.
- Languagetoselectthelanguageyouwanttousefortheprintersoftwarescreens.
- PrinterandOptionInformationtosetthetimetoturnofftheprinterautomatically.
- SpeedandProgressstoselectvariousprintingoptions.
- Menu Arrangement to arrange the Setting, Media Type, and Paper Size options by frequency of use.
- Export or Import to save the print settings to a file or import them from a file. This is useful when youwanttoselectthesameprintsettingsonmultiplecomputers.
- EpsonLFPRemotePanel2tooptimizeprintersettingsandcreateandmanagecustompaper configurations. ThisoptionisavailableonlyifEpsonLFPRemotePanel2isinstalled.
- Epson Color Calibration Utility to perform printer calibration. This option is available only if the EpsonColorCalibrationUtilityisinstalled.
5.ClickOKtoclosetheprintersoftwarewindow.
Parenttopic: PrintingwithWindows
Relatedtasks
CheckingtheNozzlesUsingaComputerUtility
CleaningthePrintHeadUsingaComputerUtility
AligningthePrintHeadAutomaticallyUsingaComputerUtility
PrintingYourDocumentorPhoto-Windows
Onceyouhaveselectedyourprintsettings,youarereadytosaveyoursettingsandprint.
- ClickOKtosaveyoursettings.
Youseeyourapplication'sPrintwindow,suchasthisone:

text_image
Print General Select Printer EPSON Microsoft XPS Documen Fax Microsoft Print to PDF Status: Ready Location: Comment: Print to file Preferences Find Printer... Page Range All Selection: Current Page Pages: Number of copies: 1 Coflate 1 1 2 2 3 3 Print Cancel Apply- ClickOKorPrinttostartprinting.
CheckingPrintStatus-Windows
Parenttopic: PrintingwithWindows
CheckingPrintStatus-Windows
Duringprinting,youseethiswindowshowingtheprogressofyourprintjob.Itallowsyoutocontrol printingandcheckinkcartridgestatus.
text_image
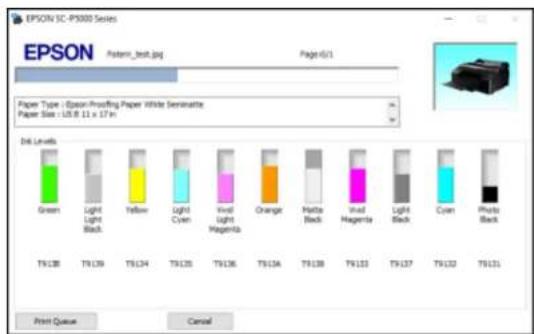
EPSON 1C-PS300 Series Pattern_test.jpg Page 6/1 Paper Type : Epson-Prerfing Paper White Serenette Paper Size : L8.8 x 17 x D4 Levels Green Light Light Black Yellow Light Cyan White Light Hagemma Orange Hindi Black White Hagemma Light Black Cyan Photo Black T9:128 T9:139 T9:134 T9:125 T9:136 T9:134 T9:138 T9:133 T9:137 T9:132 T9:131 Print Queue Cancel•Tocancelprinting,clickCancel.
- Toseeprintjobswaitingtoprintortocancelprinting, clickPrintQueue.
Parenttopic: Printing Your Documentor Photo-Windows
Saving, Sharing, and Customizing the Printer Settings
Youcansavegroupsofprintsettingsormediasettingsssoyoucanreusethemforfutureprintjobs.You canexportthesesettingsasafilesoyoucansharethemwithotherusers.Youcanalsoeditthesettings displayedintheprintersoftwarescreens.
SavingandSharingPrintSettings-Windows
SavingandSharingMediaSettings-Windows
EditingPrintSettingDisplays-Windows
Parenttopic: PrintingwithWindows
SavingandSharingPrintSettings-Windows
Youcansaveyourprintsettingssoyoucanusethemforfutureprintjobs.
-
Selecttheprintsettingsyouwanttosave.
-
ClickSave/DelatthetopoftheMainorPageLayouttabinyourprintersoftware.
Youseeawindowlikethis:
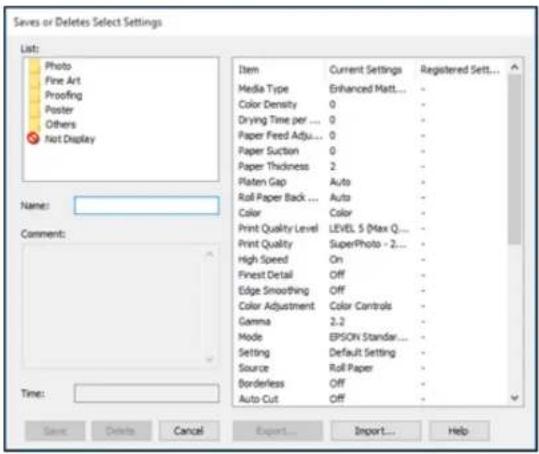
text_image
Saves or Deletes Select Settings List: Photo Fine Art Proofing Poster Others Not Display Name: Comment: Time: Item Current Settings Registered Set... Media Type Enhanced Matt... - Color Density 0 - Drying Time per ... 0 - Paper Feed Adj... 0 - Paper Suction 0 - Paper Thickness 2 - Platen Gap Auto - Roll Paper Back ... Auto - Color Color Print Quality Level LEVEL 5 (Max Q... - Print Quality SuperPhoto - 2... - High Speed On - Finest Detail Off - Edge Smoothing Off - Color Adjustment Color Controls Gamma 2.2 - Mode EPSON Standar... Setting Default Setting - Source Roll Paper Borderless Off - Auto Cut Off - Save Delete Cancel Export....Import... Help- Verify that your settings are correct, enter a name for the group of settings in the Name field, and clickSave.
Note: If you need to delete a group of settings you have created, select the name of the group of settingsfromthelistandclickDelete.
4.Dothefollowingasnecessary:
- SelectthenameofthegroupofsettingsfromtheSelectSettinglistandusethemtoprint.
- To export the settings, click Save/Del, select the name of the group of settings, click Export, selectalocation.andenterafilename.
- To import a group of settings, click Save/Del, click Import, select the file you want to use, and clickOpen. Thenusethesettingstoprint.
Parenttopic: Saving, Sharing, and Customizing the Printer Settings
Relatedtasks
SelectingBasicPrintSettings-Windows
PrintingYourDocumentorPhoto-Windows
SavingandSharingMediaSettings-Windows
Youcansaveandsharesettingsyouhaveselectedforaparticularmediatypesoyoucanusethemforfutureprintjobs.
- Select the Media Settings you want to save on the Maintab, as necessary.
2.ClickCustomSettings.
Youseeawindowlikethis:
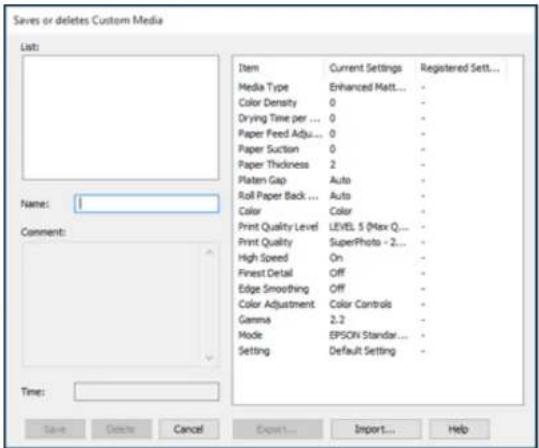
text_image
Saves or deletes Custom Media List: Name: 1 Comment: Time: Item Current Settings Registered Sett... Media Type Enhanced Matt... - Color Density 0 - Drying Time per ... 0 - Paper Feed Adj... 0 - Paper Suction 0 - Paper Thickness 2 - Platen Gap Auto - Roll Paper Back ... Auto - Color Color - Print Quality Level LEVEL 5 (Max Q... - Print Quality SuperPhoto - 2... - High Speed On - Finest Detail Off - Edge Smoothing Off - Color Adjustment Victoria Controls Gamma 2.2 - Mode EPSON Standar... - Setting Default Setting - Save Delete Cancel Export....Import... Help- Verify that your settings are correct, enter a name for the media settings in the Name field, and click Save.
Note: If you need to delete a group of settings you have created, select the name of the settings fromthelistandclickDelete.
-
Dothefollowingasnecessary:
-
SelectthenameofamediasettingastheMediaTypesettinganduseittoprint.
- Toexportthesettings, clickCustomSettings, selectthenameofthemediasettings, clickExport, selectalocation, andenterafilename.
- To import settings, click Custom Settings, select the name of the media settings, click Import, select the file you want to use, and click Open. Then us these setting stop print.
Parenttopic: Saving, Sharing, and Customizing the Printer Settings
Relatedtasks
SelectingBasicPrintSettings-Windows
PrintingYourDocumentorPhoto-Windows
EditingPrintSettingDisplays-Windows
Youcanarrangethedisplayedprintsettingssoyoucaneasilyselectthesettingsyouusemostoften.
- ClicktheUtilitytabintheprintersoftware.
- SelectMenuArrangement.
Youseethiswindow:

text_image
Menu Arrangement Edit Item Select Setting Media Type Paper Size List: Photo Fine Art Proofing Poster Others Not Display Add Group... Delete Group Reset Save Cancel Help- Selecttheitemyouwanttoedit.
- Order orgroup items in the listing as follows:
• Tomoveandreorderitems, draganddroptheminthelist.
• Toaddanewgroup(folder),clickAddGroup.
- Todeleteagroup(folder),selectthegroupandclickDeleteGroup.
•Tohideagroup,draganddropittoNotDisplay.
Note: If you delete a group, the group folder is deleted but the items within the folder remain.
5.ClickSave.
Parenttopic: Saving, Sharing, and Customizing the Printer Settings
SelectingDefaultPrintSettings-Windows
When you change your print settings in a program, the changes apply only while you are printing in that program session. If you want to change the print settings you use in all your Windows programs, you can select new default print settings.
- Access the Windows Desktop and right-click the product icon in the Window stask bar.
- SelectPrinterSettings.
Youseetheprintersettingswindow:

text_image
Printing Preferences Main Page Layout Utility Select Setting: Current Settings Save/Del... Media Settings Media Type: Premium Luster Photo Paper (260) Custom Settings... Color: Color Photo Black Ink Print Quality: Quality Paper Config... Mode: Automatic Custom EPSON Standard (sRGB) Paper Settings Source: Roll Paper Roll Paper Option... Size: Letter 8 1/2 x 11 in User Defined... Borderless Save Roll Paper Print Preview Layout Manager Ink Levels GR LLK Y LC VLM OR ME VM LK C PK Reset Defaults Show Settings... Version 6.70 OK Cancel Help- SelecttheprintsettingsyouwanttouseasdefaultsinallyourWindowsprograms.
4.ClickOK.
Thesesettingsarenowthedefaultsselectedforprinting.Youcanstillchangethemasneededfor printinginanyprogramsession.
Parenttopic: PrintingwithWindows
Relatedtasks
SelectingBasicPrintSettings-Windows
ChangingtheLanguageofthePrinterSoftwareScreens
YoucanchangethelanguageusedontheWindowsprintersoftwarescreens.
- AccesstheWindowsDesktopandright-clicktheproducticonintheWindowstaskbar.
- SelectPrinterSettings.
Youseetheprintersettingswindow.
- ClicktheUtilitytab.
Youseetheseoptions:

text_image
Printing Preferences Main Page Layout Utility Nozzle Check Head Cleaning Print Head Alignment EPSON Status Monitor 3 Monitoring Preferences Print Queue Printer and Option Information Speed and Progress Menu Arrangement Export or Import EPSON LFP Remote Panel 2 Epson Color Calibration Utility Language: English (English) Version 6.70 OK Cancel Help- SelectthelanguageyouwanttouseastheLanguagesetting.
5.ClickOKtoclosetheprintersoftwarewindow.
Theprintersoftwarescreensappearinthelanguageyouselectedthenexttimeyouaccessthem.
Parenttopic: PrintingwithWindows
ChangingAutomaticUpdateOptions
YourprintersoftwareforWindowsautomaticallychecksforupdatestotheproductsoftware.Youcan changehowoftenthesoftwarechecksforupdatesordisablethisfeature.
-
AccesstheWindowsDesktopandright-clicktheproducticonintheWindowstaskbar.
-
SelectSoftwareUpdateSettings.
Youseethiswindow:

text_image
Software Update Settings Check for Software Updates on the Internet ● Check every 2 weeks ○ Never OK Cancel3.Dooneofthefollowing:
• To change how often the software checks for updates, select a setting in the Check every menu.
- Todisabletheautomaticupdatefeature,selecttheNeveroption.
4.ClickOKtoexit.
Note: If you choose to disable the automatic update feature, you can check for updates manually.
Parenttopic: PrintingwithWindows
PrintingonaMac
YoucanprintwithyourproductusinganyMacprintingprogram,asdescribedinthesesections.
Note: If you have an Internet connection, it is a good idea to check for updates to your product software on Epson's support website.
SelectingBasicPrintSettings-Mac
SelectingPrintLayoutOptions-Mac
SelectingRollPaperSettings-Mac
SelectingAdvancedMediaControlSettings-Mac
ManagingColor-Mac
SizingPrintedImages-Mac
SelectingPrintingPreferences-Mac
PrintingYourDocumentorPhoto-Mac
Parenttopic: PrintingfromaComputer
SelectingBasicPrintSettings-Mac
Selectthebasicsettingsforthephotoordocumentyouwanttoprint.
-
Openaphotoordocumentforprinting.
-
Selecttheprintcommandinyourapplication.
Note: You may need to select a print icon on your screen, the Print option in the File menu, or another command. See your application's help utility for details.
- Select your product as the Printert setting.
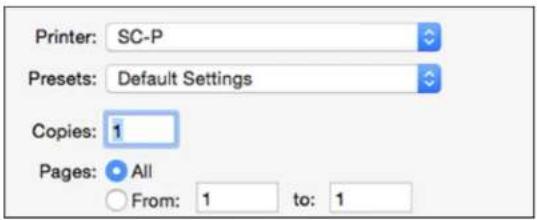
text_image
Printer: SC-P Presets: Default Settings Copies: 1 Pages: All From: 1 to: 1- If necessary, click the arrow next to the Printer setting or the Show Details button to expand the printwindow.
Youseetheexpandedprintertsettingswindowforyourproduct:
text_image
Printer: SC-P Presets: Default Settings Copies: 1 Pages: All From: 1 to: 1 Paper Size: US Letter 8.50 by 11.00 inches Orientation: Preview ✓ Auto Rotate Scale: 100% ○ Scale to Fit: ● Print Entire Image ○ Fill Entire Paper Copies per page: 1 Cancel PrintNote: The print window may look different, depending on the MacOS version and the application you are using.
- SelecttheCopiesandPagesettingsasnecessary.
Note: If you do not see these settings in the print window, check for them in your application before printing. They maybe accessible by selecting PageSetup from the Filemenu.
-
SelectthesizeofthepaperyouloadedasthePaperSizesetting.
-
To print a borderless photo, select the Borderless checkbox or a paper size with a Borderless option. You can also create custom papersize, but the highest available Output Resolution setting is limited to Fine-360dpi.
- Toprintonrollpaper, selectarollpapersizeoronewithaBorderlessoption.
Note: For roll paper, make sure the maximum width of your photo is set to 17 inches to fit in the width of your roll paper (setthemargin to 0 in your application software).
Note: You can reduce or enlarge the size of the printed image by selecting Paper Handling from the pop-upmenuandselectingascalingoption.
- Choose portraitor landscape as the Orientation setting.
- Selectanyapplication-specificsettingsthatappearonthescreen, suchasthoseshownintheimage aboveforthePreviewapplication.
- SelectPrinterSettingsfromthepop-upmenu.
| Preview |
| Layout |
| Color Matching |
| Paper Handling |
| Cover Page |
| Printer Settings |
| Roll Paper Settings |
| Advanced Media Control |
| Supply Levels |
Note: In certain programs, you may need to select Advanced before you can select Printer Settings. For more information about printer settings, click the ? button.
Youseethesesettings:
text_image
Printer Settings Basic Advanced Color Settings Page Setup: Sheet, Borders Paper Source: Paper Cassette Media Type: Premium Luster Photo Paper (260) Ink Photo Black Print Mode: EPSON PrecisionDot 16 Bit Output Color Mode: EPSON Standard (sRGB) Output Resolution: SuperPhoto - 1440 dpi Super MicroWeave High Speed Finest Detail-
SelectthePaperSourcesetting.
-
SelectthetypeofpaperyouloadedastheMediaTypesetting.
Note: The setting may not exactly match the name of your paper. Check the media type settings list for details.
Note: The Ink setting may change depending on the size and type of paper you select. To avoid changing blackink more oftenthan necessary, settheprint tothetype of blackink you usually use on the control panel.
- SelectoneofthefollowingasthePrintModesetting:
- SelectEPSONPrecisionDotforanytypeofphotographicprinting.
- Select Advanced B&W Photo to print black-and-white photos on certain types of photo paper. SeethelistofAdvancedB&WPhotooptionsfordetails.
- SelectBlack/Grayscalewhenusingplainpaper.
-
SelectoneofthefollowingastheColorModesetting:
-
Charts and Graphs: Performs color correction based on the sRGB space. Click the Advanced ColorSettingstabtouseadvancedcolorcontrols.
- EPSON Standard (sRGB): Increases the contrast in images. Click the Advanced Color Settings tabtouseadvancedcolorcontrols.
- AdobeRGB:MatchesimagecolorstotheAdobeRGBcolorstandard.Usethissettingifyour sourcefilewascapturedinAdobeRGB.ClicktheAdvancedColorSettingstabtouseadvanced colorcontrols.
- Off (NoColorAdjustment): Turnsoffcolormanagementinyourprintersoftwaresoyoucan managecolorusingonlyyourapplicationsoftware.
Note: If desired, you can instead use Color Synctomanage colors. In most cases, you get better results by applying color management in your application, rather than in the printer driver.
- SelecttheOutputResolutionsettingyouwanttouse.
- Selectanyoftheavailableprintoptions.
AdvancedColorSettings-Mac
OutputResolutionSettings-Mac
PrintOptions-Mac
Parenttopic: PrintingonaMac
Relatedtasks
SelectingRollPaperSettings-Mac
PrintingYourDocumentorPhoto-Mac
AdvancedColorSettings-Mac
When you click the Advanced Color Settings tab, you see one of the screens below depending on the PrintModesettingyouselected.
•EPSONPrecisionDot
Youcanspecifyvaluesforadjustinggamma,brightness,contrast,saturation,andindividualCyan,Magenta,andYellowcolortones.

text_image
Printer Settings Basic Advanced Color Settings Gamma: 2.2 Brightness 0 Contrast 0 Saturation 0 Cyan 0 Magenta 0 Yellow 0•AdvancedB&WPhoto
Youcanselectanyoftheavailableoptions.

text_image
Printer Settings Basic Advanced Color Settings Color Toning: Neutral Tone: Darker Brightness: 0 Contrast: 0 Shadow Tonality: 0 Highlight Tonality: 0 Max Optical Density: 0 Highlight Point Shift: OffColorToning
Adds tone (hue) to your black-and-white output. The default is Neutral, which provides a neutral tonal scale print. You can also choose other popular presets such as Cool, Warm, and Sepia. Note that thepresetsaffectthetargetinthetonecolorcircle.
Tone
Changes the entire tonal scale of your black-and-white output. While Darker is the default setting, you may see better results if you choose Dark. The tone color circle adjusts the hue of your black-and-whiteprint.Clickonanyportionofthecolorwheelorentecorrespondingvaluestocustomizethe tone(hue)toaddtoyourprint.Thecloseryouselecttotheedgeofthewheel,themorecoloryouadd.
Brightness
Adjuststheoveralllightnessanddarknessofyourimage.
Contrast
Adjuststhedifferencebetweenthelightanddarkareasoftheoverallimage.
ShadowTonality
Controlstonalityonlyintheshadowareasofyourimage.
HighlightTonality
Controlstonalityonlyinthehighlightareasofyourimage.
MaxOpticalDensity
Adjuststheoveralldensityorfocusoftheprint.Createasoftfocusprintbyloweringthedensity setting.
HighlightPointShift
Helpsreduceglossdifferentialonglossymediabyaddingdensitytothehighlightsofyourimage.
Parenttopic: SelectingBasicPrintSettings-Mac
OutputResolutionSettings-Mac
You can select any of the Output Resolution settings to fine-tune the quality of your print. Some settings maybe unavailable, depending on the papertype and bordersetting you have chosen.
Draft-180dpi
Fordraftprintingonplainpaperatlowresolution
Draft-360dpi
Fordraftprintingonplainpaper.
Fine-720dpi
Foreverydaytextandimageprinting.
Fine-1440dpi
Foreverydaytextandimageprintingwithhigherprintquality.
SuperPhoto-1440dpi
Forphotosandgraphicswithgoodprintqualityandspeed.
SuperPhoto-2880dpi
Forthebestprintqualitybuttheslowestprintspeed.
Parenttopic: SelectingBasicPrintSettings-Mac
PrintOptions-Mac
Youcanselectanyoftheprintoptionstocustomizeyourprint.Someoptionsmaybeunavailable, dependingonothersettingsyouhavechosen.
SuperMicrowave
Increasesdetailbutmayreduceprintspeed.
HighSpeed
Speedsupprintingbutmayreduceprintquality.
FinestDetail
Sharpensedgesonvector-baseddataincludingtext,graphics,andlinearart.(Thissettingdoesnot affectphotographs.)
Note: Enabling FinestDetail may decrease the printspeed.
Parenttopic: SelectingBasicPrintSettings-Mac
SelectingPrintLayoutOptions-Mac
You can select a variety of layout options by selecting Layout from the pop-up menu on the print window.

text_image
Layout Pages per Sheet: 1 Layout Direction: Z S U N Border: None Two-Sided: Off Reverse page orientation Flip horizontally Cancel Print- To print multiple pages on one sheet of paper, select the number of pages in the Pages per Sheet pop-upmenu.Toarrangetheprintorderofthepages,selectaLayoutDirectionsetting.
• To print borders around each page on the sheet, select a line setting from the Border pop-up menu. - To invert or flip the printed image, select the Reverse page orientation or Flip horizontally settings.
Parenttopic: PrintingonaMac
SelectingRollPaperSettings-Mac
Toprintonrollpaper,youselecttherollpapersizeandrollpaperoptionsfromthePrinterSettings menu.
- SelectRollPaperSettings.
Youseethiswindow:

text_image
Roll Paper Settings Auto Cut Settings: Normal Cut Auto Rotate 17 inch (432 mm) Print Page Line Save Roll Paper Borderless Enlargement Setting Min Standard Max Moving the slider to Min will reduce the amount of image enlargement. However, margins may appear around the printed image.Note: Some settings may not be available, depending on the Roll Paper option you selected for your PaperSize.
2. SelectoneofthefollowingAutoCutSettings:
- Off: Selectthisoptiontocutyourprintsmanually.
- NormalCut: Createsamarginandthetopandbottomofyourimage. These margins vary by mediatype and maybe changed from their defaults using custommediasettings.
text_image
A B- SingleCut:Printsimageswithinthesameprintjobend-to-endwithnogapbetweenthem. Borderlessimagesmayoverlapslightly.
text_image
A B- Double Cut: Increases the space between each image and trims each print individually, providing the cleanested gewithnoimageoverlapforborderlessprinting.

text_image
A B- Select the following settings as necessary:
- Select the Auto Rotate checkbox and select the roll paper width to fit the images to the paper size.
- Select the Print Page Line checkbox to print trim lines around images when you select a banner papersize.
- ClickSaveRollPapertominimizetheamountofblankpaperwastedwhenyouprintonbanner paper.
- Use the Expansionslidertoadjusttheamountofimageexpansionwhenprintingborderless images.
Note: This option is available only when you choose a Paper Sizesetting with a Borderless option.
4.ClickPrint.
Parenttopic: PrintingonaMac
Relatedreferences
BorderlessPaperTypeCompatibility
SelectingAdvancedMediaControlSettings-Mac
If you are using non-Epson media and need to fine-tuneits print quality, select Advanced Media Control from the pop-up menu. Select the available options as necessary.
Note: Before adjusting the Advanced Media Control settings, select the Media Type setting that is closest to the paperyou are using.

text_image
Advanced Media Control Color Density: -80 0 (%) +50 Drying Time per Print Head Pass: 0 0 (0.1sec) +50 Paper Feed Adjustment: -70 0 (0.01%) +70 Paper Thickness: 3 (0.1mm) Paper Suction: Standard Platen Gap: Auto Roll Paper Back Tension: Auto DefaultAdvancedMediaControlOptions-Mac
Parenttopic: PrintingonaMac
AdvancedMediaControlOptions-Mac
SelectanyoftheavailableAdvancedMediaControloptionstofine-tunethequalityofyourprintouts.
ColorDensity
Adjuststheinksaturationlevel.
DryingTimeperPrintHeadPass
Pausesprintheadmovementforupto5secondsaftereachpasstoallowinktoday.Thisletsyou printwithnon-Epsonmediaandavoidsmearingtheink.
PaperFeedAdjustment
Modifiesthespeedofthepaperfeedingtocompensateforbandinginthedirectionoftheprinthead.
PaperThickness
Adjuststheappearanceofdetailsinprintoutsbasedonpaperthickness.
Note: If you have high speed (bi-directional) printing enabled and small type or fine details appear too thick, you may need to adjust the paper thickness setting.
PaperSuction
Decreases the papersuction when printing on thin media, such as drafting paper or backlight film.
PlatenGap
Adjuststhedistancefromthepapertotheprinthead.(Useawidersettingifyouareseeingedge marksorscuffsonyourprints.)
RollPaperBackTension
Increasesorautomaticallycontrolsthetensionforclothorthinpaper,orifterollpaperwrinkles duringprinting.
Parenttopic: SelectingAdvancedMediaControlSettings-Mac
ManagingColor-Mac
You can adjust the Color Matching setting to fine-tunethe colors in your print out, or turn off color management in your printers software.
- SelectColorMatchingfromthepop-upmenuintheprintwindow.
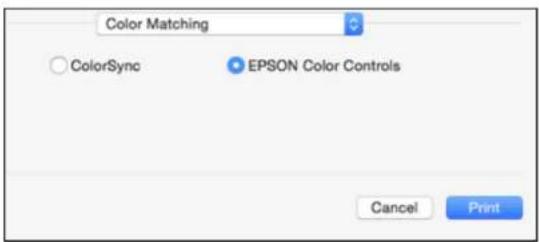
text_image
Color Matching ColorSync EPSON Color Controls Cancel Print- Selectoneoftheavailableoptions.
ColorMatchingOptions-Mac
Parenttopic: PrintingonaMac
ColorMatchingOptions-Mac
You can select from these settings on the ColorMatchingmenu.
ColorSync
Printsusingstandardcolorprofilesforyourproductandpapertohelpmatchimagecolors. You can customizetheconversionmethodandfiltersettingsontheColorSyncpop-upmenuintheprint window.
EPSONColorControls
Letsyoumanagecolorusingcontrolsinyourprintersoftwareorturnoffcolormanagement.
Parenttopic: ManagingColor-Mac
SizingPrintedImages-Mac
You can adjust the size of the image as you print it by selecting Paper Handling from the pop-up menu onthePrintwindow.

text_image
Paper Handling Collate pages Pages to Print: All pages Page Order: Automatic Scale to fit paper size Destination Paper Size: Suggested Paper: US Letter Scale down only- Tocollatemultiplecopiesintosetsofdocuments,selecttheCollatepagescheckbox.
- To print only selected pages in a multi-page document, select an option from the Pages to Print popup menu.
• To adjust the order in which pages are printed, select an option from the Page Order pop-up menu. - To scale the image to fit on a specific paper size, select the Scale to fit paper size checkbox and selectapapersizefromtheDestinationPaperSizepop-upmenu.
- To restrict scaling of the image to reduced sizing, select the Scale down only checkbox. (Deselect thischeckboxwhenenlargingtheimage.)
Parenttopic: PrintingonaMac
SelectingPrintingPreferences-Mac
Youcanselectprintingpreference that apply to all the print jobs you send to your product.
- In the ApplemenuortheDock, select System Preferences.
- Select Print & Fax, Print & Scan, or Printers & Scanners, select your product, and select Options & Supplies.
- SelectOptions.
Youseeascreenlikethis:
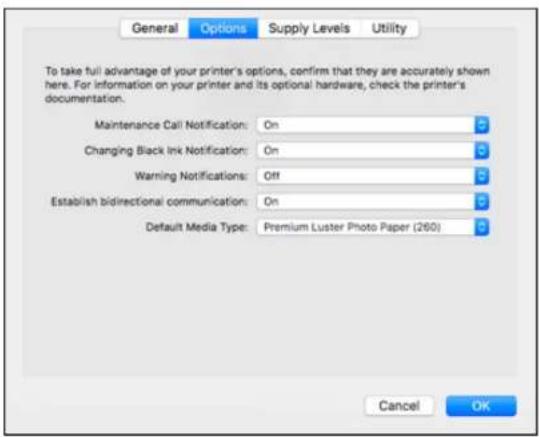
text_image
General Options Supply Levels Utility To take full advantage of your printer's options, confirm that they are accurately shown here. For information on your printer and its optional hardware, check the printer's documentation. Maintenance Call Notification: On Changing Black Ink Notification: On Warning Notifications: Off Establish bidirectional communication: On Default Media Type: Premium Luster Photo Paper (260) Cancel OK- Selectanyoftheavailableprintingoptions.
5.ClickOK.
PrintingPreferences-Mac
Parenttopic: PrintingonaMac
PrintingPreferences-Mac
YoucanselectfromthesesettingsontheOptionstab.
MaintenanceCallNotification
Alertsyouifthemaintenancetanksarenearingcapacityorneedtobereplaced.
ChangingBlackInkNotification
Alertsyouiftheselectedblackinktypedoesnotmatchwhatisselectedintheprintersoftware.
WarningNotifications
Letsyouchoosewhetherornottoreceivewarningnotificationsfromtheprintersoftwareforvarious operatingconditions.
Establishbidirectionalcommunication
Allowstheproducttocommunicatewiththecomputer.Donotchangethedefaultsettingunlessyou experienceissueswhenusingasharedprintingpool.
Defaultmediatype
SelecttheMediaTypethatyouwanttouseasthedefaultintheprinterdriver.
Parenttopic: SelectingPrintingPreferences-Mac
PrintingYourDocumentorPhoto-Mac
Onceyouhaveselectedyourprintsettings,youarereadytoprint.
ClickPrintatthebottomoftheprintwindow.

text_image
Printer: SC-P Presets: Default Settings Copies: 1 Pages: All From: 1 to: 1 Paper Size: US Letter 8.50 by 11.00 inches Orientation: Printer Settings Basic Advanced Color Settings Page Setup: Roll, Borders Media Type: Premium Luster Photo Paper (260) Ink: Photo Black Print Mode: EPSON PrecisionDot 16 Bit Output Color Mode: EPSON Standard (sRGB) Output Resolution: SuperPhoto - 1440 dpi Super MicroWeave High Speed Finest Detail Cancel PrintCheckingPrintStatus-Mac
Parenttopic: PrintingonaMac
Relatedtasks
SelectingBasicPrintSettings-Mac
CheckingPrintStatus-Mac
Duringprinting, you can view the progress of your print job, control printing, and check in k status.
- ClicktheprintericonwhenitappearsintheDock.
Youseetheprintstatuswindow:
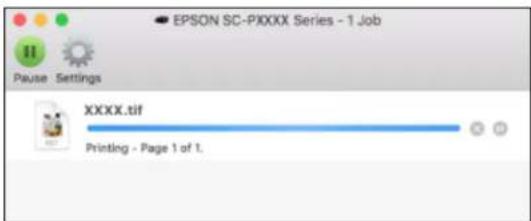
text_image
EPSON SC-PIXXXX Series - 1 Job Pause Settings XXXX.tif Printing - Page 1 of 1.- Select the following options as necessary for your MacOS version:
• Tocancelprinting, clicktheprintjobandclickorDelete.
- Topauseaprintjob, clicktheprintjobandclickorHold Toresumeaprintjob, clickthe pausedprintjobandclickorResume.
- To pause printing for all queued print jobs, click Pause or Pause Printer.
• To display other printer information, click Settings or Supply Levels.
Parenttopic: Printing Your Documentor Photo-Mac
UsingtheControlPanelMenus
Followtheinstructionsinthesesectionstoaccesstheprintermenusystemandselectsettings.
AccessingthePrinter'sMenus
MaintenanceMenuSettings
PaperMenuSettings
PrinterSetupMenuSettings
PrinterStatusMenuSettings
NetworkSetupMenuSettings
PreferencesMenuSettings
AdministratorMenuSettings
AccessingthePrinter'sMenus
Youcanusetheprintermenustoadjustthesettingsthatcontrolhowyourprinterworks.
- PresstheMenubuttononthecontrolpanel.
YouseethemenuontheLCDscreen.
2.Presstheupordownarrowbuttontoscrollthroughthemenus.
Note: Toreturntothepreviousmenu, presstheleftarrowbutton.
- Tochangesettingsinthehighlightedmenu, presstherightarrowbutton.
4.Presstheupordownarrowbuttontomovethroughthesettings.Ifthereareadditionalsettings, presstherightorleftarrowbuttonasinstructedonthescreen.
-
To select a setting, press the OK button any time the OK button option is displayed.
-
When you finish changing settings on an menu, press the left arrow button to log back or press the II · pause/cancel button to completely exit themenu.
Parenttopic: UsingtheControlPanelMenus
MaintenanceMenuSettings
The Maintenance menulets your unnozzle checks, cleaning cycles, and other maintenance operations.
Caution: Follow the instructions in the topic links below the table to use these menu settings correctly.
| SettingOptions | Description | ||||
| NozzleCheckPrintlessNozzleCheckDisplaysthenozzle | statusontheLCD screen. | ||||
| HeadCleaningCheckandCleanNozzleChecksthenozzle | statusandcleansany cloggednozzles. | ||||
| SelectNozzles | Various colors | Heavy | Letsyoucleanallor selectednozzlesbased onthenozzlecheck pattern.SelectNormal cleaningfirst.Ifnozzles arestillclogged,select Heavycleaning. | ||
| Head Alignment | Paper Thickness | PaperTypeListssupportedmedia | types. | ||
| PaperThicknessLetsyousetthe | thicknessoftheloaded paper. | ||||
| AlignmentAuto | Uni-D | Bi-D5-color Bi-DAII | Letsyoualigntheprint headwhenprintresults aregrainyoroutof focus: Uni-D:whenprintingin onedirection. Bi-Dsettings:when printinginboth directions.Ifhead alignmentdoesnot correcttheproblem, selectUni-D. | ||
| ManualUni-D | Bi-D2-color Bi-DAII | ||||
| AdjustCut Position | -3to3mmLetsyouadjustthe | cutterpositionin incrementsof0.008 inch(0.2mm)from -0.12to0.12inch(-3 to3mm). | |||
| ChangeBlack Ink | PhotoBlktoMatteBlkMatteBlktoPhotoBlk | Letsyouswitch betweenblackink types. | |||
Parenttopic: UsingtheControlPanelMenus
Relatedtasks
CheckingtheNozzlesUsingtheProductControlPanel
CleaningthePrintHeadUsingtheProductControlPanel
AligningthePrintHeadAutomaticallyUsingtheProductControlPanel
AligningthePrintHeadManuallyUsingtheProductControlPanel
PrintlessNozzleCheck
SwitchingtheBlackInkType
PaperMenuSettings
The Papermenuletsyoumodifysettingsforthecurrentpaper,orcreatecustompaperconfigurationsfor upto10differenttypesofpaper.
| SettingOptionsDescription | ||
| PaperTypePhotoPaperSelectthe | loadedEpsonmedia. | |
| ProofingPaper | ||
| FineArtPaper | ||
| MattePaper | ||
| PlainPaper | ||
| Others | ||
| CUSTOMPAPERListsthecustompaperconfigurations thatyouhavecreated. | ||
| NOPAPERSELECTEDSelecttocontrolpapertypeusingonly yourprintersoftwaresettings. | ||
| CustomPaperPapernumberLetsyoucreateacustomconfiguration fortheloadedmedia.Seethenext table. | ||
| PrintPaperList—PresstheOKbutontoprintalistof | custompapersettings. | |
| RollPaperRemainingRemaining | PaperSetupOn:Letsyoutrackthelengthofroll paperremaining. | |
| RollPaperLengthSetsthelengthoftheloadedrollpaper from17to327ft(5to99.5m).RemainingPaperSetupmustbe turnedOn. | ||
| RollLengthAlertSetsthelengthofrollpaperremaining atwhichtheprinteralertsyou,from4to 50ft(1to15m).RemainingPaper SetupmustbeturnedOn. | ||
| Cut Sheet Remaining | Sheet Number | Displays the number of sheets loaded inthepapercassettefrom10to990in incrementsof10. |
| SheetNumberAlert | Setsthenumberofsheetsremainingin thepapercassetteforwhentheprinter alertsyou,from1to50sheetsin incrementsof1. | |
| RollPaperSetupPrintPageLineS | Setswhethertoprintapagelineon | rollpaper.Anytrimlineoptionsselectedintheprinterdriverwilloverridethissetting. |
| RollPaperMarginSetsthetop | andbottommarginsforprinting. | |
| AutoRollFeedingLetsyoule | averollpaperloadedintheprinterwhenaprintjobissentusingthepapercassette.AftertheprintjobiscompleteandarollpaperoptionisselectedfromthePaperTypemenu,theloadedrollpaperisfedautomatically.SettoOffifusingEpsonUltraSmoothFineArtPaper. | |
| RefreshMargin—Letsyouautomatically | edgeandremoveanyinkstainsleftbythepreviousimageduringborderlessprinting. | |
CustomPaperSettingoptions
| OptionsDescription | |
| SelectReferencePaperLetsyouselectthetypeofpaperthatisclosesttothepaperforwhichyouarecreatingacustompaperconfiguration:PhotoPaperProofingPaperFineArtPaperMattePaperPlainPaperOthers | |
| PlatenGapAdjuststhegapbetweenthemedia | andtheprinthead.Standard:selectformostmedia.WideorWider:selectifprintoutsaresmeared. |
| ThicknessPatternWhencreatingacustomp | paperconfiguration,letsyouprintpatternstodeterminethethicknessofthecustompaper: Selectthepatternnumberwiththeleastmisalignment. Selectthepatternnumberwiththeleastmisalignment. |
| PaperFeedAdjustALetsyouadjustthepaper | feedifyouareunabletoresolvebandingissuesevenafterheadcleaningandalignment.Pattern:printsanadjustmentpatternthatyoucanusetoadjustthepaperfeedbyselectingthelightest-coloredpatternineachrow:A  Value:letsyouchooseanadjustmentbetween-0.70and+0.70%.Selectahighervaluetoreducedarkbandsoralowervaluetoreducewhitebands. Value:letsyouchooseanadjustmentbetween-0.70and+0.70%.Selectahighervaluetoreducedarkbandsoralowervaluetoreducewhitebands. |
| PaperFeedAdjustBLetsyouchooseanadjust | tmentbetween-0.70and+0.70%forthebottomareaofcutsheets. |
| DryingTimeLetsyouadjusttheamountoftimetheheadpausesbetweeneachpass(from0secondsto10seconds).Ifthe imageisblurringonthepaper,youmayneedtoincresethedryingtimeperpass. | |
| Paper Suction | Lets you adjust the amount of suction from -4 to -1 or Standardtoincreasethegapbetweentheprintheadand thinorsoftpaper.Ifprintqualityisreducedormediadoes notfeedcorrectly,youmayneedtolowerthesuction. |
| Set Roll Paper Tension | Lets you adjust the paper tension. SelectHighorExtra Highifpaperwrinklesduringprinting. |
| RemoveSkewLetsyouenablepaperskewreduction. | |
Parenttopic: UsingtheControlPanelMenus
Relatedreferences
AvailableEpsonPapers
Relatedtasks
LoadingRollPaper
CreatingCustomPaperConfigurations
Relatedtopics
CuttingRollPaper
CutSheetHandling
PrinterSetupMenuSettings
ThePrinterSetupmenuletsyouconfigureandmonitorvariousaspectsofyourproduct.
| SettingOptionsDescription | ||
| PlatenGapNarrow | Adjuststhegapbetweenthemedia | andtheprinthead.Standard:selectformostmedia.Narrow:selectifheadalignmentdoes notcompletelyaligntheprinthead.Wide,Wider,orWidest:selectif printoutsaresmeared.Caution:Toavoiddamagingthe printer,donotselecttheNarrow settingwhenloadingthickmedia. |
| Standard | ||
| Wide | ||
| Wider | ||
| Widest | ||
| PaperSize Check | OnAutomaticallydetectsthewidthofthe | loadedmedia.ChooseOffonlyifthe printerdisplaysapapersettingerror whenmediaisloadedcorrectly.Changedsettingstakeeffectwhenyou reloadpaper.Caution:Disablingthissettingmay causetheprintertoprintoutsidethemarginsoftheloadedmediaandmay causeinktobuildupinsidetheprinter. |
| Off | ||
| PaperSkew Check | OnStopsprintingwhenskewedpaperis | detected.Leavethissettingturnedon toavoidpaperjams. |
| Off | ||
| SettingOptionsDescription | |||
| AutoNozzle Check | AutoCleaning Setting | Periodically EveryJob Off | Automaticallyrunsanozzlecheckand cleanstheprintheadifnecessary.Periodically:checksthenozzles occasionally.EveryJob:checksthenozzlesafter everyprintjob.Note:EvenifyouselectOffasthe AutoCleaningSettingoption,the printerrunsanautomaticnozzlecheck (andmaycleantheprinthead)when youswitchbetweenblackinksand afterinitialinkcharging. |
| AutoCleaning Times | 1to3Selectsthenumberofautomaticprint headcleaningstheprinterperforms whencloggednozzlesaredetected. | ||
| TimerCleaning6to | 60hoursPerformsanautomaticnozzlecheck | andheadcleaningiftheprinteris turnedonorwokenfromsleepmode andtheprinterhasnotprintedwithin thesetlengthoftime. | |
| Off | |||
| PrintNozzle Pattern | Every10Pages EveryPage Off | Selectshowoftentoprintanautomatic nozzlecheckpattern. | |
| AutoBlackInk Change | Manual Auto | Allowsyoutochangetheblackinktype fromtheprinterdriver.Manual:anerrorappearsontheLCD screenwhentheblackinktype selectedinthedriverandintheprinter controlpaneldonotmatch.Auto:theblackinktypeischanged automatically. | |
| BKInkChange Setting | NormalQuick | SelectQuicktoreducethetimeit takestochangetheblackinktype; however,printqualityisreducedwhen youchangetheinktype. | |
| Calibration Setting | OnOff | LetsyouusetheEpsonColor CalibrationUtility. | |
| InitializeSettings | ExecuteReturnsallprintersettingstotheir | defaultvalues. | |
Parenttopic: UsingtheControlPanelMenus
Relatedtasks
SwitchingtheBlackInkType
CheckingtheNozzlesUsingtheProductControlPanel
CleaningthePrintHeadUsingtheProductControlPanel
AdjustingthePlatenGap
PrinterStatusMenuSettings
ThePrinterStatusmenuletsyoudisplayandprintinformationaboutyourprinter.
| SettingDescription | |
| FirmwareVersionDisplaystheprinter'sfirmwareversion. | |
| PrintStatusSheetPrintsasheetlistingthecurrentprintersettings. | |
| CalibrationDateDisplaysthedatethatheEpsonColorCalibrationUtilitywaslastrun,ifapplicable. | |
| TotalPrintsDisplaysthetotalnumberofpagesprintedsinceinitialsetup. | |
| PrintJobInformationPrintsjobinformationforthelast10jobssavedintheprinter. | |
Parenttopic: UsingtheControlPanelMenus
NetworkSetupMenuSettings
TheNetworkSetupmenuletsyouconfigureyourprinter'snetworksettings.
| SettingOptionsDescription | ||
| NetworkSettingsHideDisplay | sorhidesinformationforther | estof themenuitems. |
| Show | ||
| IPAddressSettingAutoDeter | mineswhetherIPaddresses | are obtainedautomaticallythroughDHCPor manually.SelectPaneltoenteranIP address,subnetmask,anddefaultgateway address. |
| Panel | ||
| IP,SM,DGSetting—SetsthelIP | address,subnetmask,and | defaultgateway. |
| PrintStatusSheet—Printsash | heetlistingthecurrentnetwork | statusandsettings. |
| InitNetwork—Returnsallnetw | orksettingstotheirdefault | values. |
Parenttopic: UsingtheControlPanelMenus
PreferencesMenuSettings
ThePreferencesmenuletsyoucustomizevariousdisplayandpowersettings.
| SettingOptionsDescription | |||
| LanguageVariouslanguagesSelects | thelanguageused | onthecontrolpaneldisplay. | |
| Length Units | Metric | Selects the unit of length usedonthecontrolpanel displayandwhenprinting testpatterns. | |
| Feet/Inch | |||
| TemperatureUnits | °C | Selectstheunitof temperatureusedonthe controlpaneldisplay. | |
| °F | |||
| MaintenanceAlertDisableNoalertsa | reset. | ||
| InkThealertlightflasheswhen | inkislow. | ||
| MaintenanceBoxThealertlightflasheswhenMaintenanceBox1or2is full. | |||
| InkorMaintBoxThealertlightflasheswheninkisloworMaintenance Box1or2isfull. | |||
| PapersThealertlightflasheswhen | rollpaperorcutsheetsarerunninglow,orwhenRoll PaperRemainingorCut SheetRemainingissetto on. | ||
| AllThealertlightflasheswhen | inkislow,amaintenance tankisfull,orpaperis runninglow. | ||
| CutSheetRemainingOnTurnontodis | playanalert | whencutsheetlevelislow (setlevelforalertusing SheetNumberAlertsetting inPapermenu). | |
| Off | |||
| SleepMode5to210minutesSelectsth | eintervalbefore | theprinterenterssleep mode.Thedefaultis15 minutes. | |
| PowerManagementPowerOff | Timer | DisableChooses | ftheprinterturns offautomaticallywhenitis idle. Thedefaultidletimeis8 hours. |
| Enable | |||
| TimetoOff | 1to24hours | ||
Parenttopic: UsingtheControlPanelMenus
AdministratorMenuSettings
TheAdministratorMenuletsyouselectadministrativesettingsandcontrolwhocanaccessthesettings.
| SettingOptionsDescription | ||
| PowerfulCleaningAll | NozzlesLetsyoucleanallorselectedcolors,Variouscolors | basedonthenozzlecheckpattern.UsethissettinglyifyoustillhavecloggednozzlesafterrunningmultipleheadcleaningsfromtheMaintenance menu. |
| ClockSetting—Setsth | eprinter'sbuilt-inclock.The | timeanddateareusedinlogsand statusheets. |
| ResetAllSettingsExecute | Returnsallmenusettingstotheir | defaultvalues. |
Parenttopic: UsingtheControlPanelMenus
Relatedtasks
UsingthePowerfulCleaningUtility
ReplacingInkCartridgesandMaintenanceTanks

If the △ Check ink light stays lit and the □ icon appears above an ink cartridge on the LCD screen, the cartridge is expended and you need to replace it.
Youmayalsoneedtoreplaceacartridgethatismorethansixmonthsold,orifyourprintoutsdonotlook theirbest,evenaftercleaningandaligningtheprinthead.
Themaintenancetankabsorbsinkusedinmaintenanceoperationssuchasheadcleaningandswitching
betweenblackinktypes.Yourproductcontainstwoseparatemaintenancetanks.Iftheiconappers ononeofthemaintenancetanksontheLCDscreen,thetankisattheendofitservicelifeandyou needtoreplaceit.
Note: Please dispose of your used Epson branded ink cartridges and maintenance tanks responsibly and in accordance with local requirements. If you would like to return your used ink cartridges and maintenance tanks to Epson for proper disposal, please go to epson.com/recycle for more information.
CheckingInkandMaintenanceTankStatuswithWindows
CheckingInkandMaintenanceTankStatusonaMac
PurchaseEpsonInkCartridgesandMaintenanceTanks
Removing and Installing Ink Cartridges
ReplacingMaintenanceTanks
SwitchBlackInkType
CheckingInkandMaintenanceTankStatuswithWindows
You can check your inkormaintenancetankstatusatanytimeusingautilityonyourWindows computer.
- To check your status, access the Windows Desktop, double-click the product icon in the Windows taskbar, and click Details.
Youseethiswindow:
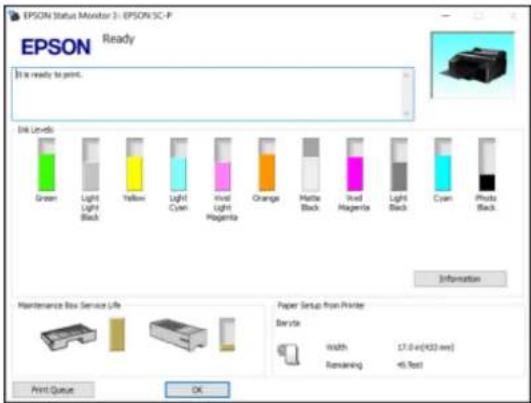
text_image
EPSON Status Monitor 1: EPSON SC-P Ready It is ready to print. Disk Levels Green Light Light Black Yellow Light Cyan Invol Light Hagenta Orange Mistle Black Invol Hagenta Light Black Cyan Photo Black Maintenance Box Service Life Paper Setup from Printer Battery Width Remaining 17.0 x (423 mm) 45 feet Print Queue OK- Replaceorreinstallthemaintenancetankorinkcartridgeasindicatedonthescreen.
Note: If any of the ink cartridges installed in the product is broken, incompatible with the product model, or improperly installed, EpsonStatusMonitorwillnotdisplayanaccurateinkstatus.
Parenttopic:ReplacingInkCartridgesandMaintenanceTanks
Relatedconcepts
ReplacingMaintenanceTanks
Relatedtasks
Removing and Installing Ink Cartridges
CheckingInkandMaintenanceTankStatusonaMac
YoucancheckyourinkormaintenancetankstatususingautilityonyourMac.
- In the Apple menu or the Dock, select System Preferences. Select Print & Fax, Print & Scan, or Printers & Scanners, select your product, and select Options & Supplies. Select Utility and select OpenPrinterUtility.
2. SelectEPSONStatusMonitor.
Youseeawindowlikethis:
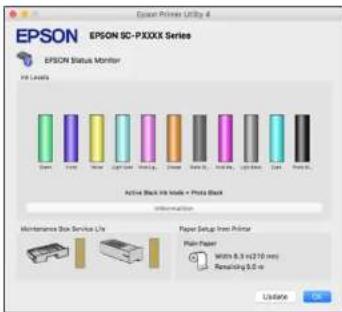
text_image
Epson Printer Utility 4 EPSON SC-PXXXX Series EPSON Status Monitor IP- Level Active Black IP- Mode + Photo Black Information Maintenance Box Service Life Paper Setup Iron Printer Plain Paper Width: 8.3 x 270 mm Removing 0.0 m Update3.Dothefollowingasnecessary:
- Toupdatetheinkcartridgestatus, clickUpdate.
-Replaceorreinstallanyinkcartridgeormaintenancetankindicatedonthescreen.
Note: If any of the cartridges installed in the product is broken, incompatible with the product model, orimproperlyinstalled, EpsonStatusMonitorwillnotdisplayanaccuratecartridgesstatus.
Parenttopic:ReplacingInkCartridgesandMaintenanceTanks
Relatedconcepts
ReplacingMaintenanceTanks
Relatedtasks
Removing and Installing Ink Cartridges
PurchaseEpsonInkCartridgesandMaintenanceTanks
YoucanpurchasegenuineEpsonink,paper,andaccessoriesfromanEpsonauthorizedreseller.To find the nearest reseller, visit proimaging.epson.com (U.S.) or proimaging.epson.ca (Canada), select your product series and product, and click the Where to Buy button. Or call 800-GO-EPSON (800-463-7766)intheU.S.or800-807-7766inCanada.
Note: This product uses only genuine Epson-brand cartridges. Other brands of ink cartridges and ink supplies are not compatible and, even if described as compatible, may not function properly.
Thecartridgesincludedwiththeprinteraredesignedforprintersetupandnotforresale. Aftersomeink isusedforcharging,therestisavailableforprinting.Yieldsvaryconsiderablybasedonimagesprinted, printsettings,papertype,frequencyofuse,andtemperature.Forprintquality,avariableamountofink remainsinthecartridgeafterthe"replacecartridge"indicatorcomeson.
InkCartridgeandMaintenanceTankPartNumbers
Parenttopic:ReplacingInkCartridgesandMaintenanceTanks
InkCartridgeandMaintenanceTankPartNumbers
Usethesepartnumberswhenyouorderorpurchaseanewmaintenancetankorinkcartridges.
Note: For best printing results, use up acar tridgewithin 6 month so f opening the package.
Inkmaintenancetank(maintenancebox1)partnumber:T6190
Borderlessmaintenancetank(maintenancebox2)partnumber:T6191
| InkbaySlotInkcolor | Partnumber | ||
| Left1Green(G)T913B | |||
| 2LightLightBlack(LLK)(StandardandDesignerEditiononly) | T9139 | ||
| Violet(V)(CommericalEditiononly)T913D | |||
| 3Yellow(Y)T9134 | |||
| 4LightCyan(LC)T9135 | |||
| 5VividLightMagenta(VLM)T9136 | |||
| 6Orange(O)T913A | |||
| Right7MatteBlack(MK)T9138 | |||
| 8VividMagenta(M)T9133 | |||
| 9LightBlack(LK) T9137 | |||
| 10 Cyan(C) T9132 | |||
| 11 PhotoBlack(K) T9131 | |||
Parenttopic: Purchase Epson Ink Cartridges and Maintenance Tanks
RemovingandInstallingInkCartridges
Makesureyouhaveyourreplacementcartridgeshandybeforeyoubegin. Youmustinstallnew cartridgesimmediatelyafterremovingtheoldones.
Note: Replace all expended ink cartridges. You cannot print if any of the ink cartridges are expended or anyinkslotsareempty.
- Turnonyourproduct.
- Presstheinkcartridgecovertoopenit.
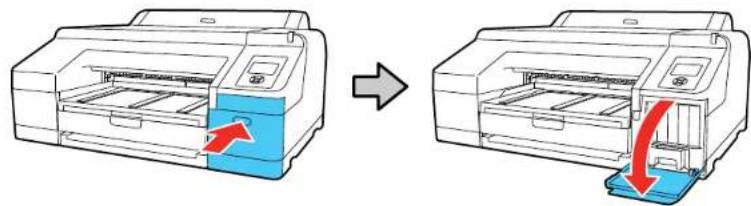
natural_image
Diagram showing a printer being inserted into a paper airplane, with no text or symbols present.- Pressinontheinkcartridgeyouwanttoreplace. Theinkcartridgepopsoutslightly.
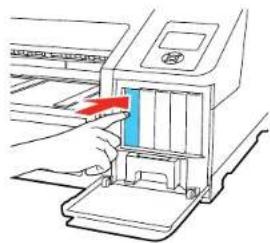
natural_image
Illustration of a hand inserting a blue component into a printer (no text or symbols visible)4.Pullouttheinkcartridge.

natural_image
Diagram of a printer's internal structure with a blue cover and red arrow indicating motion (no text or symbols)Note: Dispose of used cartridges carefully. Do not take the used cartridge apart or try to refill it.
Warning: If ink gets on your skin, wash it thoroughly with soap and water. If ink gets into your eyes, flush them immediately with water. If ink gets into your mouth, spit out and see a doctor right away. Keep pink cartridges out of the each of children.
- Removethenewcartridge from the package. Thengently shakethe cartridge for about 15 seconds.
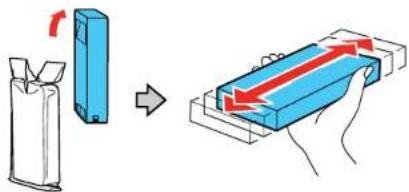
text_image
Diagram illustrating a battery cell being transferred to a rectangular device, with red arrows indicating the process.Caution: Donottouch the green chip on the cartridge.
- Insert thenewcartridges with the arrow facing up and push it in until clicks in to place.
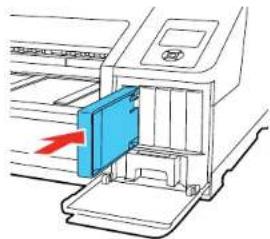
natural_image
Diagram of a printer with a blue cover and red arrow indicating a loading or movement (no text or symbols present)Caution: Do not remove and re-insert cartridges more often than necessary. Doing so can break the needlevalvesealandallowairtoentertheinktubes,damagingthenozzles.
- Closetheinkcartridgecoverandpushitinuntilitclicksintoplace.

natural_image
Illustration of a printer with a blue base and red arrow indicating compression or lifting (no text or symbols)Yourproductbeginschargingtheinkdeliverysystem.
Note: Donotturnoff the product during ink charging.
Caution: If you remove an ink cartridge for later use, protect the ink supply area from dirt and dust and storeitinthesameenvironmentastheprinter. Thevalveintheinksupplyportisdesignedtocontain anyexcessink, but donottouchtheinksupplyportorsurroundingarea. Alwaysstoreinkcartridgeswith thelabelfacingup; donotstorecartridgesupside-down.
Note: If a cleaning cycle starts when ink is low and the level of ink remaining in the cartridge is estimated to be less than required for acleaning, the printer will tell you that there is not enough hinkt o complet the process. You must insert a full arcrid get o complet the cleaning. At the end of the cleaning, the original cartridge can be inserted and used until it is expended.
Parenttopic:ReplacingInkCartridgesandMaintenanceTanks
Relatedconcepts
PurchaseEpsonInkCartridgesandMaintenanceTanks
ReplacingMaintenanceTanks
Themaintenancetankabsorbsinkusedinmaintenanceoperationssuchasheadcleaningandswitching betweenblackinktypes.Yourproductcontainstwoseparatemaintenancetanks.Replacehespecified maintenancetankwhenyouseeamessageontheLCDscreen.
Note: Do not reuse maintenance tanks that you have removed from the product and exposed to air for a longperiodoftime.Theboxwillnotabsorbanymoreink.
Note: Do not replace a maintenance tank while printing. Colors may vary and print quality may decline when printing is resumed.
ReplacingtheInkMaintenanceTank
ReplacingtheBorderlessMaintenanceTank
Parenttopic:ReplacingInkCartridgesandMaintenanceTanks
Relatedconcepts
PurchaseEpsonInkCartridgesandMaintenanceTanks
Relatedreferences
OptionalEquipmentandReplacementParts
ReplacingtheInkMaintenanceTank
Replacetheinkmaintenancetank(maintenancebox1)ontherightsideoftheprinter.
- Presstherightinkcartridgecovertoopenit.

natural_image
Diagram showing the process of printer printing and disassembly (no text or symbols present)- Use the handle on the bottom of them maintain an octanctank to carefully pull out of the product without tilting the tank.
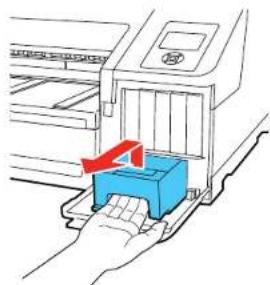
natural_image
Diagram of a printer printing process with a blue printer and red directional arrow (no text or symbols)Warning: If ink gets on your skin, wash it thoroughly with soap and water. If ink gets into your eyes, flush them immediately with water. If ink gets into your mouth, spit out and see a doctor right away.
- Removethenewmaintenancetankfromthepackage.
Caution: Do not touch the chip on the side of the maintenance tank or you may damage the product. Donotremovethefilmfromthetopofthemaintenancetank.
- Insertthenewmaintenancetankintheslot.
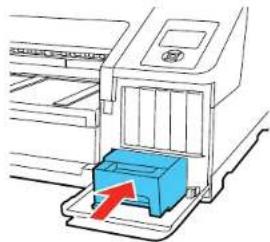
natural_image
Line drawing of a printer with a blue printer inserted, showing no text or symbols.- Placetheusedmaintenancetankinthebagsuppliedwiththenewtankandsealthebag.

natural_image
Diagram of a blue mechanical component with a red arrow indicating direction, partially covered by a transparent sheet (no text or symbols)- Closetheinkcartridgecover.
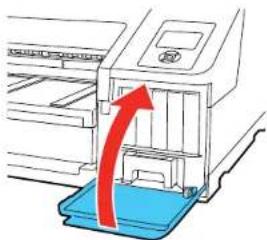
natural_image
Illustration of a printer with a blue base and red arrow indicating motion (no text or symbols)Note: Disposeofusedmaintenancetankscarefully.
Parenttopic:ReplacingMaintenanceTanks
Relatedconcepts
PurchaseEpsonInkCartridgesandMaintenanceTanks
Relatedreferences
OptionalEquipmentandReplacementParts
ReplacingtheBorderlessMaintenanceTank
Replacetheborderlessmaintenancetank(maintenancebox2)insidetheprinter.
- Lifttheedgeoftheoutputtraytoremoveit.
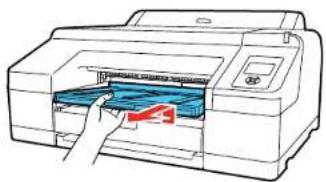
natural_image
Line drawing of a printer with a hand inserting a paper into the output (no text or symbols)2.Movethelocklevertotheunlockposition.

text_image
Diagram showing printer printing process with directional arrow indicating rotation or movement- Use the handle on the bottom of them maintain an octanctank to carefully pull out of the product without tilting the tank.

text_image
Diagram showing printer printing process with blue paper being inserted into a machine, accompanied by a red arrow indicating the process.- Removethenewmaintenancetankfromthepackage.
Caution: Do not touch the chip on the side of the maintenance tank or you may damage the product.
- Insert thenewmaintenancetankandpushitfirmlyintheslot.

text_image
Diagram showing printer printing process with blue component and red directional arrow indicating process flow- Placetheusedmaintenancetankinthebagsuppliedwiththenewtankandsealthebag.

natural_image
Illustration of a hand holding a blue plastic tray with a red arrow pointing to it, no text or symbols present.Warning: If ink gets on your skin, wash it thoroughly with soap and water. If ink gets into your eyes, flush them immediately with water. If ink gets into your mouth, spit out and see a doctor right away.
- Returnthelocklevertothelockedposition.
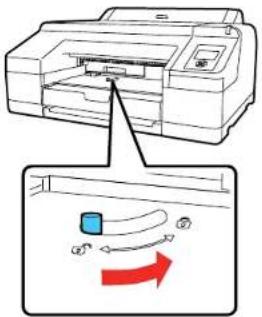
text_image
Diagram showing printer printing process with directional arrows and a blue square component, likely illustrating print or printing motion.- Replacetheoutputray.

natural_image
Illustration of a printer with a hand inserting a blue component into the paper (no text or symbols visible)Note: Disposeofusedmaintenancetankscarefully.
Parenttopic:ReplacingMaintenanceTanks
Relatedconcepts
PurchaseEpsonInkCartridgesandMaintenanceTanks
Relatedreferences
OptionalEquipmentandReplacementParts
SwitchBlackInkType
YourproductcomeswithMatteBlackandPhotoBlackinkcartridges.Althoughbothcartridgesmustbe installedforyourproducttowork,itcanprintusingonlyonetypeofblackinkatatime.
Youcanswitchtheblackinktype,dependingonthetypeofmediayouload. Thisprocessconsumes someink,soyoushouldavoidswitchingblackinkmoreoftenthannecessaryandselectadefaultblackinktypeforthetypeofmediayouprintonmostoften.
Note: To enable automatic black ink switching when the black ink type setting in the printer and printer software are different, press the Menu button and select Printer Setup > Auto Black Ink Change > Auto.
SwitchingtheBlackInkType
BlackInkTypeMediaList
Parenttopic:ReplacingInkCartridgesandMaintenanceTanks
Relatedreferences
PrinterSetupMenuSettings
SwitchingtheBlackInkType
Switchingtheblackinktypetakesseveralminutesandconsumessomeink.Checktheblackinktype medialisttoselectthecorrectinktypeforthemediayouloaded.
- Pressthe Blackink/maintenancebutton.
- PressthedownarrowbuttontoselectChangeBlackInkandpresstherightarrowbutton.
3.PresstheOKbuttontoswitchblackinks.
Theprinterchargestheblackinkforafewminutes:
- PhotoBlacktoMatteBlack:about2minutes.
•MatteBlacktoPhotoBlack:about4minutes.
Parenttopic: SwitchBlackInkType
Relatedreferences
BlackInkTypeMediaList
BlackInkTypeMediaList
Toconserveink, select the default black ink typethat match the type of mediayou usually print on.
MatteBlackInkMediaTypes
•EpsonPresentationPaperMatte
•EpsonPremiumPresentationPaperMatte
•EpsonPremiumPresentationPaperMatteDouble-sided
•EpsonUltraPremiumPresentationPaperMatte
•EpsonVelvetFineArtPaper
•EpsonExhibitionWatercolorPaperTextured
•EpsonWatercolorPaperRadiantWhite
•EpsonUltraSmoothFineArtPaper325gsm
•EpsonExhibitionCanvasMatte
•EpsonExhibitionCanvasNaturalMatte
•EpsonPhotoQualitySelf-adhesiveSheets
•EpsonHotPressBright
•EpsonHotPressNatural
•EpsonColdPressBright
•EpsonColdPressNatural
PhotoBlackInkMediaTypes
•EpsonPhotoPaperGlossy
•EpsonPremiumPhotoPaperGlossy
•EpsonUltraPremiumPhotoPaperGlossy
•EpsonPremiumPhotoPaperSemi-gloss
•EpsonUltraPremiumPhotoPaperLuster
•EpsonExhibitionCanvasGloss
•EpsonExhibitionCanvasSatin
•EpsonExhibitionCanvasNaturalSatin
•EpsonExhibitionCanvasNaturalGloss
•EpsonExhibitionFiberPaper
•EpsonMetallicPhotoPaperGlossy
•EpsonMetallicPhotoPaperLuster
Parenttopic:SwitchBlackInkType
Relatedreferences
AvailableEpsonPapers
AdjustingPrintQuality
If your print quality declines, you may need to run a utility to clean an align the printhead.
Ifrunningtheseutilitiesdoesnotsolvetheproblem,youmayneedtoreplacetheinkcartridges.
PrintHeadMaintenance
PrintHeadAlignment
PrintHeadMaintenance
If your printoutsbecometoolight, or youseedarkorlightbandsacrossthem, you may need to clean the printhead nozzles. Cleaning usesink, socleanthenozzles only if print quality declines.
Youcancheckforcloggednozzlesbeforeyoucleanthemsoyoudon'tcleanthemunnecessarily.
Note: You cannot clean the print head if an ink cartridge is expended, and may not be able to clean it when acartridge is slow. You must replacethe cartridge first.
PrintHeadNozzleCheck
PrintHeadCleaning
UsingthePowerfulCleaningUtility
Parenttopic: AdjustingPrintQuality
Relatedtasks
Removing and Installing Ink Cartridges
PrintHeadNozzleCheck
Youcanprintanozzlecheckpatterntocheckforcloggednozzles.
PrintlessNozzleCheck
CheckingtheNozzlesUsingtheProductControlPanel
CheckingtheNozzlesUsingaComputerUtility
Parenttopic: PrintHeadMaintenance
PrintlessNozzleCheck
Youcancheckthestatusofthenozzlesanddetermineifanyofthemarecloggedfromthecontrolpanel. Ifcloggednozzlesaredetected, youcanalsocleanthemautomaticallyfromthecontrolpanel.
- PresstheBlackink/maintenancebutton.
2.PresstherightarrowbuttontoselectNozzleCheck.
3. PresstheOKbuttontoselectPrintlessNozzleCheck.
Thenozzlecheckbegins.
4.Dooneofthefollowing:
- Iftherenonozzleclogsaredetected, press the OK button to return to themainscreen.
- Ifanozzleclogisdetected, amessageappearsontheLCDscreenanddisplayswhichnozzles areclogged. PresstheBlackink/maintenancebuttontobeginautomaticcleaning.
Note: If you select Finish, you risk printing that may exhibit banding from clogged nozzles. It is recommended to print an ozzle check pattern and clean nozzles as necessary before continuing to print.
Parenttopic: PrintHeadNozzleCheck
Relatedreferences
MaintenanceMenuSettings
CheckingtheNozzlesUsingtheProductControlPanel
Youcanchecktheprintheadnozzlesusingthecontrolpanelonyourproduct.
- Makesurerollorcutsheetpaperisloadedintheprinter.
- Makesurethecorrectpapertypeisselected.
3.PresstheBlackink/maintenancebutton.
4.PresstherightarrowbuttontoselectNozzleCheck.
5.PressthedownarrowbuttontoselectPrintCheckPattern.
6.PresstheOKbutton.
Thenozzlepatternprints.
- Check the printed pattern to see if there are gaps in the lines.
Note: Use at least a 10× eyeloupeto examinethe pattern for any missing or deflected dots or segments.
Printheadisclean

Printheadneedscleaning

8.Dooneofthefollowing:
- Iftherearenogaps,selectExitandpresstheOKbutton.
-
If there are gaps or the pattern is faint, select Head Cleaning and press the OK button.
-
Follow the instructions on the screentocleantheprinthead, check thenozzles, and repeat the process as necessary.
Parenttopic: PrintHeadNozzleCheck
Relatedreferences
MaintenanceMenuSettings
Relatedtasks
CleaningthePrintHeadUsingtheProductControlPanel
CheckingtheNozzlesUsingaComputerUtility
YoucanchecktheprintheadnozzlesusingautilityonyourWindowsorMaccomputer.
- Loadrollorcutsheetpaperintheprinter.
- Makesurethecorrectpapertypeisselected.
3.Dooneofthefollowing:
- Windows:AccesstheWindowsDesktopandright-clicktheproducticonintheWindowstaskbar.
- Mac: In the Apple menu or the Dock, select System Preferences. Select Print & Fax, Print & Scan, or Printers & Scanners, select your product, and select Options & Supplies. Select UtilityandselectOpenPrinterUtility.
- SelectNozzleCheck.
Youseeawindowlikethis:
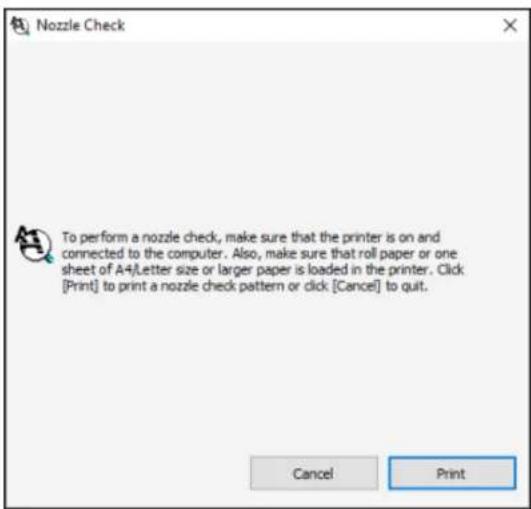
text_image
Nozzle Check To perform a nozzle check, make sure that the printer is on and connected to the computer. Also, make sure that roll paper or one sheet of A4/Letter size or larger paper is loaded in the printer. Click [Print] to print a nozzle check pattern or click [Cancel] to quit. Cancel Print5.ClickPrint.
Thenozzlepatternprints.
- Check the printed pattern to see if there are gaps in the lines.
Note: Use at least a 10× eyeloupetoexaminethe pattern for any missing or deflected dots or segments.
Printheadisclean

Printheadneedscleaning

- If there are no gaps, click Finish.
Iftherearegapsorthepatternisfaint,cleantheprinthead.
Parenttopic: PrintHeadNozzleCheck
Relatedtasks
CleaningthePrintHeadUsingaComputerUtility
PrintHeadCleaning
If print quality has declined and then ozzle check pattern indicates clogged nozzles, you can clean the printhead. Uset henozzle check pattern to determine which colors need cleaning. You can save in by cleaning only selected colors (control panel only).
Note: You cannot clean the print head if an ink cartridge is expended, and may not be able to clean it when acartridge is slow. You must replace the cartridge first.
CleaningthePrintHeadUsingtheProductControlPanel
CleaningthePrintHeadUsingaComputerUtility
Parenttopic: PrintHeadMaintenance
CleaningthePrintHeadUsingtheProductControlPanel
Youcancleantheprintheadusingthecontrolpanelonyourproduct.
-
Makesurerollorcutsheetpaperisloadedintheprinter.
-
Makesurethecorrectpapertypeisselected.
-
PresstheBlackink/maintenancebutton.
4.PressthedownarrowbuttontoselectHeadCleaningandpresstherightarrowbutton.
5.Presstheupordownarrowbuttontoselectoneofthefollowing:
- Tocheckforclogsfollowedbyanautomaticcleaning,selectCheckandCleanNozzleandpress the right arrow button. Press the down arrow button to select Yes and press the OK button to start.
- To select the specific nozzles for cleaning, select Select Nozzles and press the right arrow button. Presstheupordownarrowbuttonstoselectthecolor(s)thatneedcleaning,andpresstheOK buttontostart.
-
Tocleanallnozzles, selectAllNozzlesandpresstherightarrowbutton.
-
Selectone of the following asthecleaning strength level:
-
Forafirstcleaning,selectNormal.
-
Ifnozzlesarestillcloggedafterthreenormallevelcleanings,selectHeavy.
-
PresstheOKbuttontostartthecleaningcycle.
When the cleaning cycle is finished, the power-light stops flashing and a confirmation screen appears.
Caution: Neverturnofftheproductduringacleaningcycleoryoumaydamageit.
- Select Nozzle Check and press the right arrow button.
9.PresstheOKbutton.
Thenozzlepatternprints.
- Check the printed pattern to see if there are gaps in the lines.
Note: Use at least a 10× eyeloupetoexaminethe pattern for any missing or deflected dots or segments.
Printheadisclean

Printheadneedscleaning

- Follow the instructions on the screentoclean the printhead, check thenozzles, and repeat the process as necessary.
If you don't see any improvement after running three Normal level cleanings and a Heavy level cleaning, you may need to perform a Powerful cleaning from the Administrator menu.
Parenttopic: PrintHeadCleaning
Relatedreferences
MaintenanceMenuSettings
AdministratorMenuSettings
Relatedtasks
Removing and Installing Ink Cartridges
UsingthePowerfulCleaningUtility
CleaningthePrintHeadUsingaComputerUtility
YoucancleantheprintheadusingautilityonyourWindowscomputerorMac.
- Makesurerollorcutsheetpaperisloadedintheprinter.
- Makesurethecorrectpapertypeisselected.
3.Dooneofthefollowing:
- Windows:AccesstheWindowsDesktopandright-clicktheproducticonintheWindowstaskbar.
- In the Apple menu or the Dock, select System Preferences. Select Print & Fax, Print & Scan, or Printers & Scanners, select your product, and select Options & Supplies. Select Utility and select OpenPrinterUtility.
- SelectHeadCleaning.
Youseeawindowlikethis:
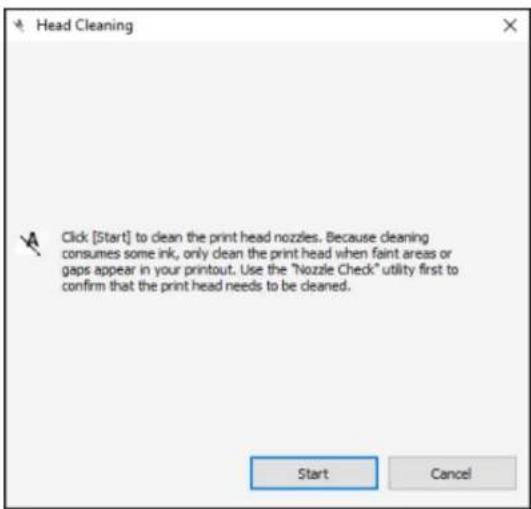
text_image
Head Cleaning Click [Start] to clean the print head nozzles. Because cleaning consumes some ink, only clean the print head when faint areas or gaps appear in your printout. Use the "Nozzle Check" utility first to confirm that the print head needs to be cleaned. Start Cancel- ClickStarttobeginthecleaningcycle.
When the cleaning cycle is finished, the power light stops flashing and a confirmation screen appears.
Caution: Neverturnoff the product during acleaning cycle or you may damage it.
6.ClickNozzleCheck.
7.ClickOK.
Thenozzlepatternprints.
- Check the printed pattern to see if there are gaps in the lines.
Note: Use at least a 10× eyeloupetoexaminethe pattern for any missing or deflected dots or segments.
Printheadisclean

Printheadneedscleaning

If you don't see any improvement after running an ozzle check from the computer utility, then run a
Heavy level cleaning from the product's control panel. If you still don't see any improvement, you may need to perform a Powerful cleaning from the Administrator menu.
Parenttopic: PrintHeadCleaning
Relatedtasks
Removing and Installing Ink Cartridges
UsingthePowerfulCleaningUtility
UsingthePowerfulCleaningUtility
If print head nozzles are still clogged after running three Normal cleanings and one Heavy cleaning, you should run a Powerful Cleaning using the control panel on your product. This process consumes a lot of ink.
- Makesurerollorcutsheetpaperisloadedintheprinter.
- Makesurethecorrectpapertypeisselected.
3.PresstheMenubutton.
4.PressthedownarrowbuttontoselectAdministratorMenuandpresstherightarrowbutton.
5.PresstherightarrowbuttontoselectPowerfulCleaning.
6.Presstheupordownarrowbuttontoselectoneofthefollowing:
- Tocleanallnozzles, selectAllNozzlesandpresstherightarrowbutton.
- Toselectspecificnozzlesforcleaning,selectoneofthenozzlecolorcombinationsandpressthe rightarrowbutton.
- Press the down arrow button to select Yes to start the cleaning. The cleaning can take up to 37 minutes.
- PresstheOKbuttontostartthecleaningcycle.
When the cleaning cycle is finished, the power light stops flashing and a confirmation screen appears.
Caution: Neverturnoff the product during a cleaning cycle or you may damage it.
9.Printanothernozzlecheckpatterntoviewtheresultsofthecleaning.
Ifnozzlesarestillclogged,turnofftheprinterandleitoffovernight.Ifnozzlesarestillcloggedafter sometime,contactEpsonforsupport.
Parenttopic: PrintHeadMaintenance
Relatedreferences
AdministratorMenuSettings
Relatedtasks
CheckingtheNozzlesUsingtheProductControlPanel
CleaningthePrintHeadUsingtheProductControlPanel
PrintHeadAlignment
If your printouts become grainy or blurry, you notice misalignment of vertical lines, or you seed a long horizontal bands, you may need to align the printhead.
Beforeyoualigntheprinthead, notethefollowing:
- Alignmentvariesdependingontheloadedmedia.Aligntheprintheadusingthemediaonwhichyou wanttoprintandselectthecorrectpapertypeasthePaperTypesetting.
- Runanozzlecheckbeforeyoualigntheprinthead. If thereareanygapsinthenozzlecheckpattern, cleantheprinthead.
AligningthePrintHeadAutomaticallyUsingaComputerUtility
AligningthePrintHeadAutomaticallyUsingtheProductControlPanel
AligningthePrintHeadManuallyUsingtheProductControlPanel
Parenttopic: AdjustingPrintQuality
Relatedconcepts
PrintHeadNozzleCheck
PrintHeadCleaning
AligningthePrintHeadAutomaticallyUsingaComputerUtility
YoucanautomaticallyaligntheprintheadusingautilityonyourWindowscomputerorMac.
- Loadrollpaperorcutsheetpaperinthissizeorlarger: A4(8.3×11.7 inches[210×297mm]).
- Makesurethecorrectpapertypeandpaperthicknessareselected. You cannot use plain paper or transparent or colored paper for automatic printhead alignment.
3.Dooneofthefollowing:
- Windows:AccesstheWindowsDesktopandright-clicktheproducticonintheWindowstaskbar.
- Mac: In the Apple menu or the Dock, select System Preferences. Select Print & Fax, Print & Scan, or Printers & Scanners, select your product, and select Options & Supplies. Select UtilityandselectOpenPrinterUtility.
- SelectPrintHeadAlignment.
Youseeawindowlikethis:
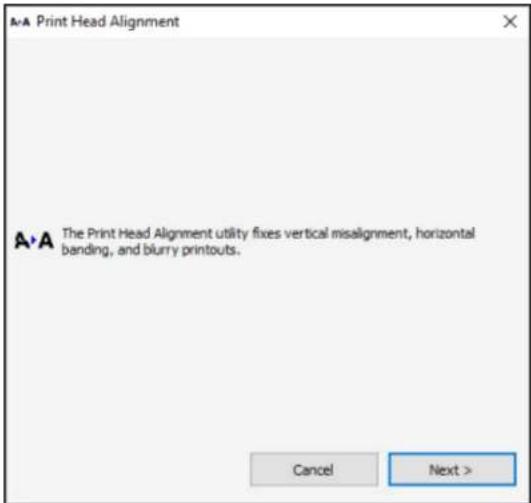
text_image
A-A Print Head Alignment A-A The Print Head Alignment utility fixes vertical misalignment, horizontal banding, and blurry printouts. Cancel Next >- ClickNext, thenclick OK to begin automatic printhead alignment.
If your product is not properly aligned, perform a manual headalignment on the printer's control panel.
Parenttopic: PrintHeadAlignment
AligningthePrintHeadAutomaticallyUsingtheProductControlPanel
Youcanautomaticallyaligntheprintheadusingthecontrolpanelonyourproduct.Makesurenoexternallightordirectsunlightisenteringtheprinterwhenperformingprintheadalignment.
- Loadrollpaperorcutsheetpaperinthissizeorlarger: A4(8.3×11.7 inches[210×297mm]).
- Makesurethecorrectpapertypeandpaperthicknessareselected. You cannot use plain paper or transparent or colored paper for automatic printheadalignment.
- PresstheBlackink/maintenancebutton.
4.PressthedownarrowbuttontoselectHeadAlignmentandpresstherightarrowbutton.
5.PressthedownarrowbuttontoselectAlignmentandpresstherightarrowbutton. - SelectAutoandpresstherightarrowbutton.
- Presstheupordownarrowbuttontoselectoneofthefollowingoptions:
- Uni-Dalignseachcolorforuni-directionalprintingbasedonLightCyan.
- Bi-DAllalignseachcolorforbi-directionalprintingbasedonallcolors.
8.PresstheOKbutton.
Thealignmentprocessstarts.
Note: Donotopenthefrontcoverorturnofftheprinterduringthealignmentprocess.
If your product is not properly aligned, select a differential alignment method and repeat the process. If your printer still is not properly aligned, perform a manual headalignment.
Parenttopic: PrintHeadAlignment
Relatedreferences
MaintenanceMenuSettings
AligningthePrintHeadManuallyUsingtheProductControlPanel
You can manually align the printhead using the control panel on your product if you are not satisfied with the automatic printhead alignment results.
- Loadrollpaperorcutsheetpaperinthissizeorlarger: A4(8.3×11.7 inches[210×297mm]).
- Makesurethecorrectpapertypeandpaperthicknessareselected.Useplainpaperortransparent orcoloredpaperformanualprintheadalignment.
3.PresstheBlackink/maintenancebutton.
4.PressthedownarrowbuttontoselectHeadAlignmentandpresstherightarrowbutton.
5.PressthedownarrowbuttontoselectAlignmentandpresstherightarrowbutton. - SelectManualandpresstherightarrowbutton.
-
Presstheupordownarrowbuttontoselectoneofthefollowingoptions:
-
Uni-D aligns each color for uni-directional printing based on Light Cyan. You should choose this optionfirst.
- Bi-D 2-color aligns each color for bi-directional printing based on Light Cyan and Vivid Light Magenta. You should choose this option second.
- Bi-D All aligns each color for bi-directional printing based on all colors. You should choose this optionlastifyouarenotsatisfiedwiththepreviousadjustmentresults.
8.PresstheOKbutton.
Thealignmentsheetprints.

text_image
LC 1 2 3 4 5 6 7Note: When aligning on cut sheet paper, the alignment sheet is printed across multiple pages. Once the first sheet prints, load then next piece of paper.
- Aftereachalignmentsheetisprinted, viewtheLCDscreenforinstructionsonselectingthebestpatternineachpatternset.
- Check the printed patterns and choose the number representing the pattern in which the whitelines are them most evenly spaced, then press the OK button.
If your product is not properly aligned, select a differentialignment method and repeat the process.
Parenttopic: PrintHeadAlignment
Relatedreferences
MaintenanceMenuSettings
Maintenance and Transportation
Seetheinstructionsinthesesectionstomaintainyourprinterforoptimumresults,ortomoveor transportyourprinter.
CleaningYourProduct
ReplacingtheCutter
MovingorTransportingYourProduct
CleaningYourProduct
Tokeep your product working at its best, you should clean it regularly (about once a month).
Note: Do not use a hard brush, benzene, alcohol, or paint thinner to clean the product or you may damage it. Donotuseoilorotherlubricantsinsidetheproductorletwatergetinside.
- Turnoff the product.
- Unplugthepowercable.
- Disconnectanyconnectedcables.
- Removeanypaperfromtheproduct.
-
Opentheprintercoverandcarefullycleantheinsideoftheproductwithasoft,cleancloth.
-
Gentlywipethelightblueareasinthedirectionindicatedbythearrow.

text_image
Diagram showing printer operation with a blue control panel and a red arrow indicating action directionNote: Do not touch the gray areas (the rollers or the ink absorption pads) or your prints may be soiled.
Caution: Becarefulnottotouchtheinktubesinsidetheproduct.
-
If your product is still dirty, dampenthe cloth with a small amount of water and amild detergent and repeat the previous step. Then wipe the inside of the printer with as soft, dry cloth.
-
If paper particles have accumulated in the holes on the platen, use toothpickorsimilar tool topush them through.
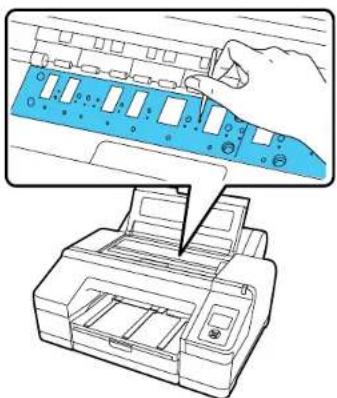
natural_image
Illustration of a printer and its paper with a hand inserting a blue plastic component into the top panel (no text or symbols)9.Closetheprintercover.
10. Useasoft, cleanclothto removeanydustordirtfromtheoutsideoftheproduct.
11.Plugthepowercordandinterfacecablesbackin.
12. Turnon the product.
13.Loadrollpaperintheprinter.
14. Pressthepaperfeedbuttonseveraltimestofeedblankpaperthroughthepaperpathandcleantherollers.
15.Pressthepapercutbutton.
CleaningtheRollPaperFeedSlot
Parenttopic: Maintenance and Transportation
CleaningtheRollPaperFeedSlot
Tokeep your product working at its best, you should clean the roll paper feed slot once a year using a cleaningsheet.
YoucanpurchasegenuineEpsonink,paper,andaccessoriesfromanEpsonauthorizedreseller.To find the nearest reseller, visit proimaging.epson.com (U.S.) or proimaging.epson.ca (Canada), select your product series and product, and click the Where to Buy button. Or call 800-GO-EPSON (800-463-7766)intheU.S.or800-807-7766inCanada.
-
Turnontheprinter.
-
PressthepapersourcebuttononthecontrolpaneltoselectPaperType.
-
Press the up or down arrow button to select Roll Paper/Cut or Roll Paper/No Cut, and press the OKbutton.
4.Presstheloadpaperbutton.
- Opentherollpapercover. Removetherollpaper, if necessary.

natural_image
Line drawing of a printer with a paper feeding into a slot, showing no text or symbols.- Removetheprotectivefilmfromthecleaningsheet.

natural_image
Abstract graphic with a blue curved shape and a red arrow, no text or symbols present.Note: Donottouchtheadhesiveonthesheet(thedarkgrayarea).
- With the adhesive facing toward you, insert the cleanings sheet on the left side of the printer until it reaches the end of the roll paper feed slot, then pull out. Repeat this two times. Repeat for the center and right side of the roll paper feed slot.
natural_image
Illustration of hands holding a blue rectangular object over a document, with a red upward arrow indicating motion (no text or symbols)Note: You can use a cleaningsheet only once.
- Presstheloadpaperbuttonwhencomplete.
Parenttopic: Cleaning Your Product
Relatedreferences
OptionalEquipmentandReplacementParts
ReplacingtheCutter
If you notice that your paper does not cut cleanly, you may need to replace the cutter.
Note: If the optional SpectroProofer is installed, remove it before replacing the cutter. See the instruction that camewith the SpectroProofer for detail on removing it from your printer.
-
Removeanypaperfromtheprinter.
-
Opentheleftandrightinkcartridgecovers.
- Opentheprintercover.
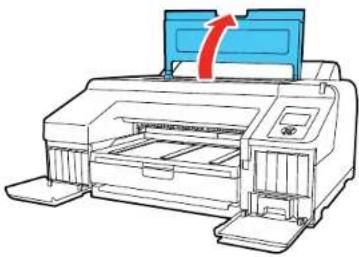
natural_image
Illustration of a printer with a blue cover and red arrow indicating compression or shift (no text or symbols)- UseaPhillips-headscrewdrivertoremovethefourscrewssecuringthefrontcover, thenremovethe frontcover.

text_image
Diagram illustrating printer operation steps with arrows indicating rotation and assembly, showing mechanical states before and after assembly.- Pressinonthetabonthecuttercover,releaseit,andpulldownonthecuttercovertoopenit.
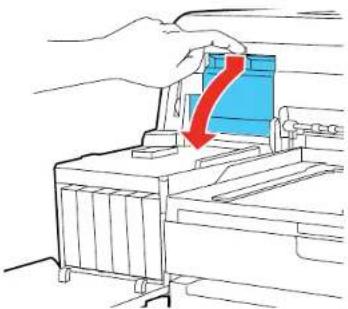
natural_image
Illustration of a hand pressing down on a mechanical component with a red arrow indicating downward motion (no text or symbols)- Loosenthescrewholdingthecutterinplaceandcarefullyremovethecutter.
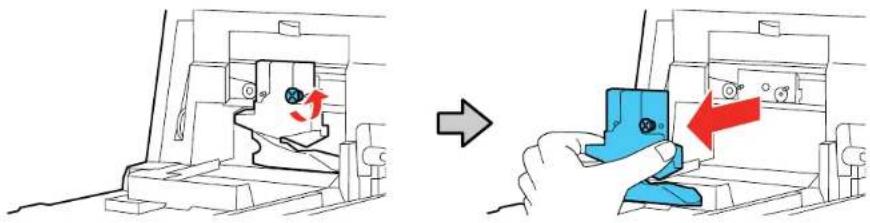
natural_image
Diagram showing a mechanical assembly before and after a change, with no visible text or symbols.Warning: Keep the cutter out of there each of children. The blade is sharp and can cause injury.
- Align the pin on thenewcutter with the hole in the product and insert it. Tightenthe cutterscrew securely.

natural_image
Illustration of a hand using a blue tool to interact with a mechanical device, showing a red arrow indicating direction (no text or symbols present)
natural_image
Technical diagram of a mechanical assembly with directional arrow indicating motion (no text or symbols)- Closethecuttercoverasshownandpressitinuntilitclicksintoplace.

natural_image
Mechanical assembly diagram showing a blue component being inserted into a machine, with a red arrow indicating direction (no text or symbols present)Note: If you removed the optional SpectroProofer, reinstall it. See the instructions that came with the SpectroProoferfordetailsoninstallingit.
- Replacethefrontcover. Insert and tightenthefourscrews.

text_image
Diagram illustrating the process of printer tool positioning and mounting, with labeled steps and directional arrows indicating movement.10.Closetheprintercover.
11.Closetheleftandrightinkcartridgecovers.
Parenttopic: Maintenance and Transportation
Relatedreferences
OptionalEquipmentandReplacementParts
MovingorTransportingYourProduct
If you need to move or transport your product, prepare it as described here.
Caution: During transportation and storage, follow these guidelines:
- Avoidtiltingtheproduct,placingitvertically,orturningitupsidedown;otherwiseinkmayleak.
-Leavetheinkcartridgesinstalled.Removingthecartridgescandryouttheprintheadandmayprevent theproductfromprinting,orinkmayleak.
Note: Before storing your product for a long period, replace low, expended, or expired ink to help prevent the printhead from drying out. Store your product in a cool, dry place.
- Turnoff the product.
- Unplugthepowercable.
- Disconnectanyconnectedcables.
-
Remove all the paper from the product.
-
Havetwopeople lift the printer by placing their hands in the indentations on the left and right sides as shown.
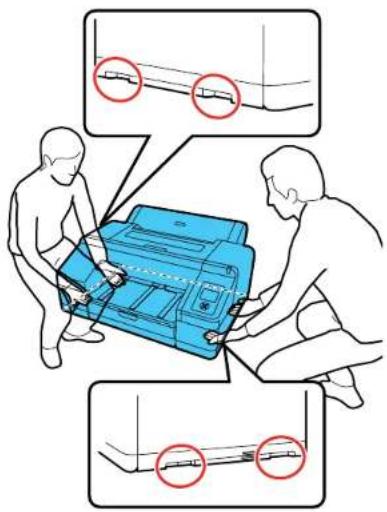
text_image
Diagram illustrating cable installation or repair process with labeled components and red circles indicating inspection points.Warning: This product is heavy and require stwopele to move it.
- Placetheproductinitsoriginalpackingmaterials, if possible, or use equivalent materials with cushioningaroundtheproduct. Makesuretheboxadequatelyprotectstheproductcontrolpanel.
Keep the product level during transportation. If print quality has declined when you print again, clean and align the print head.
Parenttopic: Maintenance and Transportation
Relatedconcepts
PrintHeadAlignment
PrintHeadCleaning
SolvingProblems
Checkthesesectionsforsolutionstoproblemsyoumayhaveusingyourproduct.
ProductStatusMessages
SolvingPrinterProblems
SolvingPrintingProblems
SolvingPaperProblems
SolvingPrintQualityProblems
WheretoGetHelp
ProductStatusMessages
YoucanoftendiagnoseproblemswithyourproductbycheckingthemessagesontheLCDscreen.
| LCDscreenmessageCondition/solution | |
| InkCartridgeErrorReplaceinkcartridge(s). | Theinkcartridgeshaveaproblem.•Checkthatthecartridgeisthesamecolorasthecolordisplayedonthe controlpanelandinkdoorlabel,andreinstallthecartridge.Ifthemessage persists,insertanewinkcartridge.•Youcannotchangetheinkconfiguration(StandardorCommercialedition) aftertheinkcartridgeshavebeeninstalled.Makesurethecorrect cartridgesareinstalled.•Condensationmayhaveoccurredintheinkcartridge.Removethe cartridge,leaveitforfourhoursormoreatroomtemperature,andreinstall it. |
| InkCartridgeExpendedReplaceinkcartridge. | Replacetheinkcartridgewithanewone. |
| InkCartridgeAlertPleaseusegenuineEpsoninkcartridges. | ReplacetheinkcartridgewithagenuineEpsoninkcartridgethatcanbe usedwiththisprinter. |
| InkCartridgeAlertNon-genuinecartridge!Qualityofnon-genuineinkmayvary. | SelectDeclinetoreplacetheinkcartridgewithagenuineEpsoninkcartridgethatcanbeusedwiththisprinter.SelectingAcceptmayvoidEpson'swarranty. |
| InkCartridgeErrorPleaseinstallthecorrectinkcartridge. | Replacetheinkcartridgewithaninkcartridgethatcanbeusedwiththis printer. |
| NolnkCartridgesInstallinkcartridge(s). | Installinkcartridges. |
| InkLowTheinkislow.Make | sureyouhaveareplacementinkcartridgehandy. |
| Cutterunitnearingend ofservicelife.Recommendreplacing thecutterunit. | Papercuttermaybebecomingdull.Replaceecutter. |
| CartridgeCoverOpenCloseleftorright cartridgecover. | Closethespecifiedinkcartridgecover. |
| PaperLoadErrorFollowthe | instructionsdisplayedontheLCDscreentoremovethejammed paperandcleartheerror. |
| PaperLoadErrorPresstheloadpaper buttonandresetroll paper. | Presstheloadpaperbuttontorewindtherollpaper,thenreloaditintothe printer. |
| PaperEjectErrorRemovepaperfrom printer. | Presstheloadpaperbuttontoreleasethepressureroller,thenremovethe paper. |
| PaperCutErrorRemoveuncutpaper. | Rollpaperisnotcutcorrectly.Presstheloadpaperbuttontoreleasethe pressureroller,thenremovetheuncutpaper. |
| PaperSizeErrorLoadcorrectpapersize. | Theloadedpaperisnotasupportedwidth.Presstheloadpaperbuttontoreleasethepressureroller,thenremovethepaper.Ifthemessagestillappearswhenyouhaveloadedpaperinasupportedwidth,setthePaperSizeChecksettingtoOff. |
| PaperSensorErrorLoadedpaperorprintouthasaproblem. | Theloadedpaperisnotdetectedcorrectlybytheprinter.PressthepHuse/cancelbutton.Ifthiserrorappearswhileperforminganautomaticheadalignment,check thefollowing:Makesureyouthatyouhavenotloadedtransparentorcoloredmedia,tracingpaper,plainpaper,EpsonEnhancedMattePosterboard,orpaper thatismorethan0.04inch(1mm)thick.Makesuretheprinterisnotexposedtodirect,brightlight(suchasdirect sunlight)whileperforminganautomaticprintheadalignment.Runanozzlecheckandmakesuretheprintheadnozzlesarenotclogged.Ifthiserrorappearsatanyothertime,makesurethattheprintersupportsthe loadedmedia. |
| PaperLowTherollpaperislow. | Makesureyouhaveareplacementrollhandy. |
| PaperSourceErrorCutsheetisloaded.Removeitandchangepapersourcetorollpaper. | PresstheOKbuttontoclearthemessage.Removethecutsheetsfromthe printerandchangethesourceinthePaperTypemenu. |
| PaperSourceErrorRollpaperisloaded.Removeitandchangepapersourcetocutsheet. | PresstheOKbuttontoclearthemessage.Removetherollpaperfromthe printerandchangethesourceinthePaperTypemenu.WhenAutoRollFeedingis set toOff,you cannot change the paper type when roll paper is fedthroughtheprinter. |
| PaperSettingErrorCheckthepapersourceinyourdriversettingsorreloadpapercorrectly. | Thepapersourcesettingintheprinterdriverandintheprinter'sPaperTypemenusettingdonotmatch.Checktheloadedpaperandsettingsinthedriver andprintermenus. |
| PaperSettingErrorThispapercannotbe loadedfrompaper cassette.Insertpaper lessthan0.8mm thicknessfromrear manualfeeder. | Pressthepulse/cancelbuttonandselectJobCancel,thenremovethe paperfromthepapercassette.Printusingthefrontorrearmanualfeeder, dependingonthepaperthickness. |
| PaperSettingErrorRollpaperisloaded.Removeitandchange papersourcetoroll paper. | PullouttherollpaperandselectarollpaperoptionfromthePaperType menu. |
| PaperSkewLoadpaperproperly. | Thepaperisnotloadedstraight.Presstheloadpaperbuttontorelease thepressureroller,thenloadthepapercorrectly. |
| BorderlessErrorLoadasupportedpaper sizeorloadpaper correctly. | Checkthefollowing:Pressthepause/cancelbuttonandselectJobCancel,thenejectthe paper.Loadthecorrectsizeofpaper.Makesurethepaperisnotwavyorcurled.Loadpaperinthecorrectpositiondependingonthepapertype.ChangethePaperSizeChecksettingtoOn. |
| CleaningErrorNotenoughink.Continuecleaning? | SelectYes.Replaceanyinkcartridgeswithlowinkwithnewonesto continuecleaning.Aftercleaning,youmayreinstalltheoriginalcartridgeand useituntilitisexpended. |
| NozzleClogDetectedNotenoughink.Continuecleaning? | |
| CleaningErrorAutomaticheadcleaning failed.Retry? | Theprinternozzlesarestillcloggedevenafterrunningtheautomatichead cleaning.SelectYestorunanotherautomaticheadcleaning. |
| CleaningErrorNotenoughemptyspaceinmaintbox1.Continuecleaning? | SelectYes.Replacethemaintenancetank(intheinkcartridgecompartment)withanewonetocontinuecleaning. |
| NozzleClogDetectedNotenoughemptyspaceinmaintbox1.Continuecleaning? | |
| InkTooLowToCleanReplaceinkcartridge.Thecartridgebeingusedcanbeinstalledagainforprinting. | ThismessagemaybedisplayedwhenYesisselectedafteracleaningerrorornozzleclogerror.Replaceanyinkcartridgeswithlowinkwithnewones. |
| BlackInkErrorBlackinkdoesnotmatchprintjob.Tocancelprinting,pressII·Wpause/cancelbutton.Tochangeblackinktoprint,pressBlackink/maintenancebutton. | Thetypeofblackinkthatissetontheprinterandintheprinterdriverdoesnotmatch.Pressthebuttontoswitchtotheblackinktypespecifiedintheprinterdivertocontinueprinting.Thistakesapproximately3minutes,andsomeextrablackinkisconsumed.Donotswitchtheblackinkunlessnecessary. |
| CommandErrorCheckdriversettings. | Theprinteriversentaninvalidorincorrectcommandtotheprinter.Pressthephuse/cancelbuttonandselectJobCancel.Makesurethatthedriveryouareusingsupportsyourproduct. |
| CheckandCleanNozzleThisfeatureisnot availablenow.Printthe checkpatterninthe nozzlecheckmenu. | Press the OK button to clear the message. Select Print Check Pattern from theMaintenancemenu. |
| PrintlessNozzleCheckThisfeatureisnot availablenow.Printthe checkpatterninthe nozzlecheckmenu. | |
| NoMaintenanceBox1 (or2)InstallMaintenancebox 1(or2). | Makesuretheindicatedmaintenancetankisinstalledcorrectly. |
| MaintenanceBoxErrorReplace the maintenancebox1 (or 2). | Makesuretheindicatedmaintenancetankisinstalledcorrectly.Ifyou continuetoseethismessage,youmayneedtoreplacethemaintenance tankwithanewone. |
| ReplaceMaintBox1Attheendofservicelife.Replacemaintbox1. | Replacetheinkmaintenancetankintheinkcartridgecompartment (maintenancebox1)withanewone. |
| NotEnoughEmpty SpaceReplace the maintenancebox1. | |
| ReplaceMaintBox2Tocontinueborderless printing,replacemaint box2. | Replacetheborderlessmaintenancetankinsidetheprinter(maintenance box2)withanewonetoperformborderlessprinting. |
| MaintBox2Unlocked Lockleverfor maintenancebox2. | Makesuretheleverfortheborderlessmaintenancetankinsidetheprinter (maintenancebox2)isinthelockposition. |
| SpectroProoferErrorSeedocumentationfor howtosolvethe problem.(errorcode) | SeetheSpectroProoferdocumentationfordetailsonthedisplayederror code. |
| SpectroProoferErrorConnectcableof SpectroProoferthen restartprinter. | TurnofftheprinterandmakesuretheSpectroProofermounterisconnected correctly.Waitamoment,thenturnontheprinteragain.SeetheSpectroProofermounterdocumentationfordetails. |
| SpectroProoferErrorRefertothemanualand connecttheILSto SpectroProofer.Turn theprinterpoweroff, andthenonagain. | Turnofftheprinterandremovethecolormeasurementdevicefromthe SpectroProofer.Reinstallitcorrectly,thenturnontheprinteragain.SeetheSpectroProoferUVSdocumentationfordetails. |
| F/WInstallErrorFirmwareupdatefailed.Restarttheprinter. | Thefirmwareupdateddidnotinstall.Turnofftheprinter,waitforawhile,andturnontheprinteragain.Runthe firmwareupdateagain.Ifthemessagestillappears,contactEpsonforsupport. |
| MaintenanceRequestReplacePart Soon/ReplacePartNow (maintenancerequest code) | Apartusedintheprinterisnearingtheendofitsservicelife.ContactEpson forsupportandprovidethemwiththedisplayedmaintenancerequestcode.Theerrorpersistsuntilyoureplacetherequestedpart. |
| CallForService (servicecode)Poweroffandthenon.If thisdoesn'twork,note thecodeandcallfor service. | Acallforserviceoccurswhen:•Thepowercableisnotconnectedsecurely•AerroroccursthatcannotbeclearedWhenacallforservicehasoccurred,theprinterautomaticallystopsprinting.Turnofftheprinter,disconnectthepowercablefromboththeoutletandthe printer,andreconnectthem.Turntheprinteronandoffseveraltimes.Ifthe samecallforserviceisdisplayedontheLCDscreen,contactEpsonfor supportandprovidethemwiththedisplayedservicecode. |
Parenttopic: Solving Problems
Relatedconcepts
PrintHeadNozzleCheck
PrintHeadCleaning
Relatedreferences
PrintQualityOptions-Windows
ColorManagementOptions-Windows
OutputResolutionSettings-Mac
AdvancedColorSettings-Mac
PaperMenuSettings
PrinterSetupMenuSettings
AdministratorMenuSettings
WheretoGetHelp
Relatedtasks
Removing and Installing Ink Cartridges
Relatedtopics
MediaHandling
ReplacingInkCartridgesandMaintenanceTanks
SolvingPrinterProblems
Checkthesesectionsify you have problems operating your product.
PrinterDoesNotTurnOn
LCDScreenShutsOff
Parenttopic: Solving Problems
PrinterDoesNotTurnOn
If the printer does not turn on, try thesesolutions:
- Makesurethepowercableissecurelyconnected.
- Makesurethepoweroutletworksbyconnectingthepowercableforanotherelectronicdevice.
Parenttopic: SolvingPrinterProblems
LCDScreenShutsOff
If the LCD screenshutsoffintermittently, the interterm maybe in Sleep Mode. Try these solutions:
- Pressanyofthebuttonsonthecontrolpaneltoexitsleepmode.
- You can adjust the delay time before the product enters sleep mode in the Preferences menu.
Parenttopic: SolvingPrinterProblems
Relatedreferences
PreferencesMenuSettings
SolvingPrintingProblems
Checkthesesectionsifyuhaveproblemsprintingwithyourproduct.
NothingPrints
CannotPrintOveraNetwork
PrintHeadMovesButNothingPrints
Parenttopic: Solving Problems
NothingPrints
If you have sent a print job and nothing prints, try thesesolutions:
- MakesureyourprinteristurnedonandinReadymode.
- Makesureanyinterfacecablesareconnectedsecurelyatbothends.Ifyouhaveasparecable,try connectingwiththesparecable.
- Checkthemodelandspecificationsoftheinterfacecabletoseeifthecableisappropriateforyour computerandprinter.
- If you connected your printertoa USBhub, makes sure it is first-tier hub. If still does not print, connect your print directly to your computer instead of the hub.
- MakesuretheUSBhubisrecognizedcorrectlyonthecomputer.DisconnectallUSBhubsfromthe computerandconnecttheprinterdirectlytothecomputer'sUSBport.
- MakesuretheUSBcablelengthdoesnotexceed10feet(3m).
Parenttopic: SolvingPrinting Problems
Relatedreferences
InterfaceSpecifications
CannotPrintOveraNetwork
If you cannot print over an network, try thesesolutions:
• Makesurethatyourprinteristurnedon.
• If you are using TCP/IP, makes sure the printer's IP address is set correctly for your network. If your network does not assign IP addresses using DHCP, set the IP address manually.
- CheckyourwiredLANrouteroraccesspointtoseeiftheLEDfortheporttowhichyourprinteris connectedisonorflashing.IfthelinkLEDisoff,trythefollowing:
- MakesuretheEthernetcableissecurelyconnectedtoyourprinterandtoyourrouter,accesspoint, switch,orhub.
- Tryconnectingyourprintertoadifferentportoradifferentrouter,accesspoint,switch,orhub.
- TryconnectingwithadifferentEthernetcable.
- Tryprintingtoyourprinterfromanothercomputeronthenetwork.
- If you have the optional SpectroProofer installed, verify its status shows as calibrated and backing color display is white.
Parenttopic: Solving Printing Problems
Relatedreferences
NetworkSetupMenuSettings
InterfaceSpecifications
PrintHeadMovesButNothingPrints
If the printhead is moving and nothing prints, try thesesolutions:
- Printanozzlecheckpattern. If the pattern does not print correctly, clean the print head again. (If the printer has not been used for long time then nozzles may be clogged.)
- If you see the message Motor Self Adjustment on the product's LCD screen, the printer is adjusting itsinternalmotor.Waitafewmomentsforthemessagetodisappearanddonotturnofftheprinter.
Parenttopic: SolvingPrinting Problems
Relatedconcepts
PrintHeadNozzleCheck
PrintHeadCleaning
SolvingPaperProblems
Checkthesesectionsify you have problems using paper with your product.
PaperFeedingProblems
RollPaperJamProblems
CutSheetPaperJamProblemsinthePaperCassette
CutSheetPaperJamProblemsintheFrontorRearManualFeeder
Parenttopic: Solving Problems
PaperFeedingProblems
If you have problems feeding paper, try thesesolutions:
- Makesurepaperisloadedinthecorrectorientation.Loadcutsheetsvertically(shortedgefirst).
•Forbestresults, follow these guidelines:
- Usenew, smooth, high-quality paper that is not damp, curled, creased, old, toothin, ortoothick.
- Followanyspecialloadinginstructionsthatcamewiththepaper.
•Ifrollpaperdoesnotfeed,cuttheendstraightacrossanduncurlitbyrollingitbackward,ifnecessary. Thenreloadthepaper.
- If you cannot insert papereasily into the paper feed slot, makes sure the paper is perfectly flat and not curled.
- Donotloadmorethanonepieceofcutsheetpaper.
- Makesureyourpapermeetsthespecificationsforyourproduct.
- Ifthickmediadoesnotfeed, makesureyouareloadingitstraightintotheproduct, notatanangle.
- If paper does not eject correctly, decrease the Paper Suction setting for the loaded paper type.
•Makesurethatpaperisnotjammedinsidetheproduct.
Parenttopic: SolvingPaperProblems
Relatedreferences
PaperMenuSettings
PaperSpecifications
Relatedtopics
RollPaperHandling
CutSheetHandling
RollPaperJamProblems
Ifrollpaperhasjammedintheprinter,followthestepsheretoclearthejam.
- Opentherollpapercover.
- Cutthepaperabovethepaperfeedslot.
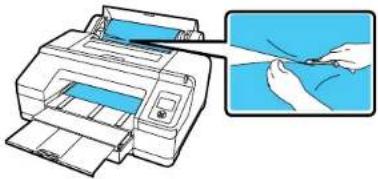
natural_image
Illustration of a printer being inserted into a paper airplane (no text or symbols visible)- Liftthespindlefromthespindleholder.
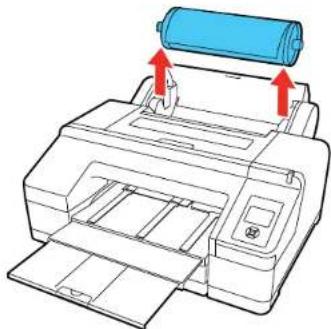
natural_image
Illustration of a printer with a blue roller being inserted, showing paper roll and paper holder (no text or symbols)- Removethejammedpaperfromtherollpaperfeederand/orthefrontmanualfeeder.

natural_image
Illustration of a printer being inserted into a door, showing paper movement (no text or symbols)- Opentheprintercoverandremoveanyotherjammedpaperasnecessary.
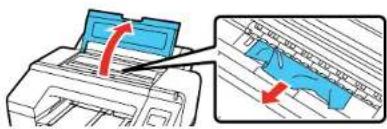
text_image
Diagram showing printer printing process with blue paper and red arrow indicating rotation direction- Closethefrontcover.
- Turntheprinteroffandbackonagain.
- Cuttheedgeoftherollpaperstraighthorizontally, thenreloadtherollpaper.
Note: Makesuretocutoffanyjaggedorfoldedsectionsofpaper.
Parenttopic: SolvingPaperProblems
Relatedtasks
LoadingRollPaper
CuttingRollPaperManually
CutSheetPaperJamProblemsinthePaperCassette
Ifcutsheetpaperhasjammedinthepapercassette,followthestepsheretoclearthejam.
- Removetheoutputtrayandpapercassette.
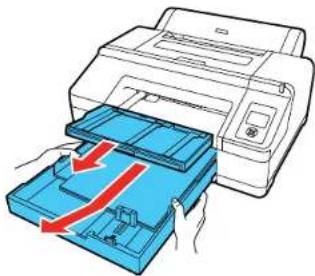
natural_image
Illustration of a printer being inserted into a blue plastic tray with red arrows indicating flow (no text or symbols present)- Removeanyjammedpaperfromthefrontoftheprinter.

natural_image
Illustration of a printer with a blue internal component and a red arrow indicating compression (no text or symbols)- If paper is jammed in there are the printer, remove there a unit. Push the abst forward each other, then pull out the unit. Remove any jammed paper.
text_image
Diagram illustrating the process of inserting a printer into a device, showing step-by-step assembly and component insertion.- Replacetherearunit.Pushitintotheprinterfirmlyuntilyouhearaclick.
- Replacethepapercassette and the output tray.
- Turntheprinteroffandbackonagain.
Parenttopic: SolvingPaperProblems
Relatedtasks
LoadingCutSheetsinthePaperCassette
CutSheetPaperJamProblemsintheFrontorRearManualFeeder
Ifcutsheetpaperhasjammedinthefrontorrearmanualfeeder, followthestepsheretoclearthejam.
- Removethejammedpaper.

natural_image
Diagram showing two views of a printer with arrows indicating flow direction (no text or symbols present)- Opentheprintercover. Remove any other jammed paper as necessary.

natural_image
Diagram showing a printer printing a blue sheet with red arrows indicating motion (no text or symbols present)3.Closetheprintercover.
4. Turntheprinteroffandbackonagain.
Parenttopic: SolvingPaperProblems
Relatedtasks
LoadingCutSheetsintheRearManualFeeder
LoadingCutSheetsintheFrontManualFeeder
SolvingPrintQualityProblems
Checkthesesectionsifyuhaveproblemswithprintquality.
NozzleCheckPatternPrintsIncorrectly
OverallPrintQualityisPoor
LinesAreMisaligned
PrintsareScuffedorSmeared
MarginsAppearinBorderlessRollPrints
TooMuchInkisConsumed
Parenttopic: Solving Problems
NozzleCheckPatternPrintsIncorrectly
If thenozzlecheckpatterndoesnotprintcorrectly, trythesesolutions:
- Run a Normal cleaning cycle and print the check pattern again. If cleaning the print head three times does not solvethe problem, runaHeavycleaningcycle.
• Ifnozzlesarestillcloggedafterheadcleaningatthestrongestlevel,leavetheproductturnedoff overnightandcheckthenozzlesagain.Ifyoustillcannotclearthenozzles,contactEpsonsupport. - If the printer has not been used for all longtime, nozzles may be bedied and clogged. Turn the printer on at least once every few weeks and print an ozzle check pattern to prevent then ozzles from clogging.
Parenttopic: SolvingPrintQualityProblems
Relatedconcepts
PrintHeadNozzleCheck
PrintHeadCleaning
Relatedreferences
AdministratorMenuSettings
Relatedtasks
UsingthePowerfulCleaningUtility
OverallPrintQualityisPoor
If you notice that your print quality is uneven, to light, to dark, or there are lines in the print (banding), try the sesolutions:
- Runanozzlechecktoseefanyoftheprintheadnozzlesareclogged. Thencleantheprinthead, if necessary.
•Aligntheprinthead.
- MakesureyouareusinggenuineEpsoninkcartridges.Ifyouusenon-Epsoninkcartridges,theprint resultmaybefaintorthecoloroftheprintedimagemaybeinaccuratebecausetheremaininginklevel isnotcorrectlydetected.
- Makesureyourinkcartridgeshavenotexpired.Forbestresults,useinkcartridgesbeforethe expirationdateprintedonthepackage(withinsixmonthsofinstallationintheprinter).Replaceexpired cartridgeswithnewones.
- Shakethecartridgesbeforeinstallingthemintheprinter.Tomaintainoptimumprintquality,remove andshaketheinstalledcartridgesiftheprinterhasnotbeenusedinthelastthreemonths.
- Make sure you selected the correct Media Type setting in the printer driver that matches the paper loadedintheprinter.
- Comparetheprintresultwiththeimageonyourcomputerscreen.Sincemonitorsandprinters producecolorsdifferently,printedcolorsandscreencolorsdonotalwayslookthesame.
- Makesurethattheprintercoverisclosedduringprinting.
- ChecktheinklevelsontheLCDscreen.Replaceanycartridgesthatarelowonink.
- Enablecolormanagementinthesoftwareapplicationorintheprinterdriver.
- If you are using non-Epson media, makes sure you create custom paper configuration for the media.
- Checkthequalitysettingthatyouselectedintheprinterdriver. Usinga fasterprintingmethodmay decrease the overall print quality.
Parenttopic: SolvingPrintQualityProblems
Relatedconcepts
PrintHeadNozzleCheck
PrintHeadCleaning
PrintHeadAlignment
PurchaseEpsonInkCartridgesandMaintenanceTanks
Relatedreferences
PrintQualityOptions-Windows
ColorManagementOptions-Windows
OutputResolutionSettings-Mac
AdvancedColorSettings-Mac
Relatedtasks
Removing and Installing Ink Cartridges
CreatingCustomPaperConfigurations
SelectingBasicPrintSettings-Windows
SelectingBasicPrintSettings-Mac
LinesAreMisaligned
Youmayseeverticallinesinthe(bi-directional)printoutput.Ifthisoccurs,aligntheprinthead.
Parenttopic: SolvingPrintQualityProblems
Relatedconcepts
PrintHeadAlignment
PrintsareScuffedorSmeared
If your prints are scuffedorsmeared, try thesesolutions:
- Makesureyourpapermeetsthespecificationsforyourproduct.
- Donotusepaperwithfoldsorcreasesandalwaysusenewmedia.
• If you are using cutsheet paper, check that changes in humidity and temperature have not made the paper wavy or curled upon the edges. Flattenthe paper before loading it or used to use paper.
- If the surface of the paper is scuffed, select a wider Platen Gap setting.
- Ifthebottomedgeisscuffed,trywideningthebottommargin.
• Ifinkissmearedonyourprints,cleantherollers.Loadblankpaperandpressthepaperfeedbutton tofeeditthroughtheprinter. - If you are using non-Epson media, makes sure you create a custom paper configuration for the media.
- Make sure the Paper Size Check setting is set to On, or the printer may print outside the edges of the loadedpaperandsmearinkonthebackoftheprint.
- Depending on the print density and type of papery you are using, the ink may take awhile today. Donot stack the prints until the ink is completely dry.
Parenttopic: SolvingPrintQualityProblems
Relatedreferences
PaperMenuSettings
PrinterSetupMenuSettings
Relatedtasks
CreatingCustomPaperConfigurations
MarginsAppearinBorderlessRollPrints
Ifborderlessrollprintsstillhavemargins,trythesesolutions:
- Checktheprintsettingsselectedinyourprintapplicationyouareusing,aswellastheprinterdriver.
- MakesurethatthepapersettingsontheLCDscreenmatchthepaperyouloaded.
- MakesureborderlessenlargementisnotsettoMinintheprinterdriver.
- Paperthatisstoredincorrectlymayexpandorcontract.Makesureyouhavestoredthepaper accordingtothemanufacturer'sspecifications.
- Check that the paperyouare usingsupportsborderlessprinting.
- Change the Adjust Cut Position setting. This may reduce the margins at the top and bottom of the print.
Parenttopic: SolvingPrintQualityProblems
Relatedreferences
MaintenanceMenuSettings
PaperMenuSettings
BorderlessPaperTypeCompatibility
RollPaperOptions-Windows
Relatedtasks
SelectingRollPaperSettings-Mac
TooMuchInkisConsumed
If your printer is consuming to much think during printing, try thesesolutions:
- Make sure you selected the Media Type setting in the printer driver that matches the paper you loaded in the printer. The amount of ink used during printing is controlled by the Media Type setting.
- Lowerthedensityofinkinthepaperormediaoptionsintheprinterdriver.
Parenttopic: SolvingPrintQualityProblems
Relatedreferences
PaperConfigurationOptions-Windows
Relatedtasks
SelectingBasicPrintSettings-Windows
SelectingBasicPrintSettings-Mac
SelectingAdvancedMediaControlSettings-Mac
WheretoGetHelp
Epsonprovidestechnicalsupportandinformationontheinstallation,configuration,andoperationof professionalprintingproductsthroughtheEpsonPreferredLimitedWarrantyPlan.Dial(888)377-6611,6AMto6PM,PacificTime,MondaythroughFriday.Daysandhoursofsupportaresubjecttochange withoutnotice.
Note: If you experience difficulty with the toll-free number, call (562) 276-1305 (U.S.) or (905) 709-3481 (Canada).
Beforeyoucall, makesureyouhaveyourprinterserialnumberandproofofpurchase.
Visit epson.com/support (U.S.) or epson.ca/support (Canada) and select your product for solutions to commonproblems.Youcandownloadaddrivers,firmware,anddocumentation,getFAQsand troubleshootingadvice,ore-mailEpsonwithyourquestions.
Note: For help using any other software on your system, see the documentation for that software for technicalsupportinformation.
PurchaseSuppliesandAccessories
YoucanpurchasegenuineEpsonink,paper,andaccessoriesfromanEpsonauthorizedreseller.To find the nearest reseller, visit proimaging.epson.com (U.S.) or proimaging.epson.ca (Canada), select your product series and product, and click the Where to Buy button. Or call 800-GO-EPSON (800-463-7766)intheU.S.or800-807-7766inCanada.
Parenttopic: Solving Problems
TechnicalSpecifications
These sections list the technical specifications for your product.
Note: Epson offers a recycling program for end of life Epson products. Please go to this site (U.S) or this site(Canada)forinformationonhowtoreturnyourEpsonproductsforproperdisposal.
WindowsSystemRequirements MacSystemRequirements PaperSpecifications PrintableAreaSpecifications InkCartridgeSpecifications DimensionSpecifications ElectricalSpecifications EnvironmentalSpecifications InterfaceSpecifications SafetyandApprovalsSpecifications
WindowsSystemRequirements
Touseyourproductanditssoftware,yourcomputershouldmeettheserequirements.
| MicrosoftWindowsOS version(32-and64-bit compatible) | Windows10,Windows8.x,Windows7 |
| CPUCore2Duo3.05GHz | orbetter |
| Memory1GBormore | |
| Harddiskspace available | 32GBormore |
| InterfaceHigh-SpeedUS | BportcompatiblewithUSB2.0Specification |
| Ethernet10BASE-T/100BASE-TX/1000BASE-T | |
| DisplayresolutionSVGA(800×600)orhigher | |
Note: For the latest product software available for your operating system, visit the Epson support site at epson.com/support (U.S.), epson.ca/support (Canada), or epson.com.jm/support (Caribbean), select yourproduct,andselectDownloads.
Parenttopic: Technical Specifications
MacSystemRequirements
Touseyourproductanditssoftware,yourMacshouldmeettheserequirements.
| OSXversionMacOSX10.7 | throughmacOS10.12.x |
| CPUCore2Duo3.05GHz | orbetter |
| Memory1GBormore | |
| Harddiskspace available | 32GBormore |
| InterfaceHigh-SpeedUS | bportcompatiblewithUSB2.0Specification |
| Ethernet10BASE-T/100BASE-TX/1000BASE-T | |
| DisplayresolutionWXGA(1280×800)orhigher | |
Note: For the latest product software available for your operating system, visit the Epson support site at epson.com/support (U.S.), epson.ca/support (Canada), or epson.com.jm/support (Caribbean), select yourproduct,andselectDownloads.
Parenttopic: Technical Specifications
PaperSpecifications
Note: Since the quality of any particular brand or type of paper may be changed by the manufacturer at anytime, Epson cannot guarantee the equality of any non-Epson brand or type of paper. Always stesta sample of paper stock before purchasing large quantities or printing large jobs.
Cutsheetpaper
SizeA4(8.3×11.7inches[210×297mm])
A3(11.7×16.5inches[297×420mm])
13×19inches(330×483mm)
A2(16.5×23.4inches[420×594mm])
Letter(8.5×11inches[216×279mm])
Legal(8.5×14inches[216×356mm])
8×10inches(203×254mm)
9×12inches(229×305mm)
10×12inches(254×305mm)
11×14inches(279×356mm)
11×17inches(279×432mm)
16×20inches(279×432mm)
17×22inches(432×559mm)
Thickness0.003to0.06inch(0.08to1.5mm)
Thickpaper:0.03to0.06inch(0.8to1.5mm)
Rollpaper
Coresize2inches(51mm)and3inches(76mm)
Outerdiameter2-inchcore:upto4inches(103mm)
3-inchcore:upto6inches(150mm)
Width8inches(203mm) to 17inches(432mm)
Length2-inchcore: upto147feet(45m)
3-inchcore: upto100feet(30.5m)
Thickness0.003to0.02inch(0.08to0.5mm)
Note: Maximum thickness is reduced to 0.02 inch (0.45 mm) when using the optional SpectroProofer.
Parenttopic: Technical Specifications
PrintableAreaSpecifications
Note: When printing borderless, quality may decline in the expanded printable area.
Cutsheetpaper
text_image
① ② ③ ④ ⑤1Left/right/top/bottommargin:0.12inch(3mm)minimum
2Printablelength:10inches(254mm)to24inches(610mm)
3Printablewidth:8inches(203mm) to 17inches(432mm)
Rollpaper

text_image
4 ① ③ ② ② ①Note: Margins may change depending on the Roll Paper Margin setting that you select. The numbers below are the default settings. When printing with the left and right border less setting, the left and right margins are 0. When printing with the border lesson all sides setting, all margins are 0.
1Top/bottommargin:0.59inch(15mm)minimum*
2Left/rightmargin:0.12inch(3mm)minimum
3Printablelength:0.4feet(0.13m)to49.2feet(15m)**
4Printablewidth:8inches(203mm)to17inches(432mm)
*Forthesepapertypesthedefaulttopandbottommarginsare0.8inch(20mm):EpsonPremium GlossyPhotoPaper(250),EpsonPremiumSemiglossPhotoPaper(250),EpsonPremiumLusterPhoto Paper(260),andEpsonPremiumSemimattePhotoPaper(250).
**ThemaximumprintablelengthusingtheEpsondriveris49.2feet(15m).Toprintlongerimages,you needtousethird-partybannerprintingsoftware.
Parenttopic: Technical Specifications
InkCartridgeSpecifications
Note: This product uses only genuine Epson-brand cartridges. Other brands of ink cartridges and ink supplies are not compatible and, even if described as compatible, may not function properly.
Thecartridgesincludedwiththeprinteraredesignedforprintersetupandnotforresale. Aftersomeink isusedforcharging,therestisavailableforprinting.Yieldsvaryconsiderablybasedonimagesprinted,
printsettings, papertype, frequencyofuse, and temperature. For printquality, a variable amount of fink remains in the cartridge after the "replace cartridge" indicator comes on.
PigmentinkStandardEdition:Cyan,LightCyan,VividMagenta,VividLight
Magenta, Yellow, Orange, Green, LightLightBlack, LightBlack, PhotoBlack, MatteBlack.
CommercialEdition:Cyan,LightCyan,VividMagenta,VividLightMagenta,Yellow,Orange,Green,Violet,LightBlack,PhotoBlack,MatteBlack.
Note: Theinkconfigurationispermanent(LightLightBlackorViolet) oncetheprintercompletesitsinitialinkchargeandcannotbe changed.
Cartridgelife
Unopenedpackage:donotuseifthedateonthepackagehas expired
PrintqualityguaranteeAfterinstallation:6months
TemperatureIntransit(unopened):-4to140°F(-20to60°C)
Storage: -4to104°F(-20to40°C)
1monthat104°F(40°C)
Inkfreezesat14°F(-10°C)
Inkthawsandisusableafter4hoursat77°F(25°C)
Parenttopic: Technical Specifications
Relatedreferences
InkCartridgeandMaintenanceTankPartNumbers
DimensionSpecifications
Height16inches(405mm)
Width34inches(863mm)
Depth30inches(766mm)
Weight
114.6lb(52kg)
(withoutinkcartridgesoroptional equipment)
Parenttopic: Technical Specifications
ElectricalSpecifications
Powersupplyrating100to240V
Ratedfrequencyrange50/60Hz
Inputfrequencyrange49.5/60.5Hz
Ratedcurrent0.7to0.4A
PowerconsumptionPrinting:52W(55WwithoptionalSpectroProoferinstalled)
(ISO/IEC24712)
Sleepmode:5.0W
Poweroffmode:0.5Worless
Parenttopic: Technical Specifications
EnvironmentalSpecifications
TemperatureOperating:50to95°F(10to35°C)
Operating(recommended):65to75°F(18to24°C)
Storage(beforeunpacking):-4to140°F(-20to60°C)
1monthat104°F(40°C)
Storage(afterunpacking):-4to104°F(-20to40°C)
1monthat104°F(40°C)
Humidity
Operating:20to80%RH
(non-condensing)
Operating(recommended):45to60%RH
Storage:5to85%RH
Parenttopic: Technical Specifications
InterfaceSpecifications
USBInterfaceHi-SpeedUSB-CompatiblewiththeUniversalSerialBus SpecificationsRevision2.0
NetworkInterface10BASE-T/100BASE-TX/1000BASE-T(useaCategory5/5eor highershieldedtwistedpaircable)
Parenttopic: Technical Specifications
SafetyandApprovalsSpecifications
UnitedStatesSafety:UL60950-1
EMC:FCCpart15SubpartBclassB
CanadaSafety:CAN/CSAC22.2No.60950-1
EMC:CAN/CSA-CEI/IECCISPR22ClassB
Parenttopic: Technical Specifications
Notices
Checkthesesectionsforimportantnoticesaboutyourproduct.
Note: Epson offers a recycling program for end of life Epson products. Please go to this site (U.S) or this site(Canada)forinformationonhowtoreturnyourEpsonproductsforproperdisposal.
ImportantSafetyInstructions
FCCComplianceStatement
Trademarks
CopyrightNotice
ImportantSafetyInstructions
Before using your Epson product, read and follow the safety instructions.
GeneralProductSafetyInstructions
InkCartridgeSafetyInstructions
Parenttopic:Notices
GeneralProductSafetyInstructions
- Besuretofollowwallwarningsandinstructionsmarkedontheproduct.
- Donotattempttoservicethisproductyourself.
- Useonlythetypeofpowersourceindicatedontheproduct'slabel.
- Useonlythepowercordthatcomeswiththeproduct.Useofanothercordmaycausefiresorshock.Donotusethecordwithanyotherequipment.
- Placetheproductnearawalloutletwheretheplugcanbeeasilyunplugged.
- Connectyourproducttoproperlygroundedpoweroutlet.Avoidpluggingtheproductintoanoutlet onthesamecircuitasaphotocopieroraircontrolsystemthatregularlyswitchesonandoff,oranan outletcontrolledbyawallswitchortimer.
- Donotletthepowercordbecomedamagedorfrayed. Placeittoavoidabrasions, cuts, fraying, crimping, and kinking. Donotplaceobjectsontopofitandonotallowittobesteppedonorrunover. Becarefultokeepthecordstraightateachend.
- If you use an extension cord with the product, makes sure the total ampererating of the devices plugged into the extension cord does not exceed the cord's ampererating. Also, makes sure the total
ampereratingofalldevicespluggedintothewalloutletdoesnotexceedthewalloutlet'sampere rating.
• If damage occurs to the plug, replace the cord set or consulta qualified electrician. If there are refuses in the plug, makes sure you replace them with fuses of the correct size and rating.
- Alwaysturnofftheproductusingthepowerbutton, and wait until the powerlight stops flashing before unplugging the product or cutting off power to the electrical outlet.
- If you will not be using the product for a long period, unplug the power cord from the electrical outlet.
- Placetheproductionaflat,stablesurfacethatextendsbeyonditsbaseinalldirections.Itwillnot operateproperlyifitistiltedoratanangle.
- Avoidlocationsthataresubjecttorapidchangesinheatorhumidity,shocksorvibrations,ordust.
- Donotplaceorstoretheproductoutdoors.
- Donotplacetheproductnearexcessiveheatsourcesorindirectsunlight.
- Leaveenoughroomaroundtheproductforsufficientventilation.Donotblockorcoveropeningsinthe cabinetorinsertobjectsthroughtheslots.
- Keep the product away from potential sources of electromagnetic interference, such as loudspeakers or the base unit of cordless telephones.
- Whenconnectingtheproducttoacomputerorotherdevicewithacable,ensurethecorrect orientationoftheconnectors.Eachconnectorhasonlyonecorrectorientation.Insertingaconnector inthewrongorientationmaydamagebothdevicesconnectedbythecable.
- Donotputyourhandsinsidetheproductortouchtheinkcartridgeswhileprinting.
- Donotmovetheprintheadbyhand; this may damage the product.
- Donotspillliquidontheproductorusetheproductwithwethands.
- Donotuseaerosolproductsthatcontainflammablegasesinsideoraroundtheproduct.Doingsomay causefire.
- Exceptasspecificallyexplainedinyourdocumentation,donotattempttoservicetheproductyourself.
- Unplugtheproductandreferservicingtoqualifiedservicepersonnelunderthefollowingconditions:if thepowercordorplugisdamaged;ifliquidhasenteredtheproduct;iftheproducthasbeendropped orthecabinetdamaged;iftheproductdoesnotoperatenormallyorexhibitsadistinctchangein performance.Adjustonlythosecontrolsthatarecoveredbytheoperatinginstructions.
- Whenstoringortransportingtheproduct,donottiltit,standitonitsside,orturnitupsidedown; otherwiseinkmayleak.
Note: The lithium batteries in this product contain Perchlorate Material - special handling may apply. Clickherefordetails.
Parenttopic: ImportantSafetyInstructions
InkCartridgeSafetyInstructions
- Keepinkcartridgesoutofthereachofchildrenanddonotdrinktheink.
•Becarefulwhenyouhandleusedinkcartridges;theremaybeinkremainingaroundtheinksupply port.Ifinkgetsonyourskin,washitoffwithsoapandwater.Ifitgetsinyoureyes,flushthem immediatelywithwater.
- Donotputyourhandinsidetheproductortouchanycartridgesduringprinting.
- Installanewinkcartridgeimmediatelyafterremovinganexpendedone.Leavingcartridges uninstalledcandryouttheprintheadandmaypreventtheproductfromprinting.
• Installinkcartridgesinalltheinkcartridgeslots. You cannot printf any of the slots are empty.
• Driedinkonthesupplyportmaycauseinkleakshwenthecartridgeisreinsertedandused. Wipeoff anyexcessinkbeforereinserting.
- Donotinsertorremovereplacementcartridgesduringprinting.
- Donotremovethetransparentsealfromtheinksupplyport. This may cause the cartridge to become unusable.
• The green IC chiponth this ink cartridge retains a variety of cartridge-related information, such as the ink cartridge status, so that the cartridge may be removed and reinserted freely. Donottouch the green IC chiponth side of the cartridge. This may prevent normal operation and printing.
• If you remove an ink cartridge for later use, protect the inksupply area from dirt and dust and store it in the same environment at the product. Not that there is a valve in the inks supply port, making covers or plugs unnecessary, but care is needed to prevent the inks from staining items that the cartridge touches. Donottouch the ink cartridge in supply port or surrounding area.
- Toensureprintquality,useaninkcartridgebeforethedateprintedonitspackage.
- Donotdismantleoralteraninkcartridge. This could damage the printhead and may prevent the product from printing.
- Donotdropcartridgesorbumpthemagainsthardobjects;otherwise,theinkmayleak.
- Storeinkcartridgesatroomtemperatureinalocationthatisnotexposedtodirectsunlight.
• After bringing an ink cartridge inside from acold storagesite, allow it to warm up at room temperature for at least four hours before using it.
Parenttopic: ImportantSafetyInstructions
FCCComplianceStatement
ForUnitedStatesUsers
This equipment has been tested and found to comply with the limits for a Class B digital device, pursuant to Part 15 of the FCC Rules. These limits are designed to provide reasonable protection against harmful interference in a residential installation. This equipment generates, uses, and can radiater radio frequency energy and, if not installed and used in accordance with the instructions, may cause harmful interference or radio television reception. However, there is no guarantee that interference will not occur in particular installation. If this equipment does cause interference or radio and television reception, which can be determined by turning the equipment off and, the user is encouraged to try to correct the interference by one or more of the following measures:
•Reorientorrelocatethereceivingantenna.
- Increase these separation between the equipment and receiver.
- Connecttheequipmentintoanoutletonacircuitdifferentfromthattowhichthereceiverisconnected.
- Consultthedealeroranexperiencedradio/TVtechnicianforhelp.
WARNING
The connection of an on-shielded equipment interface cable to this equipment will invalidate the FCC Certification or Declaration of this device and may cause interference levels which exceed the limits established by the FCC forthisequipment. It is therefore the user to obtain and use a shielded equipment interface cable with this device. If this equipment has more than one interface connector, do not leave cables connected to unused interfaces. Changes or modifications not expressly approved by the manufacturer could void the user's authority to operate the equipment.
ForCanadianUsers
CANICES-3(B)/NMB-3(B)
Parenttopic:Notices
Trademarks
EPSON ^® , SureColor ^® , PrecisionCore ^® , and SpectroProofer ^® are registered trademarks and EPSON Exceed Your Vision is a registered logomark of Seiko Epson Corporation.
EpsonStore ^SM isaservicemarkofEpsonAmerica, Inc.
MacandOSXaretrademarksofAppleInc., registeredintheU.S.andothercountries.
GeneralNotice: Other product names used herein are for identification purposes only and maybe trademark of their respective owners. Epson disclaims any and all rights in those marks.
EPSON®
EXCEED YOUR VISION
Parenttopic:Notices
CopyrightNotice
Allrightsreserved. Nopartofthispublicationmaybereproduced, storedinaretrievalsystem, or transmittedinanyformorbyanymeans, electronic, mechanical, photocopying, recording, or otherwise, without the prior written permission of SeikoEpsonCorporation. The information contained herein is designed only for use with this Epsonproduct. Epsonis not responsible for any use of this information as applied to other products.
Neither Seiko Epson Corporation nor its affiliates shall be liable to the purchaser of this product or third parties for damages, losses, costs, or expenses incurred by purchaser third parties as a result of: accident, misuse, or abuse of this product or unauthorized modifications, repairs, or alteration to this product, or (excluding the U.S.) failure to strictly comply with Seiko Epson Corporation's operating and maintenance instructions.
SeikoEpsonCorporationshallnotbeliableforanydamagesorproblemsarisingfromtheuseofany optionsoranyconsumableproductsotherthanthosedesignatedasOriginalEpsonProductsorEpson ApprovedProductsbySeikoEpsonCorporation.
SeikoEpsonCorporationshallnotbeheldliableforanydamageresultingfromelectromagneticinterferencethatoccursfromtheuseofanyinterfacecablesotherthanthosedesignatedasEpsonapprovedProductsbySeikoEpsonCorporation.
Thisinformationissubjecttochangewithoutnotice.
ANoteConcerningResponsibleUseofCopyrightedMaterials
CopyrightAttribution
Parenttopic:Notices
ANoteConcerningResponsibleUseofCopyrightedMaterials
Epsonencourageseachusertoberesponsibleandrespectfulofthecopyrightlawswhenusingany Epsonproduct.Whilesomecountries'lawspermitlimitedcopyingorreuseofcopyrightedmaterialin
certaincircumstances,thosecircumstancesmaynotbeasbroadassomepeopleassume.Contactyour legaladvisorforanyquestionsregardingcopyrightlaw.
Parenttopic: CopyrightNotice
CopyrightAttribution
©2017EpsonAmerica,Inc.
5/17
CPD-52925R1
Parenttopic: CopyrightNotice