Coda - Chambre Fantastic - Free user manual and instructions
Find the device manual for free Coda Fantastic in PDF.

User questions about Coda Fantastic
0 question about this device. Answer the ones you know or ask your own.
Ask a new question about this device
Download the instructions for your Chambre in PDF format for free! Find your manual Coda - Fantastic and take your electronic device back in hand. On this page are published all the documents necessary for the use of your device. Coda by Fantastic.
USER MANUAL Coda Fantastic
natural_image
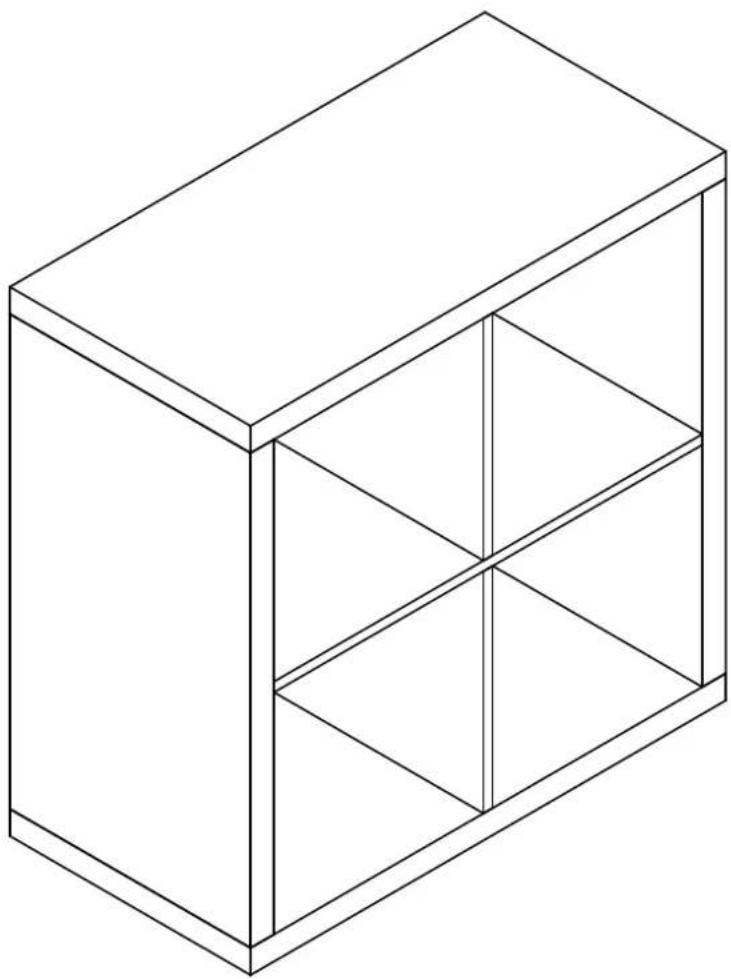
Isometric line drawing of a 3D rectangular box with internal shelves (no text or symbols)Secure it!
Reduce the risk of furniture tip-over accidents

natural_image
Illustration of a three-tiered bookshelf with shelves and spines (no text or symbols)
WARNING: ENSURE THE WALL STRAP IS ATTACHED TO AVOID SERIOUS INJURY OR DEATH.
To avoid any serious or fatal injury, a wall strap has been provided with this product to prevent toppling. We strongly recommend that this product is permanently fixed to the wall or other suitable surface. Fixing devices are not included since different surface materials require different attachments.
Please seek professional advice if you are in doubt of what fixing device to use.
Recommended Weight Capacity :10kg/shelf
To reduce the risk of furniture tipover:

- Do not allow children to stand, climb or hang on furniture. It may topple and cause serious injury or death.
- Do not place toys or other child appealing items on top of this furniture, and place heaviest items towards the bottom of the furniture.
- Do not open more than one drawer at the time.
- Anchoring this product to a wall or other suitable surface is recommended. Check anchors regularly.
- Avoid putting a TV on this product.
Wall attachment guide
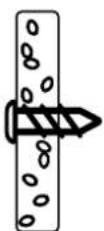
For plasterboard
(withoavailable wood stud)
Securing method:
Self drilling plasterboard anchor.
natural_image
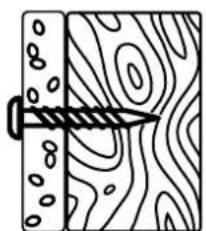
Diagram showing a hammer inserted into a rectangular block with a textured surface and circular patterns (no text or symbols)For plasterboard
(with available wood stud)
Securing method:
Screw idiredly into stud.


For masonry wall
Securing method:
Solid wall: Plug with screw
Hollow wall: Spring toggle
Please seek professional advice if you are in doubt of what fixing device to use.
Looks like you've found your Fantastic!
We're thrilled you've chosen Fantastic Furniture to help create a home you'll love!

natural_image
Simple black icon of a stylized armchair (no text or symbols)Fantastic Furniture
Love it? Share it!
Fantastic buy! Share how it looks at home on Instagram for your chance to win a \$250 Fantastic Furniture Gift Card!
@fantasticfurniture
Assembly Checklist

natural_image
Illustration of a person reading a box with a 'Fantastic Furniture' label, no other text or symbols present.Read through the instructions carefully before you begin.

text_image
Safety warning illustration showing a person with crossed-out tools and checkmarks indicating incorrect or invalid conditions.Make sure you have all the required tools. Never use power tools unless instructed.

text_image
A. B. C.Identify and lay out all of the components before you begin assembly.
natural_image
Simple line drawing of a person kneeling beside a rectangular object with circular elements (no text or symbols)Unless instructed, do not fully tighten screws until the item is fully assembled.
Useful Information
! Never use power tools unless specifically instructed. They can damage your components or hardware if used incorrectly.
! The most common mistakes made during assembly are using the wrong hardware or getting components back to front.
! Always use a soft surface (such as carpet or cardboard) when assembling your product to avoid scratching or damaging the surface of the product.
! Bulky items such as wardrobes and bunk beds should be assembled in the room they will be used in as they may not fit through a door once assembled.
! Never use any glue until you are certain that the parts belong together.
! Periodically check and re-tighten all fasteners. Check the product care label or website for product care instructions.
! If you are having any difficulties assembling your product, missing any hardware or components please visit our website Help Centre for further assistance.
! Please see page 2 for any safety requirements or weight restrictions.
What you need
to assemble the product

natural_image
Two black icons: a crossed-out screwdriver and a circle with a prohibition symbol (no text or numbers present)DO NOT USE

Other tools you need:
Phillips Head Screwdriver;
Hammer

text_image
Top Panel (P1) Divider (P4) Side Panel (P2) Shelf Panel (P3) Divider (P5) Bottom Panel (P6) Side Panel (P2)Parts list
Top Panel (P1);
2 x Side Panels (P2);
Shelf Panel (P3);
Divider (P4);
Divider (P5);
Bottom Panel (P6);
Hardware pack
 |  |  |  |  |  | |
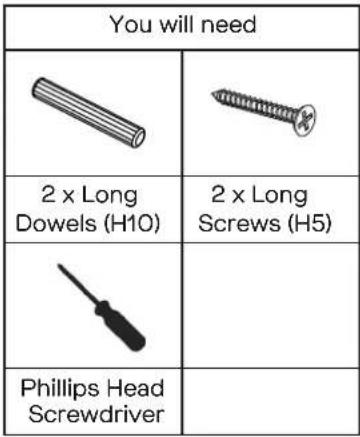
| 8 x Dowels (H1) | 8 x Small Dowels (H2) | 12 x Cam Bolts (H3) | 12 x Cam Nuts (H4) | 2 x Long Screws (H5) | 6 x Inside Hexagonal Bolts (H6) | |
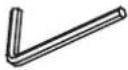 |  |  | 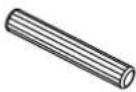 |  | ||
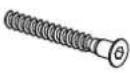
| 1 x Allen Key (H7) | 8 x Covers (H8) | 4 x Plastic Glides (H9) | 2 x Long Dowels (H10) | 1 x Restraint Strap (H11) | 1 x Screw (H12) | 2 x Brackets (H13) |
Step 1
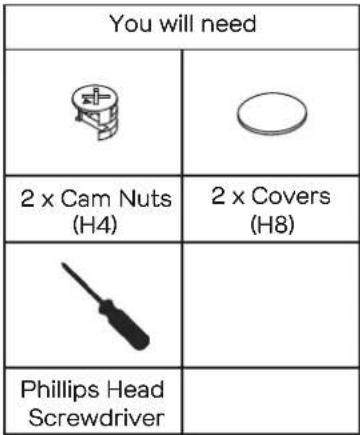
| You will need | |
 | |
| 6 x Cam Bolts (H3) | Phillips Head Screwdriver |

text_image
H3 H3 H3 H3 H3 (P1)Attach 6 x Cam Bolts (H3) into Top Panel (P1) as shown.
Step 2
| You will need | |
 | |
| 4 x Cam Bolts (H3) | Phillips Head Screwdriver |
text_image
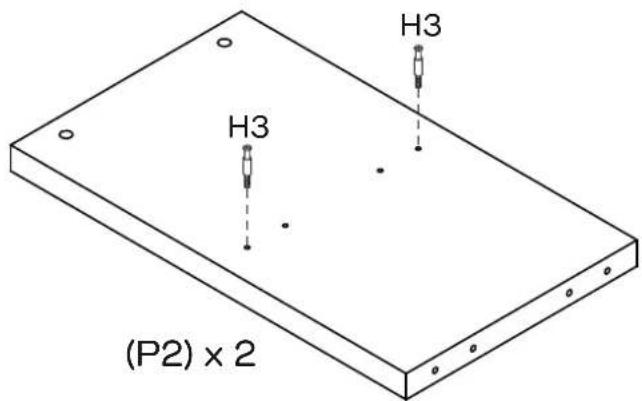
(P2) × 2 H3 H3Attach 2 x Cam Bolts (H3) into each Side Panel (P2) as shown.
Step 3
| You will need | |
 | |
| 2 x Cam Bolts (H3) | Phillips head screwdriver |

text_image
H3 H3 (P3)Attach 2 x Cam Bolts (H3) into Shelf Panel (P3) as shown.
fantasticfurniture.com.au

Fantastic Furniture
Step 4
 |

text_image
(P4) (P3) H5 H10 H10 H5Insert 2 x Long Dowels (H10) into the holes of Divider (P4) through Shelf Panel (P3) as shown. Attach Divider (P4) to Shelf Panel (P3) with 2 x Long Screws (H5) using a Phillips Head Screwdriver.
Step 5
 |

text_image
This is how a cam nut works...... The head of the cam bolt goes into the open mouth of the cam nut. You then turn the cam nut so it tightens over the bolt.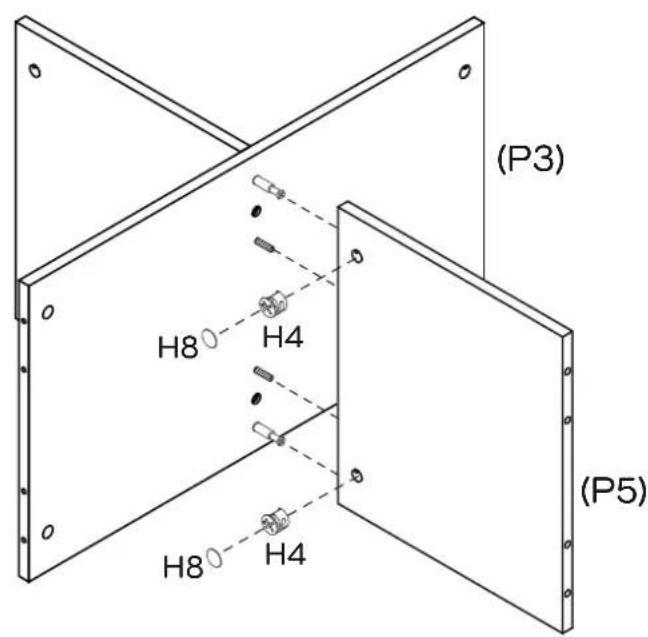
text_image
(P3) H8 H4 (H8) H4 (P5)Insert 2 x Cam Nuts (H4) into the holes of Divider (P5).
Rotate the Cam Nuts so the arrows point towards the incoming Cam Bolts.
Push Divider (P5) into place and then tighten the Cam Nuts using a Phillips Head Screwdriver. Seal the holes with 2 x Covers (H8).
Step 6
| You will need | |
| 2 x Small Dowels (H2) | 2 x Cam Nuts (H4) |
| Phillips Head Screwdriver | |

text_image
(P2) (P4) (P3) H2 H4 (P5) H4Insert 2 x Small Dowels (H2) into the holes of Shelf Panel (P3).
Insert 2 x Cam Nuts (H4) into the holes of Shelf Panel (P3).
Rotate the Cam Nuts so the arrows point towards the incoming Cam Bolts.
Push Side Panel (P2) into place and then tighten the Cam Nuts using a Phillips Head Screwdriver.
Step 7
| You will need | |
| 2 x Small Dowels (H2) | 2 x Cam Nuts (H4) |
| Phillips Head Screwdriver | |

text_image
(P2) (P3) H2 H4 H2 H4 (P3)Insert 2 x Small Dowels (H2) into the holes of Shelf Panel (P3).
Insert 2 x Cam Nuts (H4) into the holes of Shelf Panel (P3).
Rotate the Cam Nuts so the arrows point towards the incoming Cam Bolts.
Push Side Panel (P2) into place.
Tighten the Cam Nuts using a Phillips Head Screwdriver.
Step 8
| You will need | |
 |  |
| 4 x Dowels (H1) | 2 x Small Dowels (H2) |
 |  |
| 6 x Cam Nuts (H4) | 6 x Covers (H8) |
 | |
| Phillips Head Screwdriver | |
text_image
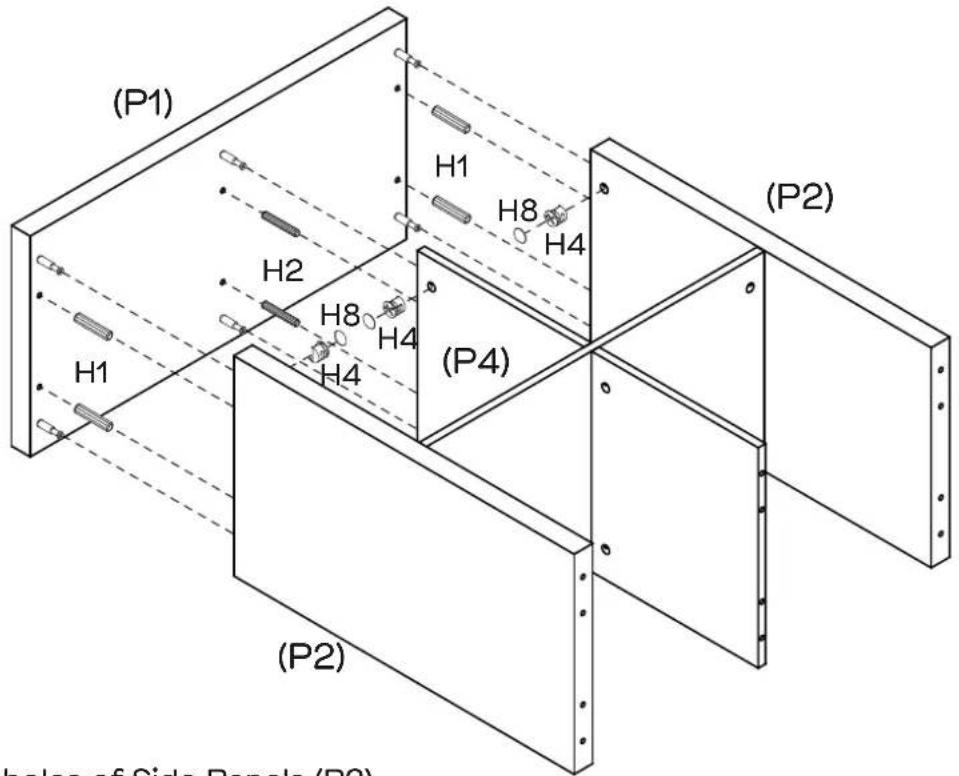
(P1) H1 H8 H4 (P2) H2 H8 H4 (P4) H1 H4 (P2) holes of Side Panels (P3)Insert 4 x Dowels (H1) into the holes of Side Panels (P2).
Insert 2 x Small Dowels (H2) into the holes of Divider (P4).
Insert 6 x Cam Nuts (H4) into the holes of Side Panels (P2) and Divider (P4),
Rotate the Cam Nuts so the arrows point towards the incoming Cam Bolts.
Attach Top Panel (P1) into place and then tighten the Cam Nuts using a Phillips Head Screwdriver. Seal the holes with 6 x Covers (H8) as shown.
Step 9
| You will need | |
| 4 x Dowels (H1) | 2 x Small Dowels (H2) |
| 6 x Inside Hexagonal Bolts (H6) | 1 x Allen Key (H7) |

text_image
(P2) (P5) (H1) H2 (P6) (H6) (H6) (H6) (H6) (H7) (P2) H1 H6 the holes of Side Panels (P2). into the holes of Divider (P5). Side Panels (P6) and Divider (P5) withInsert 4 x Dowels (H1) into the holes of Side Panels (P2).
Insert 2 x Small Dowels (H2) into the holes of Divider (P5).
Attach Bottom Panel (P6) to Side Panels (P2) and Divider (P5) with 6 x Inside Hexagonal Bolts (H6) using an Allen Key (H7).
Step 10
| You will need | |
 | |
| 4 x Plastic Glides (H9) | Hammer |
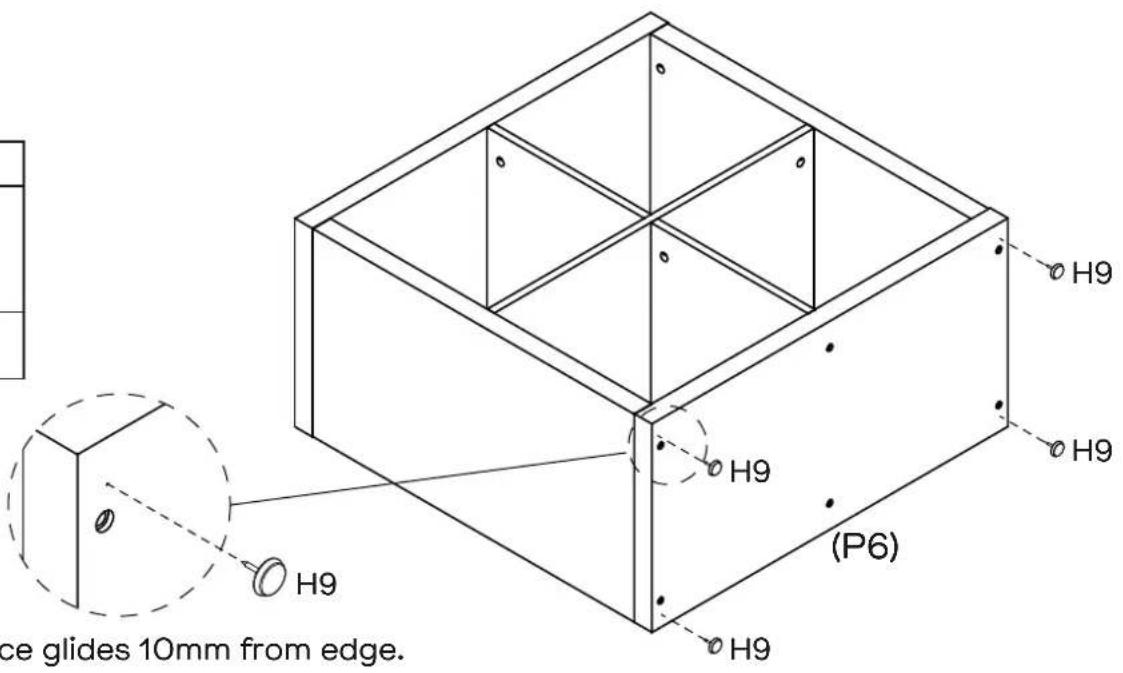
text_image
ce glides 10mm from edge. H9 H9 (H9) (P6)Attach 4 x Plastic Glides (H9) to the bottom of Bottom Panel (P6) with a Hammer.
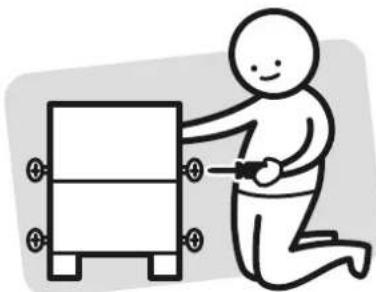
Step 11
| You will need | |
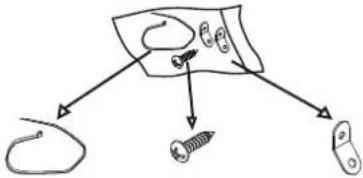
| 1 x Restraint Strap (H11) | 1 x Screw (H12) |
| 2 x Brackets (H13) | Phillips Head Screwdriver |
| Screw and Wall Plug are not provided. Please use appropriate fixtures for your wall. | |
We strongly advise that you use the wall safety strap provided to prevent the unit toppling

natural_image
Line drawing of a cabinet with shelves and a wall, showing structural components (no text or symbols)Seek advice from a qualified trades person on how to attach this safety strap to your specific wall.

text_image
H13 H12
text_image
Wall H13 Wall Screw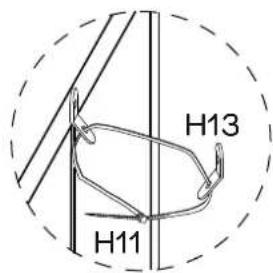
text_image
H13 H11Carefully turn the bookcase over to an upright position.
Attach 1 x Bracket (H13) securely to back of Top Panel (P1)
with 1 x Screw (H12) through the smaller hole.
Align the opposite wall Bracket about 20mm lower than the one attached to the bookcase so the Bracket can't be seen.
Using appropriate wall connection fixtures, secure the bracket to the wall and thread the Restraint Strap through it.
Be careful not to over tighten the strap which would cause the unit to lean.
natural_image
Isometric line drawing of a three-tiered cabinet or shelf unit (no text or symbols)Job Complete!
In the interest of our environment please dispose of all packaging thoughtfully.