Stealthbox SB-F-ESCP/10W1v3 - Subwoofer JL Audio - Free user manual and instructions
Find the device manual for free Stealthbox SB-F-ESCP/10W1v3 JL Audio in PDF.

User questions about Stealthbox SB-F-ESCP/10W1v3 JL Audio
0 question about this device. Answer the ones you know or ask your own.
Ask a new question about this device
Download the instructions for your Subwoofer in PDF format for free! Find your manual Stealthbox SB-F-ESCP/10W1v3 - JL Audio and take your electronic device back in hand. On this page are published all the documents necessary for the use of your device. Stealthbox SB-F-ESCP/10W1v3 by JL Audio.
USER MANUAL Stealthbox SB-F-ESCP/10W1v3 JL Audio
Thank you for choosing a JL Audio Scalibbox ^® for your automotive sound system. With proper installation, your new vehicle specific enclosed subwoofer system will deliver years of listening pleasure.
We strongly recommend that you have your new Stealthbox ^® installed by your authorized JL Audio dealer. The installation professionals employed by your dealer have the necessary tools and experience to disassemble and reassemble your vehicle properly. Also, keep in mind that your warranty coverage extends to 2 years if your system is installed or approved by your authorized JL Audio dealer. If you prefer to perform your own installation, please read this installation guide completely.
before beginning the process.
JL AUDIO.
Ahead of the Curve
SB-F-ESCF/10W1V2INSIR_SKU#011286
! IMPORTANT
If you choose to perform the installation yourself, it is absolutely vital that the Stealthbox' be properly mounted to the vehicle according to these instructions. Failure to mount the enclosure properly presents two problems:
1) The sub-bass performance will suffer due to the movement of the enclosure caused by the force exerted by the woofer(s).
2) A loose enclosure presents a serious safety hazard in the event of a collision or sudden deceleration.
INSTALLATION DIFFICULTY:

ESTIMATED TIME: 2-3 HOURS

natural_image
Close-up of a hand pressing down on a gray plastic door (no text or symbols visible)STEP 1
Remove the cover in front of the pocket as shown.

natural_image
Close-up of a white plastic container with rounded corners and small circular indentations (no text or symbols visible)STEP 2
This is how it looks after removing the cover.
natural_image
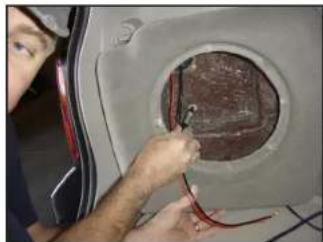
Person using a tool to install or install a brown component on a car door (no visible text or symbols)STEP 3
Remove the woofer from the Stealthbox ^® . Hold the enclosure in place and use a marker to mark the interior panel through the hole in the back of the Stealthbox ^®

natural_image
Close-up of a white plastic container with a small circular hole on the side (no text or symbols visible)STEP 4
Drill a 1' hole in the interior panel where marked as STEP 3 as shown.
Note: Before drilling, make sure that you are not going to be drilling into any gas lines, brake lines, transmission lines, electrical wiring, transfer case (4x4 vehicles) or anything else that might cause a reduction in your weekly pay. Always wear eye protection when drilling!
natural_image
Person adjusting a car seat cover with a blue plastic bottle (no visible text or symbols)STEP 5
Remove bottom trunk plastic trim panel as shown.

natural_image
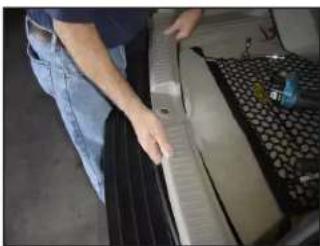
Close-up of a car's side door and tire assembly (no visible text or symbols)STEP 6
Remove bottom plastic trim piece from rear left door opening.

natural_image
Interior view of a car showing the backrest door and seat, with a person adjusting the door (no visible text or symbols)STEP 7
Remove side panel as shown.
natural_image
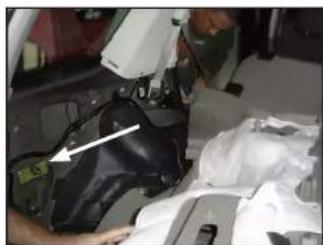
Interior view of a car showing a person adjusting the hood of the engine compartment with a white arrow pointing to the component (no visible text or symbols)STEP 8
The interior with the side panel removed. Note where the bracket had been previously installed
natural_image
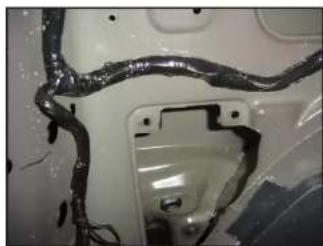
Close-up of a white car body panel with visible wiring and mounting holes (no text or symbols)STEP 9
This shows the holes where the bracket mounts.

natural_image
Close-up of a mechanical component with a metallic bracket and wiring (no visible text or symbols)STEP 10
Mount the bracket.
The bracket will be oriented as shown with all three bolts in a straight line in the newer vehicles.
For the older models, the bracket will be mounted upside down to the photo at left with the stud threaded into the "triangular" hole and, above the two mounting bolts as shown below
The bracket will be mounted as shown at left in the older model vehicles.
Please refer to the detail pictures for further clarification.
STEP 10 DETAIL (1)

natural_image
Metal plate with three holes and a small protrusion, placed on a plain surface (no text or symbols visible)Page 2 • JL Audio, Inc 2008

text_image
VEHRED FROM ARCHICLOWING DOWN VEHRED WITH FLAVEL STRUCTURAL ARCHIC LANE CREAM LINE MOUNTING BLOOD FLOOD FRYMPHYPER VEHRED WITH FLAVEL STRUCTURAL ARCHIC LANE CREAM LINE FLOOD FRYMPHYPER VEHRED WITH FLAVEL STRUCTURAL ARCHIC LANESTEP 10 DETAIL (2)
This is how the hardware should be configured for the bracket and, the Stealthbox ^4 .

natural_image
Close-up of a white plastic door panel with a small circular component on the left side (no visible text or symbols)STEP 11
Expand the round hole in the interior panel from STEP 4 as shown, re-install all of the the interior panels that were removed earlier. place the 1" Spacer (included) over the Stud as shown.
natural_image
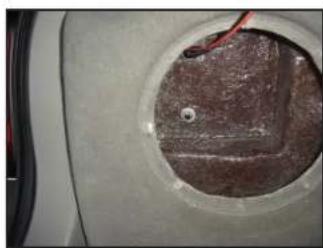
Close-up of a car's side panel showing a circular opening with a textured brown surface and a small circular hole (no text or symbols visible)STEP 12
Put the box in the panel and line it up with the bolt. Make sure to run speaker wire from the enclosure to the location of the amp before securing it to the vehicle.

natural_image
Interior view of a black car trunk with visible rear seats and cargo bags (no text or symbols)STEP 13
Mount woofer to the box, place grill over the speaker, secure the woofer and you are done.
CONGRATULATIONSI
You have completed the installation for this model!
Enjoy your new Stealthbox®
Please refer to the Power Recommendation section for an amplifier recommendation and basic set up help.
INCLUDED HARDWARE
2) 1/4 20 x 1 1/4" Hex Head Bolt 2) 1/4 20 Hex Head Nut
2) 1/4" Split Lock Washer 2) 1/4" Flat Washer
1) 3/8" Split Lock Washer 1) 3/8" Flat Washer
1) 3/8-16 x 2 1/4" Allen Head Stud 1) 1" Spacer
1) Custom Mount bracket
SPECIFICATIONS
Enclosure Type: Acoustic Suspension (sealed)
Driver Type: 10w1v2-4
Nominal Impedance: 4 ohms
Continuous Power Handling: 300 watts
POWER RECOMMENDATION
JL Audio recommends using a high quality amplifier such as the JL Audio 250/1v2.
The diagram below shows the recommended crossover, infrasonic filter and equalizer settings for the 250/1v2 when being used to power your Stealthbox.

text_image
e12VDC Ground Remote JL AUDIO 250/120 Monochrome Subconverter Amplifier Bass Control Ampli LP Filter Amplifier Input Section Subconverter Output Voltage Input Signal Input OFF Input OFF Input OFF Input OFF Input OFF Input OFF Input OFF Input OFF Input OFF Input OFF Input OFF Input OFF Input OFF Input OFF Input OFF Input OFF Input OFF Input OFF Input OFF Input OFF Input OFF Input OFF Input OFF Input OFF Input OFF Input OFF Input OFF Input OFF Input OFF Input OFF Input OFF Input OFF Input OFF Input OFF Output OnlyThe JL Audio 250/1v2 is a very versatile audio component. Please consult the owner's manual for even more detailed information about installing and tuning this amplifier.
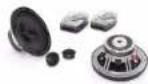
MID/HIGH FREQUENCY DRIVER FITMENT
A variety of JI. Audio coaxial and component systems will fit in the factory speaker locations of you vehicle.
Front Speaker Size / Location: 5'x 7" / 6'x 8" Front Doors
Fits JL Audio Models: TR570-CXI, CS-570, CS-570x & ZR570-CSI
Rear Speaker Size / Location: 5'×7" / 6'×8'-Rear Door
Fits JL Audio Models: RS70-CXI, C5-5/0x
JL AUDIO® Ahead of the Curve
(954) 443-1100 w w w.jlaudio.com
If the authors are subject to exchange with a trade in "Linde" and the L. Aard of "Stockton" and the Stockton governing street trademarks of L.Audic, Inc. (Ahead of the Carney) and to respective local trademarks of L.Audic, Inc. (L.Audic 211200, 212200-0000 - Limited 0154 - 015500, L.Audic, Inc. - U.S. 19876, # 25,734,751,979,528, 46,118,511,46,219,900, # 25,256,799, 974,573,751,979,528, 46,291,900, 46,371,900, 46,371,900, 46,371,900, 46,371,900, 46,371,900). Other U.S. & Foreign persons pending. For more detailed information available online www.sse.com.

10369 NORTH COMMERCE PARKWAY - MIRAMAR, FLORIDA - 33025 - USA