
AS309 - Video projector ACER - Free user manual and instructions
Find the device manual for free AS309 ACER in PDF.

| Brand | Acer |
| Model | AS309 |
| Product Type | DLP Video Projector |
| Display Technology | DLP |
| Native Resolution | 800 x 600 (SVGA) |
| Brightness | 2500 ANSI Lumens |
| Contrast Ratio | 20000:1 |
| Aspect Ratio | 4:3 (Native), 16:9 (Supported) |
| Lamp Life | Up to 4000 h (Normal), 6000 h (Eco) |
| 3D Support | DLP Link, 96/100/120 Hz Sync |
| Inputs | HDMI 1.4a, VGA, Composite, S-Video, Audio |
| Outputs | 3.5mm Audio, USB (service) |
| Built-in Speaker | 2W Mono |
| Keystone Correction | ±40° (Vertical) |
| Projection Lens | Manual Zoom (1:1.1), Manual Focus |
| Power Consumption | 220W (Normal), <0.5W (Standby) |
| Noise Level | 30 dB (Eco mode) |
| Weight | 2.5 kg (approx) |
| Dimensions (WxHxD) | 300 x 220 x 100 mm |
| Maintenance | Clean air filter periodically, replace lamp when needed |
| Spare Parts | Replacement lamp module (contact Acer support) |
| Repairability | Serviceable by authorized technicians only |
Frequently Asked Questions - AS309 ACER
User questions about AS309 ACER
0 question about this device. Answer the ones you know or ask your own.
Ask a new question about this device
Download the instructions for your Video projector in PDF format for free! Find your manual AS309 - ACER and take your electronic device back in hand. On this page are published all the documents necessary for the use of your device. AS309 by ACER.
USER MANUAL AS309 ACER
Acer Projectors with 3D Technology
Quick Guide
© 2014 All Rights Reserved.
Acer Projector Series Quick Guide
Original Issue: 10/2014
Model number: ____
Serial number: ____
Date of purchase: ____
Place of purchase: ____
The Acer projector you have bought has integrated DLP technology.
If you have connected your projector to a computer, please read sections "Using DLP 3D / NVIDIA 3DTV Play technology" on page 4.
If you have connected your projector to a DVD or Blu-ray player, please read "Watching 3D DVD or Blu-ray content" on page 7.

Important: When you turn the 3D technology on, you will be shown a reminder that 3D is enabled. If you do not wish to view 3D content, you should turn it off, otherwise the image may not be projected at full brightness.
Note: 3D display is now enabled.
- Please make sure you have the correct 3D signals and glasses.
- Remember to turn 3D off if you don't want to see 3D images.
- If the 3D display isn't correct, please try to enable 3D Sync Invert.
- Display mode options will be disabled while in 3D mode.
Using 3D glasses
DLP 3D glasses are powered. In order to enhance battery life, they turn off after a few minutes of inactivity. Before you can view 3D content, you need to ensure the glasses are turned on. In many cases, there is a power switch on one of the arms that you can press, and an LED that indicates if the glasses are turned on or not.

Note: Refer to the documentation that came with your glasses for instructions how to turn them on and how to change the battery.
Note: Suggest to use Acer DLP 3D glasses to enjoy perfect 3D performance without compatibility issues.
Note: Require DLP Link 3D glasses and support 96Hz, 100Hz, 120Hz sync signal. Acer projectors need 3D glasses to support 144Hz sync signal for 24P contents. (1080P, 24Hz)
Using DLP 3D / NVIDIA 3DTV Play technology
Requires DLP 3D glasses.
Before you can enjoy the benefits of the DLP 3D technology, you will need to do the following.
1 Ensure your graphics card supports 3D playback.

Note: Please refer to your graphics card's documentation.
2 Download and install the latest drivers for your graphics card.

Note: Please refer to your graphics card vendor's website for the latest driver version.
3 You should also download a suitable 3D player such as the one available from www.3dtv.at.
To download software and use an NVIDIA 3DTV Play ready projector with DLP glasses, refer to the NVIDIA 3DTV Play website: www.nvidia.com/3dtv.

Note: You may need to purchase additional software.
4 Ensure you have the correct DLP-compatible 3D glasses.
Setting up a 3D environment
Once you have installed the drivers, you will need to set up the environment.
1 Set the refresh rate to 100/120 Hz on your graphics card for frame/field sequential 3D formats. Others, please set refresh rate which the 3D content requires.
If you are viewing Blu-ray 3D content over an HDMI 1.4a or later connection, this will be set automatically.
2 Press the menu button on the projector remote control to open the OSD.
Select the 3D section (the sixth menu option) on the left-hand side of the window.

Note: Blu-ray 3D content over an HDMI 1.4a or later connection is not supported on most of LED projectors.
3 Set 3D to On.
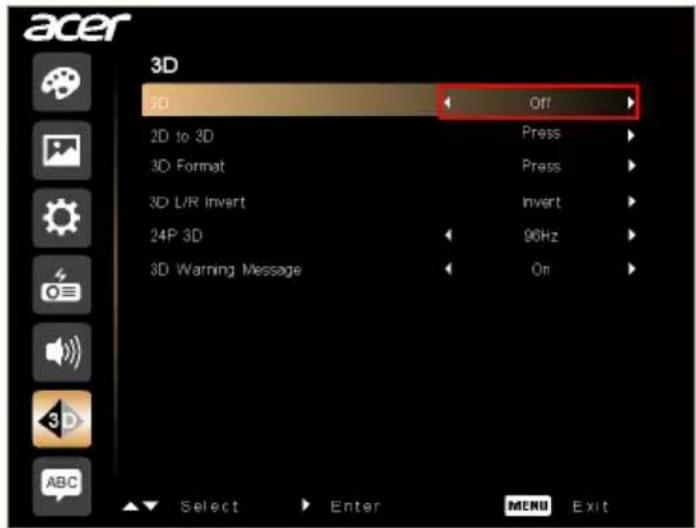
4 Alternatively, press the 3D Key on your projector's remote control. From the 3D options, select On.
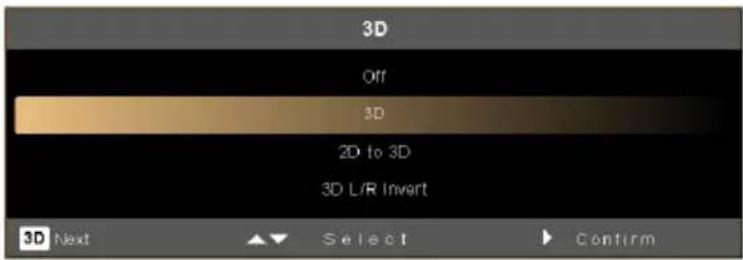
5 2D to 3D supports most of 2D contents convert to 3D display. And provide different 3D mode, convergence and depth setting.
6 3D Format shows while no enough info, please choose suitable one for correct 3D displaying.
![3D Format [Auto] Frame Packing Side by Side Half Side by Side Full Top and Bottom Frame Sequential Field Sequential MENU Exit ▲ Select ▶ Confirm](/content/2026/06/1221191/images/34722ac492064f9c882ab8e70925bdd5cd5b6335ee5263bcf4593f746fbe670e.jpg)

Note:
- The "3D Format" is only available for HDMI 1.4 or 2nd generation 3D projectors.
- The "Frame Packing" is only existed at HDMI 1.4 or later input.
- "2D to 3D" is only available on some specific models.
- Design and functions are subject to model's specifications and change without notice.
7 If you find that the 3D content is not displaying properly, try selecting 3D to compatible with 3D glasses.
24P
8 If you find that the 3D content is not displaying properly, try selecting 3D L/R Invert from the projector OSD or 3D Key for frame / field sequential 3D format. Otherwise, try to change the 3D Format to match the 3D signal.

Important: If you have an NVIDIA graphics card and the NVIDIA 3D Vision/3DTV Play drivers installed, you may need to disable the Stereoscopic feature to use the DLP 3D technology, while you are using non-NVIDIA 3D Players.

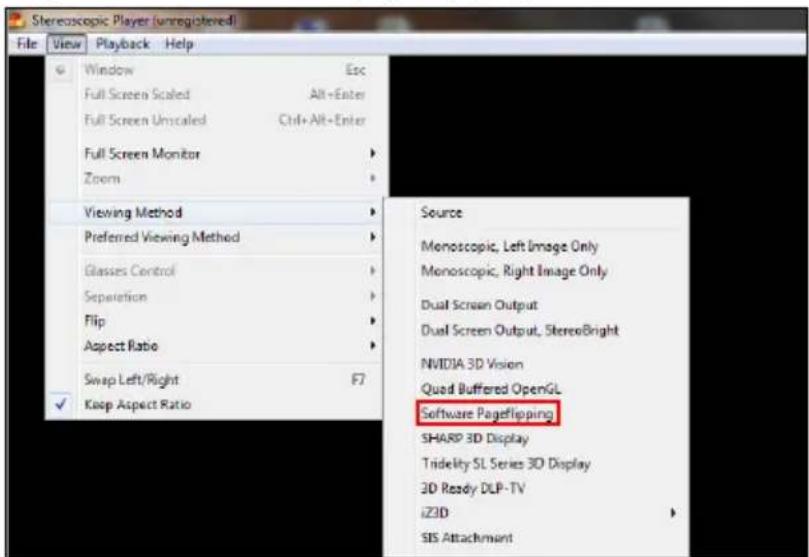
Using the stereoscopic player
You need to have a stereoscopic player in order to view 3D content. The instructions below explain how to view 3D content using the Stereoscopic player that is available at www.3dtv.at.
Other players may have different procedures, e.g. to download and use the NVIDIA 3DTV Play software (including a free photo viewer) with DLP glasses, refer to the NVIDIA 3DTV website: www.nvidia.com/3dtv.
1 Open the stereoscopic player and set the viewing method by going to View > Viewing Method > Software pageflipping.
2 Open the 3D content in the player.

Note: You need to view content at fullscreen resolution in order to get the 3D effects.
Watching 3D DVD or Blu-ray content
If you have a DVD or Blu-ray player that supports 3D playback, you can watch 3D DVD content using your Acer 3D-enabled projector. Connect your DVD or Blu-ray player to the projector using any of the available input formats.
To enable and adjust 3D function, follow the procedures in the "Setting up a 3D environment" section on pages 4-6.

Note: If your DVD or Blu-ray player supports 3D over HDMI 1.4a, check that 3D options are on and the video uses 24p before turning on your projector.
Older connections should check the resolution is set to 480i or 576i.
Brand : ACER
Model : AS309
Category : Video projector