
Cyclestation 3 - Home trainer LifeSpan - Free user manual and instructions
Find the device manual for free Cyclestation 3 LifeSpan in PDF.

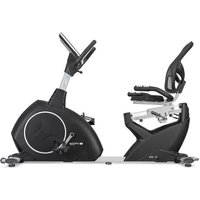
| Product Type | Stationary Exercise Bike |
| Model | Cyclestation 3 |
| Brand | LifeSpan |
| Maximum User Weight | 100 kg (220 lbs) |
| Resistance Levels | 8 (adjustable knob) |
| Display | LCD with time, speed, distance, calories, pulse |
| Power Supply | 1x CR2032 battery (not included) |
| Seat Adjustment | Vertical, tool-free knob |
| Backrest | Adjustable, included |
| Pedals | Standard with toe straps, left and right marked |
| Frame Material | Steel |
| Stabilizers | Front and rear with leveling end caps |
| Assembly Required | Yes, tools included |
| Warranty | Standard manufacturer warranty (see manual) |
| Intended Use | Home fitness |
| Safety Features | Button battery warning, emergency stop (not specified) |
| Maintenance | Regular bolt tightening and joint lubrication |
| Included Accessories | Manual, assembly tools |
| Dimensions | Approx. 100 x 50 x 120 cm (estimated) |
| Net Weight | Approx. 25 kg (estimated) |
Frequently Asked Questions - Cyclestation 3 LifeSpan
User questions about Cyclestation 3 LifeSpan
0 question about this device. Answer the ones you know or ask your own.
Ask a new question about this device
Download the instructions for your Home trainer in PDF format for free! Find your manual Cyclestation 3 - LifeSpan and take your electronic device back in hand. On this page are published all the documents necessary for the use of your device. Cyclestation 3 by LifeSpan.
USER MANUAL Cyclestation 3 LifeSpan
LFE01 Cyclestation 3
USER MANUAL

natural_image
Line drawing of a stationary exercise bike with adjustable seat, legs, and front-mounted railings (no text or symbols)
Read all instructions carefully before using this product. Retain this owner's manual for future reference.
! IMPORTANT
All nuts and bolts are to be checked and tightened on a regular basis. This includes pedals and other moving parts. Failure to do so may cause damage to your threads and void your warranty.
NOTE:
Product may vary slightly from the item pictured due to model upgrades. This manual may be subject to updates or changes. Up to date manuals are available through our website at www.lifespanfitness.com.au
TABLE OF CONTENTS
I. Important Safety Instructions 03
II. Care Instructions 04
III. Battery Safety, Replacement & Disposal 05
IV. Exploded Diagram 07
V. Parts List 08
VI. Assembly Instructions 09
VII. Exercise Guide 14
VIII. Warranty 15
I. IMPORTANT SAFETY INSTRUCTIONS
! WARNING: Read all instructions before using this machine.
Thank you for purchasing the Cyclestation 3 Exercise Bike! For your safety and benefit, please read this manual carefully before using the machine.
Prior to assembly, remove components from the box and verify that all the listed parts were supplied. Assembly instructions are described in the following steps and illustrations.
! PRECAUTIONS
Be sure to read the entire manual before you assemble or operate your machine. In particular, note the following safety precautions:
- Check all the screws, nuts, and other connections before using the machine for the first time and ensure that the trainer is in the safe condition.
- Set up the machine in a dry level place and leave it away from moisture and water.
- Place a suitable base (e.g., rubber mat, wooden board etc.) beneath the machine in the area of assembly to avoid dirt and etc.
- Before beginning training, remove all objects within a radius of 2 meters from the machine.
- DO NOT use aggressive cleaning articles to clean the machine, only use the supplied tools or suitable tools of your own to assemble the machine or repair any parts of machine. Remove drops of sweat from the machine immediately after finishing training.
- Your health can be affected by incorrect or excessive training. Consult a doctor before beginning a training program. They can define the maximum setting (Pulse. Watts. Duration of training etc) to which you may train yourself and can get precise information during training.
- This machine is not suitable for therapeutic purpose.
- Only do training on the machine when it is in correct working way. Use only original spare parts for any necessary repairs.
- This machine can be used for only one person's training at a time.
- Wear training clothes and shoes which are suitable for fitness training with the machine. Your training shoes should be appropriate for the trainer.
- If you have a feeling of dizziness, sickness, or other abnormal symptoms, please stop training, and consult a doctor as soon as possible.
- People such as children and handicapped persons should only use the machine in the presence of another person who can give aid and advice.
- The power of the machine increases with increasing the speed, and the reverse. The machine is equipped with adjustable knob which can adjust the resistance. Reduce the resistance by turning the adjusting knob for the resistance setting towards stage 1. Increase the resistance by turning the adjusting knob for the resistance setting towards stage 8.

WARNING
Before beginning any exercise program, consult your physician. This is especially important for individuals over the age of 35 or persons with pre-existing health problems. Read all instructions before using any fitness equipment.
Maximum user's weight: 100kg
II. CARE INSTRUCTIONS
- All nuts and bolts are to be checked and tightened on a regular basis. This includes pedals and other moving parts. Failure to do so may cause damage to your thread and void your warranty.
- Lubricate moving joints with grease after periods of usage.
- Be careful not to damage plastic or metal parts of the machine with heavy or sharp objects.
- The machine can be kept clean by wiping it down using dry cloth.
III. BATTERY SAFETY, REPLACEMENT & DISPOSAL
Battery Safety

natural_image
Blue circular icon with white pictogram showing a person handing a box to a child (no text or symbols)
WARNING
THIS PRODUCT CONTAINS A BUTTON BATTERY THAT IS HAZARDOUS AND IS TO BE KEPT AWAY FROM CHILDREN
The battery can cause severe or fatal injuries in 2 hours or less if it is swallowed or placed inside any part of the body. Seek medical attention immediately if this occurs.
If suspected of swallowing the battery or otherwise placed inside any part of the body, please contact Australian Poison Centre immediately on 13 11 26.
Hotline is open 24/7.
Call triple zero (000) immediately if you or someone you know stops breathing, slips into a coma, or has a seizure or a severe allergic reaction to suspected poisoning.
Battery Disposal
- Batteries are to be installed or replaced by adult only.
- Do not use rechargeable batteries. Do not mix different battery types. Do not mix old and new batteries.
- Do not mix alkaline, standard (Carbon-Zinc), or rechargeable (Nickel-Cadmium) batteries.
- Remove batteries when product is not in use.
- Remove exhausted batteries from product and dispose of in accordance with the manufacturer's recommendation.
- Do not attempt to recharge non-rechargeable batteries.
- Batteries are to be inserted with correct polarity.
- The supply terminals are not to be short-circuited.
- Do not dispose of batteries in fire, batteries may explode or leak.
How to Replace Battery for Display
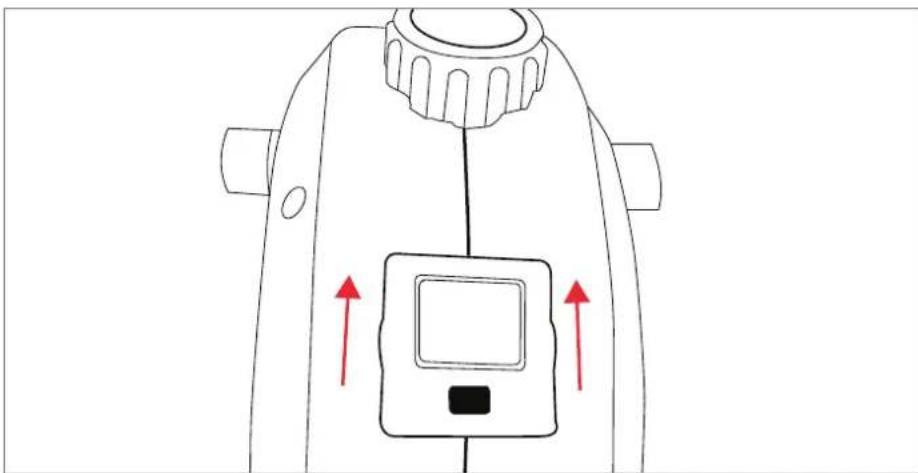
- Battery is stored behind the display console. Hold the two sides as pictured and pull it up.
natural_image
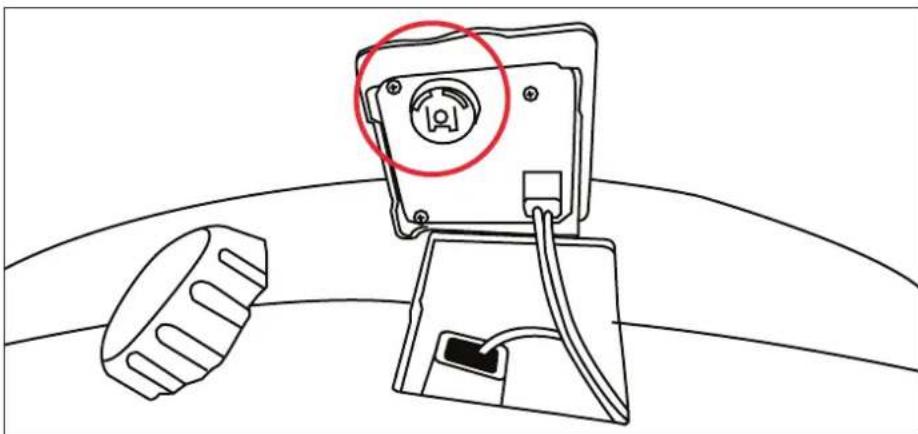
Line drawing of a mechanical device with red arrows indicating upward motion or force direction (no text or symbols)- Once the display is removed from the main body, the battery can be seen as circled in diagram. Remove the battery cover and you can now change the battery. Make sure the battery is inserted in the correct position as when before it was removed.
natural_image
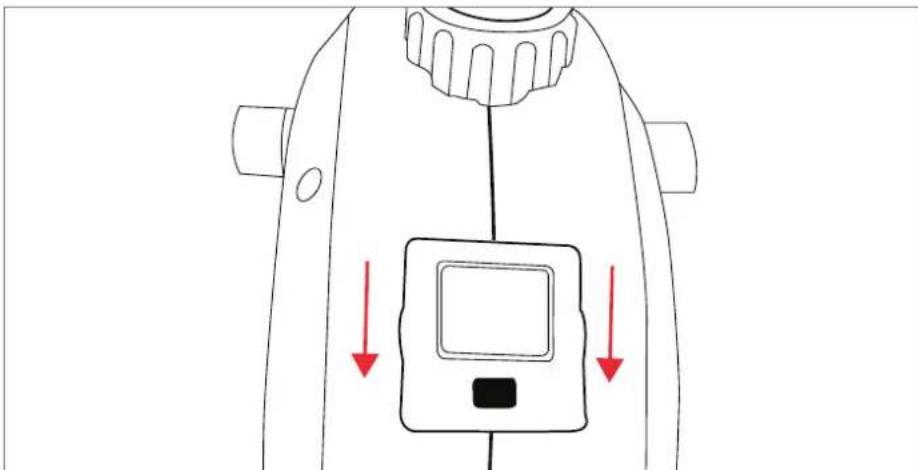
Line drawing of a mechanical device with a red circle highlighting a circular component, and a separate gear-like component attached (no text or symbols)- Once the battery is changed, place the display back into its original position and push it down so it clicks back into place.
natural_image
Line drawing of a mechanical device with red arrows indicating downward motion (no text or symbols)IV. EXPLODED DIAGRAM
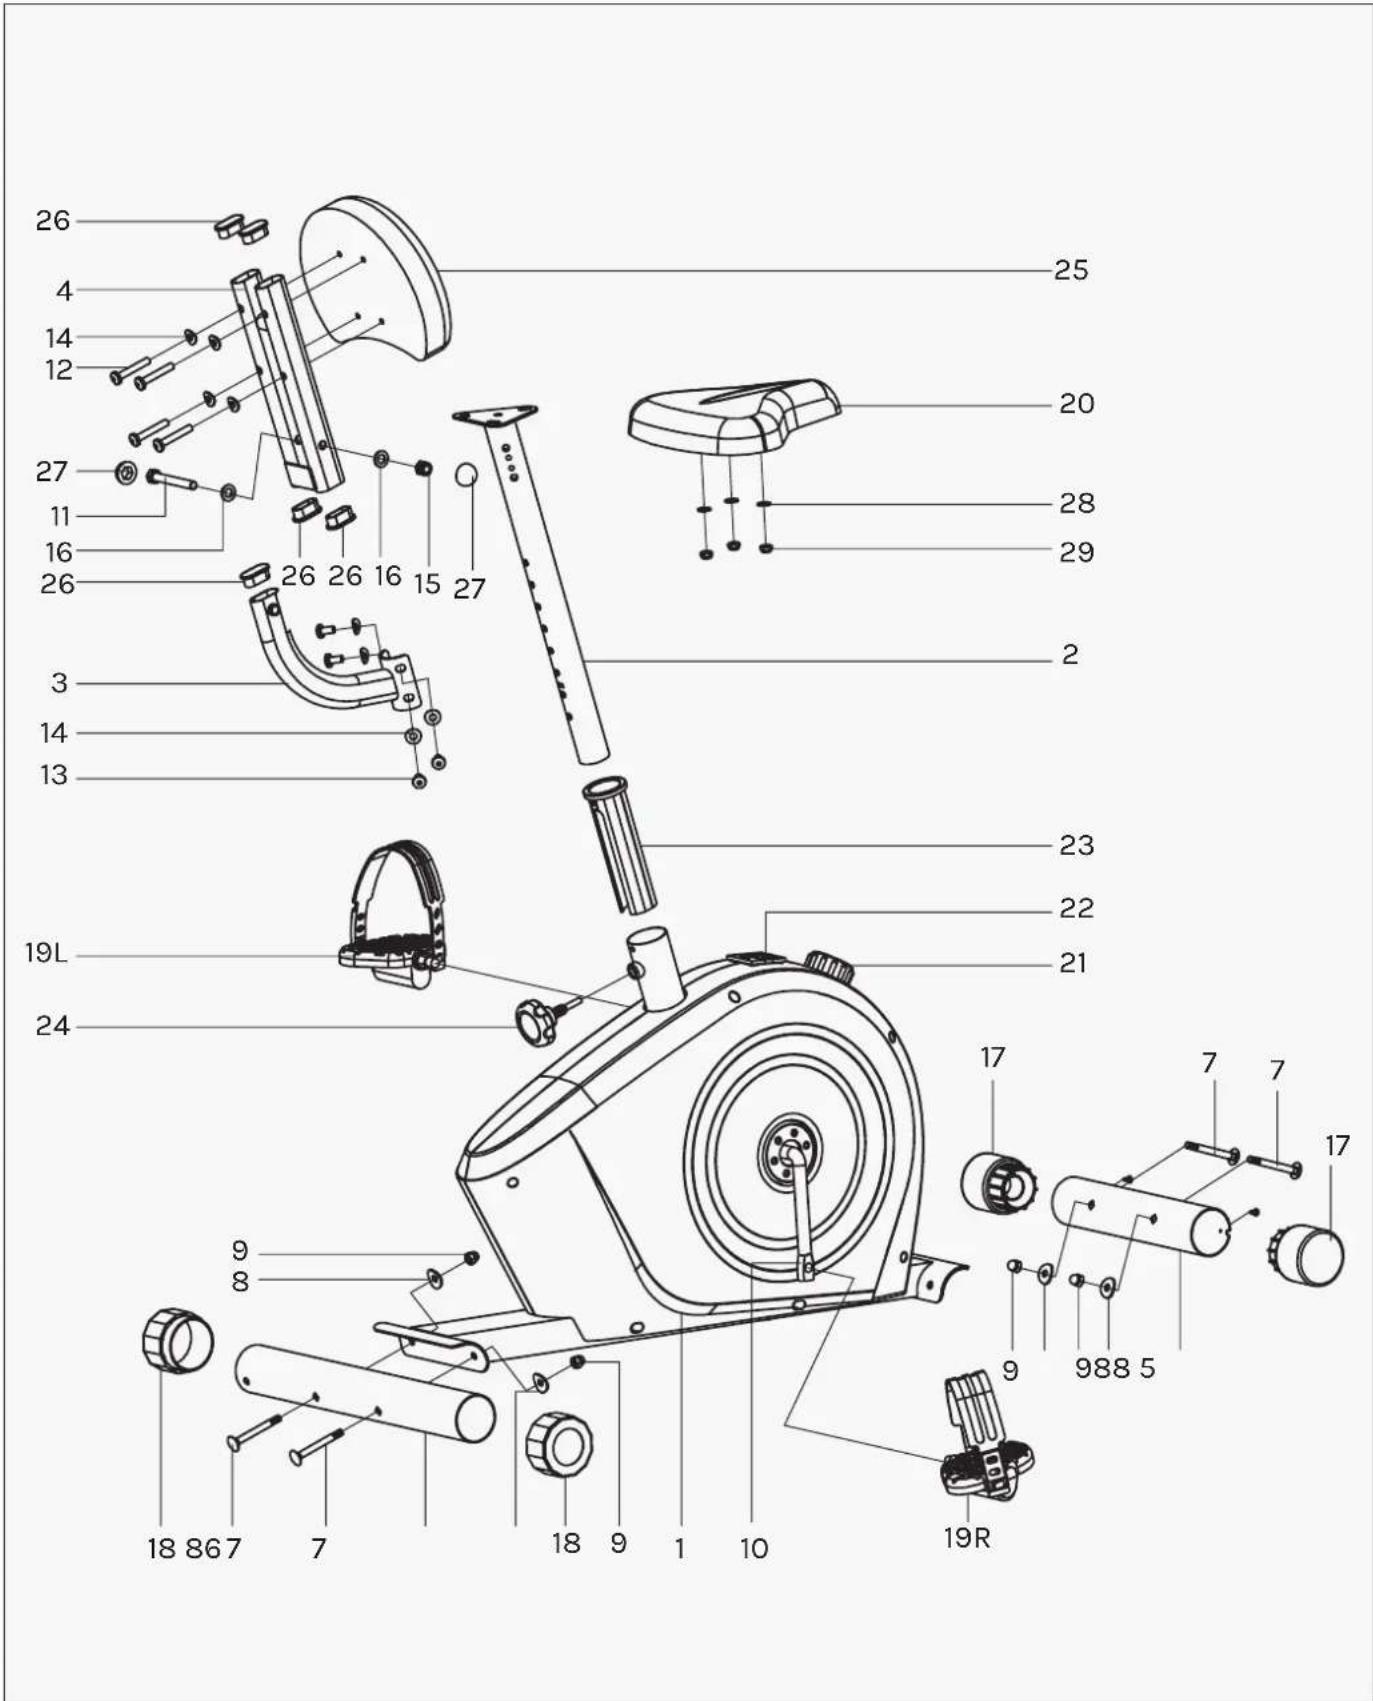
V. PARTS LIST
Part No. Description Qty
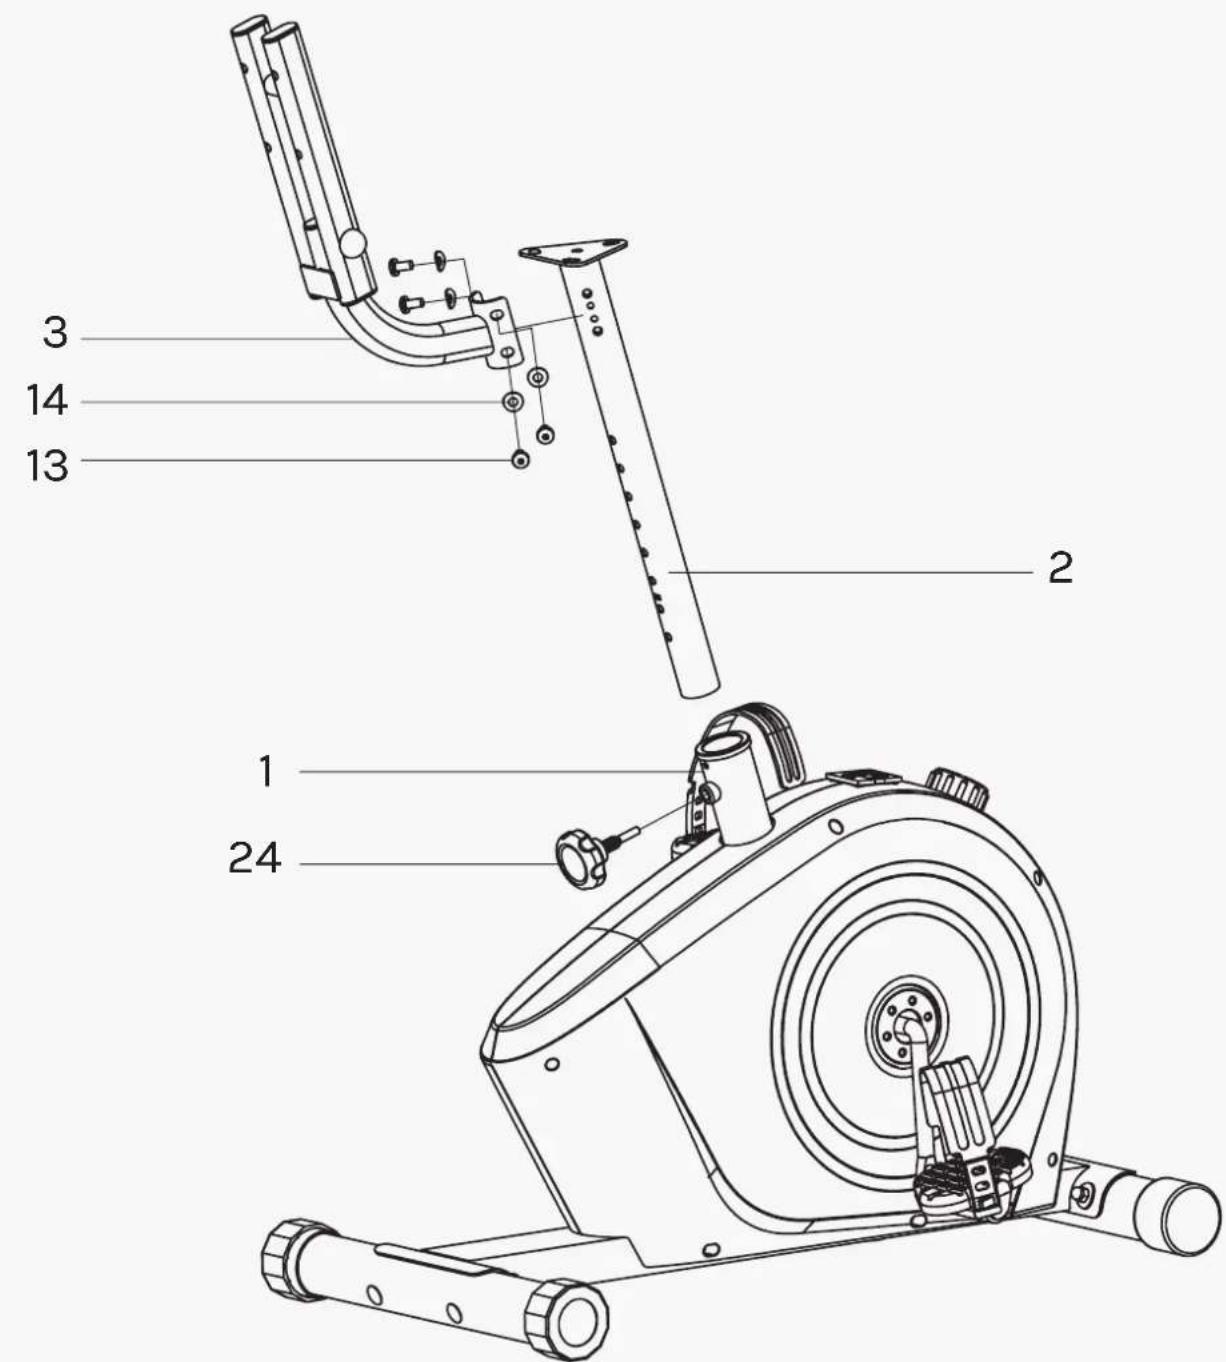
| 1 | Main frame 1 | |
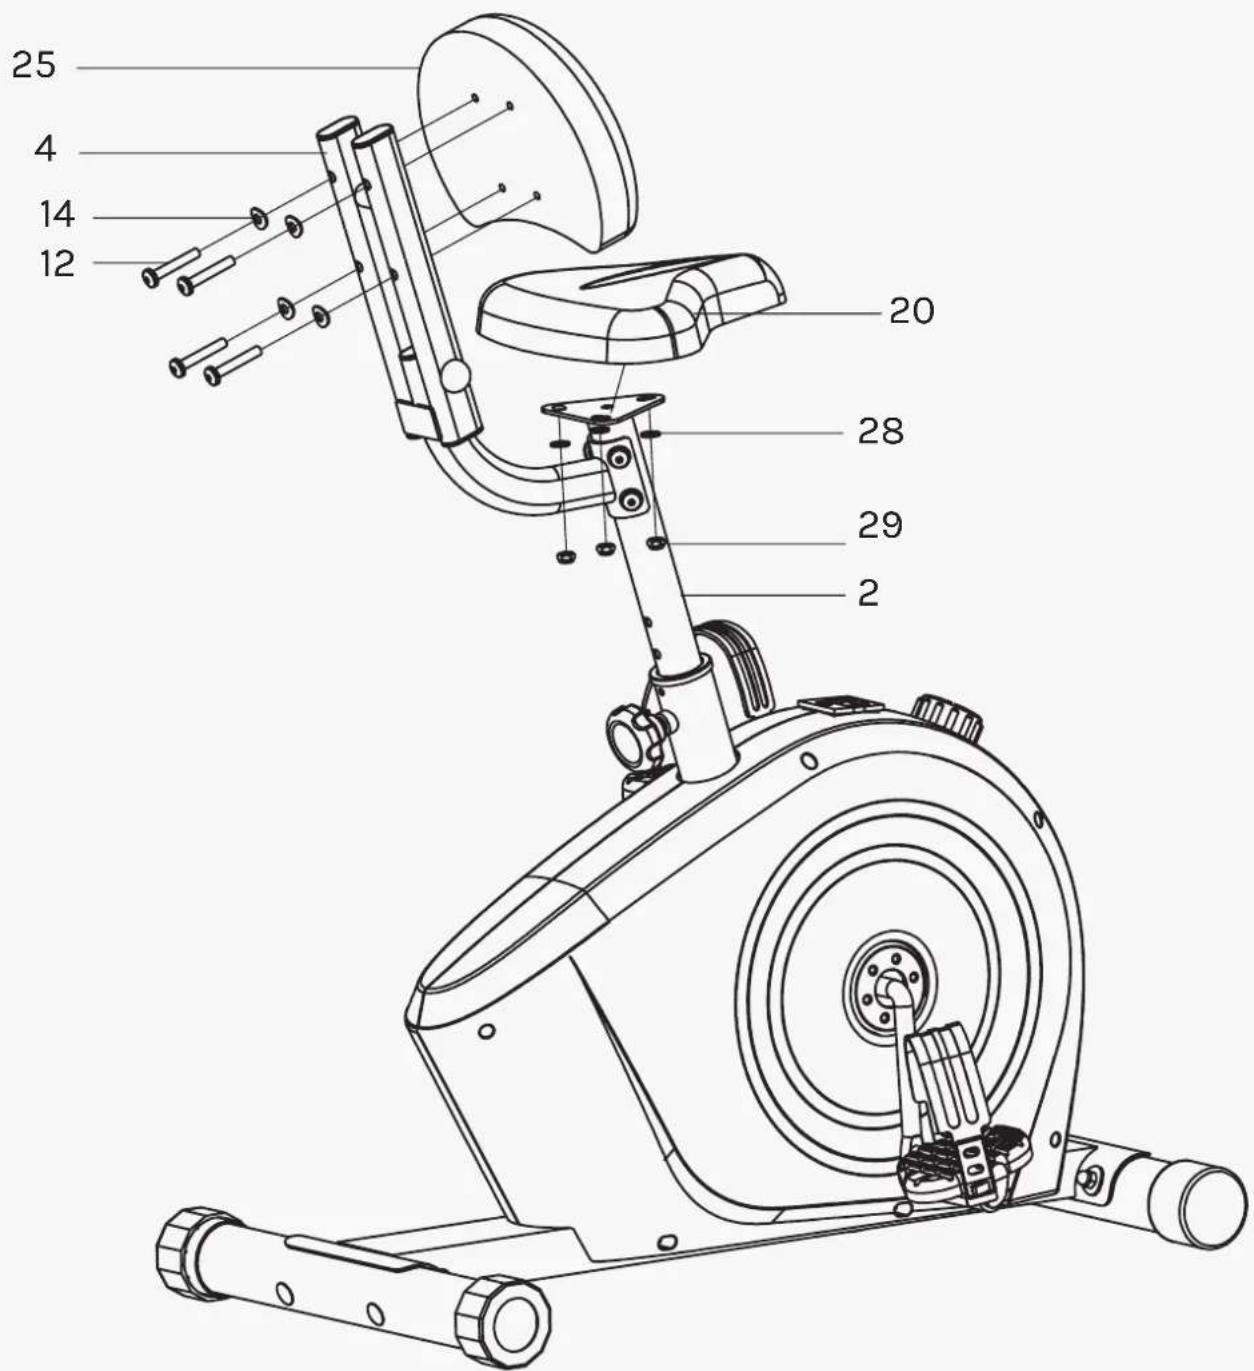
| 2 | Saddle Post 1 | |
| 3 | Backrest Support 1 | |
| 4 | Backrest Frame 1 | |
| 5 | Front Stabilizer 1 | |
| 6 | Rear Stabilizer 1 | |
| 7 | Carriage Bolt M8XL74 4 | |
| 8 | Arc Washer 8.5 × 1.5 × 25 × R33.5 4 | |
| 9 | Acorn Nut 4 | |
| 10 | Crank 1 | |
| 11 | Hex Bolt M10x85 1 | |
| 12 | Inner Hex Bolt M8x50 | 4 |
| 13 | Inner Hex Bolt M8x16 | 4 |
| 14 | Arc Washer 8.5 × 1.5 × 20 × R25 | 8 |
| 15 | Nylon Nut M10 | 1 |
| 16 | Flat washer D10xD20x1.5 | 2 |
| 17 | Front End Cap | 2 |
| 18 | Rear End Cap | 2 |
| 19 | Pedal | 1pair |
| 20 | Saddle | 1 |
| 21 | Tension Controller | 1 |
| 22 | Computer | 1 |
| 23 | Saddle Bushing | 1 |
| 24 | Knob | 1 |
| 25 | Backrest | 1 |
| 26 | Oval Plug | 5 |
| 27 | Cap | 2 |
| 28 | Flat Washer D8 | 3 |
| 29 | Nylon Nut M8 | 3 |
VI. ASSEMBLY INSTRUCTIONS

NOTE
Most of the listed assembly hardware has been packaged separately, but some hardware items have been pre-installed in the identified assembly parts. In these instances, simply remove and reinstall the hardware as assembly is required.
Please reference the individual assembly steps and make note of all preinstalled hardware.
PREPARATION
Before assembling, make sure that you will have enough space around the item. Use the present tooling for assembly. Before assembly, please check whether all needed parts are available.
It is strongly recommended this machine to be assembled by two or more people to avoid possible injury.
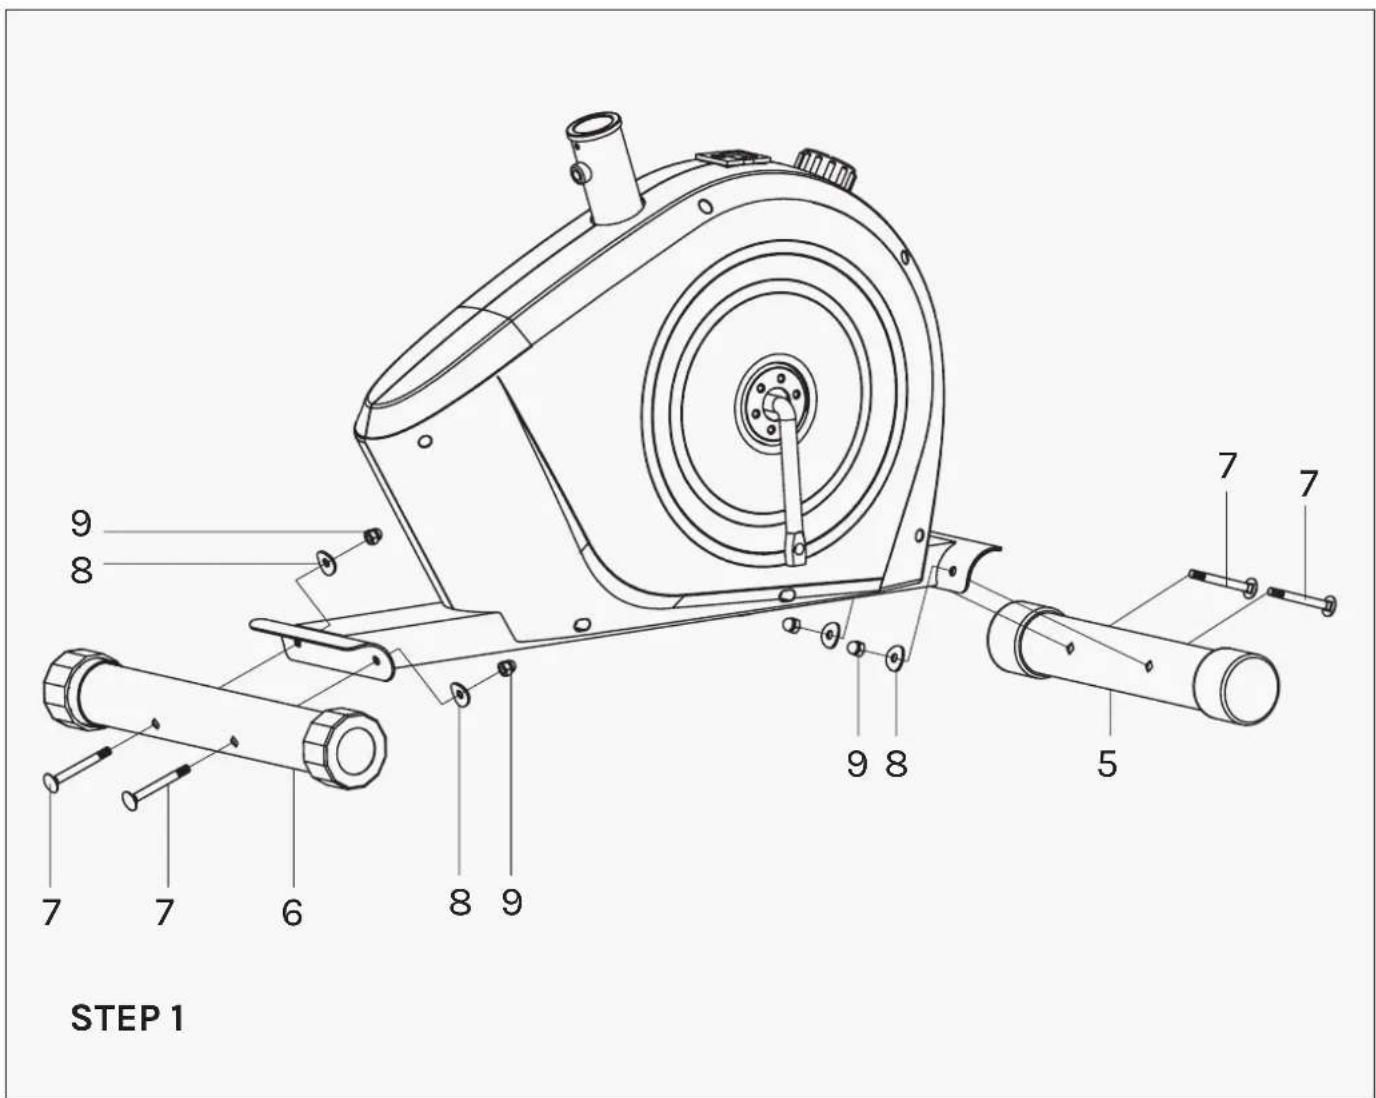
- Attach the front stabilizer (5) and rear stabilizer (6) to the main frame (1) with the acorn nuts (9), arc washers (8) and carriage bolts (7) as shown.

STEP 2
- Attach the pedals (19L/R) to the Crank (10) respectively, viewed from the rider's exercising position. Always make sure the pedals are securely tightened before any exercise.

Note: Both pedals are labeled L FOR LEFT and R FOR RIGHT.
Tighten the left pedal COUNTERCLOCKWISE and the right pedal CLOCKWISE.
STEP 3
- Insert the saddle post (2) into the main frame (1), then lock it tightly with the knob (24) at a proper height as shown.
- Attach the backrest Support (3) to the saddle Post (2) with Inner hex bolt (13) and Arc Washer (14).
STEP 4
- Attach the saddle (20) to the saddle post (2) with nylon nut (29) and flat washer (28).
2 Attach the backrest (25) to the backrest frame (4) with Inner hex bolt (12) and arc washer (14).
! ATTENTION: Always make sure the Saddle (20) is securely tightened to Saddle Post (2) before you start workout.
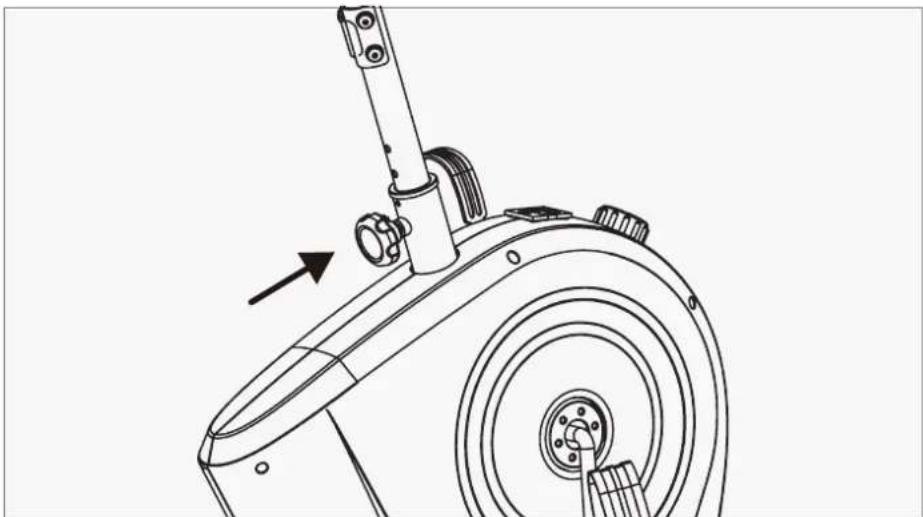
Adjusting Seat Height
For effective exercise, the seat should be at the proper height. As you pedal, there should be a slight bend in your knees when the pedals are in the lowest position.
To adjust the seat, first unscrew the seat post knob (Counter-clockwise) and pull it out of the seat post. Move the seat post up or down to your preferred height and making sure it aligns for the screw holes. Insert the knob back into the screw holes that you have aligned and tighten (Clockwise) the knob.
natural_image
Technical line drawing of a mechanical device with a lever and circular base (no text or symbols)How to Level the Exercise Bike
If your floor is uneven, you can rotate the two back feet end caps.
The caps have high or low sides, you will need to rotate until the caps firmly touch the ground.

natural_image
Technical line drawing of a stationary exercise machine with two upward arrows indicating motion direction (no text or symbols present)VII. EXERCISE GUIDE
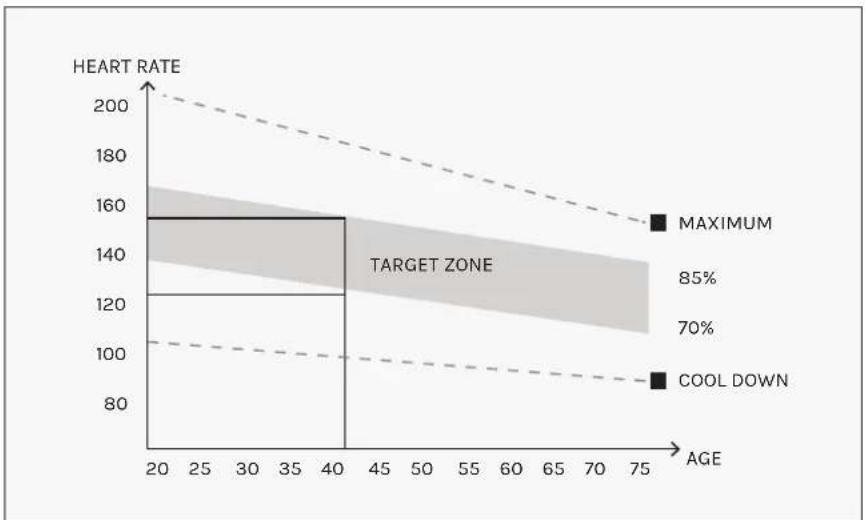
! PLEASE NOTE:
Before beginning any exercise program, consult your physician. This is important especially if you are over the age of 45 or individuals with pre-existing health problems.
The pulse sensors are not medical devices. Various factors, including the user's movement, may affect the accuracy of heart rate readings. The pulse sensors are intended only as an exercise aid in determining heart rate trends in general.
Exercising is great way to control your weight, improving your fitness and reduce the effect of aging and stress. The key to success is to make exercise a regular and enjoyable part of your everyday life.
The condition of your heart and lungs and how efficient they are in delivering oxygen via your blood to your muscles is an important factor to your fitness. Your muscles use this oxygen to provide enough energy for daily activity. This is called aerobic activity. When you are fit, your heart will not have to work so hard. It will pump a lot fewer times per minute, reducing the wear and tear of your heart.
So as you can see, the fitter you are, the healthier and greater you will feel.
WARM UP
Start each workout with 5 to 10 minutes of stretching and some light exercises. A proper warm-up increases your body temperature, heart rate and circulation in preparation for exercise. Ease into your exercise.
After warming up, increase the intensity to your desired exercise program. Be sure to maintain your intensity for maximum performance. Breathe regularly and deeply as you exercise.

natural_image
Four sequential illustrations of a person performing a stretching or martial arts movement, showing different postures (no text or symbols present)COOL DOWN
Finish each workout with a light jog or walk for at least 1 minute. Then complete 5 to 10 minutes of stretching to cool down. This will increase the flexibility of your muscles and will help prevent post-exercise problems.
line
| AGE | HEART RATE | | --- | ---------- | | 20 | 160 | | 40 | 120 | | 75 | 90 |WORKOUT GUIDELINES
This is how your pulse should behave during general fitness exercise. Remember to warm up and cool down for a few minutes.
VIII. WARRANTY
AUSTRALIAN CONSUMER LAW
Many of our products come with a guarantee or warranty from the manufacturer. In addition, they come with guarantees that cannot be excluded under the Australian Consumer Law. You are entitled to a replacement or refund for a major failure and compensation for any other reasonably foreseeable loss or damage.
You are entitled to have the goods repaired or replaced if the goods fail to be of acceptable quality and the failure does not amount to a major failure. Full details of your consumer rights may be found at www.consumerlaw.gov.au.
Please visit our website to view our full warranty terms and conditions:
http://www.lifespanfitness.com.au/warranty-repairs
WARRANTY AND SUPPORT
Any claim against this warranty must be made through your original place of purchase. Proof of purchase is required before a warranty claim may be processed.
If you have purchased this product from the Official Lifespan Fitness website, please visit https://lifespanfitness.com.au/warranty-form
For support outside of warranty, if you wish to purchase replacement parts or request a repair or service, please visit https://lifespanfitness.com.au/warranty-form and fill in our Repair/Service Request Form or Parts Purchase Form.
Scan this QR code with your device to go to lifespanfitness.com.au/warranty-form

- LFE01 Cyclestation 3
- USER MANUAL
- ! IMPORTANT
- TABLE OF CONTENTS
- IMPORTANT SAFETY INSTRUCTIONS
- ! WARNING: Read all instructions before using this machine.
- ! PRECAUTIONS
- WARNING
- CARE INSTRUCTIONS
- BATTERY SAFETY, REPLACEMENT & DISPOSAL
- Battery Safety
- THIS PRODUCT CONTAINS A BUTTON BATTERY THAT IS HAZARDOUS AND IS TO BE KEPT AWAY FROM CHILDREN
- Battery Disposal
- How to Replace Battery for Display
- EXPLODED DIAGRAM
- PARTS LIST
- ASSEMBLY INSTRUCTIONS
- NOTE
- PREPARATION
- STEP 2
- Adjusting Seat Height
- How to Level the Exercise Bike
- EXERCISE GUIDE
- ! PLEASE NOTE:
- WARM UP
- COOL DOWN
- WORKOUT GUIDELINES
- WARRANTY
- AUSTRALIAN CONSUMER LAW
- WARRANTY AND SUPPORT
Brand : LifeSpan
Model : Cyclestation 3
Category : Home trainer