GPF425B - Dishwasher GE - Free user manual and instructions
Find the device manual for free GPF425B GE in PDF.

User questions about GPF425B GE
0 question about this device. Answer the ones you know or ask your own.
Ask a new question about this device
Download the instructions for your Dishwasher in PDF format for free! Find your manual GPF425B - GE and take your electronic device back in hand. On this page are published all the documents necessary for the use of your device. GPF425B by GE.
USER MANUAL GPF425B GE
Installation Instructions
1/4" Custom Dishwasher Door and Access Panel Kit GPF425 Series Kit
GPF425A-Almond Trim Kit, GPF425B-Black Trim Kit, GPF425C-Bisque Trim Kit, GPF425W-White Trim Kit

BEFORE YOU BEGIN
Read these instructions completely and carefully.
IMPORTANT – Save these instructions for local inspector's use.
IMPORTANT – Observe all governing codes and ordinances.
Note to Installer – Be sure to leave these instructions with the Consumer.
Note to Consumer – Keep these instructions with your Owner's Manual for future reference.
TOOLS AND MATERIALS REQUIRED:
- 1/4" socket driver
• Phillips screwdriver - Electric drill
- 1/8" drill bit
- Masking tape
- Safety glasses
- Gloves to protect against sharp edges
KIT INCLUDES:
- Left, right and bottom door trim
- Top and bottom access panel trim
• Color matched screws

WARNING:
To prevent electric shock, disconnect electrical power supply to dishwasher before changing panels. Do not operate dishwasher while changing panels or when lower access panel assembly is removed.
IMPORTANT!
GPF100 Dishwasher Door Spring Kit MUST BE installed when custom door panels weigh 4 pounds or more.
INSTALLATION OPTIONS
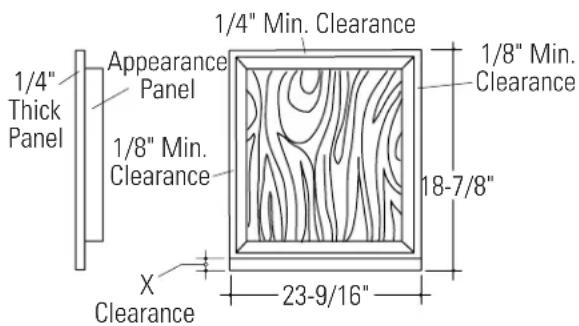
This trim kit is designed to accommodate 1/4" thick panels. A raised panel screwed or glued to 1/4" thick backing can be used. The raised portion of the panel must be fabricated to permit clearances for the trim on all sides.
- "X" Clearance shown at the bottom of the raised panel must be maintained to prevent the door from striking the access panel when opened.
| Appearance | Total “X” Panel Backing Thickness Clearance | ||
| 3/4" 1/4" | 1" 2" | ||
| 1/2" 1/4" | 3/4" 1-7/8" |
A 3/4" thick custom panel may be installed by routing the top and sides to 1/4" thickness. The bottom edge, Dimension "X", should be 1-1/2" high and 1/4" thick.
text_image
1/4" Min. Clearance Appearance Panel 1/4" Thick Panel 1/8" Min. Clearance 1/8" Min. Clearance 18-7/8" X Clearance 23-9/16"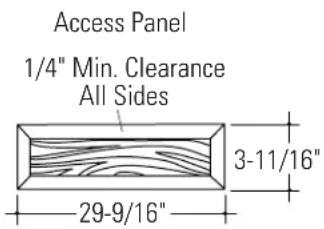
text_image
Access Panel 1/4" Min. Clearance All Sides 3-11/16" 29-9/16"1 CUT 1/4" THICK CUSTOM PANELS TO SIZE
- Cut door panel and access panel to the dimensions shown.
NOTE: The trim provided will conceal the cut edges of the panels.

text_image
1/4" Thick Door Panel 19-3/4" 1/4" Thick Access Panel 3-11/16" 23-9/16"2 REMOVE LOWER ACCESS PANEL ASSEMBLY
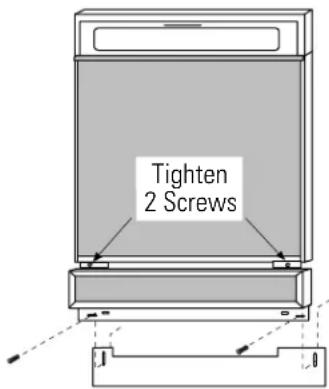
- Remove the two screws below the access panel. Retain screws.
- Loosen the two screws located between the door and the access panel. Do not attempt to remove these screws. They are secured to the access panel with washers.
- Remove the access panel assembly from the dishwasher.
- Remove the toekick and set aside.
NOTE: Do not remove the insulation behind the access panel or toekick.

text_image
Escutcheon Door Panel Loosen 2 Screws Access Panel Toekick3 INSTALL DOOR PANEL TRIM AND CUSTOM PANEL
- Remove the protective plastic covering from side trim pieces.
natural_image
Simple line drawing of a rectangular device with a lid and base, no text or symbols present- Place bottom trim against the bottom of the door panel and drive center screw, then left and right screws.
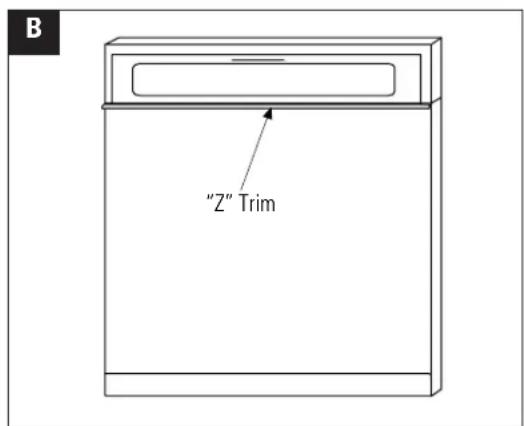
text_image
B "Z" Trim- Slide "Z" shaped trim under the escutcheon.

natural_image
Simple line drawing of a rectangular box with a side panel and an arrow indicating direction (no text or symbols)- Slide custom door panel under the "Z" trim and bottom trim.

natural_image
Diagram of a rectangular device with two vertical supports and an upward arrow indicating direction (no text or symbols)- The notch on the side trim pieces goes towards the front. Slide side trim up and under the escutcheon and over the edge of the custom panel.

text_image
E Tape Trim to Custom Panel on Each Side- Use masking tape to hold trim tightly against the custom panel.
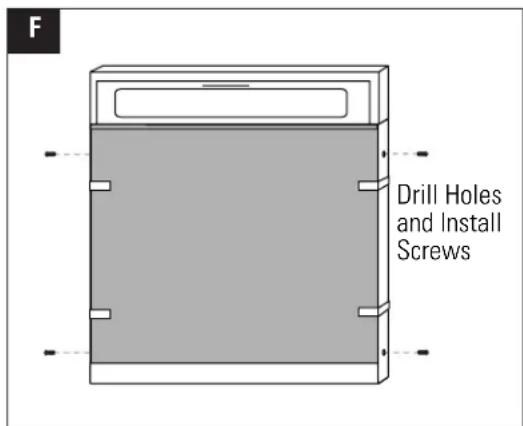
text_image
F Drill Holes and Install Screws- Center punch and drill holes through the holes in the side trim and into the dishwasher door.
- Secure the trim to the door with color matched screws provided. Remove tape.
4 INSTALL CUSTOM ACCESS PANEL
- Place 1/4" custom panel in position on the access panel assembly. Use masking tape to hold in position.
- Loosely, install 3 color matched screws into the bottom of the access panel.
- Peel paper backing off the tape on the bottom trim piece.
- Slip trim under screw heads and press the trim against the bottom of the access panel. Tighten screws.
- Remove masking tape.
- Position top trim against the custom panel and form the ends over the sides of the panel.
- Remove the trim and peel off the paper backing on the tape.
- Reinstall the trim over the assembly.
- Use masking tape to hold the trim against the panel on each side.
- Drill holes through the side trim holes and into the access panel. Secure each side with one screw.
- Remove masking tape.
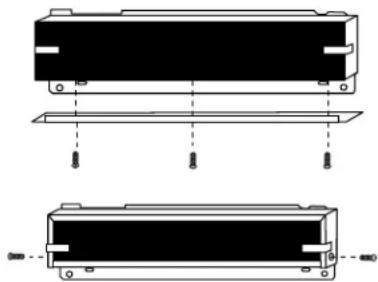
natural_image
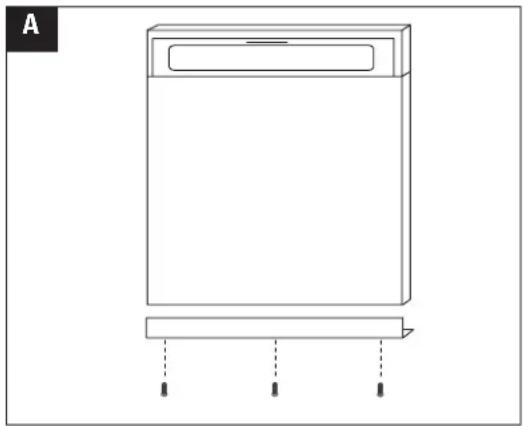
Technical line drawing of a mechanical component with two views (top and side), showing mounting holes and internal structure without any text or symbols.5 INSTALL ACCESS PANEL ASSEMBLY AND TOEKICK
- Place the toekick against the bottom of the dishwasher.
- Place the access panel assembly against the dishwasher and tighten the attached screws.
- Re-install two original bottom screws loosely. Adjust the toekick up or down and tighten screws.