C3-DT7 - Entraîneur de vélo LifeSpan - Free user manual and instructions
Find the device manual for free C3-DT7 LifeSpan in PDF.

User questions about C3-DT7 LifeSpan
0 question about this device. Answer the ones you know or ask your own.
Ask a new question about this device
Download the instructions for your Entraîneur de vélo in PDF format for free! Find your manual C3-DT7 - LifeSpan and take your electronic device back in hand. On this page are published all the documents necessary for the use of your device. C3-DT7 by LifeSpan.
USER MANUAL C3-DT7 LifeSpan
Smart Console for Office Bikes and Treadmills
Owner's Manual for SC120-2022
Welcome
Congratulations on Choosing
LifeSpan Workplace™ line of products.
These products give you the opportunity to remain productive while taking care of yourself as you integrate movement with normally sedentary tasks.
The average American now spends eleven hours, five days a week, sitting, and burns one-hundred fewer calories each day than they did a few decades ago. Sitting for long periods slows your metabolism, reduces calories burned, and increases your risk for heart disease and diabetes.
Whether you plan on placing this product in a TV room, replace your desk at home or are adding another workspace in the office, LifeSpan Workplace™ products are a great way to add movement to an otherwise sedentary activity.
Before you assemble or operate your product, please read this manual thoroughly. Important information, including safety precautions, ongoing product maintenance, assembly instructions, and information on proper operation are included.
If you need to contact LifeSpan customer service, call (801-973-9993 and choose option 4.
Neither LifeSpan nor its representatives can accept responsibility for any damages or injury incurred as a result of information presented in this manual except under the terms of the product warranty.
Welcome
Getting Started 6
Warranty
Setup With Your Existing Desk 8
Hardware
Install Safety Key
Treadmill to Desk Setup
Bike to Desk Setup
Button Functions
Specifications
Treadmill/Bike Operation....18
Quick Start
Initial Setup Mode
Table of Contents
Using With Your LifeSpan Electric Adj. Desk....21
Additional Functions For a LifeSpan Desk 22
Console Desk Functions
Preset Desktop Height Settings
Install the Desktop Ht. Adj. Cable
Treadmill/Bike Desk Operations 26
Quick Start
Initial Setup Mode
Specifications For a LifeSpan Desk....28
Preset Desktop Height Adjustment
Custom Settings....30
Treadmill Desk Troubleshooting....32
Bike Desk Troubleshooting.... 34
Getting Started
Warranty
Your LifeSpan treadmill/bike desk comes with the following limited warranty valid in North America. If you are outside of this area contact your local authorized LifeSpan dealer.
Parts 2 Years
LifeSpan warrants the equipment it manufactures is free from defects in materials and workmanship under normal use and services. The periods above are based on the date of purchase. During these periods, LifeSpan will replace defective parts. Free labor is included on all parts that are not normally assembled or replaced by the customer within the labor period.
If within the time frames specified above, any part fails to operate properly, call 801-973-9993 option 4 for a Customer Service Agent (please note that certain kinds of service should only be performed by a qualified service technician).
LifeSpan reserves the right to make changes and improvements to our products without incurring any obligations to similarly alter any product purchased. In order to insure our product warranty and to ensure the safe and efficient operation of your LifeSpan product, only authorized parts can be used. The warranty is void if any parts other than those provided by LifeSpan are used.
Getting Started
Exclusions and Limitations:
- This warranty does not apply to any defects caused by negligence, misuse, improper assembly, or maintenance, accident, or "act of God."
- This warranty does not apply to discoloration of paints or plastics.
- LifeSpan shall not be responsible for incidental or consequential damages.
- This warranty is non-transferable form the original owner.
Setup With Your Existing Desk
Hardware
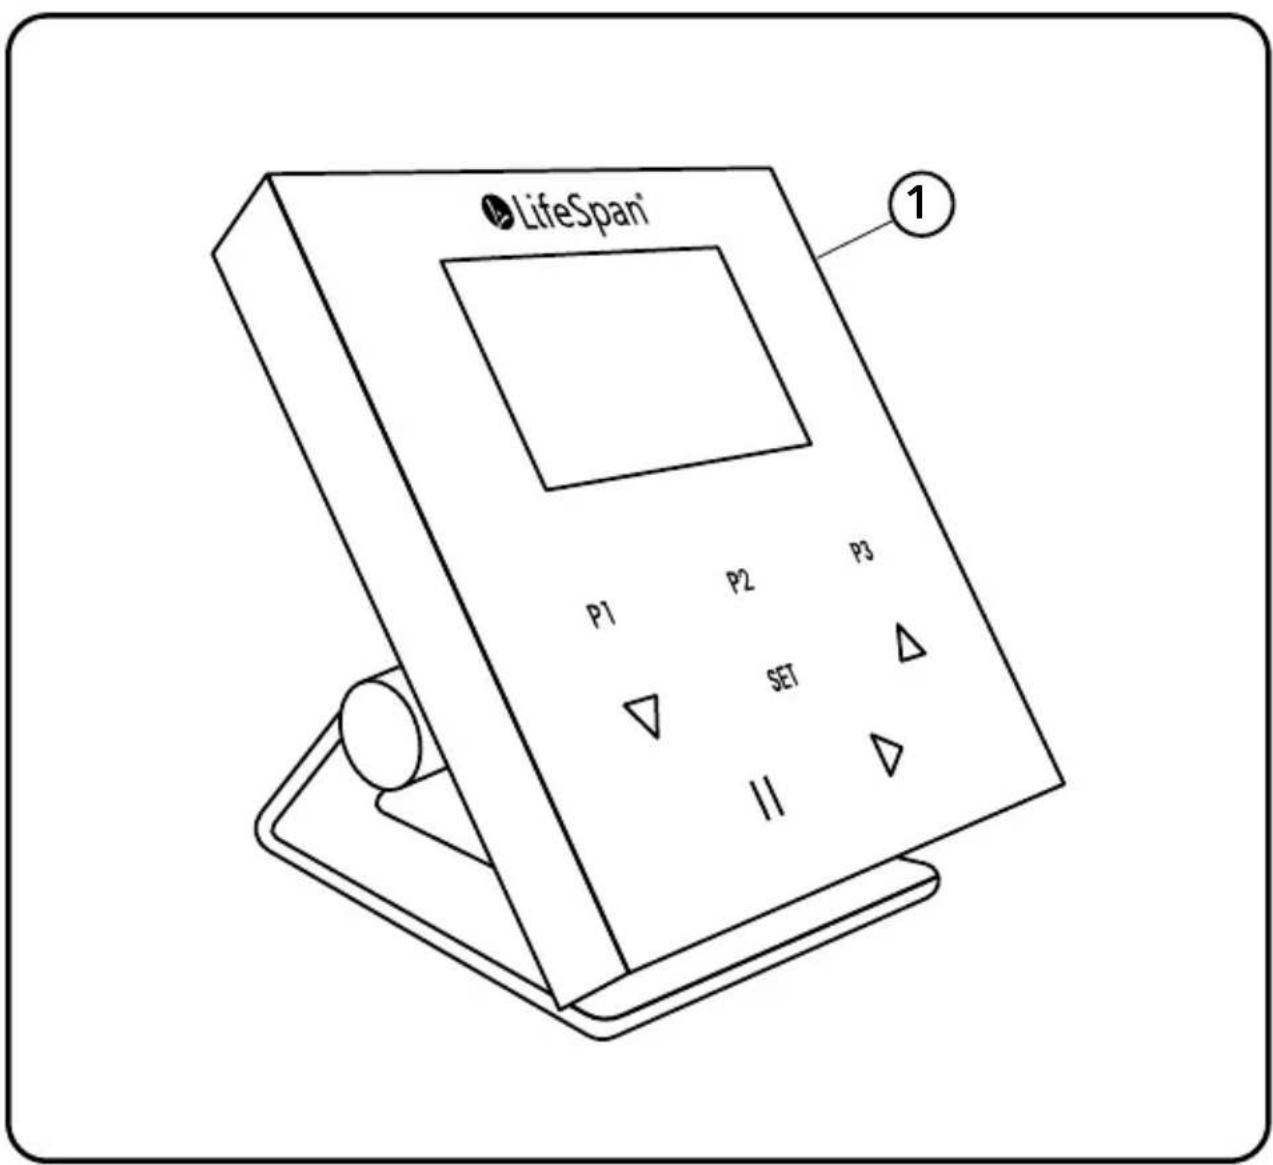
text_image
LifeSpan P1 P2 P3 SET IISetup With Your Existing Desk
| Item# Qty. Part Description | ||
| 1 1 SC1 | 20-2022 Console | |
| 2 2 #6 × | 1/2" Phillips Screw | |
| 3 1 Double Sided Tape | ||
| 4 1 Safety Key Unit & Cable | ||
| 5 3 Cable Ties | ||
| 6 1 Velcro Strap | ||
| 7 1 9 Pin Data Cable | ||
| 8 1 Desktop Ht. Adj. Cable | ||

text_image
#6 x 1/2" Screw x2 Double Sided Tape Safety Key Unit Cable Ties (x3) Velcro Strap 9 Pin Data Cable Desktop Ht. Adj. CableSetup With Your Existing Desk
Install the Safety Key
A. Get the Safety Key Unit(4) and attach the Double Sided Tape(3) to the side of the Safety Key Unit that will be against the desk. Position toward the front of the desk where the treadmill or bike will be used, and tack in place.
B. Fasten to the desk with the two #6 x 1/2" Phillips Screws(2).
C. Position the cable for the Safety Key Unit in the center of the desk and attach with the Cable Ties(5). You can also use the Velcro Strap(6) to help bundle and organize your cables.
D. Check to see that the end of cable for the Safety Key Unit is plugged into the back of the Console.
Setup With Your Existing Desk

text_image
Underside of Desk Secure Position With Double Sided Tape #6 x 1/2" Screw x2 Double Sided Tape Safety Key Unit Cable Ties (x3) Velcro StrapSetup With Your Existing Desk
Treadmill to Desk Setup
A. Position the pre-assembled treadmill as shown below.
B. Lift the rear of the treadmill and roll it forward under the desk. Once in position, stand on the treadmill and see if you feet are too close to the hood. If so, reposition the treadmill further under the desk.
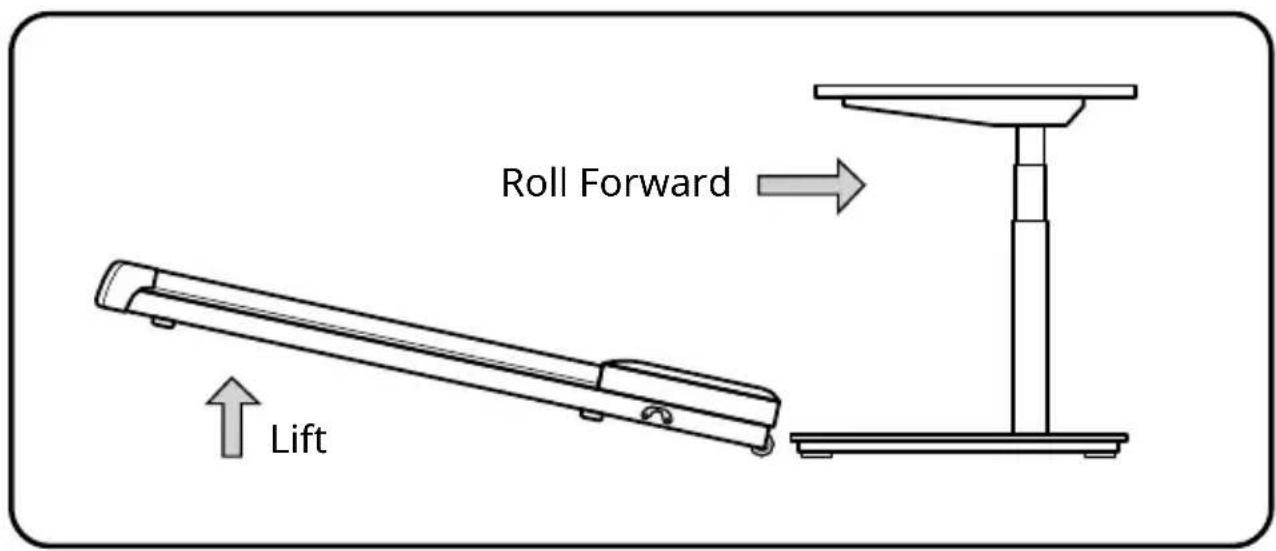
text_image
Roll Forward LiftSetup With Your Existing Desk

text_image
Treadmill Connections, Rear View 7 Note: Be sure all connectors are plugged in prior to connecting the power cord 9 Pin Data Cable Power Switch Power Receptacle Console PortC. Connect the 9 Pin Data Cable(7) from the Console into the treadmill Console Port and tighten the thumb screws.
D. Plug the Power Cord into the treadmill Power Receptacle and into a wall outlet.
E. Turn the treadmill Power Switch on.
Setup With Your Existing Desk
Bike to Desk Setup
A. Position the pre-assembled bike as shown below.
B. Tilt the front of the bike up and roll it forward under the desk to the desired position.

text_image
Roll Forward Place Into Tilt Back PositionSetup With Your Existing Desk

text_image
Treadmill Connections, Rear View Note: Be sure all connectors are plugged in prior to connecting the power cord 9 Pin Data Cable 7C. Connect the 9 Pin Data Cable(7) from the Console into the Bike Data Cable and tighten the thumb screws.
D. Plug the Power Cord from the back of the bike to a wall outlet.
Setup With Your Existing Desk

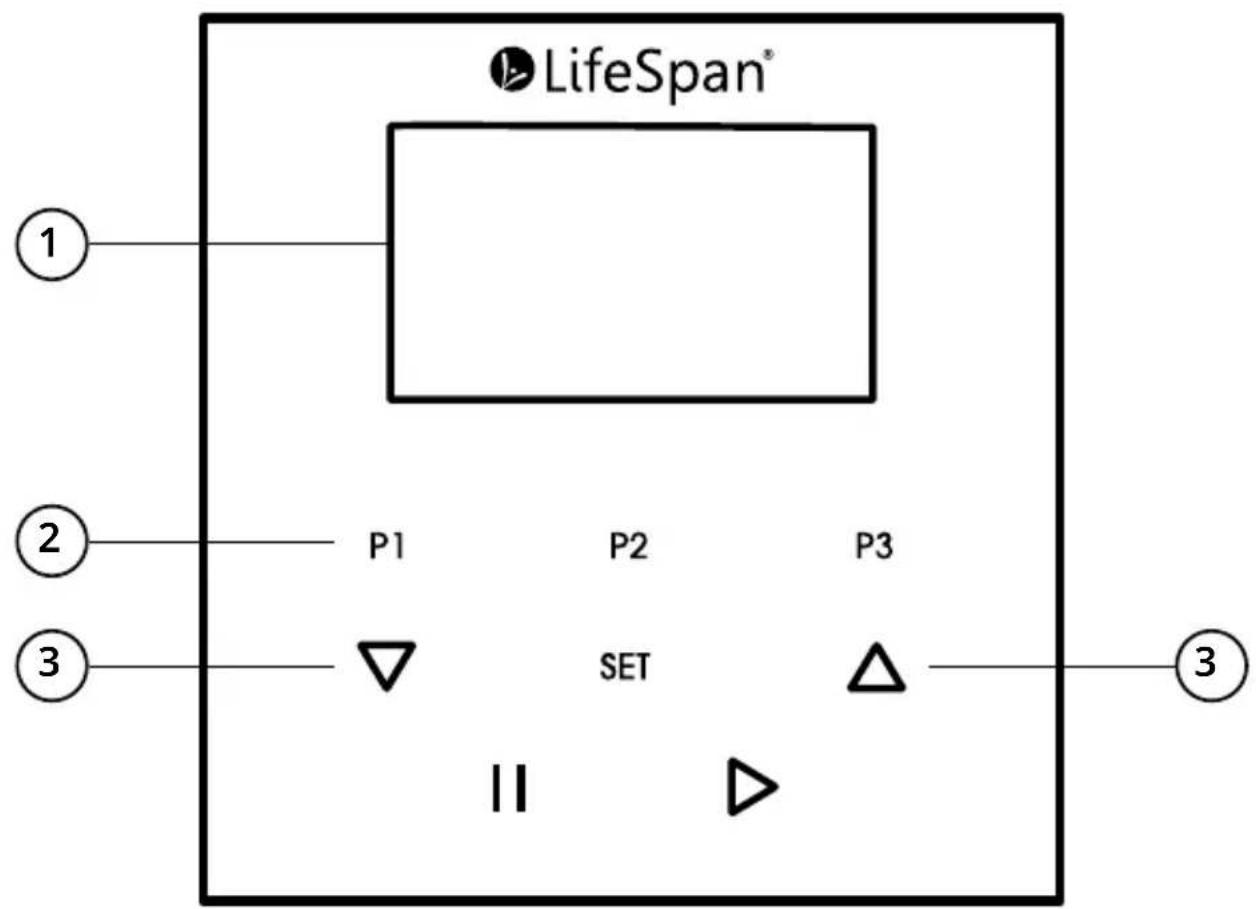
text_image
LifeSpan® ① ② ③ P1 P2 P3 SET Ⅱ ④ ⑤ ⑥ ③Note: Default setting is 4 mph (6.4 kph). Can be changed to max speed of 2 mph/3.2 kph in personal settings
Setup With Your Existing Desk
- 3.5" Display Screen
- Preset buttons: Preset treadmill speeds. The default values for preset speeds are P1=0.4 mph, P2=1.2 mph, and P3=2.0 mph.
- Up and Down Arrows: When using treadmill will increase or decrease speed. When using the desk bike, will increase and decrease pedal resistance.
- Pause/Stop Button: Used to pause/stop the treadmill, or to pause bike program. Press again and the summary screen of your exercise data will show. This is also used to back out of any current screen you are on. When you press and hold down it will turn off the console.
- Set: Tap the Set button to access Personal Settings. Press and hold the Set button to access initial setup screen.
- Start Button: Press to start the treadmill or to initiate bike tracking.
| Readouts | Time, Date, Speed(Treadmill/Resistance(Bike)), Distance, Exercise Time, Calories, Steps, Speed (Bike), Summary |
| Display | 3.5" 320x480 pixel TFT |
| Bluetooth | Yes |
| Buttons | Speed or Resistance Preset, Increase/Decrease Speed or Resistance, Pause/Stop, Start |
Treadmill/Bike Operation
Quick Start
- Make sure the safety key is set in place.
Note:
The display will show a warning image if the Safety Key is not engaged. Please make sure that the Safety Key is fully engaged. It is possible the display will not show a warning when just partially engaged.
- Press and hold the Start Button to turn on console screen.
- Enter settings for Initial Setup Mode.
- Press and hold the Start Button for 3 seconds to start the treadmill. If using a desk bike this will start recording your exercise data).
- Use the up and down arrows to adjust speed or pedal resistance.
- Press the Pause/Stop button to stop treadmill belt, and pause the exercise program.
- Press the Pause/Stop button to exit the program and to see your exercise summary.
- Press the Pause/Stop button to exit exercise summary and enter standby mode.
- Press and hold the Pause/Stop button to turn off the Console.
Treadmill/Bike Operation
Initial Setup Mode
The first time you turn on the console you will need to set the calendar, time, and some basic physical information about yourself.
Year: Use the up and down buttons to select year. Press Set.
Month: Use the up and down buttons to select month. Press Set.
Day: Use the up and down buttons to select day. Press Set.
Time: Use the up and down buttons to select time. Press Set.
Units: Use the up and down buttons to select Imperial or Metric. Press Set.
Age: Use the up and down buttons to input your age. Press Set.
Weight: Use the up and down buttons to input your weight. Press Set.
You will exit initial setup mode and see the Standby Screen showing the date and time.
If you ever need to change any of the settings for Initial Setup, press and hold the Set Button.
Using With Your LifeSpan Electric Adjustable Desk

natural_image
Line drawing of a simple desk with a digital display and two vertical supports (no text or symbols)Please refer to the SD120 Electric Adjustable Desk manual for assembly and console connection instructions
Additional Functions For a LifeSpan Desk
text_image
LifeSpan® ① ② ③ P1 P2 P3 SET II ▷Additional Functions For a LifeSpan Desk
Console Desk Functions
- Additional display features includes desk height
- Preset buttons: Used for desktop height adjustment or for preset treadmill speeds
- Up and Down Arrows: Used to adjust desktop height or making selections in Initial Setup and Personal Settings. When using treadmill will increase or decrease speed. When using the desk bike, will increase and decrease pedal resistance.
Preset Desktop Height Settings
To set the desktop height presets, your console screen needs to be in standby mode that shows the date and time. Press the Pause/Stop button to back out of any screen you may be on and it will return you to the standby screen.
- Press the up and down arrow keys to adjust the desktop to your desired height
- Press and hold the P1, P2 or P3 key. A message on the screen will tell you that the height has been successfully set.
Install the Desktop Ht. Adj. Cable
A. Connect one end of the Desktop Ht. Adj. Cable to the back of the Console.
B. Connect the other end of the Desktop Ht. Adj. Cable to the underside of the desktop into the Electronic Control Box.
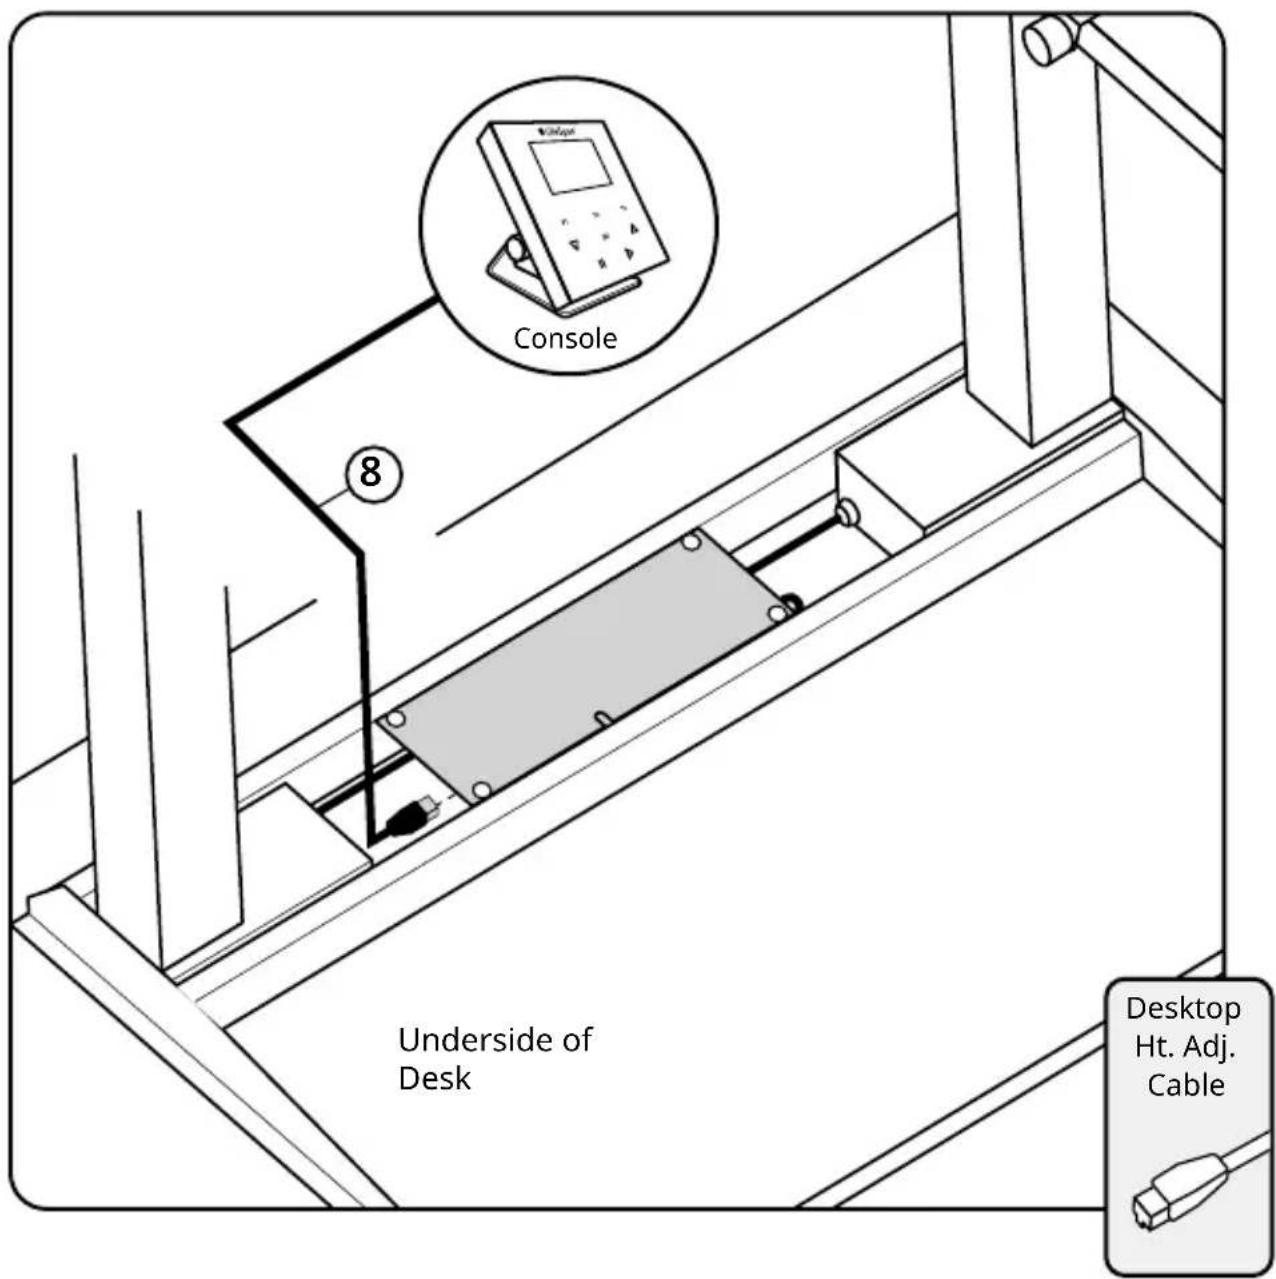
text_image
Underside of Desk Console Desktop Ht. Adj. CableTreadmill/Bike Desk Operation
Quick Start
- Make sure the safety key is set in place.
Note:
The display will show a warning image if the Safety Key is not engaged. Please make sure that the Safety Key is fully engaged. It is possible the display will not show a warning when just partially engaged.
- Press and hold the Start Button to turn on console screen.
- Enter settings for Initial Setup Mode.
- Press the up and down arrows to adjust the desk height.
- Press and hold the Start Button for 3 seconds to start the treadmill. If using a desk bike this will start recording your exercise data).
- Use the up and down arrows to adjust speed or pedal resistance.
- Press the Pause/Stop button to stop treadmill belt, and pause the exercise program.
- Press the Pause/Stop button to exit the program and to see your exercise summary.
- Press the Pause/Stop button to exit exercise summary and enter standby mode.
- Press and hold the Pause/Stop button to turn off the Console.
Treadmill/Bike Desk Operation
Initial Setup Mode
The first time you turn on the console you will need to set the calendar, time, and some basic physical information about yourself.
Year: Use the up and down buttons to select year. Press Set.
Month: Use the up and down buttons to select month. Press Set.
Day: Use the up and down buttons to select day. Press Set.
Time: Use the up and down buttons to select time. Press Set.
Units: Use the up and down buttons to select Imperial or Metric. Press Set.
Age: Use the up and down buttons to input your age. Press Set.
Weight: Use the up and down buttons to input your weight. Press Set.
Height: Use the up and down buttons to input your height. Press Set.
You will exit initial setup mode and see the Standby Screen showing the date and time.
If you ever need to change any of the settings for Initial Setup, press and hold the Set Button.
Specifications For a LifeSpan Desk
Console Specifications
| Readouts | Time, Date, Speed(Treadmill/Resistance(Bike)), Distance, Exercise Time, Calories, Steps, Speed (Bike), Summary |
| Display | 3.5" 320x480 pixel TFT |
| Bluetooth | Yes |
| Buttons | Desk Height Preset, Height Up/Down, Speed or Resistance Preset, Increase/Decrease Speed or Resistance, Pause/Stop, Start |
Specifications For a LifeSpan Desk
Desk Specifications
| Speed Range | 0.4 - 4.0 mph*0.6 - 6.4 kph | |
| Dimensions | Two Optional Sizes: | 38" W x 29" D in- (96.52" W x 73.66 D cm)48" W x 29" D in - (120.65 W x 73.66 D cm) |
| Desktop Height Adjustment Range | Approx. 28 in. to 50 in.Approx. 71 cm to 128 cm | |
| User Height Range | 3'9" - 7'2"120 - 220 cm | |
| Height Adjustment Method | Electric | |
| Desktop Material | High-density Composite Board or Bamboo | |
| Desktop Surface | Durable Laminate or Bamboo | |
| Maximum Load on Desktop | 220 lbs100 kg | |
| Desk Lift Speed | Up 1.7 in/sec, Down 1.9 in/secUp 4.3 cm/sec, Down 3.8 cm/sec | |
| Desk Height Memory 3 | Pre-Sets | |
Custom Settings
- Tap the Set Button to enter Settings mode.
- Press the up or down arrows to highlight your choice selection.
- Press the Set Button to scroll down the list to the next item.
- Press the Pause/Stop button to exit Settings mode.
Intelli-Guard — Intelli-Guard ON/OFF. (Treadmill only)
Buzzer — Turns off the normal treadmill beep that happens at every button press.
Speed Resume — Controls whether, after a Pause, the treadmill resumes the most recent walking speed, or resets to 0.4 mph. If ON, the speed resets to 0.4 mph. (Treadmill only)
Speed Limit — The maximum speed of the treadmill.
Adj. Desk — The default setting of Present lets the desk height be adjusted. The None setting keeps the desk at its current height and prevents it from being adjusted.
BT ID No. — You can change the last two digits of your console's Bluetooth Identification Number. In the event that you have two or more SC120-2022 consoles in the same room, and both have the same BT ID No, you can change one of them to be different. Your number options are from 00-99.
Sleep Mode — Set the amount of minutes before the console/treadmill go to sleep. Can set from 0 - 99 minutes.
Custom Settings
Preset — The P1, P2, and P3 preset buttons can be set for desktop height or speed. Preset desktop heights can be set to any level. Preset treadmill speeds cannot be changed. The default values for preset speeds are P1=0.4 mph, P2=1.2 mph, and P3=2.0 mph.
Settings Display
| Setting | Choice 1(Default) | Choice 2 |
| Intelli-Guard | ON OFF | |
| Buzzer: | ON OFF | |
| Speed Resume: | ON OFF | |
| Speed Limit (mi/h): | 4.0 2.0 | |
| Adj. Desk: | Present None | |
| BT ID No. | LifeSpan-TM-2100 | |
| Sleep Mode: | 10 | |
| Preset | Height Speed | |
Treadmill Desk Troubleshooting
The LifeSpan Treadmill Desk is designed and manufactured to be reliable and easy to use. However, if you have a problem, these troubleshooting steps may help you find the cause.
Problem: The console is erratic or not lighting up.
Solution: Check to make sure the treadmill desk is properly plugged in. Turn the power switch off and back on again and make sure the Safety Key is in place. Make sure the connectors located in the front of the treadmill and under the desktop are fully plugged in. If the problem persists contact LifeSpan customer service.
Problem: The treadmill motor seems strained or E1 comes up after several minutes of use.
Solution: The silicone lubricant that is applied to the deck and belt is wearing down and the belt needs to be lubricated with 100% silicone (non-aerosol). Available at www. LifeSpanFitness.com.
Problem: The treadmill automatically pauses during a workout.
Solution: The treadmill is not picking up the step count. Go into the Personal Settings section (page 29) to turn the Intelli-Guard feature off.
Problem: "UART" appears in the display.
Solution: Turn the treadmill desk power switch off. Unplug and re-plug the connections made in Step C on page 13. Make sure the thumb screws are properly tightened. Turn the treadmill desk power back on and check to see if it functions properly.
Problem: "dc-7" appears in the display.
Solution: Turn the treadmill desk power switch off. Unplug and re-plug the connections made in Step C on page 13. Make sure the thumb screws are properly tightened. Turn the treadmill desk power back on and check to see if it functions properly.
Treadmill Desk Troubleshooting
Problem: The desktop surface is not level.
Solution: Check to make sure the base feet are on a level surface. Run calibration by pressing and holding the height adjustment buttons simultaneously for three seconds.
Problem: "E32" appears in the display.
Solution: Check to make sure the motor wires from the Left and Right Motorized Legs are properly connected into the Electronic Control Box. See page 17. Run calibration by pressing and holding the height ▼adjustment buttons simultaneously for three seconds.
Problem: "Table Uart Communication Time Out" appears in the display.
Solution: Check both cable connections to the console and to the desktop motor control are securely in place. Go to Settings in your console and check the setting for Adj. Desk. For your LifeSpan standing desk set to 'Present' instead of 'None'. If you are using without a LifeSpan standing desk, set this to 'None'.
Problem: The treadmill belt is beginning to slip and needs to be tensioned.
Solution: Refer to the owners manual included with the treadmill base.
Problem: The treadmill belt is beginning to drift to the left or right and needs to be aligned.
Solution: Refer to the owner's manual included with the treadmill base.
If you experience any other error codes, please call LifeSpan Customer Support.
Bike Desk Troubleshooting
This bike desk has been designed and manufactured to be reliable and easy to use. However, if you have a problem, these troubleshooting steps may help you find the cause.
Problem: The console is erratic or not lighting up.
Solution: Check to make sure the bike is properly plugged in. Make sure the connectors on the bike and under the desktop are fully plugged in. If the problem persists contact LifeSpan customer service.
Problem: "UART" appears in the display.
Solution: Turn the bike desk power switch off. Unplug and re-plug the connections made in Step C on page 15. Make sure the thumb screws are properly tightened. Unplug the bike and plug it back in and check to see if it functions properly.
Problem: "E32" appears in the display.
Solution: Check to make sure the motor wires from the Left and Right Motorized Legs are properly connected into the Electronic Control Box. See page 17. Run calibration by pressing and holding the height ▼ adjustment buttons simultaneously for three seconds.
Problem: "Table Uart Communication Time Out" appears in the display.
Solution: Check both cable connections to the console and to the desktop motor control are securely in place. Go to Settings in your console and check the setting for Adj. Desk. For your LifeSpan standing desk set to 'Present' instead of 'None'. If you are using without a LifeSpan standing desk, set this to 'None'.
If you experience any other error codes, please call LifeSpan Customer Support.
SC120-2022
Treadmill/Bike Desk Console
LifeSpan Fitness
785 West 1700 South Suite 1
Salt Lake City, UT. 84104
Phone: 801-973-9993
www.LifeSpanFitness.com
Version 1.0 – Sept 2021