USBVGADOCK - Computer accessory StarTech.com - Free user manual and instructions
Find the device manual for free USBVGADOCK StarTech.com in PDF.

User questions about USBVGADOCK StarTech.com
0 question about this device. Answer the ones you know or ask your own.
Ask a new question about this device
Download the instructions for your Computer accessory in PDF format for free! Find your manual USBVGADOCK - StarTech.com and take your electronic device back in hand. On this page are published all the documents necessary for the use of your device. USBVGADOCK by StarTech.com.
USER MANUAL USBVGADOCK StarTech.com
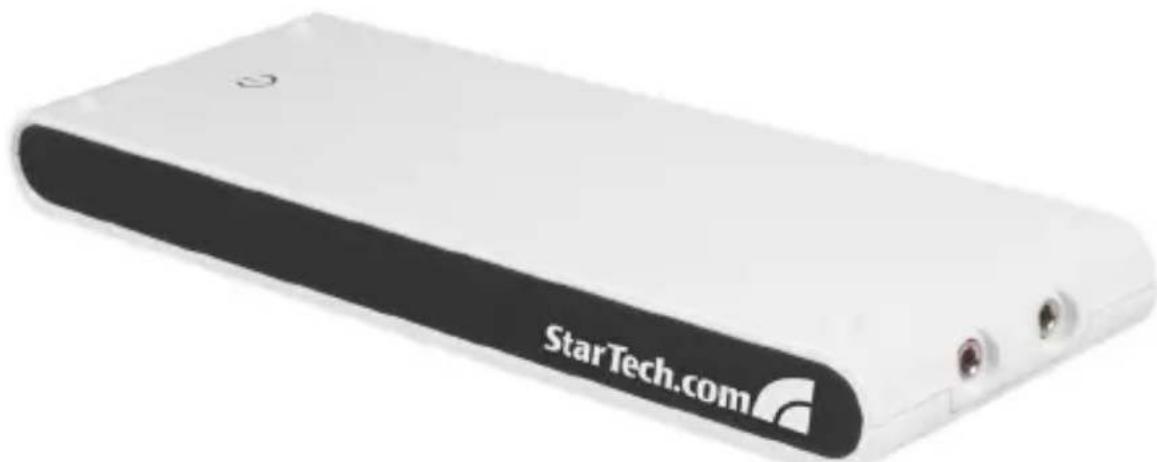
USB 4-in-1 Docking Station with VGA
USBVGADOCK
natural_image
White rectangular electronic device with 'StarTech.com' branding on its side, no visible text or symbols on body beyond the brand name.FCC Compliance Statement
This equipment has been tested and found to comply with the limits for a Class B digital device, pursuant to part 15 of the FCC Rules. These limits are designed to provide reasonable protection against harmful interference in a residential installation. This equipment generates, uses and can radiate radio frequency energy and, if not installed and used in accordance with the instructions, may cause harmful interference to radio communications. However, there is no guarantee that interference will not occur in a particular installation. If this equipment does cause harmful interference to radio or television reception, which can be determined by turning the equipment off and on, the user is encouraged to try to correct the interference by one or more of the following measures:
Reorient or relocate the receiving antenna.
Increase the separation between the equipment and receiver.
Connect the equipment into an outlet on a circuit different from that to which the receiver is connected.
Consult the dealer or an experienced radio/TV technician for help.
Use of Trademarks, Registered Trademarks, and other Protected Names and Symbols
This manual may make reference to trademarks, registered trademarks, and other protected names and/or symbols of third-party companies not related in any way to StarTech.com. Where they occur these references are for illustrative purposes only and do not represent an endorsement of a product or service by StarTech.com, or an endorsement of the product(s) to which this manual applies by the third-party company in question. Regardless of any direct acknowledgement elsewhere in the body of this document, StarTech.com hereby acknowledges that all trademarks, registered trademarks, service marks, and other protected names and/or symbols contained in this manual and related documents are the property of their respective holders.
Instruction Manual
Table of Contents
Introduction 1
Installation 2
Driver Installation 2
Windows 2000/XP ......2
Windows Vista™ 3
Verifying Driver Installation ....5
Windows 2000/XP ....5
Windows Vista™ 6
Operation 8
USB to Ethernet 8
USB to Audio ....8
USB to VGA 8
Modes of Display Operation 9
Primary 9
Extended (Default) 9
Mirror 10
OFF 10
Rotation ....10
Troubleshooting 11
Specifications 13
Technical Support ....14
Warranty Information ....14
Introduction
Thank you for purchasing a StarTech.com 4-in-1 USB Docking Station with VGA. This innovative device converts a single USB 2.0 port into multiple connection ports, including a VGA Port, 10/100 RJ45 network port, dual (3.5mm phono) audio ports and four additional USB 2.0 ports. Perfect for desktop or notebook operating environments, USBVGADOCK also makes a stylish addition to any desktop or notebook computer.
Features
Supports monitor resolutions up to WUXGA 1920 x 1200•
Plug-and-Play USB connectivity•
Stereo audio output (Speaker/Headphone) and monaural audio input • (Microphone)
Package contents
This package should contain:
1 x USB Docking Station with VGA•
1 x USB 2.0 A to mini B type cable•
1 x AC Power Adapter (DC 3A/5V)•
1 x Driver CD•
1 x Instruction Manual•
System Requirements
1.0GHz or higher processor (i.e. Intel Pentium 4 / Celeron Family AMD • K6 / Athlon / Duron Family)
256 MB memory or higher (512B memory or higher recommended for optimal performance)
Available USB 2.0 port, USB 2.0 host controller•
Windows 2000 SP4 / Windows XP SP2 / Windows Vista (32-bit) •
NOTE: Aero desktop theme not supported.
Installation
Installing the device driver enables your computer's operating system to recognize the docking station ports once it is connected.
To properly connect USBVGADOCK to a host computer, please ensure that the necessary driver installation (detailed below) has been completed prior to connecting USBVGADOCK to the host computer.
Driver Installation
Windows 2000/XP
With the computer in a powered state, insert the Driver CD (included) 1. into the CD/DVD-ROM drive. When the setup program launches, click OK to launch the InstallShield Wizard.
If the setup program does not begin automatically, please browse to and execute the Setup.exe file on the Driver CD (D:\Disk 1\Setup.exe, where D: denotes the path of your CD/DVD-ROM drive).
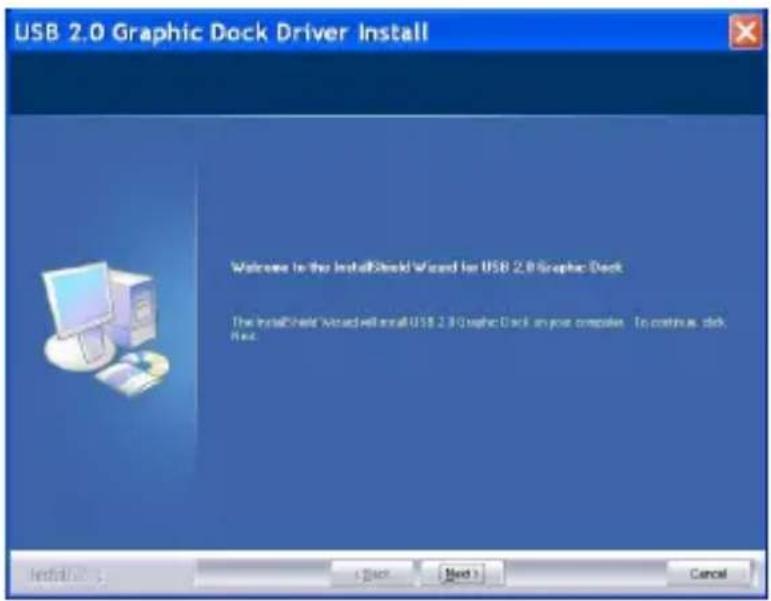
Click 2. Next on the InstallShield Wizard Welcome screen:
text_image
USB 2.0 Graphic Dock Driver Install Welcome to the InstallShield Wizard for USB 2.0 Graphic Dock The InstallShield Wizard will install USB 2.0 Graphic Dock on your computer. To continue, click Next.When the License Agreement screen appears, please review it and 3. check I accept the terms of the license agreement. Click Next to proceed.
Instruction Manual
When the Microsoft Hardware Installation warning dialogue appears, 4. please select Continue Anyway to continue with the device driver installation. It will not affect the device driver installation or device usage.
Once the installation has completed, you will be asked if you wish to re 5. start your computer. Please select Yes, I want to restart my computer now and click Finish to reboot.
After rebooting, the Found New Hardware6. Wizard will appear. Please ensure that Install the software automatically (recommended) is selected, and click on Next to continue.
A Microsoft Hardware Installation warning dialogue will be displayed; 7. please select Continue Anyway.
Upon completion, the Found New Hardware Wizard will indicate that it 8. has ...finished installing the software... Please click on Finish.
Windows Vista™
With the computer in a powered state, insert the Driver CD (included) 1. into the CD/DVD-ROM drive. When the setup program launches, click OK to launch the InstallShield Wizard.
If the setup program does not begin automatically, please browse to and execute the Setup.exe file on the Driver CD (D:\Disk 1\Setup.exe, where D: denotes the path of your CD/DVD-ROM drive). Click OK to launch the InstallShield Wizard.
text_image
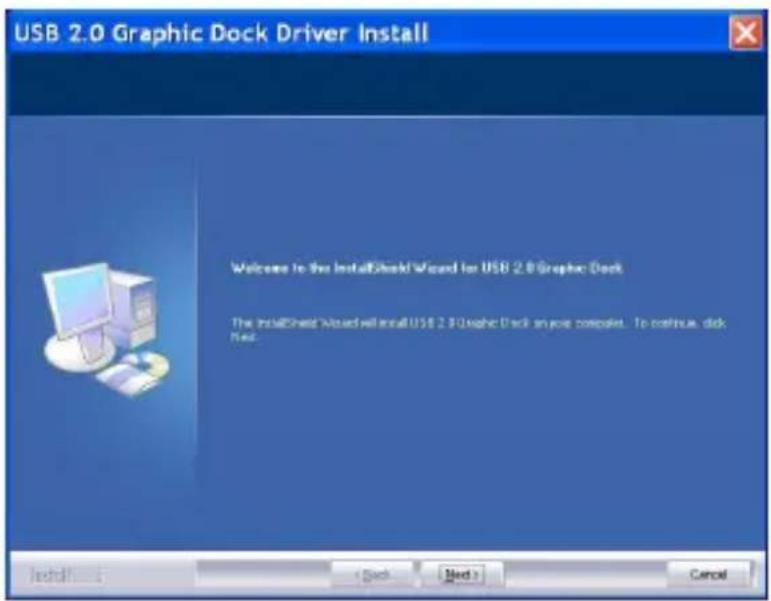
USB 2.0 Graphic Dock Driver Install Welcome to the InstallShield Wizard for USB 2.0 Graphic Dock The InstallShield Wizard will install USB 2.0 Graphic Dock on your computer. To continue, disk Next. Install... (Cash) (Med) CancelInstruction Manual
Click 2. Next on the InstallShield Wizard Welcome screen (shown previous page).
When the License Agreement screen appears, please review it and 3. check I accept the terms of the license agreement. Click Next to proceed.

text_image
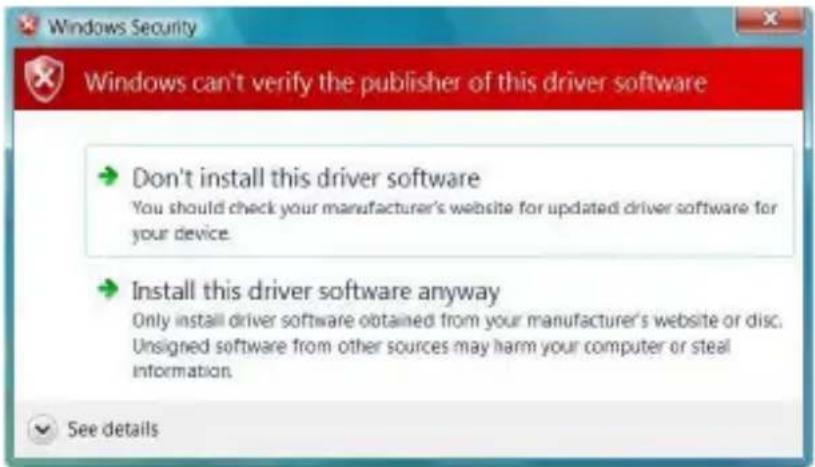
USB 2.0 Graphic Dock Devator Install License Agreement Please read this following license agreement.casally SOFTWARE END USER LICENCE (EUL) AGREEMENT FOR USB GRAPHICS ADAPTER ENABLED DEVICES Magic Control Technology Corporation ("MCT"), a Taiwanese registered corporation, licenses Licensee to use the computer program(s) to which this license agreement ("Agreement") is attached (the "Program"), and related user documentation, subject to the following terms and conditions: I. YOU SHOULD CAREFULLY READ THE FOLLOWING TERMS AND CONDITIONS BEFORE OPENING THIS PACKAGE OR INSTALLING THE PROGRAM INTO THE COMPUTER. OPENING THIS PACKAGE OR INSTALLING THE PROGRAM INTO THE COMPUTER MEANS YOU ACCEPT THESE TERMS AND CONDITIONS AND UNDERSTAND THAT THEY WILL BE LEGALLY PRINTING ON YOU, ANY END USER, AND THE COMPANY, IF YOU! ● Accept the terms of the license agreement ○ Get not accept the terms of the license agreement Install... + Back Next CancelA Windows Security warning dialogue box will appear. Please select 4. Install this driver software anyway to continue:
text_image
Windows Security Windows can't verify the publisher of this driver software Don't install this driver software You should check your manufacturer's website for updated driver software for your device. Install this driver software anyway Only install driver software obtained from your manufacturer's website or disc. Unsigned software from other sources may harm your computer or steal information. See detailsUpon completion, the Found New Hardware Wizard will indicate that it has ...finished installing the software... Please select Yes, I want to restart my computer now and click Finish to reboot
Verifying Driver Installation
Windows 2000/XP
To ensure that driver installation was successful:
Right-click on 1. My Computer.
Select 2. Manage to launch the Computer Management window.
In the left pane of the Computer Management window, select 3. Device Manager.
At the top of the Computer Management window, click on View, then select By Connection Type:

text_image
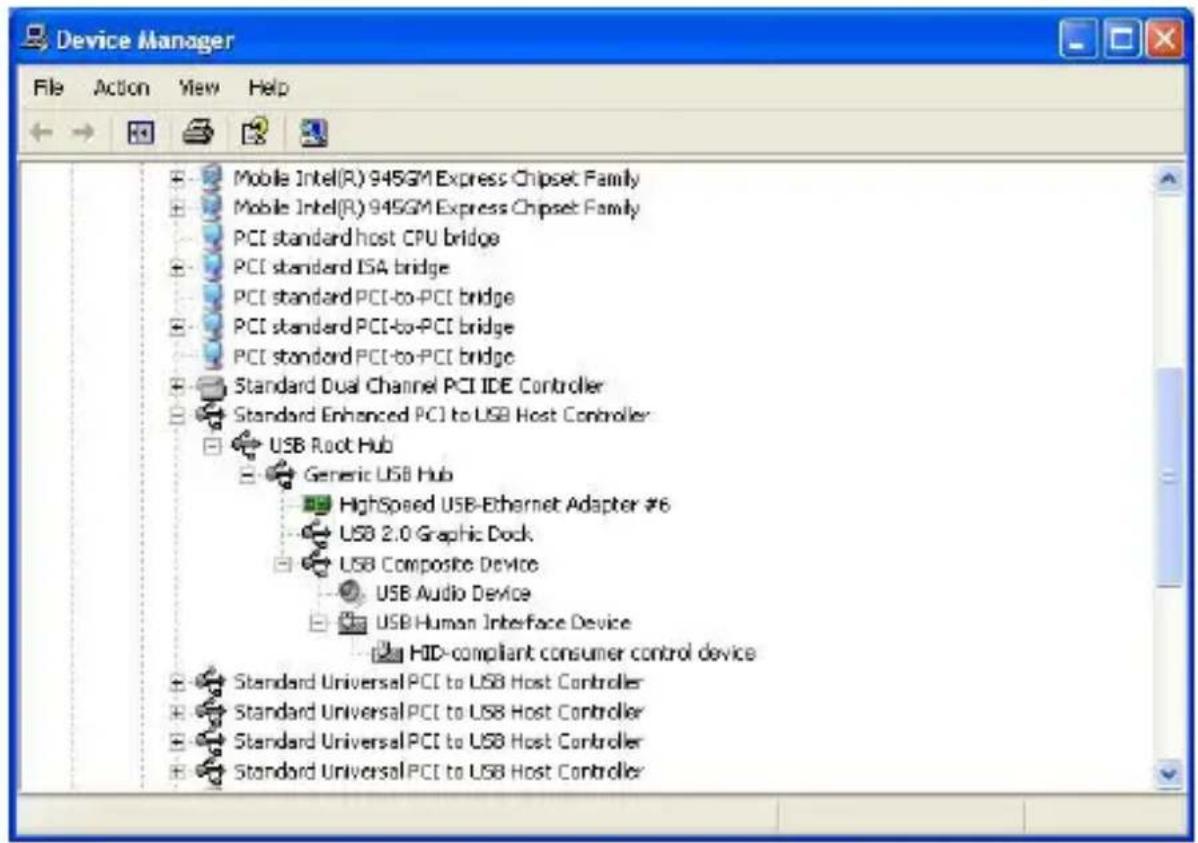
Device Manager File Action View Help Devices by type • Devices by connection Resources by type Resources by connection Show hidden devices Customize... TESTXP ACP Displays cIn the right pane of the Computer Management window, select 4. Standard Enhanced PCI to USB Host Controller, then click on USB Root Hub, to display the newly installed devices (depicted on the following page):
High Speed USB Ethernet Adapter, USB2.0 GRAPHIC DOCK Device USB Composite Device, USB Audio Device, USB Human Interface Device, HID-compliant consumer control device.
Instruction Manual
text_image
Device Manager File Action View Help Mobile Intel(R) 945GM Express Chipset Family Mobile Intel(R) 945GM Express Chipset Family PCI standard host CPU bridge PCI standard ISA bridge PCI standard PCI-to-PCI bridge PCI standard PCI-to-PCI bridge PCI standard PCI-to-PCI bridge Standard Dual Channel PCI IDE Controller Standard Enhanced PCI to USB Host Controller USB Root Hub Generic USB Hub HighSpeed USB-Ethernet Adapter #6 USB 2.0 Graphic Dock USB Composite Device USB Audio Device USB Human Interface Device HID-compliant consumer control device Standard Universal PCI to USB Host Controller Standard Universal PCI to USB Host Controller Standard Universal PCI to USB Host Controller Standard Universal PCI to USB Host ControllerWindows Vista™
Right-click on 1. Computer.
Select 2. Manage to launch the Computer Management window.
In the left pane of the Computer Management window, select 3. Device Manager.
At the top of the Computer Management window, click on View, then select By Connection Type:

text_image
Device Manager File Action View Help 640M-P Devices by type ACP Devices by connection Micr Resources by type Micr Resources by connection Micr Show hidden devices Plug Customize... Term UMBus Root Bus Enumerator USB 2.0 Graphic Dock (Extend). USB 2.0 Graphic Dock (Mirror).Instruction Manual
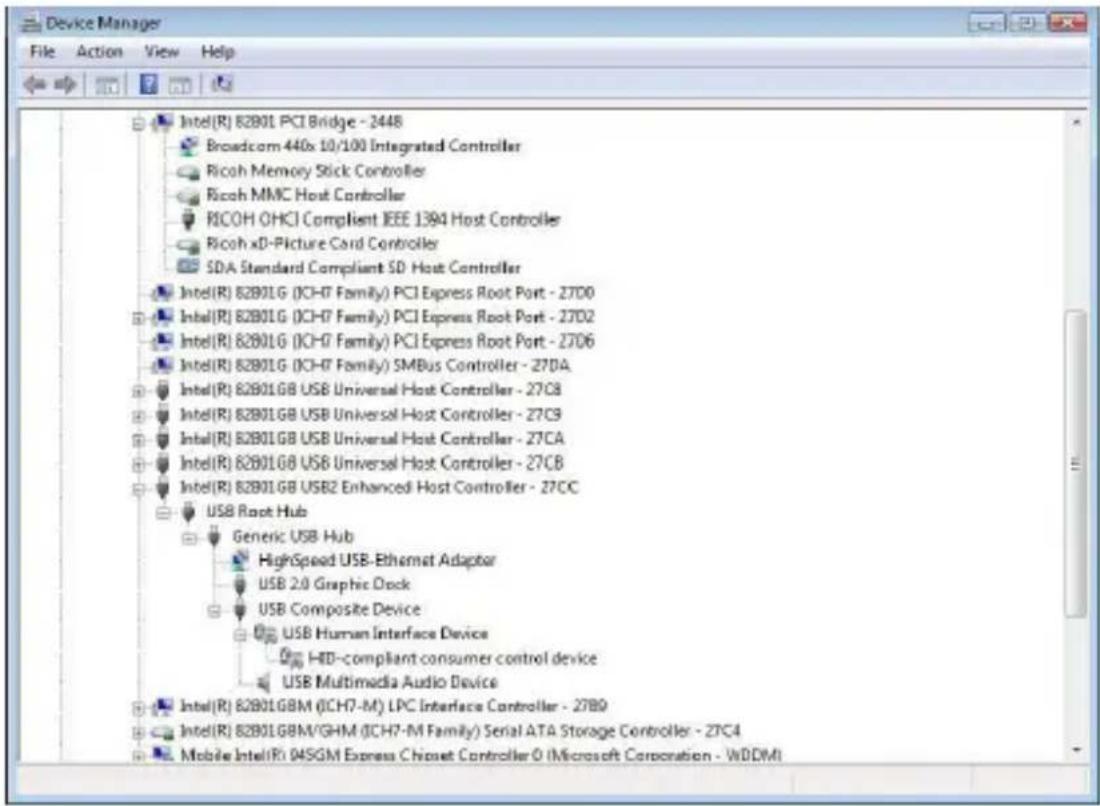
In the right pane of the Computer Management window, select 4. Intel(R) 82801GB USB2 Enhanced Host Controller-27CC, then USB Root Hub to display the list of newly installed devices:
High Speed USB- Ethernet Adapter, USB 2.0 GRAPHIC DOCK, USB Composite Device, USB Human Interface Device, HID-compliant consumer control device, USB Multimedia Audio Device.
text_image
Device Manager File Action View Help Intel(R) 82B01 PCI Bridge - 3448 Broadcom 440x 10/100 Integrated Controller Ricoh Memory Stick Controller Ricoh MMC Host Controller RICOH OHCI Compliant IEEE 1394 Host Controller Ricoh xD-Picture Card Controller SDA Standard Compliant SD Host Controller Intel(R) 82B01G (ICH7 Family) PCI Express Root Port - 2700 Intel(R) 82B01G (ICH7 Family) PCI Express Root Port - 2702 Intel(R) 82B01G (ICH7 Family) PCI Express Root Port - 2706 Intel(R) 82B01G (ICH7 Family) SMBus Controller - 270A Intel(R) 82B01GB USB Universal Host Controller - 27C8 Intel(R) 82B01GB USB Universal Host Controller - 27C9 Intel(R) 82B01GB USB Universal Host Controller - 27CA Intel(R) 82B01GB USB Universal Host Controller - 27CB Intel(R) 82B01GB USB2 Enhanced Host Controller - 27CC USB Root Hub Generic USB Hub HighSpeed USB-Ethermat Adaptor USB 2.0 Graphic Dock USB Composite Device USB Human Interface Device HD-compliant consumer control device USB Multimedia Audio Device Intel(R) 82B01GBM (ICH7-M) LPC Interface Controller - 27B9 Intel(R) 82B01GBM/GHM (ICH7-M Family) Serial ATA Storage Controller - 27C4 Mobile Intel(R) 04SGM Express Chipset Controller O (Microsoft Corporation - WDDM)Operation
This section describes the main functions provided by USBVGADOCK:
NOTE: The Aero desktop theme is not supported by this adapter, so should be disabled prior to use of the USB Video Adapter.
USB to Ethernet
USBVGADOCK supports the 10/100Mbps LAN transfer capability, and is compliant with IEEE specifications 802.3u 100BASE-TX and 802.310BASE-T.
USB to Audio
USBVGADOCK provides one microphone input and one stereo speaker output.
USB to VGA
USBVGADOCK supports three distinct display modes: Primary, Extended and Mirror.
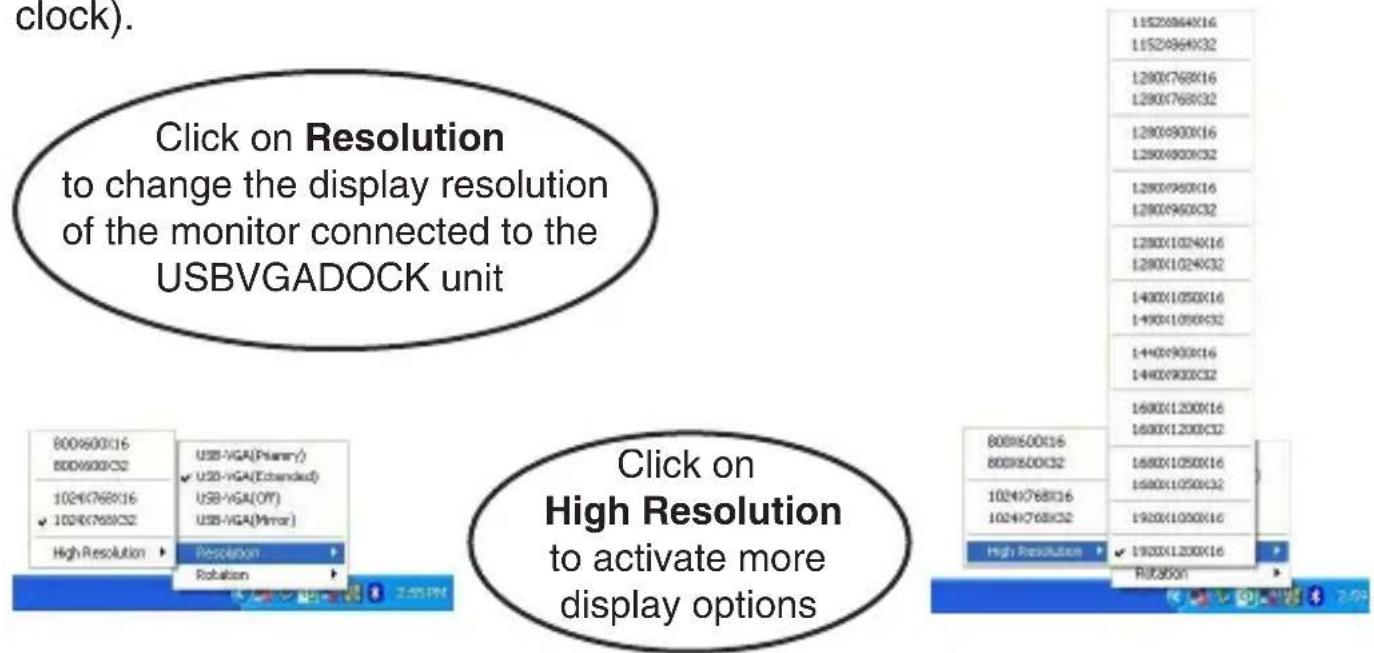
To configure how the VGA monitor connected to USBVGADOCK is used, right-click on the UVD logo, situated in the task bar (typically near the clock).
text_image
clock). Click on Resolution to change the display resolution of the monitor connected to the USBVGADOCK unit 800X600X16 800X600X32 1024X768X16 1024X768X32 High Resolution USB-VGA(Planar) USB-VGA(Extended) USB-VGA(OFF) USB-VGA(Mirror) Resolution Robation Click on High Resolution to activate more display options 800X500X16 800X500X32 1024X768X16 1024X768X32 High Resolution RUT350N 11520964X16 11520964X32 1280X768X16 1280X768X32 1280X900X16 1280X900X32 1280X950X16 1280X950X32 1280X1024X16 1280X1024X32 1400X1050X16 1400X1050X32 1440X900X16 1440X900X32 1600X1200X16 1600X1200X32 1680X1050X16 1680X1050X32 1920X1050X16 1920X1200X16Instruction Manual
Alternately, the same setting changes can be made from the Display Properties menu, which can be activated by right-clicking on an empty area of the user desktop and selecting Properties, then clicking the Advanced button and choosing the Monitor tab:
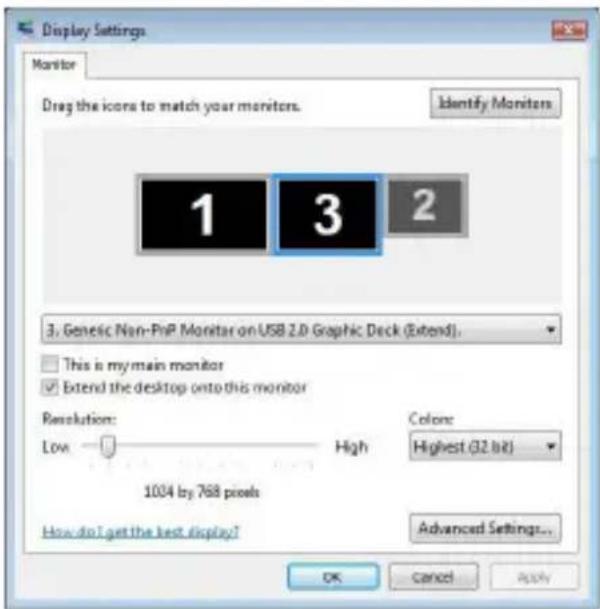
text_image
Display Settings Monitor Drag the icons to match your monitors. Identify Monitors 1 3 2 3. Genetic Non-PnP Monitor on USB 2.0 Graphic Deck (Extend). This is my main monitor Extend the desktop onto this monitor Resolution: Low High Color: Highest (32 bit) 1004 by 768 pixels How do I get the best display? Advanced Settings... OK Cancel ApplyModes of Display Operation
Primary
The system's main graphics adapter will automatically switch to act as the secondary graphics adapter and the main screen will now work as the extended desktop. The monitor connected to the USBVGADOCK will now act as the primary Windows desktop.
Please be advised that some display utilities and drivers that shipped with certain AGP and built-in display adapters may prevent this option from working on some systems. You can disable the other utility program (usually found in the same toolbar located on the bottom right hand corner) to enable this function to work properly.
Extended (Default)
By default, the monitor connected to the USBVGADOCK unit will work as an Extended Desktop, by extending the primary Windows desktop of your system onto the USBVGADOCK connected monitor. You can change the
Instruction Manual
relative position of this extended desktop in the operating system Display Properties.
Mirror
In Mirror mode, the Windows desktop will be mirrored/duplicated onto the secondary CRT/LCD monitor (connected to USBVGADOCK). The screen resolution setting on the secondary monitor will match that of the primary screen's resolution. For example, if the primary resolution is 1024x768@32bit, the secondary monitor's resolution will be the same.
However, if the selected resolution setting is not supported by the primary screen, a warning dialogue box will be displayed and the suggested screen resolution will be shown.
OFF
This option disables the monitor connected to the USBVGADOCK unit.
Rotation
This feature enables you to configure the orientation of the secondary monitor. Options include rotating Right (90 °), Left (270 °), Flip (180 °) and Normal, available in both Extended or Primary modes of operation.
Troubleshooting

text_image
Warning symbol image with exclamation mark inside a trianglePlease Note: Should the USBVGADOCK become overloaded, simply disconnect it from the host computer, wait for the operating system to indicate that it has been removed, then reconnect it to the host computer.
In the event that you encounter difficulty when installing or using the USBVGADOCK USB 4-in-1 Docking Station with VGA, the following suggestions may be useful:
Q: Why can't I make the monitor connected to USBVGADOCK the primary display?
A: Some video cards are shipped with a utility that prevents other video cards from being set as the primary card. Check the taskbar (typically located next to the clock, in the lower right hand corner of the Windows desktop) for the utility. Disable this utility, in order to set the USBVGA-DOCK monitor to act as the primary display.
Q: Why won't my DVD player work when I move it over to the extended display?
A: Some DVD playback software packages do not support playing on a second display adapter. Try to open the program in the secondary display first before playing the DVD.
Q: Video will not play on Media Player if I move it over to the extended desktop?
A: Check that you have moved the Media Player window completely over to the second screen.
Q: Why does my mouse not move past the right side of the screen as it should (extended desktop)?
Instruction Manual
A: Ensure that the display settings accurately reflect the desired configuration. In this case, make sure that your display number '2' is on the right side of display number '1'. You can rearrange how Windows treats each display in relation to each other in the Display Properties Settings.
Q: There are lines running horizontally up and down the screen on the monitor connected to USBVGADOCK.
A: First, try to reset/refresh/resynchronize the display. Typically, there is a button on the front panel of the display that allows this function. Please consult the vendor documentation that accompanied the monitor, if necessary to locate this button/function.
This could also be due to a low refresh rate setting. This can be changed in the operating system Display Properties menu. In the menu, click on Settings, Advanced, then Monitor. Make sure you select the USB 2.0 VGA Device first and do not set the refresh rate higher than what is supported by the connected monitor. This may damage your monitor. You can also try to reset/refresh/resynchronize your monitor.
Q: Direct3D does not work?
A: Please check our website for driver updates that may support this function. If your application requires this, please use the main display adapter.
Q: USBVGADOCK does not work with a Windows Vista™ 64-bit system?
A: Please check our website for driver updates in the future, that may support this function.
Specifications
| General Specifications | |
| LAN | 10/100Mbps |
| Audio | USB Audio Device Class Specification v1.0 |
| Connectors | 1 x SVGA(DB-15); 1 x RJ45 (female)2 x 3.5mm phono (audio) (female)4 x USB 2.0 (type ‘A’ female)1 x USB Mini B 5-pin (female) |
| Regulatory Certifications | CE, RoHS, WEEE |
| Operating System Support | Windows 2000 / XP / Vista (32-bit) |
| Supported Resolutions (Widescreen) | ||
| Aspect Ratio Resolution Color Depth | ||
| 16:10 1920 x | 1200 16-bit | |
| 16:9 1920 x | 1080 16-bit | |
| 16:10 1680 x | 1050 16-bit, 32-bit | |
| 16:10 1440 x | 900 16-bit, 32-bit | |
| 16:10 1280 x | 800 16-bit, 32-bit | |
| 15:9 1280 x | 768 16-bit, 32-bit | |
| Supported Resolutions (Standard) | ||
| 1280 x 1024 | ||
| 5:4 1280 x 1 | 1024 16-bit, 32-bit | |
| 4:3 1600 x 1 | 1200 16-bit, 32-bit | |
| 4:3 1280 x 9 | 60 16-bit, 32-bit | |
| 4:3 1152 x 8 | 64 16-bit, 32-bit | |
| 4:3 1024 x 7 | 68 16-bit, 32-bit | |
| 4:3 800 x 6 | 0 16-bit, 32-bit | |
Technical Support
StarTech.com's lifetime technical support is an integral part of our commitment to provide industry-leading solutions. If you ever need help with your product, visit www.startech.com/support and access our comprehensive selection of online tools, documentation, and downloads.
Warranty Information
This product is backed by a one-year warranty. In addition, StarTech.com warrants its products against defects in materials and workmanship for the periods noted, following the initial date of purchase. During this period, the products may be returned for repair, or replacement with equivalent products at our discretion. The warranty covers parts and labor costs only. StarTech.com does not warrant its products from defects or damages arising from misuse, abuse, alteration, or normal wear and tear.
Limitation of Liability
In no event shall the liability of StarTech.com Ltd. and StarTech.com USA LLP (or their officers, directors, employees or agents) for any damages (whether direct or indirect, special, punitive, incidental, consequential, or otherwise), loss of profits, loss of business, or any pecuniary loss, arising out of or related to the use of the product exceed the actual price paid for the product. Some states do not allow the exclusion or limitation of incidental or consequential damages. If such laws apply, the limitations or exclusions contained in this statement may not apply to you.
StarTech.com Making hard-to-find easy!
StarTech.com has been making “hard-to-find easy” since 1985, providing high quality solutions to a diverse IT and A/V customer base that spans many channels, including government, education and industrial facilities to name just a few. We offer an unmatched selection of computer parts, cables, A/V products, KVM and Server Management solutions, serving a worldwide market through our locations in the United States, Canada, the United Kingdom and Taiwan.
Visit www.startech.com today for complete information about all our products and to access exclusive interactive tools such as the Cable Finder, Parts Finder and the KVM Reference Guide. StarTech.com makes it easy to complete almost any IT or A/V solution. Find out for yourself why our products lead the industry in performance, support, and value.