
9120A - Hot plate Nemco - Free user manual and instructions
Find the device manual for free 9120A Nemco in PDF.

| Product Type | Drop-In Induction Warmer/Range |
| Model Number | 9120A |
| Dimensions (W x D x H) | 14 9/16" x 11 5/8" x 3 1/8" |
| Weight | 14 lbs |
| Power Source | 120 V, 60 Hz |
| Amperage | 15 A |
| Power Output | 1800 W |
| Power Settings | H1 - H7 (hold), 1 - 10 (cook) |
| Timer Range | 1 second to 719 minutes |
| Temperature Control Mode | Not available on this model |
| Cooktop Material | Glass ceramic |
| Compatible Cookware | Induction-compatible (magnetic base), min. bottom diameter 4.75", max. 10.25" |
| Mounting | Flush mount or with optional stainless steel trim ring |
| Cooling Fan | Yes, continues after turn-off until cool |
| Safety Features | Pan detection, overheat protection, auto shut-off on timer |
| Cleaning | Mild non-abrasive detergent, damp cloth; do not spray control panel |
| Warranty | 1 year parts and labor from date of service, 18 months from shipment |
| Certifications | ETL/UL listed |
| Error Codes | Displays codes for no pan, over current, over/under voltage, overheating, etc. |
Frequently Asked Questions - 9120A Nemco
User questions about 9120A Nemco
0 question about this device. Answer the ones you know or ask your own.
Ask a new question about this device
Download the instructions for your Hot plate in PDF format for free! Find your manual 9120A - Nemco and take your electronic device back in hand. On this page are published all the documents necessary for the use of your device. 9120A by Nemco.
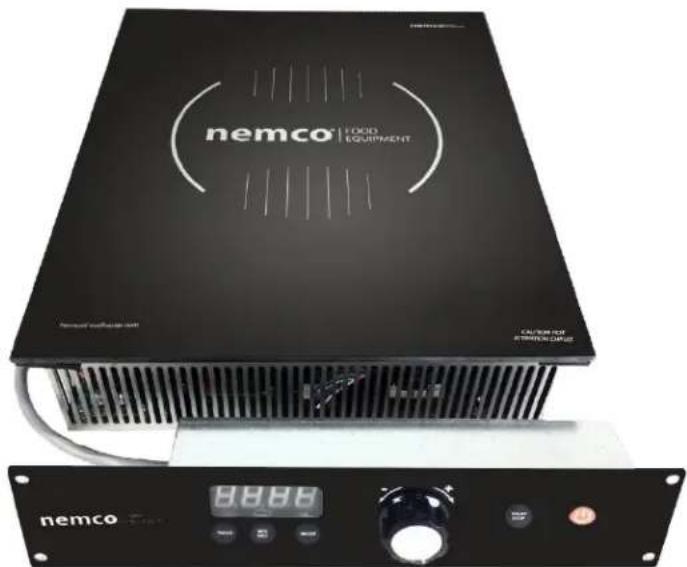
USER MANUAL 9120A Nemco
Drop-In Induction Warmers and Ranges
Remote Control
INSTALLATION AND OPERATING INSTRUCTIONS
IMPORTANT INFORMATION READ BEFORE USE
It is recommended that maintenance and repairs be conducted by authorized service agents using genuine Nemco replacement parts. Nemco is not responsible for the damages caused by unauthorized service agents or parts. The information contained in this manual is subject to updates and/or change at the discretion of Nemco Food Equipment without notice. Please read the Installation and Operating Instructions in its entirety before attempting to install or operate this unit.
Contents
Important Safety Instructions.... 3
Control Features 4
Operating Instructions.... 5
Power Settings/Cooking Guide 6
Temperature Control Mode 6
Timer Mode....7
Setting the Timer 7
Cleaning the Induction Range....8
Cookware Requirements....8
Product Specifications....8
Installation Guide 9
Troubleshooting/Error Codes ....10
Warranty 11
Important Safety Instructions
When using electrical appliances, basic safety precautions should be followed, including the following:
Warning – To reduce the risk of burns, electric shock, fire, injury to persons, or exposure to excessive electromagnetic energy:
1) Read all instructions before using the appliance.
2) Read and follow the specific "PRECAUTIONS TO AVOID POSSIBLE ELECTRIC SHOCK" found on page X.c
3) This appliance must be grounded. Connect only to properly grounded outlet. See "GROUNDING INSTRUCTIONS" found on page X.
4) Use this appliance only on the specified electrical circuit.
5) Install or locate this appliance only in accordance with the provided installation instructions.
6) Do not heat any sealed cans on the induction range. A Sealed can may explode.
7) Use this appliance only for its intended use as described in the manual. Do not use corrosive chemicals or vapors on this appliance.
8) As with any appliance, close supervision is necessary when used by or around children.
9) Do not operate this appliance if it has a damaged cord or plug, broken or cracked glass surface, if it is not working properly, or if it has been damaged or dropped.
10) This appliance should be serviced only by qualified service personnel. Contact Nemco for the authorized service facility for examination, repair or adjustment.
11) Do not cover or block any openings on the appliance. Allow 4" clearance from all vent openings.
12) Do not place the range in, on or near open flames, electric burners, ovens or other high temperature surroundings.
13) Do not move the range while cooking or while hot.
14) Do not store this appliance outdoors. Do not use this product near water – for example, near a kitchen sink, in a wet basement, near a swimming pool, or similar locations.
15) Do not immerse cord or plug in water.
16) Keep cord away from heated surfaces.
17) Do not let cord hang over edge of table or counter.
18) When cleaning, use only mild, nonabrasive soaps or detergents applied with a sponge of soft cloth.
19) Do not clean with metal scouring pads. These will scratch and damage the glass and control surfaces.
20) Do not touch the hot surface of the glass cooktop.
21) Do not heat empty pots/pans. Using an empty pan can
result in extremely high temperatures that may damage the pan and the range.
22) Keep pacemakers at least 2 feet from the cooktop.
SAVE THESE INSTRUCTIONS
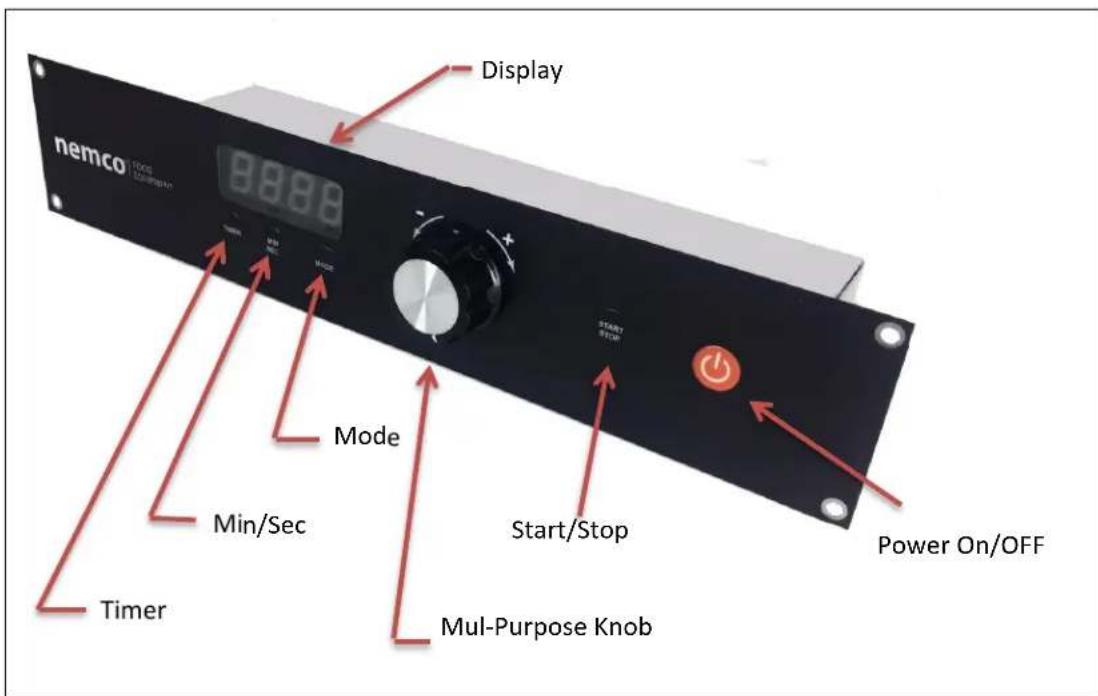
Control Features
- The range will not operate without an appropriate pan or vessel in place on the cooktop. After a few seconds, the display will flash '00' indicating that no pan is present. If the pan is removed during cooking, the unit will turn off after about 40 seconds and the display will show '00'. Resume cooking by placing the pan on the cooktop and pressing the 'Start/Stop' button.
- If the temperature of the cooktop reaches 260 °C or 500°F, the unit turns off automatically and displays an error code. This can happen if a pan is empty or is allowed to boil dry. Allow the unit to cool off. Restart by pressing power on/off button
- If the voltage or current in the device is abnormal it will shut itself off and display an error code.
- Small objects such as a knife or spoon will not be 'seen' as a valid pan by the range and it will not operate, however, do not place items other than induction cookware on the range surface.
Operating Instructions
- Plug the unit in to the appropriate power outlet. The display will show four red dots when voltage is present.
- Press the red power on/o buon. The display will show '00' and the unit is now in the ready state.
- Place an appropriate pan on the glass cooktop, centering it on the target.
- Press the Power Up 'Start/Stop' buon. The display will show '5' or '6', and the fan will start. The range is now warming or cooking at the displayed power level.
- Rotate the knob to the right to increase the power seng.
-
Rotate the knob to the le to decrease the power level.
-
Warming Units:
(NBKW-A, NBKW11-A): The power will adjust from H1 to H7. See chart for approximate holding temperatures.
Cooking units:
NBK118-A, the power will adjust from H1 to H7 and 1 to 10.
NBK26-A, the power will adjust from H1 to H7 and 1 to 10.
NBK35-A, the power will adjust from H1 to H7 and 1 to 10.
Power levels H1 thru H7 are hold sengs, designed to keep food warm at a constant temperature for serving.
Power levels 1 thru 10 are for cooking. The unit will connuously deliver power at that seng, similar to a gas ame seng.
- While cooking or warming, press the 'Start/Stop' buon to stop the cooking cycle, or remove the pan.
If the pan is removed and replaced within approximately 40 seconds while the '00' symbol is ashing on the display, the system will automatically resume heang at the previous seng. Aer 40 seconds with no pan, the display will show a steady '00'.
Pressing the 'Start/Stop' buon once will resume operaon at the previous seng if the pan is present.
-
The power level can be adjusted 'on the y' at any me while the unit is heang.
-
When the unit is turned o using the Power On/O buon, the cooling fan may connue to operate for a short period of me.
Power Settings/Cooking Guide
The ‘Best’ Power Sengs will vary depending on the range model number, the type and shape of the pan being used, as well as the type and quantity of food being cooked or held. Unl you get a ‘feel’ for the unit, you should start at medium sengs of 5 or 6 and adjust up or down from there to get the performance you want.
For cooking units (NBK118-A, NBK26-A, NBK35-A you can use the following as a starng guide:
- Sr Fry: Quickly sr fry on high heat sengs of 8 to 10.
- Boil Water: Boil water on high heat sengs of 9 or 10, then reduce to level 5 or 6 to maintain a hard boil. Reduce to 3 or 4 for a slow boil.
- Pan Fry: Pan fry on medium to high heat sengs of 5 to 10.
- Sauté/Simmer: Use medium to low sengs 3 to 5.
- Warming: Hold food at serving temperatures using seng 2. Results will vary depending on the volume of food being held.
- Chocolate Melng: Use seng 1.
For Warming units (NBKW11-A, NBKW-A), the following chart shows an approximate temperature guide. Results will vary depending on the type of pan, and the type and volume of food being held.
| Warmer Seng | H1 | H2 | H3 | H4 | H5 | H6 | H7 |
| Temp °F | 95 | 105 | 122 | 140 | 160 | 180 | 195 |
Temperature Control Mode
Temperature control mode is not available on this model. If you press the 'Mode' buon the display will show '000F', but it will have no eect on the operaon of the unit. Pressing the 'Start/Stop' buon in this mode will result in an 'E5' error message aer a few seconds. Press the red 'Power' buon to turn the unit o and clear the error message.
The mer funcon allows you to set a mer from 1 second, up to 719 minutes. The mer resets to 719 minutes every me the power is turned o/on. The mer always runs in the background, so if the unit runs connuously for 12 hours (719 minutes), the mer will run out and the unit will turn o. To reset, turn the power o/on, or manually set the mer.
Setting the Timer
- With the unit powered on and in the Ready state (display shows a steady '00'), press the 'TMR' buon. The display will show '0719'.
- To change the mer seng, press the 'MIN/SEC' buon. The display will ash '719'.
- Turn the knob to adjust the number of minutes. Turning the knob to the le will reduce the number of minutes. If you turn the knob to the right past 719, the display will go to '00.59' or 59 seconds. Keep turning to the right to increase the minutes.
- If you want to set seconds, for instance 3 minutes and 30 seconds, turn the knob unl the display shows '03.59' minutes. Then press the 'MIN/SEC' buon again. The 'seconds' eld will ash. Use the knob to adjust the seconds to 30. The display will show '03.30'
- When the me is set to what you want, press the 'Start/Stop' buon. The power will come on and the mer will count down. When the mer counts down to 0, the unit will stop heang.
- While the unit is heang, the display will alternate between the mer and the power seng. You can always adjust the power seng while the display is showing the power level.
- If you press the TMR buon while the unit is heang, the display will stop alternang between the mer and the power level. The mer will connue to run. Pressing the TMR buon again will resume alternang the display.
- While the unit is heang, the mer display decimal points will ash.
- Once the mer counts down to zero, pressing the 'Start/Stop' buon will restart the cycle at the me that you set previously. Turning the unit o/on using the 'Power' Buon will reset the mer to 719 minutes.
Cleaning the Induction Range
Aer the inducon range has cooled down, clean as follows:
Glass Cooktop: Wipe with a damp cloth or use a mild, non-abrasive cleaning soluon.
Control Panel: Wipe with a damp cloth only. Do not spray with cleaning soluons! Do not use sharp or metal objects to press the buons! Only press the buons using your nger!!
DO NOT USE SHARP OBJECTS OR ABRASIVES ON THE GLASS COOKTOP. SCRATCHES IN THE GLASS CAN WEAKEN IT AND LEAD TO BREAKAGE!
Cookware Requirements
Cooking with any inducon range requires the use of inducon compatible pots/pans. In general this means that the vessel must be magnec. If a magnet socks to it, it will probably be a good Inducon pan. Other things to consider are the size and shape of the pan. Pans should have a minimum boom diameter of 4.75 inches, and the boom of the pan should be at within about 1/8 of an inch. For best results, the maximum boom diameter of the pan should not exceed 10.25 inches.
Materials that will NOT work with inducon ranges include glass, ceramics, earthenware, bronze, copper, aluminum or 300 series stainless steel.
To test a pan to see if it is compatible, put it on the range, press the Start buon and increase the power level. If the display ashes '00' the pan is not compatible with inducon cooking.
Product Specifications
| Model | Frequency | Voltage | Amps | Power | Weight | Dimensions |
| 9101, 9101-C | 50/60Hz | 120 | 2.2 | 270 W | 14 lbs. | L 14 9/16”W 11 5/8”D 3 1/8” |
| 9101-1 | 208 or 240 | 2 | 400 W | |||
| 9120, 9120-C | 120 | 15 | 1800 W | |||
| 9121-1 | 208 or 240 | 12.5 | 2600 W | |||
| 9122-1 | 208 or 240 | 15 | 3500 W |
Installation Guide
Always ensure that the glass surface of the range is mounted FLUSH with the counter top. The exposed edge of the glass is fragile and can be easily chipped or broken by side impact.
If ush moung is not feasible, you can purchase the oponal Stainless Steel Trim Ring this allows you make a simple cut-out in the counter top, and the Trim Ring supports the unit and protects the glass edge from damage.
With either moung method, seal around the unit (and Trim Ring) with silicone caulking to keep liquids from penetrang and geng below the surface.
If the units are mounted in a closed cabinet, you must ensure that there is adequate air ow for the units. Each unit draws in cooling air from the back, and exhausts warm air from the front. In a closed cabinet you must provide adequate openings for both the intake and the exhaust air.
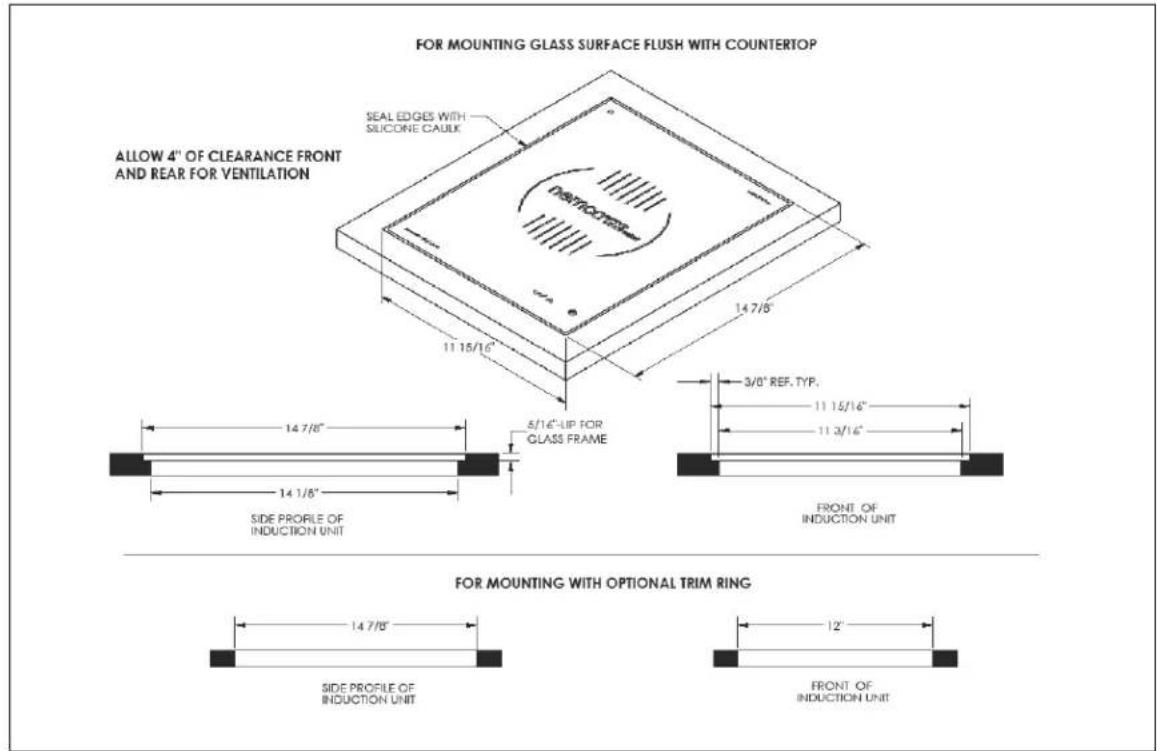
Drawing for the control panel cut-out.
Troubleshooting/Error Codes
| Flashing Display Indicaon | Cause | Soluon |
| U | No pan or non- inducon pan | Place an appropriate pan on the cooktop target |
| 1 | Over current | Check for abnormal condions like water, moisture or broken parts or cord. Unplug the unit. Plug it back in. If the error connues, contact customer service. |
| 2 | Over Voltage | Check to verify that the outlet voltage is correct and within limits. Unplug the unit. Plug it back in. If the error connues, contact customer service. |
| 3 | Under Voltage | Check to verify that the outlet voltage is correct and within limits. Unplug the unit. Plug it back in. If the error connues, contact customer service. |
| 4 | Main Heat Sink Over Temp | Check to verify that the fans are working. Check to make sure the air ow is unrestricted. |
| 5 | External Temp. Probe problem | Temp mode not available on BKT series. |
| 6 | Pan is Overheated | Make sure the pan is not empty. Allow the unit to cool down. |
| 7 | Power Frequency is Unstable | Check the incoming power for frequency stability. Unplug the unit. Plug it back in. If the error connues, contact customer service. |
| 8 | OP Amp Oset Error | Unplug the unit. Plug it back in. If the error connues, contact customer service. |
| 9 | Main Coil Overcurrent | Unplug the unit. Plug it back in. If the error connues, contact customer service. |
Warranty
Except as otherwise provided below, Nemco Food Equipment, Ltd. ("Nemco") warrants, to the original user, this product (other than blades, light bulbs, and ceramic glass cooktop breakage) to be free of electrical and mechanical defects in material and workmanship under "normal use" (dened below) for the shorter of the following periods: (a) one (1) year from the date placed in service by the original user, or (b) 18 months from the date of shipment from its factory. In addition, Nemco warrants its non-electrical food preparaon products (other than blades) to be free of mechanical defects in material and workmanship under normal use for two (2) years from the date placed in service by the original user. The warranty provided for herein shall be limited to parts and labor. Any determinaon that a product is defective or covered by this warranty, shall be made by Nemco, in its sole discreon. The determinaon of whether to repair or replace a defective, covered product, or to refund the purchase price for the product, will be at Nemco's sole discreon. This warranty does not cover products used outside the United States, or damages caused by accident, misuse, negligence of any person other than Nemco, current or voltage other than stated on the appliance, re, ood or other casualty. Any alteraon to the product or unauthorized repair voids this warranty. For purposes of this warranty, the phrase, "normal use" shall mean the use of the product in conneccon with food in accordance with the product manual accompanying the product.
Nemco shall be responsible only for repairs or replacements of defective parts performed by Nemco's authorized service personnel. Authorized service agencies are located in principal cies throughout the connental United States, Alaska and Hawaii.
THE FOREGOING WARRANTY IS EXCLUSIVE AND IN LIEU OF ALL OTHER WARRANTIES, EXPRESS OR IMPLIED. NEMCO EXPRESSLY DISCLAIMS ANY IMPLIED WARRANTY THAT ANY OF ITS PRODUCTS IS MERCHANTABILITY, FIT FOR A PARTICULAR PURPOSE, OR DOES NOT INFRINGE ON THE RIGHTS OF ANY THIRD PARTY. THE FOREGOING WARRANTY SHALL BE NEMCO'S SOLE AND EXCLUSIVE OBLIGATION. ANY PERSON'S (BUYER, USER OR OTHERWISE) EXCLUSIVE REMEDY AGAINST NEMCO, AND NEMCO'S SOLE OBLIGATION, FOR ANY AND ALL CLAIMS, WHETHER FOR BREACH OF CONTRACT, WARRANTY, TORT (INCLUDING WITHOUT LIMITATION NEGLIGENCE), OR OTHERWISE, SHALL BE LIMITED TO NEMCO REPAIRING OR REPLACING THE PRODUCT, OR, AT NEMCO'S OPTION, REFUNDING THE PURCHASE PRICE THEREFOR. IN NO EVENT SHALL NEMCO HAVE ANY LIABILITY FOR DAMAGES IN AN AMOUNT EXCEEDING THE PURCHASE PRICE OF THE PRODUCT, NOR SHALL NEMCO HAVE ANY LIABILITY FOR INCIDENTAL, SPECIAL OR CONSEQUENTIAL DAMAGES. Any person desiring to make any claim against Nemco must do so within six (6) months aer expiraon of the applicable warranty period, or such claim be forever barred.
Model #: ____
Serial #: ____
Installaon Date: ____
nemco®
FOOD EQUIPMENT
301 Meuse Argonne
Hicksville, OH 43526
www.nemcofoodequip.com


- INSTALLATION AND OPERATING INSTRUCTIONS
- IMPORTANT INFORMATION READ BEFORE USE
- Contents
- Important Safety Instructions
- SAVE THESE INSTRUCTIONS
- Control Features
- Operating Instructions
- Power Settings/Cooking Guide
- Temperature Control Mode
- Setting the Timer
- Cleaning the Induction Range
- Cookware Requirements
- Installation Guide
- Troubleshooting/Error Codes
- Warranty
- nemco®
- FOOD EQUIPMENT
Brand : Nemco
Model : 9120A
Category : Hot plate