
VividPar Hex 6 - Effects machine ColorKey - Free user manual and instructions
Find the device manual for free VividPar Hex 6 ColorKey in PDF.

| Product Type | RGBAW+UV LED Wash Light |
| Model | VividPar HEX 6 (CKU-2250) |
| Brand | ColorKey |
| Dimensions | 10.25 in x 3.14 in x 9.25 in |
| Weight | 4.4 lb |
| Power Supply | AC 100-240 V, 50-60 Hz |
| Power Consumption | 80 W |
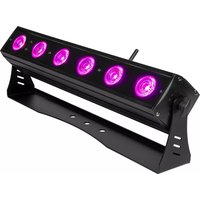
| LED Configuration | 6 x 12 W RGBAW+UV LEDs |
| DMX Channel Modes | 6 channels or 10 channels |
| Control Modes | DMX 512, Master/Slave, IR Remote, Sound Active |
| IR Remote | Included; functions: Black Out, Auto, Sound, Strobe, Fade, Manual Color Mixing, Color Presets |
| Strobe | Yes, press and hold Strobe button |
| Fade | Yes, smooth color transitions with speed control |
| Auto Programs | Auto color scroll, color fades, sound-activated |
| Sound Active | Built-in microphone, adjustable sensitivity |
| Master/Slave | Supports NASt (master) and SL1-SL4 (slave) modes |
| Blackout | Instant all LEDs off via button |
| Color Presets | 10 preset colors accessible via IR remote (0-9) |
| Manual Color Mixing | Adjust Red, Green, Blue, Amber, White, UV individually (0-255) |
| Safety | Indoor use only; avoid direct eye exposure; disconnect power before service; do not operate with damaged cord; keep away from flammable materials |
| Warranty | 2-year limited warranty |
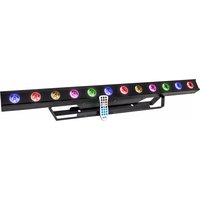
| Package Contents | VividPar HEX 6 fixture, power cable, IR remote, mounting brackets, user manual |
| Maintenance | Wipe with a dry cloth; no user-serviceable parts; opening voids warranty |
| Repairability | Contact ColorKey for service; do not attempt self-repair |
Frequently Asked Questions - VividPar Hex 6 ColorKey
User questions about VividPar Hex 6 ColorKey
0 question about this device. Answer the ones you know or ask your own.
Ask a new question about this device
Download the instructions for your Effects machine in PDF format for free! Find your manual VividPar Hex 6 - ColorKey and take your electronic device back in hand. On this page are published all the documents necessary for the use of your device. VividPar Hex 6 by ColorKey.
USER MANUAL VividPar Hex 6 ColorKey
natural_image
Hexagonal pattern composed of seven colored hexagons (red, blue, black, yellow, green, cyan) within a black border (no text or symbols)ColorKey
creative lighting

natural_image
Technical line drawing of a circular mechanical component with five holes, mounted on a stand (no text or symbols)VividPar HEX 6
RGBAW+UV Wash Light
CKU-2250
USER MANUAL
Table of Contents
INTRODUCTION ....3
SERVICE & SUPPORT ....3
DISPLAY OPERATION....4
MENU GUIDE....5
DMX VALUES....6
6 CHANNELS MODE....6
10 CHANNELS MODE....6
IR REMOTE OVERVIEW....7
OPERATION....9
TROUBLESHOOTING 10
TECHNICAL INFORMATION......11
Please read these instructions carefully before use. Operating this fixture according to these instructions is important to avoid any possible damage or accidents caused by misuse.
Introduction
Package Contents
- VividPar HEX 6
- Power Cable
- IR Remote
- Brackets
- User Manual
Caution! Opening this unit voids warranty. Contact ColorKey for any service requests.
Warning! To avoid electrical shock, be sure to disconnect power before any service or when moving or setting up the fixture.
Caution! Avoid direct eye exposure with the fixture when on.
- This fixture is for indoor use only.
- Do not install or operate this fixture near flammable materials.
- This device must be installed, operated, and maintained by a qualified professional.
- Please check if the voltage is in accordance with the rated power before installing.
- Do not operate this fixture if the power cord has been damaged. Turn off fixture and replace with a power cord of similar rating.
Service & Support
Your ColorKey product includes a 2-year warranty. For technical support or to register your product, please visit https://www.colorkeyled.com/support/
You can also reach us by phone Monday thru Friday, 8:30am – 5pm PST at (818) 578-4030.

Display Operation

Menu: Access the menu/Scroll through menu options (*Hold Menu for two seconds exit menu and return to your chosen program)
Up: Scroll through menu selection or increase parameter
Down: Scroll through menu selection or parameters decrease
Enter: Open/Select the current menu option
Menu Guide
| Menu Item | Values | Function |
| Addr | 001-512 | DMX Address setting |
| ChNd | 6ch / 10ch | Channel selection mode |
| SLNd | NASt / SL1 / SL2 / SL3 / SL4 | Master / Slave mode 1 / Slave mode 2 / Slave mode 3 / Slave mode 4 (see pg 9 &10) |
| ShNd | CoLoAutoSoUnFAdE | Performance modes – Static color select, Auto color scroll, Color fades, Sound active |
| Led | On / Off | Turn LED display on or off during use |
| diSP | disp | Flip LED display direction |
| bALA | rEd, GrEE, bLuE | Manual white balance adjustment. Add or decrease red, green, and blue values to create desired White Balance |
| NAnu | rEdGrEEbLuEUhbeAnbeuU | Manual Mode – Create color displays by increasing or decreasing the values for each colors LED value parameter from 0-255.*Example – for only Red, rEd will be 255, all other colors 0. |
| teSt | Test | Auto-test – the light will automatically engage color LEDs to test. |
| FhrS | 0-9999 | Displays lifetime fixture use hours |
| rF | Yes / No | IR Remote sensor on (Yes) / off (No) |
| teNP | Temperature | Displays temperature |
6 Channels Mode
| Channel | Value | Function |
| 1 | 0-255 | Red |
| 2 | 0-255 | Green |
| 3 | 0-255 | Blue |
| 4 | 0-255 | White |
| 5 | 0-255 | Amber |
| 6 | 0-255 | UV |
10 Channels Mode
| CH | Value | Function |
| 1 | 0-255 | Red |
| 2 | 0-255 | Green |
| 3 | 0-255 | Blue |
| 4 | 0-255 | Amber |
| 5 | 0-255 | White |
| 6 | 0-255 | UV |
| 7 | 0-255 | Master Dimmer |
| 8 | 3-255 | Strobe |
| 9 | 8-255 | Auto color scroll |
| 10 | 008-199 | Color auto scroll speed |
| 200-255 | Sound control |
IR Remote Overview
To use the IR remote, simply point the remote at the IR receiver on the lighting fixture. The IR receiver on the VividPar HEX 6 is located on the face with the LED lenses.

Black Out
Black Out mode instantly turns all LED's off.
Press the Black Out button to engage or disengage Black Out mode.
Auto
In Auto mode, the light loops through various preprogrammed colors.
To turn on Auto mode, press the Auto button, then press (+) or (-) to increase or decrease the speed of the program.
Sound
Sound-Active mode enables the light to respond to ambient sounds in the room using the fixture's built-in microphone.
Press the Sound button to activate Sound-Active mode. Press (+) or (-) to increase or decrease sound sensitivity based on the playback level of the music.
Strobe
In Strobe mode, the light will strobe while the button is pressed.
To turn on Strobe mode, press and hold the Strobe button, this mode can be engaged while running other programs for added effect. When Strobe is released, the light will continue previous operating program.
Manual Color Mixing
VividPar can create an almost unlimited number of colors by mixing the Red, Green, Blue, Amber, UV and White LEDs.
To begin mixing colors, press the Red (R), Green (G), Blue (B), Amber (A), UV (UV), White (W) button, then press (+) or (-) to increase or decrease the brightness of each color. Continue with the next color until you achieve your desired color.
Fade
In Fade Mode, the light creates smooth, gradual color transitions.
To turn on Fade mode, press the Fade button, then press (+) or (-) to increase or decrease the speed of the program.
Color Presets
10 preset colors can be accessed from the IR Remote. Press any number between (0) and (9) to set a color.
0 - White
1 - Red
2 - Magenta
3 - Yellow
4 - Green
5 - Blue
6 - UV
7 - Purple
8 - Pink
9 - Orange
Operation
Using a DMX controller:
- Use a DMX cable to connect your VividPar HEX 6 to the DMX in/out sockets on the bottom of the light.

flowchart
graph LR
    A["Module 1"] --> B["Switch"]
    B --> C["Module 2"]
    C --> D["Switch"]
    D --> E["Module 3"]
    E --> F["Switch"]
    F --> G["Control Panel"]
Using Master/Slave Mode:
The Master/Slave mode allows a group of VividPar HEX 6 units (the slaves) to duplicate the output of another VividPar HEX 6 (the master) without a DMX controller.
- Set each of the slaves:
■ Go to SLNd in the main menu and press enter.
■ Select SL1.
- Set the master:
■ Go to SLNd in the main menu and press enter.
■ Select NASt.
- The master (NASt) is the unit that runs your program whether in one of the static color modes or various Auto programs.

flowchart
graph LR
    A["Stage 1: Device with two components"] --> B["Stage 2: System with one component"]
    B --> C["Stage 3: System with one component"]
    C --> D["Stage 4: System with one component"]
    D --> E["Stage 5: System with one component"]
Using Slave modes (SL1, SL2, SL3, SL4) to create a light show
Using 5 or more lights for best effect, VividPar HEX 6 can help create auto-light shows by setting lights in order from Master, SL1, SL2, SL3, SL4 and engaging Auto Programs on the Master fixture.
- Set each of the desired slaves SL1, SL2, SL3, SL4:
■ Go to SLNd in the main menu and press enter.
■ Select SL1.
■ Repeat steps for each slave fixture SL2, SL3, and SL4
- Set the master:
■ Go to SLNd in the main menu and press enter.
■ Select NASt.
- For best effect, have lights connected in sequence from Master, to SL1, to SL2, to SL3, to SL4.
- Accessing the (ShNd) programs on the Master light will now create varying displays of synchronized light on the master and slave fixtures through (Auto) and (SoUn) functions.
Troubleshooting
| Problems | Solutions |
| No DMX Control | Ensure your DMX controller is sending signal and you are using a proper and working DMX cable. |
| No response with IR Remote | Engage and disengage Blackout as it may be active and keeping the light dark |
| No response with IR Remote | Ensure IR remote is enabled in Menu (rF) setting to YES |
Technical Information
- 6x12W RGBAW+UV LED Wash Light
• DMX Channel Modes: 6 / 10 channels
• Control modes: DMX 512, Master /Slave, IR Remote, Sound
• Power consumption: 80W
• Power supply: AC100-240V; 50-60Hz - Weight: 4.4lb
• Measurements: 10.25in. x 3.14in. x 9.25in.
Please note: As we continue to work towards improving our products and your experience as a user, we recommend that you check our website periodically for updates to user manuals and specifications at www.ColorKeyLED.com or you may contact us directly at info@colorkeyled.com.
- ColorKey
- VividPar HEX 6
- Table of Contents
- Introduction
- Package Contents
- Service & Support
- Display Operation
- IR Remote Overview
- Black Out
- Auto
- Sound
- Strobe
- Manual Color Mixing
- Fade
- Color Presets
- Operation
- Using a DMX controller:
- Using Master/Slave Mode:
- Using Slave modes (SL1, SL2, SL3, SL4) to create a light show
- Technical Information
Brand : ColorKey
Model : VividPar Hex 6
Category : Effects machine