Connect Dante - Hi-Fi System ClearOne - Free user manual and instructions
Find the device manual for free Connect Dante ClearOne in PDF.

User questions about Connect Dante ClearOne
0 question about this device. Answer the ones you know or ask your own.
Ask a new question about this device
Download the instructions for your Hi-Fi System in PDF format for free! Find your manual Connect Dante - ClearOne and take your electronic device back in hand. On this page are published all the documents necessary for the use of your device. Connect Dante by ClearOne.
USER MANUAL Connect Dante ClearOne
Network Audio Bridge for CONVERGE® PRO & SR Products
Quick-Starl Guide
natural_image
Exterior view of a black electronic device labeled 'COSCO' and 'ClearOne', with no visible text beyond labels.Table of Contents
THE CONNECT DANTE....1 SOFTWARE AND FRAMWARE VERSIONS REQUIRED....1
QUICK-START OVERVIEW ....2 QUICK-START SUMMARY ....2
UPDATE THE CONVERGE PRO FIRMWARE....4
SET THE DEVICE ID 5
CONNECTING THE CONNECT DANTE UNIT 6
UPDATING CONNECT AND BEAMFORMING
MICROPHONE ARRAY FIRMWARE....7
ADDING CONNECT NETWORK BRIDGES TO SITES....8
ADDING THE BRIDGE....8
EDITING THE CONNECT NETWORK BRIDGE IN SITE 8
DAVTE CONVERGE CONSOLE SETTINGS....9
CONREGIBING CONNECT DANTE WITH DANTE CONTROLLER 12
DIGITAL MICROPHONE INPUT PROCESSING 13
UPGRADING FROM OLDER VERSIONS
OF CONVERGE FIRMWARE 14
OPGRADING FROM CONVERGE PRO 3.X FRAWARE....14 Uncovering from CONVERGE Pro 2.X FRAWARE....14
UPGRADING FROM CONVERGE PRO.2.X FERMWARE....14 UPGRADING FROM CONVERGE PRO.1.X FERMWARE....15
PART NUMBERS....16
CLEARONE LOCATIONS 16
QUICK-START GUIDE
THE CONNECT DANTE
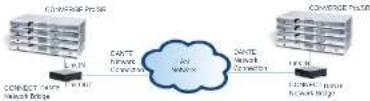
The CONNECT Dante network bridge adds Dante network audio capabilities to CONVERGE PRO and CONVERGE SR products. Up to eight CONNECT units can be attached to a single CONVERGE Pro/SR stack
The following diagram shows how two CONVERGE Pro/SR stacks within the same site can connect over a LAN network.
IMPORTANT: CONVERGE ProSR systems and all connected units
must operate at the proper software and firmware versions.
Software and Firmware Versions Required
• 4.5.x - CONVERGE Console Installer
• 4.4.x - CONVERGE Console Application
• 4.3.x - Firmware for all units including Convergo Pro, SR1212
Boarmformer, CONNECT Dante and CobraNet.
The latest versions of the software and firmware can be found on the ClearOne website at
http://www.clearone.com/resources#professional_audio
CONNECT NETWORK BRIDGES QUICK-START GUIDE QUICK-START OVERVIEW
Installing and using the CONNECT Dante bridges in your CONVERGE ProSR site is subject to the following rules:
- The CONNECT Danle can only be used with CONVERGE Pro/SR systems operating at version 4.3.X or greater, and requires that the firmware on the CONVERGE Pro/SR be updated.
- You must have a CONVERGE Pro 840T, 880, 880T, 880TA, 81, TI 120 VH20 and/or SR1212, SR1212A in the sila.
- The CONNECT Danle bridge can only interlace with the Dante network architecture, but can operate in sites including CONNECT CobraNet - bridges
Quick Start Summary
These steps must be done in the following order to use the CONNECT network audio bridge in your CONVERGE Pro Site:
1 Update the CONVERGE Pro Software to version 4.4.X using the software installer version 4.5.X
2. Update the CONVERGE Pro firmware to version 4.3.X using CONVERGE Console.
- Update the firmware of all devices on the site to 4.3 X. (CONVERGE Pro units, Beamforming Microphone Arrays, CONNECT CobraNet, etc.)
- Set the Device ID of the CONNECT Dante network audio bridge using the Device ID rotary selector switch at the back of the device.
- Connect the CONNECT Dante network audio bridge to the updated CONVERGE Pro/SR via the Expansion bus (E-pus).
- Configure the CONNECT Dante bridge with CONVERGE Console.
- Configure the Danle network using the Danle Controller software
CONNECT NETWORK BRIDGES QUICK-START GUIDE UPDATE THE CONVERGE PRO FIRMWARE
After updating your CONVERGE Console software, you must update your CONVERGE firmware to version 4.3 or higher. All CONNECT network audio bridges are not recognized by systems running older versions and the 4.3 X versions offer significant upgrades from previous versions
ClearOne strongly encourages users to upgrade all firmware to the latest release version. Instructions for updating from version 1.X 2.X and 9X are detailed later in this document.
NOTE: Save the CONVERGE Console file before performing any firmware upgrade.
-
Download the 4.3.X firmware file to the stack of units.
-
The units will default and reboot after the download of 4.3.X firmware
-
Units are fully upgraded
-
Verify units have been upgraded by checking the firmware version on the front panel.
Reconnect all E-bus cables, if needed, to complete the stack of units.
SET THE DEVICE ID
Set each CONNECT unit to a unique ID using the Device ID selector rotary switch on the back of the unit. (Range 0-7) Each CONNECT unit in any site needs a unique Device ID. Only 8 units are allowed in any site.
Device ID Rotary Selection Switch

CONNECT NETWORK BRIDGES QUICK-START GUIDE CONNECTING THE CONNECT DANTE UNIT
Connect the CONNECT Dante units to the CONVERGE Pro/SR stack via the E-bus connections using CAT5/CAT6-24AWG solid conductor RJ4S cables. Power to the CONNECT Dante is supplied by a standard power adapter supplied with the unit.

text_image
E-bus LINK IN from Slack Device ID Switch 5V DC Power Input Primary to Danta Network E-bus LINK OUT LAN Pass Secondary to Danta Network Connects to CONVERG PC, or any device requiring EthernetUPDATING CONNECT AND BEAMFORMING MICROPHONE ARRAY FIRMWARE
NOTE: AI CONNECT Dante, CONNECT CooraNet, and Beamforming Microphone Array units in the site must be running the same level of firmware (4.3.X) to be compatible with the CONVERGE Pro/SR units in the site.
- Connect the E-bus cable between the CONVERGE Pro units and the CONNECT audio network bridge or Beamforming Microphone Array.
- Connect the CONVERGE Pro units with CONVERGE Console
- Open the Firmware Loader screen
-
Browse for the corresponding firmware file: connect_dante.mdo for the CONNECT AVB cobranet.mdo for the CONNECT CobraNet bf_mic.mdo for the Beamforming microphone Array
-
Download the firmware.
-
The CONNECT audio network bridge will default and reboot after the download of the firmware. (Check the Unit Properties screen for the device to verify this cover.)
- Units are fully upgraded. (All units connected via the E-bus on the site are simultaneously updated.)
- Restore the saved site file to the system using CONVERGE Console.
CONNECT NETWORK BRIDGES QUICK-START GUIDE ADDING CONNECT NETWORK BRIDGES TO SITES
Each CONNECT network bridge must be added to the site using the CONVERGE Console 4.9 X and later software. This software also provides the capability selecting the audio channels and other characteristics. Refer to the online help available with the CONVERGE Pro/SR software for adding devices.
Adding the Bridge
Using the CONVERGE Console software, ADD the CONNECT Danio network bridge to the site using the drop-down menu.

Editing the CONNECT Network Bridge in Site
Select the CONNECT audio network bridge from the Site View lab in Console, and the device appears under the Site button on the right-hand portion of the screen.

Click on the device box and the Unit Properties appear for the device.
Dante CONVERGE Console Settings
The next two figures show the Unit Properties tabs for the CONNECT Dante bridge.
Under the General Tab, set the Device ID (DID) to match that of the rotary selection switch of the CONNECT Danio device.

text_image
CONNECT Display List Properties - [View 2017] General [ ] General A/B C/C D/D E/F F/G G/H H/I I/II/III/IV/VI/IX/IX/IX/IX/IX/IX/IX/IX/IX/IX/IX/IX/IX/IX/IX/IX/IX/IX/IX/IX/IX/IX/IX/IX/IX/IX/IX/IX/IX/IX/IX/IX/IX/IX/IX/IX/IX/IX/IX/IX/IX/IX/IX/IX/IX/IX/IX/IX/IX/IX/XX Browse Shower: Windows Import: Windows Export: Windows Help: HelpCONNECT NETWORK BRIDGES QUICK-START GUIDE
Under the Dante Tab, connection information from the Dante network is displayed.

text_image
C:\WINNT\Current Unit Properties - Windows 10 Default Name: Win: 123.65.67.70.18 Secondary: 124.00.78.61.00 Default Primary: 102.160.259.1 Secondary: 102.160.259.2 Channel Name: Win: Win: Win: Win: Win: Win: Win: Win: Win: Win: Win: Win: Win: Win: Win: Win: Win: Win: Win: Win: Win: Win: Win: Win: Win: Win: Win: Win: Win: Win: Win: Win: Win: Win: Win: Win: Win: Win: Win: Win: Win: Win: Win: Win: Win: Win: Win: Win: Win: Win: WINNT Name: 0.00 Win: 0.00 Win: 0.00 Win: 0.00 Win: 0.00 Win: 0.00 Win: 0.00 Win: 0.00 Win: 0.00 Win: 0.00 Win: 0.00 Win: 0.00 Win: 0.00 Win: 0,00 Win: 0,00 Win: 0,00 Win: 0,00 Win: 0,00 Win: 0,00 Win: 0,00 Win: 0,00 Win: 0,00 Win: 0,00 Win: 0,00 Win: 0,00 Win: 0,00 In: CancelRefresh - Click the Refresh button to update the information from the CONNECT Dante unit
Link or Duplex Indicator Shows if a link is present on either the Primary or Secondary port.
MAC Address - The Primary and Secondary MAC Addresses
IP Address - The IP Addresses of each network port.
Dante Device Name - Name of the CONNECT Dante unit set by the Dante Controller
Channel Names - The fixed E-bus Channels (S through Z) and their correlating transmit and receive channel names as set by the Dante Controller.
Versions - The Dante version information
CONNECT NETWORK BRIDGES QUICK-START GUIDE
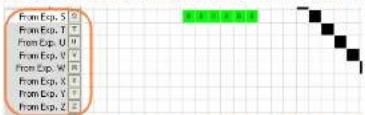
text_image
From Exp. 5 From Exp. T From Exp. U From Exp. V From Exp. W From Exp. X From Exp. Y From Exp. ZNote: These channels will not appear in the Matrix if the CONVERGE Console has Digital Microphone Input Processing enabled in the Site Properties Management tab;
Dante Controller Settings
The Dante Controller software, provided by Audinala™, is used to discover, control, and configure all devices and services on the Dante network including the CONNECT Dante network bridges. This software and its documentation can be obtained from the ClearOne website:
http://www.clearone.com/resources#professional_audio
Configuring CONNECT Dante with Dante Controller
Using the Dante Controller software, perform the following
1 Connect a PC with Dante Controller Software installed to the Dante Network.
2. Connect the Primary ports of the CONNECT Danle units to the Danle Network.
- Use the Dante Controller Software to discover the CONNECT Danta units
- Use the Routing tab on the Dante Controller Software to route audio between the CONNECT Dante units
- Use the Matrix Screen on the CONVERGE Consolo software to route audio to/from Expansion Bus S-Z. Dante channels 1-8 are associated with Expansion Bus channels S-Z on both the input and output cells.
Note: You are unable to route audio across two Dante units without the Audinalo Controller software
Digital Microphone Input Processing
Beginning with CONVERGE Console 4.4X, Digital Microphone Input Processing is included to enable processing CONNECT Dante or CONNECT CobraNet audio through the input stage instead of the audio on the analog inputs. This feature disables the rear panel analog MicroLine inputs and instead the uses the audio coming in from a CONNECT Dante or CobraNet Bridge. This allows microphones on a Dante or CobraNet network to be processed using AEC, Noise Suppression, AGC, Filtering, Gating, etc.
With this enabled, the analog output audio is mirrored to the digital outputs on the CONNECT Dante or CobraNet Bridge.
Details for these controls will be detailed in the COMVERGE Console 4.4.X documentation.
CONNECT NETWORK BRIDGES QUICK-START GUIDE UPGRADING FROM OLDER VERSIONS OF CONVERGE FIRMWARE
Please follow the steps listed below to upgrade your firmware. NOTE: Save the CONVERGE Console site file before performing any firmware upgrade.
Upgrading from CONVERGE Pro 3.X firmware
- Remove any 1.X, 2.X and 4.X units from the stack by disconnecting the expansion bus link cable from the 5.X units.
- Re-connect to the 3 X stack with CONVERGE Console
- Download the 4.3X firmware file to the stack of units
- The units will default and reboot after the download of 4.3X firewall.
- Units are fully upgraded
- Verly units have been upgraded by checking the firmware version on the from panel.
Reconnect all E-bus cables, if needed, to complete the stack of units.
Upgrading from CONVERGE Pro 2.X firmware - Remove any 1.X, 3.X and 4.X units from the stack by disconnecting the expansion bus link cable from the 2.X units.
- Re-connect to the 2X stack with CONVERGE Console
-
Download the 4.3.X firmware file to the stack of units.
-
The units will default and reboot after the download of 4.3.X firmware. The 2 X to 4.3 X upgrade requires the firmware to be loaded twice to complete the version upgrade.
-
Units are fully upgraded
-
Verify units have been upgraded by checking the firmware version on the front panel.
Reconnect all E-bus cables, if needed, to complete the stack of units.
Upgrading from CONVERGE Pro 1.X firmware
- Forms any 2.X, 3.X and 4.X units from the stack by disconnecting the expansion bus link cable from the 1.X units
- Re-concept to the 1 X stack with CONVERGE Console
- Download: the 4.3.X firmware file to the stack of units
- The units will default and reboot after the download of 4.3.X firmware. The * X to 4.3 X upgrade requires this firmware to be loaded twice to complete the version upgrade.
- Reconnect to the stack with CONVLRGE Console. Download 4.3.X a second time to the units. The units will reboot.
- Units are fully upgraded.
- Verify units have been upgraded by checking the firmware version on the front panel.
Reconnect all E-bus cables, if needed, to complete the stack of units.
CONNECT NETWORK BRIDGES
PART NUMBERS
910-151-807 CONNECT Dante Network Bridge
CLEARONE CONTACTS
| HEADQUARTERS: | TechSales |
| Salt Lake City, UT USA325 Way Hotel WaySum 500Salt Lake City, UT 54116 | Tel: 800 705-2113e-mail: ad.kreles@clearone.com |
| Technical Support | |
| Sales: +1 800 579 7200Toll Free: 606 548, 7700Fleet: 801 377 2087e-mail: com@clearone.com | Tel: 800 283 6596e-mail: tech support@clearone.com |
| EMEA: | APAC: |
| Tel: 44 1454 618 377e-mail: global@clearone.com | Tel: 1052 2000 4296e-mail: global@clearone.com |
| LATAM: | Middle East: |
| Tel: 801 574 3921e-mail: global@clearone.com | Tel: 1952 3700 4296e-mail: global@clearone.com |
© A14-DeoDr. Inc., 2019, 10:30
Dome is a trademark of Australia Pty. Inc., Australia is a registered trademark of Australian Pty. Inc.