MJ504M-RM - Lawn mower Sun Joe - Free user manual and instructions
Find the device manual for free MJ504M-RM Sun Joe in PDF.

User questions about MJ504M-RM Sun Joe
0 question about this device. Answer the ones you know or ask your own.
Ask a new question about this device
Download the instructions for your Lawn mower in PDF format for free! Find your manual MJ504M-RM - Sun Joe and take your electronic device back in hand. On this page are published all the documents necessary for the use of your device. MJ504M-RM by Sun Joe.
USER MANUAL MJ504M-RM Sun Joe
A Division of Snow Joe ^15 , LLC
MANUAL QUAD-WHEEL REEL MOWER
16-INCH | 9 CUTTING HEIGHTS | RAZOREEL
Model MJ504M-RM Form No. SJ-MJ504M-RM-880E-V1
THANKS FOR YOUR PURCHASE OF A REMANUFACTURED PRODUCT.
To make sure you get the most out of your product, be sure to register online at
snowjoe.com
to enjoy full product support.

OPERATOR'S MANUAL
A Division of Snow Joe ^13 , LLC
MANUAL QUAD-WHEEL REEL MOWER
16-INCH | 9 CUTTING HEIGHTS | RAZOREEL
Model MJ504M-RM Form No. SJ-MJ504M-RM-880E-V1
IMPORTANT!
Safety Instructions
All Operators Must Read These Instructions Before Use
Always follow these safety guidelines. Failure to do so may result in serious bodily injury or death.
General Safety WARNINGS!
When using this reel mower, basic safety precautions should always be followed to reduce the risk of personal injury. These precautions include:
⚠ WARNING! This unit can be dangerous! Careless or improper use can cause serious injury.
⚠ WARNING! Risk of dismemberment: keep hands and feet away from the rotating blades and the cutting area.
Before using the reel mower, familiarize yourself with the controls, especially how to stop the mower in an emergency. The only individuals who should use the mower are those who thoroughly understand these instructions and know how to properly operate the unit. Children should never be allowed access to the mower.
Retain this manual for future reference and reread it at the start
- Make sure that the reel mower is in proper working order prior to use. Do not attempt to operate this reel mower if it is damaged. Contact your authorized Snow Joe ^3 + Sun Joe ^5 dealer or call the Snow Joe ^5 + Sun Joe ^5 customer service center at 1-866-SNOWJOE (1-866-766-9563).
IMPORTANT!
Safety Instructions for Walk-Behind Reel Mowers
General Operation
- Read, understand, and follow all instructions on the machine and in the manual(s) before starting.
- Do not put hands or feet near or under the machine. Always stay clear of the discharge opening.
- Only responsible adults who are familiar with the instructions should be allowed to operate this machine.
- Clear the mowing area of foreign objects such as rocks, wire, toys, and other miscellaneous articles, which could be picked up and thrown by the rotating blades.
- Make sure that the mowing area is clear of bystanders before starting the mower. Stop the mower if anyone enters the area.
• Always look down and behind before starting and while moving backward with the mower.
Slope Operation
Slopes are major factors involved in slip and fall accidents. Such accidents can cause severe personal injury. Operating this mower on any inclined surface requires extra caution. If you feel uneasy on a slope, do not mow it.
- Mow across the face of a sloped surface; never mow up and down a slope. Exercise extreme caution when changing direction on a slope.
- Watch for holes, ruts, bumps, rocks, or other hidden objects. These may cause an unexpected slip or fall.
- Do not mow on wet grass or excessively steep slopes. Poor footing could cause a slip and fall accident.
- Do not mow near drop-offs, ditches, or embankments. You could lose your footing or balance.
Children
Tragic accidents can occur if the operator is not alert to the presence of children. Children are often attracted to the mower and the mowing activity. Never assume that children will remain where you last saw them.
- Keep children out of the mowing area and under the watchful care of a responsible adult other than the operator.
- Stay alert and stop the reel mower if a child enters the area.
- Never allow children access to the machine.
- Use extra care when approaching blind corners, shrubs, trees, or other objects that may block your view of a child.
Service
- Keep all nuts and bolts tight.
- Never tamper with safety devices. Regularly check to ensure these devices are in place and in proper working
Safety Symbols
The following table depicts and describes safety symbols that may appear on this product. Read, understand, and follow all instructions on the machine before attempting to assemble and operate.
| Symbols SymbolsDescriptions Descriptions | |||
 | READ THE OPERATOR'S MANUAL(S) – Read, understand, and follow all instructions in the user manual(s) before attempting to assemble and operate. |  | CAUTION! Beware of stones and other foreign objects that could be thrown from the appliance. |
 | SAFETY ALERT – Indicates a precaution, a warning, or a danger. |  | Slip on slope hazard – Use extra caution when mowing on slopes to prevent slip and fall accidents. |
 | DANGER! Cutting/dismemberment hazard – Keep feet away from the rotating blades. |  | Keep bystanders and children a safe distance away. |
Know Your Manual Reel Mower
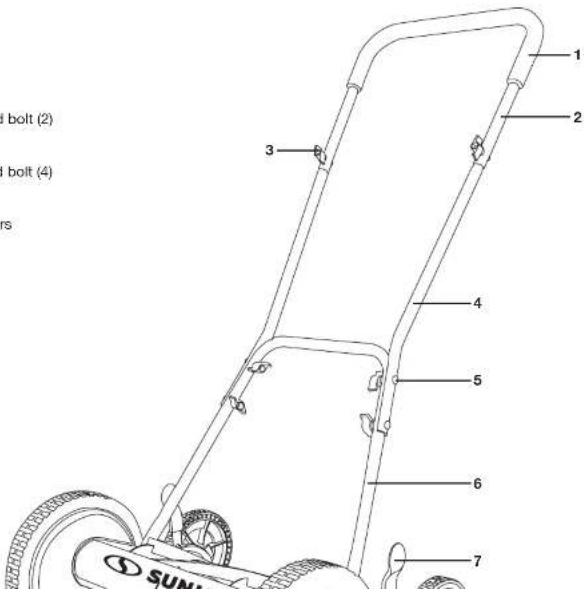
Read the owner's manual and safety instructions carefully before operating the reel mower. Compare the illustration below to the reel mower in order to become familiar with the location of the various controls and adjustments. Save this manual for future reference.
- Foam grip
- Upper handle
- Upper handle knob and bolt (2)
- Middle handle bar (2)
- Lower handle knob and bolt (4)
- Lower handle
- Height adjustment levers
- Rear wheel (2)
- Front wheel (2)
- Reel mower body
- Steel blades
text_image
1 2 3 4 5 6 7 d bolt (2) d bolt (4) ers SUN.Unpacking
Carton Contents:
- Reel mower body
- Upper handle
• Middle handle bar (2) - Lower handle
- Handle knob and bolt (6)
• Paper test strips (20) -
Hex wrench
• Manuals with registration card -
Carefully remove the manual reel mower and check to see that all of the above items are supplied.
- Inspect the product carefully to make sure no breakage or damage occurred during shipping. If you find damaged or missing parts, DO NOT return the unit to the store. Please call the Snow Joe ^® + Sun Joe ^® customer service center at 1-866-SNOWJOE (1-866-766-9563).
NOTE: Do not discard the shipping carton and packaging material until you are ready to use your new manual reel mower. The packaging is made of recyclable materials. Properly dispose of these materials in accordance with local regulations.
IMPORTANT! The equipment and packaging material are not toys. Do not let children play with plastic bags, foils, or small parts. These items can be swallowed and pose a suffocation risk!
Assembly
Fitting the handle
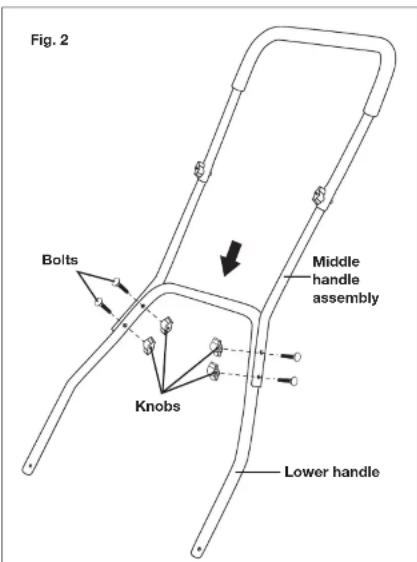
NOTE: Do not tighten the knobs completely until assembly is
- Attach the upper and middle handle assembly to the lower handle using the remaining knobs and bolts provided. Tighten the knobs on each side to ensure a secure fit (Fig. 2).
text_image
Fig. 2 Bolts Knobs Middle handle assembly Lower handle-
After assembling the handle, line up the holes at the lower end of each handle arm with the short posts that extend from the side plates of the mower base (Fig. 3).
-
Pull both sides of the lower handle bars over the posts on the mower body. Press inward on the handle bars to ensure a secure fit over the posts.
Operation
Cutting height adjustment
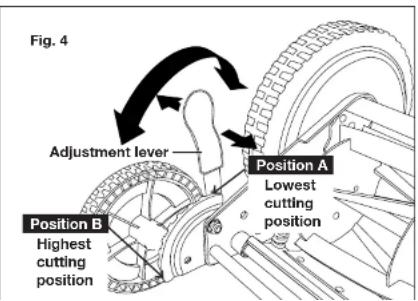
- The cutting height of the 16' (40.6 cm) reel mower can be adjusted from 1.1" to 2.9" (27 to 73 mm) by moving the 9-position height adjustment levers to the desired setting. The height adjustment levers are located next to the smaller wheels.
- In order to set the mower to its lowest cutting position, pull the adjustment levers on both sides, one at a time, and set them to position A (Fig. 4).
- In order to set the mower to its highest cutting position, move the adjustment levers on both sides to position B (Fig. 4).
NOTE: The two adjustment levers MUST be set to the same position (height).
text_image
Fig. 4 Adjustment lever Position A Lowest cutting position Position B Highest cutting position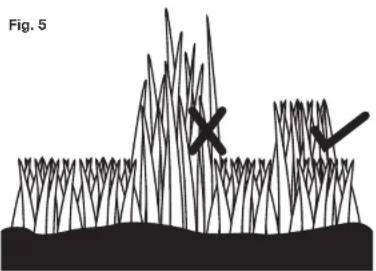
text_image
Fig. 5Quality
- To verify proper blade alignment, place the mower on a flat surface. Remove the handles and turn the mower reel upside down to expose the cutting bar.
- Insert a sheet of paper between the blade reel and cutting bar, then slowly turn the wheel by hand (Fig. 6).

text_image
Fig. 6 PaperAdjusting the mower blades
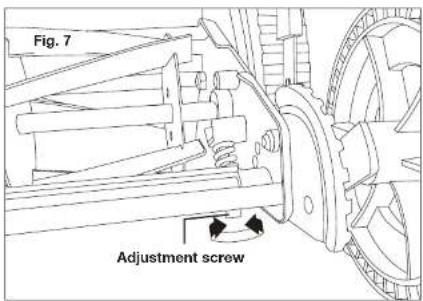
- Each end of the cutting bar can be adjusted separately.
- The cutting bar blade, which is located under the reel, is able to pivot. The two adjustment nuts located at the back of the mower move the cutting bar away from the blades when they are turned counterclockwise, and closer to the blades when they are turned clockwise (Fig. 7).
text_image
Fig. 7 Adjustment screw
text_image
Fig. 8 1/3 1"- Following this rule will stimulate the turf's root growth, maintain its health, and encourage its natural ability to crowd out unwanted weeds.
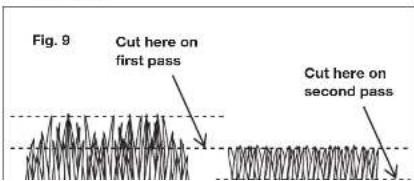
Tall grass requires incremental cutting
- For extremely tall grass, set the cutting height at the mower's maximum setting for the first pass, and then reset it to the desired height and mow a second or third time (Fig. 9).
⚠ WARNING! Do not overtighten the adjustment screws as this could damage the cutting bar. Both screws must be tight on final adjustment.
- To loosen the blades, use the hex wrench provided and turn both adjustment screws by an equal amount counterclockwise.
- To tighten the blades, tighten both screws by an equal amount by turning them clockwise.
NOTE: If you have any questions, please call the Snow Joe ^3 + Sun Joe ^9 customer service department at 1-866-SNOWJOE (1-866-766-9563) for assistance.
text_image
Fig. 9 Cut here on first pass Cut here on second passTransporting the Mower
During normal operation, the blade reel will turn anytime the mower's front wheels are turning. To safely move the mower from one location to another without the blade reel turning, simply pivot the handle over the reel and push the mower from the opposite side. Pushing the mower in this manner (transport mode) prohibits the blade reel from turning (Fig. 10).
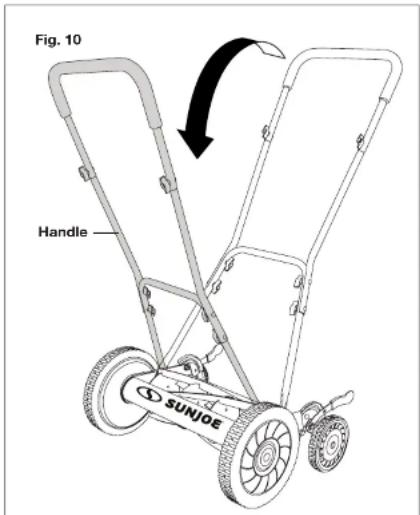
text_image
Fig. 10 Handle SUNJOE⚠ WARNING! Clean any grinding compound or debris from the cutting bar blade, reel blade, pinions, and pawls.
NOTE: Use industrial or valve lapping compound between 100 and 240 grit.
NOTE: Lubricate the axle and pinion with a light film of wheel bearing grease.
Cleaning and Storage
- Clean the exterior of the machine thoroughly using a soft brush and cloth before storing. Do not use water, solvents, or polishes.
- Turn the mower on its side to clean the blade area.
⚠ WARNING! Do not place your hands inside or near the cutting area. If grass cuttings are compacted in the blade area, remove them using a wood or plastic cleaning tool appropriate for blade cleaning.
- Store the mower in a dry place. Do not place other objects on top of the mower during storage.
Maintenance Tips
Reel mowers are relatively low maintenance. For consistent cutting, follow the below instructions:
- Always keep the cutting bar properly adjusted. Refer to the instruction manual for further directions.
- Regularly clean and lubricate cutting edges with light spray oil.
IMPORTANT! Reel mowers have difficulty cutting tall weeds, such as dandelions, and will often bend, rather than cut, such weeds. Cut often to prevent this.
Service and Support
If your Sun Joe ^® manual reel mower requires service or maintenance, please call the Snow Joe ^® + Sun Joe ^® customer
NOTES

SNOW JOE ^® + SUN JOE ^® REFURBISHED GOODS WARRANTY
GENERAL CONDITIONS:
Snow Joe ^a + Sun Joe ^c operating under Snow Joe ^d , LLC warrants this refurbished product to the original purchaser for 90 days against defects in material or workmanship when used for normal residential purposes. If a replacement part or product is needed, it will be sent free of charge to the original purchaser except as noted below.
The duration of this warranty applies only if the product is put to personal use around the household. It is the owner's responsibility to correctly perform all maintenance and minor adjustments explained in the owner's manual.
HOW TO OBTAIN YOUR REPLACEMENT PART OR PRODUCT:
To obtain a replacement part or product, please visit snowjoe.com/help or email us at help@snowjoe.com for instructions. Please be sure to register your unit beforehand to speed up this process. Certain products may require a serial number, typically found on the decal affixed to the housing or guard of your product. All products require a valid proof of purchase.
EXCLUSIONS:
- Wearing parts like belts, augers, chains and tines are not covered under this warranty. Wearing parts can be purchased at snowjoe.com or by calling 1-866-SNOWJOE (1-866-766-9563).
- Batteries are covered in full for 90 days from the date of
Snow Joe ^6 + Sun Joe ^6 may from time to time change the design of its products. Nothing contained in this warranty shall be construed as obligating Snow Joe ^5 + Sun Joe ^3 to incorporate such design changes into previously manufactured products, nor shall such changes be construed as an admission that previous designs were defective.
This warranty is intended to cover product defects only. Snow Joe ^® , LLC is not liable for indirect, incidental or consequential damages in connection with the use or misuse of the Snow Joe ^® + Sun Joe ^® products covered by this warranty. This warranty does not cover any cost or expense incurred by the purchaser in providing substitute equipment or service during reasonable periods of malfunction or non-use of this product while waiting for a replacement part or unit under this warranty. Some states do not allow exclusions of incidental or consequential damages so the above exclusions may not apply in all states. This warranty may give you specific legal rights in your state.
HOW TO REACH US:
We're here to help Monday through Friday from 9AM to 6PM EST. You can reach us at 1-866-SNOWJOE (1-866-766-9563), online at snowjoe.com, via email at help@snowjoe.com or tweet us @snowjoe.
EXPORTS:
Customers who have purchased Snow Joe ^® + Sun Joe ^®