ServerSwitchIQ SSIQ8-I5 - Security Camera Razberi - Free user manual and instructions
Find the device manual for free ServerSwitchIQ SSIQ8-I5 Razberi in PDF.

User questions about ServerSwitchIQ SSIQ8-I5 Razberi
0 question about this device. Answer the ones you know or ask your own.
Ask a new question about this device
Download the instructions for your Security Camera in PDF format for free! Find your manual ServerSwitchIQ SSIQ8-I5 - Razberi and take your electronic device back in hand. On this page are published all the documents necessary for the use of your device. ServerSwitchIQ SSIQ8-I5 by Razberi.
USER MANUAL ServerSwitchIQ SSIQ8-I5 Razberi
Product Installation Guide
Version 2.0.2
Razberi Product Installation Guide
Razberi Product Installation Guide
Product List
EndpointDefender™ 5
ServerSwitchIQ™ 17
Razberi Monitor™ 39
EndpointDefender™
Table of Contents:
Package Contents....7
Hardware Overview....7
Front View
Rear View
LED Operation Information
Install SFP Modules
Power Notice
Mounting Options 9
Software Overview....11
EndpointDefender™ Web Interface
Razberi Monitor™
Razberi MonitorCloud™
Obtaining and Changing an IP Address.... 11
DHCP Procedure
Static IP Procedure
Change IP Connection Type or Address as Appropriate
Managing EndpointDefenders....12
Connect and Secure Endpoints 13
How to Factory Reset the Product....13
Specification 14
PoE
Ethernet Switch
Software
Alerts
Part Numbers
Support and Warranty Information....15
This installation guide provides instructions for installing Razberi EndpointDefenders and monitoring them using Razberi Monitor software.
Package Contents
- EndpointDefender™ Cybersecure PoE Appliance
• Power Cord (16/24 port units)
• Rack Mounting Brackets (16/24 port units)
• Power Supply (8 port unit) - Installation Guide
Hardware Overview
Front View

text_image
1 Power 2 PoE IndicatorRear View
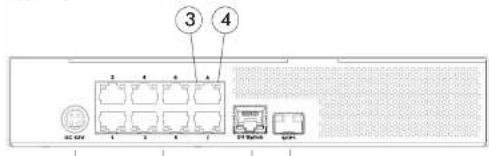
text_image
③ ④ 2 4 6 8 1 DC MVR 1 2 3 4 ST Bypass GPTSLED Operation Information
The tables below describe the status conditions of the various light emitting diode (LED) lights on the front and rear of your EndpointDefender.
Front Power and PoE Port LED Information
When the unit is powered, the Power LED will be on (green). When endpoints are connected to the device ports, they will be off, on (red), or blinking.
| LED STATUS | ||
| PoE LED OFF | Poe not provided | |
| RED ON PoE provided | ||
| RED BLINKING PoE overloaded | ||
Rear RJ45 Connector LED Information
Each RJ45 connector has a left and right LED. Data rate is shown on the left LED and link status is shown on the right LED.
| LED STATUS | |
| Left LED Data Rate Indicator | OFF 10-MBPS data rate selected |
| GREEN 100-MBPS data rate selected | |
| ORANGE 1000 MBPS data rate selected (U1 only) | |
| Right LED Link Status Indicator | OFF LAN link not established |
| AMBER ON LAN link established | |
| AMBER LAN activity is occurring | |
Install SFP Modules
The SFP port should use UL listed transceiver products, rated 3.3 V DC, Laser Class 1. The SFP is a combo port. Only the SFP or the RJ45 Uplink can be active at any given time.
Power Notice
This product requires 100-240 VAC / 50-60 HZ power. Consider using an UPS (Uninterruptible Power Supply) to avoid network data loss or network downtime. Installing a surge protector may help protect the product from being damaged by unregulated power surges.
Mounting Options
Rack Mounting
16/24 port EndpointDefenders come with rack mounting brackets and side mount screws.
16/24 Port Mount Kit (side mount screws not shown)
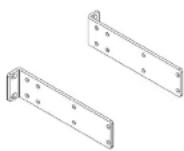
8 port EndpointDefenders require a mounting kit (MNT-RACK-SSIQ8) sold

text_image
Technical diagram of a rectangular electronic device with labeled components 1 and 28 Port Mounting Kit (MNT-RACK-SSIQ)
1 Mounting Tabs
2 Power Supply Location
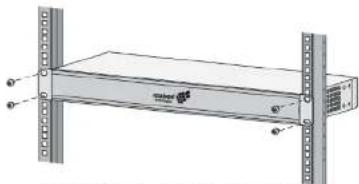
- Remove the rubber feet from the bottom of the EndpointDefender to ensure a proper fit within the rack.
- For 16/24 port EndpointDefenders, remove the front screws on both sides of the unit and align them with the mounting bracket holes. Insert the screws included with the kit and tighten them to secure the brackets. The removed screws can be discarded.
- For 8 port mounting kits, remove the rear side screws on both sides of the device, place the device within the kit and align the device's holes with kit tabs (1). Insert and tighten the screws to secure the EndpointDefender to the kit. Place the power supply to the right of the device on the kit (2).
- Place the assembled kit within the rack. Align the kit's rack brackets with the rack post mounting holes. Insert rack post screws (not included) and tighten them.
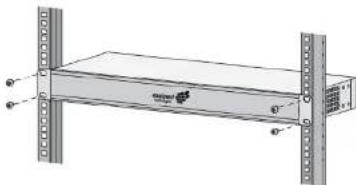
natural_image
Diagram of a server rack with vertical racks and a central shelf (no text or symbols)Mounting the product to rack posts.
Software Overview

pointDefender™ Web Interface
Your product has an embedded web management interface that may be accessed using the default username: admin and password: system. You will use the web interface to configure and secure the product. Access to the web management interface requires an IP address. Detailed instructions on obtaining the IP address are covered later in this guide.

Razberi
Monitor™
Razberi Monitor is a .NET Windows service that collects device information, monitors devices, and proactively notifies users of alert conditions. Razberi Monitor has alarm integrations with other systems such as Milestone XProtect® and Razberi MonitorCloud. Razberi Monitor is installed on every ServerSwitchIQ, Rugged, and Core unit. Alternatively, it can be installed on any Windows 10, Windows Server 2012 R2, or Windows Server 2016 platform. Instructions for installing and using Razberi Monitor are covered in the Razberi Monitor section.

Razberi
MonitorCloud™
MonitorCloud provides 24/7 health monitoring and centralized management using secure, cloud-based services. You can receive Razberi Monitor performance and cyber security alerts from thousands of endpoints and Razberi appliances via email and SMS messages using MonitorCloud. For more information on Razberi MonitorCloud, visit www.razberi.net/support to review Razberi MonitorCloud prerequisites.
Obtaining and Changing an IP Address
To reason and manage your EndpointDefender you will need to obtain its
EndpointDefender
server network to assign its IP address.
- Use an IP device discovery tool such as Windows Network Discovery to discover your device.
Static IP Procedure
- Power the device and connect the EndPointDefender's Uplink 1 network interface to a test or lab network of 169.254.X.X/ subnet 255.255.0.0
- The EndpointDefender's static IP address is shown on its product label. This unique address will be within the 169.254.X.X/ subnet 255.255.0.0 network. Once you have the device's IP address, it may be changed.
Change IP Connection Type or Address as Appropriate
- Browse to the device's IP address, enter the default user name of admin and password of system.
- Follow the prompts to change the password. Assign the device's name and location. Record the new password in secure location.
- To change the IP connection type or IP address, navigate to the "Network" tab and enter the desired network settings. Select "Save" and "No" when asked to reboot the device.
- Remove power and connect to the production network.
Managing EndpointDefenders
Use Razberi Monitor installed on a Razberi appliance or other Windows device to discover, add, and manage EndpointDefenders and their endpoint devices.
- Select the Razberi Monitor desktop icon to open its web-based management interface.


EndpointDefender
- To add discovered, unmanaged devices, go the EndpointDefender tab, click "Add Devices" and select the add button icon to manage the device. For devices not discovered, select the "Add by IP" button. You will be prompted to enter the device's IP address and credentials to manage. For discovering EndpointDefenders on a layer 2 network, SSDP must be enabled.
- Click on "Managed Devices" to view all managed EndpointDefenders and their status.
| Name | Molecule | - | Model | Year | Year | Year | Emissionation | Outcome |
| H2V | H2O-01324 | 153321.17 | 200947.67 | 20124014.54 | 20081027.03 | ✓ | Normal | # |
| D2V, D1, D2, D3 | D2V.124 | 153321.17 | 200947.67 | 20124014.54 | 20081027.03 | ✓ | Normal | # |
| ZnP, ZnF, ZnT | ZnP.123 | 153321.17 | 200947.67 | 20124014.53 | 20081027.03 | ✓ | Normal | # |
Managed Devices and their Status
- Razberi Monitor is a licensed product for providing alerts to external systems. To obtain a license, contact Razberi Sales via email at salesinfo@razberi.net.
Connect and Secure Endpoints
If your network and endpoint devices (cameras, controllers and IoT devices) are DHCP enabled, connect the devices to PoE LAN ports to obtain IP addresses, otherwise ensure the endpoint devices' IP addresses are within the same subnet as the EndpointDefender's network. Power over Ethernet (PoE) will automatically be provided to devices that require it. Secure your endpoint devices from cyber security threats by browsing to the EndpointDefender's CameraDefense webpage. Follow the CameraDefense setup instructions to bind MAC addresses, limit services, and apply other security policies. See the User Guide, CameraDefense section for more information and a detailed explanation of CameraDefense cyber security features, found at www.razberi.net/support.
How to Factory Reset the Product
In the event you cannot access the product's web interface. it can be
EndpointDefender
- Using a short CAT 5 / 6 LAN cable, connect RJ45 LAN ports 1 and 2 together creating a loop-back condition. Wait for 15 seconds for detection of the loop-back condition.
- Remove the CAT 5 / 6 LAN cable and wait for 1 minute as the unit performs a factory reset.
- Your EndpointDefender's IP address and login credentials will be restored to their factory defaults.
Specification
PoE
- IEEE 802.3af, 802.3at
- 8 or 16 ports
- Up to 30W per port
Ethernet Switch
- HTTPS browser interface
- Layer 2 switching
• VLAN - DHCP server
• Simple Service Discovery Protocol
• AES 256 encrypted communications - Deep packet inspection to support Razberi CameraDefense
Software
• Razberi CameraDefense (included)
• Razberi Monitor (license not included)
Alerts
- Hardware performance
- Cyber
For a complete listing of all supported alerts see the User Guide.
Part Numbers
• EPD-8P: 8 Port EndpointDefender, 8 PoE, 140W output
- EPD-16P: 16 Port EndpointDefender, 6 PoE, 277W output
- MNT-RACK-SSIOR: 8 Port EndpointDefender rack mount kit
EndpointDefender
Support and Warranty Information
If you experience any problems with the installation or operation of this product do not return it, please contact Razberi.
For technical support via phone:
• In the United States, call 469-828-3380 Option 3, from 8:00 AM to 5:00 PM CDT.
• In Latin America, call +52 55 4161 1511, from 8:00 AM to 5:00 PM CDT.
• In the UK / Europe / Middle East / and Asia, call +44 113 868 0160
For technical support via email, contact technicalsupport@razberi.net
For information about Razberi's product warranty, see www.razberi.net/support/warranty/
ServerSwitchIQ™
Table of Contents
Package Contents....19
8 Port
16/24 Port 1U
24 Port 2U
Hardware Overview....19
Model Front/Rear Views
LED Operation Information
Network Uplinks
Power Notice
Mounting Options 24
8 Port
16/24 Port 1U
24 Port 2U
Software Overview....29
Operating System Activation
NVIDIA® GPU (optional)
Setup Wizard
Razberi Monitor™
Razberi MonitorCloud™
RAID Management
CylancePROTECT®
Getting Started 30
Initial Setup
Windows Administration
Use Setup Wizard
Verify RAID Configuration
Complete Switch Setup
Connect Cameras Securing them using CameraDefense
Manage ServerSwitchIQ
Verify CylancePROTECT Operation
How to Factory Reset the Switch ....36
This installation guide provides instructions for installing all ServerSwitchIQ 1U and 2U models, and associated software.
Package Contents
8 Port
• ServerSwitchIQ™ 8 port
- Power Cord
• Wall Mounting Brackets
• Power Supply
- Installation Guide
16/24 Port 1U
• ServerSwitchIQ™ 16/24 port 1U
- Power Cord
- Mounting Brackets
- Installation Guide
24 Port 2U
- ServerSwitchIQ™2U
- Two Power Cords
- Rack Mount Accessories
- Installation Guide
Hardware Overview
Model Front/Rear Views
• 8 Port
Front View

ServerSwitchIQ
ServerSwitchIQ
Rear View

text_image
2 3 8 12 1 4 5 6 11 0971 Power 52V (Exl. Power Supply)
2 Left LED Green
3 Right LED Amber
4 LAN Port
5 U1 Uplink Port: Razberi Switch
6 U1 Uplink Port: SFP1 (Fiber)
USB 3.0 Ports
8 U2 Uplink Port: Razberi Server
9 U2 Uplink Port: SFP2 (Fiber)
10 eSATA Port
11 HDMI Monitor Display
12 VGA Monitor Display
Rear View

text_image
① ② ③ ④ ⑤ 6 7 8 ⑨ 11 13 ⑩ 10 121 Power 100-240VAC 50-60HZ
2 Redundant Power Input (optional)
3 Left LED Green
4 Right LED Amber
5 LAN Ports
6 U1 Uplink Port: Razberi Switch
7 U1 Uplink Port: SFP1 (Fiber)
8 USB 3.0 Ports
9 U2 Uplink Port: Razberi Server
10 U2 Uplink Port: SFP2 (Fiber)
11 cSATA Port
12 HDMI Monitor Display
13 VGA Monitor Display
• 16/24 Port 1U
Front View

text_image
1 USB 2.0 Ports 2 Power LED1 USB 2.0 Ports
2 Power LED
3 Disk Acitivity LED
4 PoE Indicators
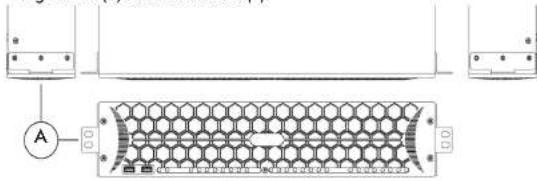
• 24 Port 2U
Front View
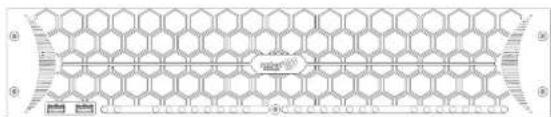
natural_image
Hexagonal grid pattern with no text or symbols, featuring a central horizontal line and two small rectangular markers (no readable text or symbols)
1 USB 2.0 Ports
2 Power LED
3 Disk Acitivity LED
4 PoE Indicators
Rear View

text_image
① ② 5 6 7 8 4 ⑨ ⑪ ⑬ ⑭ ⑩ ⑪ ⑫ ⑯ ⑰ ⑱ ⑲1 Power 100-240VAC 50-60HZ
2. Power 100-240VAC 50-60HZ
2. Left LED Green
3. Left LED Green
4. Right LED Amber
4 Right LED
5 LAN Ports
6 UT Oplink Port: Razberi Switch
7 U1 Uplink Port: SFP2 (Fiber)
8 USB 3.0 Ports
9 U2 Unlink Port: Razheri Server
10. U2 Unlink Port: SEP2 (Fiber)
10. OZ Optimik Port. SHT2 (Hiber)
11. eSATA Port
11 ESA DATA
12 HDMI Monitor Display
13 VGA Monitor Display
LED Operation Information
The tables below describe the status conditions of the various light emitting diode (LED) lights on the front and rear of your ServerSwitchIQ.
Front Power and PoE Indicator LED Information
When the unit is powered, the Power LED will be on (green). When endpoints are connected to the device ports, they will be off, on (red), or blinking.
| LED STATUS | ||
| PoE Indicator | OFF Poe not provided | |
Rear RJ45 Connector LED Information
Each RJ45 connector has a left and right LED. Data rate is shown on the left LED and link status is shown on the right LED.
| LED STATUS | ||
| Left LED Data Rate Indicator | OFF 10-MBPS data rate selected | |
| GREEN | 100-MBPS data rate selected | |
| ORANGE | 1000 MBPS data rate selected (U1 only) | |
| Right LED Link Status Indicator | OFF LAN link not established | |
| AMBER ON | LAN link established | |
| AMBER BLINKING | LAN activity is occurring | |
Network Uplinks
There are two network uplinks on each ServerSwitchIQ:
- Uplink 1 is a 10/100/1000 RJ45/SFP combo port. Only one connection type, either RJ45 or SFP, can be active at any given time.
- Uplink 2 offers both 10/100/1000 RJ45 and SFP. Both connection types can be active simultaneously.
For questions regarding supported SFP modules, please contact Razberi technical support.
Power Notice
ServerSwitchIQ
Mounting Options
8 Port
Use the two wall-mount brackets for securing your 8 port unit to a wall or shelf.

Wall-mount Brackets
Rack-mounting the 8 port ServerSwitchIQ requires a mounting kit (MNT-RACK-SSIQ8) sold separately.

text_image
Technical diagram of a device with labeled components, showing internal layout and numbered parts.1 Mounting Tabs 2 Power Supply Location
8 Port Mounting Kit (MNT-RACK-SSIQ8)
ServerSwitchIQ
device within the kit and align the device's holes with kit tabs (1). 3. Insert and tighten the screws to secure the 8 Port ServerSwitchIQ to the kit.
- Place the power supply to the right of the device on the kit (2).
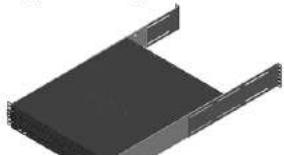
- Place the assembled kit within the rack. Align the kit's rack brackets with the rack post mounting holes. Insert rack post screws (not included) and tighten them.
natural_image
Diagram of a server rack unit with mounting holes and ventilation duct (no text or labels)Mounting the 8 Port ServerSwitchIQ to rack posts.
16/24 Port 1U
The 16/24 port 1U ServerSwitchIQ comes with rack mounting brackets and side mount screws.

ServerSwitchIQ
- Remove the front screws on both sides of the device and align them with the mounting bracket holes.
- Insert the screws included with the kit and tighten them to secure the brackets. The removed screws can be discarded.
- Place the assembled kit within the rack. Align the kit's rack brackets with the rack post mounting holes. Insert rack post screws (not included) and tighten them.

natural_image
Illustration of a server rack unit with mounting brackets and ventilation slots (no text or symbols)Mounting the 16/24 Part 1U ServerSwitchIQ to rack posts.
24 Port 2U
The ServerSwitchIQ 2U rack mount kit allows you to install the appliance in any standard rack, accommodating racks with varying heights and depths. The kit includes a left and right L bracket rail structure that can be adjusted to the front and rear mounting posts of racks. Two small rack ears are also provided to secure the unit so that it cannot slide while resting on the L brackets of the rails.

ORTANT WARNING MESSAGE

This rail-based rack mounting kit is safe and rated for supporting the
ServerSwitchIQ
Follow these instructions to rack-mount the 24 port 2U ServerSwitchIQ:
- Conduct an inventory of all the components that come with the kit. Use the table below to review the component listing and their descriptions prior to starting the installation process. Should something be missing contact salesinfo@razberi.net.
| Ref. Part Name Description Qty | |||
| A Rack ear fastener plate | Secures the ServerSwitchIQ to the rack, preventing it from sliding while on the rails. | 2 | |
| B Left and right rails, with L brackets | One rail is designed for the left and other for the right.Together they provide a rail that the ServerSwitchIQ sits upon. | 2 | |
| C Rear adjustable rail plates | Screwed to the rails with L brackets (B) and adjustable to be secured to back of the rack. | 2 | |
| D Rail screws and nuts | Secure the adjustable rails (B and C) 8 | ||
| E Ear mount screws | Secure the rack ears (A) to the chassis. | 6 | |
24 Port 2U ServerSwitchIQ Component Inventory List
- Install the rack ears (A) on the left and right side of the appliance using the six (6) rack ear screws (E).
text_image
Technical diagram showing a hexagonal grid structure with labeled components and an ammeter symbol.Installing the rack ears (A)
ServerSwitchIQ
ServerSwitchIQ
to the rear rack mounting posts in the matching location using four additional rail screws and nuts. The rear rails should fit on the outside of the front rails.

text_image
B CLeft and right front rails (B) with left and right rear rails (C)
- Fasten together the front and rear rails using four (4) rail screws and nuts (D) on each side. Place screws in the top and bottom positions, and as far apart as possible in the mounting holes provided.
- Tighten all mounting screws to ensure they are secure prior to placing the appliance in the rack. Double check each of the 16 screws and nuts as this is CRITICAL for a secure rack mount assembly.
- Test the strength of the two rails by gently applying downward pressure. This serves as a double check that all screws are tightened and properly placed. You are now ready to place the appliance on the rails.
- Remove the rubber feet on the bottom of the appliance to ensure proper fit. Place the appliance on the two rails by sliding it into the rack, resting the appliance on top of the L brackets of the rails.
natural_image
3D rendering of a black server rack with two metal clamps (no text or symbols visible)Software Overview
Operating System Activation
Razberi appliances come with Windows 10 Enterprise LTSB, Windows Server 2012 R2 or Windows Server 2016, and must be activated to enable all features. Please refer to the Windows license activation instructions in the Getting Started section below.
NVIDIA® GPU (optional)
Select units include an NVIDIA® Graphics Processing Unit for enabling analytics solutions from our certified partners. The option reduces CPU utilization, improves video quality, and reduces hardware costs by enabling higher camera counts per appliance.

Setup
Wizard
Select the Setup Wizard desktop icon to start the application. Use the Setup Wizard to perform Product Registration, Switch Configuration, Network Configuration, MonitorCloud Registration, and to install your selected Video Management System VMS software.

Razberi
Monitor™
Razberi Monitor is a .NET Windows service that collects device information, monitors devices, and proactively notifies users of alert conditions. It comes installed on the desktop of your ServerSwitchIQ. Razberi Monitor has alert integrations with other systems such as Milestone XProtect®, SolarWinds®, Syslog Servers, and Razberi MonitorCloud. Instructions for using it are covered in the Razberi Monitor section.

Razberi MonitorCloud™
ServerSwitchIQ
www.razberi.net/support and review Razberi MonitorCloud prerequisites.
RAID Management
The unit's default RAID configuration is RAID 0. If that is not your desired configuration, you need to change it to avoid future video loss. Depending on your model, you will use either the Intel® Rapid Storage Technology or Highpoint application located on the Windows Startup Menu for configuring and managing your devices RAID configuration. Each application provides extensive help instructions to guide you through changing or managing your RAID configuration.
CylancePROTECT®
CylancePROTECT® is a licensed endpoint protection product. Users can check its status by right clicking on the green shield found in the Windows toolbar. It provides Razberi Monitor alerts if malware or other cyber threats are detected.
Getting Started
Initial Setup
-
Connect a keyboard, mouse and monitor to the appliance.
-
Power the unit
-
8 Port: Connect the power supply to the appliance. Connect the power cord to the power supply and plug it into a power source.
- 16/24 Port 1U: Connect the power cord to the appliance and plug it into a power source.
- 24 Port 2U: Attach each of the two power cords to the appliance and plug each into a power source for redundancy.
ServerSwitchIQ
Windows Administration
The first time you start the appliance you will be asked to configure Windows for your use and accept the product terms and conditions.
The MS Windows license automatically activates if the appliance has access to the internet.
Windows 10 can be activated in one of two ways:
- Via the Internet: Connect Uplink 2 (U2) to the internet, right click on the Startup Window on the left side of the toolbar and select "System". Follow the instructions for activation on this page.
OR
- Via the phone with Microsoft: Right click on the Startup Window on the left side of the toolbar and select "Run". Enter "SLUI.EXE 4" without quotes and with a space before the 4 in the command entry field and hit "Enter". Follow instructions for phone activation.
Windows Server 2012 R2 and 2016 can be activated as follows.
- Copy the product key from the Windows label located on the top left of the appliance.
- From Windows, right click on the Startup Window on the left side of the toolbar and select "System". From this page select "Activate Windows". For Windows Server 2012 a Product Key entry form will appear. For Windows Server 2016 select "Change product key" for the Product Key entry form to appear.
- Enter the product key into the form and select "Next".
- Your unit's Windows Server license is activated.
Use Setup Wizard
- Network Setup
Select the "Network Setup" tab to configure the network settings for
ServerSwitchIQ
ServerSwitchIQ
- Switch Configuration
Select the "Switch Configuration" tab to configure network settings for the appliance's switch, open the switch's web interface, reboot the switch, and reset the switch to its factory defaults.
- Product Registration
Select the "Product Registration" tab to register your new Razberi appliance to claim three years of warranty service. In addition to extending your 90-day warranty to three years, you also receive priority technical support, important notifications of software, hardware, and firmware updates, and health checks and cyber security reports relating to this appliance.
- MonitorCloud Registration
Razberi MonitorCloud is a cloud-based cybersecurity and health monitoring feature on all Razberi appliances. Select this tab, connect the appliance to the internet, and register for a MonitorCloud account. Only one account is needed for monitoring hundreds of Razberi appliances. Users can set up event triggers that proactively send out SMS texts or email alerts.
- VMS Installation
Select the "VMS Installation" tab for installing one of the leading Video Management Systems available. Each featured installer product has been qualified to run on your Razberi appliance.
Verify RAID Configuration
The unit's default RAID configuration is RAID 0. If that is not your desired configuration, you need to change it now to avoid future video loss. Models with multiple storage drives have two different RAID management options.
• HighPoint RAID Management
If your model includes a HighPoint RAID Controller, use the HighPoint application located in the Startup Menu to change its configuration. Enter username: RAID, password: hpt when prompted to access the configuration menu. Select its "Help" menu to learn how to use this application for changing and managing the appliance's RAID configuration.
Complete Switch Setup
Your unit comes with a Power over Ethernet (PoE) switch for networking and powering cameras and endpoints. Besides providing a dedicated surveillance network, its build-in CameraDefense automates camera or endpoint cyber protection. Follow these steps to access, configure, and manage these capabilities.
- Open the Switch web interface in either of the following two ways:
-
From the Setup Wizard, select the "Switch Configuration" tab and click on the "Open Switch Webpage" button.
• Or, from your browser, access http://192.168.50.1 -
Login to the switch and change its default password. Its default credentials are username: admin / password: system Record the new password in a safe location.
-
Select the switch's "Network" tab and configure the network.
By default, the switch web interface's connection type is static and the DHCP Server is disabled.
If you want an isolated DHCP network for your cameras and endpoints, click on the DHCP Server's "Enabled" setting option to set it to 1. This will enable the switch's DHCP server for providing IP addresses to DHCP enabled cameras and endpoints.
If you want to use an external DHCP server, ensure it is connected via
ServerSwitchIQ
ServerSwitchIQ
See the ServerSwitchIQ User Guide for more details on this functionality.
- The Uplink 2 (U2) default is DHCP. It can be managed from the Windows Network and Sharing Center > Change adapter settings page.
Connect Cameras Securing them using CameraDefense
After configuring the switch's network, you are ready to attach cameras and other endpoints. The switch will automatically provide PoE to devices that require it. Next, use CameraDefense to protect cameras and endpoints from cybersecurity threats. Its setup wizard within the Switch web user interface quickly steps you through the configuration process.
-
Before you begin ensure the following:
-
Cameras and other devices are connected to the switch and generating traffic.
- The VMS or other applications using the endpoints are configured and running, and
-
You have the addresses of any networks you want to whitelist.
-
Login to the switch web user interface selecting the "CameraDefense" tab.
-
Follow its setup wizard prompts.
- Once complete, the CameraDefense dashboard will provide you the status of any vulnerabilities or cyber alert conditions. Its alerts are also provided to Razberi Monitor for centralized, proactive alerting.
Manage ServerSwitchIQ
Use Razberi Monitor installed on a Razberi appliance or other Windows device to discover, add, and manage ServerSwitchIQ, EndpointDefender and their endpoint devices.

Razberi Monitor desktop icon

Razberi Monitor web-based management interface
- Razberi Monitor will manage your ServerSwitchIQ and its switch by default. To add EndpointDefenders go to the "Managed Devices" tab, click "Add Devices" and select the add button icon to manage the device. For discovering EndpointDefenders, SSDP protocol must be enabled. For devices not discovered, select the "Add by IP" button entering the device's IP address and credentials.
- Click on "Managed Devices" to view the managed ServerSwitchIQ, all managed EndpointDefenders and their status.

text_image
Managed Devices Service: 100% managing system services Unit: GB/T 2.5 Parameters: Model: Model: MRT: Model: Database: Database name: Database ID: Database ID: Database ID: Database ID: Database ID: Database ID: Database ID: Database ID: Database ID: Database ID: Database ID: Database ID: Database ID: Database ID: Database ID: Database ID: Database ID: Database ID: Database ID: Database ID: Database ID: Database ID: Database ID: Database ID: Database ID: DatabaseID DatabaseID DatabaseID DatabaseID DatabaseID DatabaseID DatabaseID DatabaseID DatabaseID DatabaseID DatabaseID DatabaseID DatabaseID DatabaseID DatabaseID DatabaseID DatabaseID DatabaseID DatabaseID DatabaseID DatabaseID DatabaseID DatabaseID DatabaseID DatabaseID DatabaseID DatabaseID DatabaseID DatabaseID DatabaseID DatabaseID DatabaseID DatabaseID DatabaseID Software Software Name: Software Name: Software Type: Software Color: Software Color: Software Date: Software Date: Software ID: Software ID: Software Date: Software ID: Software ID: Software ID: Software ID: Software ID: Software ID: Software ID: Software ID: Software ID: Software ID: Software ID: Software ID: Software ID: Software ID: Software ID: Software ID: Software ID: Software ID: Software ID: Software ID: Software ID: Software ID: Software ID: Software ID: Software ID: Software ID: Software ID: Software ID: Software ID: Software ID: Software ID: Software ID: Software ID: Software ID:Managed Devices and their Status
- Razberi Monitor is a licensed product for providing alerts to external systems. To obtain a license contact Razberi Sales via email at salesinfo@razberi.net
Verify CylancePROTECT Operation
CylancePROTECT comes pre-installed on all professional models of ServerSwitchIQ. Follow these steps to verify that the program is running:
- Open the system tray from the Windows Taskbar, typically located at the bottom of the screen next to the date/time display.
a. cl. 1. 1. cl. 2.
How to Factory Reset the Switch
In the event you cannot access the switch's web interface, it can be reset to its factory default by creating a network loop-back condition.
- Remove power from the product and remove all endpoint devices and cables from the RJ45 PoE LAN Ports and Uplink 1.
- Restore power to the product. Wait for 1 minute to allow the product to start normally before proceeding to the next step.
- Using a short CAT 5 / 6 LAN cable, connect RJ45 LAN ports 1 and 2 together creating a loop-back condition. Wait for 15 seconds for detection of the loop-back condition.
- Remove the CAT 5 / 6 LAN cable and wait for 1 minute as the unit performs a factory reset.
- Your EndpointDefender's IP address and login credentials will be restored to their factory defaults.
Support and Warranty Information
If you experience any problems with the installation or operation of this product do not return it, please contact Razberi.
For technical support via phone:
• In the United States, call 469-828-3380 Option 3, from 8:00 AM to 5:00 PM CDT.
• In Latin America, call +52 55 4161 1511, from 8:00 AM to 5:00 PM CDT.
• In the UK / Europe / Middle East / and Asia, call +44 113 868 0160
For technical support via email, contact technicalsupport@razberi.net
For information about Dushov's product warranty, 200
Razberi Monitor™
Table of Contents
Activate Razberi Monitor.... 41
Register Razberi Devices with MonitorCloud......41
Manage Products Using Razberi Monitor 42
Other Alert Integrations 42
Milestone XProtect®
SolarWinds®
Syslog Server
Install Razberi Monitor on Other Devices....43
Ports Used by Razberi Monitor....44
Use Razberi Monitor to manage and monitor Razberi products and services. Razberi Monitor is a suite of features that:
- Communicates with Razberi MonitorCloud for providing proactive SMS and Email notifications of Razberi hardware performance and cyber security threats.
- Integrates with leading VMS and Network Monitoring platforms to provide alert notifications.
- Manages ServerSwitchIQ and EndpointDefender appliances.
Activate Razberi Monitor
Razberi Monitor is a licensed product for providing monitoring alerts to systems such as MonitorCloud, SolarWinds, Milestone XProtect, and Syslog. To obtain a license contact Razberi Sales via email at salesinfo@razberi.net. You will be provided with a license activation file covering alerts generated from your ServerSwitchIQ and managed EndpointDefenders. Activate external alerting by uploading the license activation file from Razberi Monitor's License tab.
Register Razberi Devices with MonitorCloud
Razberi MonitorCloud is a health monitoring service providing hardware performance and cyber security threat notifications.
To register your Razberi devices, select the Razberi Monitor desktop icon, navigate to the "Razberi MonitorCloud" tab, and enter your credentials. If you do not have credentials, select the "Create account" link to request an account.

Razberi Monitor desktop icon

MonitorCloud
desktop icon

text_image
Radener1 MonitorCloud ✓ Correct name has been registered with Radener Cloud True Name (optional): Code Code Password: Access to the InternetManage Products Using Razberi Monitor
Please refer to the specific product section above for detailed instructions on how to configure Razberi Monitor for product management.
Other Alert Integrations
In addition to MonitorCloud, Razberi Monitor provides alerts to other enterprise systems.

Milestone XProtect®
To enable Razberi Monitor's alert integration with Milestone XProtect Corporate and Plus versions, follow these steps:
- Select the Razberi Monitor desktop icon, navigate to the "Milestone" tab, and enter the Milestone XProtect Management server's IP address and Windows Authentication login credentials. Select save and enable.
- Razberi Monitor will connect and automatically create event and alert definitions within the XProtect Management client.
- Razberi alerts will be passed to the Alarm manager of Milestone XProtect. Work with the Milestone administrator to add the notifications for Razberi Alerts.
- See the ServerSwitchIQ User Guide, Alert Integration section for more details on setup options and management.

SolarWinds®
Razberi Monitor was tested on the SolarWinds Orion Platform 2018.2, NPM 12.3 and should work on this or higher versions. To enable Razberi Monitor's alert integration with SolarWinds, follow these steps:
- Select the Razberi Monitor desktop icon, navigate to the "SolarWinds" tab, and enter the SolarWinds Management Server's IP address and application login credentials. Select save and enable.
- Razberi Monitor will connect and automatically create Razberi alert
Syslog Server
To enable Razberi Monitor's alert integration with Syslog Servers, follow these steps:
- Select the Razberi Desktop icon, navigate to the "Syslog" tab, and enter the Syslog Server's IP address. Select "Save" and "Enable".
- Select the "Send Test Syslog" button to send a test message to the Syslog Server. Verify the message was received.
- Work with the Syslog Server administrator to create alert notification rules for the Razberi Alerts.
Install Razberi Monitor on Other Devices
To run Razberi Monitor on a non-Razberi Windows device follow these steps:
- Download the latest version of Razberi Monitor from https://www.razberi.net/support/
- Ensure the device is running Windows 10, Windows Server 2012, or Windows Server 2016.
- .NET 4.7.2 or higher must be installed and enabled. If it is not, the installer will direct you to the Microsoft site where it can be downloaded. The installer will not operate without this prerequisite.
- With the Razberi Monitor executable placed on the device, double click to install it. Follow the installation instructions. When finished, the Razberi Monitor Service will be operational and the Razberi Monitor and MonitorCloud icons will be installed on the desktop.
- Ensure the Windows or other network firewalls are not blocking ports used by Razberi Monitor. See the Ports Used By Razberi Monitor section of this guide for details.
- Select the Razberi Monitor desktop icon to open its web-based management interface.
Ports Used by Razberi Monitor
Razberi Monitor's host platform requires the following UDP and TCP ports enabled. Unless otherwise noted, assume both inbound and outbound access are required.
| Protocol/Port | Description |
| UDP 124 Time | synchronization between EndpointDefenders and the Razberi Monitor host. Allows alerts from Endpoint-Defenders to be in time synchronization with Razberi Monitor. |
| TCP 8443 HTTP | PS Razberi Monitoring communications with End-pointDefenders. Necessary for Razberi Monitor to manage and monitor EndpointDefenders. |
| TCP 433 TLS 1.2 | Razberi Monitor initiated communications with MonitorCloud at https://monitor.razberi.net. Necessary for sharing EndpointDefender and Host Platform status and alerting with MonitorCloud. |
| UDP 1900 SS | DP is used by EndpointDefenders for automated discovery within Razberi Monitor. Otherwise, users must know the IP address of EndpointDefenders to add and manage them. |
Ports for Milestone, SolarWinds and Syslog:
See the respective product guides for ports used by each system.
- For Milestone, Razberi Monitor communicates with both the XProtect® Management and Event servers for providing its AlarmManager alerting information.
- For SolarWinds, Razberi Monitor communicates with the SolarWinds management server.
- For Syslog, Razberi Monitor communicates with the Syslog server using UDP port 514.
NOTES NOTES