RAS-M18YAV-E - Air-conditioner TOSHIBA - Free user manual and instructions
Find the device manual for free RAS-M18YAV-E TOSHIBA in PDF.
Download the instructions for your Air-conditioner in PDF format for free! Find your manual RAS-M18YAV-E - TOSHIBA and take your electronic device back in hand. On this page are published all the documents necessary for the use of your device. RAS-M18YAV-E by TOSHIBA.
USER MANUAL RAS-M18YAV-E TOSHIBA
KLIMAGERAT (MULTI-SPLIT SYSTEM)
CONDIZIONATORE D'ARIA (TIPO MULTIAMBIENTI)
For general public use
A l'usage du public
Thank you very much for purchasing TOSHIBA Air Conditioner.
Please read this owner's manual carefully before using your Air Conditioner.
- Be sure to keep the "Owner's manual" and "Installation manual" from constructor (or dealer).
Request to constructor or dealer
Please clearly explain the contents of the Owner's manual and hand over it.
This Air Conditioner is a new type one which adopts a new refrigerant HFC (R410A) instead of the conventional refrigerant R22 in order to prevent destruction of the ozone layer.
UTILISATION DU NOUVEAU REFRIGERANT
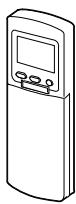
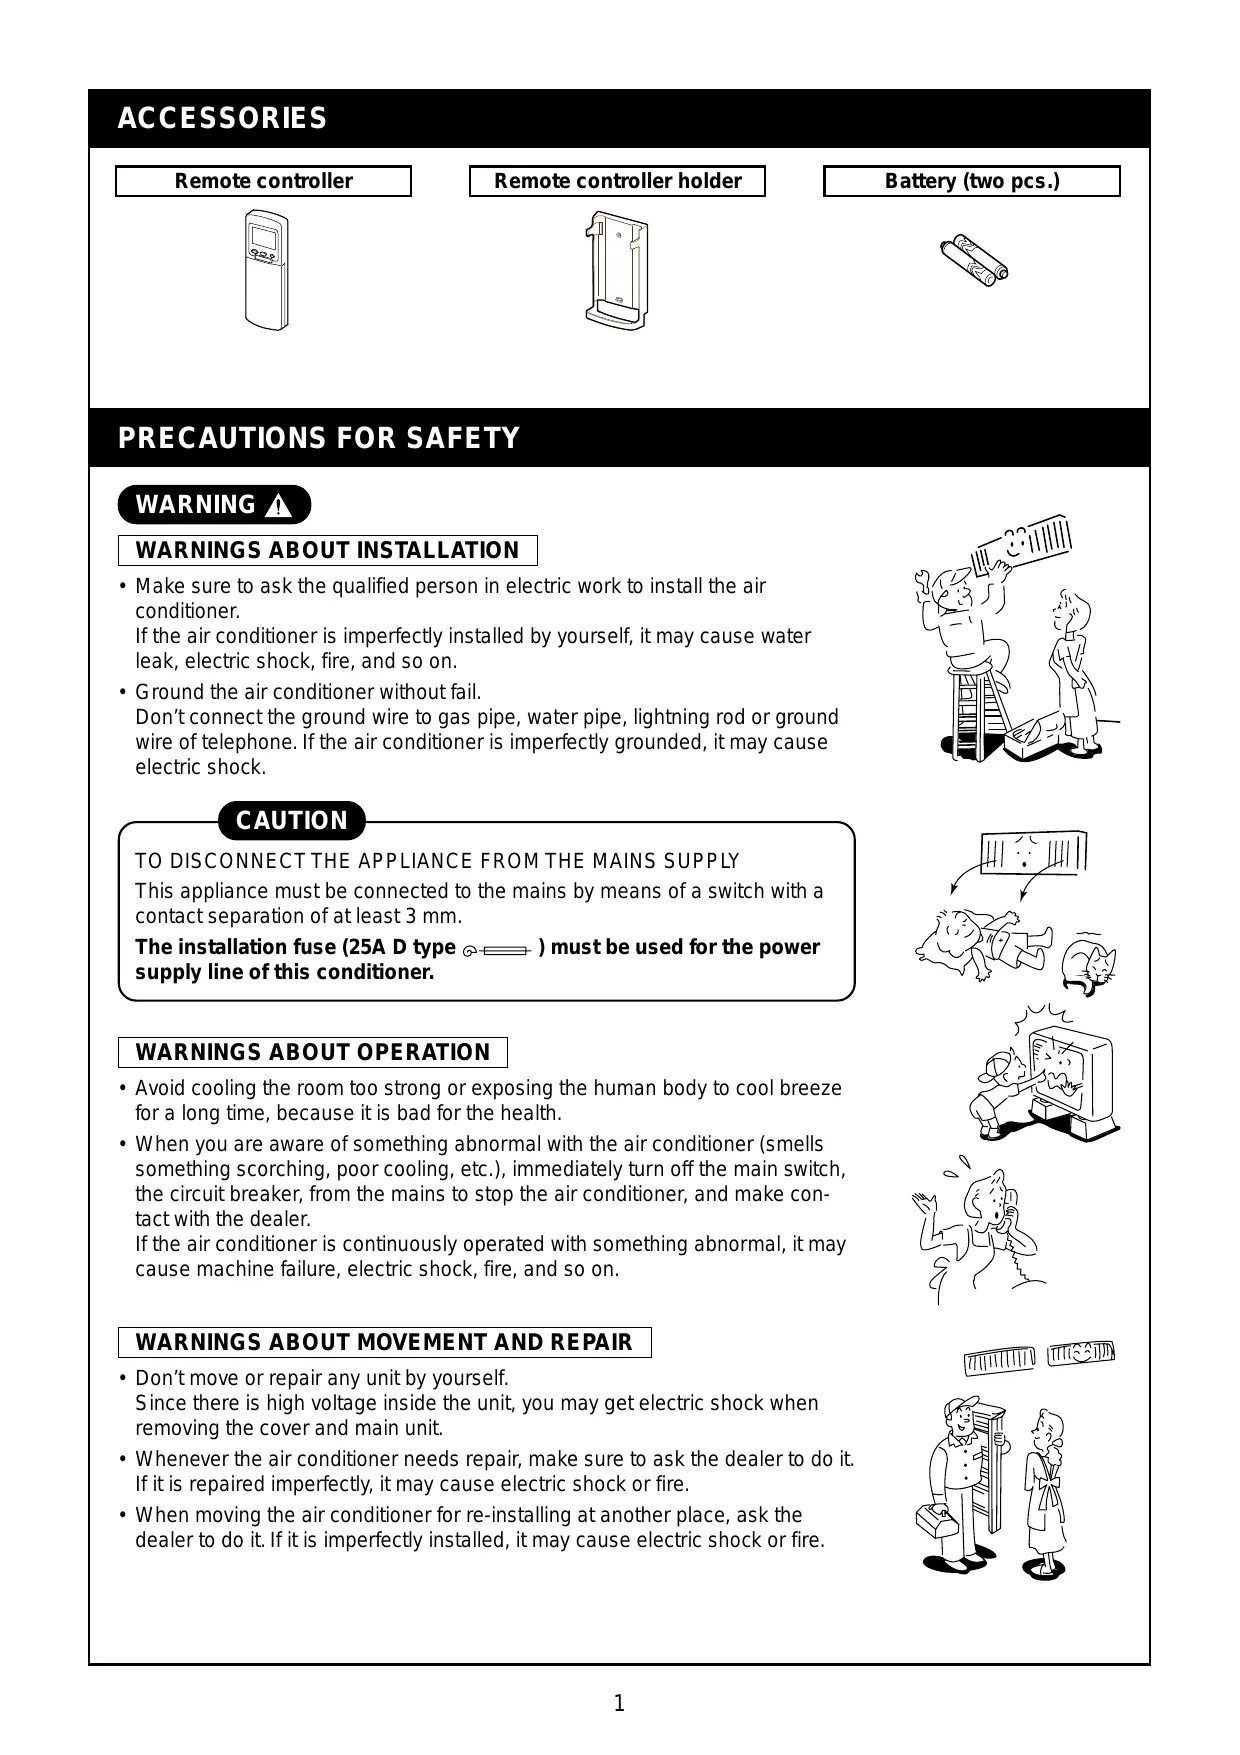
Remote controller holder

Battery (two pcs.)
PRECAUTIONS FOR SAFETY
WARNING A
WARNING ABOUT INSTALLATION
- Make sure to ask the qualified person in electric work to install the air conditioner.
If the air conditioner is imperfectly installed by yourself, it may cause water leak, electric shock, fire, and so on.
- Ground the air conditioner without fail.
Don't connect the ground wire to gas pipe, water pipe, lightning rod or ground wire of telephone. If the air conditioner is imperfectly grounded, it may cause electric shock.
CAUTION
TO DISCONNECT THE APPLIANCE FROM THE MAINS SUPPLY
This appliance must be connected to the mains by means of a switch with a contact separation of at least 3 mm.
The installation fuse (25A D type ) must be used for the power supply line of this conditioner.
WARNING ABOUT OPERATION
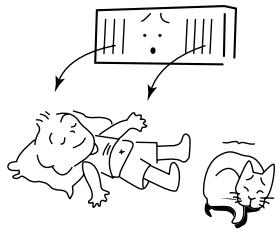
- Avoid cooling the room too strong or exposing the human body to cool breeze for a long time, because it is bad for the health.
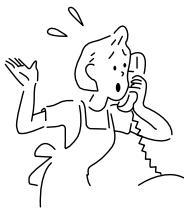
- When you are aware of something abnormal with the air conditioner (smells something scorching, poor cooling, etc.), immediately turn off the main switch, the circuit breaker, from the mains to stop the air conditioner, and make contact with the dealer.
If the air conditioner is continuously operated with something abnormal, it may cause machine failure, electric shock, fire, and so on.
WARNING ABOUT MOVEMENT AND REPAIR
- Don't move or repair any unit by yourself.
Since there is high voltage inside the unit, you may get electric shock when removing the cover and main unit. - Whenever the air conditioner needs repair, make sure to ask the dealer to do it. If it is repaired imperfectly, it may cause electric shock or fire.
- When moving the air conditioner for re-installing at another place, ask the dealer to do it. If it is imperfectly installed, it may cause electric shock or fire.

CAUTION
CAUTIONS ABOUT INSTALLATION
- Certainly lay the drain hose for perfect draining. Bad drainage may cause flooding in the house and getting furniture wet.
- Make sure to connect the air conditioner to an exclusive AC outlet of the rated voltage, otherwise, the unit may break down or cause a fire.
- Don't install the unit in a place where inflammable gas may leak. If inflammable gas accumulates around the unit, it may cause a fire.
CAUTIONS ABOUT OPERATION
- Carefully read this manual before starting the air conditioner. There are many important things for daily operation in them.
- Don't use this air conditioner for special purpose such as preserving food, precision instruments, art objects, breeding animals, growing potted plants, etc.
- Avoid exposing potted plants and animals to wind of the air conditioner, because it badly affects the health and growing of them.
- When the air conditioner is operated together with a combustion appliance in the same place, be careful of ventilation to let fresh air enter into the room. Poor ventilation causes oxygen shortage.
- When the air conditioner is used in a closed room, be careful of sufficient ventilation of the room. Poor ventilation causes oxygen shortage.
- Don't touch any switches with wet finger, otherwise you may get an electric shock.
- Don't place any combustion appliance in a place where it is directly exposed to wind of the air conditioner, otherwise it may cause imperfect combustion.
- When the air conditioner won't be used for a considerably long time, turn off the main switch or the circuit breaker, for safety. Disconnect from the power supply prevents the unit from lightning and power supply surge.
- Check the concrete blocks, etc. of the base of the outdoor unit occasionally. If the base is left damaged or deteriorated, the unit may topple over and inflict an injury on a person as the worst case.
- When cleaning the unit, make sure to turn off the main switch or the circuit breaker, beforehand for preventing you from getting injured by the electric fan running inside. For details of cleaning method, refer to "Maintenance" on page 16.
- Don't put anything on the outdoor unit nor step onto it. If you do so, it may not only topple over the unit but also injure yourself.
- To make the air conditioner demonstrate its original performance, operate it within the range of the operating temperature specified in the instructions. Otherwise it may cause a malfunction, or water leak from the unit.

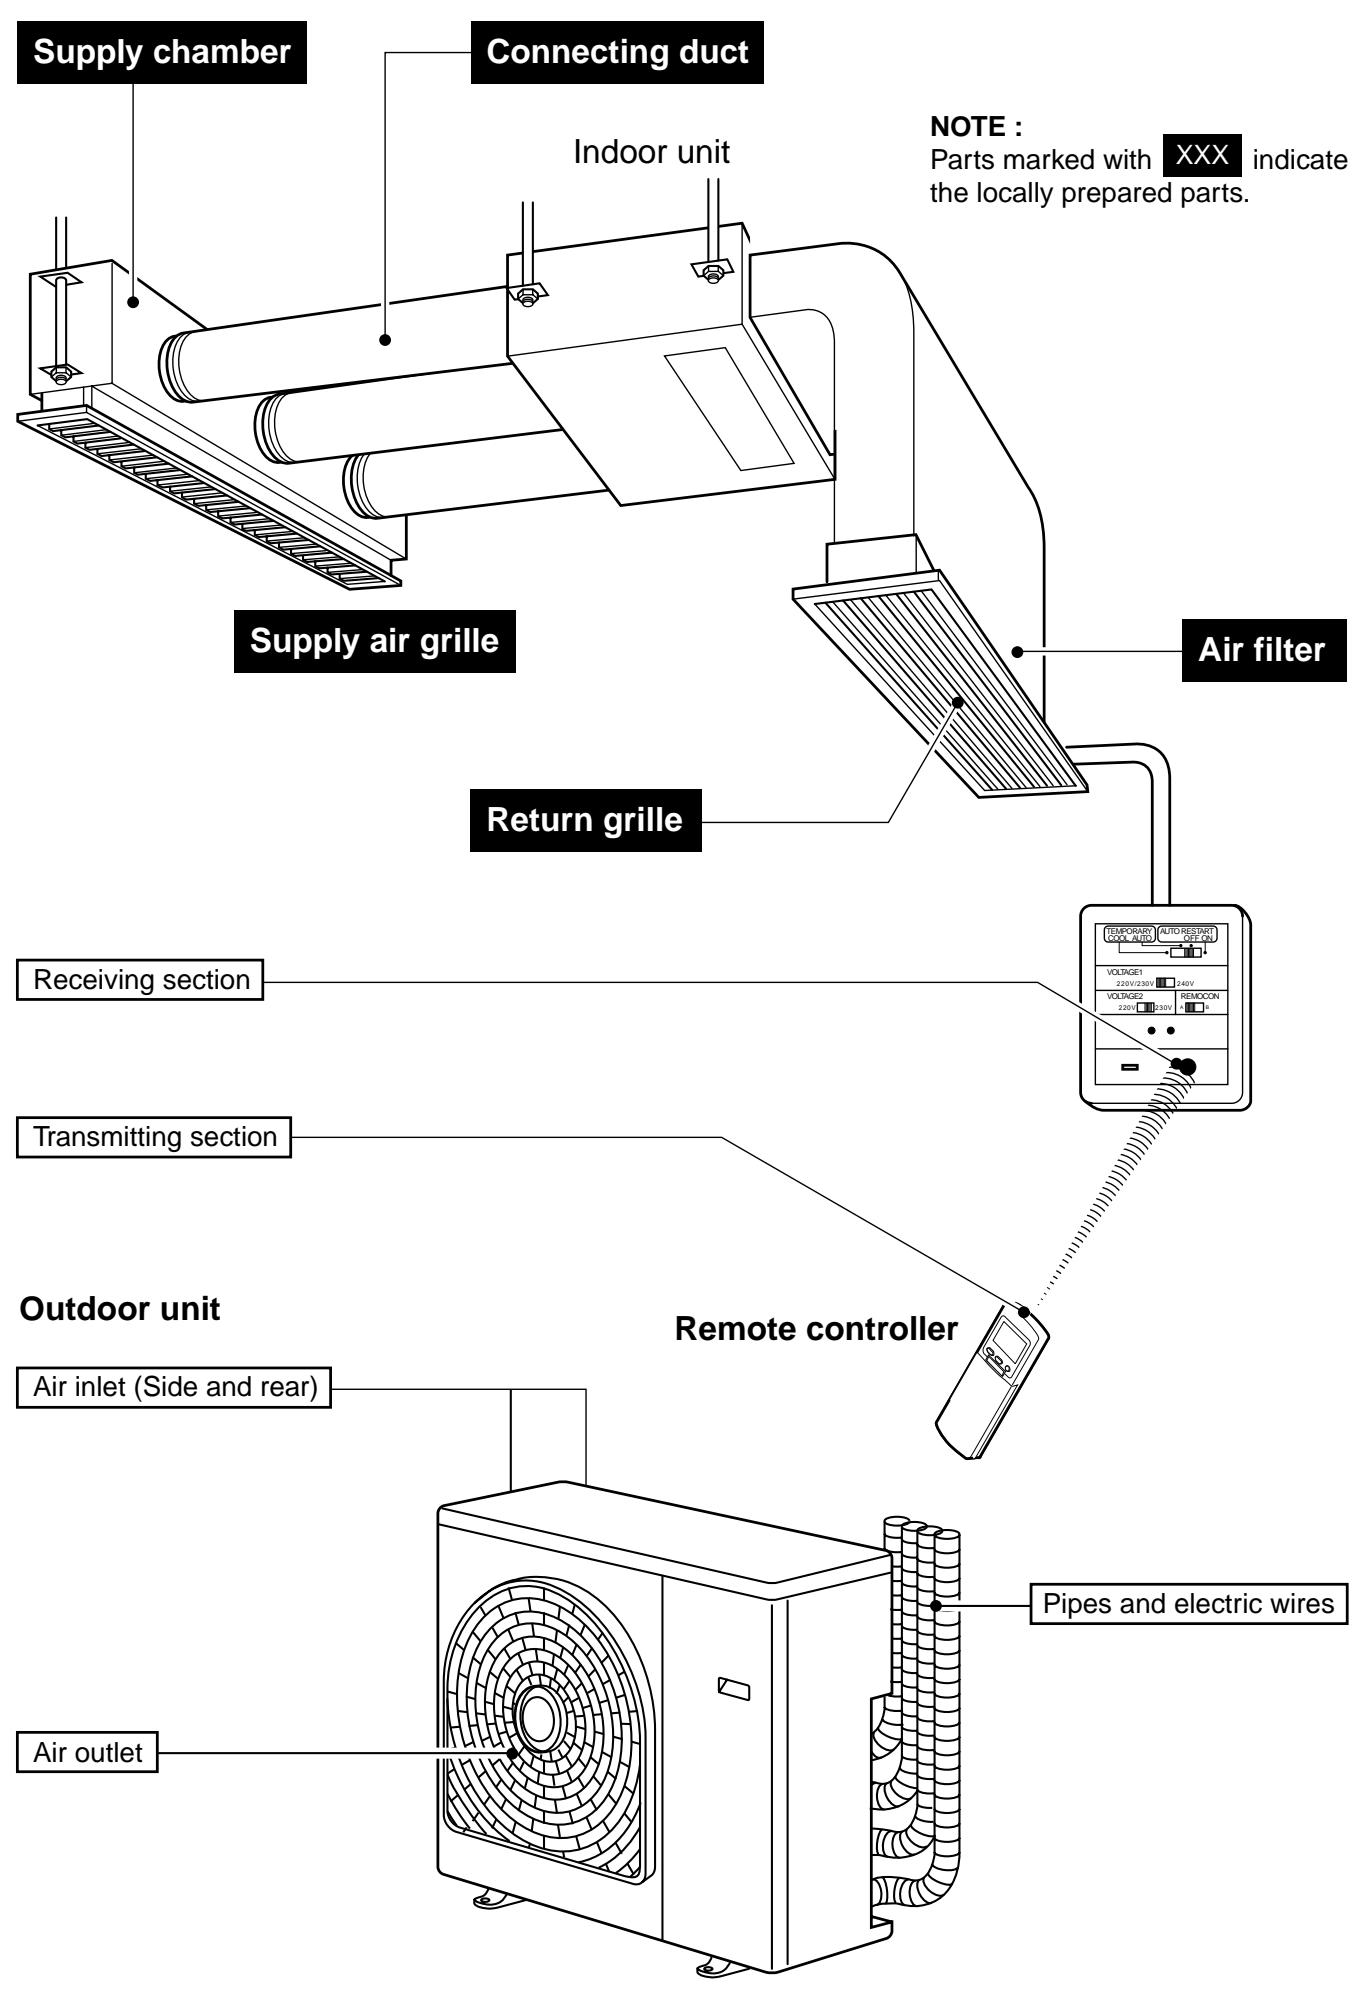
PARTS NAME
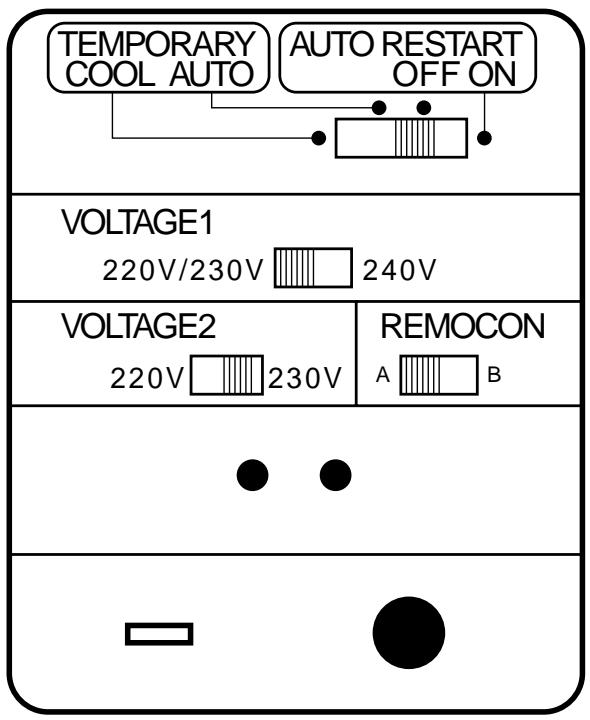
TEMPORARY OPERATION / VOLTAGE SETTING
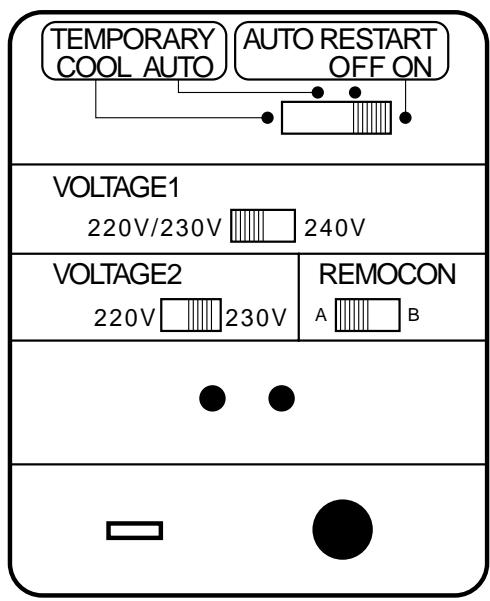
TEMPORARY switch (COOL, AUTO)
When you can't use the remote controller temporarily due to missing, etc., temporary operation can be performed on the switch panel.
- Setting the TEMPORARY switch to "AUTO" starts the automatic operation, to "COOL" starts the cooling operation (LOW), respectively.
- Setting the TEMPORARY switch to "AUTO" or "COOL", the operation can't be performed from the remote controller.
To stop the temporary operation, set the switch to "AUTO START OFF".
Voltage setting
The most suitable voltage can be set up by combining the VOLTAGE SELECT 1 with 2 when adjusting the voltage on the spot.
(Do not touch the switches at the installation time because an installation dealer will adjust them.)
| Supply voltage | Voltage select 1/Voltage select 2 |
| 220V | VOLTAGE1 220V/230V 240V |
| VOLTAGE2 220V 230V | |
| 230V | VOLTAGE1 220V/230V 240V |
| VOLTAGE2 220V 230V | |
| 240V | VOLTAGE1 220V/230V 240V |
| VOLTAGE2 (Both are available.) 220V 230V 220V 230V |
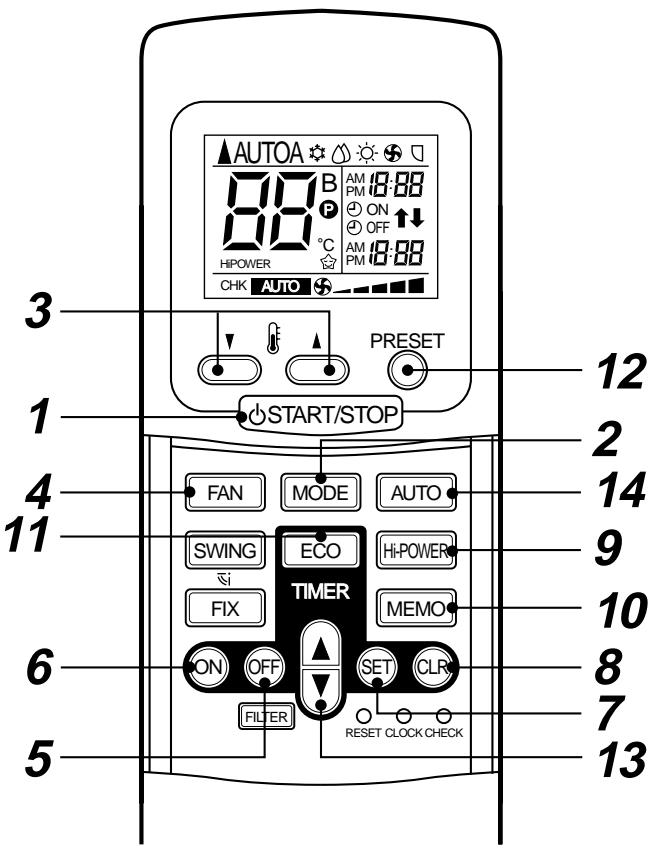
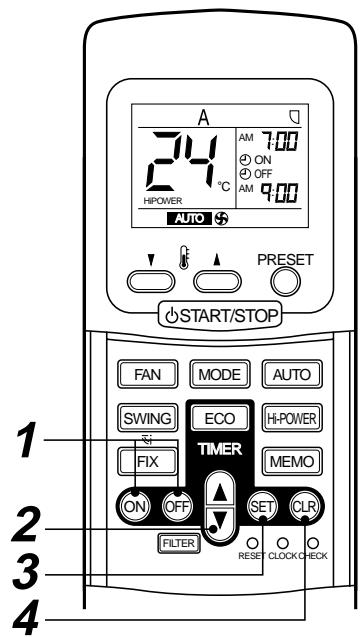
1 START/STOP button
Push the button to start operation.
(A receiving beep is heard.)
Push the button again to stop operation.
(A receiving beep is heard.)
If no receiving sound is heard from the indoor unit, push the button twice.
2 Mode select button (MODE)
Push this button to select a mode.
Each time you push the button, a mode is selected in a sequence that goes from
A:Auto changeover control, Cool,
: Dry, : Heat (for Heat pump model only),
: Fan only (For Cooling only model), and back to A. (A receiving beep is heard.)
3 Temperature button
The set temperature is increased up to 30^ .
▼. The set temperature is decreased to 17^ C . (A receiving beep is heard.)
4 Fan speed button (FAN)
Push this button to select fan speed. When you select AUTO, the fan speed is automatically adjusted according to the room temperature.
You can also manually select the desired fan speed among five settings.
(LOW , LOW* , MED , MED* , HIGH ) (A receiving beep is heard.)
5 Off timer button (OFF)
Push this button to set the OFF timer.
6 On timer button (ON)
Push this button to set the ON timer.
7 Reserve button (SET)
Push this button to reserve time settings. (A receiving beep is heard.)
8 Cancel button (CLR)
Push this button to cancel ON timer and OFF timer. (A receiving beep is heard.)
9 High power button (Hi-POWER)
Push this button to start the high power operation.
CAUTION
- When pushing the "SWING", "FIX" and "FILTER" buttons.
Indoor unit does not operate and the receiving beep sound also not appear :
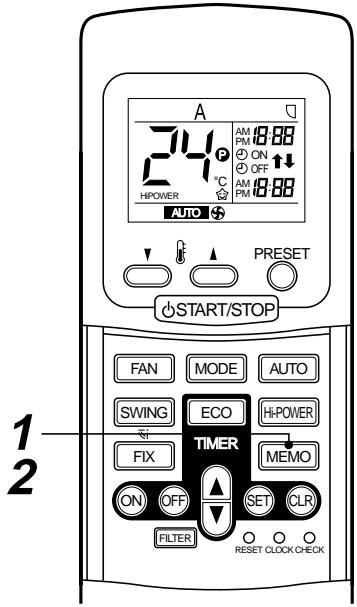
10 Memory button (MEMO)
Push this button to stand by memorizing the settings.
Push the button again for more than 4 seconds to memorize the setting indicated on the remote controller and mark is indicated.
(Refer to "MEMORY/PRESET OPERATION")
11 ECO timer button (ECO)
Push this button to start the ECO timer (OFF timer) operation.
You can select the OFF timer time among four settings (1, 3, 5 or 9 hours).
12 PRESET button
Push this button to operate the air conditioner according to settings memorized by the MEMO button.
13 TIMER button
Use this button to change the clock, ON timer, and OFF timer times.
To forward the time, push the “TIMER” button.
To set back the time, push the "TIMER" button.
14 Automatic operation button (AUTO)
Push this button to operate the air conditioner automatically. (A receiving beep is heard.) (Refer to "AUTOMATIC OPERATION")
NAMES AND FUNCTIONS OF INDICATIONS ON REMOTE CONTROLLER
Display
All indications, except for clock time indication, are indicated by pushing the START/STOP button.
1 Transmission mark
This transmission mark indicates when the remote controller transmits signals to the indoor unit.
2 Mode display
Indicates the current operation mode.
(AUTO: Automatic control, A: Auto changeover control, Cool, Dry, Heat, Fan only)
3 Temperature display
Indicates the temperature setting (17^ to 30^)
When you set the operating mode to : Fan only, no temperature setting is indicated.
4 FAN speed display
Indicates the selected fan speed. AUTO or one of five fan speed levels (LOW, LOW+, MED, MED+, HIGH) can be indicated.
Indicates AUTO when the operating mode is either AUTO or : Dry.
5 TIMER and clock time display
The time set for timer operation or clock time is indicated.
The present time is always indicated except for TIMER operation.
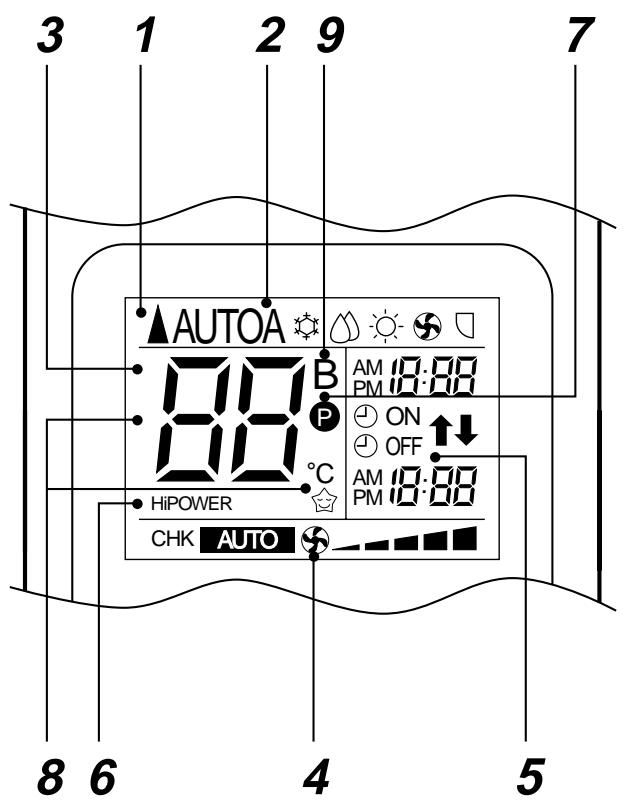
6 High power display
Indicates when the High power operation starts. Push the Hi-POWER button to start and push it again to stop the operation.
7 (MEMORY) display
Flashes for 3 seconds when the MEMO button is pushed during operation.
mark is indicated when the button is not pushed for more than 3 seconds while the mark is flashing.
Push another button to turn off the mark.
8 ECOTIMER display
Indicates when the ECO TIMER is in operation. Each time you push the ECO button, the display changes in the sequence of 1, 3, 5, or 9h.
9 A, B change indication remote controller
Push the "CHK" point and "MODE" button at once, for changing remote controller setting from "A" to "B". (Priority is given to "A" setting.)
The switch panel of indoor unit is also changed to "B" setting.
- In the illustration, all indications are indicated for explanation.
During operation, only the relevant indications will be indicated on the remote controller.
PREPARATION AND CHECK BEFORE USE
Loading the remote controller batteries.
1 Remove the cover, and insert the batteries.
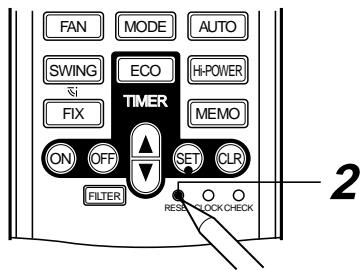
2 Push the RESET button.
The clock display flashes. Adjust the clock. Place back the cover.
- Slide off the cover while pushing the sides.
- Battery replacement
- Be careful not to reverse the (+) position and the (-) position.
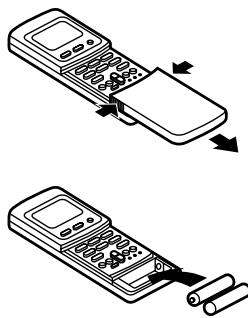
Batteries
- To replace the batteries, use two new batteries (AAA type).
- In normal use, the batteries will last about one year.
- Replace the batteries if there is no receiving beep from the indoor unit or when the air conditioner cannot be operated using the remote controller.
- To avoid malfunctions by battery leakage, remove the batteries when not using the remote controller for more than one month.
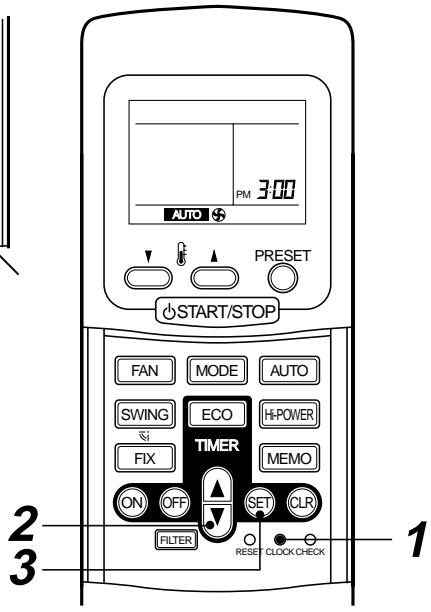
Setting the clock
Before you start operating the air conditioner, set the clock of the remote controller using the procedures given in this section. The clock panel on the remote controller will indicate the time regardless of whether the air conditioner is in use or not.
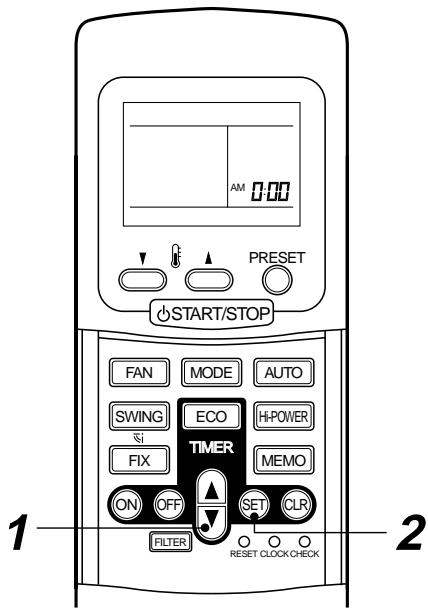
Initial setting
When batteries are inserted in the remote controller, the clock panel will indicate AM 0:00 and will flash.
1 TIMER button
Push the TIMER button to set the current time.
Each push of the TIMER button changes the time in one minute steps.
Pushing the TIMER button continually changes the time in ten minute steps.
2 SET 念 button.
Push the SET 念 button.
The current time is indicated and the clock starts.
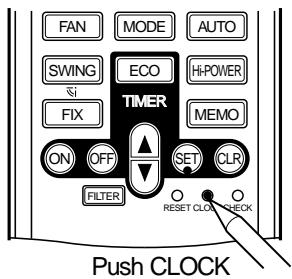
Clock adjusting
1 CLOCK button
Push the CLOCK button.
The CLOCK display flashes.
2 TIMER button.
Push the TIMER button to set the current time.
Each push of the TIMER button changes the time by one minute.
Pushing the TIMER button continually changes the time by ten minutes.
3 SET button.
Push the SET button.
The current time is indicated and the clock starts.
CAUTION
- The air conditioner will not operate if curtains, doors or other materials are blocking the signals sent from the remote controller to the indoor unit.
- Prevent any liquid from falling into the remote controller. Do not spill juice, water or any kinds of liquids.
- If the infrared signal receiver on the switch panel is exposed to direct sunlight, the air conditioner may not function properly. Use curtains to prevent reaching the receiver from direct sunlight.
- If the air conditioner is installed in a room which has fluorescent lights with electronic starters or inverter system, signals may not be properly received and the air conditioner can't start or stop while the lights go on. If you are planning to use such fluorescent lights in the same room where the air conditioner operates, consult your local dealer.
- If other electrical appliances react to the remote controller of the air conditioner, either remove these appliances or consult your local dealer.
Location of the remote controller
- Keep the remote controller where its signals can reach the receiver on the switch panel. (maximum distance is 7m )
- When you select the timer operation, the remote controller automatically transmits a signal to the indoor unit at the specified time.
If you keep the remote controller in a position that hinders proper signal transmission, a time lag of up to 15 minutes may occur.
Remote controller holder
Installing the remote controller holder
- Before you install the remote controller holder on a wall or pillar, check whether the remote controller signals can be received by the indoor unit.
Mounting and removing the remote controller
- To mount the remote controller, hold it parallel to the remote controller holder and push it in fully. To remove the remote controller, slide the remote controller upwards and take it out from the holder.
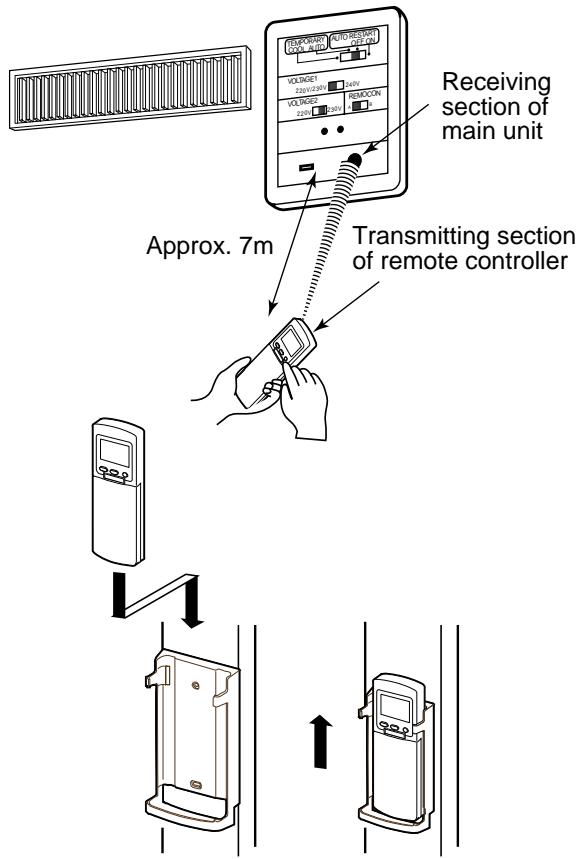
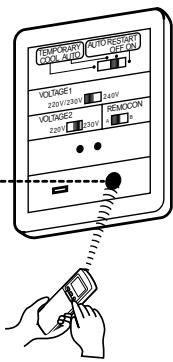
Receiving section of main unit
When the receiving section receives the signal, a receiving sound is issued from the indoor unit.
pip, pip :Operation
J Long pip : Stop
:Change
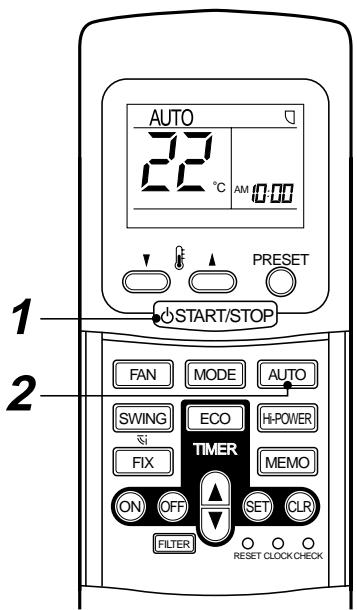
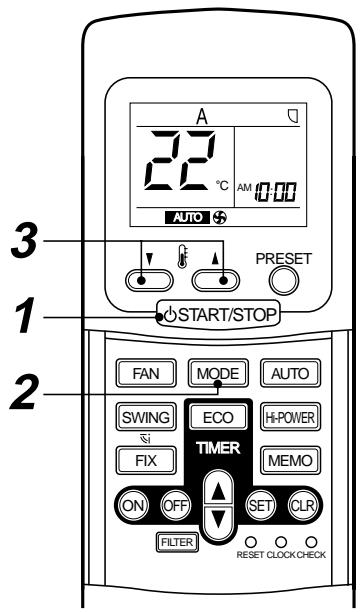
AUTOMATIC OPERATION
When you set the air conditioner in AUTO mode, it will automatically select either cooling, heating, or fan only operation depending on the outdoor temperature. (Refer to page 15.)
In addition, fan speed is automatically controlled.
Start
1 START/STOP button
Push this button to start the air conditioner.
2 AUTO button (AUTO)
Push AUTO button.
- The OPERATION lamp (green) on the switch panel of the indoor unit lights. The operating mode is selected in accordance with the room temperature and operation starts after approximately 3 minutes.
- If the AUTO mode is uncomfortable, you can select the desired conditions manually.
Temperature and fan speed can be changed.
When it is changed, MODE is also changed from AUTO to A.
At the same time, fan speed indication is indicated.
Stop
START/STOP button
Push this button again to stop the air conditioner.
When you set the air conditioner in A mode or switch over from AUTO operation because of some settings change, it will automatically select either cooling, heating, or fan only operation depending on the outdoor temperature. (Refer to page 15.)
Start
1 START/STOP button
Push this button to start the air conditioner.
2 Mode select button (MODE)
Select A.
3 Temperature button
Set the desired temperature.
- The OPERATION lamp (green) on the switch panel of the indoor unit lights. The operation mode is selected in accordance with the room temperature and operation starts after approximately 3 minutes.
- When you select the A mode, it is unnecessary to set the fan speed. The FAN speed display will show AUTO and the fan speed will be automatically controlled.
- If the A mode is uncomfortable, you can select the desired conditions manually.
Stop
START/STOP
Push this button again to stop the air conditioner.
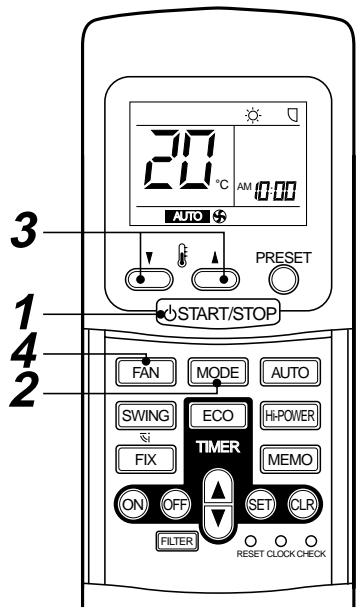
Push this button to start the air conditioner.
2 Mode select button (MODE)
Select Cool , Heat , or Fan only . (For cooling only model)
3 Temperature button
Set the desired temperature.
Cooling 21^ or higher.
Heating 28^ or lower.
When the air conditioner is in FAN ONLY operation, the temperature display is not indicated.
4 Fan speed button (FAN)
Select one of "AUTO", LOW, LOW+, MED, MED+, HIGH.
- The OPERATION lamp (green) on the switch panel of the indoor unit goes on. And operation starts after approximately 3 minutes. (If you select FAN ONLY mode, the unit will start immediately.)
- The : Fan only mode does not control temperature. Therefore, perform only steps 1, 2 and 4 to select this mode.
Stop
START/STOP button
Push this button again to stop the air conditioner.
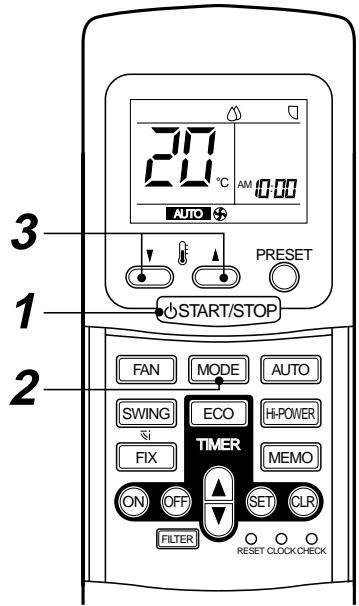
DRY OPERATION
Start
1 START/STOP button
Push this button to start the air conditioner.
2 Mode select button (MODE)
Select DRY
3 Temperature button
Set the desired temperature.
- The fan speed display indicates AUTO.
- The OPERATION lamp (green) on the switch panel of the indoor unit lights, and operation starts after approximately 3 minutes.
Stop
START/STOP button
Push this button again to stop the air conditioner.
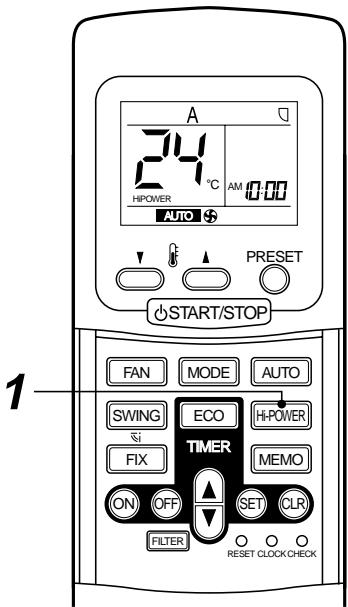
Hiigh Power Operation
High power (Hi POWER)
- The High power (High power operation) mode automatically controls room temperature, operation mode so that the room is quickly cooled in summer and warmed in winter. (Refer to page 15.)
Setting High power mode
1 Hi-POWER button
Push the Hi-POWER button.
The "Hi POWER" mark on the remote controller is indicated.
Canceling High power mode
1 Hi-POWER button
Push the Hi-Power button once again. The "Hi POWER" mark on the remote controller goes out.
CAUTION
The High POWER mode cannot be activated in the DRY and FAN ONLY operation and when the ON TIMER operation is reserved.
TIMER OPERATION
ON timer and OFF timer Setting TIMER
1 ON/OFF TIMER button
Push the ON or OFF TIMER buttons as required.
- The previous timer setting is displayed and flashes along with ON/OFF TIMER display.
2 TIMER button
Push the TIMER button.
Set the timer to the desired time.
Each push of the TIMER button changes the time in ten minutes steps. Pushing the TIMER button continually changes the time in one hour steps.
3 SET button
Push the SET button to set the timer.
The timer time is indicated and the timer starts.
4 CLR button
Push the CLR button to cancel the timer setting.
CAUTION
- When you select the timer operation, the remote controller automatically transmits the timer signal to the indoor unit at the specified time. Therefore, keep the remote controller in a location where it can transmit the signal to the switch panel properly.
- If you do not push the SET button within 30 seconds after setting the time, the setting will be cancelled.
Once you select the timer operation mode, the settings are saved in the remote controller. Thereafter, the air conditioner will start operating under the same conditions when you simply push the ON/OFF button of the remote controller.
If the clock display is flashing, you cannot set the timer. Follow the instructions in the section "SETTING THE CLOCK" on page 8 to set the clock, and then set the timer.
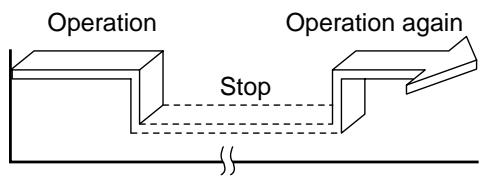
Combined timer (Setting both ON and OFF timers simultaneously)
OFF timer ON timer
(Operation Stop Operation)
This feature is useful when you want to stop the air conditioner after you go to sleep, and start it again in the morning when you wake up or you return home.
Example:
To stop the air conditioner and start it again next morning.
Setting combined TIMER
(1) Push the OFF button.
(2) Push the TIMER button to adjust the OFF timer.
(3) Push the ON button.
(4) Push the TIMER button to adjust the ON timer.
(5) Push the SET button.
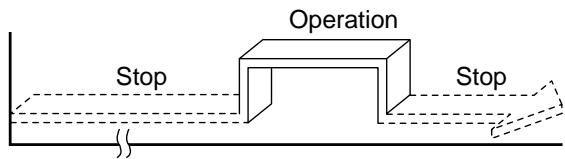
ON timer OFF timer
(Stop Operation Stop)
You can use this setting to start the air conditioner when you wake up and stop it when you leave the house.
Example:
To start the air conditioner next morning and stop it.
Setting combined TIMER
(1) Push the ON button.
(2) Push the TIMER button to adjust the ON timer.
(3) Push the OFF button.
(4) Push the TIMER button to adjust the OFF timer.
(5) Push the SET button.
- Either ON or OFF timer function which is closer to the current time, is activated first.
- If the same time is set for both ON and OFF timers, no timer operation is performed. Also, the air conditioner may stop operating.
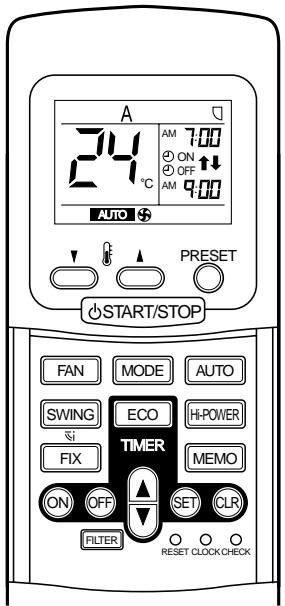
Every day combined timer
(Setting both ON and OFF timer simultaneously and activate every day.)
This feature is useful when you want to use combined timer at the same time every day.
Setting combined TIMER
(1) Push the ON button.
(2) Push the TIMER button to adjust the ON timer.
(3) Push the OFF button.
(4) Push the TIMER button to adjust the OFF timer.
(5) Push the SET button.
(6) After step (5), an arrow mark ( or ) flashes for about 3 seconds and during this flashing, push the SET button.
- During the every day timer is activating, both arrows (, ) are indicated.
Cancel the timer operation
Push the CLR button.
Clock display
During the TIMER operation (ON-OFF, OFF-ON, OFF timer) clock display is disappeared so as to show the setting time. To see the present time, push SET button briefly and the present time is displayed after about 3 seconds.
Memorize the frequently used operation setting by the MEMO button for convenience.
Start the air conditioner in the operation mode which you want the remote controller to memorize.
Push the button as follows while the air conditioner is in operation.
1 MEMO button
Push this button briefly to standby memorizing the setting.
All the icons currently displayed except for the clock display and mark flashes.
2 MEMO button
Push and hold the MEMO button for more than 3 seconds while the display flashes.
The mark is indicated and the setting is memorized.
- If you do not push the MEMO button within 3 seconds or if you push another button, the MEMORY setting is cancelled.
- Operation modes which can be memorized with the MEMO button are MODE, Temperature, FAN, TIMER and High power.
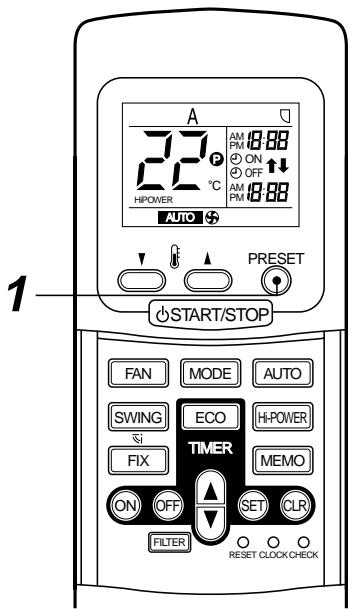
To operate the air conditioner with the setting memorized by the MEMO button.
1 PRESET button
Push the PRESET button. The setting memorized with the MEMO button will be indicated and the air conditioner operates with regards to the setting.
- The OPERATION lamp (green) on the switch panel of the indoor unit goes on, and operation starts after approximately 3 minutes.
- Initial setting :
MODE : AUTO
Temperature : 22
AUTO Restart Function
This unit is equipped with an Automatic restarting function which allows the unit to restart and resume the set operating conditions in the event of a supply power shutdown without the use of the remote controller.
The operation will resume without warning three minutes after the power is restored.
INFORMATION
The AUTO RESTART FUNCTION is not set to work on shipment from the factory, and so it is necessary to set it to function as required.
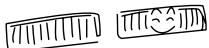
HOW TO SET THE AUTO START
To set the auto restart function, proceed as follows:
| OPERATION | MOTION |
| Slide the slide switch to AUTO START ON side. | When you set to “ON” position of Auto restart, Pi Pi Pi sound (3 times) are appear. (During power supply to the unit) When power supplying return, system will be restart automatically. |
- The Auto Restart function will not accept an instruction if timer operation with the remote controller is selected. (Please refer to the section of setting the timer operation.)
HOW TO CANCEL THE AUTO START
To cancel the AUTO START function, proceed as follows:
The system will now be required to manually restart with the remote controller after the main supply is returned.
| OPERATION | MOTION |
| Slide the slide switch to AUTO START OFF side. | When you set to “OFF” position of Auto restart, Pi Pi sound (3 times) are appear. (During power supply to the unit) When power supplying return, system will not be restart automatically. |
HOW THE AIR CONDITIONER WORKS
Automatic operation
- The air conditioner selects and operates a mode from the cooling, the heating, or the fan only operations, depending on the outdoor temperature.
- If the AUTO mode is uncomfortable, you can select the desired conditions manually.
| Outdoor temperature in operation | Operating condition | |
| Outdoor temperature 22°C or more (in case that the outdoor is hot) | Cooling operation | Performs the cooling operation at a temperature 1°C higher than the setting. |
| Outdoor temperature 20°C to 22°C | Fan only operation | Performs the fan only operation (low speed) while monitoring the outdoor temperature. When the room temperature changes, the air conditioner will select the cooling or heating mode. |
| The set temperature less than 20°C (in case that the outdoor is cold) | Heating operation | Performs the heating operation at a temperature 1°C lower than the setting. |
High POWER operation
When you push the Hi-POWER button during cooling, heating, or A operation, the air conditioner will start the following operation. (A operation : Auto change over)
- Cooling operation
Performs the cooling operation lower than the setting temperature.
When the room temperature is above the setting temperature. In addition, fan speed is high*.
Once room temperature is within 1^ of the setting temperature.
- Noise level raises in accordance with fan speed.
Heating operation
Performs the heating operation at 2^ higher than the setting temperature.
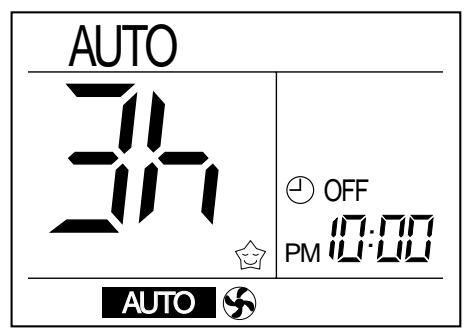
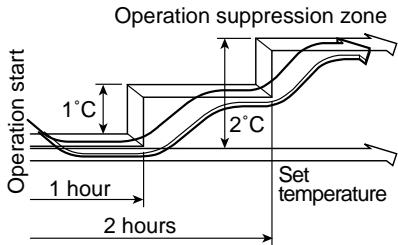
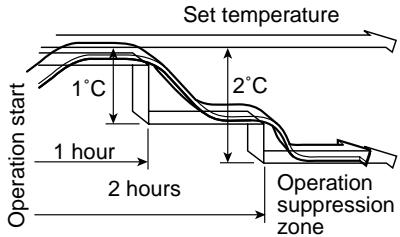
ECO timer operation
When you push the ECO button during cooling, heating, or A operation, the air conditioner will start the following operation.
The fan speed will be automatically controlled.
Cooling operation
In the operation suppression zone, where capacity is kept to the minimum, overcooling is prevented by raising the temperature setting by 1^ after 1 hour and by 2^ after 2 hours of operation.
The room temperature is thus regulated between the operation suppression zone and the set temperature.
Heating operation
In the operation suppression zone, where capacity is kept to the minimum, overheating is prevented by lowering the temperature setting by 1^ after 1 hour and by 2^ after 2 hours of operation.
The room temperature is thus regulated between the set temperature and the operation suppression zone.
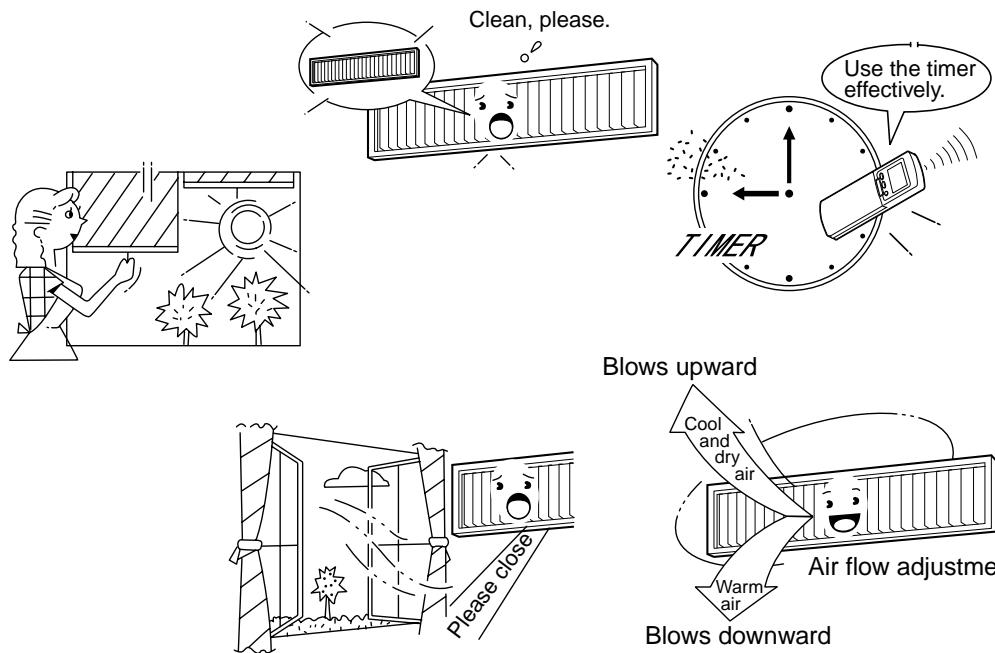
Maintain room temperature at comfortable level
Clean air filters
The clogged air filter impairs the performance of the air conditioner.
Clean them once two weeks.
Never open doors and windows more often than necessary
To keep cool or warm air in the room, never open doors and windows more often than necessary.
Windows curtains
In cooling, close the curtains to avoid direct sunlight.
In heating, close the curtains to keep the heat in.
Use the timer effectively
Set the timer for the desired operating time.
Get uniform circulation of room air
Adjust air flow direction for even circulation of room air.
MAINTENANCE
Cleaning of remote controller
CAUTION
- Use a dry cloth to wipe the remote controller.
- A cloth dampened with cold water may be used on the indoor unit if it is very dirty.
- Never use a damp cloth on the remote controller.
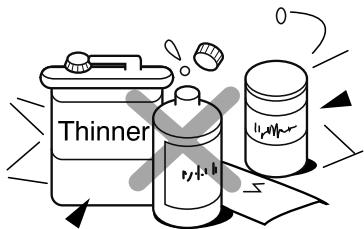
- Do not use a chemically-treated duster for wiping or leave such materials on the unit for long. It may damage or fade the surface of the unit.
- Do not use benzine, thinner, polishing powder, or similar solvents for cleaning. These may cause the plastic surface to crack or deform.
If you do not plan to use the unit for more than 1 month
(1) Operate the fan for 3 to 4 hours to dry the inside of the unit
- Cooling only model : Operate “FAN ONLY” mode.
- Heating pump model : Operate "Cooling" mode with setting temperature 30^ .
(2) Stop the air conditioner and turn off the power main switch or the circuit breaker.
(3) Remove the batteries from the remote controller.
Checks before operation
(1) Check that the air filters are installed.
(2) Check that the air outlet or inlet is not blocked.
(3) Load batteries in the remote controller. (Refer to page 7.)
(4) Turn on the power main switch or the circuit breaker to the mains AC outlet to turn on the air conditioner.

FAN ONLY operation or thermo.-off operation
WARNING
Make sure to ask the qualified person for cleaning.
Turn off the main power supply switch or breaker before unit maintenance.
Cleaning of Return grille
Preparation :
- Turn off the air conditioner by the remote controller.
- Dismount the Return grille.
Clean the Return grilles with water:
- Wipe down the Return grille with a sponge or towel moistened with a kitchen detergent. (Don't use any metallic brush for cleaning.)
- Carefully rinse the Return grille to wash out the detergent.
- After rinsing the Return grille with water, dry it in the shade.
CAUTION
- Don't start the air conditioner while leaving the return grille removed.
Cleaning of Air Filters
- Recommended cleaning intervals: Every two weeks.
- If the air filters are not cleared, it not only gets the cooling performance of air conditioner declined but causes a failure in the air conditioner such as water-drops fall down from it.
Preparation :
- Turn off the air conditioner by the remote controller.
- Dismount the Return grille.
Use a vacuum cleaner to remove dust from the filters or wash them with water.
- After rinsing the air filters with water, dry them in the shade. Set the air filter into the air conditioner.
NOTE
For Air conditioning system which is operated regularly, cleaning and maintenance of the indoor/outdoor units are strongly recommended.
As a general guide, if an indoor unit is operated for about 8 hours daily, the indoor/outdoor units will need to be cleaned at least once in every 3-MONTHS. This cleaning and maintenance shall be carried out by a qualified person.
Failure to clean the indoor/outdoor units regularly will result in poor cooling effect, icing, water leaking and even premature compressor failure.
AIR CONDITIONER OPERATIONS AND PERFORMANCE
3-minutes protection function
3-minutes protection function prevents the air conditioner from starting for about 3 minutes just after the power main switch/circuit breaker is turned on for re-starting the air conditioner.
Power failure
Power failure during operation will stop the unit completely.
- The OPERATION lamp on the indoor unit will start flashing when power is restored. (1 Hz)
- To restart the operation, push the START/STOP button on the remote controller.
- Lightning or a car wireless telephone operating nearby may cause the unit to malfunction. Turn off the power main switch or circuit breaker and then to on them again. Push the START/STOP button on the remote controller to restart.
Priority of Operation Types
Use the air conditioners by matching operation mode of the units in each room.
- For the indoor units in each room, different operation mode such as COOL and HEAT, DRY and HEAT cannot be operated.
If operation type in a room differs from one in another room, priority is given to the operation type in the room where operation has started previously.
Heating characteristics
Preheating operation
The air conditioner will not deliver warm air immediately after it is turned on. Warm air will start to flow out after approximately 5 minutes when the indoor heat exchanger warms up.
Warm air control
When the room temperature reaches the set temperature, the fan speed is automatically reduced to prevent to blow cold draft. At this time, the outdoor unit will stop.
Defrosting operation
If the outdoor unit is frosted during the heating operation, defrosting is started automatically (for approximately 5 to 10 minutes) to maintain the heating capacity.
- The fans in both of the indoor and outdoor units will stop during the defrosting operation.
- During the defrosting operation, the defrosted water will be drained from the bottom plate of the outdoor unit.
Heating capacity
In the heating operation, the heat is absorbed from the outside and released into the room. This way of heating is called heat pump system. When the outside temperature is too low, it is recommended to use another heating apparatus in combination with the air conditioner.
Attention to snowfall and freeze on the outdoor unit
- In snowy areas, the air inlet and air outlet of the outdoor unit are often covered with snow or frozen up. If snow or freeze on the outdoor unit is left as it is, it may cause machine failure or poor warming.
- In cold areas, pay careful attention to the drain hose so that it perfectly drains water out without water remaining inside for freeze prevention. If water freezes in the drain hose or inside the outdoor unit, it may cause machine failure or poor warming.
Air conditioner operating conditions
For proper performance, operate the air conditioner under the following temperature conditions:
| Cooling operation | Outdoor temperature : 15°C to 43°C |
| Room temperature : 21°C to 32°C | |
| CAUTION Room relative humidity – less than 80%. If the air conditioner operates in excess of this figure, the surface of the air conditioner may attract condensation. | |
| Dry operation | Outdoor temperature : 15°C to 43°C (Maximum suction air temp. 46°C) |
| Room temperature : 17°C to 32°C | |
| Heating operation | Outdoor temperature : -10°C to 24°C |
| Room temperature : Less than 28°C |
If air conditioner is used out of the above conditions, safety protection features may come into operation.
INSTALLATION
DANGER
Ask the dealer or a special store to install the air conditioner to a new place or move it to another place and to observe the following items.
If the air conditioner is imperfectly installed by yourself, it may cause electric shock or fire.
Don't install the air conditioner in the following places
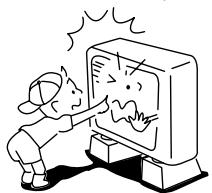
- Don't install the air conditioner in any place within 1m from a TV, stereo, or radio set. If the unit is installed more than 1m apart from such a set and operation of the air conditioner makes such an appliance generate noise, move the unit further away until noise is considerably reduced.
- Don't install the air conditioner near a high frequency appliance (sewing machine or massager for business use, etc.), otherwise the air conditioner may malfunction.
- Don't install the air conditioner in a humid or oily place, or in a place where steam, soot, or corrosive gas is generated.
- Don't install the air conditioner in a salty place such as seaside area.
- Don't install the air conditioner in a place where a great deal of machine oil is used.
- Don't install the air conditioner in a place where it is usually exposed to strong wind such as in seaside area or on the roof or upper floor of a building.
- Don't install the air conditioner in a place where sulfurous gas generated such as in a spa.
- Don't install the air conditioner in a vessel or mobile crane.
Be careful with noise or vibrations
- Don't install the air conditioner in a place where noise by outdoor unit or hot air from its air outlet annoys your neighbors.
- Install the air conditioner on a solid and stable foundation so that it prevents operation noise and vibration from increasing and being transmitted outside.
- If one indoor unit is operating, some sound may be audible from other indoor units that are not operating.
TROUBLES AND CAUSES
CAUTION
If any of the following conditions occur, turn off the main power supply switch and immediately contact the dealer :
- The indicator lamps flash at short intervals (5 Hz) even though you have tried turning off the power supply and turning on again after 2 or 3 minutes.
- Switch operation are erratic.
- The main power fuse often blows out, or the circuit breaker is often activated.
- A foreign matter or water has fallen into the inside of the air conditioner.
- Any other unusual condition is observed.
| Before you ask for servicing or repairs, check the following points. | |
| Recheck | Inoperative · The power main switch is turned off. · The circuit breaker is activated to cut off power supply. · The main power fuse has blown out. · Stoppage of electric current. · The batteries in the remote controller are exhausted. · ON timer is set. · Selected indication (B) on the switch panel unit differs from that of the remote controller selector (B). Does not cool well or heat well · The air inlet and/or outlet of the outdoor unit is blocked. · Doors or windows are opened. · The fan speed is set to low. · The air conditioner is set in the ECONO. or DRY mode. · The set temperature is too high. (In cooling operation) · The set temperature is too low. (In heating operation) |
| These are not failures. | Indoor unit or outdoor unit makes a strange noise. · When temperature sharply changes, the indoor or outdoor unit occasionally makes a strange noise because of expansion/contraction of parts or change of refrigerant flow. The room air is smelly or a bad odor comes from the air conditioner. · Smells impregnated in the walls, carpets, furniture, clothing, or furs, come out. The OPERATION lamp goes on and off. · The lamp goes on and off 1 Hz when power is restored after a power failure, or when the power main switch is turned on. Reset the circuit breaker to ON. (To stop flashing, see "Power Failure" on page 18.)Sound issues from indoor unit when it is not operating. · When other indoor units are operating, some sound may be audible even from indoor units that are turned off. Outdoor unit is frosted in heating operation. Water is drained out of outdoor unit. · The outdoor unit is sometimes frosted in heating operation. In that case, the unit automatically performs defrosting (for 2 to 10 minutes) for raising the heating efficiency. · In defrosting operation, both the indoor and outdoor units stop air flow. · Hiss sound is heard when flow of the refrigerant is changed for defrosting. · Resultant water of automatic defrosting in heating operation is drained out of the outdoor unit. Air flow changes though the FAN button is not set to the AUTO mode. · When the temperature of blown air goes down in heating operation, the air conditioner automatically changes or stops air flow from the indoor unit not to make persons in the room feel chilly. · Air flow from the indoor unit is occasionally changed in the cooling operation. A white mist of chilled air or water is generated from the outdoor unit. · The indoor unit in cooling operation or the outdoor unit in defrosting operation occasionally steams. |
TROUBLES AND CAUSES (Concerning Remote Controller)
Before you ask for servicing or repairs, check the following points:
| Setting Change is Impossible | ||
| Symptoms | Causes | Reason and Disposal |
| The fan speed can not be changed. | ·Check whether the MODE indi-cated on the display is “AUTO”. AUTO | When the automatic mode is se-lected, the air conditioner automat-ally selects the fan speed. |
| ·Check whether the MODE indi-cated on the display is “DRY”. (DRY) | When dry operation is selected, the air conditioner automatically selects the fan speed. | |
| The Transmission Indicator “▲” Never Goes On | ||
| Symptoms | Causes | Reason and Disposal |
| The remote controller signal is not transmitted even when the ECONO. FAN button is pushed. | ·Check whether the ON TIMER is indicated on the display. | The remote controller signal is not transmitted, because the air conditioner is off. |
| The Display Never Goes On | ||
| Symptoms | Causes | Reasons |
| The TEMP. indicator does not go on. (for cooling only model) | ·Check whether the MODE indicated on the display is “FAN ONLY”. (FAN ONLY) | The temperature can not be set during fan only operation. |
| The Display Goes Off | ||
| Symptoms | Causes | Reasons |
| The indication on the display disappears after a lapse of time. | Check whether the timer operation has come to an end when the OFF TIMER is indicated on the display. | The air conditioner operation stops since the set time elapsed. |
| The TIMER indicators go off after a lapse of certain time. | Check whether the timer operation is started when the ON TIMER is indicated on the display. | When the time set to start the air conditioner is reached, the air conditioner will automatically start and the appropriate indicator will go off. |
| The Signal Receiving Tone Does Not Sound | ||
| Symptoms | Causes | Disposal |
| No receiving tone sounds from the indoor unit even when the START/STOP button is pushed. | ·Check whether the signal transmitter of the remote controller is properly directed to the receiver of the indoor unit when the START/STOP button is pushed. | Direct the signal transmitter of the remote controller to the receiver of the indoor unit, and then repeatedly push the START/STOP button twice. |
ACCESSIONS
Télécommande