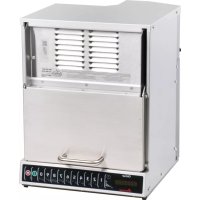
HDC18Y2 - Microwaves ACP - Free user manual and instructions
Find the device manual for free HDC18Y2 ACP in PDF.

User questions about HDC18Y2 ACP
0 question about this device. Answer the ones you know or ask your own.
Ask a new question about this device
Download the instructions for your Microwaves in PDF format for free! Find your manual HDC18Y2 - ACP and take your electronic device back in hand. On this page are published all the documents necessary for the use of your device. HDC18Y2 by ACP.
USER MANUAL HDC18Y2 ACP
This document covers HDC*, HDC*-Y*, MDC*, MDC*Y*, DEC* and MCHDC* models
Owner's Manual
[0.6 Cubic Foot (17 Liter)]

natural_image
Line drawing of a microwave oven with ventilation slots and a handle (no text or symbols)
natural_image
Line drawing of a simple kitchen appliance with a door and side panel (no text or symbols)STYLE 1 STYLES 2 & 3

natural_image
Simple line drawing of a rectangular box or container with no text or symbolsTABLE OF CONTENTS
Model Identification
When contacting ACP, provide product information. Product information is located on oven serial plate. Record the following information:
Model Number:
Manufacturing Number:
Serial or S/N Number:
Date of purchase:
Dealer's name and address:
Keep a copy of sales receipt for future reference or in case warranty service is required.
Any questions or to locate an authorized ACP servicer, call ACP ComServ Service Support.
• Inside the U.S.A. or Canada, call toll-free at 866-426-2621.
• Outside the U.S.A. and Canada, call 319-368-8195.
• Email: commercialservice@acpsolutions.com
Warranty service must be performed by an authorized ACP servicer. ACP also recommends contacting an authorized ACP servicer, or ACP ComServ Service Support if service is required after warranty expires.
Before using your oven, please take the time to read the Safety Instructions which shipped with the oven.
Information herein is subject to change without notice. Errors are subject to correction.
For the most recent product literature, please visit acpsolutions.com/product-literature/

ACP warrants this product only when original purchaser uses the oven for commercial food service preparation. See warranty certificate for full details. Warranty Certificate for this product can be found on the ACP, Inc. website at acpsolutions.com/warranty

Online Oven Resources
IMPORTANT SAFETY INSTRUCTIONS
RECOGNIZE THIS SYMBOL AS A SAFETY MESSAGE
WARNING
When using electrical equipment, basic safety precautions should be followed to reduce the risk of burns, electrical shock, fire, or injury to persons including the following.
- READ all instructions before using equipment.
- READ AND FOLLOW the specific "PRECAUTIONS TO AVOID POSSIBLE EXPOSURE TO EXCESSIVE MICROWAVE ENERGY" on this page.
- This equipment MUST BE GROUNDED. Connect only to properly GROUNDED outlet. See "GROUNDING / EARTHING INSTRUCTIONS".
- Install or locate this equipment ONLY in accordance with the installation instructions in this manual.
- Liquids or other foods, must NOT be HEATED in sealed containers since they are liable to explode.
- Eggs in their shell and whole hard-boiled eggs should NOT be HEATED in microwave ovens since they may explode even after microwave heating has ended.
- Use this equipment ONLY for its intended use as described in this manual. DO NOT use corrosive chemicals or vapors in this equipment. This type of oven is specifically designed to heat, cook, or dry food. It is not designed for industrial or laboratory use.
- This appliance is NOT intended for use by persons (including children) with reduced physical, sensory or mental capabilities, or lack of experience and knowledge, unless they have been given supervision or instruction concerning use of the appliance by a person responsible for their safety
-
CHILDREN SHOULD BE SUPERVISED to ensure that they DO NOT play with the appliance
-
Failure to maintain the oven in a clean condition could lead to deterioration of the surface that could adversely affect the life of the appliance and possibly result in a hazardous situation;
- See door cleaning instructions on page 22-page 23 of this product safety manual.
- DO NOT heat baby bottles in oven. Baby food jars shall be open when heated and contents stirred or shaken before consumption, in order to avoid burns.
- DO NOT operate this equipment if it has a damaged cord or plug, if it is not working properly, or if it has been damaged or dropped.
- This equipment, including power cord, must be serviced ONLY by qualified service personnel. Special tools are required to service equipment. Contact nearest authorized service facility for examination, repair, or adjustment.
- DO NOT cover or block louvers or other openings on equipment.
- DO NOT store this equipment outdoors. DO NOT use this product near water – for example, near a kitchen sink, in a wet basement, a swimming pool, or a similar location.
- DO NOT immerse cord or plug in water.
- Keep cord AWAY from HEATED surfaces.
- DO NOT let cord hang over edge of table or counter.
- For commercial use only.
WARNING
To avoid risk of fire in the oven cavity:
A. DO NOT overcook food. Carefully attend oven when paper, plastic, or other combustible materials are placed inside the oven, due to the possibility of ignition.
B. Remove wire twist-ties from paper or plastic bags before placing bag in oven.
C. If materials inside the oven ignite, keep oven door CLOSED, turn oven off and disconnect the power cord, or shut off power at the fuse or circuit breaker panel.
D. DO NOT use the cavity for storage. DO NOT leave paper products, cooking utensils, or food in the cavity when not in use.
WARNING
Liquids such as water, coffee, or tea are able to be overheated beyond the boiling point without appearing to be boiling due to surface tension of the liquid. Visible bubbling or boiling when the container is removed from the microwave oven is not always present. THIS COULD RESULT IN VERY HOT LIQUIDS SUDDENLY BOILING OVER WHEN A SPOON OR OTHER UTENSIL IS INSERTED INTO THE LIQUID. To reduce the risk of injury to persons:
i. DO NOT overheat the liquid.
ii. Stir the liquid both before and halfway through heating it.
iii. DO NOT use straight-sided containers with narrow necks.
iv. After heating, allow the container to stand in the microwave oven for a short time before removing the container.
v. Use extreme care when inserting a spoon or other utensil into the container.
CAUTION
To avoid personal injury or property damage, observe the following:
- DO NOT deep fat fry in oven. Fat could overheat and be hazardous to handle.
- DO NOT cook or reheat eggs in shell or with an unbroken yolk using microwave energy. Pressure may build up and erupt. Pierce yolk with fork or knife before cooking.
-
Pierce skin of potatoes, tomatoes, and similar foods before cooking with microwave energy. When skin is pierced,
-
Never use paper, plastic, or other combustible materials that are not intended for cooking.
- When cooking with paper, plastic, or other combustible materials, follow manufacturer's recommendations on product use.
- DO NOT use paper towels which contain nylon or other synthetic fibers. Heated synthetics could melt and cause paper so to invite
Grounding and Installation
Grounding/Earthing Instructions
Oven MUST be grounded. Grounding reduces risk of electric shock by providing an escape wire for the electric current if an electrical short occurs. This oven is equipped with a cord having a grounding wire with a grounding plug. The plug must be plugged into an outlet that is properly installed and grounded. Consult a qualified electrician or servicer if grounding instructions are not completely understood, or if doubt exists as to whether the oven is properly grounded.
Do NOT use an extension cord.
If the product power cord is too short, have a qualified electrician install a three-slot receptacle. This oven should be plugged into a separate circuit with the electrical rating as provided in product specifications (available at www.acpsolutions.com) and the oven's serial plate / rating label. When the oven is on a circuit with other equipment, an increase in cooking times may be required and fuses can be blown.
EXTERNAL EQUIPOTENTIAL EARTHING TERMINAL (export only)
Equipment has secondary earthing terminal. Terminal provides external earthing connection used in addition to earthing prong on plug. Located on outside of oven back, terminal is marked with symbol shown at right
Installation
Unpacking Oven
- Inspect oven for damage such as dents in door or inside oven cavity.
• Report any dents or breakage to source of purchase immediately.
Do not attempt to use oven if damaged.
- Remove all packing materials from oven interior.
- If oven has been stored in extremely cold area, wait a few hours before connecting power.
Radio Interference
Microwave operation may cause interference to radio, television. Reduce or eliminate interference by doing the following:
- Clean door and sealing surfaces of oven according to instructions in "Care and Cleaning" section.
Oven Placement
WARNING
To avoid risk of electrical shock or death, this oven must be grounded and plug must not be altered.
WARNING
Excessive Weight Hazard
Use two or more people to move and install oven. Failure to do so can result in back or other injury

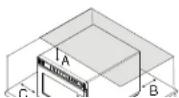
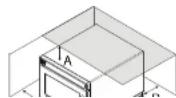
OVEN CLEARANCES
A. Allow at least 2" (5.1 cm) of clearance around top of oven. Proper air flow around oven cools electrical components. With restricted air flow, oven may not operate properly and life of electrical parts is reduced.
B. General market models: There is not an installation clearance requirement for the back of the oven.
HDC21RB2, MCHDC21, HDC21DQ only: Allow at least 1" (2.54 cm) of clearance around back of oven.
C. Allow at least 1" (2.54 cm) of clearance around sides of oven.
D. Install oven so oven bottom is at least 3 feet (91.5 cm) above floor.
STYLES 1 & 4 Control Panel and Features
Note: There are four styles of controls shown Style 1, Style 2, Style 3, and Style 4. Choose the control that matches unit.
Control panel coloring may vary by model.
Control Panel Features
(A) USB PORT (select models)
Standard USB flash drive compatible.
Allows for import/export of
programmed settings and user options,
and to update firmware.
(B) DISPLAY
2.8" Color LCD Display
(C) NUMBER KEYPADS
Used to operate preset cooking programs; enter settings; navigate through display; and/or activate secondary keypad functions.
(D) START/OK KEYPAD
Begins cooking in Manual Time
Entry Mode. Restarts an interrupted
cooking cycle. Used to save settings
and entries. Toggles through pages in
Programming and User Option Modes.
(E) STOP/RESET KEYPAD
Interrupts operation, and/or exits
modes and menus
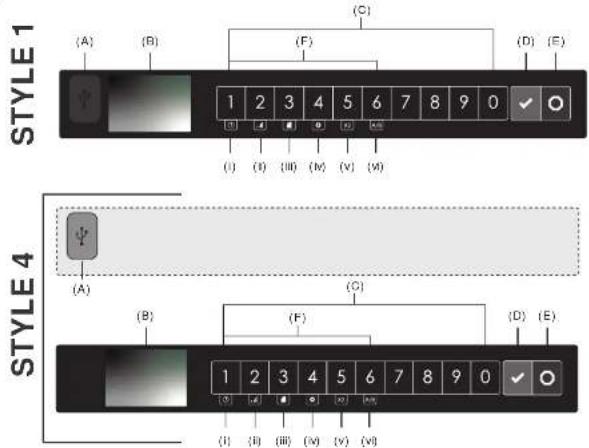
(F) SECONDARY FUNCTION KEYPADS
To activate, press and hold corresponding number keypad for 0.75 seconds. Note: Press and hold time can be set between 0.75 – 2 seconds by factory option.
(i) Manual Time Entry Mode (keypad '1')
Allows the operator to heat without changing the preset program keypads.
(ii) Power Level (keypad "2")
Use to set microwave power level between 0% to 100% in 10% increments (1 = 10% power, 2=20%, 3=30%, etc.) while in Manual Time Entry Mode. Used to edit COOK FACTOR while in Programming Mode.
(iii) Programming Mode (keypad "3")
Edit preset programs and/or create new programs for customized cooking.
(iv) User Options (keypad "4")
STYLES 1 & 4 Cooking & Programming Features
Programming Features
STAGE COOKING
Allows operator to use up to four different cooking cycles or stages consecutively without repeated input from the operator. For example, stage cooking could be set to defrost food initially, then cook it, and then keep the food warm until serving time.
PRESET PROGRAM KEYPADS
Oven can store between 10 to 200 cooking programs in memory. Available quantity varies based on "Digit Entry" User Option, and "Menu A/B" factory setting
Note: To change "Digit Entry" options, see "User Options" section in this manual. "Menu A/B" only available when factory option ALLOW AB MENU is enabled
| DIGIT ENTRYUSER OPTION | AVAILABLE COOKING PROGRAMS | |
| IF “MENU A/B” IS DISABLED IF “MENU A/B” IS ENABLED | ||
| 1 Single Digit | 10 programs (0-9)(10 total cooking programs) | 2 menu sections (A or B)← 10 programs per menu(0-9) and (0-8)(20 total cooking programs) |
| 01 Double Digit | 100 programs (00-99)(100 total cooking programs) | 2 menu sections (A or B)← 50 programs per menu(00-49) and (00-49)(100 total cooking programs) |
| 1 Folders | 10 folders (0-9)← 10 programs per folder (0-9)(100 total cooking programs) | 2 menu sections (A or B)← 10 folders per menu(0-9) and (0-9)← 10 programs per folder(0-9) and (0-8)(200 total cooking programs) |
QUANTITY PROMPT (select models)
Note: Only available when factory option ALLOW QUANTITY PROMPT is enabled and "Quantity Prompt" is enabled in "User Options"
Allows operator to select preset program keypad(s) for a menu item, followed by the quantity of items to be heated. Cook times and settings can be customized for quantities 1-9.
STYLES 1 & 4
Operation

Interrupting Operation
Open oven door or press STOP/RESET keypad to interrupt operation. Display continues to show countdown time. Close door and press START/OK keypad to resume oven operation.

Canceling Mistakes
If oven is not cooking, press STOP/RESET keypad to clear display. If oven is cooking, press STOP/RESET keypad once to stop oven, then again to clear display. If oven door is open and time shows in display, close oven door and press STOP/RESET keypad to clear display.
Operating Preset Program Keypads
From the factory, this oven comes preprogrammed with several cooking sequences in memory. To heat using a preset program, press number keypad(s). Oven will start to heat automatically.
- Open oven door, place food in oven, and close oven door.
• READY screen is displayed
- If keypad is not pressed within 60 seconds, open and close oven door again.
-
Press desired number keypad(s)
-
Single Digit Keypad Cooking: press a single keypad (0-9)
- Double Digit Keypad Cooking: press the two keypads, in order, of the double digit number for the desired cooking sequence (00-99)
- Folders: press one keypad to open folder (0-9), followed by keypad for desired cooking sequence (0-9)
Note: To change Digit Entry option see User Options section in this manual
- Oven operates and time counts down.
• Display shows the program name and counts down cooking time.
- If additional cooking time is required, press preset keypads before or after cooking cycle ends.
- At the end of the cooking cycle, the oven beeps. Carefully remove food from oven.
FACTORY PRESET PROGRAMS
Menu A
| KEYPAD TIME POWER | |
| 1 10 spc. | 100% |
| 2 20 spc. | |
| 3 30 spc. | |
| 4 45 spc. | |
| 5 1:00 min. | |
| 6 1:30 min. | |
| 7 2:00 min. | |
| 8 3:00 min. | |
| 9 4:00 min. | |
| 0 5:00 min. |
Factory setting may vary by model


STYLES 1 & 4
Operation

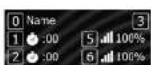
Manual Time Entry Mode
Allows operator to heat without changing the preset program keypads. From READY or DOOR OPEN screen:
- Open oven door, place food in oven, and close door
- READY screen is displayed. Fan and light operate
-
If keypad is not pressed within 60 seconds, open and close oven door again
-
Press and hold number keypad "1"/TIME ENTRY
• MANUAL COOK screen is displayed
-
Press number keypads to enter desired cook time
-
Press and hold number keypad "2"/ POWER LEVEL to change power level.
-
Press number keypads to enter % microwave power ("1" = 10%, "2" = 20%, etc.) For 100% power level, press and hold number keypad "2"/ POWER LEVEL
-
Press START/OK keypad to begin cooking • Oven operates and display counts down cooking time
-
At the end of the cooking cycle, the oven beeps. Carefully remove food from oven.
2

4

5

Manual Time Entry with Multiple Stages
Stage cooking allows consecutive cooking cycles (stages) without interruption. Up to four different cooking cycles can be entered.
-
Follow "Manual Time Entry Mode" steps 1-4 above to enter settings for stage one.
-
To enter additional cooking stages: Press and hold number keypad "1"/TIME ENTRY • MANUAL COOK STAGE entry screen is displayed
-
To enter cook time for Stage Two: Press number keypad "2"
-
Press number keypad(s) to enter cook time
- Press START/OK keypad
4 To enter power level for Stage Time: Dress number bounded "C"
2

STYLES 1 & 4 Programming Display Screens
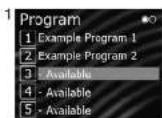
Programming Mode Screen
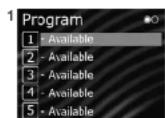
Indicates oven is in programming mode. The operator may press keypads to open program and/or folder locations.
Note: Screens may vary based on "Digit Entry" User Option, and "Menu A/B" factory setting
(A) PROGRAM/FOLDER LOCATIONS
Numbers represent programmed cocking sequences and available memory locations. Unused locations are labeled "- Available." First available location is highlighted. Operator may press keypads to view and edit locations.
(B) MENU A/B DISTINCTION (select models)
Displays active menu section. Operator may press and hold number keypad '6' to toggle between A and B menus.
(C) MULTIPLE PAGES
Radio button icons indicate page number. Display automatically toggles to the next page every 2 seconds. Operator may press START/OK keypad to manually toggle between pages.
(B) (C)

- Single Digit Entry
- Menu A shown
• Page 1 of 2 shown
• "3" is first available location

- Folder Digit Entry
- Menu A/B disabled
Page 1 of 2 shown
• 4 is first available location
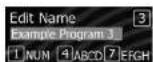
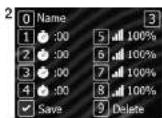
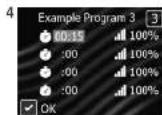
Program Entry Screen
Displays while a program or folder location is open. Stored location is represented by number at top right corner of screen

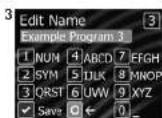
Edit Name Screen
Displays while editing name of program or folder. Operator may press number keypads to enter a name. To cycle through available characters, press the same keypad within 1 second.
STYLES 1 & 4
Programming

Manual Programming Mode
Allows operator to edit preset programs and/or create new programs for customized cooking.
Note: Manual Programming must be enabled in User Options
From READY or DOOR OPEN screen:
- Press and hold number keypad "3"/PROGRAM
- Oven will display list of preset program and available locations
- The first available location will be highlighted. If no locations are available, the first preset program on the first page will be highlighted.
- Display automatically toggles to the next page of program locations every 2 seconds. Select the START pad to manually toggle to next page.
- Press number keypad(s) to open the desired program location
• PROGRAM ENTRY screen is displayed.
- To edit name: Press number keypad "0"
• EDIT NAME screen is displayed
- Press number keypads to enter program name.
- Press START/OK keypad to save and return to program entry screen.
- To edit cook time for Stage One: Press number keypad "1"
- Press number keypads to enter cook time
- Press START/OK keypad to save and return to program entry screen
- To edit power level for Stage One: Press number keypad "5"
- Press number keypads to enter % microwave power ("1" = 10%, "2" = 20%, etc.)
For 100% power level, press and hold number keypad "2"/ POWER LEVEL
- Press START/OK keypad to save and return to program entry screen
- To save and exit programming mode: Press START/OK keypad
Manually Programming Multiple Stages
Stage cooking allows consecutive cooking cycles (stages) without interruption. Up to four different cooking cycles can be programmed
- Follow "Manual Programming Mode" steps 1-5 above.

STYLES 1 & 4
Programming

Quantity X2 Programming
This feature allows a preset percentage of original cook time, called a cook factor, to be added to a cook sequence. Default cook factor is 80% unless otherwise stated.
EDIT THE COOK FACTOR
From READY or DOOR OPEN screen:
- Press and hold number keypad "3"/PROGRAM
-
Press number keypad(s) to open the desired program location • PROGRAM ENTRY screen is displayed
-
Press and hold number keypad "2" / POWER LEVEL
• EDIT COOK FACTOR screen is displayed
- Press number keypads to enter cook factor between 10 - 100%
- Press START/OK keypad to save and return to program entry screen

Folders Programming (optional)
Note: Folders must first be enabled in User Options> DIGIT ENTRY.
NAVIGATE FOLDERS
- To open folder: Press number keypad to open the desired folder
• To exit folder: Press STOP/RESET keypad
CREATE FOLDERS
Note: Desired keypad location must be empty "- Available" before creating a folder.
From READY or DOOR OPEN screen:
-
Press and hold number keypad "3"/PROGRAM
-
Oven will display list of preset program and available locations
- The first available location will be highlighted. If no locations are available, the first preset program on the first page will be highlighted.
- Display automatically toggles to the next page of program locations every 2 seconds. Select the START pad to manually toggle to next page.
A. D. 10, 11, 12, 13, 14, 15, 16, 17, 18

STYLES 1 & 4 USB Flash Drive
Export Menu via USB Flash Drive
Note: Before beginning, "PIN Code" must be enabled in User Options From READY or DOOR OPEN screen:
-
Insert flash drive into the USB port
-
Press and hold keypad number "4"/ USER OPTIONS • PIN Code prompt appears
-
Press keypads 1-3-5-7-9 to enter SERVICE MODE
-
Press corresponding number keypad to select "Export to USB"
- EXPORTING... screen appears. Oven beeps once export is complete
-
Settings, menu items, and oven usage data will be loaded on USB Flash Drive
-
Press STOP/RESET keypad to exit SERVICE MODE. Remove USB Flash Drive
Import Menu via USB Flash Drive
Note: Menu file must be .xml format; must be the only .xml file on the flash drive. Menu file must be saved at the top level (root directory) of the flash drive, and cannot be located inside any folders.
From READY or DOOR OPEN screen:
-
Insert flash drive into the USB port
-
Press and hold keypad number "4"/USER OPTIONS • If prompted, enter the PIN Code and press START/OK keypad
-
Press START/OK keypad to scroll through pages of user options until "Load File" appears
-
Press corresponding number keypad to select "Load File" Caution: Uploading a new file will overwrite existing items on oven. To ensure items are not lost, first backup files by exporting to USB drive.
• IMPORTING... screen appears.
- IMPORT COMPLETE screen displays once import is complete
- Settings and menu items will now be loaded on oven and ready to use
- Press STOP:RESET keypad to exit USER OPTIONS. Remove USB Flash Drive

ACP Programming Application
ENABLE:DISABLE PIN CODE
From READY or DOOR OPEN screen:
-
Press and hold keypad number "4"/USER OPTIONS • If prompted, enter the PIN Code and press START/OK keypad
-
Press START/OK keypad to scroll through pages of user options until "PIN Code" appears.
-
Press corresponding number keypad to open "PIN Code" options
-
To change the setting, press corresponding number keypad
-
Press STOP/RESET keypad to exit User Options Menu

Updating Firmware
Note: Firmware files must be loaded on USB flash drive. Must be saved at the root directory of the flash drive, and cannot be located inside any folders.
-
From READY screen, Press and hold keypad number "7". • PIN Code prompt appears
-
Press keypads 1-3-5-7-9 to enter SERVICE MODE
-
Press and hold keypad number "7".
-
Firmware update screen appears
-
Insert flash drive into the USB port
-
Press press START/OK keypad to
STYLES 1 & 4 User Options
There are several options you can change to customize the operation of the oven for your business. Options are shown below. The factory setting is shown in bold type.

Access and Modify User Options
From READY or DOOR OPEN screen
- Press and hold keypad number "4"/USER OPTIONS.
If prompted, enter the PIN Code and press START/OK keypad
USER OPTIONS screen is displayed
- Press the START/OK keypad to scroll through pages of user options
- To access an individual user option, press the corresponding number keypad
• To change the setting, press corresponding number keypad
• To return to User Options Menu, press START or STOP/RESET - Press STOP/RESET keypad to exit User Options Menu

text_image
User Options 1 Enc of Cycle Beep 2 Speaker Volume 3 Key Beep 4 Reset on Door Open 5 Next Page User Options 1 Digit Entry 2 Manual Programming 3 Time Entry 4 Maximum Cook Time 5 Next Page User Options 1 Keypad Enable Window 2 On-the-Fly 3 Quantity Prompts 4 Default to Menu A or B 5 Next Page User Options 2 PIN Code 3 Language 4 Load Tile 5 Next PageSTANDARD DEFAULT PER MODEL(FACTORY SETTINGS IN BOLD)
Factory setting may vary by model
SETTING DISPLAYED OPTIONS DESCRIPTION
| SETTING DISPLAYED OPTIONS DESCRIPTION | ||
| End of Cycle Beep 3 Seconds | 3 second continuous beepContinuous beep until door is opened5 beep bursts until door is open | |
| Speaker Volume Low | MediumHigh | Sets volume to lowSets volume to mediumSets volume to high |
| Key Boop On | Off | Allows beep when keypad is pressedPrevents beep when keypad is pressed |
| Reset on Door Open End | Cook CyclePause Cook Cycle | Canals heating time count down after door is opened during cycle.Allows oven to resume heating time countdown after door is opened during cycle |
| Digit Entry | Single DigitDouble DigitFolders | Allows 10 (0-9) preprogrammed itemsAllows 100 (00-99) preprogrammed itemsAllows 10 folders (0-9), each with 10 preprogrammed items |
| Manual Programming On | Off | Allows use of manual time entry and preprogrammed keypadsAllows use of preprogrammed keypads only |
| Time Entry On | Manual time entry/cooking allowed | |
STYLES 2 & 3 Control Panel and Features

text_image
(A) (B) (C) (D) (E) (F) STYLE 2 1 2 3 4 5 6 7 8 9 0 (G) STYLE 3 (A) (B) (C) (D) (E) (F) TIME ENTER 1 2 3 4 5 6 7 8 9 0 POWER LEVEL START STOP RESET (G)Control Panel Features
(A) DISPLAY (select models)
Some items in display can be seen but will not glow.
(B) TIME ENTRY KEYPAD
Use to enter cooking time for either manual entry or programming.
(C) NUMBER KEYPADS
Use to begin cooking programs or enter times and power levels for "Manual Time Entry" cooking
(D) POWER LEVEL KEYPAD
Use to set microwave power level between 0% to 100% in 10% increments (1 = 10% power, 2=20%, 3=30%, etc.). The power level can be decreased for foods that require slower more even cooking. If cooking time is set and START keypad pressed, oven cooks at 100% power. When programming to reset power level
(E) START KEYPAD
Begins Manual Time Entry cooking or restarts an interrupted cooking cycle. When programming, use to save time and power level, and to advance to next user option.
(F) STOP/RESET KEYPAD
Use to exit programming mode and stop cooking during cooking cycle.
(G) QUANTITY X2 KEYPAD
Increases a preset cook time by a percentage of the original cook time, also know as a cook factor. Used for cooking multiple servings of foods.
STYLES 2 & 3
Displays and Operation
Cooking Displays
| STYLE 2 STYLE 3 | DESCRIPTION | |
| READY READY | Displays when oven control will accept entries | |
| 00:00 00:00 | Displays cooking time. If stage cooking is programmed, total cooking time is displayed | |
| % MW POWER | COOK LEVEL | Displays while oven is operating to show the percent microwave power level.• Style 2: The % MW Power is displayed about as a number 10-90 in intervals of 10. If no number is displayed, the oven is cooking at full power.• Style 3: The cooking level is displayed above as a number 1 through 9. (1=10%, 2=20%, 3=30%, etc.) If no number is displayed, the oven is cooking at full power. |
| COOKING POWER | Displays while the oven is generating microwave energy during a cooking cycle. |
Programming Displays
| STYLE 2 STYLE 3 DESCRIPTION | ||
| PROGRAM PROGRAM | Displays when entering programming mode. | |
| PO- P:O | Displays when oven enters programming mode for single digit keypad memory only. | |
| P-- P: | Displays when oven enters programming mode for double digit keypad memory. 2 keypads must be pressed to enter a program. | |
| OPTIONS OP: -- | Displays when oven is in user option mode. User options can then be set or specified. | |
| CF:O- CF: | Displays with a numerical cooking factor when the X2 keypad is pressed. Cooking Factor is the percentage by which cooking time increases when using X2 keypad to cook multiple portions. (1=10%, 2=20%, 3=30%, etc.) | |
| STAGE- P:-- | 1 | Number (1 through 4) indicates the stage that is being programmed. • Style 2: The stage # is displayed above cooking time. • Style 3: The stage # displays briefly when programming a specific cooking stage. |
Interrupting Operation
While the oven is operating, press STOP/RESET keypad to interrupt operation. Display shows remaining cooking time. Close door and press START key to resume oven operation.
Operating Preset Program Keypads
From the factory, this oven comes preprogrammed with several cooking sequences in memory. Note: To change single or double keypad entry option see
STYLES 2 & 3 Operation and Programming
Manual Time Entry
Allows operator to heat without changing the preset program keypads.
- Open oven door and place food in oven. Close door. • Display shows "READY"
- Press the TIME ENTRY keypad • Display shows "00:00" and "READY"
- Press number keypads to enter the desired cook time. • If keypad is not pressed within 60 seconds, open and close oven door again.
- Press POWER LEVEL keypad to select power level. Press a number keypad to adjust the power level, or press POWER LEVEL keypad again to reset to 100%.
- Style 2: Display shows “% MW POWER” and current power level if other than 100 percent power.
- Style 3: Display shows “COOK LEVEL” and current power level if other than 100 percent power.
- To enter additional cooking stages: Repeat steps 2-4 for each additional cooking stage. • Up to four different stages can be programmed.
- Press START keypad to begin cooking
Quantity X2 Keypad
To increase cooking time when cooking more than one serving.
-
Open oven door and place food in oven. Close door. • Display shows "READY"
-
Press X2 keypad.
- Amount of time added is a percentage of the original preset cooking time.
- The percentage can be changed. See Programming section in this manual.
Programming Mode
Allows operator to assign cook times, power levels, and stage cooking to the number keypads.
-
Open oven door and press and hold number keypad "1" for 5 seconds. The oven beeps.
• Style 2: Display shows "PROGRAM"
• Style 3: Display shows "P:0"
Note: If STOP/RESET keypad is pressed before programming is complete, changes are discarded and microwave exits programming mode. -
Select the keypad(s) to change or review the program cooking sequence.
-
Single Digit Keypad Cooking: press a keypad (0-9)
-
Double Digit Keypad Cooking: press the two keypads, in order, of the double digit number for the desired cooking sequence.(00-99)
-
Press number keypads to enter the desired cook time.
-
Press POWER LEVEL keypad to select power level. Press a number keypad to adjust the power level, or press POWER LEVEL keypad again to reset to 100%. • Style 2: Display shows “% MW POWER” and current power level if other than 100 percent power. • Style 3: Display shows “COOK LEVEL” and current power level if other than 100 percent power.
-
To add additional cooking stages: Press TIME ENTRY keypad. Then repeat steps 3-4 for each additional cooking stage.
- Up to four different stages can be programmed.
-
To save the cooking program: Press START keypad
-
To exit programming mode: Press STOP/RESET keypad or close oven door.
-
To save the cooking program: Press START keypad
- To exit programming mode: Press STOP/RESET keypad or close oven door.
STYLES 2 & 3 User Options
Changing User Options
This allows the user to customize various oven settings. Options such as single or double digit keypad programming, beep volume, and maximum cooking time can be changed to suit individual preferences.
- Open oven door and press and hold number keypad "2" for 5 seconds. The oven beeps.
• Style 2: Display shows "OPTIONS"
• Style 3: Display shows "OP:"
Note: If STOP/RESET keypad is pressed before programming is complete, changes are discarded and microwave exits programming mode. - Press any number keypad to enter related options as noted in chart below.
- To change, repeat pressing the number keypad until desired setting is reached.
• Each time the keypad is pressed, option will change. - Match code displayed with code for desired option.
- Press START keypad to save the selected setting.
- To exit User Option Mode, press STOP/RESET keypad and close door.
| KEYPAD DISPLAY OPTIONS | (FACTORY SETTINGS IN BOLD) | |
| 1End of Cycle Beep | OP:10OP:11OP:12 | 3 second continuous beepContinuous beep until door is opened5 beep bursts until door is open |
| 2Speaker Volume | OP:20OP:21OP:22OP:23 | Eliminates beepSets volume to lowSets volume to mediumSets volume to high |
| 3Key Boep | OP:30OP:31 | Provents beep when keypad is pressedAllows beep when keypad is pressed |
| 4Keyboard EnableWindow | OP:40OP:41OP:42OP:43 | 15 seconds after oven door is opened, keyboard disabled30 seconds after oven door is opened, keyboard disabled1 minute after oven door is opened, keyboard disabled2 minutes after oven door is opened, keyboard disabled |
| 5Add Time During Heating | OP:50OP:51 | Provents adding heating time while oven is hostingAllows heating time to be changed while oven is heating when a memory keypad is pressed |
Cooking Guidelines
The ACP Microwave Oven can make your job easier. You'll cook ahead and pre-portion more. You'll also spend less time preparing special-order dishes.
To be sure of consistently good results, you'll want to remember a few simple guidelines.
Food Variables
Microwave cooking can be directly affected by different food variables.
The shape of foods can greatly affect the amount of cooking time. Foods that are flat and thin heat faster than foods which are chunky. For example, a casserole will cook faster in a flat dish, rather than if heaped in a small dish. Foods cut into small pieces will cook faster than large-shaped foods. Pieces should be of a uniform size and shape for more uniform cooking, or the smaller pieces will cook faster. The greatest amount of cooking takes place within 3/4" (1.9 cm) of the food's surface. The interior of large food items, or dense foods, is heated by the heat conducted from the outer food layer. The most uniform cooking occurs in flat, doughnut-shaped foods. For best results, cook foods together which have similar sizes and shapes.
The quantity or volume of a food can affect the amount of cooking time. As the volume of the food is increased, the time required to cook or heat the item increases almost proportionately. If twice the amount of food is placed in the oven, it will take almost twice as long to cook. To determine the time for larger quantities, multiply the individual serving time by the increased amount, then reduce the total cooking time by about 20%.
The density of foods can greatly affect the amount of cooking time. Porous foods, such as breads, cakes or
The starting temperature of foods affects the amount of cooking time. Each temperature degree that the food item is to raise must be supplied with a definite amount of energy. Lower initial starting temperatures require more energy and more time to cook. Therefore, refrigerator temperature foods require a longer cooking time than do room temperature foods. Foods already slightly warm will heat very quickly in the oven.
The moisture content of foods affects the amount of cooking time. The higher the moisture content is in a food the longer the amount of cooking time.
The salt, fat, and sugar content of foods affects the amount of cooking time. Foods containing high salt, fat, and sugar levels heat very quickly and may reach much higher temperatures than foods having low salt, fat, and sugar levels. Foods having lower salt, fat, and sugar levels require longer cooking times.
The arrangement of food within a microwave oven cavity affects the way in which the food cooks. A "round" arrangement is best. Use round utensils whenever possible. Also, arrange foods such as baked potatoes in a circle, rather than in rows, for cooking. When only one food item is being cooked, place it in the center of the oven glass shelf for cooking.
Cooking Guidelines (continued)
Manipulation of Foods
Sometimes recipes suggest manipulating or moving food during cooking. There are several forms of manipulation:
Stirring is required less often in microwave cooking than in conventional cooking. In conventional cooking, you use a spoon to move food up from the bottom of a pan to evenly distribute the heat. In microwave cooking, you still stir to redistribute the heat within some foods, but you need to stir from the outside of a dish toward the inside or center. If a recipe states to stir once or twice during cooking, stir at approximately even intervals. For example, in a 12-minute cooking period, if a recipe states to stir twice, stir after 4 minutes of cooking and again, after 8 minutes of cooking. However, it is not necessary to be precise. Stir only when necessary. When using lower power levels or settings, less stirring is required. Some examples of foods which may require stirring are puddings, some casseroles, some sauces, some soups, and some egg dishes. Some foods can't be stirred. These foods are rearranged or turned.
Some foods can't be stirred and should be repositioned or rearranged during cooking. Some examples include baked potatoes, cupcakes (in custard cups), chicken pieces, and others. Rearranging allows for more even cooking of foods. Foods which are cooked, covered, or which are cooked using lower power levels, usually require little rearranging.
There are actually two types of turning. Turning is done when foods cannot be stirred. Foods which are cooked, covered, or which are cooked at lower power levels usually require little turning.
Turning foods over: Turning foods over is done to distribute heat. Meat and poultry are two types of foods which are sometimes "turned over." Examples include roasts, turkeys and whole chickens. Small meat items such as poultry picons
Microwave Utensils
Never use cooking containers or covers with any metal content. This includes all metal and enameled metal-core ware, foil, and metal-trimmed containers. Suitable cooking containers include those made of paper products, glass, china, cloth, and wicker baskets.
| RECOMMENDED NOT RECOMMENDED | |
| Glass/Ceramic Aluminum foil | |
| Natural fiber cloth Grocery bags | |
| Non-recycled paper Recycled paper | |
| Plastic Lead crystal | |
| Wood Newspapers | |
| Metal | |
| Metallic trimmed china | |
UTENSIL CHECK TEST
Use the following test to check utensils for microwave safeness.
-
Place glass measuring cup of water next to empty dish to be tested in microwave oven.
-
Heat on full power for one minute.
-
Check temperature of dish and water.
- If dish remains cool and water is hot, dish is microwave safe.
• If dish is slightly warm, use for short term cooking.
- If dish is hot and water is cool, do not use. Dish remains cool if not absorbing microwaves and microwaves are being absorbed by water. Dish becomes hot if absorbing microwaves.
Cooking Hints
Cover foods for faster, more even cooking. Glass lids, plastic wrap, plate covers or other paper products may be used. Do not seal. Instead, allow for steam-venting at all
Cooking Instructions
Steaming Tips
1. Cooking Vessels
a. Always heat or cook food items in covered containers to accomplish:
• Retention of steam for efficient cooking and to keep foods moist
• Even cooking results and temperatures
• A cleaner oven interior and prevention of food splatters
b. Ceramic, paper, china, styrofoam, glass and plastic are suitable materials for use in microwave ovens.
A high temperature resistant amber pan is recommended for ALL items, especially those high in fat or sugar content, as
these ingredients get hot very quickly.
2. Food Temperature
a. To reach a mandatory serving temperature, frozen foods require a longer cook time than refrigerated items.
b. Refrigerated Items:
- Items stored at 40^ (4°C) in the refrigerator should be covered while heated; except breads, pastries or any products with a breaded coating, which should be heated uncovered to avoid softening.
c. Room temperature items:
- Foods held at room temperature, such as canned items or vegetables, will require less time to heat than refrigerated items.
d. Conventionally prepared foods should be slightly undercooked to prevent overcooking when rethermed by microwave steaming.
e. After a steaming cycle has been completed, internal food temperatures continue to slightly rise due to the presence of steam.
3. Structure of Food
a. Food items that are high in fat, sugar, salt and moisture attract and quickly absorb microwave energy, allowing for a shorter cook time.
b. Items high in protein or fiber require a longer cook time, due to a slower absorption of microwave energy.
4. Quantity
a. As the mass of food increases, so will the necessary cook time.
Refer to and comply with all USDA/FDA Food Code guidelines when cooking or heating food items.
Care and Cleaning
Microwave energy is attracted to any food source in the oven. Food splatters or spills can affect heating performance, and can also cause oven damage. To prevent damage to oven, keep the microwave oven clean and remove any food debris.
Follow the recommendations below for proper maintenance of oven.
WARNING: NOT FOLLOWING APPROVED OVEN CLEANING INSTRUCTIONS MAY VOID YOUR OVEN WARRANTY
NOT use abrasive cleaners or cleaners containing ammonia, citrus, phosphates, chlorine, sodium or potassium hydroxide (lye). The use of caustic cleaning products or those containing ammonia, citrus, phosphates, chlorine, sodium or potassium hydroxide (lye) can damage critical oven parts.
Use of unapproved cleaning agents will void the terms of the warranty.
Never pour water into microwave oven bottom.
NOT use water pressure type cleaning systems.
DO NOT operate oven without the antenna shield and air filter in place.
Never turn on or operate oven during cleaning procedure. Always unplug oven before cleaning.
The appliance is NOT to be cleaned with water jet or steam cleaner.
WARNING
To avoid electrical shock which can cause severe personal injury or death, unplug power cord or open circuit breaker to oven before cleaning.
Wear protective gloves and protective glasses when cleaning the oven.
Failure to maintain the oven in a clean condition could lead to deterioration of the surface that could adversely affect the life of the appliance and possibly result in a hazardous situation.
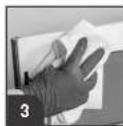
Daily Care and Cleaning
INTERIOR, EXTERIOR, AND DOOR
- Unplug Oven
- Remove any food debris
- Clean microwave oven with mild detergent in warm water using soft sponge or cloth. Wring sponge or cloth to remove excess water before wiping equipment.
- If desired, boil a cup of water in microwave oven to loosen soil before cleaning.

CONTROL PANEL
- Open oven door to deactivate oven timer.
- Clean with mild detergent in warm water using soft sponge or cloth. Wring sponge or cloth to remove excess water before wiping equipment.
ANTENNA/SPLATTER SHIELD
The antenna shield (or splatter/drease shield) is a vital part of the oven's design.


Care and Cleaning (continued)
See previous page for detailed Daily Care and Cleaning recommendations.
Weekly Care and Cleaning
AIR FILTERS
Clean air intake filter weekly for proper airflow.
H REPORTANT: To avoid overheating and oven damage, clean air filter regularly.
CAUTION: Do NOT operate oven without filter in place.
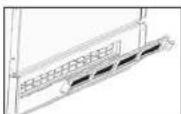
- Locate the air filter(s):
Style 1, Style 2, and Style 3 models:
The oven has one (one) air filter. Air filter is located below oven door.
Style 4 models:
The oven has two (2) air filters. Air filters are located on the lower right and left sides of the oven.
- Unplug Oven.

- Grasp filter tabs and pull forward. Filter will release from retaining clips.
- Wash filter in hot water and mild detergent. Rinse and dry thoroughly.
- To reinstall, place bottom of filter in clips and push top of filter into position.
Monthly Care and Cleaning
DISCHARGE AIR VENTS
Check monthly for a buildup of cooking vapors along intake and discharge louvers on bottom and back of oven. Clean air vents with damp cloth to ensure proper airflow. Dry thoroughly.
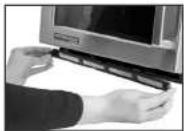
(Styles 1-3) Remove air filter to clean

(Style 4) Remove both air filters to clean

Before Calling for Service
Record all inspections and repair for future reference.
WARNING
To avoid electrical shock which can cause severe personal injury or death, do not remove outer case at any time. Only an authorized servicer should remove outer case.
| SYMPTOM POSSIBLE CAUSE | |
| Oven fan runs and light remains on after cook cycle has completed | Fan cools oven components. It is normal for fan to run 60 seconds |
| Oven fan runs while oven is not cooking Normal operation | |
| Oven does not operate Confirm oven is plugged in.Check fuse or circuit breaker.Confirm oven is plugged into dedicated circuit.Confirm oven is on grounded and polarized circuit. Contact electrician to confirm. | |
| If oven does not accept entries when keypad is pressed | Open and close oven door. Press keypad again. |
| If oven malfunctions Unplug oven, wait for 1 minute, and plug in oven. | |
| Oven operates intermittently Check air filters and discharge area for obstructions | |
| Oven operates, but does not heat food | Place one cup cool water in oven. Heat for one minute. If water temperature does not rise, oven is operating incorrectly and a service should be called. |
| "Clean Filter" displays This is normal and will appear for 24 hours. | |
| Frozen oven display Oven display needs to reset. Unplug oven. Wait 5 seconds. Plug back in. | |
| "INVALID ENTRY" alert Cook time is zero or unset. Enter correct cook time. | |
| "Exceeds Maximum Cook Time" alert Total cook time exceeds the maximum allowable.Check cook times per stage.Check User Option>Maximum Cook Time | |