GO1751PBT - Home Automation JUNG - Free user manual and instructions
Find the device manual for free GO1751PBT JUNG in PDF.

User questions about GO1751PBT JUNG
0 question about this device. Answer the ones you know or ask your own.
Ask a new question about this device
Download the instructions for your Home Automation in PDF format for free! Find your manual GO1751PBT - JUNG and take your electronic device back in hand. On this page are published all the documents necessary for the use of your device. GO1751PBT by JUNG.
USER MANUAL GO1751PBT JUNG
Universal timer Bluetooth
Art. no.: ..1751BT..
Operating instructions
1 Safety instructions

Electrical devices may only be mounted and connected by electrically skilled persons.
Serious injuries, fire or property damage possible. Please read and follow manual fully.
Danger of electric shock. Always disconnect before carrying out work on the device or load. In so doing, take all the circuit breakers into account, which support dangerous voltages to the device and or load.
These instructions are an integral part of the product, and must remain with the end customer.
2 Device components
text_image
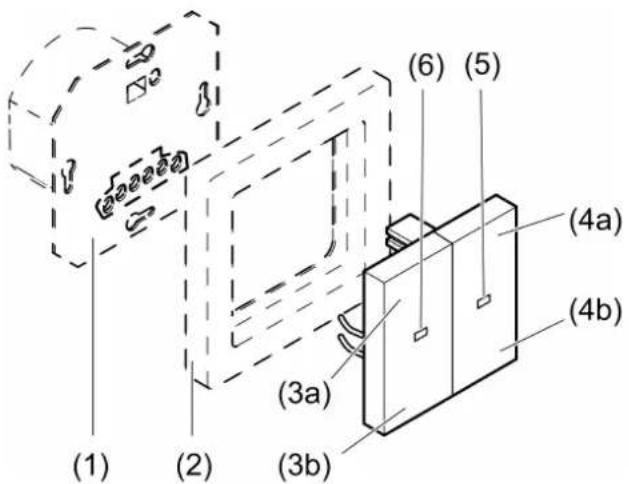
(1) (2) (3a) (3b) (4a) (4b) (5) (6)Figure 1: Device components
(1) Insert
(2) Frame
(3a) Blind/shutter up / light on, brighter
(3b) Blind/shutter down / light off, darker
(4a) Disabling function
(4b) = activate Bluetooth coupling, Activating / deactivating automatic operation
(5) Function LED Red = Disabling function active Orange = Automatic operation deactivated Blue = Bluetooth connection active Flashing blue = Bluetooth coupling mode active Flashing blue three times = Time is not set
(6) Status LED Green = Blind/shutter activated / light switched on Red = Error message or reset
Priorities for the LED display: - Red LED before green or orange LED - Blue LED before red LED
3 Function
Intended use
- Manual and time-controlled operation of e.g. Venetian blinds, shutters, awnings, lighting or fans
– Operation and programming with mobile end device (smartphone or tablet) via Bluetooth
– Operation of switching, dimming or Venetian blind insert or 3-wire extension from LB management
Product characteristics
Functions directly on the cover
– Operation of blinds/shutters and lighting
- Activating / deactivating the disabling function
- Activating / deactivating automatic operation
- Running time and ventilation position of the blind/shutter can be saved
- Switch-on brightness or switch on to last brightness with dimming insert can be saved
- Night mode
Functions via Bluetooth app
– Operation of blinds/shutters and lighting with status feedback
- Display of current blind/shutter position, dimming position or switching state
– Programming of up to 40 individual switching times
- Venetian blind and slat positions or switching and dimming values can be saved at any switching time
– Possible to copy switching times from other devices
- Switching at sunrise and/or before sunset (Astro function)
– Astro time through position fixing
– Astro time shift can be set for each switching time
- Automatic summer/winter time changeover, can be switched off
- Random function
– Automatic date and time update when connecting with smartphone
– Code request for protection for time programs and configuration possible
- Save a ventilation position, blind/shutter running time, slat change-over time and change-over-time for direction change
– Switch to inverse operation for Venetian blind inserts possible
- Maximum brightness and minimum brightness for dimming insert can be set
– Sun protection and twilight functions are possible via optional brightness sensor
Behaviour after a mains voltage failure
Voltage failure less than power reserve
– All data and settings are preserved
– Missed switching times are not performed later
Voltage failure greater than power reserve
- The blue LED flashes three times repeatedly until the time is automatically updated when connected with the app
– No switching operations are executed
- Switching times are preserved
Default setting
– Switching times on a Venetian blind insert:
07:00, Mo - Thu
21:00, Mo - Thu
07:00, Fr
21:30, Fr
09:00, Sat
21:30, Sat
09:00, Sun
21:00, Sun
Astro function is deactivated
– Automatic summer/winter time changeover is active
No switching times are available when operating on a switching/dimming insert
4 Commissioning
Install app on a mobile end device
Requirement for operation via app is a mobile end device with Bluetooth interface, running the Android operating system or iOS.
■ Download and install the Bluetooth app Google Play Store (Android).
Clever Config from the iTunes App Store (iOS) or
Couple mobile end devices via Bluetooth
Precondition: The insert must be connected and switched off. The cover is placed on the insert and the mobile end device is close to the cover.
■ Activate coupling mode: Press the ✝ button (4b) for more than 4 seconds. The blue LED flashes slowly. The coupling mode is active for one minute.
■ Start the Clever Config app and search for the device to be coupled. The Jung Timer BT cover is displayed in the app.
■ Perform coupling. The coupling mode is automatically exited after successful coupling. The blue LED lights up to confirm an active connection.
A maximum of 8 mobile end devices can be coupled with a cover. When coupling the 9th device, the least used device will be deleted.
To be able to perform position movements of the blind/shutter on a Venetian blind insert, a reference movement is performed in the upper end position after the programming. This reference movement should not be stopped.
5 Operation of Venetian blind and shutters
All settings and operations are also possible via Bluetooth app.
Moving the blind/shutter
- Press button (3a) or (3b) for longer than one second. The blind/shutter moves in the desired direction to the end position or stops when the button is pressed again.
If a ventilation position has been saved, the blind stops in the ventilation position when moving down (see Saving the ventilation position).
Adjusting the slats
■ Press the button (3a) or (3b) for less than one second.
Saving blind/shutter running time
To perform positioning movements, the blind/shutter running time has to be saved beforehand.
To save blind/shutter running time, the Venetian blind must be moved to the upper end position and the status LED (6) switch off automatically.
■ From the top end position, press the button (3b) for longer than second. The blind/shutter moves in the lower end position direction.
■ Press and hold down the button (3a) and (3b).
The blind/shutter remains stopped, but continues to move after 4 seconds.
■ As soon as the blind/shutter has reached the lower end position, release the buttons and press button (3b) within the next 4 seconds.
The running time is saved. The blind/shutter moves back to the upper end position.
Saving the ventilation position
To save the ventilation position, the Venetian blind must be moved to the upper end position and the status LED (6) switch off automatically.
■ From the top end position, press the button (3b) for longer than second.
The blind/shutter moves in the lower end position direction.
■ Press and hold down the button (3a) and (3b).
The blind/shutter remains stopped, but continues to move after 4 seconds.
■ As soon as the desired ventilation position has been reached, release the buttons and press the button (3a) within the next 4 seconds.
The ventilation position is saved. The blind/shutter moves back to the upper end position.
i If the ventilation position is saved again, the old value is overwritten.
6 Operation of lighting
All settings and operations are also possible via Bluetooth app.
Switching the light
■ Press button (3a) or (3b) for less than 0.4 seconds.
With a dimming insert, the light switches to the brightness that was last set or a saved brightness.
Switch light on with minimum brightness
■ Press the button (3b) for longer than 0.4 seconds.
Adjusting the brightness
■ Press button (3a) or (3b) for longer than 0.4 seconds.
Save switch-on brightness
■ Adjusting the brightness
■ Press the buttons (3a) and (3b) for longer than 4 seconds.
Switch-on brightness is saved. For confirmation, the light is switched off briefly and switched on again.
Delete switch-on brightness
■ Press button (3) briefly: Light switches on at the saved switch-on brightness.
■ Press the buttons (3a) and (3b) for longer than 4 seconds.
The switch-on brightness has been deleted.
Switching on takes place at the last brightness value set. For confirmation, the light is switched off briefly and switched on again.
7 Activate functions
Activating / deactivating automatic operation
■ Press button ✝ (4b) briefly.
If automatic operation is deactivated, the function LED (5) turns orange. Saved travelling times are not executed.
Activating / deactivating the disabling function
The disabling function disables extension operation and operation via the app and deactivates automatic operation. Manual operation using the buttons (3a) and (3b) continues to be possible.
With Venetian blinds, extension operation in the "UP" direction (wind alarm) continuous to be possible.
■ Press the button (4a) for longer than 4 seconds.
The disabling function is activated or deactivated.
The function LED (5) turns red if the disabling function is active.
Activating / deactivating night mode
In night mode, the status and function LEDs are not permanently lit, but only for 5 seconds after a button is pressed.
■ Press the buttons (4a) and (4b) for longer than 4 seconds.
Night mode is activated: The function LED turns red for 3 seconds.
Night mode is deactivated: The function LED turns green for 3 seconds.
Resetting the device to the factory setting
■ Press the (3a) and (3b) buttons during the first 2 minutes after switching on the mains voltage for longer than 20 seconds until the red status LED flashes quickly.
■ Release buttons (3a) and (3b) and press briefly once again within 10 seconds.
The red status LED flashes more slowly for approx. 5 seconds.
The device is reset to default setting. The blue function LED flashes three times to indicate that the time is not set.
On a Venetian blind insert, a reference run to the upper end position is performed.
i After resetting the device to the default setting, it has to be removed from the app. On iOS equipment, the device also has to be removed from the list of paired Bluetooth devices (Settings/Bluetooth). Otherwise, re-pairing will not be possible.
8 Information for electrically skilled persons

DANGER!
Mortal danger of electric shock
Disconnect the device. Cover up live parts.
Fitting the device
Switching, dimming or Venetian blind insert or 3-wire extension are mounted and connected properly (see instructions of the relevant inserts).
■ Fit the cover with frame on the insert.
■ Switch on mains voltage.
If the status LED (6) flashes red three times at repeated intervals, the cover was previously connected to another insert. To enable operation again, either place the cover onto the respective insert or press buttons (3a) and (3b) for longer than 4 seconds.

This device includes an integrated battery. At the end of its useful life, dispose of the device together with the battery in accordance with the environmental regulations. Do not throw device into household waste. Consult your local authorities about
environmentally friendly disposal. According to statutory provisions, the end consumer is obligated to return the device.
9 Technical data
Ambient temperature -5 ... +45 °C
Storage/transport temperature -20 ... +70 °C
Accuracy per month ± 10 s
The time is updated with every connection to the app.
Power reserve approx. 4 h
Radio frequency 2.402 ... 2.480 GHz
Transmission capacity max. 2.5 mW, Class 2
Transmitting range typ. 10 m
10 Parameter list
Adjustable parameters via app
Depending on the insert, the following parameters can be changed with the Bluetooth app.
Settings for switching/dimming and Venetian blind inserts
| Parameters Setting | optionsDefault setting | Explanations |
| Position Determination of the current position via the GPS function of the mobile end device. | To adapt the Astro times to the geographical location, the GPS function of the mobile end device must be activated. The Astro time is calculated once a week for the localised place. | |
| Sunrise time offset | +/- 0 ... 120 minutesDefault setting: 0 minutes | Astro times represent the sunrise and sunset times in the course of a calendar year. If you want the switching to be executed in the early morning at the start of twilight or only at full brightness, this can be realised with this shift.An extended adjustment can be used to specify a time at which the switching should be executed at the earliest or at the latest. |
| Sunset time offset | +/- 0 ... 120 minutesDefault setting: 0 minutes | Astro times represent the sunrise and sunset times in the course of a calendar year. If you want the switching to be executed in the evening at the start of twilight or only at full darkness, this can be realised with this shift.An extended adjustment can be used to specify a time at which the switching should be executed at the earliest or at the latest. |
| Random function On, OffDefault setting: Off | If the random function is active, the switching times are moved at random within a limit of +/- 15 minutes. | |
| Time change active | On, OffDefault setting: On | Activates automatic summer/wintertime changeover |
Settings only for dimming inserts
| Parameters Setting | optionsDefault setting | Explanations |
| Minimum brightness | 1 ... 67 %Default setting: 5% | Specifies the minimum settable brightness. |
| Maximum brightness | 75 ...100 %Default setting: 100% | Specifies the maximum settable brightness. |
| Switch-on brightness | 1 ...100 %Default setting: 100% | During brief operation, the output switches on at the set switch-on brightness. Note: If the value is above the set maximum brightness or below the minimum brightness, then the system will switch to the appropriate limit value. |
| Switching on to the last value | On, OffDefault setting: Off | It is switched on to the brightness that existed before switching off. |
Settings only for 2-channel switch inserts
| Parameters Setting | optionsDefault setting | Explanations |
| Dedicated fan channel | On, OffDefault setting: On | Switches the switch-on delay for output 2 on and off.If the parameter is switched off, output 2 switches on simultaneously with output 1. |
| Switch-on delay channel 2 | 0 s ... 60 minDefault setting: 2 min | After switching on output 1, output 2 also switches on after the time set here has elapsed.Precondition: "Dedicated fan channel" parameter is switched on. |
| Switch-off delay channel 2 | 0 s ... 60 minDefault setting: 5 min | After switching off output 1, output 2 also switches off after the time set here has elapsed. |
Settings only for venetian blind inserts
| Parameters Setting | optionsDefault setting | Explanations |
| Minimum motor change-over-time | 300 ms ... 10 sDefault setting: 1 s | Minimum interruption time when changing directions. Increasing the minimum change-over time will cause less wear on the motors. |
| Blind/shutter running time | 1 ... 600 sDefault setting: 120 s | Absolute time which the blind/shutter requires from the top to the bottom end position. The entry is essential if position movements are to occur. |
| Slat change-over time | 300 ms ... 10 sDefault setting: 1 s (venetian blind)0.3 s (awning) | Absolute time for changing-over Venetian blind slats. Here, the fabric-stretching time can be set for the operation of awnings. |
| Inverse operation | On, OffDefault setting: Off | Inverts the activation of the relay outputs. During inverted operation, the relay outputs "Up" and "Down" should be activated in reverse. This is required, for example, for controlling skylights. |
| Operating mode R | Roller shutterVenetian blindAwningDefault setting: Roller shut-ter | Roller shutterA rolling shutter or an awning is controlled for which the Fabric stretching function is re-quired.Venetian blindA Venetian blind is controlled.AwningAn awning is controlled for which the Fabric stretching function is required. |
| Blind/shutter ventilation posi-tion | 0 ... 100 %Default setting: 100% | The blind/shutter stops in this position when shutting down. |
| Slat ventilation position | 0 ... 100 %Default setting: 100% | In the "Venetian blind" operating mode, the opening angle of the Venetian blind slats for the ventilation position can be influenced here. |
| Wind alarm Off On | OffDefault setting: Off | Off:If the disabling function is active, extension operation in the "UP" direction (wind alarm) continues to be possible.On:If the disabling function is active, extension operation is no longer possible. Note: Should not be used in systems where wind alarm takes place via an extension. |
Settings with optional brightness temperature sensor
| Parameters Setting | optionsDefault setting | Explanations |
| Sun protection function | On, OffDefault setting: Off | If the sun protection function is switched on and the brightness of the sun protection is exceeded for more than 2 minutes, sun protection is carried out. If the brightness falls below the set sun protection brightness for more than 15 minutes, the sun protection end action is carried out. |
| Sun protection brightness | 4,000 ... 80,000 luxDefault setting: 20,000 lux | Brightness threshold to carry out sun protection |
| Temperature control | On, OffDefault setting: Off | If temperature control is activated, before implementing the sun protection, the preset temperature threshold is checked to see if it was exceeded. If this is not the case, the sun protection is implemented only when the temperature exceeds. |
| Sun protection temperature | 5 ... 50 °C, OffDefault setting: Off | Temperature threshold to carry out sun protection. |
| Action with sun protection | Depending on the insert Dimming value or blind/shutter position with slat position | The set value is called up when the sun protection brightness is exceeded. |
| Action with sun protection end | Depending on the insert Dimming value or blind/shutter position with slat position | The set value is called up when the sun protection brightness is not reached. |
| Brightness twilight | 5 ... 4,000 luxDefault setting: 10 lux | If a set twilight threshold value is exceeded for more than 4 minutes, twilight is activated. If the brightness rises over the preset twilight value for longer than 4 minutes, the twilight function is deactivated. |
| Dusk On, Off | Default setting: Off | When dusk is switched on, the stored action is carried out when it falls below the twilight value. Depending on the insert, light is switched or blinds are moved to a stored position and slats are tilted. |
| Action at dusk Dep | ending on the insert Dimming value or blind/shutter position with slat position | The set value is called up when the twilight threshold value is not reached. |
| Dawn On, Off | Default setting: Off | When dawn is switched on, the stored action is carried out when it exceeds the twilight value. Depending on the insert, light is switched or blinds are moved to a stored position and slats are tilted. |
| Action at dawn Dep | ending on the insert Dimming value or blind/shutter position with slat position | The set value is called up when the twilight threshold value is exceeded. |
11 Conformity
Albrecht Jung GmbH & Co. KG hereby declares that the radio system type art. no. ..1751BT.. meets the directive 2014/53/EU. You can find the full article number on the device. The complete text of the EU Declaration of Conformity is available under the Internet address: www.jung.de/ce
12 Warranty
The warranty is provided in accordance with statutory requirements via the specialist trade.
ALBRECHT JUNG GMBH & CO. KG
Vollmestraße 1
58579 Schalksmühle
GERMANY
Telefon: +49 2355 806-0
Telefax: +49 2355 806-204
kundencenter@jung.de
www.jung.de