VK5320GHTMY - Vacuum Cleaner LG - Free user manual and instructions
Find the device manual for free VK5320GHTMY LG in PDF.

User questions about VK5320GHTMY LG
0 question about this device. Answer the ones you know or ask your own.
Ask a new question about this device
Download the instructions for your Vacuum Cleaner in PDF format for free! Find your manual VK5320GHTMY - LG and take your electronic device back in hand. On this page are published all the documents necessary for the use of your device. VK5320GHTMY by LG.
USER MANUAL VK5320GHTMY LG
natural_image
Interior view of a hotel room with a person in white robe standing by a window overlooking a cityscape and greenery (no visible text or symbols)吸尘器
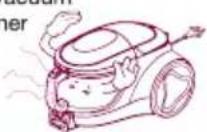
强劲吸力
VK5320GHTMY
English Page 17-31
售后服务电话

text_image
Illustration showing a plastic bottle emitting smoke next to a washing machine, with no visible text or symbols.natural_image
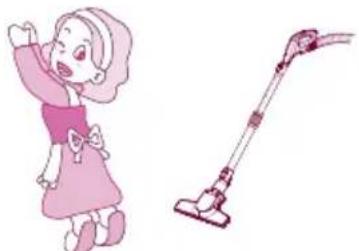
Illustration of a girl waving while pulling an electrical plug (no text or symbols)
警告
natural_image
Line drawing of a vacuum cleaner with a hand gesture and no text or symbolsnatural_image
Illustration of a medical or laboratory procedure showing tubing and smoke rising (no text or symbols)natural_image
Illustration of a cartoon vacuum cleaner with raised arms, standing beside a faucet (no text or symbols)natural_image
Line drawing of a hand holding a tool next to a vacuum cleaner (no text or symbols)
警告
natural_image
Illustration of a vacuum cleaner connected to a power cord and cable (no text or symbols)natural_image
Line drawing of a vacuum cleaner with a handle and exhaust pipe (no text or symbols)natural_image
Illustration of two different vacuum cleaner designs with motion arrows indicating airflow (no text or symbols)
注意
非专业维修人员请勿开机修理。

natural_image
Illustration of a woman kneeling beside a cartoon-style vacuum cleaner (no text or symbols present)text_image
Illustration of a baby washing machine with a no-smoking symbol, next to a door with Chinese text.natural_image
Illustration of a vacuum cleaner connected to a pink bottle (no text or symbols present)natural_image
Illustration of a small stool next to a pink cup and a vacuum cleaner with a prohibition symbol (no text or labels)natural_image
Illustration of a girl pouring liquid from a bucket next to a vacuum cleaner (no text or symbols present)natural_image
Illustration of a girl waving next to a vacuum cleaner (no text or symbols present)部品名称和连接方法
natural_image
Illustration of a hand using a tool to clean or repair a pink-colored object (no text or symbols)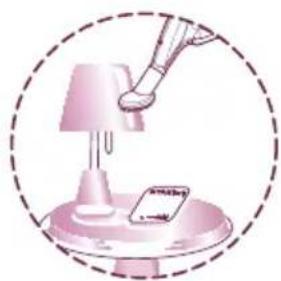
natural_image
Illustration of a robotic arm interacting with a lamp and a small object, enclosed in a dashed circular border (no text or symbols)
natural_image
Illustration of a tool interacting with a 3D geometric structure, enclosed in a dashed circle (no text or symbols)角落刷头的使用
组合
natural_image
Illustration of a vacuum cleaner with a handle and lever, no text or symbols present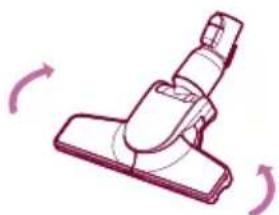
natural_image
Illustration of a vacuum cleaner with rotating arrows indicating motion (no text or symbols)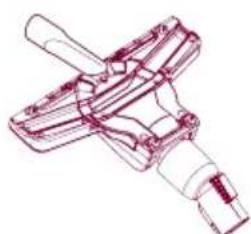
natural_image
Technical line drawing of a mechanical clamp or connector (no text or symbols)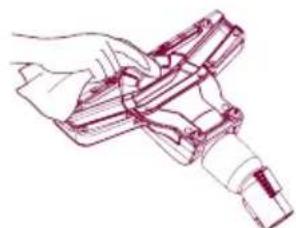
natural_image
Line drawing of a hand holding a handheld device (no text or symbols)震动刷头使用方法与清洗方法
震动刷头使用方法
请按图示使用
组合
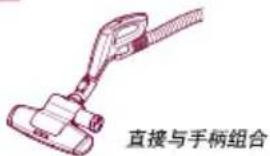
text_image
直接与手柄组合使用
地毯
natural_image
Illustration of a clipboard with arrows indicating flow or movement (no text or symbols)- 薄被、毛毯

natural_image
Illustration of a hand holding a tool interacting with a document or notebook (no text or symbols visible)text_image
Diagram illustrating a 180-degree angle measurement process on a device, showing step-by-step folding and rotation.抹布刷头的使用方法
分离方法
natural_image
Illustration showing a hand holding a device next to a pink caseplate, with no visible text or symbols.清理方法
text_image
Diagram illustrating the process of cleaning a toilet, showing steps from washing to cleaning with water displacement.集尘桶的安装方法

text_image
方形开口natural_image
Line drawing of a mechanical device with an inset showing a close-up of the component (no text or symbols)natural_image
Line drawing of a vacuum cleaner with a close-up inset showing internal components (no text or symbols)natural_image
Line drawing of a hand pressing down on a vacuum cleaner's hood, showing mechanical components and a magnified view of the component (no text or symbols)flowchart
graph TD
    A["UV Cleaner"] --> B["Close-up of clean air"]
    B --> C["Close-up of clean air with eye icon"]
    C --> D["Close-up of clean air with hand valve"]
    D --> E["Close-up of clean air with hand valve and water tap"]
    E --> F["Close-up of clean air with hand valve and handbag"]
    F --> G["Final inspection and repair"]
natural_image
Line drawing of a mechanical device with internal components and a spring-like structure (no text or symbols)1 将电机保护过滤器装入过滤器外壳内。

natural_image
Line drawing of a mechanical device with an inset showing airflow or motion (no text or symbols)2 盖上过滤器盖。
text_image
Diagram illustrating eye contact mechanism with labeled eye and magnified view of the device3 将组装好的过滤器放入安装部位。
natural_image
Line drawing of a hand holding a vacuum cleaner device (no text or symbols)4 装入集尘桶。

text_image
集 ×集尘盒手柄

natural_image
Illustration of a person using a mobile phone to interact (no text or symbols present)机体手柄
text_image
Illustration showing a hand removing a trash can into a trash bin, with a magnified inset showing the same object.1 抖动排气过滤器进行清洁。
安装方法
natural_image
Diagram of a robotic vacuum cleaner with mesh insulation and internal components, showing a close-up view of the component (no text or symbols present)natural_image
Illustration of a cartoon girl with pink hair and a pink hat, enclosed in a pink circular frame (no text or symbols)使用吸尘器后的保管方法

text_image
卷线器按钮natural_image
Illustration of a vacuum cleaner and a cartoon character with motion lines (no text or symbols)第二步
Product specifications 17
Attention before using the appliance 18\~19
Assembling and adjusting the Cleaner 20
Parts description and assembly
Accessories
Using and cleaning method of all the accessory nozzles 21-24
How to use crevice tool, upholstery nozzle and dust brush
How to use and clean corner nozzle
How to use sani punch nozzle
How to clean sani punch nozzle
How to use mop and mop nozzle
How to separate, clean and assembly the dust tank and the motor
protection filter 25\~27
How to separate, clean the dust tank
How to assemble the dust tank
How to separate, clean the motor protection filter
How to assemble the motor protection filter
How to separate, clean and assemble exhaust filter 28
Disassembling
Cleansing
Assembling
If you have a problem 29\~30
Packing List 31
Product specifications
text_image
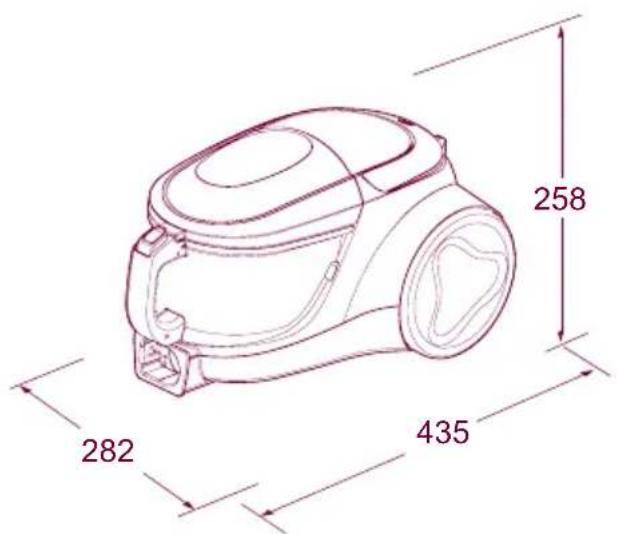
258 282 435Model: VK5320GHTMY
220V\~50Hz
IEC: 1800W
MAX: 2000W
Net Weight: 5.2Kg
Dust Capacity: 1.5L
Dimension: 282mm×435mm ×258mm
This appliance complies with the
following GB Directives:
GB4706.1-2005
GB4706.7-2004
GB17625.1-2012
GB4343.1-2009
※ You will not be informed otherwise of any changes in appearance and standard deriving for improvement of product quality.
Attention before using the appliance
Please read all the following information, which contains important instructions for the safety, the use of the appliance.

DANGER
May immediately cause serious injury or death.

WARNING
May possibly cause serious injury or death.

ATTENTION
May possibly cause losses of property or light injury.

DANGER
Do not pick up anything that is burning or smoking, such as cigarettes, matches or hot ashes.
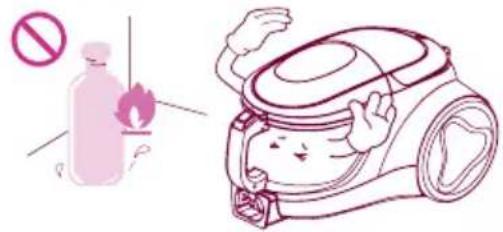
text_image
Safety warning illustration showing a plastic bottle with no hazard symbol and a cartoon vacuum cleaner with a smiling face.Please turn off the power before pulling out the plug to prevent fire or electric shock. Never handle plug or appliance with wet hands. (Do not use the appliance on the power above 220V.)

natural_image
Illustration of a girl in pink dress holding a phone to her ear, with no text or symbols present
WARNING
Avoid picking up hard, sharp objects with the cleaner. They may damage the cleaner and the tank.
Do not vacuum the objects like hair ball or big paper ball, otherwise the hose is possibly blocked up. Please clear the hose in time when it is blocked.

natural_image
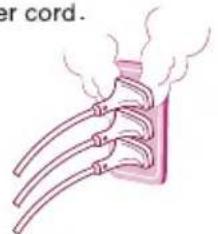
Line drawing of a vacuum cleaner with handle and hose, no text or symbols presentIndependently use a socket when the current is ≥15A. It may cause fire when many electric appliances share one socket. In order to avoid the needless danger, you had better not use the prolonged thread of power cord.

natural_image
Illustration of a rib cage with steam rising from its side (no text or symbols)To avoid the danger of fire or electric shock, do not vacuum liquid, blade, flammable substances, or small particles like cement and gesso in cleaning.
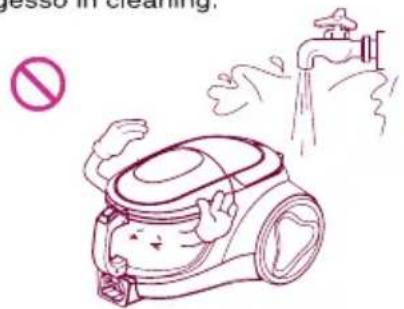
text_image
no jesso in cleaning,Unplug cleaner when not in use. Turn off all controls before unplugging.
text_image
Illustration of a hand holding a tool with a prohibition symbol above, indicating no chemical hazard or toxicity.Attention before using the appliance

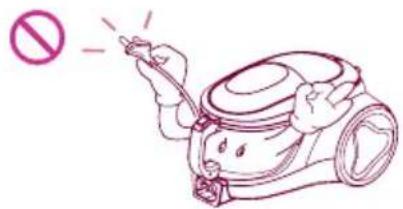
WARNING
Do not let the power cord near the electric heater or other heat source, lest that the cleaner should be deformed or it should cause fire. Do not use the appliance when the power cord or plug is damaged. The damaged power cord or plug must be replaced in the approved service station.


natural_image
Illustration of a vacuum cleaner connected to a power outlet (no text or symbols)Close supervision is necessary when any appliance is used by or near children. Do not allow vacuum cleaner to be used as a toy or to run unattended at any time.


Do not operate the appliance for long when the nozzle inlet or nozzle outlet is blocked, which may have it deformed or damaged.

natural_image
Line drawing of a vacuum cleaner with hose and bulb (no text or symbols)In using the appliance, pay attention to the electrostatic effect generated on the telescopic tube and cleaner body.
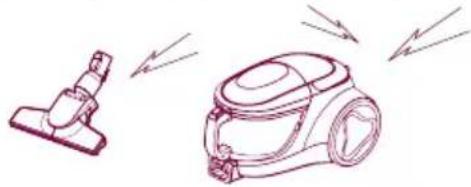
natural_image
Line drawing of two different vacuum cleaner units with motion arrows indicating airflow (no text or symbols)
ATTENTION
Do not allow the non-professional maintenance people to repair.

natural_image
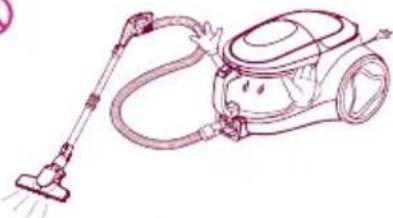
Illustration of a cartoon character waving next to a robot with a prohibition symbol (no text or labels)Do not pull or carry by cord, use cord as a handle, close door on cord or pull cord around sharp edges or corners. Do not run appliance over cord. Keep cord away from heated surfaces.

natural_image
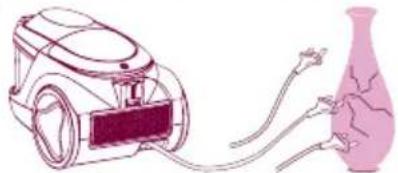
Illustration of a cartoon character in a vacuum cleaner inside a room with a door (no text or symbols)In winding the power cord, hold the plug before pressing the button of the cord reel. Do not pull the power cord beyond the red warning line, other wise the power cord may be damaged or unable to be wound up. Pay attention to the plug in winding the cord to avoid damaging the surrounding objects.
natural_image
Illustration of a vacuum cleaner connected to a pink bottle (no text or symbols present)Do not bend, stamp on, or drag the hose. Do not continue to use the hose if it is damaged.
Do not use any heavy or sharp object to press the power cord.


natural_image
Line drawing of a small table with a pink cup and a vacuum cleaner (no text or symbols)Do not use without dust tank or filters in place. Change tank frequently when picking up very fine materials such as powder.

natural_image
Illustration of a woman pouring liquid from a bucket next to a vacuum cleaner (no text or symbols present)Keep hair, loose clothing, fingers, feet and all parts of body away from the nozzle or movable portion.
natural_image
Illustration of a girl waving next to a vacuum cleaner (no text or symbols present)Parts description and assembly
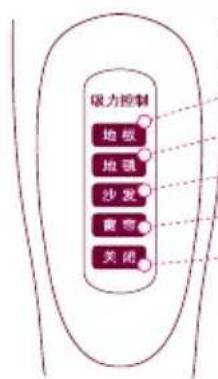
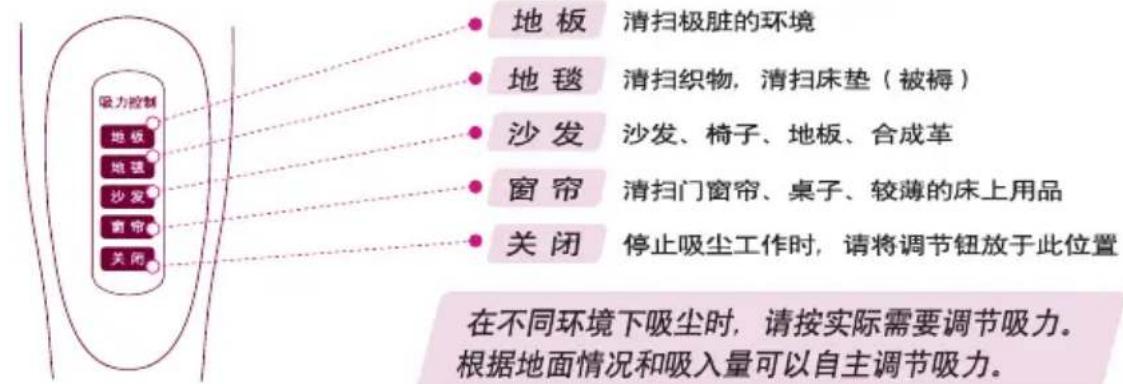
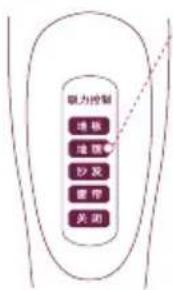
地板 cleaning the dirtiest environment.
地毯 cleaning fabrics and mattress (bedding).
- 沙发 cleaning sofa, chair, floor.
- 窗帘 cleaning door and window curtain, table, and light blanket.
- 关闭 Adjusting to “关闭” when you stop operating the appliance.
When cleaning under different environment, adjust the suction level according to practical need.
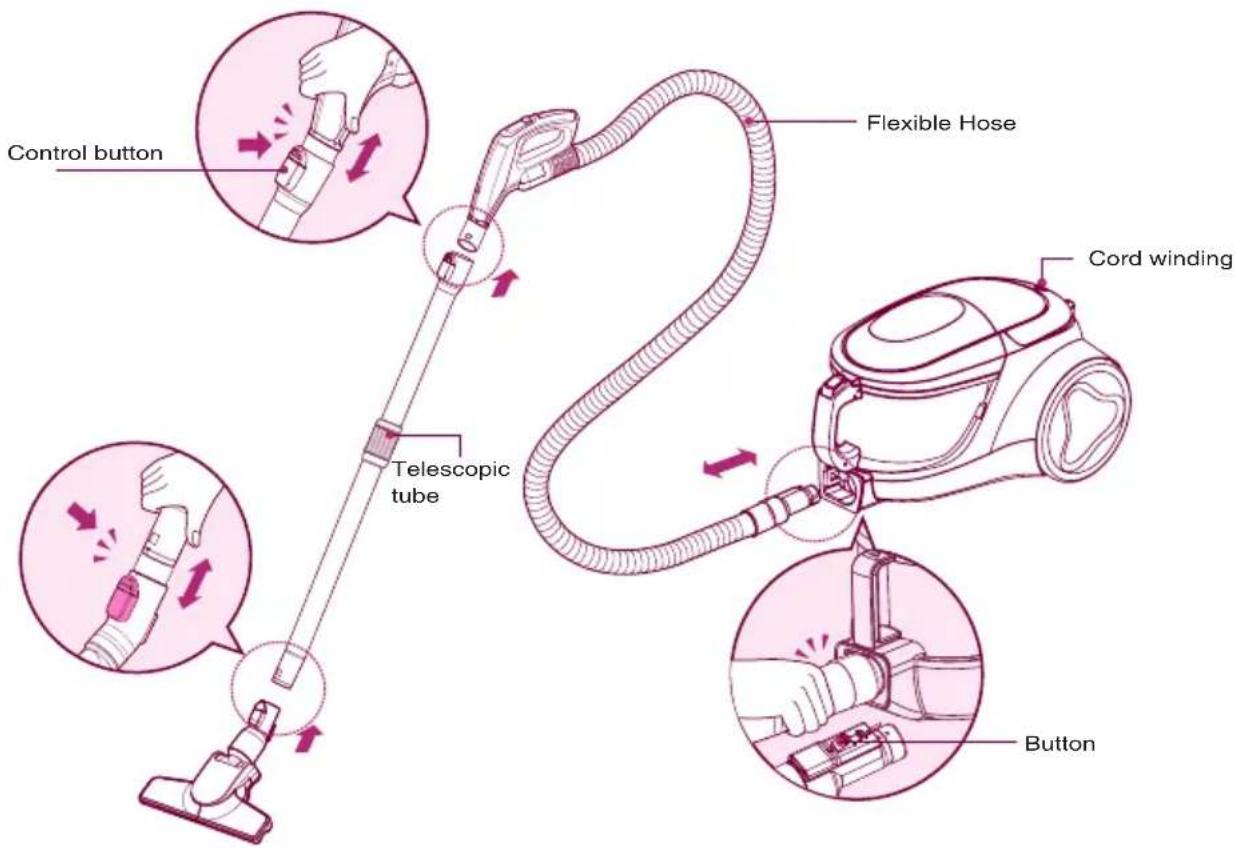
text_image
Control button Telescopic tube Flexible Hose Cord winding Button
text_image
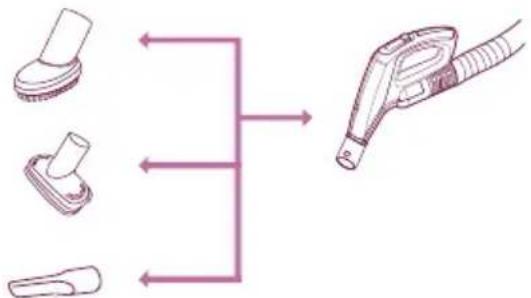
Accessories • Upholstery Nozzle • Dusting Brush • Corner Nozzle • Sani Punch • elzzo Nopmocie cover • HoseUsing and cleaning method of all the accessory nozzles
Using Upholstery Nozzle & Dust Brush & Crevice Tool
▶ Tear the vinyl bag and pull out accessories.
Use it as shown in the diagram
flowchart
graph TD
    A["Device 1"] --> B["Component 1"]
    C["Device 2"] --> D["Component 2"]
    E["Device 3"] --> F["Component 3"]
    B --> G["Device 4"]
    D --> G
    F --> G
    G --> H["Device 5"]
Dust brush can be used to clean the picture frame, furniture brim, book and other irregular surface.
Upholstery nozzle can be used to clean upholstery, mattresses, etc.
▶ Crevice tool can be used to clean the gap of sofa cushion or the place with cobweb and other place hard to reach.
Using method

natural_image
Illustration of a hand using a brush to clean or repair a pink-colored object (no text or symbols)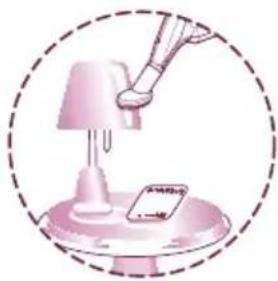
natural_image
Illustration of a pink lamp illuminating a small card on a stand, enclosed in a dashed circle (no text or symbols)
natural_image
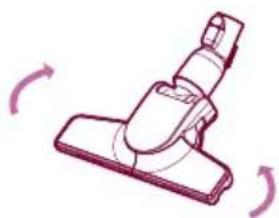
Diagram of a tool interacting with a 3D rectangular block, enclosed in a dashed circle (no text or symbols)Using and cleaning the corner nozzle
Assembling
Corner nozzle can be used to clean common floor, also can be used to clean corner when be puckered.

text_image
be puckered.Using
Corner nozzle makes you more convenient to clean corner and small space.
natural_image
Illustration of a vacuum cleaner with directional arrows indicating motion (no text or symbols)Cleaning
1 Use crevice tool to clean
2 Use calico dishcloth to clean

natural_image
Technical line drawing of a mechanical clamp or connector (no text or symbols)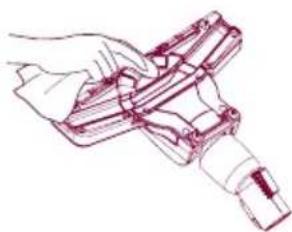
natural_image
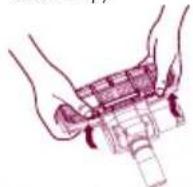
Line drawing of a hand holding a tool or device (no text or symbols)Using the Sani Punch
Use it as shown in the diagram
Assembling
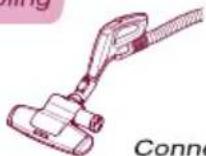
Connect to Hose
Effective cleaning
• bed, bedding, heavy blanket
Using
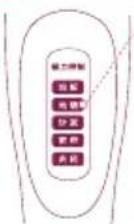
flowchart
graph TD
    A["联力控制"] --> B["选择"]
    A --> C["选择"]
    A --> D["投发"]
    A --> E["增持"]
    A --> F["关闭"]
地毯
Set the suction power control switch to "地毯" before vacuuming. Depending on the type of bedding, handing may be awkward or it may cause a lot of noise. If this is the case, adjust the suction power control switch to a lower setting.
• Light blanket & sheet

natural_image
Illustration of a clipboard with arrows indicating flow or movement, no text or symbols present
natural_image
Illustration of a hand holding a clip attached to a flat surface with directional arrows (no text or symbols)To increase cleaning efficiency for light blankets, lay on top of a bulky blanket and then clean.
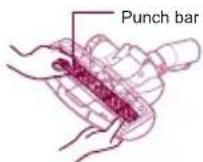
- If the punch bar does not move, lift the nozzle slightly off the surface.
- If it does not move, even after doing this, check if the suction power is too low or if the nozzle base is clogged with a foreign object.
This Sani Punch nozzle is for effective cleaning of beds and blankets to remove mites and dust.
Cleaning the Sani Punch
The vibrator may break down due to the cleansing of the inhaler with water.

1 Tum the button 2-3 times when the dust is filled in the dustbin while cleaning.(the dust can be cleaned up)
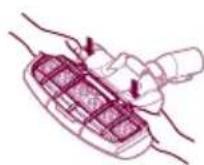
5 Separate the bottom plate by pressing the buttons in the back.
8 Arrange the vibrator in order.
2 After the cleaning, if there are lots of dusts in the box, separate the box from the inhaler by turning it anticlockwise.

3 Empty the box.
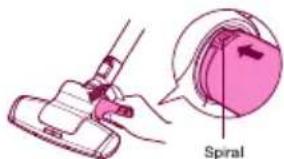
text_image
Spiral4 Aim at the Spiral, Fix the box into the inhaler by turning it clockwise.

6 Clean the dirty body of the inhaler carefully with a cloth.

text_image
Bottom plate7 Wash the separated bottom plate and dry it in the shade.
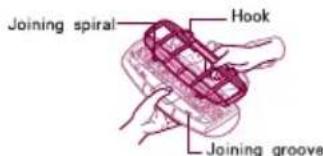
text_image
Joining spiral Hook Joining groove9 Insert the joining spiral into the groove.
10 Attach the bottom plate properly by pressing down.
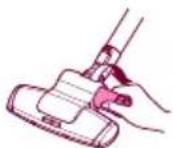
Using the Mop
When using the mop nozzle, please dry it first.
▶ Always using special mop of LG.
▶ Attach the mop to the bottom of the nozzle with the white surface upturned.
When drying the mop in washing machine, set it to the weakest mode.
When using the Mop Nozzle without mop, the mop board both sides can be fixed to use, the assembly method as shown in the right
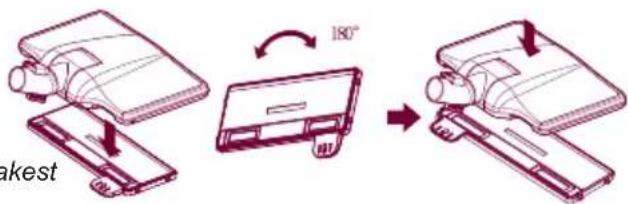
text_image
180° Makest
NOTE:
- It will be electrical danger when using the mop with excess moisture, and will be harmful to the cleaner.
• The mop can not be fixed when it deviates from the fixing place. - Mind that do not block the dust suction inlet when fixing the mop.
Using the Mop Nozzle
▶ Depending on different condition, connect or disconnect the mop.
Connecting method
- Paste the microfiber cloth after it wrapped in the microfiber cloth board.
When the nylon fastening of microfiber cloth is fix to the nylon fastening of mop board, the microfiber cloth is fixed.
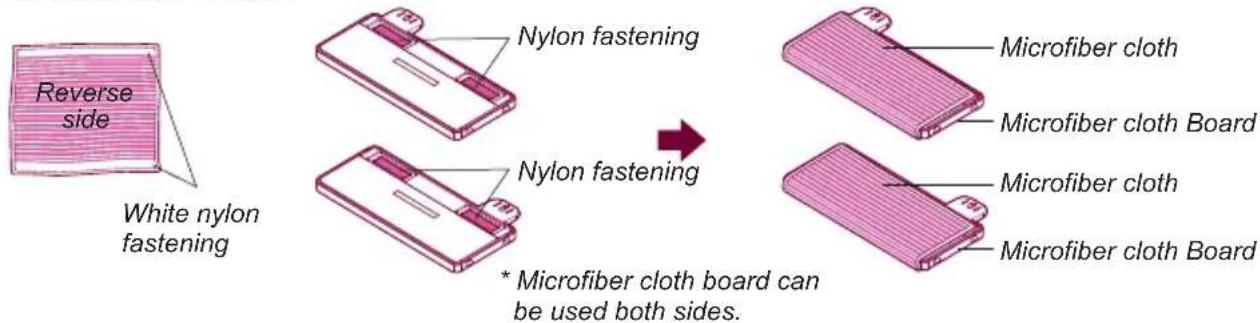
text_image
Reverse side White nylon fastening Nylon fastening Nylon fastening * Microfiber cloth board can be used both sides. Microfiber cloth Microfiber cloth Board Microfiber cloth Microfiber cloth Board- Push the top of nozzle after microfiber cloth fix to the microfiber cloth board. *When heard the "click" the microfiber cloth is fixed to the board completely.
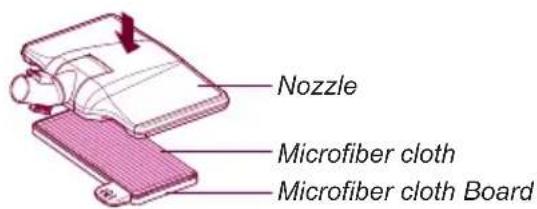
text_image
Nozzle Microfiber cloth Microfiber cloth Board- In the process of cleaning, One side of microfiber cloth is dirty, you can disassembling the mop from mop board by push the treadle, then you can continue using after change another side of mop.

text_image
Diagram illustrating a 30-degree angle measurement process for a device, showing step-by-step folding and rotation.Using the Mop
Disconnecting method
- After cleaning, press the treadle of mop board to separate the mop and mop board. Then you can take off the dirty mop.
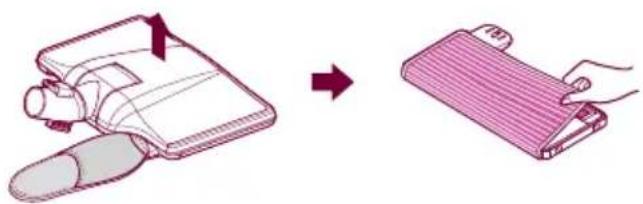
natural_image
Illustration showing a hand holding a device next to a folded notebook or case (no text or symbols present)Cleaning method
- After cleaning, if the suction inlet blocked by scraps of paper, toothpicks or other foreign matter, please open the transparent cover then clean the nozzle.

natural_image
Five technical line drawings of a mechanical component with no visible text or symbolsunder the transparent cover cover
tneraps@kerarreihgr@pe@dkraudhephrm#rhyttlebaga
*Assembly without transparent cover, the suction power will reduce and the mop may suction into the suction inlet. Please check the transparent cover is fixed correctly before using.
How to separate, clean and assemble the dust tank and the motor protection filter

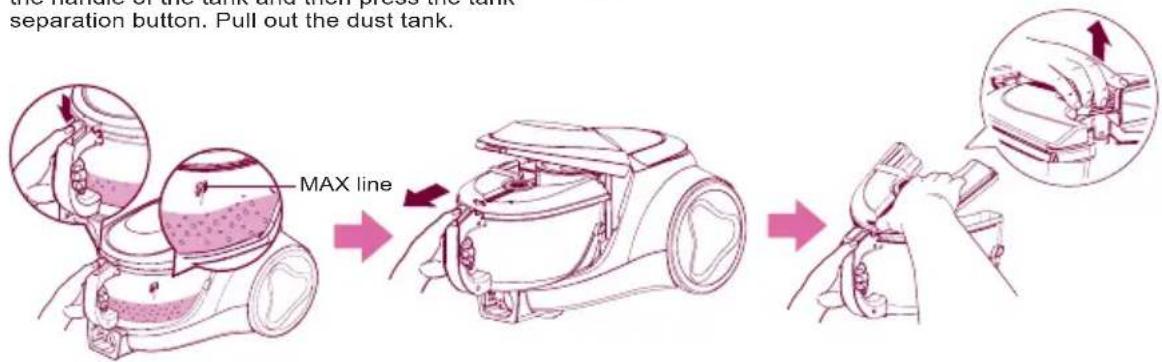
Warning: • Empty the dust tank when the dust reaches the MAX line.
• Too much dust beyond the MAX line may reduce the inhaling power.
• Dust tank should be cleaned at least once per 3 months.
How to separate, clean the dust tank
After turning off the appliance and unplug it, grasp the handle of the tank and then press the tank separation button. Pull out the dust tank.
Open the dust cover.
text_image
the nature of the tank and non-press the tank. separation button. Pull out the dust tank. MAX line → →Washing dust tank with cold water after emptying the dust. dry it fully in shade so that moisture is removed entirely.

flowchart
graph LR
    A["Water is being poured into a cup"] --> B["Water is receiving buckets and pumps"]
    B --> C["Water is collecting water from a faucet"]
    C --> D["To toilet be placed on the toilet"]
How to assemble the dust tank
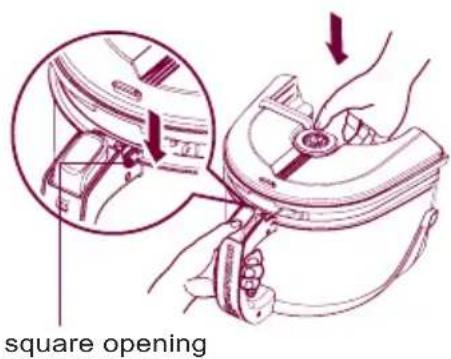
text_image
square opening1 Set the square opening of cover onto the groove of handle

natural_image
Technical line drawing of a mechanical component with an inset showing a close-up view of a bracket (no text or symbols present)2 Slide the tank on product to match the tank ribs to grooves of body
How to separate, clean and assemble the dust tank and the motor protection filter

natural_image
Line drawing of a car interior showing a hand valve and a close-up inset of the handle (no text or symbols)3 Assemble the dust tank and the body of Cleaner till the bottom locker clicks.

natural_image
Line drawing of a hand pressing down on a vacuum cleaner's hood, showing mechanical components and a magnified view of the component (no text or symbols)4 Push the front end of top cover till the locker clicks.
How to separate, clean the motor protection filter
Take out the motor protection filter from the appliance along the arrow direction. Please clean it at least once month or based on the using frequency. Suggest cleaning the motor protection filter and dry it fully in shade so that moisture is removed entirely.

flowchart
graph TD
    A["UV Cleaner"] --> B["Lighter component"]
    B --> C["Close-up of eye"]
    C --> D["Lighter device with handle"]
    D --> E["Lighter water filter with faucet"]
    E --> F["Lighter final container with handle"]
    F --> G["Final product with water filter"]
Warning: Please check the assembling of the protection filter before using the cleaner again
How to separate, clean and assemble the dust tank and the motor protection filter
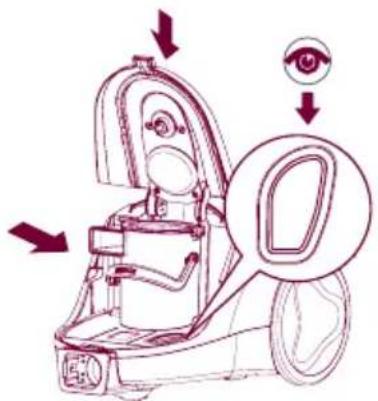
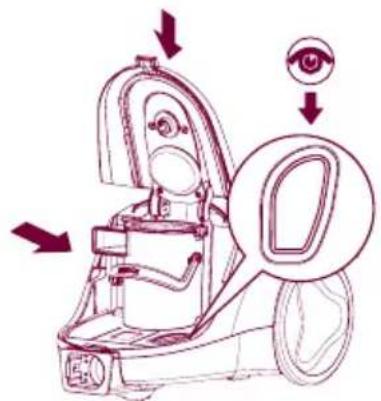
How to assemble the motor protection filter

natural_image
Line drawing of a mechanical assembly with no visible text or symbols1 Put the filter into the case.

natural_image
Line drawing of a device with an inset showing a close-up of its internal components (no text or symbols)2 Cover the filter.
text_image
Diagram of a mobile phone with labeled parts and directional arrows indicating action or perception, including an eye icon.3 Fix the assembled filter.

natural_image
Line drawing of a hand holding a vacuum cleaner device with a handle and arrow indicating motion (no text or symbols)4 Assemble the dust tank.

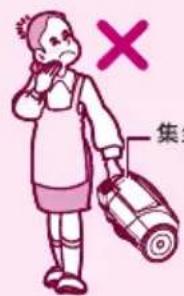
Caution when you move the cleaner

text_image
X TTank handle Carrier handle
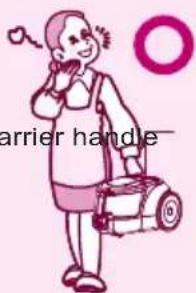
text_image
carrier handle- Don't grasp the tank handle when you are moving the vacuum cleaner. The vacuum cleaner's body may fall when separating tank and body. You should grasp the carrier handle when you are moving the vacuum cleaner.
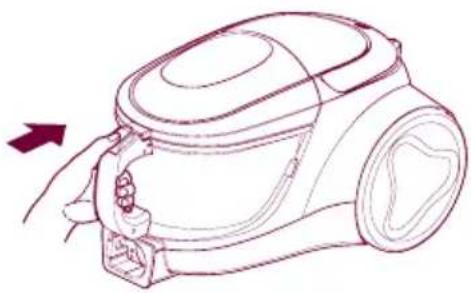
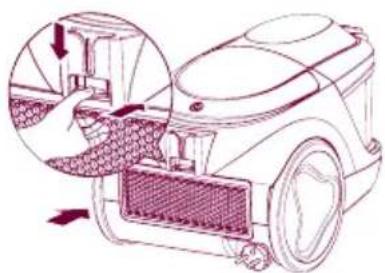
How to separate, clean and assemble exhaust filter
Disassembling
The exhaust filter should be cleaned at least once half a year. Allow exhaust filter to dry in a shaded location for a dry.

text_image
Button of the exhaust filter The exhaust filterCleansing
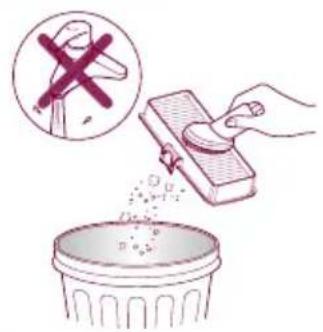
text_image
Illustration showing a hand removing a plastic bag into a trash bin, with a magnified inset showing the same object.1 Shake off the exhaust filter.
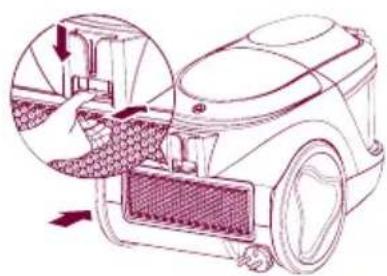
Assembling
natural_image
Diagram of a robotic vacuum cleaner with mesh chamber and hand insertion, showing internal components (no text or symbols)2 Insert the exhaust filter and join it properly until you hear the click of the button.

natural_image
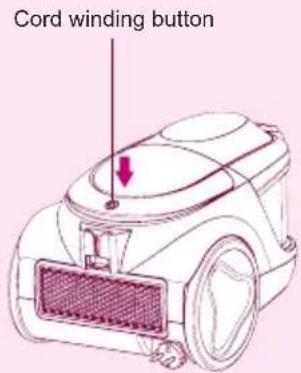
Illustration of a cartoon character with pink hair and rosy cheeks, enclosed in a pink circular frame (no text or symbols)How to keep the cleaner after using
text_image
Cord winding button
text_image
Diagram of a vacuum cleaner with labeled parts and a magnified inset showing the seatbelt adjustment.
natural_image
Line drawing of a vacuum cleaner with attached tubing and a magnified inset showing internal components (no text or symbols)• The cord winds up when you press the button.
- Insert the spiral of the inhaler into the groove in the back or at the bottom of the body
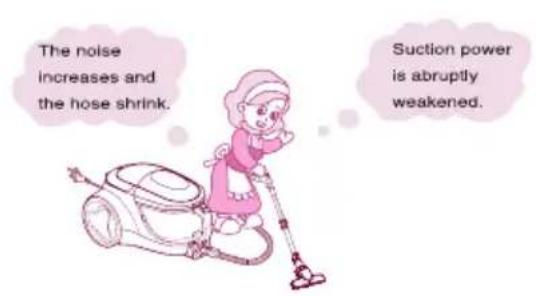
If you have a problem
If you have a problem
If a minor problem occurs, it usually can be solved quite easily when the cause is found by using the check list below.
Problem:
text_image
The noise increases and the hose shrink. Suction power is abruptly weakened.Help:

text_image
Check the dust tank and suction inlet.Solution
1 Dust tank full. (Arrive at MAX line) Empty dust tank.
② Motor filter dirty.
Clean the motor filter with brush and water, allow to dry and replace in cleaner.

Is it full? Empty the dust tank in time!

Is the filter OK? Then check the suction inlet.
3 When checking the suction inlet, adjust the suction level to the maximum.
First step
Turn cleaner off and disconnect from electrical outlet, then disconnect nozzle from telescopic tube. Check if it is blocked, and remove any blockages.
If there is still a problem, proceed the second step.

Second step
Disconnect the telescopic tube from hose. Check if it is blocked, and remove any blockages.
If there is still a problem, proceed the third step.

natural_image
Illustration of a robotic arm and a cartoon character (no text or symbols)Third step
Plug cleaner in, turn on, and check hose end for suction. Remove any obstructions.
If there is also a problem, clean the filter.

Please check before notifying malfunction
If you doubt the product meets with malfunction, please check the cause of such malfunction before contacting with the after-sales service center or agent, so as to ensure efficiency of repair.
Malfunction
The vacuum does not work?

text_image
not work?The vacuum does not work?

text_image
vacuum does work?Peculiar smell exists inside the vacuum cleaner
The power cord can not be scrolled thoroughly into the vacuum cleaner or the power cord can not be fully pulled.
The vacuum cleaner or the discharged air is too heat.
Inner wall of the hose is too dirt.
Check
• Is the plug inserted?
• Is the socket powered on?
- If the hose inserted?
- If the motor heat protection opened?
Troubleshooting
- Insert the plug tight (This product is applicable for 220V)
- Verify the power of socket is on
- Insert the hose tight
-
Restart in 2 hours
-
When the vacuum cleaner's suction is too large or the motor is under high speed running, they do not belong to the abnormal conditions. So, please use the vacuum cleaner properly.
- If it is the noise rather than the normal motor sound, please phone the repair center.
• The duster collector is filled up.
• The filter is clogged.
• Suction inlet is jammed. - Drawtube is clogged.
- Hose is clogged.
• Clean out the dust collector. - Purge the sponge filter with water and air-dry in the shady and cool place for one day.
• Take out the sucked objects before use.
Take out the objects inside the drawtube before use.
• Take out the objects inside the hose before use.
- When the motor is running, the rubber band used for fixing the motor will produce a little smell due to the heat, but it will not affect the operation or damage the machine.
-
When the machine sucks some water accidentally or the dust collector is not cleaned for a long period of time, the peculiar smell will be produced. So, clean up the dust collector timely.
-
Pull out part of the power cord and then re-scroll it.
- Please put forth your strength to pull out the power cord, which will not be damaged.
- The power cord entwined inside the machine or it is caused by high temperature in the summer.
- The cord is bended inside the machine or not coiled around the winder. After the winder is started, the normal operation could be realized.
• Is the suction normal?
- The heat air discharged from the machine is arising from the heat produced by motor. So, the temperature is normal, please use the machine continuously.
- Never suck the water because after mixing of the water and dust, the tube wall will be polluted and the motor will be damaged.
Packing List
Packing List
Vacuum Cleaner 1
Owner's Manual 1
Upholstery Nozzle 1
Dust Brush 1
Crevice tool 1
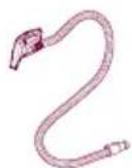
Hose 1
Telescopic tube 1
Corner Nozzle 1
Sani Punch 1
Mop Nozzle 1
Mop 3
Card, Service 1
请打电话

LG电子
400-819-9999
售后热线
一线 一号通
LG 电子 (天津)电器有限公司
地址: 中国·天津市北辰区津围公路9号
传真: 022-26903476
邮编: 300402
text_image
Black and white barcode image with vertical lines and patternsMFL67854602