PAR100W - Lighting Qtx - Free user manual and instructions
Find the device manual for free PAR100W Qtx in PDF.

User questions about PAR100W Qtx
0 question about this device. Answer the ones you know or ask your own.
Ask a new question about this device
Download the instructions for your Lighting in PDF format for free! Find your manual PAR100W - Qtx and take your electronic device back in hand. On this page are published all the documents necessary for the use of your device. PAR100W by Qtx.
USER MANUAL PAR100W Qtx
Please read through this manual thoroughly before use, any damage Caused by misuse of product will not be covered by warranty.
Thank you for choosing the PAR100W, A lightweight and compact LED PAR Can fitted with 18 bright 1W cool white LEDs. This unit can be controlled by auto, sound-to-light, master/slave programs or via DMX and provides a great value solution for white background wash and spot illumination.

natural_image
Line drawing of a mechanical device with a circular component and lever mechanism (no text or symbols)In the box:
Your PAR100W should arrive with you in a single carton in good condition. The carton should contain 1 x main unit with bracket and screws, 1x remote control, 1 x UK IEC mains lead and 1 x manual.
Warning:
To prevent risk of fire or electric shock, do not expose the unit to rain or damp environments. In the event of a spillage, disconnect the mains and allow the unit to dry out naturally. Qualified personnel should then check the unit before continuing use.

Please do not open cover, contains high voltage. This product is not serviceable or repairable by the end user. Please refer to qualified personnel for service and repair.
Placement:
• Use the included mounting bracket to fix to a stand or lighting truss
- Keep away from damp or dusty environments
- Ensure adequate airflow around the fixture housings
- Ensure adequate access to controls and connections
Cleaning:
• Use a soft cloth with a neutral detergent to clean the casing as required
• Regularly use a vacuum cleaner to clear ventilation grilles of any dust or debris build-ups
- Do not use strong solvents for cleaning the unit
text_image
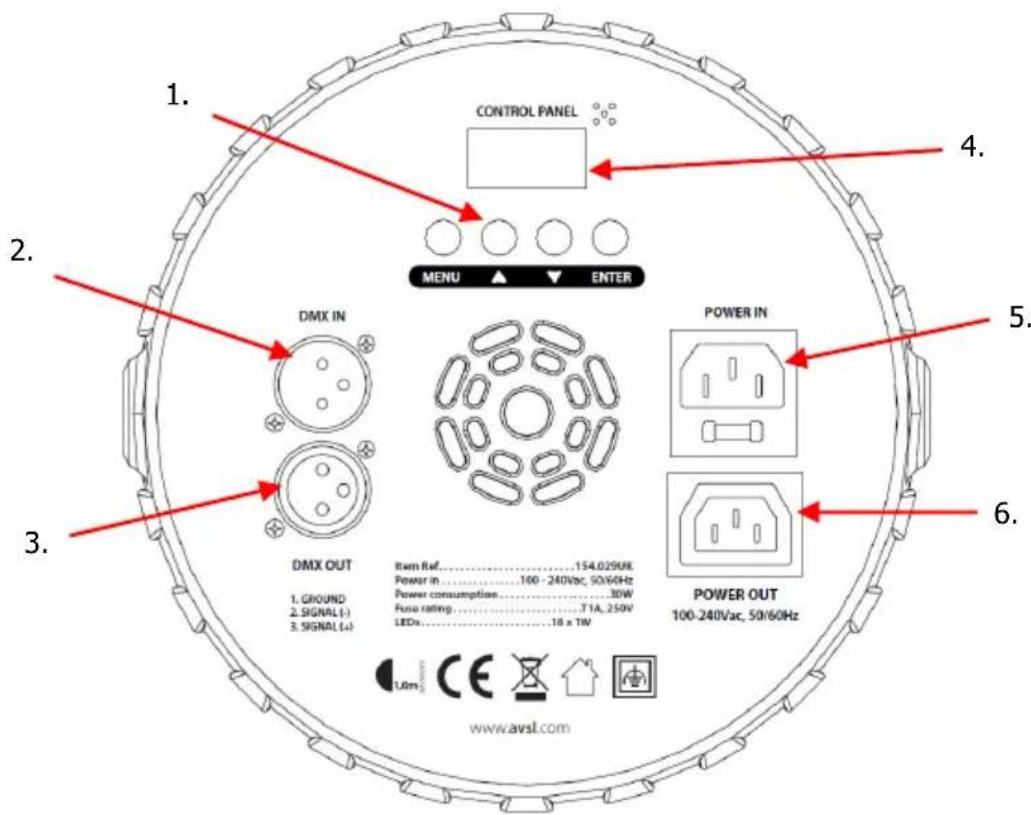
CONTROL PANEL MENU ▲ ▼ ENTER DMX IN DMX OUT 1. GROUND 2. SIGNAL (-) 3. SIGNAL (+) Item Ref..... 154.029UK Power in..... 100 - 240Vac, 50/60Hz Power consumption..... 30W Fuse rating..... T1A, 250V LEDs..... 18 x 1W POWER IN POWER OUT 100-240Vac, 50/60Hz 1.0m CE CE [icon] www.avsl.comRear panel controls:
- Manual control buttons
- DMX Signal in
-
DMX signal out
-
LED display
- IEC power in (fused)
- IEC power out
Manual control menu:
Press the "MENU" button to enter the settings menu.
Press "UP" and "DOWN" buttons to navigate through various setting functions.
Press "ENTER" button to save the desired setting.
| Menu | Number range | Function and description |
| A001 | A001-A512 | DMX512 address settings |
| ADYE | ADYE or ADno | DMX512 Master on or off (Slave) |
| rEYE | rEYE or REno | Remote control on or off |
| AU01 | AU01-AU07 | Brightness select |
| FF00 | FF00-FF99 | Auto jump setting (speed slow to fast) |
| EE00 | EE00-EE99 | Auto fade setting (speed slow to fast) |
| CC00 | CC00-CC99 | Auto pulse setting (speed slow to fast) |
| F000 | F000-F255 | Strobe setting (speed slow to fast) |
| SOUD | SOUD | Sound to light with strobe setting |
| SUND | SUND | Sound to light jump change setting |
| r000 | r000-r255 | First 6pcs LED dimming (0-100%) |
| G000 | G000-G255 | Second 6pcs LED dimming (0-100%) |
| b000 | b000-B255 | Third 6pcs LED dimming (0-100%) |
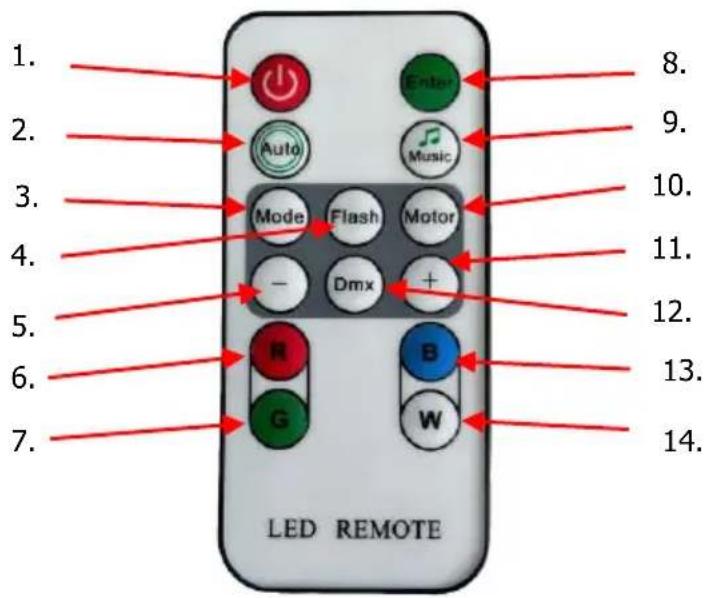
Remote control:
The PAR100W is supplied with an I.R. remote control for quick access to most of the basic functions of the unit. This must be aimed at the front of the unit where there is a remote receiver and has a maximum range of approximately 4-5m. Controls and functions are listed on the diagram below:
-
Power = Remote on/off
-
Auto = Auto jump open/off
-
Mode = Auto fade open/off
-
Flash = Strobe open/off
-
-- = Decrease option setting
-
R = First 6pcs LED open/off
-
G = Second 6pcs LED open/off
-
Enter = Save option setting
-
Music = Sound to light mode open/off
-
Motor = Brightness select
-
- = Increase option setting
-
Dmx = DMX512 open/off
-
B = Third 6pcs LED open/off
-
W = No function on this model
DMX mode:
The PAR100W can be controlled by DMX signal, simply connect the DMX signal source to the DMX input on the unit via a balanced XLR lead. Extra fixtures can be controlled by the same DMX signal by looping through the DMX out on the unit. To enter DMX mode, select A001 from the menu and confirm the correct start address by using the "UP" and "DOWN" buttons and "ENTER" to confirm.
This unit has 7 DMX channels as indicated in the table below:
| Channel | Value | Function | Setting |
| CH1 | 0-255 | Master dimming (0-100%) | Available in all modes |
| CH2 | 0-255 | First 6pcs LED dimming (0-100%) | Dimming modes only |
| CH3 | 0-255 | Second 6pcs LED dimming (0-100%) | |
| CH4 | 0-255 | Third 6pcs LED dimming (0-100%) | |
| CH5 | 0-255 | Strobe (speed slow to fast) | Available in all modes |
| CH6 | 0-50 | Open CH1-CH5 | |
| 51-100 | Brightness select | ||
| 101-150 | Auto jump setting | ||
| CH6 (cont'd) | 151-200 | Auto fade setting | |
| 201-250 | Auto pulse setting | ||
| 251-255 | Open sound to light setting | ||
| CH7 | 0-255 | Speed from slow to fast | Auto modes only |
Specifications:
| Power supply | 110-240Vac, 50/60Hz (IEC) |
| Power consumption | 30W |
| Fuse rating | T1.0A |
| LED quantity | 18 x 1W (cool white) |
| DMX channels | 7 |
| Beam angle | 25° |
| Projection distance | 10m (approx.) |
| Dimensions | 200 x 200 x 78mm (without Bracket) |
| Weight | 1.14kg |
Troubleshooting:
| No power (mains) | Check mains voltage is correct, and outlet is switched on |
| Check IEC lead and fuse (if fuse continually blows, refer to your dealer) | |
| No light output | Check control panel mode settings |
| Check DMX settings from controller (dimmer levels, blackout etc.) | |
| Unresponsive to DMX | Check that unit is in DMX mode and ensure DMX address remains lit to confirm receiving DMX signal |
| Check DMX controller is not set to black out | |
| Check DMX controller is on correct fixture/page | |
| Check master dimmer value | |
| Check correct DMX address is set | |
| Check DMX connection and leads | |
| Overheating/cutting out | Ensure adequate ventilation and unit is not too close to a heat source |

text_image
CE UK CAThis product is classed as Electrical or Electronic equipment and should not be disposed with other household or commercial waste at the end of its useful life.
The goods must be disposed of according to your local council guidelines.