L6 - Television VIZIO - Free user manual and instructions
Find the device manual for free L6 VIZIO in PDF.

User questions about L6 VIZIO
0 question about this device. Answer the ones you know or ask your own.
Ask a new question about this device
Download the instructions for your Television in PDF format for free! Find your manual L6 - VIZIO and take your electronic device back in hand. On this page are published all the documents necessary for the use of your device. L6 by VIZIO.
USER MANUAL L6 VIZIO
natural_image
A man and a woman in a modern indoor setting, smiling while seated on a sofa with glasses (no visible text or symbols)
natural_image
Solid gray image with no visible content, text, or symbols.
natural_image
Side profile of a smiling person wearing headphones, seated in a living room with window and bookshelves in the background (no visible text or symbols)Your VIZIO ^L6
20inch LCD Television
User's Guide

natural_image
Modern flat-screen TV displaying a water droplet on its screen, with no visible text or symbols on the screen or background.
natural_image
Man sitting in a modern chair using a laptop, watching TV (no visible text or symbols)
natural_image
Three people interacting in a library setting with bookshelves and TV equipment (no visible text or symbols)Table of Contents
Description Page
Getting Started 4
Package Contents 4
Precautions
4
Quick Installation (PC-DVI) 5
Installation of Wall Mount (Optional) 6
Using the Display 7
Setting the Timing Mode (DVI Input) 7
Switching Sources (DVI, Component, AV, S-Video, TV) Modes 7
Adjusting the Screen Image 8
Remote Control 9
Top Keypad Controls
11
OSD Menu
12
Picture Adjust menu
12
Input Setup menu
15
PIP Setup menu
16
TV Tuner Setup menu (TV only)
18
Audio Adjust menu
20
Parental Controls menu
22
Access Code Edit menu
24
TV Rating menu
25
MOVIE Rating menu
26
Special Features menu
27
System Information menu 28
[Non-Text]
Volume OSD
29
Channel Number OSD
30
Source Message OSD
32
Sleep Timer message
33
Channel Scanning message
34
Warning message
35
Other Information
Specifications
36
Troubleshooting
37
Cleaning the Display
39
Safety Guidelines
40
Compliance Information for U.S.A.
41
Appendix A
V Incorporated Limited Warranty
42
Copyright © V Inc. Corporation, 2003. All rights reserved.
Macintosh and Power Macintosh are registered trademarks of Apple Computer, Inc.
Microsoft, Windows, Windows NT, and the Windows logo are registered trademarks of Microsoft Corporation in the United States and other countries.
VESA is a registered trademark of the Video Electronics Standards Association. DPMS and DDC are trademarks of VESA.
ENERGY STAR® is a registered trademark of the U.S. Environmental Protection Agency (EPA).
As an ENERGY STAR® partner, V Inc. Corporation has determined that this product meets the ENERGY STAR® guidelines for energy efficiency.
Disclaimer: V Inc. Corporation shall not be liable for technical or editorial errors or omissions contained herein; nor for incidental or consequential damages resulting from furnishing this material, or the performance or use of this product.
In the interest of continuing product improvement, V Inc. Corporation reserves the right to change product specifications without notice. Information in this document may change without notice.
No part of this document may be copied, reproduced, or transmitted by any means, for any purpose without prior written permission from V Inc. Corporation.
Product Registration
To meet your future needs, and to receive any additional product information as it becomes available, please register your product on the Internet at: www.vinc.com.
For Your Records
Product Name: V Inc. Vizio L6 20" LCD TV
Model Number: LT20BAN28AAB
Serial Number:
Purchase Date:
Product disposal at end of product life
V Inc. is concerned about the preservation of our environment. Please dispose of this product properly at the end of its useful life. Your local waste disposal company may provide information about proper disposal.
Important Safeguards
- Read all the Safety Instructions and the User Manual before using the Display. Keep these instructions in a safe place for future reference.
- To avoid the risk of electric shock or component damage, switch off the power before connecting other devices to the Display.
- Unplug the power cord before cleaning the Display. A damp cloth is sufficient for cleaning the Display. Do not use a liquid or a spray cleaner for cleaning the product. Do not use abrasive cleaners.
• Always use the accessories recommended by the manufacturer to insure compatibility. - When moving the Display from an area of low temperature to an area of high temperature, condensation may form on the housing. Do not turn on the Display immediately after this to avoid causing fire, electric shock or component damageDo not use the monitor near water, e.g. near a bathtub, washbowl, kitchen sink, laundry tub, swimming pool or in a wet basement.
- Do not place the monitor on an unstable cart, stand, or table. If the monitor falls, it can injure a person and cause serious damage to the appliance. Use only a cart or stand recommended by the manufacturer or sold with the monitor. If you mount the monitor on a wall or shelf, use a mounting kit approved by the manufacturer and follows the kit instructions.
- A distance of at least 3 feet should be maintained between the Display and any heat source, i.e. radiator, heater, oven, amplifier etc.
- Slots and openings in the back and bottom of the cabinet are provided for ventilation. To ensure reliable operation of the monitor and to protect it from overheating, be sure these openings are not blocked or covered. Do not place the monitor on a bed, sofa, rug, or similar surface. Do not place the monitor near or over a radiator or heat register. Do not place the monitor in a bookcase or cabinet unless proper ventilation is provided.
- Never push any object into the slot on the monitor cabinet. It could short circuit parts causing a fire or electric shock. Never spill liquids on the monitor.
- The monitor should be operated only from the type of power source indicated on the label. If you are not sure of the type of power supplied to your home, consult your dealer or local power company.
- The power cable must be replaced when using different voltage from that specified in the User Manual. For more information, contact your dealer.
- The monitor is equipped with a three-pronged grounded plug, a plug with a third (grounding) pin. This plug will fit only into a grounded power outlet as a safety feature. If your outlet does not accommodate the three-wire plug, have an electrician install the correct outlet, or use an adapter to ground the appliance safely. Do not defeat the safety purpose of the grounded plug.
- Unplug the unit during a lightening storm or when it will not be used for long period of time. This will protect the monitor from damage due to power surges.
- Do not overload power strips and extension cords. Overloading can result in fire or electric shock.
- The wall socket shall be installed near the equipment and shall be easily accessible.
- Do not attempt to repair or service the product yourself. Opening or removing the back cover may expose you to high voltages, the risk of electric shock, and other hazards. If repair is required, please contact your dealer and refer all servicing to qualified service personnel.
- If any of the following occurs please contact the dealer:
- The power supply or connector fails.
- Liquid sprays or any object drops into the Display.
- The Display is exposed to rain or other moisture.
- The Display is dropped or damaged in any way.
- The performance of the Display changes substantially.
- Operating environment:
Temperature: 32°F\~104°F (0°C \~ 40°C)
Humidity: 20% to 85% non-condensing
Atmospheric pressure: 800 to 1100hPa
- Handling the remote control
- Do not drop or mishandle the remote control.
- Do not get the remote control wet. If the remote control gets wet, wipe it dry immediately.
- Avoid heat and humidity.
- When not using the remote control for a long period, remove the batteries.
- Do not take apart the batteries, heat them, or throw them into a fire.
Getting Started
Congratulations on your purchase of the V Inc.® Vizio L6 20" LCD TV.
Important! Save the original box and all packing material for future shipping needs.
Package Contents
Your Vizio L6 20" LCD TV package includes:
■ 20" LCD TV
■ Remote Control (including battery)
Power cord
■ Audio cable (stereo mini jack)
■ AV cable (RCA x 3)
- This User Guide
Precautions
- Sit at least 18" from your LCD TV.
- Avoid touching the screen. Skin oils are difficult to remove.
- Never remove the rear cover. Your LCD TV contains high-voltage parts. You may be seriously injured if you touch them.
- Avoid exposing your LCD TV to direct sunlight or another heat source. Orient your LCD TV away from direct sunlight to reduce glare.
-
Always handle your LCD TV with care when moving it.
-
Place your LCD TV in a well ventilated area. Do not place anything on your LCD TV that prevents heat dissipation.
- Ensure the area around the LCD TV is clean and free of moisture.
- Do not place heavy objects on the LCD TV, video cable, or power cord.
- If smoke, abnormal noise, or strange odor is present, immediately switch off the LCD TV and call your dealer or V Inc. It is dangerous to continue using the LCD TV.
Quick Installation (PC-DVI)
- Remove the two rear panel covers.
- Connect the power cord.
- Connect the DVI-D cable.
■ Make sure both the LCD display and computer are turned OFF.
- Connect the DVI-D cable from the LCD display to the computer.
- Turn on the LCD display and the computer.
Turn on the LCD display before you turn on the computer.
NOTE: Windows users may receive a message asking them to install the INF file. A copy of this file can be downloaded from the www.vinc.com website.
- Audio Installation.
Connect the audio cable (Blue color) to the AUDIO OUT port of your computer's sound card, then to the LCD display's AUDIO IN (Blue color) port (see illustration below).
- Windows users: Set the timing mode (resolution and refresh rate).
Example: 640 x 480 @ 60 Hz.
For instructions on changing the resolution and refresh rate, see the graphic card's user guide.
- Installation is complete. Enjoy your new V, Inc LCD display.
You can register your product online. See the Customer Support table in this guide. (page 38)
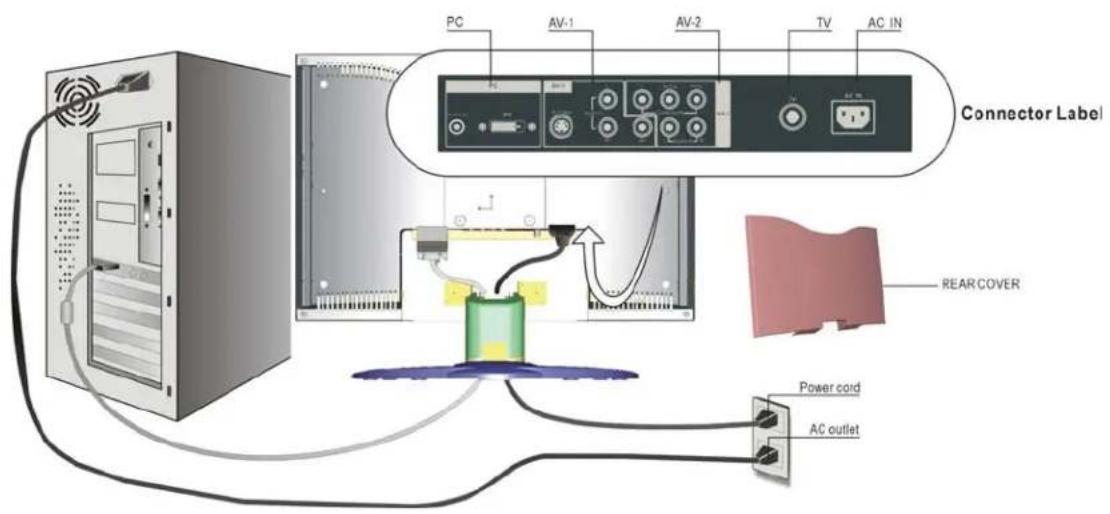
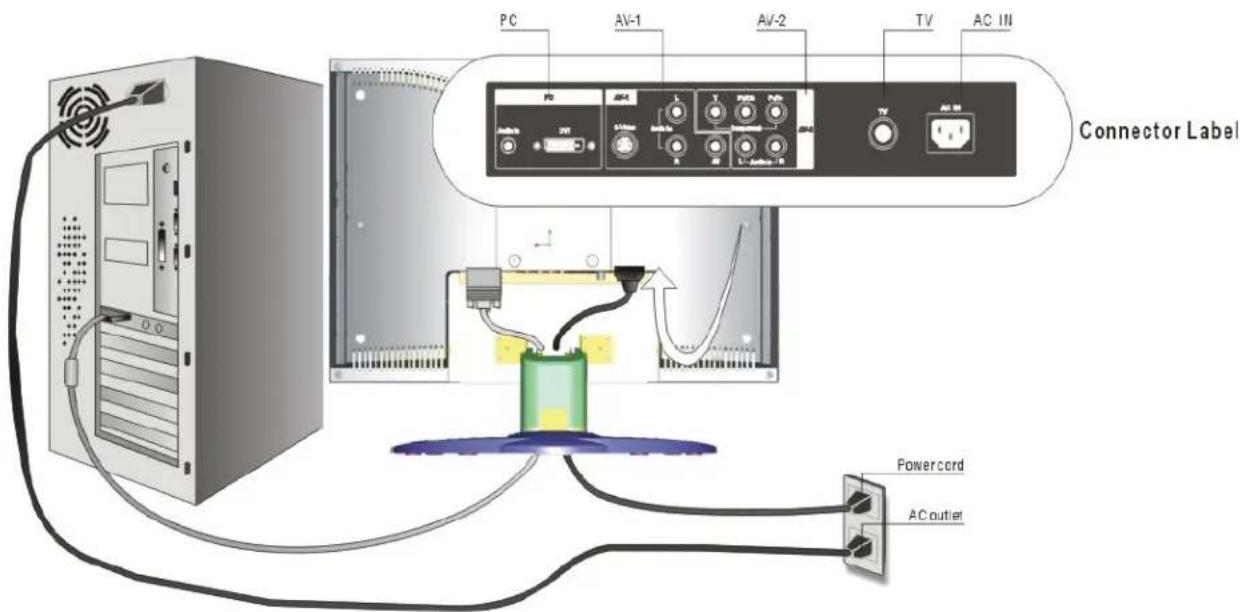
text_image
PC AV-1 AV-2 TV AC IN Connector Label REAR COVER Power cord AC outletInstallation of Wall Mount (Optional)
To obtain a wall-mounting kit, contact V Inc. or your local dealer. Refer to the instructions that come with the Wall Mount kit. To convert your LCD TV from a desk-mounted to a wall-mounted display, do the following:
Four screw holes for wall mount
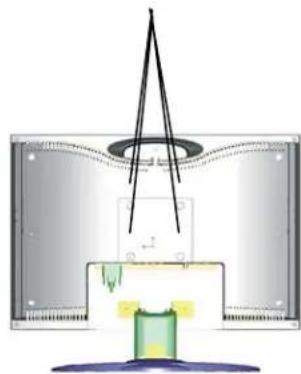
natural_image
Diagram of a mechanical or electrical component with a central shaft and internal structure, no visible text or symbols-
Disconnect Power.
-
Lay the LCD TV face down on a towel or blanket to protect the screen from damage.
-
Remove the 6 screws from the hinge of stand and remove the stand.
-
Attach the mounting bracket from the VESA compatible wall mounting kit (100 mm x 100mm size).
-
Attach the LCD TV to the wall, following the instructions with the wall-mounting kit.
Using the Display
Setting the Timing Mode (DVI Input)
Setting the timing mode is important for maximizing the quality of the screen image and minimizing eye strain. The timing mode consists of the resolution (example 640 x 480) and refresh rate (or vertical frequency; example 60 Hz). After setting the timing mode, use the OSD controls to adjust the screen image.
NOTE: For the best picture quality set your LCD TV timing mode to: 640 x 480 @ 60Hz.
To set the Timing Mode:
- Set the resolution: Right-click on the Windows desktop and select Properties. Select the Settings tab and set the resolution.
- Set the refresh rate: See your graphic card's user guide for instructions.
WARNING: Do not set the graphics card in your computer to exceed the maximum refresh rate of 85Hz; doing so may result in permanent damage to your Display.
Switching Sources (DVI, Component, AV, S-Video, TV) Modes
- Turn on the power of the connected video equipment.
- Press the Sources button on the Remote Control or the TV/Video button on the LCD TV to step through the selections, or select the source directly by pressing the DVI, YPbPr, AV, S-Video or TV button on the Remote Control. As each source is selected the appropriate DVI, Component, AV, S-Video or TV word will appear in the top left corner of the screen.
text_image
PC AV-1 AV-2 TV AC IN Connector Label Power cord AC outlet7
Adjusting the Screen Image
Use the buttons on the Top Keypad Controls (or Remote Control) to display and adjust the On Screen Display (OSD). The OSD controls are explained at the top of the next page and are defined in "Main Menu Controls" on page 12.

text_image
Top Keypad Controls shown below in detail Main Menu with OSD controls Speaker PICTURE ADJUST BRIGHTNESS 100 contrast 50 color 50 TIME 50 SNOPNESS 50 noise power normal 50 CLOSE POSITION OFF VIDEO,MISC TV MENU ▲CH ▼ ○ YOL ▶ TV/VIDEOShortcuts
Shortcuts allow quick access to commonly used functions without navigating through the OSD. The following shortcuts are available:
| Button Function | |
| [Source] Input Select. Jumps directly to next Input. | |
| [Right] (When OSD Not Active) Volume Up | |
| [Left] (When OSD Not Active) Volume Down | |
| [Up] (When OSD Not Active) Channel Up | |
| [Down] (When OSD Not Active) Channel Down | |
Remote Control
The Remote Control is range is up to 16ft (5m).
-
POWER Switch the power On/Off
-
SOURCES Select the input source
-
TV Select TV mode
-
ASPECT Select picture ratio
-
DVI Select digital video mode
-
YPbPr Select component mode
-
AV Select AV mode
-
S-VIDEO Select S-Video mode
-
PIP Display Main & Sub picture.
-
PIP SWAP Switch PIP Main/Sub source
-
PIP SIZE Adjust PIP Sub picture size
-
PIP SOURCE Select PIP Sub picture source
-
AUDIO Adjust Audio function
-
POP Display Multi-Window
-
SLEEP Set the sleep timer
-
MENU / EXIT Press to call the OSD / EXIT the OSD
-
▲/▼/◄/► (Cursor Control) Select a desired item on the screen
-
OK Execute a command
-
VOLUME ▲/▼ Set the volume
-
CHANNEL ▲/▼ Set the channel
-
LAST Return to the previous
-
MUTE Mute the sound
-
Channel Select Set the channel
-
DISPLAY Display the channel information
-
FREEZE Freeze the screen

text_image
3 2 6 5 10 9 DVI TV ASPROT 4 1 7 8 11 12 DIP PIP WRAP PIP SIZE PIP SOURCE 13 14 18 17 15 16 21 19 VOLUME LAST MUTE CHANNEL 20 22 1 2 3 4 5 6 7 8 9 DISPLAY 0 FREEZE 23 24 ← ← → ← → ← ← → ← → → ← → ← →To adjust the screen image:
- To display the OSD main menu, press the Menu on the Top Keypad or on the Remote Control. The four arrow buttons can be used to move the marker. Pressing the MENU key when in the menu will exit the OSD menu.
NOTE: OSD menus will disappear automatically after about 30 seconds.
- After a page is selected, press the ▼ button. A control screen like the one shown below appears.

text_image
PICTURE ADJUST BRIGHTNESS 100 CONTRAST 50 COLOR 50 TINT 50 SHARPNESS 50 WIDE FORMAT 4:3 CLOSE CAPTION OFF VIDEO NTSC TV The left arrow decreases, right arrow increases ▲ and ▼ key to select function- To save the adjustments and exit the marker, press the EXIT button.
The following tips may help you optimize your display:
Adjust your computer's graphic card so that it outputs a video signal of 640 x 480@ 60 Hz. (Look for instructions on "changing the refresh rate" in your graphic card's user guide.)
Top Keypad Controls
Power Button
This button functions at any time except when the AC input power is off.
If this button is pressed, power on and off are selected alternately. When the TV is on, pressing the Power button makes the TV turn off. When the TV is off, pressing the Power button makes the TV turn on and it will show the input source that was last shown before it was turned off. Note that TV turns off if this button is pressed at Power Save status.
Factory shipment setting: Power Off
Menu Button
This button functions only during Normal status. When this button is pressed the OSD main menu will appear on the screen. If it is pressed while the main menu is displayed, the main menu will disappear. If pressed while an OSD sub menu is displayed, it will exit the sub menu and go back to last menu.
▲ CH Button and ▼ CH Button
These buttons function only during Normal status. The buttons are used to step or down through the stored channel selections. While the OSD menu is displayed, when either of these buttons is pressed the selected item for adjustment is changed.
▼ VOL Button and ▲ VOL Button
These buttons function only during Normal status. The buttons are used to increase or decrease the sound volume. While the OSD menu is displayed, when either of these buttons is pressed the value of the selected item for adjustment is decreased or increased. In some submenus the right button is used to select different options.
TV/VIDEO Button
This button functions during Normal, Warning, Power Save, or Aging status.
Whenever this button is pressed the input source is selected as follows.
Input Signal List:
- DVI
- Component (Y/Pb/Pr) / (Y/Cb/Cr)
- AV (Composite video RCA x 1)
- S-VIDEO (S-Video)
- TV (Tuner)
Notes:
The Top Keypad does not have an "OK" button. Whenever an "OK" button is mentioned in this guide it is referring to the button on the Remote Control. Where a sub menu requires confirmation use the "▲VOL" button on the Top Keypad or the "OK" button on the Remote Control.
In all sub menus, the cursor movement is circulatory. For example, if the ▼ CH Button is pressed when the cursor is on the last item in the sub menu, the cursor will moved to the main icon)
OSD Menu
The OSD Menu includes seven sub menus: Picture Adjust, Input Setup, PIP Setup, TV Tuner Setup, Audio Adjust, Parental Controls and Special Features. With each input source there will be a corresponding change in the makeup of the OSD menu.
Picture Adjust menu
Figure 1 Picture Adjust menu (TV, AV and S-Video)
The Picture Adjust menu will be as shown in Figure1 when the input source is TV, AV or S-Video. Adjustments can be made using the Remote Control or Top Keypad.
- Press the Menu key to display this Menu
- Press the ▼ button on the Remote Control or the ▼CH button on the Top Keypad to enter this menu
- Press the ▼ button, (▲ button to go back), on the Remote Control or the ▼CH, (▲CH button) on the Top Keypad, to change the selected function.
- Press the ◀ or ▶ button on the Remote Control or the ▼VOL or ▲VOL button on the Top Keypad to adjust the feature.
- Press the Exit button on the Remote Control or the Menu button on the Top Keypad to return to the main menu and then press the button again to exit the OSD or wait for the time out to exit.
| Function Name | Explanation |
| BRIGHTNESS Adjust the brightness of the TV | |
| CONTRAST Adjust the contrast of the TV | |
| COLOR Adjust the amount of color | |
| TINT Adjust the skin tone or color | |
| SHARPNESS Adjust the picture to be softer or sharper | |
| WIDE FORMAT | The choices are Normal, 4:3 or 16:9 |
| CLOSE CAPTION | The choices are OFF, CC1, CC2, CC3, CC4, TT1, TT2, TT3 or TT4 |
Component mode
text_image
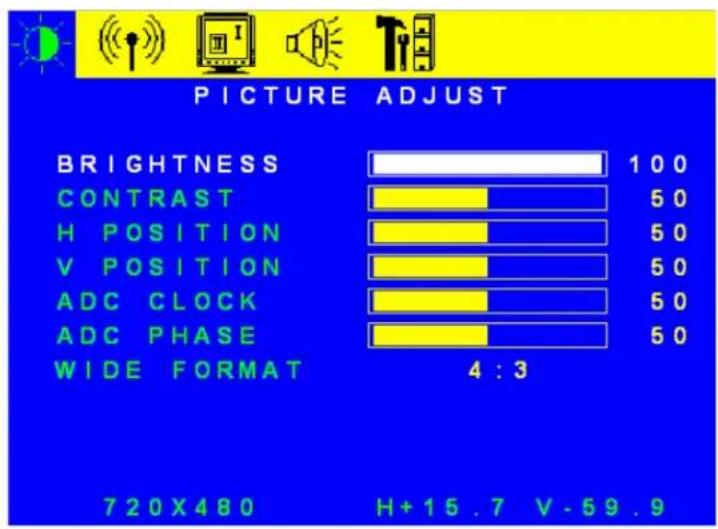
PICTURE ADJUST BRIGHTNESS 100 CONTRAST 50 H POSITION 50 V POSITION 50 ADC CLOCK 50 ADC PHASE 50 WIDE FORMAT 4 : 3 720X480 H+15.7 V-59.9Figure 2 Picture Adjust menu (Component)
The Picture Adjust menu will be as shown in Figure 2 when the input source is Component. Adjustments can be made using the Remote Control or Top Keypad.
1. Press the Menu key to display this Menu
2. Press the ▼ button on the Remote Control or the ▼CH button on the Top Keypad to enter this menu
3. Press the ▼ button, (▲ button to go back), on the Remote Control or the ▼CH, (▲CH button) on the Top Keypad, to change the selected function.
4. Press the ◀ or ▶ button on the Remote Control or the ▼VOL or ▲VOL button on the Top Keypad to adjust the feature.
5. Press the Exit button on the Remote Control or the Menu button on the Top Keypad to return to the main menu and then press the button again to exit the OSD or wait for the time out to exit.
| Function Name | Explanation |
| BRIGHTNESS | Adjust the brightness of the TV |
| CONTRAST | Adjust the contrast of the TV |
| H POSITION | Adjust the Horizontal Position of the picture |
| V POSITION | Adjust the Vertical Position of the picture |
| ADC CLOCK | Adjust the Horizontal size of the picture |
| ADC PHASE | Adjust the Horizontal noise on the picture |
| WIDE FORMAT | Choice of Normal, 4:3 or 16:9 |
DVI mode
text_image
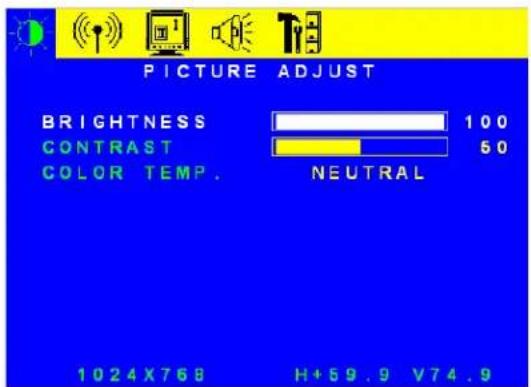
PICTURE ADJUST BRIGHTNESS 100 CONTRAST 50 COLOR TEMP. NEUTRAL 1024X768 H+59.9 V74.9Figure 3 Picture Adjust menu (DVI)
Picture Adjust Menu
The Picture Adjust menu will be as shown in Figure 3 when the input source is DVI. Adjustments can be made using the Remote Control or Top Keypad.
- Press the Menu key to display this Menu
- Press the ▼ button on the Remote Control or the ▼CH button on the Top Keypad to enter this menu
- Press the ▼ button, (▲ button to go back), on the Remote Control or the ▼CH, (▲CH button) on the Top Keypad, to change the selected function.
- Press the ◀ or ▶ button on the Remote Control or the ▼VOL or ▲VOL button on the Top Keypad to adjust the feature.
- Press the Exit button on the Remote Control or the Menu button on the Top Keypad to return to the main menu and then press the button again to exit the OSD or wait for the time out to exit.
| Function Name | Explanation |
| BRIGHTNESS | Adjust the brightness of the screen |
| CONTRAST | Adjust the contrast of the screen |
Input Setup menu

text_image
INPUT SETUP DV1 COMPONENT AV S - VIDEO TV 1024X768 H+59.9 V74.9Figure 4 Input Setup menu
The input source can be selected from the Input Setup menu as shown in Figure 4. The input currently selected is highlighted in red and the selection cursor is a hand icon.
- Press the Menu key to display the OSD Menu
- Press the ▶ button on the Remote Control or the ▲ VOL button on the Top Keypad to select the Input Setup menu.
- Press the ▼ button, (▲ button to go back), on the Remote Control or the ▼CH, (▲CH button) on the Top Keypad, to change the selected function.
- Press the OK button on the Remote Control or the ▲VOL button on the Top Keypad to select the input.
- Press the Exit button on the Remote Control or the Menu button on the Top Keypad to return to the main menu and then press the button again to exit the OSD or wait for the time out to exit.
| Function Name | Explanation |
| DVI Select the DVI (Digital Video) input source | |
| COMPONENT Select the Component (YPbPR) input source | |
| AV Select the AV (Composite [CVBS] Video) input source | |
| S-VIDEO Select the S-Video input source | |
| TV | Select TV |
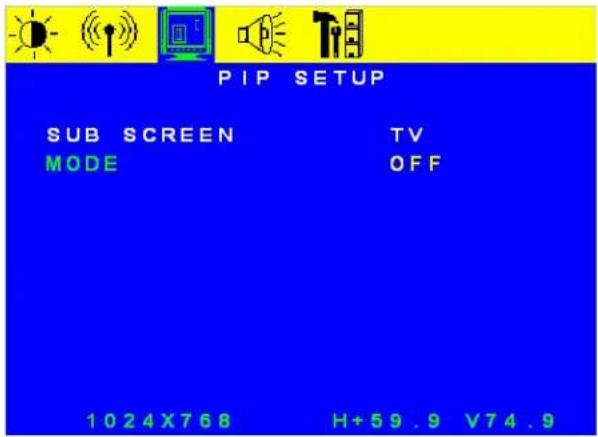
PIP Setup menu
text_image
PIP SETUP SUB SCREEN TV MODE OFF 1024X768 H+59.9 V74.9Figure 5 PIP Setup menu
text_image
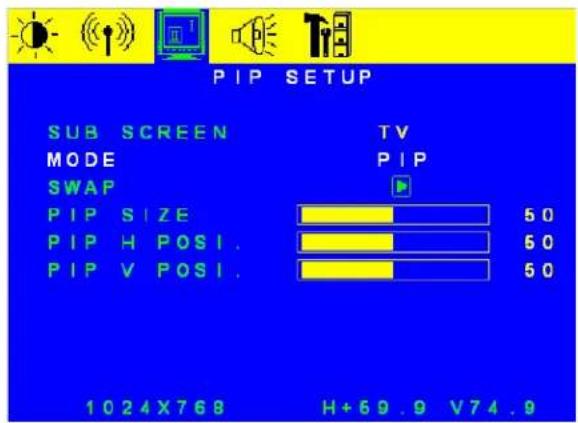
PIP SETUP SUB SCREEN MODE SWAP TV PIP PIP SIZE 50 PIP H POSI. 50 PIP V POSI. 50 1024X768 H+69.9 V74.9Figure 6 PIP menu

text_image
PIP SETUP SUB SCREEN TV MODE POP SWAP 1024X768 H+59.9 V74.9Figure 7 POP menu
When the PIP and POP functions are disabled, the menu is same as shown in Figure 5. When the PIP function is enabled, the menu is same as shown in Figure 6. When the POP function is enabled, the menu is same as shown in Figure 7.
- Press the Menu key to display the OSD Menu
- Press the ▶ button on the Remote Control or the ▲VOL button on the Top Keypad twice to select the PIP Setup menu.
- Press the ▼ button on the Remote Control or the ▼CH on the Top Keypad, to select the Sub Screen function.
- Press the ▶ button on the Remote Control or the ▲ VOL button on the Top Keypad to select the Sub Screen Input source.
- Press the ▼ button on the Remote Control or the ▼CH on the Top Keypad, to select the Mode function.
- Press the ▶ button on the Remote Control or the ▲ VOL button on the Top Keypad to select the PIP or POP Mode.
- Press the OK button on the Remote Control or the TV/Video button on the Top Keypad to select the input. The PIP or POP sub screen will now be shown with the main screen.
- Press the ▼ button on the Remote Control or the ▼CH on the Top Keypad to select the Swap function and then press the ▶ button on the Remote Control or the ▲VOL button on the Top Keypad to swap the main and sub screen inputs.
- If the PIP mode was selected then additional menu choices for PIP Size, PIP H-POS and PIP V-POS will appended to the menu list. If desired, press the ▼ button on the Remote Control or the ▼CH on the Top Keypad, to select the function. And then the press the ▶ button on the Remote Control or the ▲VOL button on the Top Keypad to adjust the function.
- Press the Exit button on the Remote Control or the Menu button on the Top Keypad to return to the main menu and then press the button again to exit the OSD or wait for the time out to exit.
| Function Name | Explanation |
| SUB SCREEN Choose sub screen source.If main input is TV, AV or S-VIDEO, there're two options in the sub screen: DVI, COMPONENTIf main input is DVI or COMPONENT, there're three options in the sub screen: TV, AV, S-VIDEO | |
| MODE Select multi | screen to be OFF, PIP or POP |
| SWAP Swap the input of main screen and sub screen | |
| PIP SIZE | Adjust PIP sub screen size |
| PIP H POS. | Adjust PIP sub screen horizontal position |
| PIP V POS. | Adjust PIP sub screen vertical position |
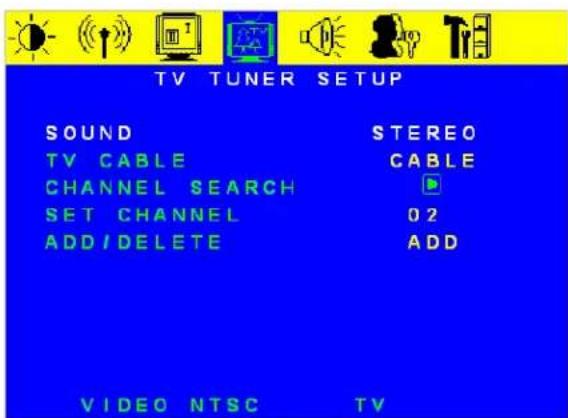
TV Tuner Setup menu (TV only)
text_image
TV TUNER SETUP SOUND STEREO TV CABLE CABLE CHANNEL SEARCH SET CHANNEL 02 ADD / DELETE ADD VIDEO NTSC TVFigure 8 TV Tuner Setup menu

text_image
TV TUNER SETUP SOUND STEREO TV CABLE CABLE CHANNEL SEARCH SET CHANNEL 0.2 ADD / DELETE DEL VIDEO NTSC TVFigure 9 TV Tuner Setup menu (The current channel is deleted)
When the main input is TV the menu will appear as shown in Figure 8. This menu is used to set some TV functions.
- Press the Menu key to display the OSD Menu
- Press the ▼ button on the Remote Control or the ▼CH button on the Top Keypad to enter this menu
- Press the ▼ button, (▲ button to go back), on the Remote Control or the ▼CH, (▲CH button) on the Top Keypad, to change the selected function.
- Press the ◀ or ▶ button on the Remote Control or the ▼VOL or ▲VOL button on the Top Keypad to choose or adjust the feature.
- Press the OK button on the Remote Control or the TV/Video button on the Top Keypad to select choice.
- Press the Exit button on the Remote Control or the Menu button on the Top Keypad to return to the main menu and then press the button again to exit the OSD or wait for the time out to exit.
| Function Name | Explanation |
| SOUND Select MTS | type include: Stereo, Sap, Mono, Dual |
| TV CABLE Select input: Cable / TV | |
| CHANNEL SEARCH | Auto scan channel (Press “Right” key to execute) |
| SET CHANNEL Change channel | |
| ADD/DELETE ADD | or DELETE the Channel. This works as a switch. Press “left” key to add channel and ADD is shown. Press “right” key to delete channel and DEL is shown. Please refer to Figure 9. |
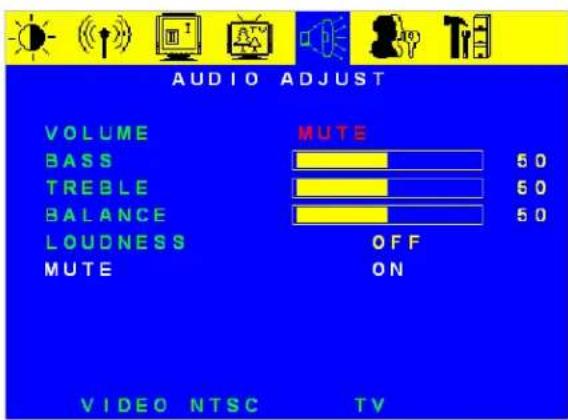
Audio Adjust menu

text_image
AUDIO ADJUST VOLUME 50 BASS 50 TREBLE 60 BALANCE 50 LOUDNESS OFF MUTE OFF VIDEO NTSC TVFigure 10 Audio Adjust menu
text_image
AUDIO ADJUST VOLUME MUTE BASS 50 TREBLE 50 BALANCE 50 LOUDNESS OFF MUTE ON VIDEO NTSC TVFigure 11 Audio Adjust menu (audio is mute)
The Audio Adjustment menu shown in Figure 10 is used to set audio parameters including volume, bass, treble, balance, loudness and mute.
- Press the Menu key to display the OSD Menu
- Press the ▶ button on the Remote Control or the ▲ VOL button on the Top Keypad to select the Audio Adjustment menu.
- Press the ▼ button on the Remote Control or the ▼CH on the Top Keypad, to select the function.
- Press the ◀ or ▶ button on the Remote Control or the ▼VOL or ▲VOL button on the Top Keypad to adjust the feature.
- Press the Exit button on the Remote Control or the Menu button on the Top Keypad to return to the main menu and then press the button again to exit the OSD or wait for the time out to exit.
| Function Name | Explanation |
| VOLUME Adjust the | Volume level |
| BASS Adjust the Bass level | |
| TREBLE Adjust the | Treble level |
| BALANCE Adjust the | Left and Right speaker balance |
| LOUDNESS The | low-pitch and high-pitch of sound will be enhanced simultaneously if this setting is on. |
| MUTE Audio mute | switch on or offIf switch is on means that the audio is muted, as in Figure 11. |
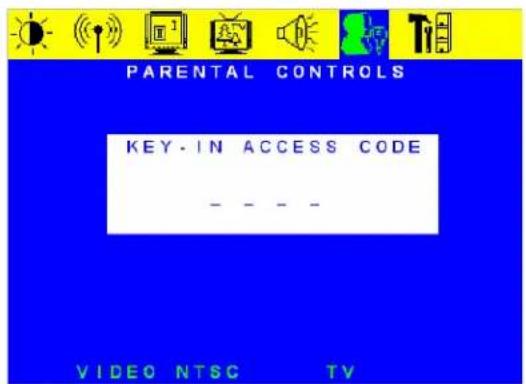
Parental Controls menu

text_image
PARENTAL CONTROLS UNRATED ALLOWED NO ACCESS CODE EDIT TV RATING MOVIE RATING VIDEO NTSC TVFigure 12 Parental Controls menu
text_image
PARENTAL CONTROLS KEY-IN ACCESS CODE - - - - VIDEO NTSC TVFigure 13 Access code menu

text_image
PARENTAL CONTROLS ACCESS CODE INCORRECT PRESS EXIT KEY TO RETURN VIDEO NTSC TVFigure 14 Access code incorrect warning message
The Parental Controls menu shown in Figure 12 is used to set the Password, TV rating and Movie rating.
As shown in Figure 14, a window will be displayed that requests a password before entering this menu. If the password is correct then entry to the Parental Controls menu is permitted, otherwise a warning message will appear as shown in Figure 14.
- Press the Menu key to display the OSD Menu
- Press the ▶ button on the Remote Control or the ▲ VOL button on the Top Keypad to select the Parental Controls menu.
- Press the ▼ button on the Remote Control or the ▼CH on the Top Keypad, to enter the menu. Key in the password and then press the OK button on the Remote Control or the TV/Video button on the Top Keypad.
- Press the ▼ button, (▲ button to go back), on the Remote Control or the ▼CH, (▲CH button) on the Top Keypad, to change the selected function.
- Press the ▶ button on the Remote Control or the ▲ VOL button on the Top Keypad to open the sub menu.
- Press the Exit button on the Remote Control or the Menu button on the Top Keypad to return to the main menu and then press the button again to exit the OSD or wait for the time out to exit.
| Function Name Explanation | |
| UNRATED ALLOWED Allow the ratings to be disabled. If YES is chosen than there will be no limit.(All TV programs and movies can be watched regardless of rating.) | |
| ACCESS CODE EDIT Edit the password | |
| TV RATING | Set the TV Ratings. Press the ▶ button on the Remote Control or the ▲VOL button on the Top Keypad to enter the menu. |
| MOVIE RATING | Set the Movie Ratings. Press the ▶ button on the Remote Control or the ▲VOL button on the Top Keypad to enter the menu. |
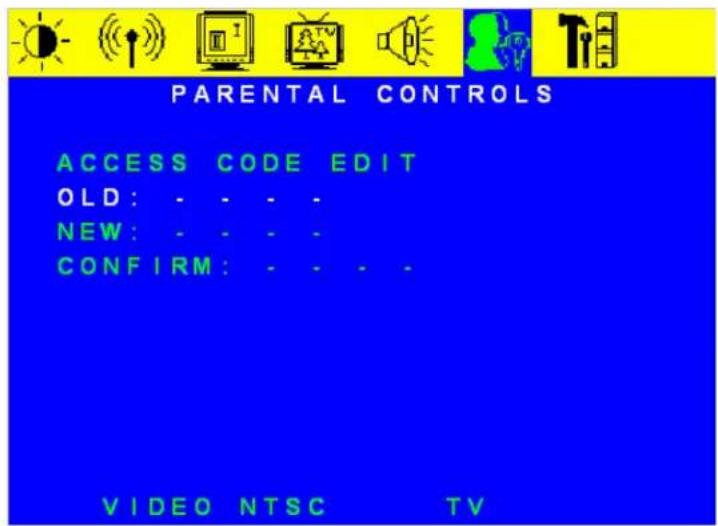
Access Code Edit menu
text_image
PARENTAL CONTROLS ACCESS CODE EDIT OLD: - - - - NEW: - - - - CONFIRM: - - - - VIDEO NTSC TVFigure 15 Access Code Edit menu
The password can be changed through the Access Code Edit menu, shown in Figure 15. The password consists of four (4) numbers. If the old password and the confirm password are different there will be a warning message as shown in Figure 14.
- Key in the old password.
- Key in the new password.
- Key in the new password again for confirmation.
- Press the OK button on the Remote Control or the TV/Video button on the Top Keypad to select choice.
- Press the Exit button on the Remote Control or the Menu button on the Top Keypad to return to the main menu and then press the button again to exit the OSD or wait for the time out to exit.
TV Rating menu

text_image
PARENTAL CONTROLS TV RATING TV Y: ○ TV Y7: ○ FVO TV G: ○ TV PG: ● V ● L ● S ● D ● TV 14: ● V ● L ● S ● D ● TV MA: ● V ● L ● S VIDEO NTSC TVFigure 16 TV Rating menu
The TV Rating menu for setting the TV program rating is shown in Figure 16.
- Press the ▼ button, (▲ button to go back), on the Remote Control or the ▼CH, (▲CH button) on the Top Keypad, to change the selected function.
- Press the OK button on the Remote Control or the TV/Video button on the Top Keypad to select choice.
- Press the Exit button on the Remote Control or the Menu button on the Top Keypad to return to the main menu and then press the button again to exit the OSD or wait for the time out to exit.
MOVIE Rating menu

text_image
PARENTAL CONTROLS MOVIE RATING G : ○ PG ○ PG 13 :○ R : ● NC 17 :● X : ● VIDEO NTSC TVFigure 17 Movie Rating menu
The Movie Rating menu for setting the Movie rating is shown in Figure 17.
- Press the ▼ button, (▲ button to go back), on the Remote Control or the ▼CH, (▲CH button) on the Top Keypad, to change the selected function.
- Press the OK button on the Remote Control or the TV/Video button on the Top Keypad to select choice.
- Press the Exit button on the Remote Control or the Menu button on the Top Keypad to return to the main menu and then press the button again to exit the OSD or wait for the time out to exit.
Special Features menu
Figure 18 Special Features menu
The Special Features menu shown in Figure 18 is used to change OSD parameters.
- Press the Menu key to display the OSD Menu
- Press the ▼ button on the Remote Control or the ▼CH button on the Top Keypad to enter this menu
- Press the ▼ button, (▲ button to go back), on the Remote Control or the ▼CH, (▲CH button) on the Top Keypad, to change the selected function.
- Press the ◀ or ▶ button on the Remote Control or the ▼VOL or ▲VOL button on the Top Keypad to choose or adjust the feature.
- Press the Exit button on the Remote Control or the Menu button on the Top Keypad to return to the main menu and then press the button again to exit the OSD or wait for the time out to exit.
Function Name Explanation
OSD H POS. Adjust horizontal position of the OSD
OSD V POS. Adjust vertical position of the OSD
OSD TIMEOUT Adjust the time the OSD is on the screen before it automatically disappears.
LANGUAGE Choose the OSD language from the selection of English, Spain, French or 中語
SLEEP TIMER Set the sleep time to be 30, 60, 90 or 120 minutes. Choose 0 minutes to turn off the Sleep Timer.
SYSTEM INFO Select this item to enter the submenu. Press the ▶ button on the Remote Control or the ▲ VOL button on the Top Keypad to enter the menu.
RESETALL Reset all mode-independent settings. Press the ▶ button on the Remote Control SETTINGS or the ▲ VOL button on the Top Keypad to enter the menu.
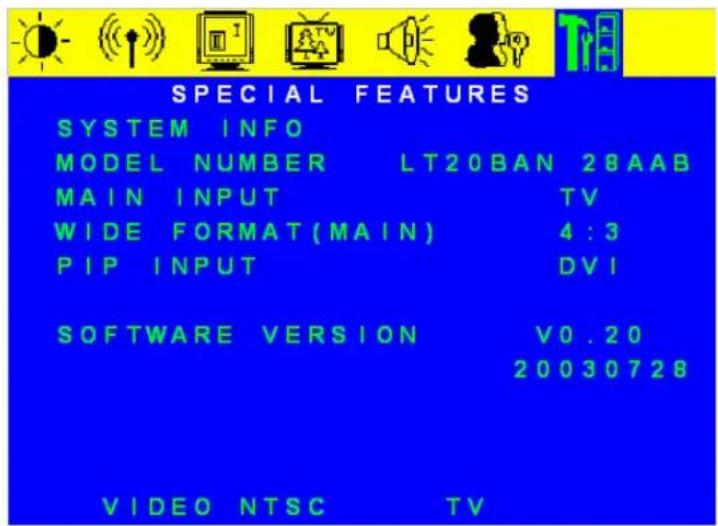
System Information menu
text_image
SPECIAL FEATURES SYSTEM INFO MODEL NUMBER LT20BAN 28AAB MAIN INPUT TV WIDE FORMAT(MAIN) 4:3 PIP INPUT DVI SOFTWARE VERSION V0.20 20030728 VIDEO NTSC TVFigure 19 System Information menu
A typical System Information menu is shown in Figure 19. Actual information may be different. Press the Exit button on the Remote Control or the Menu button on the Top Keypad to return to the main menu and then press the button again to exit the OSD or wait for the time out to exit.
| Function Name Explanation | |
| MODEL NUMBER Display the model number | |
| MAIN INPUT Display the input currently used for the main screen. | |
| WIDE FORMAT(MAIN) | Display the format selected for the main screen. |
| PIP INPUT Display the input currently used for the sub screen. | |
| SOFTWARE VERSION | Display the software version |
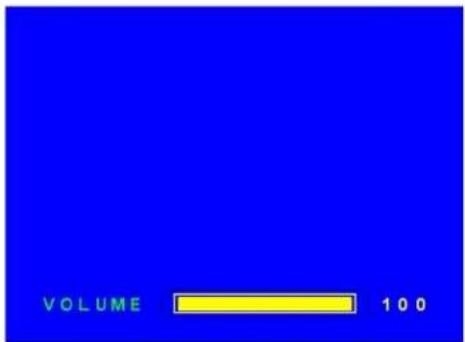
Volume OSD
text_image
VOLUME 100Figure 20 Volume OSD
Press the Volume ▲ or Volume ▼ button the Remote Control or the ▼VOL or ▲VOL button on the Top Keypad and the Volume OSD will be displayed at the bottom of the screen (Figure 20).
- Press the Volume ▲ button on the Remote Control or the ▲ VOL button on the Top Keypad to increase the audio volume.
- Press the Volume▼ button on the Remote Control or the ▼VOL button on the Top Keypad to decrease the audio volume.
- Press the Exit button on the Remote Control or the Menu button on the Top Keypad to return to exit the OSD or wait for the time out to exit.

text_image
VOLUME MUTEFigure 21 Volume OSD
When Mute button on the Remote Control is pressed the Mute OSD will be displayed on the bottom of the screen (Figure 21)
- Press the Mute button on the Remote Control to turn off the sound.
- Press the Mute button again, or press the Volume▲ or Volume▼ button the Remote Control on the ▼VOL or ▲VOL button on the Top Keypad to restore the sound.
- Press the Exit button on the Remote Control or the Menu button on the Top Keypad to return to exit the OSD or wait for the time out to exit.

text_image
LOUDNESS OFF BASS 50 TREBLE 50 BALANCE 50Figure 22 Audio Hot key OSD
Press the Audio button on the Remote Control and the Audio OSD will be displayed on the bottom of the screen (Figure 22)
- Press the Audio button on the Remote Control to display the OSD.
- Press the ▼ button, (▲ button to go back), to select the function.
- Press the ◀ or ▶ button to adjust the function.
- Press the Exit button, the Display button or wait for the time out to exit.
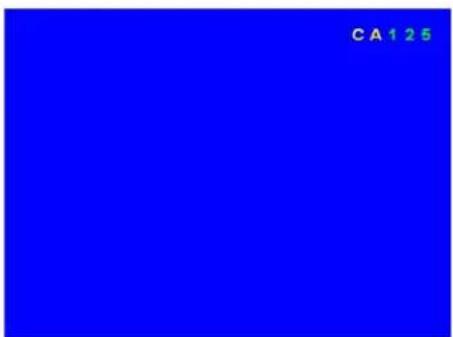
Channel Number OSD
text_image
CA 1 2 5Figure23 Channel number OSD (Channel has not changed)

text_image
CA125Figure24 Channel number OSD (Channel has changed)

text_image
CA126Figure25 Channel number OSD (Channel is deleted)
Instead of stepping through TV channels using the Channel▲ and Channel▼ buttons, a channel can be accessed directly by pressing the Number buttons on the Remote Control to change the channel; the channel number will be displayed at the top right of the screen.
- When in the TV mode, the channel can be changed directly by pressing the Number buttons on the Remote Control.
- Before the channel is changed the current channel number is shown and the CA prefix color is yellow as shown in Figure 23.
- After changing to the new channel, the display changes to the new channel number and the CA prefix color changes to green, as shown in Figure 24.
- If the Display function is disabled the channel number will be displayed for approximately three (3) seconds. If the Display function is enabled then the channel number display will remain.
- If a deleted channel number is accessed directly then the CA prefix color and channel number color will be red. See Figure 25.
Source Message OSD

text_image
COMPONENTFigure 26 Source message OSD
The Source button on the Remote Control can be used to step through all of the inputs for the main screen. The input source name will be displayed in the top left corner of the screen as shown in Figure 26.
- Press the Source button on the Remote Control to change the input source for the main screen.
- The new input choice will be shown in the top left corner of the screen for approximately three (3) seconds.
Sleep Timer message

text_image
1 2 0Figure 27 Sleep Timer message OSD

text_image
OFFFigure 28 Sleep Timer message OSD
The Sleep button on the Remote Control can be used to directly access and set the Sleep Timer. The message displayed on the screen is shown in Figure 27.
- Press the Sleep button on the Remote Control to display the Sleep Time message.
- Repeated pressing of the Sleep button will increase the time to sleep mode in thirty (30) minute intervals. Once one hundred and twenty (120) minutes is reached, press the Sleep button again will return to zero (00) minutes which is the off (disabled) state. See Figure 28.
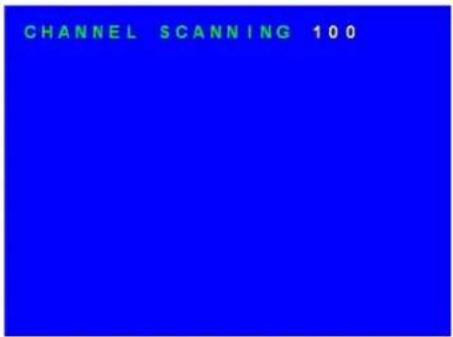
Channel Scanning message
text_image
CHANNEL SCANNING 100Figure 29 Channel Scanning message OSD

text_image
CHANNEL SCANNING 100Figure 30 Channel Scanning message OSD (Channel is deleted for "no signal")
When the Channel Search function is chosen in the TV Tuner setup sub menu, the Channel Scanning message will be displayed in the top left corner of the screen, (Figure 29). The system scans the channels automatically and when it finds channels with a signal it adds them to the channel list. If no signal is present on the current-scanned channel, the color of the channel number is red, (Figure 30), and this channel is deleted from the channel list.
Warning message
NO SIGNAL INPUT GO TO POWER SAVE
Figure 31 Power save message
When the main input source is DVI and no Multi screen function is active, the LCD TV will go into the power saving mode if there is no signal input. The message shown in Figure31 will be displayed for approximately five (5) seconds and then the LCD TV will power off to the power save mode.
- The main input is the DVI mode.
- The multi screen function is disabled, (PIP or POP is not active.)
- No sync input, (no signal), is on the DVI input
- The LCD TV goes into the power save mode in approximately five (5) seconds.
OUT OF RANGE
Figure 32 Out of range message
When the main screen input source is DVI mode and timing or resolution exceed the specification of the display, an Out Of Range message will be shown on the screen, as in Figure 32.
- The main input source is DVI mode.
- The timing of the DVI signal is more than 69kHz or less than 30kHz for the horizontal frequency, and/or greater than 85Hz or less than 50Hz for the vertical frequency.
- The resolution of the DVI signal is greater than 1024 x 768.
RESET ALL SETTINGS
Figure 33 Reset all settings message
When the Reset All Settings function is chosen in the Special Features sub menu, this message will be displayed in the center of the screen, (Figure 33). This action resets the user settings to the factory default value.
Other Information
Specifications
| Panel | Type | 20.1" (full 20.1" viewable diagonal), TFT (Thin Film Transistor), Active Matrix VGA LCD, 640RGBx480 vertical stripe |
| Color | Anti-reflective coating + Anti-glare coating | |
| Viewing angles | Horizontal 160° | |
| Vertical 140° | ||
| Input signal | Video Sync TV | |
| DVI x 1 | ||
| Composite Video x 1 | ||
| S - Video x 1 | ||
| Component Video x 1 ( YCbCr, YPbPr) | ||
| fh:30-69 kHz, fv:50-85 Hz | ||
| Compatibility | PC Up to 1024 x 768 Non-interlaced | |
| Macintosh1 | Power Macintosh up to 1024 x 768 | |
| Resolution | Supported 1024 x 768 @ 60, 75, 85 Hz | |
| 800 x 600 @ 60, 75, 85 Hz | ||
| 640 x 480 @ 60, 75, 85 Hz | ||
| 720 x 400 @ 70 Hz | ||
| Recommended | 640 x 480 @ 60, 75, 85 Hz | |
| Power | Voltage | 100-240 VAC, 50/60 Hz (auto switch), 1.5A |
| Operating conditions | Temperature 32°F to + 95°F (0°C to + 35°C) | |
| Humidity | 20% to 90% (no condensation) | |
| Altitude To 3,000 feet | ||
| Storage conditions | Temperature -4°F to + 140°F (-20°C to + 60°C) | |
| Humidity | 5% to 90% (no condensation) | |
| Altitude To 12,000 feet | ||
| Dimensions | Physical | 578 mm (W) x 472 mm (H) x 227.5 mm (D) |
| 22.76" (W) x 18.58" (H) x 8.96" (D) | ||
| Weight | Net | 19.8 lb (9 kg) |
| Regulations | FCC-B, UL, c-UL | |
| Power saving | On | Normal (Green LED) |
Troubleshooting
No power
- Make sure DC power button is ON(Green LED).
- Make sure AC power cord is securely connected to the AC socket.
Power is ON but no screen image
- Make sure the video cable supplied with the Display is tightly secured to the video output port on the back of the LCD TV. If the other end of the video cable is not attached permanently to the Display, tightly secure it to the LCD TV.
- Adjust brightness and contrast.
Wrong or abnormal colors
- If any colors (red, green, or blue) are missing, check the video cable to make sure it is securely connected. Loose or broken pins in the cable connector could cause an improper connection.
No sound
- Make sure the volume is not set to minimum.
- Make sure the sound is not set to mute.
- Make sure that headphones are not connected.
Telephone & Technical Support
Products are often returned due to a technical problem rather than a defective product which may result in unnecessary shipping charges billed to you. Our trained support personnel can often resolve the problem over the phone. For more information on warranty service or repair, after the warranty period, please contact our Support Department at the number below.
Quality service and consistent technical support are integral parts of V's commitment to service excellence. V's service representatives are dedicated to assist you with the utmost in customer satisfaction. To better assist you, please contact via email or phone.
Email: techsupp@vinc.us or Tel: (714) 593-8037, 6am-3pm PST
Corporate Contact Information
V Incorporated
10910 Talbert Avenue
Fountain Valley, CA 92708
Tel: (714) 962.4848
Fax: (714) 593-8932
Web: www.VINC.com
NOTE: You will need the product serial number.
Cleaning the Display
- Make sure the display is turned off.
- Never spray or pour any liquid directly onto the screen or case.
To clean the screen:
- Wipe the screen with a clean, soft, lint-free cloth. This removes dust and other particles.
- If still not clean, apply a small amount of non-ammonia, non-alcohol based glass cleaner onto a clean, soft, lint-free cloth, and wipe the screen.
To clean the case:
- Use a soft, dry cloth.
- If still not clean, apply a small amount of a non-ammonia, non-alcohol based, mild non-abrasive detergent onto a clean, soft, lint-free cloth, then wipe the surface.
Disclaimer
Vinc. does not recommend the use of any ammonia or alcohol-based cleaners on the Display screen or case. Some chemical cleaners have been reported to damage the screen and/or case of the Display. Vinc. will not be liable for damage resulting from use of any ammonia or alcohol-based cleaners.
Safety Guidelines
Warning: This device must be operated with the original power supply, part number: ADP-60CFA.
CAUTION: The socket-outlet should be installed near the equipment and should be easily accessible.
CAUTION: Use a power cable that is properly grounded. Always use the appropriate AC cord that is certified for the individual country. Some examples are listed below:
USA......UL Switzerland .... SEV
Canada......CSA Britain ...... BASE/BS
Germany......VDE Japan ...... Electric Appliance Control Act
IMPORTANT NOTICE CONCERNING POWER CORD SELECTION
The power cord set for this unit has been enclosed and has been selected according to the country of destination and must be used to prevent electric shock. Use the following guidelines if it is necessary to replace the original cord set, or if the cord set is not enclosed.
The female receptacle of the cord set must meet IEC-60320 requirements and may look like (Figure A1 below):


For the United States and Canada
In the United States and Canada the male plug is a NEMA5-15 style (Figure A2), UL Listed, and CSA Labeled. For units which are mounted on a desk or table, type SVT or SJT cord sets may be used. For units which sit on the floor, only SJT type cord sets may be used. The cord set must be selected according to the current rating for your unit. Please consult the table below for the selection criteria for power cords used in the United States and Canada.
| Cord Type Size of Conductors in Cord Maximum Current Rating of Unit | ||
| SJT | 18 AWG | 10 Amps |
| 16 AWG | 12 Amps | |
| 14 AWG | 12 Amps | |
| SVT | 18 AWG | 10 Amps |
| 17 AWG | 12 Amps | |
For European Countries
In Europe you must use a cord set which is appropriate for the receptacles in your country. The cord set is HARCertified, and a special mark that will appear on the outer sheath, or on the insulation of one of the inner conductors.
AC PLUG CORD PRECAUTIONS FOR THE UNITED KINGDOM
FOR YOUR SAFETY PLEASE READ THE FOLLOWING TEXT CAREFULLY.
IF THE FITTED MOULDED PLUG IS UNSUITABLE FOR THE SOCKET OUTLET THEN THE PLUG SHOULD BE CUT OFF AND DISPOSED OF SAFELY.
THERE IS A DANGER OF SEVERE ELECTRICAL SHOCK IF THE CUT OFF PLUG IS INSERTED INTO AN APPROPRIATE SOCKET.
If a new plug is to be fitted, please observe the wiring code as shown below. If in any doubt, please consult a qualified electrician.
WARNING: THIS APPLIANCE MUST BE EARTHED.
IMPORTANT: The wires in this mains lead are coloured in accordance with the following code:
Green-and-Yellow: Earth
Blue: Neutral
Brown: Live
If the coloured wires of the mains lead of this appliance do not correspond with the coloured markings identifying the terminals in your plug, proceed as follows:
The wire which is coloured GREEN-AND-YELLOW must be connected to the terminal in the plug which is marked by the letter E or by the Earth symbol or coloured GREEN or GREEN-AND-YELLOW.
The wire which is coloured BLUE must be connected to the terminal in the plug which is marked with the letter N or coloured BLACK. The wire which is coloured BROWN must be connected to the terminal in the plug which is marked with the letter L or coloured RED.
If you have any questions concerning which proper power cord to use, please consult with the dealer from whom you have purchased the product.
Compliance Information for U.S.A.
This equipment has been tested and found to comply with the limits for a Class B digital device, pursuant to part 15 of the FCC Rules. These limits are designed to provide reasonable protection against harmful interference in a residential installation. This equipment generates, uses, and can radiate radio frequency energy, and if not installed and used in accordance with the instructions, may cause harmful interference to radio communications. However, there is no guarantee that interference will not occur in a particular installation. If this equipment does cause harmful interference to radio or television reception, which can be determined by turning the equipment off and on, the user is encouraged to try to correct the interference by one or more of the following measures:
- Reorient or relocate the receiving antenna.
- Increase the separation between the equipment and receiver.
- Connect the equipment into an outlet on a circuit different from that to which the receiver is connected.
- Consult the dealer or an experienced radio/TV technician for help.
FCC Warning
To assure continued FCC compliance, the user must use grounded power supply cord and the provided shielded video interface cable with bonded ferrite cores. If a BNC cable is going to be used, use only a shielded BNC(5) cable. Also, any unauthorized changes or modifications not expressly approved by the party responsible for compliance could void the user's authority to operate this device.
CE Conformity for Europe
CE
The device complies with the requirements of the EEC directive 89/336/EEC as amended by 92/31/EEC and 93/68/EEC Art.5 with regard to “Electromagnetic compatibility,” and 73/23/EEC as amended by 93/68/EEC Art.13 with regard to “Safety”.
V INCORPORATED LIMITED WARRANTY
For VIZIO LCD Displays
Welcome to the V, Inc. Digital Family! Please read this warranty carefully, it is a "ONE-YEAR LIMITED WARRANTY" on parts and labor.
V, Inc.'s Responsibility
V, Inc. LCD Displays purchased in the United States are warranted to be free from defects in materials or workmanship for a period of one (1) year from the date of their original retail purchase. If the unit fails to conform to this warranty, we will service the monitor using new or refurbished parts.
Service Labor
During a period of one year from the effective warranty date, V, Inc. will provide, when needed, service labor to repair a manufacturing defect at its designated Service Center. To obtain warranty service in the Untied States, you must first call our Customer Support at (714) 962-4388, 9:30am-6pm EST. The determination of service will be made by V, Inc. Customer Support. PLEASE DO NOT RETURN YOUR UNIT TO V, INC. WITHOUT PRIOR AUTHORIZATION.
Parts
New or remanufactured replacements for defective parts will be used for repairs by V, Inc. at its designated Service Center for one (1) year from the effective warranty date. Such replacement parts are warranted for the remaining portion of the original warranty period.
Service
During the one (1) year warranty period, V, Inc. will, at its option and sole discretion, repair or replace defective parts, including replacement of the entire LCD Panel. The Customer will be required to ship the unit to the Service Center indicated at the time Customer Support is contacted to make the necessary repairs. You are responsible for all transportation charges to and from the service facility. V, Inc. is not responsible for the de-installation or re-installation of the unit.
Packaging and Shipping Instructions
When you send the product to an authorized V, Inc. service facility you must use the original carton box and packing material or an equivalent as approved by V, Inc.
Not Covered
This warranty does not cover defects, malfunctions or failures resulting from shipping or transit accidents, abuse, misuse, operation contrary to furnished instructions, operation on incorrect power supplies, operation with faulty associated equipment, modification, alteration, improper servicing, tampering or normal wear and tear or TVs on which the serial number has been removed or defaced. Image Sticking caused by operating at excessive brightness levels for extended periods or mishandling are not covered by this warranty.
ANY IMPLIED WARRANTIES, INCLUDING ANY IMPLIED WARRANTY OF MERCHANTABILITY AND FITNESS FOR A PARTICULAR PURPOSE SHALL BE LIMITED IN DURATION TO THE PERIOD OF TIME SET FORTH ABOVE. OUR LIABILITY FOR ANY AND ALL LOSSES AND DAMAGES RESULTING FROM ANY CAUSE WHATSOEVER, INCLUDING OUR NEGLIGENCE, ALLEGED DAMAGE OR DEFECTIVE GOODS, WHETHER SUCH DEFECTS ARE DISCOVERABLE OR LATENT, SHALL IN NO EVENT EXCEED THE PURCHASE PRICE OF THE DISPLAY. WE SHALL NOT BE RESPONSIBLE FOR LOSS OF USE, COMMERCIAL LOSS OR OTHER INCIDENTAL OR CONSEQUENTIAL DAMAGES. SOME STATES DO NOT ALLOW LIMITATIONS ON HOW LONG AN IMPLIED WARRANTY LASTS OR THE EXCLUSION OR LIMITATION OF INCIDENTAL OR CONSEQUENTIAL DAMAGES, SO THE ABOVE LIMITATIONS OR EXCLUSIONS MAY NOT APPLY TO YOU. This warranty gives you specific legal rights, and you may also have other rights which vary from state to state. This is the only warranty applicable; no one is authorized to extend or modify it or to grant any other warranty.
V, Inc. retains the right to assess all warranty claims and to determine if damages are covered by the warranty. In case of a claim that is not covered by the warranty, you will be contacted to determine whether V, Inc. should repair the damage for a fee or whether the product should be returned to you as received by the repair center.
Owner's Responsibility
Effective Warranty Date
Warranty begins on the date of sale to the end user. To ensure warranty service, keep the dated bill or sale receipt as evidence of the purchase date.
User Manual
Read your User Manual carefully so that you will understand the operation of your LCD Display and how to adjust the user controls.
Warranty Service
For warranty service information, contact V, Inc. Customer Support at (714) 962-4388, 9:30am-6pm EST. Parts and service labor that are V, Inc.'s responsibility (see above) will be provided without charge. Other service is at the owner's expense. You must provide the model, serial number and date of purchase. Before you ask for warranty service, read your User Manual. You might avoid a service call.

natural_image
Abstract geometric logo design with a stylized V shape (no text or symbols)VINC.COM
WHERE VISION MEETS VALUE!
Available in the Continental US only. Limited warranties and service agreements apply; visit www.vinc.us or call 714-962-4848 for a free copy. Copyright ©2003 V, Inc. All rights reserved. V, Inc., "V" logo, "where vision meets value" are trademarks or registered trademarks of V, Inc. in the US and other countries. V, Inc. Terms and conditions of sale apply. Trademarks mentioned are registered to their respective owners.