Parallax 29842V - Projection screen DA-LITE - Free user manual and instructions
Find the device manual for free Parallax 29842V DA-LITE in PDF.

User questions about Parallax 29842V DA-LITE
0 question about this device. Answer the ones you know or ask your own.
Ask a new question about this device
Download the instructions for your Projection screen in PDF format for free! Find your manual Parallax 29842V - DA-LITE and take your electronic device back in hand. On this page are published all the documents necessary for the use of your device. Parallax 29842V by DA-LITE.
USER MANUAL Parallax 29842V DA-LITE
natural_image
Blank whiteboard with black border, no text or symbols visibleINSTRUCTION BOOK FOR
Parallax™ Screen
Disclaimer
Milestone and its affiliated corporations and subsidiaries (collectively "Milestone"), intend to make this manual accurate and complete. However, Milestone makes no claim that the information contained herein covers all details, conditions or variations, nor does it provide for every possible contingency in connection with the installation or use of this subject to change without notice or obligation of any kind. Milestone makes no
representation of warranty, expressed or implied, regarding the information contained herein. Milestone assumes no responsibility for accuracy, completeness or sufficiency of the information contained in this document.
Da-Lite ^® is a registered trademark of Milestone AV Technologies. All rights reserved.
Included Hardware
Large Wall Bracket (47" Long) Installation screws not included
Quantities vary by screen size: Screens 80" and smaller viewing width = 1 Screens over 80" to 96" viewing width = 2 Screens over 96" viewing width = 3

Small Wall Bracket (8" Long) Installation screws not included
Quantity = 1. Only for screens 80" and smaller viewing width.

8 Stud with Shoulder (8 each) Black Flat Head Screw (12) Elastic Ring

natural_image
Close-up of a black screw with threaded head and textured surface (no text or symbols visible)
natural_image
Simple black oval shape on white background (no text or symbols)(1 Pack - Usage Varies by Screen Size)

natural_image
Line drawing of two hands in a clapping position (no text or symbols)Gloves (2 pair)

natural_image
3D rendering of a hollow foam sheet (1) with no text or symbols on the sheet itselfTools Required for Installation


Phillips Screwdriver Tape MeasurePencil
Frame Assembly
- Unwrap the frame pieces. Assemble frame pieces on provided foam sheet. This will help keep the frame clean and protect it from scratches.
NOTE: The frame pieces are labeled "top" and "bottom". Be sure the frame pieces are assembled according to the labels. This will ensure the attachment pattern on the frame and screen surface will match.
- Slide the frame pieces together at corners.
NOTE: The frame assembly holes may not appear to fit properly at the corners until all fasteners have been attached. Once fasteners are attached, the frame corners will be drawn in for a proper fit.
-
Secure frame pieces with black flat head screws provided. Do not tighten screws until all are started. See Figure 1.
-
Attach the eight #8 studs to the back of the frame in the predrilled holes.

text_image
Black Flat Head Screws #8 StudsFigure 1 (Rear View)
Material Handling Guidelines
CAUTION: Handle screen surface with care. Ambient light rejecting screen surfaces are delicate and should remain flat at all times.
- Carefully and evenly unroll screen surface to ensure flatness.
- Do not fold, stretch or crease screen surface.
-
Do not allow objects to rest on screen surface.
-
Do not puncture screen surface.
- Keep sharp objects away from screen surface.
- Rear side of screen surface is sensitive to scratches, cuts, and abrasions. Handle with care.
Cleaning
Parallax screen surface can be cleaned as follows:
Using a white clean cloth (100% cotton preferred) that is dampened with clean water, gently wipe the area in a horizontal direction. Do not wipe in a vertical direction or with a circular motion. Using a dry 100% cotton cloth, wipe screen surface dry in horizontal direction after each cleaning. Windex Original spray cleaner can be used on tough to clean areas.
Do not attempt to clean rear side of Parallax screen surfaces.
- Unpack screen surface.
CAUTION: Handle screen surface with care. See Material Handling Guidelines.
-
Locate the top of the screen surface. "Top" will be labeled on the back of the surface and should be matched with the "top" of the frame.
-
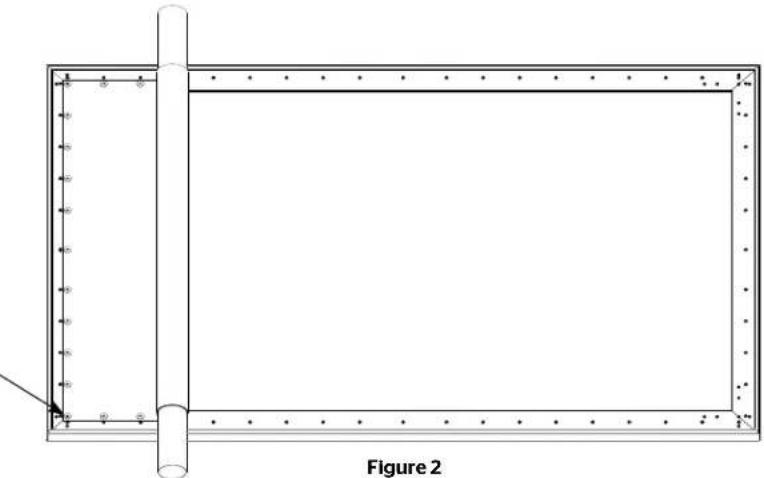
Remove foam and unroll screen surface evenly on the back of the frame. Make sure that the perimeter of the screen surface is resting on the frame. See Figure 2.
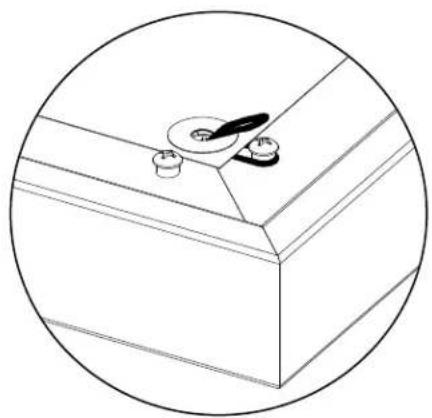
- At the top right corner, insert an elastic ring through the hole in the screen surface and secure it over the stud. Repeat this action for the other stud in the top right corner. See Figure 3.
Reinforcement tabs will be on the back of the surface.
Reinforcing tabs are not included on Parallax 2.3 screens.
natural_image
Technical line drawing of a rectangular frame with bolt holes and a vertical rod, labeled Figure 2 (no text or symbols on the diagram itself)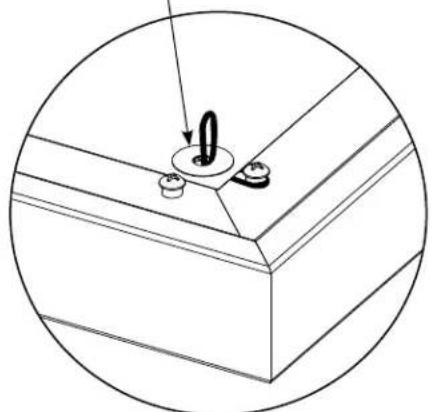
natural_image
Technical line drawing of a mechanical component with a central hub and mounting holes (no text or symbols)Figure 3a Figure 3b
natural_image
Simple line drawing of a kitchen counter with a spoon and sink (no text or symbols)
natural_image
Simple line drawing of a ceiling fixture with a handle and screw (no text or symbols)Figure 3c Figure 3d

natural_image
Simple line drawing of a corner bracket with a circular outline (no text or symbols)Surface Attachment (continued)
- Repeat Step 4 for the remaining three corners of the screen. Use the sequence shown in Figure 4.
-
Insert one elastic ring into the center hole on the right, left, top and bottom of the screen surface and secure it over the stud. Use the sequence shown in Figure 4.
-
Start at the top right corner and work counter clockwise inserting an elastic ring into the hole in the screen surface and secure it over the stud. Repeat action until all holes have elastic rings secured over the studs.
NOTE: Having leftover elastic rings is typical. You will have more rings than required.

text_image
3 7 1 6 5 2 8 4Figure 4
Installation
There are three methods of installation based on the size of the screen. Measure the width of the viewing area of your screen and refer to the appropriate method of installation below. The wall bracket diagram shows the type and quantity of bracket(s) supplied based on the size of the screen.
Method 1: Screens 80° and smaller in viewing width.
Method 2: Screens over 80" up to 96" in viewing width.
Method 3: Screens over 96° in viewing width.
Installation Method 1 (Screens 80" And Smaller In Viewing Width)
- Secure the wall bracket to wall studs at the desired height. Make sure the bracket is level. The top of the frame will be 1/8" above the top of the wall bracket when mounted. You will need at least 5/8" clearance above the bracket to hang the screen. Figures 5, 6, and 7 show the proper orientation for the supplied wall brackets.
- To install the lower wall bracket, you must measure the overall height of the screen frame and subtract 1-5/8". Using that dimension, measure down from the top edge of the wall bracket and mark the wall for two screw holes. The holes should be centered within the frame and 6' apart. Refer to Figure 6.
- Attach the small wall bracket to the wall. Refer to Figure 7 for proper orientation. Do not tighten the screws completely. The bracket should slide up and down easily.
- Position the screen with the attached surface onto the top wall bracket. Push down at the center of the bottom frame rail to hook onto the lower wall bracket. Refer to Figure 7.

text_image
Overall Height Large Wall Bracket Overall Height Less 1%" 6" Small Wall Bracket Figure 6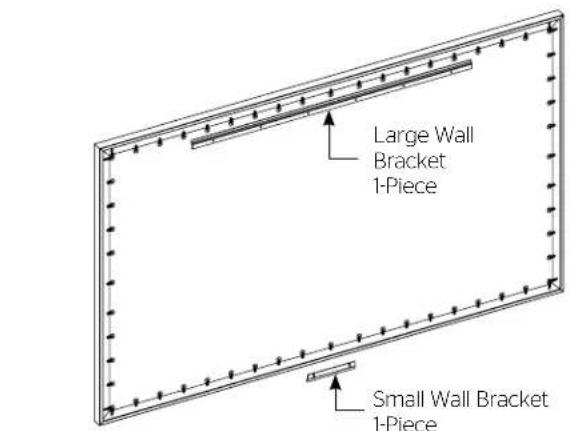
text_image
Large Wall Bracket 1-Piece Small Wall Bracket 1-PieceFigure 5

text_image
1 Lift 2 Wall 3 Figure 7Installation Method 2 (Screens Over 80" Up To 96" In Viewing Width)
- Secure the wall bracket to wall studs at the desired height. Make sure the bracket is level. The top of the frame will be 1/8" above the top of the wall bracket when mounted. You will need at least 5/8" clearance above the bracket to hang the screen. Figure 8 and 9 show the proper orientation for the supplied wall brackets.

text_image
Large Wall Bracket 2-PiecesFigure 8
-
To install the bottom large wall bracket, you must measure the overall height of the screen frame and subtract 1/2". This is the dimension from the top of the upper wall bracket to the bottom of the bottom wall bracket. See Figure 9.
-
Position the screen with the attached surface onto the top wall bracket as shown in Figure 9. Push down at the center of the bottom frame rail to hook onto the lower wall bracket.

text_image
Overall Height Figure 9 1 Wall 2 Overall Height Less ½"Installation Method 3 (Screens Over 96" In Viewing Width)
- Secure the wall brackets to wall studs at the desired height. Make sure the brackets are level. The top of the frame will be 1/8" above the top of the wall bracket when mounted. You will need at least 5/8" clearance above the bracket to hang the screen. Figure 9 and 10 show the proper orientation for the supplied wall brackets.
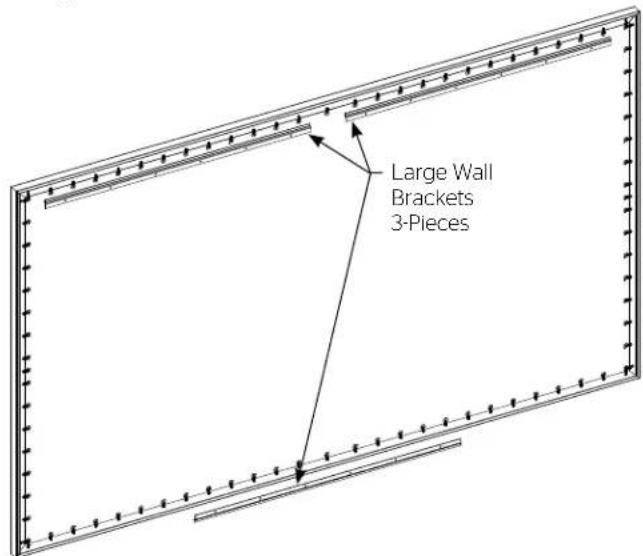
text_image
Large Wall Brackets 3-PiecesFigure 10
-
To install the bottom large wall bracket, you must measure the overall height of the screen frame and subtract 1/2". This is the dimension from the top of the upper wall bracket to the bottom of the lower wall bracket. See Figure 9.
-
Position the screen with the attached surface onto the top wall bracket as shown in Figure 9. Push down at the center of the bottom frame rail to hook onto the lower wall bracket.
Conditions for Transportation and Storage
• Temperature: Between 40 - 100°F (5 - 40°C)
• Relative Humidity: 30% to 70%, non-condensing
• Always keep the projection screen horizontal during transport and storage
• Make sure the entire package is supported when stored
- Do not stack more than six projection screens on top of each other
- Make sure the heaviest package is places at the bottom of the stack
Screen surface should be allowed to air out once every two months, or otherwise used on a regular basis, if the temperature is above 72^ F ( 22^ C) and at least once every month if the temperature goes above 85^ F ( 30^ C).
LIMITED FIVE YEAR WARRANTY ON DA-LITE PRESENTATION PRODUCTS
Milestone AV Technologies LLC warrants certain Da-Lite branded products to the original purchaser only, to be free from defects in materials and workmanship for a period of five (5) year from the date of purchase by the original purchaser; provided they are properly operated according to Da-Lite's instructions and are not damaged due to improper handling or treatment after shipment from the factory.
This warranty does not apply to equipment showing evidence of misuse, abuse or accidental damage, or which has been tampered with or repaired by a person other than authorized Da-Lite personnel.
Da-Lite's sole obligation under this warranty shall be to repair or to replace (at Da-Lite's option) the defective part of the merchandise. Returns for service should be made to your Da-Lite dealer. If it is necessary for the dealer to return the screen or part to Da-Lite, transportation expenses to and from Da-Lite are payable by the purchaser and Da-Lite is not responsible for damage in shipment. To protect yourself against damage or loss in transit, insure the product and prepay all transportation expenses.
TO THE MAXIMUM EXTENT PERMITTED BY APPLICABLE LAW, THIS WARRANTY IS IN LIEU OF ALL OTHER WARRANTIES, EXPRESS OR IMPLIED, INCLUDING WARRANTIES AS TO FITNESS FOR USE AND MERCHANTABILITY. Any implied warranties of fitness for use, or merchantability, that may be mandated by statute or rule of law are limited to the five (5) year warranty period. This warranty gives you specific legal rights, and you may also have other rights, which vary from state-to-state. TO THE MAXIMUM EXTENT PERMITTED BY APPLICABLE LAW, NO LIABILITY IS ASSUMED FOR EXPENSES OR DAMAGES RESULTING FROM INTERRUPTION IN OPERATION OF EQUIPMENT, OR FOR INCIDENTAL, DIRECT, OR CONSEQUENTIAL DAMAGES OF ANY NATURE.
In the event that there is a defect in materials or workmanship of a Da-Lite product, you may contact our Customer Care Specialists at 3100 North Detroit Street, Warsaw, IN 46582, (574) 267-8101, (800) 622-3737.
IMPORTANT: THIS WARRANTY SHALL NOT BE VALID AND DA-LITE BRANDED PRODUCTS SHALL NOT BE BOUND BY THIS WARRANTY IF THE PRODUCT IS NOT OPERATED IN ACCORDANCE WITH THE DA-LITE WRITTEN INSTRUCTIONS.
Keep your sales receipt to prove the date of purchase and your original ownership.

FOR YOUR IMAGE | legrandav.com
USA P 866.977.3901 E info@da-lite.com
CANADA P 877.345.4329 E canadainfo@milestone.com
EMEA P +31 495 580 840 E emea.sales@milestone.com
APAC P +852 2145 4099 E asia.da-lite@milestone.com
In British Columbia, Milestone AV Technologies ULC carries on business as MAVT Milestone AV Technologies ULC. ©2018 Milestone AV Technologies. DL-0606 (Rev. 5) 7/18 Da-Lite is a registered trademark of Milestone AV Technologies. All other brand names or marks are used for Identification purposes and are trademarks of their respective owners. All patents are protected under existing designations. Other patents pending.