IR-200M - Speaker TOA - Free user manual and instructions
Find the device manual for free IR-200M TOA in PDF.

User questions about IR-200M TOA
0 question about this device. Answer the ones you know or ask your own.
Ask a new question about this device
Download the instructions for your Speaker in PDF format for free! Find your manual IR-200M - TOA and take your electronic device back in hand. On this page are published all the documents necessary for the use of your device. IR-200M by TOA.
USER MANUAL IR-200M TOA
natural_image
Line drawing of an IR-200M device with a cylindrical handle and tapered end (no text or symbols on the object itself)
natural_image
Line drawing of a rectangular electronic device with ports and ventilation slots (no text or symbols)IR-300M
Thank you for purchasing TOA's Infrared Wireless Microphone.
Please carefully follow the instructions in this manual to ensure long, trouble-free use of your equipment.
TABLE OF CONTENTS
- SAFETY PRECAUTIONS .... 3
- GENERAL DESCRIPTION ...... 4
- FEATURES .... 4
- HANDLING PRECAUTIONS .... 4
- NOMENCLATURE AND FUNCTIONS
5.1. IR-200M 5
5.2. IR-300M 6
- BATTERY INSERTION .... 7
- WHEN OPERATING ON RECHARGEABLE BATTERIES
7.1. How to Charge 8
7.2. Charging Timing 8
- WHEN USING DRY CELL BATTERIES 9
-
OPERATION 9
-
INFRARED WIRELESS MICROPHONE USAGE TIPS
10.1. When Holding the Microphone or Suspending It From the Neck 10
10.2. Microphone-to-Mouth Distance 10
- CHANNEL SETTINGS ...... 11
- ABOUT THE POWER SELECTOR SWITCH 12
-
ABOUT THE MICROPHONE LEVEL CONTROL (IR-300M ONLY) ..... 12
-
DIMENSIONAL DIAGRAMS
14.1. IR-200M 13
14.2. IR-300M 13
- TROUBLESHOOTING 14
- SPECIFICATIONS
16.1. IR-200M 15
16.2. IR-300M 16
1. SAFETY PRECAUTIONS
- Before installation or use, be sure to carefully read all the instructions in this section for correct and safe operation.
- Be sure to follow all the precautionary instructions in this section, which contain important warnings and/or cautions regarding safety.
• After reading, keep this manual handy for future reference.

WARNING
Indicates a potentially hazardous situation which, if mishandled, could result in death or serious personal injury.

CAUTION
Indicates a potentially hazardous situation which, if mishandled, could result in moderate or minor personal injury, and/or property damage.

WARNING
When the Unit is in Use
- Use TOA's IR-200BC Battery Charger when recharging.
The infrared wireless microphone can be powered by optionally available nickel metal hydride (NiMH) batteries. The use of any other than the specified charger could result in fire, personal injury or environmental contamination due to battery rupture or leakage. - Stop charging if the batteries are not fully charged within 3 hours. Failure to do so may cause the batteries to fire, explode, leak, or heat.
- Never short-circuit the charging terminals on the bottom of the microphone with metal objects. Doing so could result in electric shocks or burns.
- To prevent the electromagnetic wave from badly influencing medical equipment, make sure to switch off the unit's power when placing it in close proximity to the medical equipment.

CAUTION
When the Unit is in Use
- When the unit is not in use for 14 days or more, be sure to take the batteries out of the unit because battery leakage may cause a fire, personal injury, or environmental contamination.
- Make sure to observe the following handling precautions so that a fire or personal injury does not result from leakage or explosion of the battery.
- Be sure to use only the IR-200BT Rechargeable Battery designed for use with the infrared wireless microphone when recharging.
- Avoid mixed use of new and old batteries, batteries of different types, or fully charged and discharged batteries in the same microphone.
- Do not short, disassemble, heat nor put the battery into a fire.
· Do not solder a battery directly - Note correct polarity (positive and negative orientation) when inserting a battery in the unit.
- Avoid locations exposed to the direct sunlight, high temperature and high humidity when storing batteries.
FCC Compliance
This device complies with Part 15 of the FCC Rules. Operation is subject to the following two conditions:
(1) this device may not cause harmful interference, and
(2) this device must accept any interference received, including interference that may cause undesired operation.
Any modifications made to this device that are not approved by TOA Corporation may void the authority granted the user by the FCC to operate this equipment.
Note: This equipment has been tested and found to comply with the limits for a Class A digital device, pursuant to part 15 of the FCC Rules. These limits are designed to provide reasonable protection against harmful interference when the equipment is operated in a commercial environment. This equipment generates, uses, and can radiate radio frequency energy and, if not installed and used in accordance with the instruction manual, may cause harmful interference to radio communications. Operation of this equipment in a residential area is likely to cause harmful interference in which case the user will be required correct the interference at his own expense.
2. GENERAL DESCRIPTION
The IR-200M (hand-held type) and IR-300M (hands-free type) infrared wireless microphones are intended for speech applications and use unidirectional electret condenser microphone units featuring high sensitivity and clear sound.
3. FEATURES
- Employs the PLL synthesizer system, allowing up to 6 different frequencies to be set.
- Powered by 2 IR-200BT rechargeable NiMH batteries or 2 AA alkaline batteries.
Note
It is recommended that the microphone be used with the optional IR-200BT rechargeable battery that not only ensures longer microphone operation, but is also friendly to the environment.
- The IR-300M is equipped with an external microphone input terminal, allowing it to be used in combination with the YP-M101 tie-clip type microphone or YP-M301 headset microphone.
- The microphone system's infrared transmission eliminates problems with interference or eavesdropping, allowing simultaneous use in adjacent conference rooms or school classrooms.
- Since the infrared microphone uses a frequency band that does not interfere with that of the infrared conference system (TS-800 and TS-900 Series), both the infrared wireless microphone system and the conference system can be simultaneously installed in the same location.
• Anti-bacteria-treated body.
4. HANDLING PRECAUTIONS
- Do not cover the infrared wireless microphone's infrared emitter with the hand or hide the microphone by placing it inside clothes. Covering the infrared emitter will disable light transmission.
- Avoid using the infrared microphone in close proximity to plasma displays or infrared LAN, which could lead to noise or microphone malfunctions.
- Do not dismantle or modify the infrared microphone.
• Take care not to drop the infrared microphone on the floor or hit it on hard objects, as this could lead to microphone failures. - The infrared microphone cannot be used outdoors or in areas exposed to direct sunlight.
- Do not place the infrared microphone in high-temperature locations, such as in a car parked with its doors closed in summer, or in highly humid locations, as this could lead to microphone failure.
- Avoid using the infrared microphone in locations that can be splashed with perspiration or seawater, as this could lead to microphone failures.
- When cleaning the infrared microphone, be sure to turn the power switch to OFF. Wipe with a soft dry cloth. If it gets very dirty, use the soft cloth slightly moistened in neutral cleanser. Never use volatile spirits like thinner, benzine, or alcohol. Such chemicals may damage its plastic surface.
5. NOMENCLATURE AND FUNCTIONS
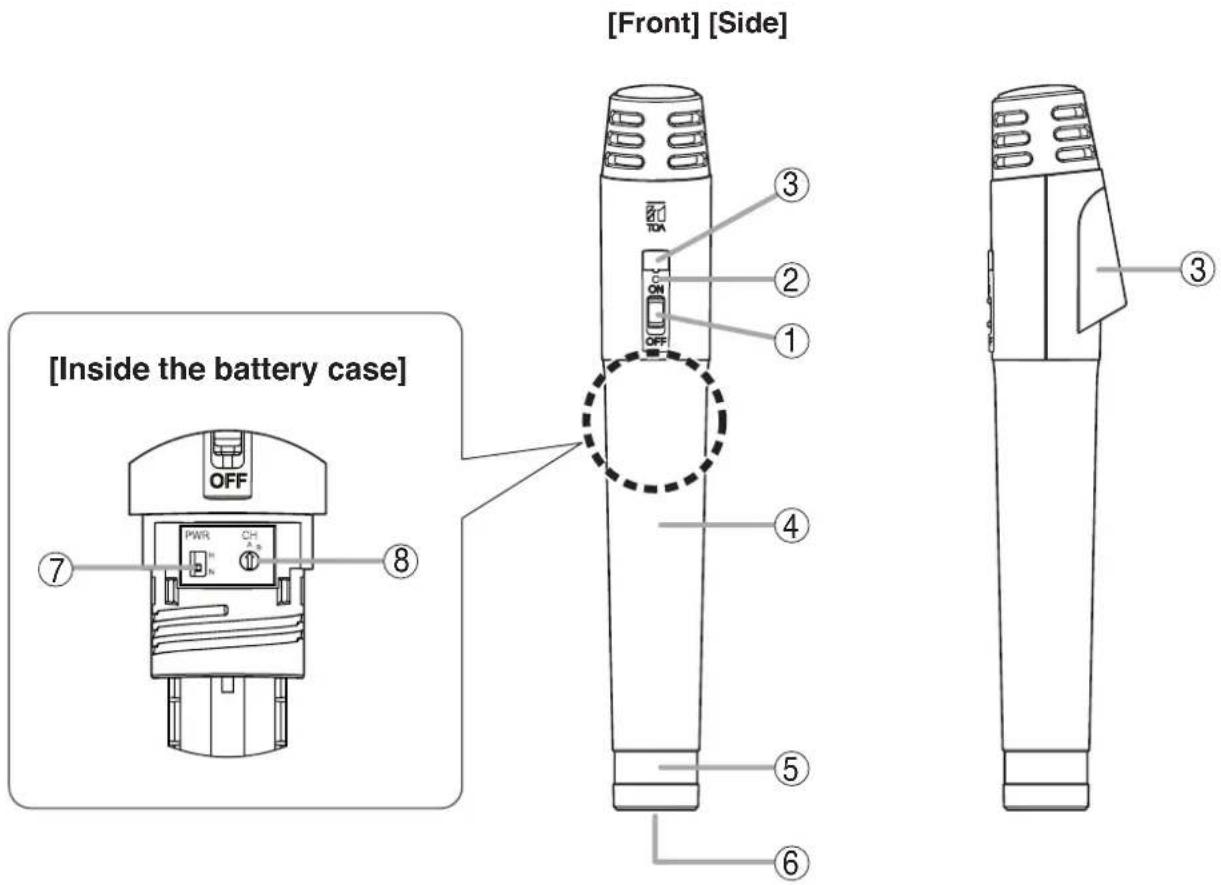
5.1. IR-200M
text_image
[Front] [Side] [Inside the battery case] OFF PWR CH ⑦ ⑧ ① ② ③ ④ ⑤ ⑥ ③1. Power switch
Turns on and off the microphone.
2. Battery indicator
Lights when the power switch (1) is turned on. Continuously lights green while the battery is fully charged, and gradually changes to red as the battery becomes weaker.
3. Infrared emitter
Emits the infrared beam for communications.
4. Battery case
Contains the battery compartment. Be sure to open and close the case correctly.
(Refer to p. 7 "Battery Insertion.")
5. Color label attachment area
Attach optional color label to distinguish between infrared wireless microphones.
6. Charging terminal
(Refer to p. 8 "How to Charge.")
7. Power selector switch [PWR]
Switches the power level of the infrared beam for communications. (Refer to p. 12 "About the power selector switch.")
8. Channel selector switch [CH]
Set the selector switch to the same channel as that of the tuner.
(Refer to p. 11 "Channel settings.")
5.2. IR-300M
[Top]

text_image
Built-in microphone ① ②[Front]

text_image
front] ③ TOA ④ 6 7
text_image
[Rear] [Inside of the battery cover] ⑤ ⑨ LEVEL PWR CH ⑧ ⑩1. Power switch / battery indicator
Turns on or off the microphone.
Turning on this switch causes its indicator to come on, allowing it to also function as a battery indicator.
This switch continuously lights green while the battery is fully charged, and gradually changes to red as the battery becomes weaker.
2. External microphone input terminal [MIC]
Used to connect a headset microphone or other external microphone.
3. Infrared emitter
Transmits the infrared beam for communications.
4. Charging terminal
(Refer to p. 8 "How to Charge.")
5. Neck strap
Used to suspend the infrared wireless microphone from the neck. (Refer to p. 10 "Infrared Wireless Microphone Usage Tips.")
6. Battery cover
Contains the battery compartment.
Be sure to open and close the cover correctly.
(Refer to p. 7 "Battery Insertion.")
7. Color label attachment area
Attach optional color label to distinguish between infrared wireless microphones.
8. Microphone level control
Used to adjust the input level when using an external microphone. (Refer to p. 12 "About the microphone level control.")
9. Power selector switch
Switches the power level of the infrared beam for communications. (Refer to p. 12 "About the power selector switch.")
10. Channel selector switch
Set the selector switch to the same channel as that of the tuner. (Refer to p. 11 "Channel settings.")
6. BATTERY INSERTION
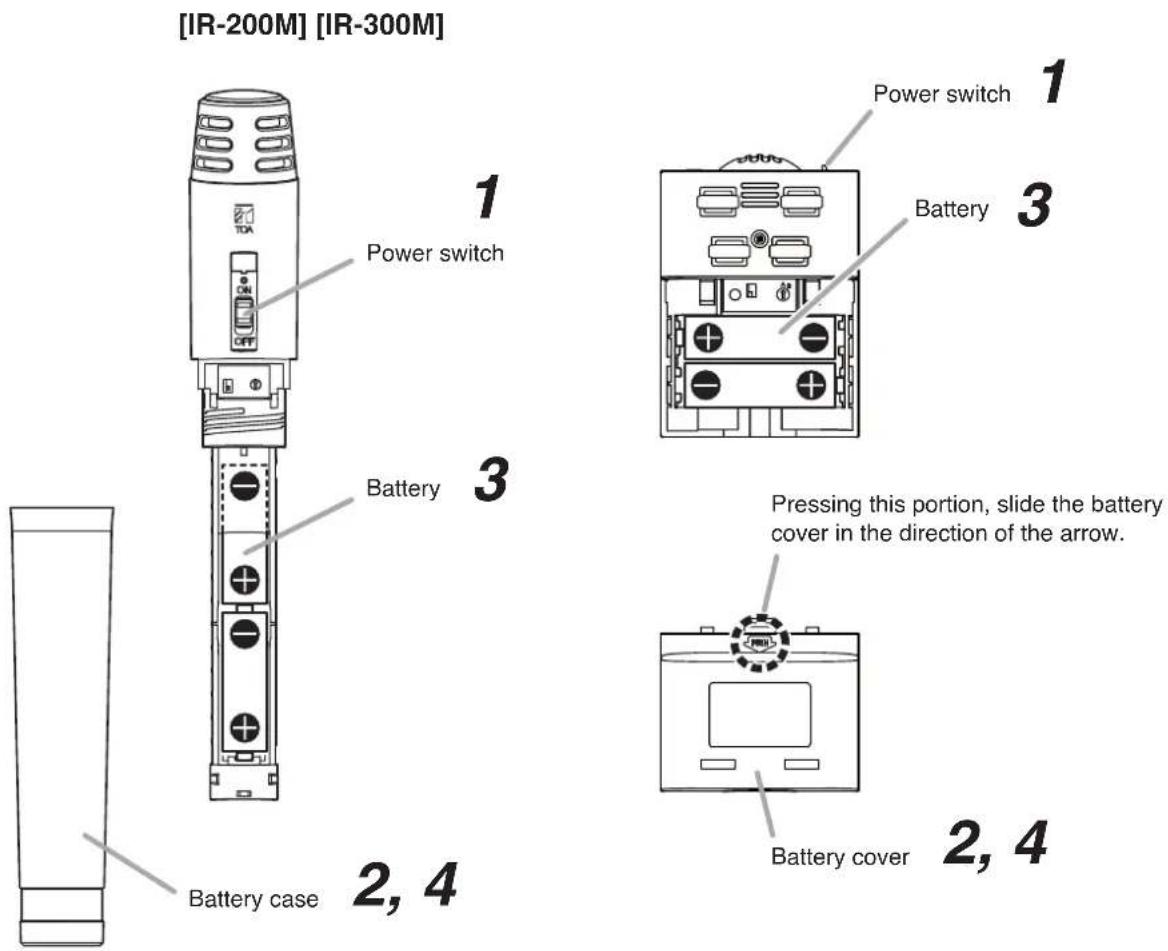
text_image
[IR-200M] [IR-300M] Power switch Battery Battery case 1 3 1 Power switch Battery Pressing this portion, slide the battery cover in the direction of the arrow. Battery cover 2, 4 2, 4Step 1. Set the power switch to the OFF position.
Step 2. Remove the battery case (IR-200M) or battery cover (IR-300M).
[IR-200M]
Rotate the battery case counterclockwise.
[IR-300M]
Slide the battery cover in the direction of the arrow while pressing the arrow portion.
Step 3. Insert 2 IR-200BT rechargeable NiMH batteries or 2 AA alkaline batteries, noting correct polarities (+ and −) indicated in the battery compartment.
Step 4. Replace the battery case (IR-200M) or battery cover (IR-300M) securely.
7. WHEN OPERATING ON RECHARGEABLE BATTERIES

CAUTION
When charging, never insert rechargeable batteries other than the specified IR-200BT battery in the infrared wireless microphone.
Charging any other than the IR-200BT battery may result in fire or personal injury due to battery rupture.
Notes
- When operating on rechargeable batteries, the optional IR-200BC Battery Charger is required.
- For rechargeable batteries, be sure to use the optional IR-200BT battery. Do not use other batteries.
7.1. How to Charge
Step 1. Set the infrared wireless microphone's power switch to the OFF position.
Note
Be sure to turn off the microphone's power switch when charging. Batteries cannot be correctly charged if the power switch is ON.
Step 2. Place 2 IR-200BT rechargeable batteries in the infrared wireless microphone.
(Refer to p. 7 "Battery insertion.")
Step 3. Fully insert the infrared wireless microphone into the microphone receptacle of the IR-200BC Battery Charger.
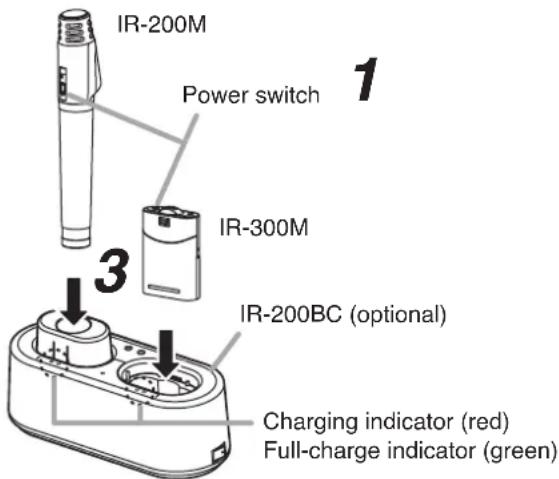
text_image
IR-200M Power switch 1 IR-300M 3 IR-200BC (optional) Charging indicator (red) Full-charge indicator (green)The IR-200BC's charging indicator lights red and charging begins.
Charging is completed in approximately 3 hours and the IR-200BC's full-charge indicator lights green.
(When charging the IR-200M microphone, attach the mounting adapter supplied with the charger.)
Notes
- If the red charging indicator does not light even if the infrared wireless microphone has been inserted into the charger, check to see if the microphone has been correctly inserted.
- The infrared wireless microphone becomes warm after charging completion, however this is not a failure.
Note: For more information, please read the instruction manual enclosed with the IR-200BC Battery Charger.
7.2. Charging Timing
As discharge progresses, the battery indicator's color gradually changes from green to red. If the indicator lights red during use, charge the infrared microphone immediately since the microphone will be disabled several minutes after the indicator has lit red.
[Guidelines on the rechargeable battery operation time]
| Power selector switch* position | Continuous usage time |
| H | Approx. 5 hours |
| L | Approx. 8 hours |
* Refer to p. 12 "About the power selector switch."
[IR-200M's front view]
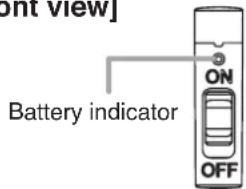
text_image
Bonn view] Battery indicator ON OFF[IR-300M's top view]
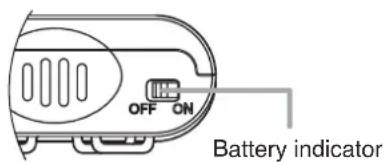
text_image
OFF ON Battery indicatorNotes
- When using the IR-200BT rechargeable battery for the first time or when using it after it has been stored for a long period of time, be sure to charge it before use.
- The IR-200BT battery is designed to cycle through about 500 charges and discharges. When the microphone operation interval becomes extremely short after prolonged repeated use, change the battery with a new one.
8. WHEN USING DRY CELL BATTERIES
[IR-200M's front view] [IR-300M's top view]
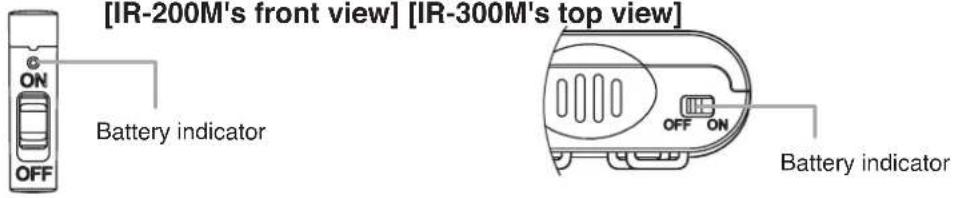
text_image
[IR-200M's front view] [IR-300M's top view] ON OFF Battery indicator OFF ON Battery indicatorThe battery indicator continuously lights green while the battery is fully charged, and gradually changes to red as the battery becomes weaker. Change the battery with a new one when the indicator lights red.
[Guidelines on the AA alkaline dry cell battery's operation time]
| Power selector switch* position | Continuous usage time |
| H Approx. 4 hours | |
| N Approx. 6 hours |
* Refer to p. 12 "About the power selector switch."
9. OPERATION
[IR-200M] [IR-300M]
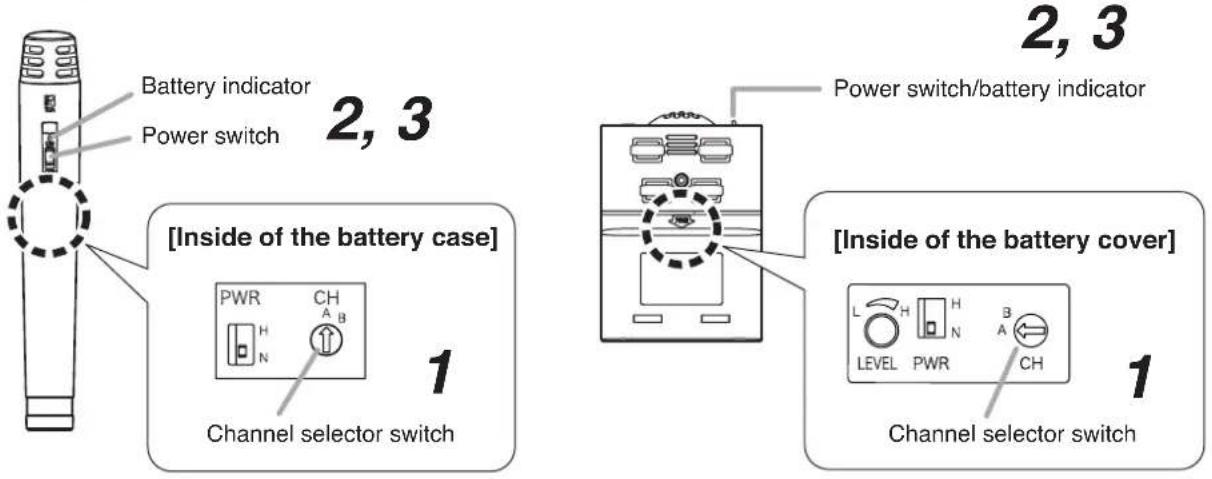
text_image
Battery indicator Power switch 2, 3 [Inside of the battery case] PWR CH A B 1 Channel selector switch 2, 3 Power switch/battery indicator [Inside of the battery cover] L H H LEVEL PWR A B CH Channel selector switch 1Step 1. Confirm that the infrared wireless microphone has been set to the same channel as that of the infrared wireless tuner. (Refer to p. 11 "Channel settings.")
Step 2. Turn on the infrared microphone's power switch and confirm that the battery indicator lights green.
Step 3. Turn off the infrared microphone's power switch after use.
10. INFRARED WIRELESS MICROPHONE USAGE TIPS
10.1. When Holding the Microphone or Suspending It From the Neck
Note
Do not cover the infrared wireless microphone's infrared emitter with the hand or hide the microphone by placing it inside clothes. Covering the infrared emitter will disable light transmission.
[Hand-held type]
Hold the infrared microphone so that its power switch faces the user and its infrared emitter is oriented toward the front.
[Correct]
![TOA IR-200M - [Hand-held type] - 1](/content/2026/06/1214101/images/9f6faeea695482d4dd3a87f184b380cf16e57f4e70cb28192d429fab077756af.jpg)
natural_image
Line drawing of a hand holding a cylindrical object (no text or symbols)[Incorrect]
![TOA IR-200M - [Hand-held type] - 2](/content/2026/06/1214101/images/d28447bab87ad715bf92d709c1c93d8bda1540c8a61b72877ff1072948d7858c.jpg)
natural_image
Illustration of a hand holding a test tube with a cross mark, no text or symbols present[Hands-free type]
Suspend the microphone from the neck so that its infrared emitter is oriented toward the front.
[Correct]
![TOA IR-200M - [Hands-free type] - 1](/content/2026/06/1214101/images/6453687336d28474600f5d8bc1ce1cd117e2315bdcc376f57750ca73ec3f6ef9.jpg)
natural_image
Line drawing of a person wearing a name tag (no text or symbols on the figure itself)[Incorrect]
![TOA IR-200M - [Hands-free type] - 2](/content/2026/06/1214101/images/b6e5300f7832080e4d85206541a3eb2cd6acb674b2ea283b2e20c4a9bc6f2570.jpg)
natural_image
Illustration of a person wearing a suit with a medical or anatomical patch, marked with X and Y symbols (no text or labels)10.2. Microphone-to-Mouth Distance
Note
Do not speak loudly with the microphone close to the mouth (within 10 cm or 4"). The voice will sound muddy and hard to hear.
[Handheld type]
Keep a distance of 10 cm (4") between microphone and mouth when speaking.
![TOA IR-200M - [Handheld type] - 1](/content/2026/06/1214101/images/2e63c43c140a9aadd1aca382a836b113ee2468781422af1cf4671cde3220a5b3.jpg)
text_image
Approx. 10 cm (4")[Hands-free type]
Adjust the strap length so that the distance between microphone and mouth is kept at 10 - 15 cm (4" - 6").
![TOA IR-200M - [Hands-free type] - 1](/content/2026/06/1214101/images/13dbd07a81e6964633e627e1b3f0f473a078ce9bebca6987a191fc4c3df452e1.jpg)
text_image
Approx. 10 - 15 cm (4" - 6")11. CHANNEL SETTINGS
Notes
- Make sure that the infrared wireless microphone channel is identical to that of the infrared wireless tuner. If the channels are different, microphone signals cannot be tuned.
- If the channel switch pointer is incorrectly set, such as between 2 numbers resulting in no indication, the battery indicator will alternately flash green and red to indicate irregularities. Confirm the channel selector switch position and set it correctly.
[IR-200M] [IR-300M]

text_image
Power switch 1 Inside of the battery case] Channel selector switch PWR CH A B H N Supplied screwdriver Battery case 2, 4
text_image
Power switch 1 Battery cover 2, 4 [Inside of the battery cover] Channel selector switch 3 L H H LEVEL PWR A CH Supplied screwdriverStep 1. Set the power switch to the OFF position.
Note
The transmitting frequency will not change even if the channel setting is performed with the power switched on.
Step 2. Remove the battery case (IR-200M) or battery cover (IR-300M).
[IR-200M]
Rotate the battery case counterclockwise.
[IR-300M]
Slide the battery cover in the direction of the arrow while pressing the arrow portion.
Step 3. Set the channel selector switch to the desired channel.
Rotate the channel selector switch using the supplied screwdriver. Select the channel A or B.
Step 4. Replace the battery case (IR-200M) or battery cover (IR-300M) securely.
12. ABOUT THE POWER SELECTOR SWITCH
Transmission output can be switched in 2 steps: Normal (Power selector switch position: N) and High (switch position: H). Set the switch position depending on the continuous usage time ^1 , battery service life and usage conditions ^2 .
Note: The power selector switch is set to the N position by default.
*1 For continuous usage time by the power selector switch settings, refer to p. 8 "Guidelines on the rechargeable battery's operation time" or p. 9 "Guidelines on the AA alkaline dry cell battery's operation time."
*2 To make the continuous usage time longer, set the switch to the N position. When a longer transmission distance is required, set to the H position.
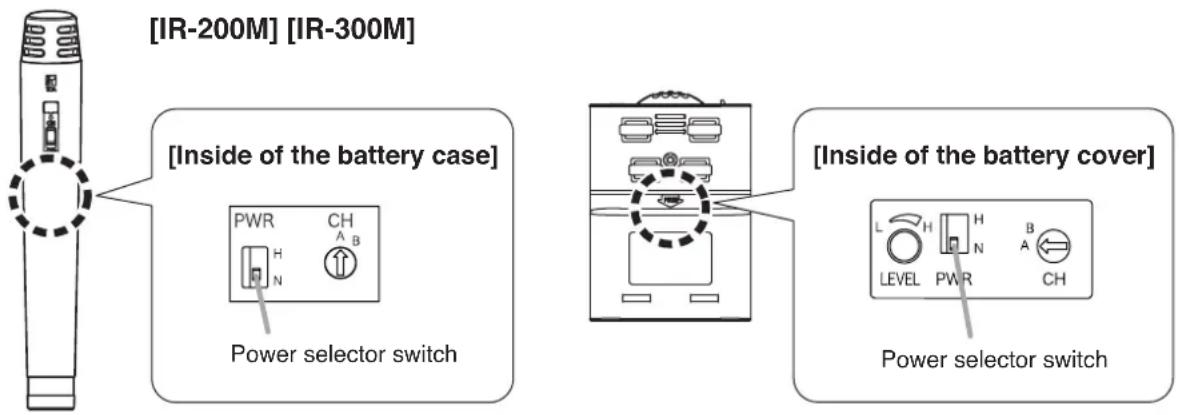
text_image
[IR-200M] [IR-300M] [Inside of the battery case] PWR CH A B Power selector switch [Inside of the battery cover] L H H LEVEL PWR A B CH Power selector switch13. ABOUT THE MICROPHONE LEVEL CONTROL (IR-300M ONLY)
When using an external microphone, sensitivity differs depending on the type of microphone connected. Use this control to set the sensitivity to an appropriate level for the connected external microphone.
Note
The microphone level control is factory-preset to the appropriate position for the built-in microphone unit.
Step 1. Remove the battery cover.
Step 2. Set the power switches of both the infrared wireless microphone and tuner to the ON position.
Step 3. Set the microphone level control to the appropriate position. Using the supplied screwdriver, set to a position that prevents sound distortion and feedback.
Step 4. Replace the battery cover.
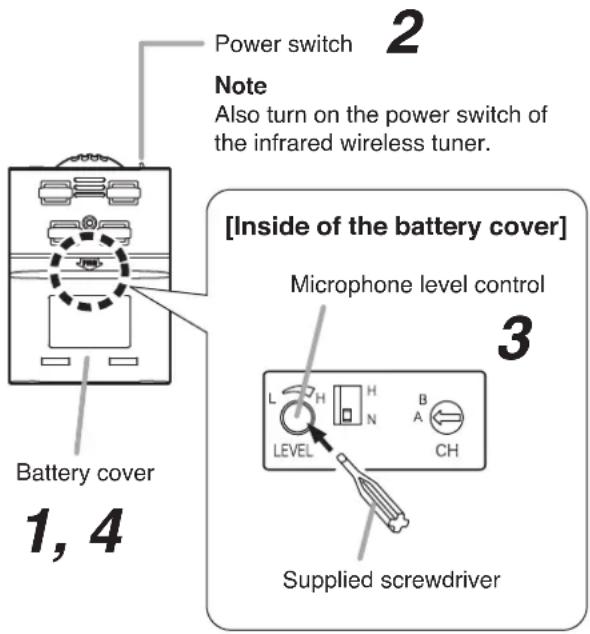
text_image
Power switch Note Also turn on the power switch of the infrared wireless tuner. Battery cover 1, 4 [Inside of the battery cover] Microphone level control 3 L H H B LEVEL CH Supplied screwdriver14. DIMENSIONAL DIAGRAMS
14.1. IR-200M
Unit: mm (inches)
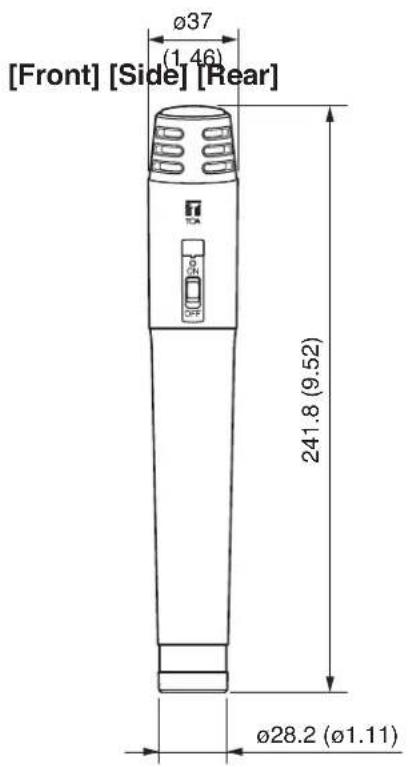
text_image
[Front] [Side] [Rear] Ø37 (1.46) 241.8 (9.52) Ø28.2 (Ø1.11)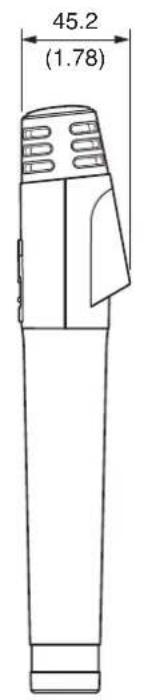
text_image
45.2 (1.78)
natural_image
Line drawing of a cylindrical device with ventilation grilles and a handle (no text or symbols)14.2. IR-300M
[Top]

text_image
NO 4.0 25 (0.98) 27.3 (1.07)[Front]

text_image
64 (2.52) TOA 91.3 (3.59)[Side]
text_image
[Rear] Approx. 500 (19.69)
natural_image
Technical line drawing of a mechanical component with no visible text or symbols15. TROUBLESHOOTING
| Symptom Possible cause Remedy | ||
| Battery indicator does not light even if the power switch is turned on. | [Operating on rechargeable batteries]·Battery polarities not correct.·Specified battery not used.·Battery not charged. | ·Reinsert batteries correctly.·Replace the batteries with the IR-200BT rechargeable batteries for the infrared wireless microphone.·Charge using IR-200BC Battery Charger. |
| [Operating on dry cell batteries]·Battery polarities not correct.·Batteries exhausted. | ·Reinsert batteries correctly.·Replace with new ones. | |
| When the power switch is turned on, the battery indicator lights red. | [Operating on dry cell batteries]·Batteries exhausted.·Replace with new ones. | |
| [Operating on rechargeable batteries]·Battery discharged. | ·Charge using the IR-200BC Battery Charger. | |
| When the power switch is turned on, the battery indicator alternately flashes green and red. | ·Channel selector switch not set correctly to an indicated position. | ·Perform channel settings correctly. (Refer to p. 11 "Channel settings.") |
| Infrared wireless tuner's reception indicator does not light (no signal received) even with the power switch turned on. | ·Channel set for infrared wireless microphone not identical to the tuner. | ·Reset the infrared microphone to the same channel as the tuner. |
| Interferes with other infrared microphone being used simultaneously. | ·Two infrared wireless microphones set to the same channel. | ·Set channels correctly. (Refer to p. 11 "Channel settings.") |
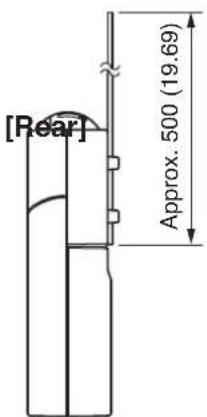
| ·Infrared wireless microphone used too close to the tuner. | ·Keep the infrared microphone at least 50 cm (19.69") away from the infrared tuner. |
16. SPECIFICATIONS
16.1. IR-200M
| Battery IR-200BT rechargeable battery for the infrared wireless microphone (2 pieces) or AA alkaline dry cell battery (2 pieces). | |
| Current Consumption Typ. | 250 mA (2.4 V, Power selector switch: N)Typ. 340 mA (2.4 V, Power selector switch: H) |
| Infrared Emitter | Wavelength 870 nm (AM: Brightness modulation) |
| Modulation Method Frequency modulation | |
| Carrier Frequency Channel A: 3.100 MHzChannel B: 3.350 MHz | |
| Transmission Approx. Distance Approx. 15 m or 50 ft (Power selector switch: N; In an unobstructed space.) | |
| Tone Signal 32.768 kHz | |
| Modulation Sensitivity ±4.8 kHz (1 kHz, when SPL of 84 dB is input) | |
| Maximum Input Sound 120 dB SPL Pressure | |
| Microphone Unit Unidirectional electret condenser microphone | |
| Frequency Response 100 Hz - 12 kHz | |
| Preemphasis 300 μs | |
| Battery Operation Time | Approx. 8 hours (when the IR-200BT rechargeable battery for the infrared wireless microphone is used; Power selector switch: N)Approx. 6 hours (when the alkaline battery is used; Power selector switch: N) |
| Operating Temperature | 0 to 40 °C (32 to 140 °F) |
| Operating Humidity | 30 to 85% RH |
| Finish | Control Section: ABS resin, metallic gray, 50% gloss, paintFilter Section: Polycarbonate, optical cut filter |
| Dimensions | ø37 x 241.8 (h) mm (ø1.46" x 9.52") |
| Weight | 170 g or 0.37 lb (with alkaline batteries)185 g or 0.41 lb (with dedicated rechargeable batteries) |
Note: The design and specifications are subject to change without notice for improvement.
- Accessories
Screwdriver (for setting) 1
Color label (6 colors) 1
- Optional products
Battery Charger : IR-200BC
Rechargeable battery: IR-200BT-2 (containing 2 pieces)
16.2. IR-300M
| Battery IR-200BT rechargeable battery for the infrared wireless microphone (2 pieces) or AA alkaline dry cell battery (2 pieces). | |
| Current Consumption Typ. | 250 mA (2.4 V, Power selector switch: N)Typ. 340 mA (2.4 V, Power selector switch: H) |
| Infrared Emitter | Wavelength 870 nm (AM: Brightness modulation) |
| Modulation Method Frequency modulation | |
| Carrier Frequency Channel A: 3.100 MHzChannel B: 3.350 MHz | |
| Transmission Approx. Distance Approx. 15 m or 50 ft (Power selector switch: N; In an unobstructed space.) | |
| Tone Signal 32.768 kHz | |
| Modulation Sensitivity ±4.8 kHz (1 kHz, when SPL of 84 dB is input) | |
| Maximum Input Sound 120 dB SPL Pressure | |
| Input Sensitivity Adjustment range: -9 dB to 0 dB (factory-preset: 0 dB) Adjustment | |
| Microphone Unit Unidirectional electret condenser microphone | |
| Frequency Response 100 Hz – 12 kHz | |
| Preemphasis 300 μs | |
| Input External microphone input (3.5 mm or 1/8" monaural mini jack) | |
| Battery Operation Time | Approx. 8 hours (when the IR-200BT rechargeable battery for the infrared wireless microphone is used; Power selector switch: N)Approx. 6 hours (when the alkaline battery is used; Power selector switch: N) |
| Operating Temperature | 0 to 40 °C (32 to 140 °F) |
| Operating Humidity | 30 to 85% RH |
| Finish | Control Section: ABS resin, metallic gray, 50% gloss, paintFilter Section: Polycarbonate, optical cut filter |
| Dimensions | 64 (w) x 91.3 (h) x 27.3 (d) mm (2.52" x 3.59" x 1.07") |
| Weight | 130 g or 0.29 lb (with alkaline batteries & strap)140 g or 0.31 lb (with dedicated rechargeable batteries & strap) |
Note: The design and specifications are subject to change without notice for improvement.
- Accessories
Screwdriver (for setting) 1
Color label (6 colors) 1
- Optional products
Battery Charger : IR-200BC
Rechargeable battery: IR-200BT-2 (containing 2 pieces)
Traceability Information for Europe (EMC directive 2004/108/EC)
| Manufacturer:TOA Corporation7-2-1, Minatojima Nakamachi, Chuo-ku, Kobe, Hyogo, Japan | Authorized representative:TOA Electronics Europe GmbHSuederstrasse 282, 20537 Hamburg, Germany |